
Finding
Your Research
Voice
Itai Cohen
Melanie Dreyer-Lude
Story Telling
and Theatre Skills
for Bringing
Your Presentation
to Life
Finding Your Research Voice

ItaiCohen • MelanieDreyer-Lude
Finding Your Research
Voice
Story Telling andTheatre Skills
forBringing Your Presentation toLife
ISBN 978-3-030-31519-1 ISBN 978-3-030-31520-7 (eBook)
https://doi.org/10.1007/978-3-030-31520-7
© Springer Nature Switzerland AG 2019
is work is subject to copyright. All rights are reserved by the Publisher, whether the whole or part of the
material is concerned, specically the rights of translation, reprinting, reuse of illustrations, recitation,
broadcasting, reproduction on microlms or in any other physical way, and transmission or information
storage and retrieval, electronic adaptation, computer software, or by similar or dissimilar methodology now
known or hereafter developed.
e use of general descriptive names, registered names, trademarks, service marks, etc. in this publication does
not imply, even in the absence of a specic statement, that such names are exempt from the relevant protective
laws and regulations and therefore free for general use.
e publisher, the authors, and the editors are safe to assume that the advice and information in this book are
believed to be true and accurate at the date of publication. Neither the publisher nor the authors or the editors
give a warranty, expressed or implied, with respect to the material contained herein or for any errors or omissions
that may have been made. e publisher remains neutral with regard to jurisdictional claims in published maps
and institutional aliations.
is Springer imprint is published by the registered company Springer Nature Switzerland AG.
e registered company address is: Gewerbestrasse 11, 6330 Cham, Switzerland
ItaiCohen
Department of Physics
Cornell University
Ithaca, New York, USA
MelanieDreyer-Lude
Department of Drama
University of Alberta
Edmonton, Alberta, Canada
v
We would like to extend special thanks to Susi Varvayanis, the Executive
Director of the BEST program at Cornell University, for her unwavering sup-
port of our work. Susi oered sage advice in each of the workshops we pro-
vided for her program and helped shape the content of this book. We thank
Sara Leanne Eddleman for her keen eye in helping to edit this manuscript. We
also want to thank the postdocs and graduate students who were participants.
ey were key players in helping us learn how best to help them deliver excep-
tional research presentations.
Acknowledgments
vii
1 Introduction 1
e Elevator Pitch 2
Part I e Story 7
2 Crafting Your Core Message 9
Guidelines for Creating a Core Message for a Research Talk 9
3 Shaping the Dramatic Arc 19
Structure 20
Shape 26
Length 29
4 Great Beginnings and Strong Endings 33
Great Beginnings 33
Strong Endings 38
e Wrap-Up 38
e Signal 42
5 Make em Care 45
Contents
viii Contents
Part II e Performance 51
6 Calibrating Your Speaking Presence 53
7 Using Your Voice 57
Volume 57
Diction 61
Pitch, Tone, and Prosody 62
Pace 66
Fillers 67
8 Using Your Body 69
Posture 70
Gesture 74
Eye Contact 77
Facial Expression 79
Movement 80
Entrances and Exits: How to Take the Stage 82
Part III e Event 85
9 Dealing with Stage Fright 87
10 How to Handle Questions 93
11 Game Day 99
12 Conclusion 101
References 103

ix
ItaiCohen is a Professor of Physics at Cornell
University, where he works on materials in
motion. His research topics have ranged from
studying the behavior of shear thickening uids
like corn-starch, to the ight of insects, to
microscale robots, and the behaviors of crowds.
Professor Cohen has given over 250 invited
public, conference, and departmental speaking
engagements. He has chaired the American
Physical Society Forum on Outreach and
Engaging the Public and organized numerous
professional development workshops on sci-
ence communication.
MelanieDreyer-Lude is an artist-scholar spe-
cializing in international, intercultural, and
interdisciplinary research. She has directed,
produced, and taught theater in Chile,
Argentina, Germany, Turkey, Uganda, Greece,
and Canada. Fluent in German, Dreyer-Lude
translates and directs contemporary German
plays, which have been produced in the USA
and Canada and published in international
magazines and anthologies. She currently serves
as Chair of the Department of Drama at the
University of Alberta and lives and works in
Edmonton, Alberta, Canada.
About the Authors
x About the Authors
Cohen and Dreyer-Lude are the organizers and instructors of the popular
Finding Your Scientic Voice workshop, which has been run at various venues
including Cornell University, SUNY Upstate, the Howard Hughes Medical
Institute, and the American Physical Society March Meeting.

1
© Springer Nature Switzerland AG 2019
I. Cohen, M. Dreyer-Lude, Finding Your Research Voice,
https://doi.org/10.1007/978-3-030-31520-7_1
1
Introduction
When is the last time you heard a compelling, interesting, or memorable
research talk? Conferences are notorious for providing ample opportunity to
see boring presentations of what could be important research. If you are read-
ing this book, chances are that you (or your students) need to learn how to tell
a better story. Whether you have been giving lackluster presentations at pro-
fessional conferences, you are on the job market and need to present your
portfolio to a search committee, or you have found yourself tongue-tied in the
middle of an ideal networking opportunity, learning to tell a compelling
research story can have a signicant impact on your career. Humans enjoy
telling and listening to great stories. ese stories help us make sense of the
world around us.
Good stories demand attention. Bad stories put an audience to sleep. Good
stories provide emotional and intellectual satisfaction. Bad stories frustrate an
audience and feel like a waste of time. e components of a great story signal
when we should pay close attention and where we will nd important
moments. By learning to tell a compelling research story, you can trigger an
emotional connection to your audience, which will help them remember the
important information you have just presented. It is easy to tell a research
story badly. It takes time and eort to learn to tell one well. Once you have
mastered the basic principles of good storytelling, you will experience the
satisfaction of performing successfully in front of an audience.
You can nd ample reference materials on presenting talks as stories. We
invite you to read them. Afterwards you may nd there is still a gap between
understanding what these books are telling you and incorporating the con-
cepts into your own work. is book lls that gap, presenting a range of key

2
research presentation techniques, followed by eld-tested exercises that will
help you improve your talk. To demonstrate, let’s look at an example.
The Elevator Pitch
A good elevator pitch provides a concise description of your research and why
it matters. A compelling elevator pitch will consist of a few clear sentences
that include:
1. What are you researching?
2. Why is this problem important?
3. What have others done, and why was that approach not sucient?
4. What you are doing dierently to solve the problem?
5. If you are successful, how will your work impact the eld and change the
conversation?
Many of us are familiar with the concept of an elevator pitch but still strug-
gle to apply these ideas in practice. Here is an exercise that illustrates this point:
Exercise 1.1 The Elevator Pitch
1. This exercise can be accomplished with just two participants, although a
larger group provides richer feedback.
2. Have the participants write down their elevator pitches based on the outline
above and then try to commit it to memory. It is helpful to agree on the
audience for this pitch (the general public, a conference presentation, your
advisor, etc.).
3. When all participants have created an elevator pitch, designate a leader
who will control the timing of the exercise.
4. Divide into groups of two or three, preferably with people you do not know
well, and determine who will speak first.
5. On the leader’s signal, the first speaker will share their prepared two- to-
three-sentence elevator pitch. They will have 30s to accomplish this task.
6. When 30s are over, the leader will call time and ask the next group member
to present their elevator pitch. Continue in this way until all members of
your small group have had a chance to pitch their research.
7. If there are enough participants, switch groups and find a new collection of
people. Repeat the exercise under the leader’s guidance. Again, take only
30s per person.
8. Gather the entire group into a circle. The leader will select someone to iden-
tify the first person they met during the exercise and ask them to describe
what that person does, providing as many details as possible.
I. Cohen and M. Dreyer-Lude

3
9. Check back with the person who provided the research pitch to verify the
accuracy of this information. If there are few details, ask the person who
pitched their research what is missing that might distinguish them in their
field. If the interviewer remembers a rich collection of details, have the
group analyze why these details were so memorable.
This is the teaching moment. When participants see where their elevator
pitch succeeds or fails to communicate or inspire, they can begin to deter-
mine why and work to make improvements. It is this personal “aha!” that
allows a participant to really see what is wrong with the pitch they created.
An elevator pitch may look good on paper, but if it does not resonate with
the audience, it fails to do the job. We find that the most memorable eleva-
tor pitches come in the form of a great story.
10. You don’t need to review every participant’s experience. Once everyone
understands the point of the exercise—your message may not be getting as
much information across as you thought—have them return to their first
small group and exchange what each remembers about the other’s elevator
pitch. This feedback will be important for revising the pitch.
11. Participants should now return to the written version of their pitch and
revise it based on what they have just learned.
The elevator pitch is a touchstone for research presentations. It encapsu-
lates key information that a researcher can reference regularly in profes-
sional conversations. It is its own tiny story. Take the time to perfect your
elevator pitch. It will be time well spent (Fig.1.1).
Fig. 1.1 Working on the elevator pitch
1 Introduction
4
We nd that the best elevator pitches come in the form of a story. is
strategy will extend to your research presentation. Communications consul-
tant Garr Reynolds (2012) suggests that when creating a presentation, one
should consider the techniques of a documentary lm. A documentary lm
intends to educate the viewer on a chosen subject using a cinematic frame to
create a compelling story. e storytelling process does not diminish the rel-
evance of the material, but rather engages the audience intellectually and
emotionally with the subject at hand. Because so many people watch lm and
television, your audience will already be habituated to experience your story
in a specic way. In this book, we will teach you how to appropriate the view-
ing habits of your audience and turn them into an advantage in the construc-
tion of your research story.
To illustrate our approach, we will focus on the 10min research talk typi-
cally presented at conferences. ere are several types of research talks you
may need to prepare in addition to our 10min talk example: the 30s elevator
pitch, the 2 min research summary, the 20 min conference talk, and the
60min colloquium presentation. e 10min talk usually has all of the ele-
ments of a longer talk but is short enough to be conveniently workshopped
while learning storytelling techniques. Once you have mastered the 10min
talk, it is easier to see how to create an hour-long talk since this is just a col-
lection of shorter talks with a common theme. e 10min talk also creates
the opportunity to prepare a 30s or 2min summary because it forces the
storyteller to focus on the core ideas they would like to convey.
We have divided this book into three main sections. We begin by address-
ing the content of your presentation and showing you how to improve the
story you want to tell. Once you have created a compelling narrative, we will
teach you how to include performance techniques to better present your story
for an audience. After you have mastered the content and polished your per-
formance, the third section will oer advice regarding logistical elements that
often impede speakers during the speaking event. e chapters are constructed
as learning modules that can be rearranged. For example, you may want to
interweave the rst two sections of the book. We encourage you to experi-
ment and adapt this manual to meet your needs.
You can apply many of the ideas in this book on your own. We provide
exercises at the end of each section that you can practice alone or in small
groups. Each of our exercises have been eld-tested in our science communi-
cation workshops and designed to specically address issues encountered in
research talks. Importantly, it will not be enough to just read the exercise
descriptions; you will only learn the material by applying the concepts through
I. Cohen and M. Dreyer-Lude
5
practice. You will make mistakes. It will take time to become a master story-
teller. But once you have learned how to create a dynamic live performance of
your research story, you will nd that this professional obligation is no longer
something to dread, and you may even come to enjoy presenting your research
in public.
1 Introduction
Part I
The Story

9
© Springer Nature Switzerland AG 2019
I. Cohen, M. Dreyer-Lude, Finding Your Research Voice,
https://doi.org/10.1007/978-3-030-31520-7_2
2
Crafting Your Core Message
Common criticism in some academic circles suggests that making a presenta-
tion more polished and including carefully crafted images will hide problems
in the research. In our experience, the opposite often happens. A clear talk
makes it easier to understand the good ideas, and illustrates where arguments
may be awed or illogical. A clear talk also gives the audience a chance to
engage with the research and the researcher in a meaningful way. Moreover,
the process of clarifying ideas in a research presentation often helps the pre-
senter see how to improve their own research.
e clarication process starts with the Core Message. A core message is a
statement, between one and three sentences long, that encapsulates the pri-
mary idea you want to convey to the audience. In addition to being succinct,
clear, and jargon-free, this message also needs to communicate why your audi-
ence should care about your ndings. While the elevator pitch gives context
to your research in general, the core message communicates specically what
you have found or achieved with this research project and why it is important.
It is the message that you would like your audience to take home. e core
message will provide the foundation for your research talk. It serves as the rst
step and most critical element in your story creation.
Guidelines for Creating a Core Message
for a Research Talk
Keep It Simple
Your research project probably covers a lot of territory. You will naturally want
to include many elements. Resist this impulse. Focus your core message on the
10
most important concept you are trying to convey in your talk. Too much infor-
mation is hard on your audience. A focused idea will help them process what
you want them to learn. Find the essence of your research (Heath & Heath,
2007). What is the one thing you want them to remember (Reynolds, 2012)?
Watch Out for the Curse of Knowledge
e curse of knowledge is the process of forgetting what it was like before you
knew what you know now (Heath & Heath, 2007). is obstacle may mani-
fest itself in a couple of ways, and we suggest the following tips to combat it:
1. Forgetting to connect the dots: You fail to explain critical components of your
research because you assume everyone “already knows that.” For example, it
does not make any sense to tell someone how to play a diminished third on
the piano if they do not understand musical scales. Determining the appro-
priate level of knowledge for your audience can be challenging and may
require feedback. It helps to know the background of your audience. Our
experience is that presenters are often speaking at a level that is too high, even
at discipline-focused conferences. After all, everyone is somewhat of a layper-
son outside of their own particular research specialty.
2. Cut the fat: You include irrelevant information, assuming everyone would
want to know how this or that process works or was developed. is extra
information, though fascinating to you, may distract from the main narra-
tive. You must be brutal when you edit and be willing to kill those beauti-
ful side stories that took you years to create. Meyers and Nix (2011) insist
that the most common complaints from a conference audience are: “(1)
Too much information. (2) Not relevant. (3) No point.” (p.44). Do not
assume your audience will know everything about your research, but do
not compensate for this lack of knowledge by including everything you
know. Keep your core message lean and clear.
Avoid Jargon Whenever Possible
Jargon has its place. When speaking with your advisor or other experts in your
eld, jargon is a useful shorthand for getting a lot of information across quickly.
In a talk to a broader audience, however, jargon stands in the way of clarity. You
may happen to be an expert on the scallop theorem and reciprocal motion in
low Reynolds number ow, but unless you specialize in uid mechanics, that
statement is incomprehensible. Instead, it is easier for the audience to under-
stand that dierent swimming strategies are necessary when a pool is lled with
honey instead of water. You may think that jargon makes you sound smart, but
it requires more processing time for the listener. e best presenters are able to
say things simply without dumbing down their presentations.
I. Cohen and M. Dreyer-Lude

11
Working on your core message can be challenging. Often we nd our-
selves in circular ruts. e following improvisation exercise will help you
further simplify your crafted core message by forcing you to utilize the right
side of your brain. is is best done in a group of three or more. We recom-
mend you use a camera to record the entire exercise. You will forget what you
say, and some of your most creative material may be lost as a result. Record
your work and play it back. Watching yourself may be dicult, but there is
no faster way to adjust your presentation, and it is worth the temporary
discomfort.
Exercise 2.1 Beginning to Craft the Core Message
1. Look at all of the material you want to communicate and reduce it to the
essential idea. You should be able to articulate this idea in a few short sen-
tences. It will take multiple attempts to reduce your research to a core idea.
Do not worry about getting it right the first time, just write many possible
versions trying to follow the guidelines listed above.
2. Once you have something you like, try to reduce any use of jargon and make
the tone of your message relatable. A good core message is something that
someone outside of your specific discipline can understand.
3. Make sure you have included why we should care. Do not take for granted
that your research is important, help us understand why and how.
Exercise 2.2 Refining the Core Message with DING!
Ding! is an improvisation game that teaches you how to instantly create a new
solution to an old paradigm.
Phase 1: Regular DING!
1. Two people come to the front of the room.
2. The audience helps set up the exercise by providing important context for the
game. They need to choose:
Location: (the beach, a nightclub, on the moon, at the car shop)
Relationship: (siblings, lovers, a rival from high school, employee/boss)
3. The actors now begin to improvise a scene. The following important rules will
help this go well.
Choose something active to do. If you are on the beach with a sibling, ask
him or her to put sunscreen on your back. If you are on the moon with your
lover, discover that you have a terrible itch in the middle of your foot. If you
are at the car shop with a rival, offer to give him or her a ride home. This
initial choice will lead you somewhere. Be as imaginative as possible.
2 Crafting Your Core Message

12
Say yes to every suggestion. The golden rule in improvisation is “Yes/And.”
That means that if someone looks at you and says, “Wow! I didn’t know you
were pregnant!” you cannot say “No, I’m not” (even if you are male). You
might say “Yes I am. And you’re the father!” or “Yes, isn’t it amazing?
Septuplets!” “Yes” always leads to a new and interesting idea. “No” shuts the
action down.
4. As the scene unfolds and events begin to happen, the audience can shout out
at any point, “Ding!” Ding! functions like a game show buzzer. The actor who
has been “dinged” must pause, wind the action back to the beginning of the
last sentence, and then say the sentence again with a new ending. It might
work like this: You and your sibling are on the beach. She comments on the nice
tan you have. You say, “Yes, isn’t it great? It only cost me $9.95.” Someone in
the audience shouts “Ding!” You wind the action back and say, “Yes, isn’t it
great? It goes well with my bathing suit.” Ding! “Yes, isn’t it great? It guaran-
tees skin cancer by the time I’m 40.” Or perhaps your partner says, “Boy this sun
is hot, I could sure use a drink.” Ding! “Boy this sun is hot, I could sure use a trip
to Alaska.” Ding! “Boy this sun is hot. I could sure use this opportunity to dis-
cuss the merits of proper retirement planning.” Moderators should try to
encourage participants to explore a variety of possible endings. For example, if
answers fall into a similar category (food, locations, etc.) ding them again until
they find something new.
5. Play a scene for up to three minutes. When the players catch on and have the
idea, thank them and offer applause. Then switch out until everyone has had
the chance to try (Fig.2.1).
Fig. 2.1 Ding!
I. Cohen and M. Dreyer-Lude

13
Phase 2: Research DING!
This is the part you will want to record on your phone. It is easy to forget what
was just said, and a recording will allow the researcher to rewind and select
great moments for a future research talk (Fig.2.2).
1. Choose a moderator to guide the process.
2. The moderator asks one person to come to the front of the room armed with
a memorized core message.
3. This participant should recite the core message to the audience as crafted.
Allow this participant to get all the way through the constructed core
message.
4. Have the participant say the core message again, allowing audience members
to Ding! them whenever they encounter a section that is difficult to under-
stand or is full of jargon. It is important that the audience not be shy about
“dinging” the person on stage. The quick-fire process of getting dinged dur-
ing this part of the exercise is what helps release creative versions of the core
message. On the other hand, let the participant catch their breath or finish
their thought between dings.
5. If the participant is still struggling to simplify the core message, have them
“tell it to a fourth grader.” This helps eliminate jargon and the curse of
knowledge.
6. Finally, have the researcher start the core message one more time, trying to
stay within the one-to-three-sentence limitation.
We find that through this exercise the researcher often creates golden
phrases that beautifully capture the central idea of their research. The mod-
Fig. 2.2 Recording the Ding! exercise
2 Crafting Your Core Message

14
erator and the audience should be sure to point these out. These phrases can
be fleeting, which is why it is important to record the exercise for later
playback.
7. Make sure everyone in the group participates in this process.
8. On your own, watch the recorded versions of your Ding! exercise and extract
ideas that will be useful to you.
9. Rewrite your core message with this new information.
Here is an example of how we used Ding! in a workshop we conducted:
Dario’s Ding!
First attempt at the core message:
Membrane proteins are the high hanging fruit of drug design. Membrane pro-
teins are hard to express, making the research very prohibitive. We have engi-
neered a way in which membrane proteins can be expressed and solutized in a
detergent-free manner making the research more accessible.
(The message is headed in the right direction but is suffering from many of the
ailments listed above.)
DING—to a 4th grader:
In our bodies, we have cells. We are made out of millions of these cells. And
although we have eyes and ears and we can see what’s going on, our cells are
the ultimate judge of what is going on. So, if you have a fever, your cells realize
they have a fever. You’re going to go to the doctor, and the doctor is going to
give you medicine that will tell the cells to get better. The medicine needs to be
precise and match your disease or the thing that is making you sick. For a doctor
to understand what is the exact medicine you need for your sickness he needs to
understand little proteins that live in your cells. Those proteins are very hard to
understand. The doctors need new tools to understand them better and that’s
the research.
(Although this version rambles, Dario is breaking down his research in new
and interesting ways.)
DING! with interruptions:
Ding! #1 Our research engineers chaperones to enable membrane research for
drug designers. (clearer but still vague)
Ding! #2 Our research eliminates the need for detergents in membrane pro-
tein research. (important but not the critical point)
Ding! #3 Our research will enable membrane protein research in drug design
in a cheaper way. (another version of #2)
Ding! #4 The technology that we have engineered allows membrane proteins
to maintain their function even in an alien environment, making
research more accessible. (Much clearer and captures both. Still needs
a bit more work but well on its way.)
Final Core Message:
Our research enables membrane proteins to maintain their function even in an
alien environment, which will allow drug designers to access them less expen-
sively, opening up the field for new drug development.
I. Cohen and M. Dreyer-Lude

15
Once you have rened your core message, it is important to test it to deter-
mine if others understand what you are trying to say. is is stage three of core
message construction.
Exercise 2.3 Workshopping Your Core Message
1. Have a volunteer share their core message.
2. Discuss the draft collectively and identify what is working and what needs
improvement.
3. Check the core message for jargon. Have the volunteer deliver the core mes-
sage again and ask audience participants to raise their hands if they do not
understand a particular concept or idea. Try to brainstorm together to find a
clearer phrase or an alternative way to express the same idea more simply.
4. Repeat the process allowing all participants to receive feedback.
5. Incorporate the feedback you received into your core message.
It is uncommon for your core message to expand to include all the ideas you
have been given. Pick and choose what works for you. The final stage of this
process is to reduce the core statement to its essence so that it can be stated
in one to three sentences.
Core Message Example 1—Draft 1:
Using confocal microscopy, we have imaged the 3D location of individual col-
loidal particles and using probabilistic methods estimated the collision frequency
and directionality of particle collisions to extract the forces on the single particle
scale.
Now we’ll apply the concepts listed above:
• Keep it simple → too complex
• Watch out for the Curse of Knowledge → this is present
• Avoid jargon → lots of jargon here
Core Message Example—Draft 7 (having gone through Ding! and an extensive
editing process):
We have developed a method for turning our microscope into a local pressure
gauge.
Applying the concepts again:
• Keep it simple → Yes. Word count dropped from 35 to 12.
• Watch out for the Curse of Knowledge → None.
• Avoid jargon → None. We can all understand what a microscope and a pres-
sure gauge are.
Core Message Example 2—Draft 1:
The melodies inherent in a foreign language performance contain the potential
to trigger psychocognitive empathy through emotional contagion and mirror
neuron processing, broadening the potential social impact of multilingual
performance.
2 Crafting Your Core Message

16
is process may seem tedious and unnecessarily time consuming.
Remember that the core message serves as the touchstone for your entire
research talk. Rening it is worth the eort. Once you have created the core
message for your research talk, you are ready to put it into action. e follow-
ing exercise demonstrates how this works.
Now we’ll apply the concepts listed above:
• Keep it simple → both long and complex
• Watch out for the Curse of Knowledge → it is not clear to the layperson what
this means
• Avoid jargon → lots of jargon here
Core Message Example—Draft 7 (having gone through Ding! and an extensive
editing process):
The music in language can trigger an empathic response even when we do not
understand the words, and those feelings can change our minds about people
different from us.
Applying the concepts again:
• Keep it simple → Yes. Character count dropped from 238 to 167.
• Watch out for the Curse of Knowledge → None.
• Avoid jargon → None. (How and when this idea might be applied will require
more explanation.)
Exercise 2.4 Using the Core Message to Focus Your Research Talk
1. Review your talk slide by slide. For each slide, construct a summary sentence
that captures the main point you are trying to convey. You can also perform
this exercise for each image or graph. Try to determine the main point of the
slide or image and what the audience should see to understand that point.
Write this idea in your summary sentence.
2. Go through these summary sentences and remove any slides that are not rel-
evant to the core message you have constructed for your talk (Fig. 2.3). Your
goal is to determine the fastest way to get from the beginning to the end of
your talk.
• Get rid of the title slide.
• Get rid of the outline slide.
• Keep the slides explaining the main research problem.
• Keep the slides explaining a crucial technique you are using to solve this
problem.
I. Cohen and M. Dreyer-Lude

17
• Remove any side stories. This includes most of the background material
that is not your own research. You must figure out how to retain the mini-
mal amount of background information without having it dominate your
talk.
• Remove unnecessary math calculations.
• Remove slides explaining a cool simulation that is not strictly necessary for
the main message.
• Keep slides that summarize results.
• Keep slides that help the audience to understand the results.
3. Review the remaining slides and determine if you have a complete narrative.
If there are holes or gaps, this is the time to construct slides that would fill
these gaps.
4. Be brutal, and make sure that the new slides are still absolutely necessary to
complete the main idea identified in your core statement.
5. It may be useful go through this exercise as a group using the talks of one or
two volunteers. For each talk, have the listeners identify the simple line of
reasoning that is being presented. If there are gaps, fill them. If something is
not in order, move it into the right place.
6. If there is not sufficient time to go through everyone’s talk, try breaking up
into groups of two or three, and have each subgroup repeat the exercise with
each person’s trimmed talk. Peer feedback from researchers outside the disci-
pline is particularly helpful to reveal misinterpretations as they share what
they interpret from each image or graph.
Fig. 2.3 Working on the core message
2 Crafting Your Core Message
18
If you would like advice on how to shape the aesthetics and eectiveness of
your slides, images, and data representations, there are multiple resources
available. Be sure to seek guidance that is appropriate to your discipline. In
our experience, slides often contain too much information. Try to use fewer
words, fewer equations, and only one or two images. Do not worry about
blank spaces. Make sure each slide visually conveys a single idea. Here are
some resources for working on the aesthetics and layout of your slide
presentation:
• Dazzle’em with style: e art of oral scientic presentation (Anholt, 2010).
• Creating Eective Slides: Design, Use, and Construction in Science
(Doumont, 2013).
• How to Avoid Death by PowerPoint (Phillips, 2014).
• Slide:ology: e art and science of creating great presentations (Duarte, 2008).
• Storytelling with data: A data visualization guide for business professionals
(Knaic, 2015).
• Presentation Zen: Simple ideas on presentation design and delivery
(Reynolds, 2012).
• Visual strategies: A practical guide to graphics for scientists and engineers
(Frankel & DePace, 2012).
Crafting a core message may be the most dicult part of designing your
talk. Once you have identied your core message, however, the rest of the talk
becomes much easier to create. A 10–20min talk usually has one core mes-
sage. An hour-long talk still has one core message but may have two or three
interrelated themes framed by this overarching idea. e core message is the
foundation for your presentation and determining a good core message is well
worth the eort.
I. Cohen and M. Dreyer-Lude

19
© Springer Nature Switzerland AG 2019
I. Cohen, M. Dreyer-Lude, Finding Your Research Voice,
https://doi.org/10.1007/978-3-030-31520-7_3
3
Shaping theDramatic Arc
e shape of your story is a critical component in eectively transmitting
your core message and inspiring interest in your research. Many researchers
make the mistake of assuming that presenting the facts in a logical, sequential
manner will be the most eective way to convey the content of their work and
the professionalism of their approach. e problem is your audience may be
asleep before you communicate your essential nding and may remember
little of what you worked so hard to tell them. When someone steps into a
room (a theater, a lecture hall, a conference auditorium) and sits down to lis-
ten to a speaker who wants to engage their attention for a period of time, they
unconsciously begin to expect certain storytelling events to happen. ey
expect the speaker to pique their curiosity, transport them to another place,
and keep them wondering how the story will end (Heath & Heath, 2007).
Why does this matter? Scientists come to a conference or research presen-
tation to hear about science and just want the facts, right? Yes and no. e
science must be presented credibly, but facts are dull and hard to remember.
People viewing a presentation seek an emotional or intellectual connection.
Gallo called this “brain-to-brain coupling” (2014), and it is this coupling
that stimulates your audience to pay attention. A good story introduces situ-
ations that pose compelling questions. Heath and Heath named this ques-
tion-posing strategy “the gap theory,” because a good speakerneeds to open a
gap in a body of knowledge before closing it with facts. In a research talk,
opening a gap creates the need to know something about your topic. e gap
Electronic supplementary material e online version of this chapter (https://doi.org/10.1007/978-3-
030-31520-7_3) contains supplementary material, which is available to authorized users. e videos
can be accessed by scanning the related images with the SN More Media App.
20
is a problem that requires knowledge to solve. Opening gaps hooks the audi-
ence and keeps them engaged. A list of facts, on the other hand, closes gaps.
With closed gaps there is no active cognition required. Facts do not inspire
curiosity; facts do not make one wonder; a list of facts fails to create mystery.
A good story contains open gaps that entice your audience into believing that
you have something extraordinary to share, something that matters, or some-
thing that will change their thinking. Once you have their interest, you can
close the gaps you have created with the facts you discovered during your
research. Starting with the facts in a research talk shuts down the opportunity
for discovery. Consider saving your facts for the best storytelling moment in
your presentation, allowing your facts to serve as the answer to the mystery
you have positioned with the rest of your talk.
We are hard-wired to absorb information in narrative form (Reynolds,
2012). Paul Zak insists that the process of becoming absorbed in a story is
biochemical:
Stories are powerful because they transport us into other people’s worlds but in
doing that it changes the way our brains work, potentially changing our brain
chemistry…Dramatic stories cause us to care about others. When we hear them,
chemicals are released in our brains spurring us to action (2012).
Researchers have tested the impact of storytelling on the retention of facts.
Students at Stanford University were asked to remember the content of pre-
sentations that included both facts and stories. Only 5% of them remembered
the facts, but 63% of them remembered the stories (Heath & Heath, 2007).
If you learn to convert your research into a compelling story, you have a
statistically higher probability that you will engage your audience, and that
they will remember your presentation.
Some stories are best told as a linear progression and some are not. A murder
mystery, for example, rarely starts with the murder. Instead, it starts in the mid-
dle, when the detective arrives and uses ash backs to assemble the plot. If the
story was told in sequence you would already know who the murderer is after
the rst scene! You will need to determine the best way to tell your story, keep-
ing in mind that the order in which you tell it can make a big dierence.
Structure
By becoming conscious of how a story is constructed, you can begin to con-
trol the order of events in your research story for maximum impact. It will
therefore be helpful to review the structure of a story, and to dene some
I. Cohen and M. Dreyer-Lude
21
terms before we investigate how to apply them to a research talk. Some basic
building blocks of any story are: exposition, inciting incident, complicating
actions, climax, and resolution. ese elements can be arranged and rearranged
to suit your storytelling needs.
Exposition Exposition is the part of the story containing all of the circum-
stantial elements your viewer needs to know in order to understand what is
going on. Where are we? When is it? Who are the players? What are their
relationships? What events have occurred prior to our story that we must
know in order to enter the narrative smoothly? In your research talk, the audi-
ence will want you to provide background so that they can understand some
basic information. What question are you researching? Why is it important?
What have other researchers done? Exposition can be tricky. It is critical that
your audience have enough information to connect to the events, but too
much information can become confusing and dull (McKee, 1997). e other
delicate aspect of exposition is when to introduce it. Traditionally, it comes at
the beginning of the story, but many stories resist this standard form.
Expositional elements can, for example, be woven throughout a story, provid-
ing the audience with just enough background information for the next nar-
rative event. ere are several strategies for including background information
in your research talk. It is important to set the scene, but be sure to carefully
calibrate this component of your story—just enough but not too much.
Inciting Incident e inciting incident is the one event without which there
would be no story. It is often the moment that sets up the conict in the plot
(omas, 2013). In your research talk, an inciting incident could be the moment
that propelled you to investigate the subject of your research. What happened that
started you thinking that this should be your next research topic? Did you have a
new idea or develop a new technique that could shed light on some aspect of your
project or allow you to tackle the research problem in an innovative way?
Something sparked your interest in this particular research topic. Identify what
that something was. Alternatively, the inciting incident could have been a failed
project. What did that project teach you, and how did it allow you to change
direction, or make progress on the topic you are investigating now?
Complicating Actions Probably the most critical aspect of storytelling is
building tension through conict. is is where complicating actions appear.
In most stories, one nds a protagonist pursuing a specic goal. If the hero or
heroine grabs the prize without encountering any obstacles, the story is wholly
unsatisfying. We are engaged with a story when it surprises us—when our
expectations are thwarted or frustrated (Reynolds, 2012). When watching
3 Shaping theDramatic Arc
22
or listening to a story, we expect our heroine to encounter challenges,
disappointments, and frustrations, and we want the protagonist to overcome
them. Living vicariously through this process is central to dramatic catharsis,
and one of the things that makes good storytelling so satisfying.
In a research talk this series of hurdles may come in the form of experi-
ments that you ran and are trying to interpret or understand. You run the rst
experiment and get a particular result. Maybe this result is confusing, which
raises a question that drives you to conduct a second experiment. Maybe that
second experiment gives a result that solves part of the problem but suggests
a third experiment to understand things more fully. Finally, the third experi-
ment may yield a result that sets up the nal conclusion. Presenting the con-
clusion or answer to your research problem will be more satisfying for your
audience if you share the hurdles you had to overcome to get there.
In many stories, the protagonist will encounter one or more antagonists.
Everyone loves a good villain, and villains are often the main source of conict. In
your research story, you may nd that you or the solution to your research prob-
lem serve as the protagonists. Few research investigations run smoothly. ere are
almost always unexpected events along the way. Perhaps these events are your
antagonists. ey may become your complicating actions. You may be tempted to
disguise or hide challenges you encountered in your research process (a particu-
larly grueling experiment, unexpected results, or the need to build a new appara-
tus) in order to save face. Resist that impulse. Obstacles, unexpected ndings, or
even failures along the way are storytelling gold. ey increase dramatic conict
and help set up the climax. By sharing them with the audience, you can build
tension in your story, and your audience will care more about how the story ends.
e key to maximizing the storytelling value of obstacles is to brag about conquer-
ing them rather than complain about having to work so hard to overcome them.
Climax Once you have established your complicating actions, you are ready to
reveal the climax of your story. Your inciting incident introduced the problem,
and your complicating actions developed conict and tension. e pressure on
your research problem should be at its greatest point when you reach the climax
in your research talk. e climax happens the moment before the resolution. It
is the moment of greatest emotional intensity in a story (omas, 2013), and
brings about a signicant change in the problem at the heart of your narrative
(McKee, 1997). If you have set your story up properly, the climax will feel inevi-
table. is has to happen; this must be resolved. After the build in tension cre-
ated by the complicating actions, the climax-to-resolution transition provides
the long-awaited emotional catharsis for your audience. Granted, your audience
may not be moved to tears at a research conference, but if you have hooked
them with the initial part of your story, the climax is where you can provide a
I. Cohen and M. Dreyer-Lude

23
satisfying payo for their attention and time. is climax will probably center
around your primary discovery or the new piece of knowledge that emerged
from your battle with the problem introduced in the inciting incident.
Resolution e resolution is the nal piece in the storytelling structure.
Sometimes referred to as falling action or denouement, this is where you wrap
up any loose ends in your story. is is the place in your talk where you pres-
ent your research breakthrough and take-home message. It is also an opportu-
nity to zoom out and let the audience know about the potential impact of
your research ndings on the broader community.
It may be helpful to see some examples of how this story analysis applies.
First, we will apply the terms to a television program so that denitions are
clear, and then we will demonstrate how to apply them to a research talk.
Example 1
House—Season 1, Episode 2 “Paternity”, rst broadcast on November 23, 2004.
(Watch it rst if your resources permit.)
Overview: A 16-year-old male comes to the hospital complaining of double
vision and night terrors after being hit in the head by a lacrosse
stick. Doctor House is dismissive until he notices a jerk in the
boy’s foot. After a near-fatal hallucination and several faulty diag-
noses, House is mystied until he learns the boy’s true paternity.
Story outline
Exposition (Laced throughout). A high school lacrosse player with two loving
parents suffers from night terrors and double vision.
Inciting
incident
A young man is hit in the head with a lacrosse stick during a game
and is rushed to the emergency room. (If he had not been injured
this story would not need to be told.)
Complicating
actions
1. In the emergency room, House sees an unusual knee jerk, which
destroys his previous diagnoses of this young man’s condition.
2. They discover a broken brain vessel and repair it.
3. The young man begins to hallucinate and nearly walks off a
roof edge.
4. The new diagnosis is neurosyphillis. They inject penicillin
directly into his brain.
5. The young man has auditory hallucinations, destroying the
previous diagnosis.
6. The young man’s parents argue with House over the lack of
progress. House steals their coffee cups and runs a DNA test.
7. We discover that the young man was adopted. They run a test
for the measles virus. He tests positive.
Climax As the young man moves closer to death, the doctors rush him into
surgery to correct the problem.
Resolution Brain surgery goes well. He recovers full function. His parents are
no longer angry with House.
3 Shaping theDramatic Arc

24
Example 2 Itai Cohen Group’s Complex Matter Lab: e ight of the fruit y.
Presented at 71st Annual Meeting of the American Physical Society Division
of Fluid Dynamics on November 18, 2018. Atlanta, Georgia (Cohen, 2019;
Video 1 in Supplementary Material).
Overview: Insect ight is aerodynamically unstable. Flies have developed strat-
egies for altering their wing motions to allow them to stabilize their
ight. e Cohen group investigates these strategies by gluing mag-
nets onto the ies and applying magnetic eld pulses to perturb the
ies in midair. By analyzing the resulting wing motions the group
has determined that insects use a proportional integral controller to
adjust these wing motions and maintain their body pitch orienta-
tion. ese controllers are very similar to those used to set the speed
of a car under cruise control or set the temperature of a room. To
investigate the neural origins of this control circuit, they use geneti-
cally modied ies where individual neurons in the circuit govern-
ing these controllers can be manipulated. Finally, they discuss why
ies may have evolved this control apparatus and the impact that
evolving ight control had on the ecology of our planet.
Story outline
Exposition
(background information
to set up the story)
Itai introduces the hero of the story (the fruit fly) and
explains basic aspects of control through a
demonstration: balancing a pipe on his fingertips.
(1:00–2:17)
Inciting incident
(introduction of the problem
that drives the story)
To fly stably, a fruit fly must do this type of balancing
at an incredibly fast timescale. How does it do this?
(2:17–2:47)
Complicating actions
(Chapters of the
investigation. Each
chapter builds on the
other and increases the
complexity and interest of
the research topic)
Chapter 1: How are fruit flies producing forward
thrusts and turns? (2:50–16:00)—also contains some
of the exposition.
Chapter 2: How does the fly maintain stable flight?
(16:00–22:01)
Chapter 3: The relevance of a gyroscope to stable
flight, genetic manipulation of the control circuit,
and the evolutionary value of halteres. (22:01–30: 31)
Climaxes Chapter 1: Demonstration of turns. (12:00–13:00)
Chapter 2: Putting the pieces together. (19:30–20:00)
Chapter 3: Comparison of pitch perturbation
experiments in normal versus b1 silenced flies.
(24:20–25:00)
Chapter 3: Glue a dandelion fiber onto the fly and
stability is restored. (29:25–29:30)
Resolution The evolution of halteres and strategies for stable
flight has had a massive impact on the ecology of
our planet. (30:40–31:07)
I. Cohen and M. Dreyer-Lude

25
Exercise 3.1 Identifying the Elements of Your Dramatic Arc
1. Give your talk a title.
Both of the examples above have titles that identify the talk. The television
episode is entitled “Paternity.” The research lecture’s title is “The Flight of the
Fruit Fly.” How would you title your talk? Keep it simple but clear.
2. Find the primary ideas that will help support your core message.
Meyers and Nix (2011) recommended identifying the three big things you
want to introduce in your talk. The number of items may depend on the
length of the talk. In a 10min talk, choose one story to support your core
message. In a 20min talk, choose two or three. In an hour-long talk, narrow
it down to four or five stories that support the big idea that you want to con-
vey. Write down your main stories.
3. Create your dramatic arc.
Using the chart below, begin to identify the components of your research
story. Do not worry about shape or length at this point, just list what you
believe belongs in each box. We recommend beginning with the climax/es, as
everything builds to that big idea or discovery. The most challenging box will
be your complicating actions. You need to take us on a journey to your big
discovery without including everything that happened along the way. Be
selective (Fig.3.1).
Fig. 3.1 Working on the dramatic arc
3 Shaping theDramatic Arc

26
Exercise chart
Exposition
(The setup. What do we need to know to understand your story?)
Inciting incident
(What was the moment when this all started? What happened?)
Complicating actions
(What sequence of events led to the climax of the story? They should build
tension as they unfold)
Climax
(What was the big moment? The crowning event? The aha!?)
Resolution
(Tie up all loose ends here. Fill in the blanks. Or suggest future research that will
emerge from this project)
Shape
“Like every book, movie, opera, or play ever written, your talk has three parts:
a beginning, a middle, and an end” (Meyers & Nix, 2011, p.49). e “begin-
ning” in the dramatic arc covers the exposition and the inciting incident.
Complicating actions and the climax comprise the middle, and the resolution
provides the ending of your story. Like an hourglass, the beginning and end
are broad, while the middle focuses on the details of your particular study.
Although this may all seem obvious from the descriptions above, what may
not be obvious is that these components can be rearranged to provide the big-
gest impact for your particular story. You have an obligation to present cred-
ible, compelling research using the tools of the profession. But there are no
rules that compel you to begin with the beginning or end with the end.
Television programs like Breaking Bad often tease the audience by beginning
an episode with a short clip of an important event (usually a complicating
action) that happens later in the story. is initial bit of narrative is out of
context and therefore mysterious. e viewer is left to wonder when that par-
ticular moment will be revealed and explained during the story. A number of
novels begin with the end of the tale, and then take us back in time to show
us how we got there. Serialized television shows (soap operas being the most
notorious) often end an episode with a new unresolved piece of information
to encourage the viewer to “tune-in next time.” To make your research story
compelling, you must nd the shape that best suits the story you want to tell.
You will need to determine what shape will best serve the experience you want
to create for your audience.
e following improvisation exercise will help you see the value in consid-
ering nontraditional structures for your research story.
I. Cohen and M. Dreyer-Lude

27
Exercise 3.2 Story Parts
1. Gather in groups of four or five. Have each member of the group tell a short
story about something memorable that happened to them. This could be an
old memory (when you fell out of the tree at age seven and broke your arm)
or a recent memory (when your mother showed up and surprised you for your
birthday).
2. Choose one of the stories in your group to serve as your material. You will not
be using everyone’s story so the story you remember best might be a good
candidate. Make sure it has a beginning, a middle, and an end.
3. You will be telling this story to the audience as though it were your own.
Assign one section of the story to each member of the group. These sections
should roughly relate to the Dramatic Arc. Someone will provide the exposi-
tion or setup, another will introduce the problem (the inciting incident), one
member will relate complicating actions, another the climax, and finally
someone will resolve the story. If necessary, group members can be in charge
of more than one section of the story arc.
4. Stand in a line on the stage and tell your story to the audience, one at a time,
using the first person. When it is your turn, tell it in the order you heard it.
5. Now keep your roles in the story, but rearrange your positions and tell the
story again, adjusting the detail of the narrative to make sense of the story.
The person telling the end may start or someone who told a portion of the
middle. This way your story will start in a new place. Just be sure that you do
not follow the same pattern that you used the first time. While this way of
telling may not be chronological (in time), it may have greater impact and
keep the audience more engaged.
Example:
(One member of your group tells the following story.)
When I was 10 years old, my mom took me on a trip to Uganda. At one point
we went on safari and we drove through this big park full of animals. It was
really cool. We stopped the car to wait for parking, and a baboon hopped up
onto the car, then the roof, then through the sunroof and down into the car
and it started to attack me. My mother was having none of it. She grabbed the
pillow I had been using to nap on and started beating that baboon. It just
hissed at her. So she got really mad and began hollering and beating and
scared the heck out of that baboon. She chased it back up and out of the sun
roof, off of the car, and out into the park. I’ll never forget that. That baboon
was almost as big as I was, and it had gigantic yellow teeth. Didn’t matter. It
was no match for my mom.
(Each person in the group now takes a piece of that story and tells it to the
bigger group using as though it were their own.)
Person 1 (exposition): When I was 10 years old, my mom took me on a trip to
Uganda. At one point we went on safari and we drove through this big park full
of animals. It was really cool.
Person 2 (inciting incident): We stopped the car to wait for parking, and a
baboon hopped up onto the car, then the roof, then through the sunroof and
down into the car and it started to attack me.
3 Shaping theDramatic Arc

28
is exercise helps demonstrate the value in rearranging the parts of your
story. You can create tension, build suspense, or generate surprise through the
simple act of choosing not to begin with the beginning. Now apply these ideas
to your research talk.
Person 3 (complicating actions): My mother was having none of it. She grabbed
the pillow I had been using to nap on and started beating that baboon. It just
hissed at her. So she got really mad and began hollering and beating and scared
the heck out of that baboon.
Person 4 (climax): She chased it back up and out of the sunroof, off of the car,
and into the park.
Person 5 (resolution): I’ll never forget that. That baboon was almost as big as I
was, and it had gigantic yellow teeth. Didn’t matter. It was no match for my
mom.
(Now rearrange the order and tell the story again, making minor adjustments
in the narrative to make sense of the whole.)
Person 5 (resolution): I’ll never forget [the time I was staring face-to-face with
a] baboon [that was] almost as big as I was. [I]t had gigantic yellow teeth. Didn’t
matter [how big it was]. It was no match for my mom.
Person 2 (inciting incident): [What happened was] we [had] stopped the car
to wait for parking, and a baboon [had] hopped up onto the car, then the
roof, then through the sunroof and down into the car and it started to attack
me.
Person 3 (complicating actions): My mother was having none of it. She grabbed
the pillow I had been using to nap on and started beating that baboon. It just
hissed at her. So she got really mad and began hollering and beating and scared
the heck out of that baboon.
Person 4 (climax): She chased it back up and out of the sun roof, off of the car,
and into the park.
Person 1 (exposition): [This all happened] when I was 10 years old [when] my
mom took me on a trip to Uganda. [We were on] safari and we drove through
this big park full of animals. It was really cool. [Except for the baboon.]
Exercise 3.3 Determining the Shape of Your Story
In a group or on your own, consider some alternatives to a traditional narrative
plot. It might be helpful to storyboard your talk (Reynolds, 2012). Storyboarding
is a technique used by filmmakers to arrange the components of a screenplay
so they can more easily organize each shot. Usually a storyboard is a graphic
representation (a thumbnail sketch) of each story moment laid out in sequence.
I. Cohen and M. Dreyer-Lude

29
Length
It is important that you monitor the length of your talk. A talk that goes
on longer than it should can undermine the overall impact of a great pre-
sentation. If a speaker goes over their allotted time, the audience gets rest-
less, the next speaker starts to panic, and the session moderator may
become annoyed. Determining how long your presentation will take is
one of the most challenging aspects of creating a talk. If you do not include
In PowerPoint, it is convenient to storyboard using the slide sorter (see Fig.3.2).
Your storyboard can take any form that is useful to you. Think of the compo-
nents of your dramatic arc as pieces of a puzzle that you can arrange in a variety
of configurations.
Looking at your dramatic arc, what would happen if:
• You began with the end?
• You began with one of your complicating actions?
• You constructed a murder mystery from your story?
• You created an action adventure with your story?
• You wrapped your story around the experiences of your hero? Or your villain?
• You modeled your story shape after a story you know that is particularly
compelling?
Notice how the focus of the story shifts when you start at different places in
the linear narrative. Now determine the best shape of your story by arranging
the components of your arc to emphasize your core statement or to generate
the greatest dramatic effect.
Fig. 3.2 Storyboarding with PowerPoint
3 Shaping theDramatic Arc
30
enough information, your audience will feel cheated. If you include too
much information, they may lose interest, or not grasp which elements of
your talk are most critical.
In short talks, it is good to remember that less is almost always more. Paring
down your presentation to the most essential concepts can help a novice
speaker avoid rushing the end of the presentation in order to stay within the
imposed time limits. It is much easier on the audience if the presentation has
fewer concepts described concisely at a slow or moderate pace, rather than
many concepts overly described at a rapid pace.
In longer talks, we recommend that you plan to end your presentation
slightly earlier than the deadline you have been given. is approach will pro-
vide two advantages: (1) ose extra minutes will serve as a cushion should
you nd yourself taking more time than normal on certain concepts. In this
case, these extra minutes serve as an insurance policy against the clock that
restricts you. (2) If you have been able to get through all of your slides, those
extra minutes can be used to discuss the big picture context more fully. Either
way you win.
If you are presenting an hour-long talk, it is helpful to know that most of
the members of your audience will need a break after 18min (Meyers & Nix,
2011). at is why TED Talks are restricted to an 18min window. To solve
this problem during an hour-long talk, break your narrative down into three
smaller sections, each of which builds toward the climax of your story. It is
helpful to change the rhythm of the talk at each of these time markers in order
to give the audience a break from the steady stream of information. Other
options include incorporating historical context, anecdotes, or personal
experiences. Master storytellers are able to incorporate some of these elements
even in shorter talks.
You will notice in Itai’s talk that he incorporates a variety of strategies to
keep the audience engaged. He introduces a concept with a demo or an anec-
dote and saves the complex equations until after he has set up relevance. He
divides his talk into three roughly equal sections, each with its own dramatic
arc including an interesting beginning and a strong ending. At 20min (very
close to the 18min recommendation), Itai incorporates a memorable video
which simultaneously generates surprise, incorporates humor, and establishes
relevance to his research. rough his talk, Itai uses multiple modes of engage-
ment. His slide show is primarily populated by images and serves as a support
rather than a repeat of his narrative.
I. Cohen and M. Dreyer-Lude

31
Finding small breaks in your story will help your audience stay engaged.
Becoming aware of the 18min window of attention allows you to embed
moments of surprise or transition that can strengthen your research story.
Breaking your talk into sections can also help you stay within your time limit.
You can identify when you might go over the time allotment if you nd your-
self exceeding your smaller 18min sections. As you plan the map of your
research talk, continue to remember that less is almost always more.
Constructing a dramatic arc for your research talk can be challenging.
Once you have found the core ideas in your story, the elements of the dra-
matic arc will more easily fall into place. Using this structure helps you identify
Exercise 3.4 Dividing Your Talk into Sections
Identify where in your talk you can take a short pause or create a shift in your
narrative. Natural places to divide a talk are at the conclusion of an experiment
or result, a place where you became stuck and needed to reevaluate your
research approach, or a shift to the next phase of your research.
1. Use the slide sorter view to look at your talk and identify possible breaking
points. Remember, the idea is to experiment with locations where these inter-
ludes can be placed.
2. Brainstorm what you can do during these short intermissions to allow the
audience to rest for a moment but still keep them engaged.
Possible ideas:
• Illustrate the research you’ve just described with a demonstration.
• Bring in a sample that you can pass around to the audience.
• Have the audience conduct a mini-experiment from their seats.
• Show a short video.
• Relate what you are discussing to modern day events or technologies.
• Include a historical interlude that traces the origin of a scientific idea.
• Tell a short anecdote.
3. Experiment. If you have a great anecdote that is not in the right place, try
putting it in a different place. Sometimes you will identify a breaking point
but your audience may not need a break. Get feedback from your colleagues
regarding whether these small intermissions are working.
4. Test your ideas in front of a live audience. If they work, great. If they sort of
work, think about how to improve them. If they don’t work, drop them or
try a different approach.
3 Shaping theDramatic Arc
32
which components of your research story are most essential, and keeps you
from including too much information. Running your trimmed dramatic arc
by a colleague, especially one who is outside your own specialty, will help you
determine whether they are engaged and can easily follow what is going on,
or if you have taken out too much. Eventually, a good dramatic arc will allow
you to turn your core message into a compelling story, oering a greater pos-
sibility that your audience will stay engaged and alert during your entire
research presentation.
I. Cohen and M. Dreyer-Lude

33
© Springer Nature Switzerland AG 2019
I. Cohen, M. Dreyer-Lude, Finding Your Research Voice,
https://doi.org/10.1007/978-3-030-31520-7_4
4
Great Beginnings andStrong Endings
Great Beginnings
First impressions make a dierence. e way you begin your research talk can
prime the audience positively or negatively for everything that follows. Daniel
Kahneman identies this phenomenon as the halo eect (2011). e halo
eect happens when the rst impression in an experience colors the way you
view everything that happens thereafter. If you begin your research talk well,
the audience will be predisposed to listen and enjoy what you have to say. If
you begin poorly, you may lose them long before you reveal the most impor-
tant information. How long do you have to make a positive rst impression?
One study suggests that you have between 5 and 15min to impress someone
(Frieder, Van Iddekinge, & Raymark, 2016). Another expert states that you
have only 2min before your audience has decided for you or against you
(Reynolds, 2012). Meyers and Nix reduce the workable time frame for accom-
plishing this goal to seven seconds (2011). e exact timing will depend on
the context of your presentation, the scheduled length of your talk, and how
famous you are. Regardless, all experts agree that a good beginning is critical
to a successful presentation. Do not make the mistake of assuming that your
audience will listen to you just because you are speaking to them (Meyers &
Nix, 2011). You have to earn their attention. You need to captivate their inter-
est. e rst words you say and the rst thing you do in your research talk are
critically important to creating your storytelling hook. You need to immedi-
ately engage the audience’s attention and create high stakes for your talk, so
that those who are watching will want to lean forward to hear the next thing
you have to say (Meyers & Nix, 2011).
34
It can be challenging to nd the right way to begin if you are accustomed
to a more traditional approach. It is important that you choose something
that matches the message you are trying to convey, but we recommend that
you try to go beyond the traditional format. Standard introductions with an
opening slide that contains the title, your name, and institution, accompanied
by an agenda or outline slide, will signal to your audience that this is a typical
talk. Because these standard introductions are less engaging, you may nd
your audience looking at their phones or studying the conference program
while your talk gets going. A great beginning, on the other hand, will engage
your audience from the moment you start to speak. Here are a few concrete
ideas that may inspire the rst few minutes of your research talk:
1. Begin with an interesting image or clip.
A provocative image that relates to your research is an interesting way to
begin. Alternatively, you could display a 1min movie clip that demon-
strates a physical phenomenon or explains the relevance of what will fol-
low. Remember that the rst slide is often displayed before the talk begins.
at means the audience will be looking at that slide for the longest
amount of time. us, your rst slide is an opportunity to be compelling,
illuminating, or to inspire curiosity.
2. Begin with a provocative statement.
is beginning is easy if you have a very important discovery to convey
which is provocative in itself. In this case, do not beat around the bush,
just say what you have done. “e reason Western cultures conquered the
Americas is because they had better guns, germs, and steel.” “We’ve dis-
covered the earliest members of the human race.” “We invented a new
technique for turning o individual neurons in the brain (optogenetics).”
In most cases your discovery may be more modest. Nevertheless, there
may be aspects of your research that go against the audience’s expectation.
For example, your research ndings may challenge current orthodoxy,
such as Emily Oster’s talk on HIV in Africa (Oster, 2007) “Everything we
know about the spread of HIV in Africa is wrong.” In these cases, pro-
vocative statements can be very eective.
3. Tell a short personal story.
Anecdotes are one of the oldest forms of engaging an audience. Anecdotes
or personal stories help make an idea memorable by engaging the listener
in something personal. Margot Leitman (2015) suggested that beginning
with a personal story will win the audience to your side. Using an anecdote
as your beginning can be powerful, but you must use it carefully. eresa
MacPhail (2015) had four suggestions when incorporating an anecdote:
(1) Don’t make it all about you. (2) Weave the anecdote throughout the
I. Cohen and M. Dreyer-Lude
35
presentation. (3) Find specic details with which your audience can iden-
tify. (4) Reference the story again at the end of the talk. Without question,
your anecdote should connect to your research. If you can nd the right
personal story to tell, you will create the opportunity for a memora-
ble moment.
4. Create an analogy.
Analogies can provide a nice frame for your central research idea. Unlike
a standard, straightforward explanation of concepts, analogies provide
poetic connections between commonly understood ideas and the com-
plex information you want to convey. A good analogy is a type of extended
metaphor and can help you gracefully and eciently introduce challeng-
ing concepts (Monarth, 2009).
5. Use an interesting prop.
Is your research about something concrete or tangible? Can you bring in
a sample? If you are studying the eect of a disease on apples, you could
bring examples of healthy and diseased apples for the audience to see.
Allowing your audience to see or touch the subject of your research will
be more eective than describing that object theoretically.
6. Create a moment of audience participation.
Audiences enjoy participating in the construction of knowledge (Conner,
2013). Can you nd a way to include the audience in the setup of your
research talk? Perhaps you could ask for a volunteer and use them to dem-
onstrate a point. Or ask the audience to look around and observe some-
thing specic in the room. Engaging the audience from the rst moment in
your presentation shifts their cognition from passive to active, and if exe-
cuted well, could create some critical initial buy-in. A note of caution about
polling the audience: if you ask an easy or obvious question, your introduc-
tion could fall at. It is more eective to ask a thought- provoking question
and allow your audience the time to contemplate the answer.
7. Begin with an astonishing statistic.
“Every year, three times as much garbage is dumped in the oceans as the
weight of sh caught.” Do you happen to have an unusual or impressive
statistic that would be a strong introduction to your research talk? Like
analogies, statistics can provide a bridge to the relevance of your research
idea. is is especially true if you can relate the statistic to the audience’s
experience or give it a meaningful context. For example, a 12% increase
in crop yield may not mean much to someone who is not a farmer. Is
12% a lot or a little? Relating this crop yield to the total income of the
farm, indicating whether it would make or break a growing season, or
comparing this result to those from other more well-known prod-
ucts can help.
4 Great Beginnings andStrong Endings
36
8. Set up a mystery that you will solve.
If you are researching the solution to something specic, a mystery might
be a nice frame for your talk. For example, “Rita has been struggling with
infertility. She also suers from celiac disease. Is there a link between
damaged villi and reproductive fertility? My lab is working to nd out.”
is scenario sets up an ideal opportunity for a story, and automatically
creates emotional connection to the subject.
9. Make it personal.
What is it about your research that is important to you? How did you
determine your particular research focus? For some, an area of research is
connected to someone specic or a particular life event. If you feel com-
fortable and can do so genuinely, share this information with your audi-
ence and let them know how much you care about your research subject.
“is is my grandmother, Ada. She’s 72 years old. She suers from
Alzheimer’s. Currently we don’t understand the specic genetic mecha-
nisms that cause Alzheimer’s. My research is working toward…”
10. Make them laugh.
Are you a natural comic? Do you enjoy making your friends laugh?
Nothing will charm an audience like beginning your talk with a funny
moment. Humor is enjoyable. Laughter is contagious. But take care. If
you are not good at jokes, if you fail to deliver punch lines properly, this
may not be the right choice for the beginning of your talk. If you are
interested in incorporating humor, remember that telling jokes is only
one form of comedy. Puns, sarcasm, running gags, or tongue-in-cheek
observations can also tickle an audience. e most important thing to
consider when incorporating humor is that the style of comedy matches
your personality, and the injection of humor is natural, not forced. Using
humor is not for everyone, but if you can, we highly recommend incor-
porating some lighter moments.
Here is how Itai applies these concepts to his research talk:
Itai begins his talk on ight of the fruit y with this introduction: “is is
Drosophila melanogaster. Isn’t he beautiful?” (#1, #2, #10). He then proceeds
to demonstrate a typical controls problem by balancing a meter stick on the
tips of his ngers—balancing an inverted pendulum (#5). In longer talks, he
uses volunteers to do this demonstration (#6). Finally, he makes the analogy
that, similar to an inverted pendulum apping ight is unstable, so that fruit
ies need to make constant corrections to their wing strokes to maintain their
stability (#4). However, because the time scale for these corrections are related
to the size of the object, ies must perform these corrections on the millisec-
ond time scale (#7), how do they do this? (#8) He then nishes by telling the
audience that this talk is about understanding this control reex.
I. Cohen and M. Dreyer-Lude

37
is beginning demonstrates ways in which you can incorporate multiple
strategies to create a good beginning. Within about a minute, Itai has hooked
the audience, and they want to know more about his research.
Exercise 4.1 Creating a Good Beginning
1. Using your Core Message and your Dramatic Arc as reference points, brainstorm
about some possible beginnings for your talk. Try to fill in at least one example
in each of the following categories. Do not worry if some of them seem ridiculous
or improbable. Just freely brain storm and see which possibilities emerge:
• An interesting image or clip
• A provocative statement
• A short personal story
• An analogy
• An interesting prop
• A moment of audience participation
• An astonishing statistic
• A mystery you will solve
• A personal reason for this research topic
• A moment of humor
2. Narrow down your choices to your strongest possibilities. Map out how you
could use each of these strategies to begin your talk. Write out some dialogue
if you find that helpful. Get on your feet and practice them in front of a cam-
era. Once you have had a chance to review your practice sessions, polish the
strongest version. Your beginning should be the most rehearsed component
of your research talk (Fig.4.1).
Fig. 4.1 Constructing a great beginning
4 Great Beginnings andStrong Endings
38
Strong Endings
Equally important to a good beginning, and often overlooked, is the impor-
tance of a strong ending. e purpose of ending strongly is to create a sense of
emotional satisfaction for the audience, make the talk memorable (in a posi-
tive way), and ll the audience with a sense of satisfaction akin to just having
nished a great meal (Meyers & Nix, 2011). A strong ending reminds your
audience of what they learned, and why it is important. Ending well helps the
audience understand why they should care about your research talk. A weak
ending, on the other hand, can deate energy and momentum, dissipate your
connection with the audience, and make you feel less positive about your
performance. erefore, it is important to take the time to gure out how you
want to end your presentation.
In order to achieve the nal emotional payo for your research talk, you
need to wrap-up the ideas you have just delivered, and signal to the audience
that you have nished your presentation. e wrap-up helps the audience
remember the important points you just talked about, while the signal helps
the audience determine when the talk is over.
The Wrap-Up
In your dramatic arc, the wrap-up is the resolution section of your story. Here
is where you ll in any narrative gaps in your storytelling and provide con-
cluding information about something you have addressed earlier in your talk.
Once again, we encourage you to try something dierent from the traditional
approach while still staying true to the message you are trying to convey.
Typical endings consist of a conclusion slide with a few bullet points
summarizing your main ndings. is slide is often followed by one listing
the collaborators and grants. While this format is useful for communicating
your information eciently and is often a safe fallback, it is not very engag-
ing. Below are a number of suggestions for improving your wrap-up (Fig.4.2).
1. e circle back or callback.
A callback is a reference to whatever you used to hook your audience at the
beginning of your talk. If you used an anecdote, nd a way to talk about it
again. If you included a joke, perhaps you can remind the audience of that
funny moment. If you began with an image, you could wrap up with the
same image on the screen.
I. Cohen and M. Dreyer-Lude
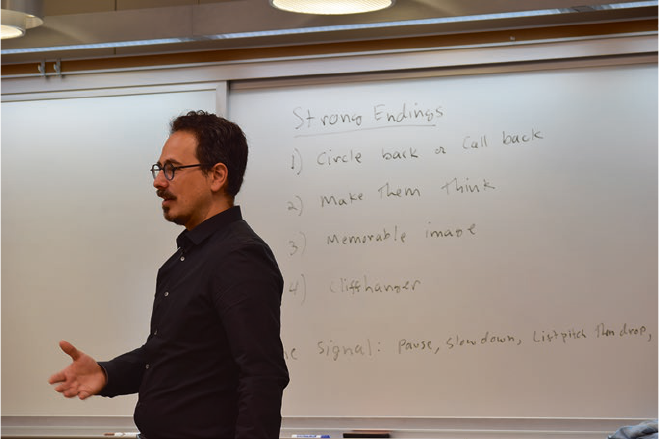
39
2. Make them think.
Talk about the implications for your research. Most speakers assume that
the audience will understand why their research is important. After all,
to you it is obvious. But remember that the audience has only been
thinking about this topic for the duration of your talk. During your talk
most of the audience’s eort is consumed with trying to keep up as you
speak. It is unlikely that they will have enough time to connect the dots
themselves. Be clear about why your research matters, and where it ts in
the big picture.
3. End with a memorable image.
Images make a stronger impression than a collection of words. If you can
nd an image or video that summarizes the core message of your talk, the
audience will have better recall. Some phenomena are naturally beautiful.
In that case, simply putting up an image of the phenomena will remind the
audience of the beauty in a breaking drop of water, or the intricacy of a
metamaterial’s deformation, or the vibrancy in a work of art. Choosing an
appropriate image is important. If you put up an image of a cat, they will
remember a cat. It will be memorable, but at the expense of your message.
Instead, use simple and eective images that summarize your ndings and
core message.
Fig. 4.2 Strong endings
4 Great Beginnings andStrong Endings
40
4. End with a cli-hanger.
Sometimes, your talk is a progress report and will not have a natural end-
ing. Your research may be ongoing, or you may have nished one of several
related projects that contribute to a bigger body of work. You can still
entice the audience by giving them a road map for the next steps in your
research. e important thing is to provide them with the vision for your
future work. Many students are hesitant to adopt this approach because
they are afraid they will be held accountable if these future projects fail.
Audiences, however, are often willing to be exible with their expectations,
especially during a talk’s conclusion. Everyone realizes that until the paper
is written and published, everything in a talk is subject to some amount of
revision. So you have some leeway. In fact, you can use this description of
your future plans to solicit ideas from the audience, or even collaborations
that could facilitate your future work.
A traditional conference talk on the Flight of the Fruit Fly would end with
a slide containing the following summary bullet points:
• Just as sh use lift forces when swimming, ies also use drag forces when
ying, so ying and swimming are not so dierent.
• A y’s ability to correct for midair perturbations can be modeled using PI
controllers.
• Using genetic manipulation, we are determining the neural circuit that takes
sensory signals and converts them to muscle contraction and wing actuation.
• Evolution has pushed the development of halteres making Diptera more
maneuverable, better predators, and better able to avoid predation.
is information is accurate and provides a nice summary of primary
points, but it is dull and far from memorable. Instead, Itai uses some of the
strategies above to make the end of this talk more interesting and compelling.
1. Callback. (31:10)
Itai uses the image of the y and returns to the sentence with which he
began his talk “is is Drosophila melanogaster, isn’t he beautiful?”
2. Make them think. (30:40)
Itai shows an image of a y on the patent for the Wright Brothers’ ier.
is image is meant to recall for the audience the elegant strategies insects
use to control their ight. He then asks the audience to imagine the world
350 million years ago before insects took ight. “ere were no trees, there
were no owers, all plants were less than three meters tall. e ability
ofinsects to take to the air and control their ight had a profound eect
on our planet’s ecology.”
I. Cohen and M. Dreyer-Lude

41
3. End with a memorable image. (31:10)
Itai begins and ends his talk with a photograph of Drosophila melanogaster.
e beauty of this image is that it is initially revolting. By the end of the
talk, however, the audience falls in love with this creature and the image
evokes a completely dierent response. By using the same image, the audi-
ence appreciates where they started and where they ended up.
4. Determine the best place to end the talk. (31:10)
To achieve a strong ending Itai thanks his collaborators after he delivers his
ending. Once the applause has begun to die down, he immediately adds
his acknowledgment slide and says his thank-yous. is approach creates
an emotionally satisfying ending to the research talk while still nding a
way to thank contributors. Another option for preserving a punchy ending
is to thank collaborators at the beginning or middle of the talk.
is wrap-up demonstrates ways in which you can create a strong conclu-
sion to your research talk. is approach does not require any more time than
the traditional conclusion slides and leaves the audience with a greater sense
of emotional satisfaction.
Exercise 4.2 The Wrap-Up
1. Think about why you are doing this research. What are the ultimate implica-
tions? What do you find so cool about what you have discovered? Why are
you putting in so much time to solve this puzzle? These are the questions
that should guide the construction of your wrap-up. If you have already
constructed a traditional concluding slide, you can use the bullet points as
guidelines for what you want the audience to take away from your talk.
Then brainstorm about some alternative ways of presenting the same ideas.
Using the prompts below, experiment with possible wrap-ups to your
research talk.
• Callback: Go back to the first few slides and determine if there is a theme
you can return to in your ending.
• Make them think: What are the implications of your work? If what you say
holds up, how will it change the world? We recommend that you consider
the largest possible implications and then scale back from there until you
feel comfortable with the connection you are making.
• End with a memorable image: There are many images that could work
here. Try using an image from your first slide. Such an image would also
address the callback. Create a compelling image that summarizes your
findings. This is the last impression you will leave on your audience so
choose the image carefully.
4 Great Beginnings andStrong Endings

42
The Signal
At the end of every talk, good speakers will signal the audience that their story
is coming to an end. ere are some techniques that can be used to accom-
plish this task:
1. Take a short pause before the nal sentence.
2. Slow down while delivering the nal sentence.
3. Lift the pitch during the rst half of the nal sentence, and then drop it
during the last half.
4. End the nal sentence with a recognizable ending phrase like “ank you.”
5. Accompany your last words with a gesture, such as dropping your hands to
your side or a slight nod of thanks to the audience. (See more on the use of
the body in Chap. 8)
In Itai’s talk, he has three closing moments that help signal applause.
(31:09) First, he pauses, and makes direct eye contact with the audience.
Second, he repeats the introduction “is is Drosophila melanogaster, isn’t he
beautiful?” Notice the pitch drop at the end of the sentence. Rather than
making this a question as he did at the beginning of his talk, with the pitch
drop he turns it into a statement signaling nality. Finally, he takes a short
pause and ends with a rm but pleasant “ank you.”
• End with a cliff-hanger: This strategy works well if the talk you just gave is
part of a larger story with an even bigger impact. If this is the case, letting
the audience glimpse what is to come can be very effective. Think about
the next steps in your research project. How will the pieces for this larger
story come together? What are the implications if your future research
leads the project one way or the other?
2. Once again, narrow your choices to your strongest possibilities. Experiment
with the different endings and see which ones are most effective at keeping
your audience riveted to the very end of your talk.
I. Cohen and M. Dreyer-Lude

43
Beginnings and endings are critically important for your research talk. e
audience will use the rst few moments of your presentation to decide if lis-
tening to what you have to say is worth their time and whether or not you are
credible in your delivery. You will know if you have a great beginning if the
audience sticks around for the rest of your talk. Strong endings, sometimes
overlooked and thrown away, are as important as good beginnings. e way
you end your talk determines the impression the audience will take away with
them. You will know when you have nailed the ending if the audience stays
for the applause rather than rushing to catch their next talk. ese two parts
of your talk are where you have the greatest creative license to experiment.
ey will be anchored by the rigorous content in the body of the talk. So be
brave. e audience will reward you for it.
Exercise 4.3 The Signal
1. Identify the final sentence of your research talk. Practice pausing before
delivering this sentence, lifting the pitch at the beginning and dropping the
pitch at the end.
2. Choose a final tag out phrase like “Thank you.” “That concludes my remarks.”
“I’ll take your questions now.” “I hope you’ve enjoyed this journey as much
as I have.”
3. Practice delivering your wrap-up and concluding with your signal sentence
and tag out phrase. Record your delivery and perfect it until you can conclude
your talk easily and smoothly.
4 Great Beginnings andStrong Endings

45
© Springer Nature Switzerland AG 2019
I. Cohen, M. Dreyer-Lude, Finding Your Research Voice,
https://doi.org/10.1007/978-3-030-31520-7_5
5
Make Them Care
Having worked hard to streamline your talk and create an engaging beginning
and a strong ending, it is now time to ask yourself once again: Why should
anyone care about this research? Does your talk answer this question? If not,
more eort may be required to explain why your work is relevant to your
audience members. To some scientists and scholars, selling their work is con-
sidered dirty and belittling. After all, if the work is great why does one need
to sell it? It should sell itself. It should be obvious why it is important. e
answers to these questions require us to overcome the “curse of knowledge”
(Heath & Heath, 2007). It may be easy for you to connect the dots and rec-
ognize the implications of your research on a grander scale, but a typical audi-
ence member will need some help. Certainly there is a risk of overselling your
work. Underselling your work by not connecting the dots for your audience
is also a problem. You may need to experiment to get the balance of your
message just right.
It may be helpful to remember that the goal in giving a good talk is to hook
the audience. In many ways your presentation is an advertisement for your
work. For many listeners, it will serve as an entry point to a eld or topic they
are interested in understanding. If they like the talk, they will be more likely
to read your papers. If they like the papers, they may want to collaborate with
you on a project or enter the eld themselves. erefore, rather than trying to
cover every single aspect of your work, your primary objective is to make your
audience care about this specic result.
is goal can be accomplished by covering fewer topics with greater clarity.
Greater clarity means that your audience will be able to discern whether your
result is substantial. It is better to be clear and honest about your ndings

46
rather than hiding them through obfuscation. In the best-case scenario, you
have a rigorous well-developed ground-breaking result and by clarifying your
presentation you are making it easy for people to understand the importance
of your research.
One of the key strategies for connecting with your listeners is to appeal to
their self-interest. Jerry Weissman (2008) called this WIIFY—What’s in it for
you? An audience becomes actively engaged when they can see how what you
are talking about matters to them personally or professionally (Heath &
Heath, 2007). e strategies you will use to create audience buy-in may
depend on the particular problem you are studying. If you are studying a dis-
ease or tracking the value in a social change movement, making your case may
be easy. Who would not want their corn to be more nutritious or to hear how
the social climate is improving? In the case of malnutrition and medical dis-
eases in particular, while including personal anecdotes and concrete examples
can be powerful, it is important to make sure you are not exploiting those
who are suering and that your descriptions are authentic. Some experimen-
tation may be in order to get your script just right. If your work has the poten-
tial to usher in a new type of important technology or asks us to reconsider
the implications of a moment in history, you might try inspiring the audience
by describing an imagined future or a reimagined past. In such cases, a good
rule of thumb is that you should be as optimistic as possible without mislead-
ing your audience. In most cases, your research will address one component
of a broader strategy. While it is important to describe the big-picture goal, it
is also important to provide context for where your particular piece of the
puzzle ts. Making the connection between what you are researching and its
ultimate impact on society is a good way to make your audience care.
e following exercise demonstrates how to think in new ways in order to
determine why your research may be important to your audience.
Exercise 5.1 Make Me Buy This
1. Identify two or three volunteers who will demonstrate the exercise for the
rest of the group.
2. Assign the roles of salesperson, customer, and coach. (If you only have two
people use salesperson and customer.)
3. Have the audience choose an unusual product for the salesperson to sell. It is
important that this item is either an odd or challenging product. For example,
a roll of toilet paper, one shoe, or your half-eaten sandwich.
4. Have the audience choose a role for the customer: unemployed father of
three, farmer, or captain of a spaceship.
I. Cohen and M. Dreyer-Lude

47
Another strategy for making your audience care is to emphasize the aes-
thetic elements in your work. You could, for example, relate the motions of the
electrons you are studying to a beautiful dance. You could demonstrate the
impact of an economic initiative through colorful graphics. You could present
5. The salesperson now has two minutes to try and sell this product to the cus-
tomer using a variety of tactics.
6. The coach (who can also serve as time keeper) may provide suggestions when
the salesperson gets stuck.
7. During the 2min time frame, if the salesperson convinces the customer of the
value of the product, the customer indicates a “win” by shaking the hand of
the salesperson and saying “I’ll take it.” If a tactic does not achieve a win and
the customer is not buying, the salesperson must shift tactics and try again
and again. To achieve success, try to imagine how your product will serve the
specific needs of this customer. Try not to get stuck on obvious uses for your
product.
8. Once the demonstration is complete, split into teams of two or three and
repeat the exercise on your own.
9. Keeping the same teams, repeat the exercise using your own research as the
product. The person whose research is being “sold” gets to choose the role
for the customer (research advisor, grant manager, reporter, or tax payer). The
other group member(s) should try to help by providing ideas for how to make
your research relevant to your chosen audience (Fig.5.1).
Fig. 5.1 Make me buy this
5 Make Them Care

48
images of the landscapes that inspired Whitman’s work as you analyze the
contemporary relevance of his writing. Perhaps the phenomena you are inves-
tigating is visually striking. You can nd good examples of arresting images in
the gallery of uid motion, or by using other sources of stock imagery like
iStock or Getty Images. Another strategy is to illustrate a clever or elegant
experimental study aimed at elucidating a complicated puzzle. You might
highlight a particularly ingenious experimental apparatus you have designed,
or a beautiful mathematical framework you have developed for investigating a
particular phenomenon. You could provide striking images of artifacts that are
relevant to your anthropological study. ese latter strategies often work well
if you are giving a talk to specialists who already care about the topic and know
why it is important. Many of your audience members will have gotten into
their eld because they thought it was beautiful. By appealing to their aesthetic
sense, you can remind them of why they became scholars in the rst place.
If you are still stumped, a good starting point is to determine why you are
passionate about your research. Something drives you to get up each morning
and wrestle with your research problem. Was it a nagging sense that our cur-
rent picture of the world is not quite right? Was it about hunting down an
idea that kept tugging at you? Or perhaps a quixotic quest to elucidate some
behavior that enthralls you? Communicating that personal passion during
your talk is another strong way to establish a connection. Your passion will
inspire their passion. Research has demonstrated that passion is contagious
(Gallo, 2014). If it appears that you are indierent to your topic, it is unlikely
that you will generate interest from your listeners (Leitman, 2015). Passion,
on the other hand, creates presence, and presence is interesting to watch. e
following exercise provides some suggestions for nding an emotional hook
for your talk:
Exercise 5.2 Finding the Emotional Connection
1. WIIFY. How is your research specifically important to your audience? Why will
it matter to them? Is it personally or professionally important to those who
will be listening? Do not assume that they will know this already.
2. Aesthetic appeal. What is it that is beautiful about your work? Did you dis-
cover an elegant way to solve a problem? Perhaps there are images that are
just beautiful. Maybe there is an elegance that you can highlight. Remember
that the aesthetics may relate to the streamlined explanation rather than the
tortuous path you took to get to your results.
3. Personal passion. Take a moment to reflect on what is personally important
to you about your research. Is it how your findings will help others? Is it the
intellectual puzzle you will solve? It is the joy of discovery? Late in the process
I. Cohen and M. Dreyer-Lude

49
In his research talk, Itai uses several tactics to help the audience understand
why they should care. First, he helps them develop an emotional relationship
to the fruit y. He does this by speaking about the object of his research with
passion, aection, and admiration. By the end of his talk, his audience is sad
to say goodbye to this underestimated creature. At several points during the
talk Itai will pose a rhetorical question as though he has anticipated the
thoughts of his audience. He then proceeds to answer this question by directly
addressing the issue. roughout his talk, Itai draws parallels to real-world
applications—particularly to ight and the engineering required to make it
possible. Some members in his audience will have been on an airplane mul-
tiple times in their lifetime. Because this is a science audience, Itai makes clear
the impact his research will have on future developments. His work has real-
world applications and lays the groundwork for future studies in this eld.
If you want to make an impact with your research presentation, you need
to connect with your audience and make them feel something. Scholarly
of conducting research, after months or years of scholarly work on your sub-
ject, it can be challenging to remember what sparked your interest in the first
place. Write down some thoughts about why you are personally passionate
about your work. Then weave this passion into your delivery (Fig.5.2).
Fig. 5.2 Working on the emotional connection
5 Make Them Care
50
presentations are often about data, arguments, and concepts. is reality can
be a challenge to engaging your audience. Long-term memory is constructed
by emotional experience. Memory athletes use this idea to generate emotion-
ally charged stories that enable them to recall long card sequences (Dresler
etal., 2017). Within the context of a conference where the brain is exposed to
lots of ideas, facts, and gures from many dierent presentations, the audi-
ence will have a better chance of retaining ideas that are emotionally compel-
ling. Stimulating retention by making your audience care will signicantly
enhance the impact of your talk.
I. Cohen and M. Dreyer-Lude
Part II
The Performance

53
© Springer Nature Switzerland AG 2019
I. Cohen, M. Dreyer-Lude, Finding Your Research Voice,
https://doi.org/10.1007/978-3-030-31520-7_6
6
Calibrating Your Speaking Presence
e audience has come to hear you speak, the real you, not a phony con-
structed version of you (Howard & Tivnan, 2003). To learn to be authentic
and poised as a public performer, you do not need to construct another per-
sona, but you may need to make some adjustments to your physical perfor-
mance. It is important to recognize that some of what you do as a performer
is already working for you and that some of it is not. In the same way that it
is hard for us to hear our own verbal ticks until they are pointed out to us, the
rst step towards reconnecting with your physical expression is to learn to
recognize the signals you are sending. Because many of us have been raised in
an atmosphere that is critical and judgmental—think of all those oral exams
and graduate school presentations—we have learned to defend ourselves by
reducing our vulnerability and restricting our expression. Unfortunately, these
behaviors often get in the way of fully communicating your story and convey-
ing your own personality.
It may be useful to remind yourself of the broad range of emotions that you
can access when trying to make a point or tell a story. e following exercise
is an exaggerated version of the broad palette that is available to each of us.
Exercise 6.1 Tell It Like…
1. Have each participant write down a mundane piece of news that they will
share with the class. This news should be about three sentences long. It could
be a weather report, the latest on the economy, or road closings. It is helpful
to the exercise if the content is rather dull.

54
One of the things that makes this exercise humorous is the mismatch between
the mundane content of the “news” and the way in which this information is
delivered. When the signals you are sending do not match your intended mes-
sage, the audience is often left confused and uncertain about how to respond.
If you are jumping with excitement when you are describing something unre-
markable, the audience may think you are crazy. On the other hand, if you talk
about your main result using the same cadence and volume as the rest of the
presentation, the audience will not understand that this part of the talk is of
particular importance. Detailed feedback about nuance may require a profes-
sional. But you should be able to understand the basics on your own or at least
with some feedback from a colleague. With these ideas in mind, let us look at
your 10min talk and determine if there are glaring inconsistencies between the
content you are presenting, your intended message, and your delivery.
2. On several small slips of paper, have each participant write down an emotion-
ally charged circumstance through which someone could deliver this news.
For example, you just won the lottery, your goldfish just died, your hateful
stepparent is coming for a visit, you found out that you need to have a tooth
pulled, you have been asked to bungee jump by your best friend… Here it is
helpful to choose circumstances that generate extreme emotional states.
3. Put the slips in a hat or other container. Have everyone blindly choose one of
the slips of paper.
4. One at a time, have participants stand in the front of the room and deliver
their “news” to the class using the circumstances indicated on the chosen slip
of paper. Each performer should be as clear as possible with their tone of
voice and body language.
5. Have the group guess what the circumstances might be based on the per-
former’s behavior.
6. Have the performer share with the group the circumstances they were trying
to convey. Ask the group for feedback regarding other strategies the per-
former could use to make those circumstances clear. Could the performer use
more body language, facial expression, or a different tone of voice?
Exercise 6.2 Finding Your Disconnect
1. Gather in groups of three or four.
2. Play the clip of one group member’s 10min talk.
3. As a group try to identify where you see a possible disconnect between the
research message and the speaker’s physical and vocal expression.
4. Review each member’s 10min talk in the same way.
5. Do you notice any common problems? What was working well in each talk
that you can borrow for yours?
I. Cohen and M. Dreyer-Lude

55
Another useful exercise is to learn to recognize how others use physical
expression in their talks to strengthen their message. Once you can recognize
these behaviors, you can learn to mimic them and incorporate them into your
own performance. rough borrowing and testing these elements in your
own talks, keeping the ones that work for you and throwing the rest away, you
will develop your own style (Fig.6.1).
Recognizing how you are expressing something is dierent from being able
to change it. e above exercises are examples of the ways in which you can
explore, test, and adjust your range of expression. is process may feel for-
eign at rst, but eectively incorporating these elements can make a big dif-
Exercise 6.3 Borrowing and Stealing
Go through Itai’s talk, attend a departmental seminar, or watch a talk of your
choosing on the internet and identify physical expressions or other behaviors
that you find particularly effective for communicating an idea. A good test
would be to ask yourself whether that behavior helped you understand a key
point of the talk. Identify one or two elements that you can try out in your own
talk. Determine where in your talk you could insert this element and then try it
out on a test audience.
Fig. 6.1 Analyzing your behavior
6 Calibrating Your Speaking Presence
56
ference in how the audience receives your talk. e next two chapters will
address in greater detail the two most important aspects of your delivery:
using your voice to be heard and understood, and using your body to support
your ideas through posture and physical expression. ese chapters and the
accompanying exercises will help you tailor and broaden your tool set for self-
expression. We encourage you to experiment beyond what you would natu-
rally do to determine what style works best for you.
I. Cohen and M. Dreyer-Lude

57
© Springer Nature Switzerland AG 2019
I. Cohen, M. Dreyer-Lude, Finding Your Research Voice,
https://doi.org/10.1007/978-3-030-31520-7_7
7
Using Your Voice
e way you speak controls how your presentation will be received. If your
audience cannot hear you, nds your voice quality unpleasant, cannot under-
stand your words, cannot keep pace with your delivery, or in some other way
becomes frustrated by the way you speak, you will have failed to engage, con-
nect, and inspire. It is helpful to recognize the qualities of good speaking and
to identify what is working and what is not in your speaking voice. When
speaking well in front of an audience, you are audible (using adequate vol-
ume), comprehensible (we can understand your words and what they mean
because you are using good diction), and sonorous (using appropriate pitch and
a pleasant tone). In addition, good speakers use an appropriate pace and
remove distracting llers.
Volume
Being heard when you speak is critically important. If your audience cannot
hear you, they will not pay attention. It can be exhausting to strain to hear a
speaker’s words. Volume is also a critical indicator of condence and energy
(Stone & Bachner, 1994). If you are speaking softly, it appears as though you
do not believe in what you are saying or in yourself as the speaker (Reynolds,
2012). On the other hand, it is important to refrain from shouting (Reynolds,
2012). Shouting can make you sound angry. e goal is to speak loud enough
to be heard with a nice sense of energy and enthusiasm. Learning to calibrate
your volume is an important component of good vocal expression.

58
Calibrating your own voice can be tricky. What you hear inside of your
head is dierent from what others hear when you speak. When you make a
volume adjustment, it might feel as though you are shouting or whispering,
but this is probably not true. Your inner perception of volume may not align
with the actual sound you are making in the room. A recording of your pre-
sentation or feedback from peers will help you calibrate the volume of
your voice.
It is often surprising to discover how loud one actually needs to be in order
to be heard. For some, speaking this loudly is not natural and can create vocal
strain. In order to avoid damaging your voice when trying to speak more
loudly, it is important to review some of the basics of voice production.
Volume is created through breath not musculature. You cannot make your
voice louder by pushing the sound out through your throat (Stone & Bachner,
1994). Pushing or striving for a louder sound creates tension that may result
in laryngitis or vocal nodes. Rather, think of the process of creating more
volume as releasing the tension, taking a deeper breath, and sending out a
bigger idea. Voice specialists Patsy Rodenburg (2015) and Kristen Linklater
(1976) recommend a version of this cycle of events: (1) Release physical ten-
sion. (2) Let the breath drop down. (3) ink of what you want to say. (4)
Send the energy out. Rodenburg describes the importance of breath support:
is support of air should connect to and with the voice. Support starts and
stops sound as we increase or cut o the air supply, just as you experience with
an air hose used to inate one of your car tyres [sic]. ink of the sound of the
voice as starting with the support from the centre [sic] of the body and not the
throat (2015, p. 152).
Exercise 7.1 Learning to Control Your Volume Using Your Breath
1. Place one hand on your belly and one on your chest. Notice where you are
breathing. Ideal breath support comes from belly breathing. Many people
breathe primarily from the chest. This limits the amount of air you draw into your
lungs and the amount of breath you have to increase the volume of your voice.
2. To help you learn to draw your breath from your belly, try the following: Push
all of the air out of your lungs—every drop. Wait one moment until you feel
the need to breathe. Give in to the need to breathe by allowing your belly to
draw the breath in. Do this several times so that your body begins to remem-
ber to draw the breath down.
3. Now place your hand on your belly. Imagine that your torso is cavernous and hol-
low but elastic. Allow the breath in naturally (do not push), but imagine it coming
all the way down to your pelvis and filling that space. Then allow the breath to
leave your body on its own. Practice this breathing method several times.
I. Cohen and M. Dreyer-Lude

59
Once you begin to understand how to generate volume with your breath,
it is important to adjust the level of volume you use when speaking in public.
e following exercise helps you learn to calibrate your volume to meet the
needs of the room.
Microphones are a big help with volume control when you are speaking to
a crowd. Learning to use a microphone eectively is an important contribu-
tion to the impression of competence and condence. Microphones can also
make it easier to use lower volume for dramatic eect without losing compre-
hension, as you can move in closer to a microphone when you drop your
volume and still be heard. When using a microphone, it will still be important
to use good breathing technique to project your voice, though the volume
calibration will be dierent.
You will probably be using one of two types of microphones: a xed mic on
a lectern, or a lavalier mic that is attached to your body. In both cases, do a
mic check before you speak to be sure the mic is working. All microphones
4. Keeping your hand on your belly, look at someone in the room and tell them
“Hey!” Imagine that the “Hey” comes from your belly (not your throat
muscles).
5. Yawn and feel your throat open.
6. Visualizing that your throat is relaxed and open (as in the yawn), find another
person, let the breath drop down, and then tell them “Hey!”
7. To practice volume control, choose a partner. Stand two feet away from one
another and say “Hey!” at a volume that is appropriate. Now move ten feet
apart and adjust your volume using your breath. Now move 20 feet apart and
say “Hey!” Think of these volume adjustments as using energy (supported by
your breath) to throw the words at the other person—do not push them.
Rather, release them like a ball when you toss it.
Exercise 7.2 Volume Calibration
1. Try to find an empty lecture hall or space comparable to a conference room.
2. Have everyone stand at the back of the hall.
3. One by one, have each participant walk to the center of the speaking stage
and introduce themselves, as in “Hello. My name is xxx and I study xxx.”
4. If the group at the back agrees that this person was audible, they may return
to the back of the room. If not, the speaker must continue to repeat this
phrase, increasing the vocal energy until the other members of the group
agree that the volume is appropriate.
5. Make sure everyone takes a turn to have their volume production checked.
7 Using Your Voice

60
have a range within which they can pick up your voice. ink of this as an
invisible cone that extends from the microphone. e better the micro-
phone, the wider the cone. With a xed microphone, you want to posi-
tion the mic so that you can stand up straight and be heard whether you
are looking at your notes, or the audience. Having your voice go in and
out of microphone transmission can be distracting, and can undermine
the quality of your presentation. Take the time to adjust the mic before
you begin.
e other kind of mic, a lavalier or lapel mic, simplies voice transmis-
sion and allows you to move more freely as you present. Lavalier mics are
normally attached to your clothing in the front and connected to a power
pack that is clipped to your belt or waistband. If you know you will be using
a lavalier mic in your presentation, it is helpful to wear clothing that will
accommodate these devices. With a lavalier mic you must remain conscious
of the transmission cone as well. Place the mic far enough away from your
face to allow for a larger transmission area, preferably in the middle of your
chest area. If the mic is too close to your neck, your voice could jump in and
out as you turn your head. To avoid these pitfalls, the best strategy is to
practice using this technology.
In the best-case scenario, there will be someone on hand to help you adjust
the microphone position and resulting volume. Practicing with a microphone
beforehand will allow you to make such adjustments on your own even when
a technician is not available.
Exercise 7.3 Using a Microphone
1. To determine the range of a podium microphone, begin to speak and move
your head left and right to determine when you move in and out of ampli-
fication. Now speak again and increase and decrease your distance from the
microphone to determine the ideal relationship between your mouth and
the mic.
2. To determine the appropriate position of a lavalier microphone, attach the
microphone to different positions on your shirt or dress to determine how the
amplification changes. Turn your head from one side to the other and notice
any volume changes. Remember, the ideal position would be in the mid-chest
region for most microphones.
3. To avoid feedback, try to stay away from any speakers.
4. Try going through some of your talking points and determine whether you
are staying within the microphone’s range.
I. Cohen and M. Dreyer-Lude

61
Diction
If you speak loudly enough to be heard, you might still struggle to be under-
stood. Diction refers to the clarity with which we speak. Some speakers mum-
ble, some speak with an accent, or some only encounter clarity issues on
certain words or sounds. e easiest way to improve your diction is to practice
pronouncing consonants eectively. Be careful not to turn “t”s into “d”s, and
be sure to enunciate your “r”s. In English, vowels provide the substance of
sound but consonants divide the sound into packets of meaning. e good
news is that comprehensible pronunciation of English words is a skill you can
learn. ere are a number of books containing explanations and exercises that
can be helpful. Below is an exercise to help you determine where you may
need help with diction. Remember that if you are a non-native speaker and
Exercise 7.4 Diction
1. A tight tongue makes it difficult to pronounce things clearly. Here is an easy
exercise you can use to loosen up your tongue. Imagine that you have just put
a large spoonful of peanut butter in your mouth (any imaginary sticky sub-
stance will do). It is now stuck in every crevice and you must use your tongue
to clear it out. Get under, behind, between every part of your mouth using
your tongue, pretending to clean out the peanut butter. This will naturally
encourage you to stretch your tongue in every direction.
2. Now that your tongue is loose, say the following tongue twisters out loud to
determine which sounds are a struggle for you. Pay attention as you read the
phrases out loud. If you struggle to clearly articulate a particular kind of
sound, this will alert you to a deficiency in your pronunciation. A partner in
this exercise can help you focus on the sounds that can be improved for
clarity.
Plosives: (p, b, d, t, k, g)
Picky people pick Peter Pan Peanut-Butter, 'tis the peanut-butter picky people
pick.
A big black bug bit a big black bear, made the big black bear bleed blood.
Begging beguilingly.
Begrudging curmudgeon.
Curiously obscure procurer.
Fricatives: (v, f, th, s, z, sh)
Alluvial bivalve.
Four furious friends fought for the phone.
Very well, very well, very well …
Three free things set three things free.
Scissors sizzle, thistles sizzle.
Casual clothes are provisional for leisurely trips across Asia.
Three tethered teething things.
7 Using Your Voice

62
your words are already comprehensible, there is no need to remove your
accent. In fact, some audiences appreciate the new melody and tones a foreign
accent can provide.
Pitch, Tone, andProsody
Pitch, tone, and prosody control the emotional qualities of speech. ey also
contribute to comprehension and the appearance of condence and authority.
Pitch refers to the range of expression of your speaking voice and could be
correlated to a musical scale (between middle C and F, for example). Tone
Affricate: (ch)
Chester Cheetah chews a chunk of cheap cheddar cheese.
Imagine an imaginary menagerie manager.
Charming bachelor Chuck.
Charting challenging channels.
Nasals: (m, n, ng)
Aluminum linoleum.
Belonging longer.
Mary Mac’s mother’s making Mary Mac marry me.
Nine nice night nurses nursing nicely.
The king would sing, about a ring that would go ding.
How many mahogany and mohair hassocks has Hermione?
Frictionless: (r, l, y, w)
Ray Rag ran across a rough road. Across a rough road Ray Rag ran. Where is
the rough road Ray Rag ran across?
Luke Luck likes lakes.
Yellow yams yank Yolanda’s yak.
I wish I were what I was when I wished I were what I am.
A wooden worm wouldn't be worthy of worship but would he if he won-
dered and worried about what he would be worthy of if he wasn't wooden?
Red leather, yellow leather.
Once you’ve determined which elements need work, you can find exercises
(in books or on the web) that will help you build proficiency with those par-
ticular sounds. When you develop the muscles that produce these sounds, you
will find them much easier to pronounce.
3. Perform the first ten minutes of your talk to find the sounds that you need to
work on in your presentations. Again, enlist the help of a partner to identify
particular words or sounds that lack clarity. Are there particular words that
are difficult for you to enunciate? Does your partner look confused when you
say a particular word? Get feedback from your partner on how to pronounce
a word more clearly. Practice the specific tongue twisters listed above to help
you generate the sounds needed to pronounce these words.
I. Cohen and M. Dreyer-Lude
63
refers to the quality of the sound. A round, resonant tone is more pleasant for
the listener than a harsh, abrasive tone. Prosody refers to the melody the
speaker uses to convey the meaning of the statement. e use of these ideas
when speaking is often cultural. Tonal languages like Mandarin place the
same word on various pitches using dierent melodies to connote distinct
meanings. English has no grammatical pitch requirements, although English
speakers also use pitch and prosody to convey meaning. In English, pitch is
used to distinguish the dierence between a question and a statement. We
raise the pitch at the end of a sentence if we are asking a question and lower it
if we are making a statement.
Operative words are important in many languages and provide a useful
communication tool. e operative word is the word (or words) in a sentence
that are most important. In English, the speaker employs operative words
using a combination of pitch and emphasis. e sentence, “e apples in this
basket are red” can have slightly dierent meanings when the speaker shifts
emphasis to the operative word. “e apples in this basket are red” (not the
oranges) versus “e apples in this basket are red” (not the other basket) versus
“e apples in this basket are red” (not green). e words are the same. e
meaning shifts with pitch and emphasis. Understanding the power of opera-
tive words may come in handy in your research talk. By carefully selecting
particular words at important moments, you can help your audience under-
stand where and when to pay attention.
A verbal tick associated with pitch that can confuse the listener is Upspeak.
Upspeak occurs when you turn a statement into a question by raising the
pitch at the end of the sentence. Upspeak is a habit that should be eliminated
as soon as possible, as it suggests uncertainty and lack of condence (Stone &
Bachner, 1994). If you hear the sentence, “I’ll meet you after work tomor-
row.” as “I’ll meet you after work tomorrow?” you might not be certain that
the person speaking will actually show up. When persuading an audience
with your research talk, you want to convey condence, certainty, and author-
ity. Upspeak can undermine those qualities and leave the audience with the
impression that you are not sure about your ndings.
It is also worth considering your optimal pitch placement. Pitch placement
is the note you use most often when speaking. Everyone has an optimal pitch
that is determined by their physiology. Gender can inuence pitch placement.
Some women tend to speak above their optimal pitch (because they may
believe it to be more feminine); some men speak below their optimal pitch
(because they may believe it to be more masculine). ese are often uncon-
scious decisions that become embedded habits or habitual pitch. A lower than
optimal pitch reduces audibility because the sounds tend to blur and distort.
A higher than optimal pitch can become shrill or breathy and undermines the
7 Using Your Voice

64
perception of condence and competence. Here are two exercises that can
help with optimal pitch and Upspeak.
A rich, resonant tone is often a component of those voices we admire
most. A beautiful tone is open, full of sound, and easy to hear. Consider the
speaking voices of Helen Mirren, Michelle Yeoh, Mahershala Ali, Salma
Hayek, or Jon Hamm. ere are a handful of problems that can impede a
rich tone. e rst is vocal tension which can make your voice sound tired
or strained. Vocal fatigue occurs when you are engaging your vocal chords
unnecessarily as you speak. If you nd that you often lose your voice after
public speaking engagements, you may need to learn to relax your throat
muscles and let the breath do the work. One version of vocal tension mani-
fests in something known as vocal fry. Vocal fry is the process of dropping
your pitch to its lowest register, tightening your chords, and speaking with
a scratchy sound (listen to Bradley Cooper, Amy Adams, and Mary-Louise
Parker as examples of vocal fry). Vocal fry is hard on your voice. If you have
fallen into the habit of using vocal fry and are nding that you regularly lose
your voice due to vocal tension, removing vocal fry from your speaking pat-
tern may help.
Exercise 7.5 Pitch
1. Optimal pitch. Working with a partner, speak a sentence in what you would
consider to be your normal pitch.
2. Repeat the sentence using a higher pitch.
3. Repeat the sentence using a lower pitch.
4. Discuss with your partner which version sounds the best (to him or her) and
feels the most comfortable (to you). Does the ideal version match the pitch
you are currently using? Or do you need to make an adjustment?
5. Upspeak. Speak the sentence you used above as though it were a question, by
using a higher tone for the last word in the sentence. Now repeat the sen-
tence as though it were a statement by dropping the tone at the end. Do you
hear the difference? If not, try having your partner repeat what they heard,
emphasizing the tonal difference at the end of the sentence.
6. On your own, record yourself describing some of your slides. Notice whether
you are using any Upspeak. If you find that you do, take a paragraph of text
and read it through while converting every sentence into a question (this
sensitizes you to the habit). Then read it through again and make every
sentence a statement (even if there are questions in the text). Note if speak-
ing in statements is easy or difficult for you. Begin to pay attention to the
ways in which you might be using Upspeak in daily conversation. Ask friends
to point it out to you when it happens. Removing a habit requires aware-
ness and time.
I. Cohen and M. Dreyer-Lude

65
Calibrating your breath is also important for generating good tone. Some
speakers put too little breath into their vocalization, which creates vocal ten-
sion. is tension can occur when the throat is too closed, the chest is tight,
and you are not using belly breathing to support your voice. When your
throat is closed, the muscles in your throat must work extra hard to generate
volume, resulting in a strained tone. To alleviate this situation, you need to
open your throat and allow the breath to ow freely. Try yawning to open
your throat and be sure to use your belly breathing to control your volume,
not your throat muscles. At the other end of the spectrum, some speakers do
not engage their vocal chords enough, allowing too much air to pass through
without generating sound. is can create a soft, breathy tone (think Marilyn
Monroe). A breathy tone that saps the volume from your voice can suggest a
lack of condence or authority. If you tend to be breathy when you speak, you
need to learn to connect your breath more strongly to your voice to generate
a fuller sound. Breathiness can sometimes arise when a speaker is nervous.
Should this occur, it is important to take a moment to breathe deeply and
relax, letting your breathing slow down a bit (perhaps by taking a sip of water).
is will allow you to return to generating a nice rich tone with your speaking
voice. Of course, using a breathy voice or a harsh tone might be the right
choice for making a certain point in your presentation and can always be
inserted for dramatic eect.
e following exercises are most useful when done in pairs. For each of
these exercises, engage in the activity by taking turns as reader and responder.
e responder can help the reader recognize when she or he is employing the
habit or leaving the habit behind.
Exercise 7.6 Tone
1. Vocal Fry. Find a paragraph of text to read. Read a portion of it trying to
deliberately use vocal fry. Now read it trying to relax your vocal chords and
leave your throat open and released.
2. Breath Control. Read the paragraph tightening your throat and releasing as
little breath as possible when you speak. Follow that by reading the para-
graph in a breathy tone à la Marilyn Monroe. Give yourself a moment to
shake off these extreme choices and read the paragraph with a balanced
tone.
3. Apply these ideas to your presentation. Choose a particular moment in your
talk and try speaking with a balanced tone. If you are ambitious, try to
determine if you can generate other effects by experimenting with your
tone.
7 Using Your Voice

66
Pace
Speaking at an appropriate speed can be critically important to comprehension.
It is rare for presenters to speak too slowly. It is far more common to hear them
speak too quickly. e information you are conveying is familiar to you, but it
is brand new to your audience. Each sentence you say will have new informa-
tion your listeners need to process. If you speak too quickly, the audience will
spend some of their processing time returning to the previous sentence to try
and decode what they think you might have said. It can be challenging to learn
to slow down when you normally speak quickly. When you do manage to slow
down, it may feel as though you are speaking at a glacial pace, but this is often
not the case. Your version of slow may be just the right speed for your audience.
In addition to tempo, it is helpful to pay attention to rhythm when you are
speaking. Rhythm is comprised of the pattern of sound you make when you
speak. Speeding up slightly when you are delivering information of less impor-
tance and slowing down a bit when you reach a critical moment in your talk
can add variety and aural interest. ink of the rhythm of your talk as group-
ing words together into blocks of meaning (Meyers & Nix, 2011). A predict-
able rhythm can lull the audience into a semiconscious state, while an
unpredictable or changing rhythm can keep them on the edge of their seat
wondering what you will say next.
One of the best tricks to use when shaping the rhythm of your talk is the
dramatic pause. A dramatic pause halts the action and allows a moment of
silence before the talk continues. ere are multiple places to include a pause.
(1) Right after you enter and before you begin to speak. (2) Directly before
presenting an important nding. (3) As you transition from one section of
your talk to another. A pause, particularly before a transition, can give your
audience a moment to reect and consider what you have just said, and to
begin to build links between what you have said and what you are about to
say (Arnold, 2010). Well-placed pauses can help reinforce your dramatic arc,
building tension and interest as you move through your points one by one.
Exercise 7.7 Pace
1. Slowing down. Find a paragraph of text and record yourself reading it at your
normal pace. Now record yourself reading the paragraph at what you would
consider a very slow pace. You could try thinking of yourself as reading the
text under water, or in a slow-motion movie. Play the “normal” and the
“slow” recordings for a colleague and ask for their opinion of the pace or
I. Cohen and M. Dreyer-Lude

67
Fillers
Many people include llers in their speech. Some common examples are: like,
um, man, so, right, ok, totally, well, you know, you see, I mean, I guess… Any
word or collection of words can become a ller. We use llers to cover insecu-
rities when we are speaking, to buy time when we are thinking, to pad our
sentence and attempt to add substance, or to try and create a smooth subject
transition. Fillers are usually unconscious habits that can be very distracting
for your audience (Kushner, 2010). ere are a variety of reasons why llers
may have crept into your vocabulary. We recommend taking the time to
remove them from your speech patterns. e best way to remove a ller from
your research talk (or your everyday conversation) is to enlist some colleagues
to alert you when you have just used a ller while speaking. By pointing out
the use of a ller word the moment you say it, your colleagues are helping you
make an unconscious habit conscious. Habits are hard to break unless you can
tempo with which you are speaking. Which do they prefer? Which recording
is more comprehensible? Are there further adjustments that they recommend
for the pace of certain words or phrases?
2. Add variety. Find a section of text that includes two or three paragraphs.
Read through it once to get a sense of the flow. Take two or three colored
highlighters and code the text, indicating which sentences you will read more
quickly because they are not crucial (perhaps coded yellow), which you will
emphasize by reading more slowly (perhaps orange), and those that you will
deliver at a normal pace (perhaps blue). Once you have coded the text, read
through it, trying to follow the guidelines you have created. On the first pass
through the text, exaggerate your choices so that fast and slow are signifi-
cantly different from one another. On the second pass, soften your choices
and try to make the transitions sound more natural and conversational.
3. Adding pauses. Using the same text, read through the document and flag at
least three places where you could put a pause. You will pause either to high-
light a point, to reveal an important moment, or to help you transition from
one section to another. Record yourself reading through the text again, keep-
ing the rhythmic variety you coded in the previous exercise, and adding the
pauses you have now identified.
4. Compare recordings. Find a colleague and play the original (part 1) and final
(part 3) recordings. Ask for feedback on the effectiveness of each recording.
5. Apply ideas to your research presentation. Go back to your 10min talk and try
to identify places where you can implement these ideas to achieve the desired
effect. We often suggest that you focus on three places in your talk where
you can consciously remember to change the pace to generate dramatic
effect.
7 Using Your Voice

68
catch yourself in the act. Once you become conscious of these vocal habits,
you can begin to remove them from your vocabulary. Stone and Bachner
(1994) recommended saying nothing when you have the impulse to add a
ller and to allow the silence to serve as an opportunity to think of the next
thing you have to say.
“A strong pleasant voice is the greatest asset a speaker can have” (Stone &
Bachner, 1994, p.19). In this chapter, we have provided an introduction to
the basic components of a good speaking voice. Most importantly, you must
be heard and understood. Calibrating your volume, diction, and pace will get
you most of the way there. As you become a more procient speaker, you will
nd that playing with your pitch, tone, and dramatic pauses will provide
nuance and specicity that will allow you to engage with your audience in a
more meaningful way. If you attend to each of these elements of your voice,
you can develop an exceptional instrument that will be a pleasure to hear.
Exercise 7.8 Fillers
Review an earlier recording of your talk. Use a sheet of paper to record a hash
mark each time you use a filler. When you have finished watching and listening
to your talk and making your marks, look at your sheet of paper and notice how
many fillers you used. Which specific fillers are problematic for you? When do
you tend to use them? Identify patterns in your use of fillers so that you can
begin to break those habits.
I. Cohen and M. Dreyer-Lude

69
© Springer Nature Switzerland AG 2019
I. Cohen, M. Dreyer-Lude, Finding Your Research Voice,
https://doi.org/10.1007/978-3-030-31520-7_8
8
Using Your Body
e goal in mastering body language is to create a sense of presence—a qual-
ity that compels the audience to look at you in a positive way. Presence creates
the expectation that something extraordinary is about to happen. According
to Sarno and Moore (1987), presence is generated through the ways in
which we carry ourselves. ey have identied a number of factors that can
aect the perception of whether or not you have presence: your physical bear-
ing, the way you enter the room, the quality of your support material, the
atmosphere in the room, and the makeup of the audience. Only some of these
factors are under your control, and body language is one of them.
Studies have made clear that we are communicating with our body lan-
guage and facial expressions whether we realize it or not (Ekman, 2007; Key,
1975). Folded arms can telegraph emotional distance, a slouched posture sug-
gests a lack of condence, and failure to make eye contact can make you look
deceptive (Burgoon & Saine, 1978; Scheen, 1972). To convey condence
and poise when presenting, you will need to become aware of your body lan-
guage. Ideal physical behavior is relaxed (free of tension and full of ease),
condent (upright and certain), and expressive (energized and passionate). e
goal, however, is not to force these behaviors. Relaxed, condent, and expres-
sive body language should emerge naturally from your preparation and prac-
tice. Once prepared, you will feel more relaxed. If your story is well formed,
you will tell it in a more condent manner. Your emotional connection to
your material can naturally lead to a passionate and expressive performance.
is chapter will focus on how to develop these qualities in your presentation
style and help you strengthen your message through the use of your body.
70
In our experience, many of the issues associated with miscommunication
through body language arise from bad habits: rocking when you stand; dget-
ing with your pencil; looking at the oor when you speak. Even overuse of a
“good” gesture can be a problem and become distracting. On the other end of
the spectrum, standing perfectly still without conveying any physical expres-
sion is also a problematic habit. Some of these behaviors are easily xed.
Recording yourself and watching your behavior will often alert you to the
most egregious problems. Other bad habits may be more ingrained and will
take longer to correct. e rst step to xing these more entrenched behaviors
is to become aware of them and consciously correct them so that, over time,
the good behaviors will become the unconscious habit.
Appropriate body language during a presentation can be broken down into
several components: posture, gesture, eye contact, facial expression, and
movement. Mastering each of these aspects will help make you more con-
dent about your presentation. Physical behavior—including posture and ges-
ture—can change how we feel emotionally (Gallo, 2014, p.94). A slouched,
withdrawn posture can contribute to feelings of sadness and lethargy, while an
open, upright posture can help generate feelings of strength and contentment.
A strong, condent posture and hand gestures also create a positive feedback
loop with your audience. If you appear more condent, the audience will
believe you are condent, helping you feel more condent, creating a vir-
tuous cycle.
Posture
Posture is a key component in creating presence. A few examples of dierent
body postures can be seen in Fig.8.1. In the rst image (sway back), the
model has pushed his pelvis too far forward. is posture disturbs the
natural center of gravity and puts a strain on the lower back and thighs. In
the second image (lumbar lordosis), the pelvis is kipped in the opposite
direction. Although the spine has a natural curve toward the tail bone,
exaggerating this curve creates excessive tension in the lower back muscles
and results in lower back pain. e third image (thoracic kyphosis) shows
a collapse of the upper spine and is common for those who work hunched
over a desk for many hours a day. is posture deates the overall physical
energy and puts strain on the shoulder and neck muscles. e next image
(forward head) has most of the elements of a good posture, but the for-
ward head position creates tension in the neck muscles, which could result
in vocal strain and the loss of your voice. In the nal image in the illustra-
I. Cohen and M. Dreyer-Lude

71
tion above (good posture), you will notice that the body lines up along a
vertical plumb line. e head is lifted but not thrust forward, the chest is
lifted but the shoulders are released, the posture is tall but relaxed and free
of tension. ese ideas are the foundation of a number of movement
methodologies (Maisel, 1989; Feldenkrais, 2013; Jakubowicz, 2018). e
key to good posture is the release of tension and the proper realignment of
the body. Proper alignment will allow your body to function more eec-
tively, and learning to release tension is key to creating a relaxed stage
presence. Here are the components of a relaxed, tension free posture:
1. You are standing with your feet shoulder-width apart and your weight
evenly balanced.
2. Your knees are soft, not locked.
3. Your pelvis is rooted, but free.
4. Your chest is lifted while your shoulders and arms are free of tension.
5. Your head is oating up and free. e back of your neck is released and long.
It may take time to master a perfect posture, particularly if bad posture is
your habit. Try to incorporate a lifted, relaxed posture into your everyday
routine. Before long it will become your new habit.
Fig. 8.1 Posture
8 Using Your Body

72
Exercise 8.1 Posture
If possible, do these exercises in front of a mirror, or in collaboration with a col-
league who can provide a reflection for you, either through a cell phone or
through verbal feedback.
1. Standing posture.
(a) Feet: Stand with your feet shoulder width apart. Your feet may point
forward or at a slight angle, whatever is natural for you.
(b) Balance: Check your center of balance by rocking in pendulum fashion
left and right and then front and back, allowing the movement to
become smaller until you can sense the central point of weight
balance.
(c) Knees: Check to be sure that your knees are soft and not locked. Soft
knees are not bent knees, and their slight bend should be mostly imper-
ceptible to the observer. Locked knees can cut off circulation and make
you feel faint. Keep your knees released but not bent.
(d) Pelvis: Take a look at the position of your pelvis. Rock your pelvis very far
forward and then very far backward. Feel the tension that each of these
extreme positions create, particularly in your lower back. Now think of
rooting your tail bone by tilting it toward the ground so that it releases
your lower back. The tilt should not be so extreme that it pushes your
body out of alignment. If you are doing this properly, you should feel the
tension in your lower back soften and disappear.
(e) Shoulders and chest: Look at the position of your shoulders and chest.
It is common for the upper chest to be collapsed forward a bit and for
the shoulders to sag forward as well. This position compromises your
appearance of confidence and erodes your physical energy. To fix this
posture problem, imagine that you have a string tied to the center of
your chest that extends upward at a 45° angle. Now allow that string
to pull your chest up gently. Your shoulders should not do the work by
pushing backward, they should just follow along and remain released
and relaxed. Lifting your chest in this way should feel gentle and easy,
not strained. You may find that this position helps with your breathing
as well.
(f) Head: Take a look at how your head is positioned on the top of your
body. Are you pushing it back or jutting it forward? To find the proper
position, imagine that your head is light as a balloon and would float
to the ceiling if it were not attached. Allow your head to float up.
There is a natural tendency for your chin to float up as well, creating
tension in your neck. Let the movement of your head initiate from the
back of your head so that your chin will naturally float down (Maisel,
1989).
(g) Neck: Put your hand softly on the back of your neck. You want to release
any residual tension that remains here. Gently direct your neck muscles to
soften into your hand. You should feel a slight release and softening of
these muscles.
I. Cohen and M. Dreyer-Lude

73
(h) Release: Move your head around gently continuing to imagine that your
head is as light as air. Check to be sure that you have not added more ten-
sion. Use your hand to release any residual tension.
(i) Review the video of your initial talk. Identify whether you are using good
posture and if not, make adjustments.
2. Sitting posture.
You can practice an upright, relaxed posture even when you are sitting.
(a) Sit in a chair with both feet on the floor.
(b) Allow your position to be well back in the chair but not all the way to the
back.
(c) Place your pelvis in a rooted position. Do not allow it to collapse.
(d) Lift your chest as instructed above. Make sure that your arms and shoul-
ders are released.
(e) Check your head and neck and allow your head to float up and forward
as instructed above.
(This posture will allow you to sit tension free for hours, although regular
breaks are best when working at a desk.)
(f) If you wish to rise from your chair without adding tension, simply tip your
torso forward and send the energy up through your head at a 45° angle.
Allow your body to follow that direction and you will easily rise from your
chair.
3. Releasing tension.
It is difficult to convey confidence if you are feeling tense and rigid. Use the
following exercise to help you relax before you speak.
(a) Sit in a chair (or you may stand) and place your body into proper
posture.
(b) With your eyes open or closed (depending on what circumstances will
allow), start at your head or at your feet, and work your way through
your body, focusing on one area and gently instructing it to release. For
example, direct your attention to your feet, notice where there might be
tension, direct your feet to release that tension and to soften into the
floor (and then continue working your way up your body).
(c) Once you have released the tension in your body, stand as instructed
above.
(d) Check to be sure you are in an upright, tension-free posture and make
corrections if necessary.
(e) Now begin to walk around, trying to keep the tension released from your
body. You may begin at a slow tempo, but try to work your way up to a
normal walking pace, still walking without tension.
(f) There may be parts of your talk where you feel extra tension (e.g., begin-
ning of the talk or during the question period). Try implementing the
tension-relaxation tips listed above. Releasing tension in your posture
may help you relax a bit and think more clearly (Fig.8.2).
8 Using Your Body

74
Gesture
Another key component of physical self-condence is the use of gesture when
you speak. Goldin-Meadow (2005) oered a technical denition of gesture as
those movements of the hands that directly relate to what you are saying, but
gesture lends itself to a broader denition. Gesture may be considered any
component of your physical expression that you employ to highlight, empha-
size, or clarify what you have to say. We will focus primarily on hand gestures,
but you can also gesture with your head, your feet, your posture, your hips, or
any other part of the body that is appropriate for expression. What if you do
not feel comfortable using your hands to express yourself? Do you really need
to incorporate gesture? Gallo (2014) says yes, because gestures help clarify
ideas and contribute to an impression of condence. Using supporting ges-
tures when speaking in public adds credibility to what you are saying.
Fig. 8.2 Working on posture
I. Cohen and M. Dreyer-Lude
75
It is important to be sure that your gestures match your words. If your ges-
tures do not appear to support your text, the audience will become uncom-
fortable and might begin to distrust your message (Gallo, 2014). For those
who struggle with gesture, the real question is how to do it. First and fore-
most, allow gestures to emerge spontaneously from your own natural move-
ment. e exercise below will help you become more comfortable with using
gesture. e best placement for gesture in a public speaking environment is
within the Gesture Box. e Gesture Box refers to the area in front of you that
is located above the waistline and below the shoulders. is is considered the
power area (Gallo, 2014). When the hands reach too low (below the hipline),
the speaker appears awkward or sti. When the hands reach too high (above
the shoulders), the speaker appears overly enthusiastic. You can break the
Gesture Box rule when you want to make a particularly important point,
surprise the audience, or change the rhythm, but in general the Gesture Box
is the area to use when gesturing.
For those who wonder how and when they might incorporate gesture into
their talk, Arnold (2010) oered some useful suggestions. ese are not pre-
scriptive, but they might help you generate ideas for when to use gesture:
1. You can DESCRIBE something using your hands.
2. You can ENUMERATE with your ngers.
3. You can EMPHASIZE with a specic gesture.
4. You can CHOP instead of pointing.
5. You can REACH OUT toward the audience.
6. You can MODEL and show the audience what they should do in your
example. (Arnold, 2010, pp.49–50) (Fig.8.3)
We recommend the following rules for incorporating gesture in your talk:
1. Keep your gestures free owing but not overly energized. Gestures need
to support your statement but not draw too much attention to themselves.
2. Resist the overuse of any gesture as it will lose its eectiveness in support-
ing your message. An overly repetitive gesture shifts from providing sup-
port to being a tick that can become irritating to watch (Collins, 2011).
3. Watch the hands in pockets. Hiding your hands in your pockets can
betray nervousness and/or look overly casual. One hand now and then is
not a problem, but be sure not to ddle with keys, coins, or anything else
you have stored there.
4. Do not use pointers, pens, or chalk when gesturing. Put them down
rst. Lasers can be hard on the eyes, so be careful not to point them at the
8 Using Your Body

76
audience. Also, watch for excessive laser circling of something in your
visual material. Point to it once, and then trust that the audience is with you.
5. Watch for nervous ticks. is includes but is not limited to: dgeting,
tapping, jingling, or standing rigidly in place (Gallo, 2014).
Fig. 8.3 Working on gesture
Exercise 8.2 Gesture
1. Find a short story from your recent past that you can tell your colleagues.
Think through the details from beginning to end.
2. Now tell the story to a small group without using words. Try to use only your
hands to convey your narrative. Note: This may be difficult and you may find
yourself resorting to absurd measures to communicate. That is ok. Do not cen-
sor yourself. The goal here is to become comfortable communicating with
your hands.
3. Now tell the story again, and add words to the story. Although your need for
absurd gestures should significantly diminish, continue to include gesture to
illuminate and support your points. Your colleagues should press you to con-
tinue using your hands to explain your tale, even when only words will do.
I. Cohen and M. Dreyer-Lude

77
Eye Contact
Looking another person directly in the eyes is an act of courage. If you are
having a conversation with someone, and they refuse to look you in the eye,
in US academic culture one might assume that they are (1) lying to you, (2)
nervous about something, or (3) socially maladjusted. A key element of con-
dence, whether you are speaking with one person or to a crowd, is the cour-
age to look your audience in the eye. You can help establish an emotional
connection with your audience through your gaze. Eye contact helps your
audience feel important, which will help them set their other activities aside
and focus on you (Zeoli, 2008). Eye contact helps create an atmosphere of
intimacy between you and your audience. Eye contact also conveys power and
condence (Stone and Bachner, 1994). If you have the courage to look your
audience in the eye, you must really believe in what you are saying.
ere are a number of recommended “Dos and Don’ts” when making eye
contact with your audience. One of the most important things to do is to
make sure that you spend most of your talk looking at your audience rather
than the projection screen or your notes (Reynolds, 2012). Keep your eyes up
and out. Experts recommend that you keep your eyes on the audience 90% of
the time (Sarno and Moore, 1987). If you are managing to keep your eyes
up during your talk, you need to watch that you do not fall into the habit of
sweeping or scanning the audience (Meyers and Nix, 2011). Connect with
one audience member at a time, delivering a point here, and a point there, as
you shift your gaze from one audience member to another. Try to shift your
gaze evenhandedly. Create a pattern that will help you include everyone: cen-
ter, right, left, center, right, left. Be sure to choose new people when you shift
your gaze. Try not to cling to those three people who seem to be enthusiastic
about your presentation. Look at all areas of the audience and nd someone
with whom to connect. If looking an audience member directly in the eye
overwhelms you, consider talking to their nose or their forehead. Be sure,
however, not to focus your gaze far above their heads (Kushner, 2010). ey
will not be fooled and you will fail to make the connection. If it is dark in the
4. Shift to a new small group and tell your tale. Use as much or as little gesture
as feels appropriate. Allow the use of gesture to feel natural, as though these
movements belong to you.
5. Finally, look through your talk for moments where gestures could support
your communication. Practice incorporating gesture into those sections of
your research talk.
8 Using Your Body

78
room and you are illuminated, it is still important to look out to all areas of
the audience. It can be challenging to make eye contact as you deliver your
research talk, but remember that it is critically important for several reasons:
conveying condence, establishing an emotional connection, and helping
your audience feel as though what you are saying matters.
Exercise 8.3 Eye Contact
1. To warm up your ability to make eye contact, gather in an open area of the room.
2. Approach each person in your group one at a time and shake their hand. As
you do, look them directly in the eye and say “Hello.” Be sure to greet every-
one in the room.
3. Now choose a five-minute section of your research talk, or a short story you
can share with your peers.
4. One at a time, stand and deliver your text to the group making an effort to
individually connect with each person in the room.
5. Offer one another feedback when you are serving as an audience member.
Did the speaker genuinely connect with you? Was the gaze long enough? Did
the speaker include everyone or fall into a pattern?
6. The next time you deliver a talk in public, have a colleague watch your pre-
sentation and offer feedback on your use of eye contact. Keep this feedback
in mind for your next talk and adjust as necessary.
7. A note for international conference presentations: the use and interpretation
of eye contact might differ in other cultures. Be sure to check if possible with
a native from that land (Fig.8.4).
Fig. 8.4 Using eye contact to connect
I. Cohen and M. Dreyer-Lude

79
Facial Expression
An expressive face helps your audience understand what you mean. We know
from the research on mirror neurons that your audience will not only be infer-
ring your point of view when they watch you speak, they will also, at least to
some degree, be living it with you (Niedenthal, 2007). You can encourage the
audience to enjoy your presentation by enjoying it yourself. Allow your facial
expression to reect pleasure and you will encourage the audience to nd
pleasure in what you say.
You are not expected to deliver a Tony Award-winning performance with
your facial expression. e most important expression you can incorporate
into your presentation is a smile. Even in the most serious of professional situ-
ations, a light smile will help you convey condence. A smile creates rapport
in almost every situation (Kushner, 2010). It can be challenging to smile when
you are nervous or concerned about how your talk will be received. Smiling
may help you feel happier about what you are doing. Research has shown that
if you come across as warm and friendly, you will appear to your audience as
more competent (Fiske, 2018). Practice smiling and it will come more natu-
rally to you. If you already smile regularly, do not hesitate to include it in your
presentation style.
Exercise 8.4 Facial Expression: The Smile
1. If you are someone who normally appears somber, serious, or even stern, your
facial muscles will be accustomed to this expression as a resting pose. In order
to create a more expressive range, you will need to “teach” your face another
possibility. Try to take a few moments during your day to pay attention to
your facial expression and incorporate a smile. You do not need to flash a big,
toothy grin, just use a light smile as your target. If you are unsure whether or
not you are smiling, check in the mirror and adjust the degree of smile accord-
ingly. It is important that the expression you use be recognizable as a smile to
outside observers. This “smile practice session” can be as long or as short as
you like. We recommend repeating it until it feels more natural. Initially, this
exercise might require attention and concentration, but eventually, a light
smile will come easily to you.
2. Review a recording of your talk and determine whether you smile. If you have
gone through the full talk without smiling, try to identify moments in your
talk where a smile would be appropriate. Then try incorporating a smile dur-
ing those moments the next time you give the presentation (Fig.8.5).
8 Using Your Body

80
Movement
In addition to posture, gesture, eye contact, and facial expression, learning to
move appropriately can contribute to the appearance of condence. Proximity,
orientation, and how to move are all aspects of this subject.
Edward Hall (1963) introduced the idea of proxemics in the 1960s.
Proximity is the distance between you and your audience. Whether or not you
have control over this distance will depend on the space in which you are
presenting. Ideally, you want to remove obstacles between you and your view-
ers to create more intimacy and enhance your emotional connection. One of
the key issues in many locations is whether or not you will be tethered to a
podium. If the room is large and you require a microphone, and the only
microphone available to you is hardwired to the podium, you may be forced
to remain there. However, if you have a lavalier mic, or the room happens to
be small, come out from behind the podium.
It is also important to orient yourself so that you are facing your audience
whenever possible. It is a mistake to spend much of your presentation talking
to the projection screen. You can turn to the screen to point out a specic ele-
ment on a particular slide, but afterwards be sure to return your body’s orien-
tation to the front. You are the star of this show, not your slide presentation.
Incorporating a stage cross during your presentation can help you look
condent and in charge (Reynolds, 2012). You could use a stage cross to help
Fig. 8.5 The smile
I. Cohen and M. Dreyer-Lude

81
emphasize an important point by drawing attention to that moment.
Depending on your presentation space, you might consider choreographing
these moves into your talk. Once you have determined where you want to
move, it is important to motivate your cross. Here are some strategies for
incorporating a motivated cross into your talk.
1. Cross to the other side of the stage to reference a point on your projection
screen. is will seem justiable to your audience if you are identifying
something on that side of your image.
2. Cross in order to talk to a specic person or section of your audience. To
do this, as you begin to transition into this section of your story, make eye
contact with someone in that section, and let your need to talk to him or
her draw you over.
3. You can cross back to your notes (perhaps on the podium?) in order to
quickly reference something (even if you do not need a reminder). is
will place you in a neutral position once again from which you can choose
to move to another location on the stage.
4. You may also consider crossing during the question and answer period of your
presentation by approaching the side of the stage closest to your questioner.
5. Be sure to nd moments of stillness as well. Crossing the stage should be
the periodic accent to your talk, not the dominant element.
ere are a few aspects of movement that you want to avoid. Be careful not
to rock or bounce when you are standing. ese distractions are nervous hab-
its and should be removed from your presentation. When you cross, do not
oat purposelessly from one place to another (Meyers and Nix, 2011). Rather,
nd your target location, create the reason to go there (your motivation), and
cross strongly to that position. When you are standing, stand on two feet in a
relaxed posture. Avoid standing on one leg, or crossing your feet. Keep your
posture upright and relaxed with an even balance of weight, and you will be
perfectly positioned to make your next stage cross.
Exercise 8.5 Adding Movement
1. Take a look at the shape (the dramatic arc) of your research talk. Identify
specific moments when you can cross (a) to the projection screen, (b) to the
audience, or (c) back to the podium or desk.
2. Practice including this movement by following the instructions above. Allow
your peers to provide feedback regarding how natural and appropriate your
movements choices were.
8 Using Your Body
82
Entrances andExits: How toTake theStage
“Taking the stage” in the theater is the process of stepping in front of the audi-
ence and commanding attention (Howey, 2005). Even in a conference pre-
sentation you are participating in a theatrical ritual. People have gathered;
someone will come to the front and tell a story; those in the audience will
listen. e audience wants you to radiate condence and charisma as you
prepare to speak. at is why they have come. You can signal from the very
start of your presentation that you are prepared, condent, competent, and
excited to share what you have to say. We spoke earlier about the importance
of beginnings when you construct a story, as the beginning is where the audi-
ence decides whether or not your story is worth their time. What you may not
know is that the audience makes some decisions about you even before your
story begins. e evaluation of you as a speaker starts with your introduction,
not with the rst moment of your story. So it is important to get this pre-
beginning section right.
e rst step in making sure your entrance goes smoothly is to check your
equipment earlier in the day. It is important to manage the logistics of your
environment, as unnecessary fumbling or malfunctioning equipment can
undermine the impression of condence (Collins, 2011). is short
investment of time can make a big dierence between a strong rst impres-
sion and the sense that you are not sure of what you are doing. If you know
that your equipment is set up and ready to go, this will remove at least one
worry from your presentation and set you up for a successful beginning.
Often (but not always) you will be introduced to the audience before you
speak. is is an important moment in your presentation. e audience will
be scrutinizing you during your introduction, making small judgements
about your appearance and your condence level. is may sound intimidat-
ing, but it is inevitable. e good news is that you can control many aspects
of the impression you make so it is important to begin conveying condence
from the very rst moment. While you wait to move to the front of the room,
stand or sit tall and relaxed, nd a comfortable position for your hands, place
a light smile on your face, and keep your eyes xed on the speaker.
Once you have been introduced, you need to take the stage. is is another
important moment in your presentation. You are providing information to
the audience about what to expect, through your body language. e way you
approach the front of the room makes a dierence. Again, theatrical tradition
provides some insight. “When [actors] enter the room, the energy level rises.
You perk up, stop what you’re doing, and focus on them. You expect some-
I. Cohen and M. Dreyer-Lude
83
thing interesting to happen” (Halpern & Lubar, 2004, p.1). You are the actor
in this scenario, and the audience will be watching to see if you convey pres-
ence. Stage presence is communicated through a combination of factors. First,
be sure that you are tall and relaxed (this is where the posture lesson comes
into play). Next, focus your gaze forward toward where you are going, not on
the oor. Look either at the person who introduced you or the place where
you will be speaking. is will motivate your movement and create the impres-
sion that you know exactly where you are going. As you walk, keep your facial
expression pleasant. Remember that a light smile conveys condence. e
tempo with which you move is also important. Your pace should be brisk and
purposeful, energized but unhurried (Dale Carnegie Training, 2011; Stone &
Bachner, 1994). A brisk pace is one that is slightly faster than a normal walk-
ing pace, but not so fast that you appear to be rushing. A simple approach to
the front of the room is actually a complex combination of messages that you
convey to your audience, all of which are under your control.
e moment you arrive on the stage and before you begin your talk is cru-
cial. Many public speaking experts agree that to convey condence and relax-
ation, once you reach the stage, do not immediately begin to speak. You have a
few options before you begin. If appropriate, shake the hand of the person
who introduced you (conveying warmth and openness), and thank that per-
son for the nice introduction (grace and charm). en move to the place
where you will begin your talk and make any nal adjustments to your equip-
ment. Once that is nished, take a breath, look up, and make eye contact with
your audience. All of this may take only 15s, but those 15s are important. By
taking your time, you create the impression that you have done this before,
that you have the situation under control, and that the audience is in good
hands for the next short period of time. e very rst moment of your talk
once you are settled is a moment of silence. A silent moment is a condent
moment. A silent moment allows your audience to relax and get ready to lis-
ten. A silent moment begins the process of anticipation and helps build ten-
sion. Do not immediately speak when you reach the stage. Take a moment
and allow the audience to settle their attention on you.
You should pay similar attention to your exit. After you have delivered your
compelling research story and have answered audience questions, you need to
exit gracefully. In the section on endings, we discussed how to signal the end
of your story and to encourage applause. As your beginning has a pre-
beginning (your entrance), your ending has a post-ending (your exit). ink
through how you will exit before you begin your presentation, perhaps during
the time you spend checking your equipment. What moves will you need to
8 Using Your Body

84
make? Do you need to take a computer or notes with you? Do you need to
return the lavalier? Do you need to log out of a software program in prepara-
tion for the next speaker? Ideally, you want to gather and return things as
quickly and smoothly as possible, and then condently leave the stage. e
movement rules of your exit are the same as your entrance. Move briskly and
condently using a pace slightly faster than normal but not hurried. Eyes are
forward and up looking toward your goal (the back of the room? the exit
door? a place where you will sit and listen to other speakers?). You should have
a light smile on your face whether or not you feel you did well. Leave the stage
with grace and pride and that is what your audience will remember about you.
ere are many aspects of a condent presentation, and the way you use
your body plays an important role. You can control some aspects of how
people view you. You can shape their perceptions of your competence, and
the message you choose to send about who you are as a speaker. Learning to
control your body language and the impression you make in public will help
you charm your audience, engage them in your subject, and persuade them
that what you have to say is worth their while.
Exercise 8.6 Entrances and Exits
1. One by one practice entering and preparing to say the first line of your story.
Have another member of the group introduce you so that you can practice
this part of your pre-beginning. As you work, have the group give feedback
on the following:
(a) Was your demeanor relaxed and confident as you were being introduced?
Did you keep your eyes on the speaker?
(b) Was your approach to the podium brisk but unhurried? Were your eyes
up and forward? Did you smile as you entered?
(c) Once you were on stage, did you take a moment to thank your host,
check your equipment, take a breath, and make eye contact with the
audience?
(d) Finish the exercise by saying the first line of your presentation.
2. Now practice your exit. Begin with the final sentence of your story and then
move into your exit. Again, have the group check for the following.
(a) Did you smoothly negotiate the logistics of exiting (returning the mic,
disconnecting your laptop, etc.)?
(b) Was your walk brisk but unhurried? Were your eyes up and forward and
focused on where you were headed?
(c) Did you smile as you left the stage?
I. Cohen and M. Dreyer-Lude
Part III
The Event

87
© Springer Nature Switzerland AG 2019
I. Cohen, M. Dreyer-Lude, Finding Your Research Voice,
https://doi.org/10.1007/978-3-030-31520-7_9
9
Dealing withStage Fright
We are often asked about how to eliminate nervousness before delivering a
talk. Being nervous is common, even for seasoned performers. What profes-
sional speakers have learned is that nerves are a part of the job. A lack of ner-
vousness can create a sloppy or half-hearted presentation. at is because
nervousness is a form of energy, energy that you can harness and funnel into
your presentation. Nerves can be your ally. Nerves can sharpen your focus and
heighten your attention. Rather than resisting your feelings of nervousness,
consider reframing how you think about the butteries you feel before you
speak. ink of nerves as that extra punch that will add passion to your talk.
Shift your worry about your upcoming talk to a focus on the value of having
all of that extra energy. Speakers who appear to have more charisma on stage
have probably learned to channel their nerves into passion for their topic
(Howard & Tivnan, 2003).
It is also helpful to remember that nervousness often dissipates during your
talk. Once you have begun your well-prepared presentation, you can forget
about the frightening part of public speaking and focus on the message you
want to tell (Dale Carnegie Training, 2011). at is why professional speakers
spend the greatest part of their preparation time working on the rst few lines
of their presentation. ey know that starting a presentation well allows the
speaker to shift more quickly from a focus on nervousness to the telling of
the story.
In reframing your relationship to nervousness, it is also helpful to reframe
your relationship to your audience. ose who came to hear you speak did so
because they were interested in what you have to say. ey want you to shine,
to be compelling, to change their world view with your new discoveries
88
(Kushner, 2010). Audience members are usually on your side. Keep that in
mind as you step onto the stage to share your research.
One of the biggest reasons people become nervous about speaking in pub-
lic is the fear of making a mistake. It is the rare public presentation that does
not contain at least one mistake. Mistakes happen. You might bungle your
words, skip ahead in your slide presentation, forget to mention something
critical, or trip as you enter. ere are many grim possibilities and spending
time imagining them or worrying about them is time and energy wasted. e
audience is not usually that bothered by little mistakes. e only person who
really cares is you (Zeoli, 2008). Your audience can and will forgive any mis-
takes you make, as long you are willing to let them go and move on (Stone &
Bachner, 1994). If you make a mistake, get yourself back on track as quickly
as possible and continue with your presentation. If you forget it, they will
forget it. ey are not interested in focusing on small imperfections. What
interests them is hearing your story.
e number one antidote to extreme anxiety when giving a research talk is
preparation. It is the rare person who can “wing it” when speaking about
something important in public. Preparing a sensational research talk takes
time. You must start weeks ahead constructing and perfecting your story.
Once you have created an interesting story to tell, you must begin practicing
your presentation. You cannot do well if you have not adequately rehearsed
your talk (Meyers & Nix, 2011). We highly recommend recording your later
practice sessions so that you can see and assess your performance from an
objective point of view. Once you have polished your talk, nd opportunities
to present it to a practice audience and invite them to oer you feedback. If
possible, try to practice in an environment similar to the location where you
will be presenting. e closer you can come to recreating the actual presenta-
tion circumstances when you practice, the more comfortable you will feel
(Menzel & Carrell, 1994). Regardless of the tools you use to improve your
performance, ample time for practice is key. It can be challenging to nd the
time to practice. Every minute you prepare will be well worth the eort. Not
only will the nal product be more convincing, it will be more fun to present
your research, and you will naturally feel more condent while delivering
your message.
Mentally preparing for your presentation is another helpful antidote to anxiety.
ere are a variety of techniques you can use to get your mind settled and ready
to go (Fig. 9.1). Belly breathing and the tension/relaxation method can help you
settle before your presentation. Belly breathing is the process of sitting in a chair
and allowing your breathing to slow and deepen so that you are breathing more
from your belly than from your chest. e tension/relaxation method involves
I. Cohen and M. Dreyer-Lude

89
isolating specic muscle groups, deliberately tensing them, holding that tension
for a moment, and then letting the tension go as you completely relax that part of
your body. Even closing your eyes and counting down from 10 is an eective
method for reminding your body that this is not a ght or ight situation.
Another great way to prepare is to spend time imagining yourself succeed-
ing. Called Creative Visualization (Gawain, 2016), some athletes use this
technique before a game to improve their performance (Newmark, 2012).
e following exercises can help you mentally prepare for your talk on the day
you will be presenting:
Exercise 9.1 Belly Breathing
1. Sit in a chair, preferably in a quiet place (although this is not required).
2. Check your posture and make sure you are sitting tall but relaxed. Do not let
yourself collapse into the back of the chair. A proper posture will help open
the channels of your breathing.
3. Release and relax the muscles of your behind, allowing them to melt into the
chair, but keep your pelvis in its neutral position (neither tipped forward nor
back).
4. Place your hand on your belly. Notice your breath.
5. Using your thoughts and a release of muscles, let the breath drop down into
your pelvis as you breathe. You should begin to feel the hand on your belly
moving up and down. You might also feel your back grazing the back of the
chair as your torso inflates. These are all good signs.
6. Give yourself at least 20 nice, slow belly breaths before returning to normal
breathing.
Fig. 9.1 Learning to relax before a presentation
9 Dealing withStage Fright

90
Exercise 9.2 Tighten and Release
1. You may do this sitting in a chair, standing, or lying down. A quiet place is
preferable but again not required.
2. Check your posture and apply proper alignment.
3. Move through your major muscles groups one by one, first tensing that mus-
cle group as hard as possible, holding that tension for a moment, and then
releasing that muscle group completely. For example, you could begin with
all of the muscles in your right leg, then your left leg, then your pelvis, then
your back, etc.
4. It can be tricky to do this without tensing other collections of muscles. Do
your best to isolate the group you are tensing and to release any group that
does not belong.
5. When you release, imagine the muscles melting away in relief—giving up the
tension all at once.
Exercise 9.3 Creative Visualization
1. A few days prior to your talk, find a quiet space and either sit or lie down in
a comfortable position.
2. Begin to imagine the process of giving your talk. Play the entire movie from
introduction to exit.
3. Play the movie from an outsider’s point of view, as though you are an audi-
ence member watching yourself present.
4. Now play the movie again from an insider’s point of view, relishing the
confidence and finesse that you are naturally presenting to an admiring
crowd.
5. Make sure that your movie is positive and successful. This is not the time for
morbid worrying. In these movies, everything goes perfectly.
6. Consider doing this exercise daily for one week before you present.
I. Cohen and M. Dreyer-Lude

91
Creative Visualization involves practicing a mental movie of your talk:
Imagine yourself stepping condently to the front of the room. Everything is per-
fectly prepared. Your equipment functions beautifully (because you checked it prior
to the event). You begin with a bang; the audience is mesmerized. Your voice is
open, resonant, and everyone can hear you. You make eye contact with the entire
room, including a smile when appropriate, adjusting your delivery tempo to punc-
tuate the important moments in your talk. When you reach the nal lines of your
presentation, you hold for a moment, and then button the talk with a condent
“ank you!” triggering enthusiastic applause. You answer follow-up questions
with lucidity, clearly demonstrating your expertise. en you gather your things
and leave the stage with grace, your head held high. Mentally imagining your
victory can prime you for success. If Creative Visualization does not work for
you, we recommend just faking it. Pretend to be calm and condent before,
during, and after your presentation. “It doesn’t really matter how nervous you
are—as long as you appear calm” (Kushner, 2010, p.124).
It might be helpful to place your preparation process on a timeline. Here is
an example that you can adjust to meet your needs.
Six week preparation timeline
Week 1 • Sketch out the primary ideas for the talk
• Establish your core message
• Determine what images will anchor your talk
Week 2 • Determine the shape of the story or dramatic arc
• Fill in the details and establish how you will create tension and
resolution
• Find a terrific beginning
Week 3 • Determine how to make a strong ending
• Find moments of humor or surprise
Week 4 • Say your talk out loud at least three times without timing it
• Make adjustments to your story and the visual aids as appropriate
Week 5 • Practice at least three times to get a sense of the performance of
the talk.
• Record your practice sessions and give yourself notes
• Go live with your research talk by practicing on your own or in
front of colleagues
• Take notes from them and make adjustments
9 Dealing withStage Fright

92
Week 6 • Practice your talk at least three times in costume with all props
• Identify where you will move and how
• Include the equipment check and the entrance in these three
rehearsals
• Practice your talk in full five times
Presentation
day
• Check your equipment ahead of time
• Find a place to relax and mentally prepare
• Present what you have practiced and allow yourself to shine
• If you make a mistake or two, learn from them and let them go
• Focus on your accomplishments. You worked hard and prepared well
• Celebrate after your talk!
As you prepare your research talk, remember that stage fright is your friend.
Allow those nerves to provide some extra energy for your performance. Believe
that you can do this and you will give a stunning presentation. You have done
your homework: You have fully prepared and rehearsed your talk, you have
checked your equipment, you are dressed appropriately, and you know your
subject well. You are the world’s expert on this particular topic. You know
more about the content of your research talk than anyone in the room. So put
on a brave face with a light smile and pretend the audience does not scare you.
Remember they are just people. People have voluntarily come to hear you
speak. ey want you to do well. If you have prepared properly, you will.
I. Cohen and M. Dreyer-Lude

93
© Springer Nature Switzerland AG 2019
I. Cohen, M. Dreyer-Lude, Finding Your Research Voice,
https://doi.org/10.1007/978-3-030-31520-7_10
10
How toHandle Questions
Most research talks provide time for a question and answer period once the
talk has nished. For some speakers, this can be the most terrifying part of the
presentation. Even if you would prefer not to take questions, it is important
to save time for a question and answer session at the end of your talk if the
venue in which you are presenting expects it. ink of a question and answer
session as another opportunity to connect with your audience rather than a
situation in which you will have to parry an attack. Most viewers who ask
questions will be genuinely curious about something you have presented.
Questions are a sign that you have sparked interest. Answering these questions
allows you to further enhance your credibility as an expert on your particular
research topic.
A typical question and answer session is between ten and twenty percent of
your entire speaking time. You may need to reduce the content of your talk in
order to accommodate questions within the time allotted for your presenta-
tion. Timing your question and answer session properly creates an impression
of control. Staying in control will contribute to a perception of condence,
something that will assist you should you encounter a challenging question.
If you are concerned about your performance during the question and
answer session, it might help to prepare by creating a collection of test ques-
tions ahead of time. You will not necessarily know which questions will be
asked once you present, but even the process of anticipating questions can
help you mentally prepare for the questions you will receive. Another way to
prepare yourself would be to include a question and answer session during the
practice sessions you present to peers. You can provide test questions to the
colleagues who are helping you prepare, or allow them to construct their own.

94
You could also give this pretend audience various roles to play as dicult
audience members, helping you learn to negotiate challenging questions.
Participating in a question and answer session is a form of performance.
ere are some protocols and recommended best practices when answering
questions in a formal situation.
Standard Question and Answer Protocol
1. When taking a question, give the speaker your full attention. Do not let
yourself become distracted. Look the speaker in the eye and listen carefully.
e audience is watching how you handle this moment.
2. Listen carefully to the speaker to make sure you are hearing what is
being asked.
3. ank the speaker for asking the question either by nodding in acknowl-
edgment or by using one of the following scripts: “anks for asking that
question.” “at’s a great question.” “at’s an interesting question.” “I’m
so glad you asked that question.” Any script will do as long as it acknowl-
edges the speaker in a positive way.
4. Repeat the question back to the speaker to be sure you have heard it cor-
rectly. “What I heard you ask is…” “You seem to be interested in more
information about…” is is both respectful and can save time, as it will
prevent you from answering a question that was not asked.
5. Answer the question to the best of your ability. Direct the answer to the
speaker who asked the question, but be sure to look around and include
the entire audience as well (Dale Carnegie Training, 2011). If you nd
yourself getting into an extended discussion with just one person and are
leaving the rest of the audience behind, cut the discussion short and sug-
gest meeting after the talk to continue the conversation.
6. Verify that you answered the question asked: “Does that answer your ques-
tion?” e Dale Carnegie Institute training (2011) refers to this step as the
“bridge” as it assists with a smooth transition from one question to the next.
Exercise 10.1 Preparing for a Question and Answer Session
1. Write a list of several questions that an audience member might ask about your
research. Include a range of possibilities. Choose easy and difficult questions.
Include questions that interrogate a data set or graph in your presentation.
Include questions that challenge your hypothesis or indicate someone has already
answered it. Include a question that asks about next steps in your research.
2. Now answer each of those questions verbally, practicing until you feel you
have found a smooth and concise answer to each.
I. Cohen and M. Dreyer-Lude

95
In our experience the place where the question and answer session typically
goes wrong is in step number 4, which requires determining the actual ques-
tion. e following improvisation exercise will help you really listen to what
is said and learn to build a logical response from that information.
Exercise 10.2 So What You Are Saying Is…So I’ll…
1. Stand in a circle, or across from a partner if there are only two of you.
2. One person begins with a statement. Anything will do. Perhaps he or she
begins with: “I’m feeling a little bit hungry.”
3. The next person repeats what that person said precisely, beginning with the
name of the game. Like this: “So what you are saying is that you’re feeling a
little bit hungry. So I’ll order lunch for us at the pizzeria.”
4. The next person takes the most recent addition to this narrative and adds to
it something of their own: “So what you are saying is you’ll order lunch for us
at the pizzeria, so I’ll call and make sure they have a table.” And the next
person: “So what you are saying is you’ll call and see if they have a table for
us, so I’ll go and put on my shoes.”
5. Listen carefully and repeat what you hear. Try and make sure that your addi-
tion to the narrative is logical and not a random statement. Others in the
group can help guide these efforts.
Exercise 10.3 Practicing a Research Talk Question and Answer Session
1. If possible, gather several colleagues for a practice presentation session and
include a question and answer session at the end. If you encounter a question
that you were not expecting, prepare an answer for next time. Chances are
that if one person had a question about a particular part of your presentation
others will, too. If you can modify a future version of your talk to address that
question, do so.
2. Consider asking your colleagues to play the role of a difficult questioner.
Possibilities include:
• A hostile questioner who asks something that challenges your credibility.
For example, “Wasn’t all this done by professor so-and-so 10 years ago?”
• A long-winded questioner who wants to make a speech more than ask a
question. In this case, try out some ways for respectfully interrupting the
speaker. For example, “I’m sorry, but I seem to have missed your question.”
• A dominating questioner who insists on asking several questions in a row.
Here, you might call on another questioner who has their hand up before
the next question is asked.
3. During your actual presentation, you may find other points in the question
and answer session during which you get stuck. Try to come up with an exer-
cise for your next practice session that tackles these new issues.
10 How toHandle Questions
96
ere may be times giving a research talk when you have fully prepared,
you are following proper protocol when taking questions, and things still
seem to go awry. Below we list some last-resort strategies for handling dicult
situations during such a session.
Tips for Handling Dicult Situations
1. Aggressive or critical questions: Individuals who present aggressive behavior
may be looking for a ght. is may or may not be personal. e easiest
way to diuse this impulse is to nd a way to agree with the individual
(Meyers & Nix, 2011). For example: Individual: “Isn’t your research just a
rehash of X’s investigation of Y?” You: “anks for asking that question. I
do agree that what I’m doing could be perceived as a reexamination of
already existing data. What’s signicant and unique about my work
here is…”
2. When you don’t know the answer: “I’d like to think about that a bit more
before I answer it. Could you and I talk afterwards?” (en, make sure to
have the answer for next time!)
3. When you disagree with the questioner: “I appreciate your position on the
issue. Perhaps you and I could discuss it in more detail later on.”
4. Someone seems to know a lot about your topic: “You seem to know a lot about
this subject. Perhaps you and I can compare notes after my talk is over.”
5. In any dicult situation maintain your cool. Stay in control, keep a pleas-
ant smile on your face, and do not let them upset you. Remember that
most of the audience (perhaps all but one) is on your side.
We have provided a collection of best practices for question and answer
sessions in this chapter. ere are also behaviors you should avoid in order to
have a successful question and answer session. Here are some recommenda-
tions for what not to do.
ings to Keep in Mind During a Question and Answer Session
1. Don’t interrupt the speaker asking the question unless this person is making
a speech (Dale Carnegie Training, 2011). You may think you understand
what is being asked and are ready to answer long before the speaker has
fully articulated the question. It is bad manners to interrupt unnecessarily,
and you could be wrong. Be sure to check and make sure that you have
understood the question properly.
2. Make sure you answer the question that was asked rather than the question
that you wish had been asked (Dale Carnegie Training, 2011). Checking
before you answer and once again when you have nished answering will
help make sure you have answered their question rather than your own.
I. Cohen and M. Dreyer-Lude
97
3. If you do not know the answer to the question just say you do not know.
Even experts encounter moments when an audience member has asked
something outside of their area of expertise (Collins, 2011). Not having all
of the answers is perfectly all right if you handle it with grace. Express
interest in knowing the answer yourself, and oer to research the answer
and get back to them. at creates a win for both parties. You can reframe
the situation when you encounter a question you cannot answer. “at’s a
really interesting question. We might be able to answer it by doing such
and such experiments in the next phase of our research. anks for the
suggestion.”
4. Sometimes questioners are just mean. Try not to take it personally
(PowerSpeaking, 2016) or get defensive. If they succeed in upsetting you,
they win. If you maintain your dignity and gracefully deect the question,
you win. e audience will not appreciate watching someone attack you.
If you handle the situation well, the person asking the hostile question will
lose face and you will gain respect.
Answering questions is a bit of an art. Like the improvisation exercises in
this book, it requires thinking on your feet and it gets easier with practice.
Eventually, this part of the talk may become the most enjoyable as the audi-
ence reects back to you how well you presented your research and how
engaged they are in your discoveries.
10 How toHandle Questions

99
© Springer Nature Switzerland AG 2019
I. Cohen, M. Dreyer-Lude, Finding Your Research Voice,
https://doi.org/10.1007/978-3-030-31520-7_11
11
Game Day
It is the day for the main event. You have important research to share and you
have carefully prepared your research talk. Make this moment count. Get
enough sleep the night before to make sure you are physically prepared. Dress
nicely. It is always better to be overdressed than underdressed. Wearing nice
clothes will help you feel condent and will convey respect for the audience.
Finally, build yourself up emotionally. Be your own coach. You have been
practicing your talk, perfecting your slides, and honing your performance
skills. You have got this.
Here are some additional things to consider as you get ready to present
your research.
Before You Arrive at the Site
• Make at least one backup copy of your slide show. You may want to bring
your slides in multiple formats (in the Cloud, on a thumb drive, on your
laptop). Having multiple copies will help put your mind at ease, should
you encounter obstacles on site.
• Pack an extra outt to wear. If your best outt becomes stained or marred
in travel, having a backup will make a dierence. If you will be ying to the
presentation site and you have a tight connection, wear your presentation
clothes on the airplane. If your luggage is lost or delayed, you will still be
well-dressed for the event.
• Remember to pack your power cords, your thumb drive, your media adapt-
ers (dongles), and your laser pointer/clicker. Although the organizers of
your talk may have these supplies on site, it is always best to bring your
own as a backup.
100
On the Day of Your Presentation
• If possible, visit the room where you will present several hours before your
presentation time. Get a sense of the size and architecture of the space.
Examine the audio-visual support you will use and take a good look at the
microphone. Even doing this from a distance as you watch another speaker
present in your space will help prepare you mentally.
• Arrive at least 30min early for your presentation. If possible, nd a quiet
space to focus and relax before you present.
• When you are introduced, stand condently and smile. Head to the front
with a bounce in your step. Pause for a moment before you begin and take
the audience in.
• Now present what you have rehearsed, forget about small mistakes, and
enjoy sharing what you know with your colleagues.
• If possible, have a colleague record your presentation so that you can watch
it at a later date.
After Your Presentation
• Smile and exit with your head held high.
• Try to stick around right after your talk in case someone wants to nd you
and ask further questions.
• If someone congratulates you on your talk, thank them. Do not be self-
eacing or falsely modest. Even if you feel like you could have done better,
the audience may have thought your talk was terric.
It is best not to reect on the details of your performance right away. It is
hard to be objective right after a presentation: small mistakes become larger
than life; big victories seem life changing. You can be more objective later,
when the emotion of the event has dissipated. If you asked a colleague to
record your performance, watch it several days after your presentation and
objectively assess what worked and what did not. Remember that developing
any skill takes time and practice. ere is no such thing as a perfect talk. Each
time we give a presentation is an opportunity to try out slight improvements.
Master speakers may present the same talk 50 times before it is perfected. So
be patient with yourself and acknowledge the improvements you make with
each iteration.
Once your talk is over, it is time to celebrate by having dinner with friends
or watching a movie. e celebration is an equally important part of the
ritual. If you are giving a departmental seminar, this celebration may include
a dinner or reception. After a conference talk, you should take the lead in
planning your own celebration and go and have some fun. You have worked
hard to construct your talk, and this eort needs to be acknowledged.
I. Cohen and M. Dreyer-Lude

101
© Springer Nature Switzerland AG 2019
I. Cohen, M. Dreyer-Lude, Finding Your Research Voice,
https://doi.org/10.1007/978-3-030-31520-7_12
12
Conclusion
Becoming an expert public speaker is possible for anyone who is willing to put
in the time and eort. If you have followed the advice in this book, you will
probably have worked harder than you ever imagined to turn your own pre-
sentation into a clear, engaging, and entertaining performance. As your pre-
sentations improve, you will discover that the eort is well worth the reward.
Remember that there is no one way to give a good talk. What we have pro-
vided in this book is a set of exercises that will help guide you in turning your
presentation into an engaging talk. is is just a beginning. We hope that as
you improve in your presentation skills, the exercises here will become even
more useful. As time goes on you may modify these exercises or even develop
new ones that help perfect your best practices.
roughout this book, we have encouraged you to break out of your com-
fort zone. It is easy to be ordinary when giving a research talk. You will see
ordinary talks everywhere you go. e exercises in this book have been about
teaching you to be extraordinary. To be exceptional, you must engage your
imagination, develop some creative tactics to grab your audience’s attention,
and then take the risk of including those ideas in your presentation. Taking a
risk in the creation of your talk and the presentation of your performance
means that you might fail. You might tell a bad joke, try an exciting reveal that
zzles, or present a story that does not engage. But by risking these moments,
you will learn what works and what does not, and you will adjust your choices
accordingly. Chances are your audience will appreciate the fact that you are
trying to provide something unexpected and interesting. You may nd that
risk-taking oers its own emotional reward as it can be exhilarating to take a
chance when giving a talk, particularly when the risk pays o.
102
Giving a great talk to a fully engaged audience is thrilling. Once you experi-
ence the power to make them laugh on cue or get them to feel the things you
want them to feel, you will nd yourself inspired to continue to improve your
presentation skills. As these skills mature and your ability to express your ideas
ourishes, you will get a small taste of what makes being an actor so intoxicat-
ing… but that is another book.
I. Cohen and M. Dreyer-Lude
103
© Springer Nature Switzerland AG 2019
I. Cohen, M. Dreyer-Lude, Finding Your Research Voice,
https://doi.org/10.1007/978-3-030-31520-7
Anholt, R.R. (2010). Dazzle’em with style: e art of oral scientic presentation (2nd
ed.). Amsterdam: Elsevier.
Arnold, K.J. (2010). Boring to bravo: Proven presentation techniques to engage, involve
and inspire your audience to action. Austin, TX: Greenleaf Book Group Press.
Burgoon, J.K., & Saine, T.P. (1978). e unspoken dialogue: An introduction to non-
verbal communication. Boston: Houghton Miin Harcourt.
Cohen, I. (2019). Flight of the fruit y. Physical Review Fluids, 4(11), 110503.
https://doi.org/10.1007/978-3-030-31520-7_3
Collective Evolution. (2016). 6 Bad postures that are ruining your health and how to correct
them, March 11, 2016. https://www.collective-evolution.com/2016/03/11/6-bad-
postures-that-are-ruining-your-health-how-to-correct-them/
Collins, P. (2011). Speak with power and condence. NewYork: Sterling.
Conner, L. (2013). Audience engagement and the role of arts talk in the digital era.
NewYork: Palgrave MacMillan.
Dale Carnegie Training. (2011). Stand and deliver: How to become a masterful com-
municator and public speaker. NewYork: Touchstone.
Doumont, J. [CTL Stanford]. (2013, April 4). Creating eective slides: Design, use,
and construction in science [video le]. Retrieved from https://www.youtube.com/
watch?v=meBXuTIPJQk&feature=youtu.be
Dresler, M., Shirer, W.R., Konrad, B.N., Müller, N.C., Wagner, I.C., Fernández,
G., etal. (2017). Mnemonic training reshapes brain networks to support superior
memory. Neuron, 93(5), 1227–1235.
Duarte, N.S. (2008). Slide:ology: e art and science of creating great presentations.
Sebastopol, CA: O’Reilly Media.
Ekman, P. (2007). Emotions revealed: Recognizing faces and feelings to improve
References
104 References
communication and emotional life. London: Macmillan.
Feldenkrais, M. (2013). inking and doing. Longmont, CO: Genesis II Publishing.
Fiske, S.T. (2018). Stereotype content: Warmth and competence endure. Current
Directions in Psychological Science, 27(2), 67–73.
Frankel, F., & DePace, A.H. (2012). Visual strategies: A practical guide to graphics for
scientists and engineers. New Haven, CT: Yale University Press.
Frieder, R.E., Van Iddekinge, C.H., & Raymark, P.H. (2016). How quickly do
interviewers reach decisions? An examination of interviewers’ decision-making
time across applicants. Journal of Occupational and Organizational Psychology,
89(2), 223–248.
Gallo, C. (2014). Talk like TED: e 9 public speaking secrets of the world’s top minds.
London: Pan Macmillan.
Gawain, S. (2016). Creative visualization: Use the power of your imagination to create
what you want in your life. Novato, CA: New World Library.
Goldin-Meadow, S. (2005). Hearing gesture: How our hands help us think. Cambridge,
MA: Harvard University Press.
Hall, E. T. (1963). A system for the notation of proxemic behavior. American
Anthropologist, 65(5), 1003–1026.
Halpern, B.L., & Lubar, K. (2004). Leadership presence. London: Penguin Books.
Heath, C., & Heath, D. (2007). Made to stick: why some ideas survive and others die.
NewYork: Random House.
Howard, K., & Tivnan, E. (2003). Act natural: How to speak to any audience.
NewYork: Random House.
Howey, B. (2005). e actor’s menu: A character preparation handbook. St. Petersburg,
FL: Compass Publishing.
Jakubowicz, R. (2018). e yoga mind: 52 essential principles of yoga philosophy to
deepen your practice. Berkeley, CA: Rockridge Press.
Kahneman, D. (2011). inking, fast and slow. London: Macmillan.
Key, M.R. (1975). Paralanguage and kinesics (nonverbal communication). Lanham,
MD: Scarecrow Press.
Knaic, C.N. (2015). Storytelling with data: A data visualization guide for business
professionals. Hoboken, NJ: Wiley.
Kushner, M. (2010). Public speaking for dummies. Hoboken, NJ: Wiley.
Leitman, M. (2015). Long story short. Seattle, WA: Sasquatch Books.
Linklater, K. (1976). Freeing the natural voice. NewYork: Drama Book Publishers.
MacPhail, T. (2015). e personal touch: Using anecdotes to hook a reader. Conciliate.
https://chroniclevitae.com/news/1019-the-personal-touch-using-anecdotes-to-
hook-a-reader
Maisel, E. (1989). e Alexander technique: e essential writings of F. Matthias
Alexander. St. Louis, MO: Carol Publishing Group.
McKee, R. (1997). Story: Style, structure, substance, and the principles of screenwriting.
NewYork: Harper Collins.
Menzel, K.E., & Carrell, L.J. (1994). e relationship between preparation and
105 References
performance in public speaking. Communication Education, 43(1), 17–26.
Meyers, P., & Nix, S. (2011). As we speak: How to make your point and have it stick.
NewYork: Simon and Schuster.
Monarth, H. (2009). Executive presence: e art of commanding respect like a CEO.
NewYork: McGraw Hill Professional.
Newmark, T. (2012). Cases in visualization for improved athletic performance.
Psychiatric Annals, 42(10), 385–387.
Niedenthal, P.M. (2007). Embodying emotion. Science, 316(5827), 1002–1005.
Oster, E. (2007). Flip your thinking on AIDS in Africa [video le]. Retrieved from https://www.
ted.com/talks/emily_oster_ips_our_thinking_on_aids_in_africa?referrer=playlist-
everything_you_thought_was
Phillips, D.J. P. [TEDx Talks]. (2014, April 14). How to avoid death by powerpoint
[video le]. Retrieved from https://www.youtube.com/watch?v=Iwpi1Lm6dFo
PowerSpeaking Inc. (2016, Nov 30). Tough questions: Tips for dealing with dicult
audiences. Retrieved from https://blog.powerspeaking.com/tough_questions_tips_for_
dealing_with_dicult_audiences
Reynolds, G. (2012). Presentation Zen: Simple ideas on presentation design and deliv-
ery. San Francisco: New Riders.
Rodenburg, P. (2015). e actor speaks: Voice and the performer. New York: St.
Martin’s Grin.
Sarno, D., & Moore, G. (1987). Never be nervous again. New York: Crown
Publishers.
Scheen, A.E. (1972). Body language and the social order: Communication as behav-
ioral control. Upper Saddle River, NJ: Prentice Hall.
Stone, J., & Bachner, J. (1994). Speaking up: A book for every woman who wants to
speak eectively. NewYork: McGraw-Hill Companies.
omas, J. (2013). Script analysis for actors, directors, and designers. Boca Raton, FL:
CRC Press.
Weissman, J. (2008). Presenting to win: e art of telling your story. Upper Saddle
River, NJ: FT Press.
Zak, P. (2012). How the dramatic arc can change our brain chemistry and spur us to
action. https://futureofstorytelling.org/video/paul-zak-empathy-neurochemistry-and-
the-dramatic-arc
Zeoli, R. (2008). e 7 principles of public speaking: Proven methods from a PR profes-
sional. NewYork: Skyhorse Publishing.
