
KNOXCONNECT®
ADMINISTRATOR
USER GUIDE
1601 W. Deer Valley Road, Phoenix, AZ 85027
Phone: 800-552-5669 ● Fax: 623-687-2290
knoxbox.com

KNOXCONNECT
®
| ADMIN USER GUIDE
Copyright® 2020 by the Knox Company. All rights reserved.
The Knox® Company, the Knox logo and all other Knox Company product or service names are registered
trademarks or trademarks of the Knox Company.
Restricted Rights Legend
U.S. GOVERNMENT RESTRICTED RIGHTS. UNPUBLISHED—RIGHTS RESERVED UNDER THE
COPYRIGHT LAWS OF THE UNITED STATES. Use, duplication, or disclosure is subject to restrictions set forth
in the FAR Section 52.227-14 Alt. III(g)(3), FAR Section 52.227-19, DFARS 252.227-7014(b), or DFARS
227.7202, as amended from time to time.
Important Information
FCC NOTICE
This device complies with Part 15 of the FCC Rules. Operation is subject to the following two conditions:
(1) This device may not cause harmful interference, and
(2) This device must accept any interference received, including interference that may cause undesired
operation”.
Any changes or modifications could void the user's authority to operate the equipment.
This Class B digital apparatus complies with Canadian ICES-003.
Cet appareil numérique de la classe B est conforme à la norme NMB-003 du Canada.
This Device Contains: FCC ID: 2A0VI-KNOX-RAS, IC: 23479-KNOXRAS

KNOXCONNECT
®
| ADMIN USER GUIDE
CONTENTS
CONTENTS .................................................................................................................................................. 3
KNOXCONNECT OVERVIEW ..................................................................................................................... 5
About the KnoxConnect Management System ....................................................................................... 5
KnoxConnect Cloud Requirements ......................................................................................................... 6
Device Communication ........................................................................................................................... 6
KnoxConnect and Device Updates ......................................................................................................... 7
Additional Documentation ....................................................................................................................... 7
KNOXCONNECT LOGIN AND NAVIGATION ............................................................................................. 8
USERS ....................................................................................................................................................... 10
User Roles ............................................................................................................................................. 10
Users Screen ......................................................................................................................................... 11
Creating a User ................................................................................................................................. 12
Editing a User .................................................................................................................................... 14
Viewing a User’s PIN Assignments ................................................................................................... 15
Deleting a User ................................................................................................................................. 15
Creating Multiple Users (Upload utility) ............................................................................................. 16
Resend Registration Emails .............................................................................................................. 17
Username and Profile Setup ............................................................................................................. 18
Username and Password Recovery .................................................................................................. 19
Updating Personal Profile ................................................................................................................. 21
LOCK CODES ............................................................................................................................................ 22
Editing Lock Code Information .......................................................................................................... 23
KNOX ELOCK CORES .............................................................................................................................. 24
Editing Knox eLock Core Information ................................................................................................ 25
Assign Lock Codes to Knox eLock Core ........................................................................................... 26
KNOX EKEYS ............................................................................................................................................ 27
Editing Knox eKey Information .......................................................................................................... 28
Programming eKey Lock Codes ....................................................................................................... 29
Applying Changes to All Knox eKeys ................................................................................................ 30
KNOXDOCK PC APP ................................................................................................................................ 31
Configuring KnoxDock ...................................................................................................................... 31
Editing KnoxDock PINs ..................................................................................................................... 32
Applying Changes to all KnoxDocks ................................................................................................. 33
KEYSECURE ............................................................................................................................................. 34
Editing KeySecure Information .......................................................................................................... 35
Editing KeySecure User PINs ........................................................................................................... 37
Applying Changes to all KeySecure Devices .................................................................................... 38
MEDVAULT ................................................................................................................................................ 40
Editing MedVault Information ............................................................................................................ 41
Editing MedVault User PINs .............................................................................................................. 43
Applying Changes to all MedVault Devices ...................................................................................... 44

KNOXCONNECT
®
| ADMIN USER GUIDE
Initializing the Door Sensor ............................................................................................................... 45
SecurePIN .................................................................................................................................................. 47
Generating a SecurePIN for a device ............................................................................................... 47
Viewing SecurePIN Transaction History ........................................................................................... 48
NETWORK SETTINGS .............................................................................................................................. 50
Network Template Tab .......................................................................................................................... 50
Adding Network Templates ............................................................................................................... 51
Certificate Authority Certificates Tab ..................................................................................................... 52
Enterprise Client Certificates Tab .......................................................................................................... 53
Edit or Delete a Certificate ................................................................................................................ 54
DEVICE AUDIT TRAILS ............................................................................................................................ 55
KeySecure Tab ................................................................................................................................. 56
Selecting and Viewing Audit Trails ................................................................................................ 56
MedVault Tab .................................................................................................................................... 57
Selecting and Viewing Audit Trails ................................................................................................ 57
KnoxDock Tab ................................................................................................................................... 57
Selecting and Viewing Audit Trails ................................................................................................ 58
Knox eKey Tab .................................................................................................................................. 58
Selecting and Viewing Audit Trails ................................................................................................ 58
Knox eLock Core
Tab ........................................................................................................................ 59
Selecting and Viewing Audit Trails ................................................................................................ 59
KNOXCONNECT EVENT LOG .................................................................................................................. 60
Selecting and Viewing Event Logs .................................................................................................... 61
Selecting and Viewing an Existing Report ........................................................................................ 61
JURISDICTION .......................................................................................................................................... 63
Viewing Jurisdiction Details ............................................................................................................... 63
ADMIN ........................................................................................................................................................ 64
Groups Tab ....................................................................................................................................... 64
Viewing Group Members ............................................................................................................... 64
Creating, Editing, and Deleting, Groups ........................................................................................ 65
Assigning Devices to a Group ....................................................................................................... 66
Firmware and Versions Tabs ............................................................................................................ 67
Viewing Release Notes .................................................................................................................. 67
Settings Tab ...................................................................................................................................... 68
Dual PIN Feature .............................................................................................................................. 69
Software Download Tab .................................................................................................................... 70
VIEWING, CREATING, AND CHANGING REPORTS ............................................................................... 71
EXPORTING LISTS ................................................................................................................................... 74
TROUBLESHOOTING ............................................................................................................................... 75

KNOXCONNECT
®
| ADMIN USER GUIDE
KNOXCONNECT OVERVIEW
About the KnoxConnect Management System
The KnoxConnect Management System (KnoxConnect) is a cloud-based software system that is accessed at the
Knox website: knoxconnect.net. It is used to administer the Knox eLock System™ and supports the following
tools and components:
• KnoxConfig™ Software: KeySecure Network Configuration Tool for devices on firmware version 1.8.6 or
below.
• Knox Device Sync Software: Configuration update tool for KeySecure and MedVault devices on
firmware version 2.0 or higher.
• KnoxDock™: desktop programmer/charger for the Knox eKey™
• Knox eKey: Programmable electronic key that opens the Knox eLock Core
• Knox eLock Core™: Programmable electronic lock that can be used as the keyway in most Knox
products
• KeySecure
®
5 Programmable key retention device for mechanical Knox Master Keys
• KeySecure
®
6: Programmable key retention device for the electronic Knox eKey and mechanical Knox
Master Key
• MedVault
®
2.5: Narcotics Vault storage vault with mechanical lock or elock override
Intended Audience
KnoxConnect is managed by administrators who have different levels of access to the system through user roles.
KnoxConnect is accessible by any authorized user but depending on the user role, certain administrative
privileges and functions are limited. See the User Roles section for additional details.
Note: System administrators should have previous experience with software systems and configuring networked
devices or have applicable training.
Primary and Secondary administrators use KnoxConnect to:
• Administer user rights and permissions
• Configure KeySecure, eKey, KnoxDock, and MedVault settings.
• Share lock codes with mutual aid jurisdictions
• Change lock codes if jurisdiction boundaries change
• Deactivate missing or stolen Knox eKeys
• Monitor activity from KeySecure
®
5, KeySecure
®
6, Knox eKey, Knox eLocks, KnoxDock and MedVault
Administrative features include the ability to:
• Activate and deactivate users and devices
• Assign PINs to users, add user PINs to devices and perform other user administration tasks
• Easily control access by restricting users to one of the multiple roles
• Create groups of users and devices such as departments or stations
• Monitor users and devices in a jurisdiction

KNOXCONNECT
®
| ADMIN USER GUIDE
• View device usage details by time and user
• Create customized reports
KnoxConnect Cloud Requirements
To use the system, you must have one of the following browsers:
• Chrome
• Internet Explorer versions 10/11
• Safari
• Firefox
• Edge
Note: Knox strongly recommends that users stay current with Microsoft
®
operating system updates and web
browser updates.
Device Communication
KnoxConnect communicates with KeySecure, KnoxDock, and MedVault devices to provide administrative data,
and software/firmware updates automatically. This software-to-device synchronization occurs when the device is
connected to an internet enabled network.
Device Network Configurations
Knox KeySecure and MedVault devices interface with KnoxConnect using Ethernet or WiFi networking.
Communication Standards:
• 802.3 Ethernet
• 802.11 b/g/n 2.4Ghz
Supported Security/Encryption:
• Open (no encryption)
• WPA-PSK: TKIP
• WPA\WPA2: Mixed
• WPA2-PSK: AES
• WPA2-EAP-TLS
• WPA2-EAP-PEAP with TLS
• WPA2-EAP PEAP with MSCHAP
Note: EAP-FAST and WPA2-EAP-PEAP with PSK are not currently supported. Please contact Knox
Technical Support for assistance if your desired encryption is not shown.
Ports (required for communication):
• 443 - SSL communication
• 123 – Network Time Protocol (optional)

KNOXCONNECT
®
| ADMIN USER GUIDE
KnoxConnect and Device Updates
Knox Company will periodically implement software and device firmware updates. Before these updates are
released, an email notification will be sent to the primary and secondary administrators with release notes and
schedule. After the scheduled time:
• For KnoxConnect updates: Close and reopen your browser to start a new session (will require login).
• For firmware updates: All networked devices will update the next time they connect to KnoxConnect.
• For software updates: Users will be prompted to install KnoxDock, Knox Device Sync, or KnoxConfig
updates when using these tools.
Additional Documentation
Additional documents are available for KnoxConnect and Knox eLocks System products including:
• KnoxConnect Administrator Quick Start Guide
• Knox eLock System Quick Start Guide
• Knox Device Networking Guide
• Knox eKey
®
Admin User Guide
• KnoxDock
®
Quick Start Guide
• KeySecure
®
5 User Guide
• KeySecure
®
5 Quick Start Guide
• KeySecure
®
6 Admin User Guide
• KeySecure
®
6 Quick Start Guide
• SecurePIN Quick Start Guide
• MedVault 2.5 Admin User Guide

KNOXCONNECT
®
| ADMIN USER GUIDE
KNOXCONNECT LOGIN AND NAVIGATION
Login
To login to KnoxConnect navigate to knoxconnect.net, enter your username and password, and then select Log
In button.
Homepage
Once logged into KnoxConnect, the homepage displays the navigation menu and dashboard.
Navigation Menu
The navigation menu allows the user to quickly navigate between the following functions:
• Home: Homepage.
• Users: Create, edit, view, and delete user information.
• Lock Codes: Manage lock codes.
• Knox eLock Cores: Manage Knox eLock Cores and installation location details.
• Knox eKeys: Manage Knox eKey settings and lock code assignments.
• KeySecure
®
: Manage KeySecure settings and PIN assignments.
• KnoxDock PC App: Manage KnoxDock settings and PIN assignments.
• MedVault: Manage MedVault settings and PIN assignment
• SecurePIN: Generate a temporary use access code for use in authorized devices
• Network Settings: Create templates containing network access configurations that can be applied to
devices
• Device Audit Trails: View detailed user and device activity.
• KnoxConnect Event Log: View detailed KnoxConnect activity.
• Jurisdiction: View your licensing details.
• Admin: Create groups, view software and firmware versions details, download software, and configure
settings.

KNOXCONNECT
®
| ADMIN USER GUIDE
• Logout: Logs the user out of KnoxConnect
Note: Menu options displayed will depend on your user role and devices used by your jurisdiction.
Dashboard
The dashboard contains the following information:
• Item: List of users, lock code owned, lock code shared, devices, and applications available in your
jurisdiction.
• Total: Number of users for that jurisdiction; number of devices/applications used by that jurisdiction
• Synced: Indicates how many of the devices have been updated with the latest updates
• Online: Indicates how many of each device type are online.
Note: Items such as Users, Own Lock Codes, Shared Lock Codes, and Knox eLock Cores will always be
blank under the Synced and Online columns.
Note: For Knox eKeys, KeySecure devices, KnoxDock, Software PC Apps and MedVault, the Synced column
will not update when changes are made in KnoxConnect until the device is synchronized with the
KnoxConnect changes.

KNOXCONNECT
®
| ADMIN USER GUIDE
KNOX COMPANY | 800-552-5669 | TEC[email protected] | KNOXBOX.COM | OPE-KSADMN-0290-G | PAGE 10 of 76
USERS
User Roles
KnoxConnect offer predefined roles that can be assigned to users. All roles except Assigned PIN User provide
login capability to KnoxConnect with varying levels of functionality. The Assigned PIN role only allows PIN access
to assigned devices.
Administrative users view and assign the user roles as shown in the table below. A Primary Admin is created by
Knox when setting up your account. All other roles are assigned by the department.
Field Capabilities
Users may also be assigned field capabilities using the Supervisor designation during user setup. Supervisors
can adjust certain device settings at the device keypad and are treated as a separate category of user when
certain features are enabled, such as when Dual PIN entry is required for key release.
General User Access Levels
Functions
Assigned
PIN
Field User
Dispatch
User
Device
Admin
View Only
Secondary
Admin
Primary
Admin
Device PIN Access
P
P
P
P
P
P
P
Generate a SecurePIN
-
-
P
-
-
P
P
User's Own Profile
-
P
P
P
P
P
P
Dashboard
-
-
-
view-only
view-only
view-only
view-only
Other Users
(Limited Info)
-
-
-
view-only
view-only
P
P
Other Users (Details)
-
-
-
-
-
P*
P**
Device Info
-
-
-
P
view-only
P
P
Audit Trails
-
-
SecurePin
only
view-only
view-only
view-only
view-only
Event Log
-
-
-
-
-
-
view-only
Groups
-
-
-
P
view-only
P
P
Firmware/Software
Versions
-
-
-
view-only
view-only
view-only
view-only
KnoxConnect
-
-
-
view-only
view-only
view-only
view-only
Settings
-
-
-
P
view-only
P
P
SSL Certificates
-
-
-
view-only
view-only
view-only
view-only
Configuration Apps
-
-
-
P
-
P
P
P
Full rights
P
* Can view all users and can add/modify/delete inactive, users and analyst
P
**Can view all users and can add/modify/delete user at or below secondary admin

KNOXCONNECT
®
| ADMIN USER GUIDE
KNOX COMPANY | 800-552-5669 | TEC[email protected] | KNOXBOX.COM | OPE-KSADMN-0290-G | PAGE 11 of 76
Users Screen
Selecting Users from the menu opens the Users screen that shows current users and their roles. Authorized
administrators can use this screen to create, edit, view, and delete users.
The Users screen contains the following information:
• Name: The name of the user.
• ID: Optional field, usually a badge ID (16 characters max.)
• Role: Admin privilege level
• Groups: Groups user is member of
• Valid Pin: Current status of user PIN
• Edit: Modify user information
• PIN Assignments: Shows the devices where the user’s PIN is Programmed and active
Note: The names are typically user’s real first and last names such as John Doe, Sally Johnson, etc.
Note: You can sort any column, where the title is underlined, by selecting the title of the column. You can also
perform a search by entering or selecting a name or ID under each column name.

KNOXCONNECT
®
| ADMIN USER GUIDE
KNOX COMPANY | 800-552-5669 | TEC[email protected] | KNOXBOX.COM | OPE-KSADMN-0290-G | PAGE 12 of 76
Creating a User
Primary and Secondary Admins can add users one of two ways: individually or through an import. To create an
individual user:
1. On the Users screen, select the Add User button at the bottom left. The Create User screen will open.
2. Enter the user’s first and last name in the Name field.
3. Select a Role for the user.
The user’s role determines the permissions the user will be given to interact with the KnoxConnect
software. See User Roles for details.
4. Determine Field Capabilities:
a. Check the Supervisor box if the user will be treated as a supervisor for dual PIN purposes and/or
is allowed to change light settings (such as Blackout Mode) on devices in the field.
b. Check the Dependent PIN box if this user will always need a second valid PIN entered after their
PIN for access to any devices regardless of the system Dual PIN setting. This setting is typically
applied to users on probation or temporary employees.
Note: For skip steps 5 through 7 for Assigned PIN users
5. Select an option for how the user account setup will be managed
a. Select Invite user via email radio button to allow the user to create a username and password
with options for PIN assignment. Email address is required.
b. Select Assign username/password/PIN radio button to create username and password for the
user with option for PIN assignment. Email address is optional. If an email address is not
provided, and the Admin assigns the PIN, the system will not send an automated email to the
user.
6. Select an option under PIN creation
a. User assigns PIN allows the user to create an account login, password and PIN in KnoxConnect
using a link sent to them from KnoxConnect through an automated process.

KNOXCONNECT
®
| ADMIN USER GUIDE
KNOX COMPANY | 800-552-5669 | TEC[email protected] | KNOXBOX.COM | OPE-KSADMN-0290-G | PAGE 13 of 76
b. System assigns PIN allows the user to create an account login and password in KnoxConnect.
The PIN is system generated and assigned to the user in KnoxConnect when the user creates
the user account.
Note: User PIN minimum and maximum length is a system setting. See the section on Administrative
settings.
7. For all user roles except for Assigned PIN, a user Email address must be used. Enter the user email
address in the Email address field.
8. Provide the optional details:
a. User ID: ID such as badge number.
b. Phone: User’s phone number.
c. Job Title: Job title of the user.
d. Groups: Select optional groups if configured.
9. Select Create button.
Note: To ensure PIN security, PINs, including assigned PINs, cannot be viewed by other users, including
Admins, once created

KNOXCONNECT
®
| ADMIN USER GUIDE
KNOX COMPANY | 800-552-5669 | TEC[email protected] | KNOXBOX.COM | OPE-KSADMN-0290-G | PAGE 14 of 76
Editing a User
1. On the Users screen select Edit for the selected user to edit their information.
2. Make changes as necessary on the Edit User screen.
3. Select the Save button.

KNOXCONNECT
®
| ADMIN USER GUIDE
KNOX COMPANY | 800-552-5669 | TEC[email protected] | KNOXBOX.COM | OPE-KSADMN-0290-G | PAGE 15 of 76
Viewing a User’s PIN Assignments
To view device permissions assigned to a user that contain that user’s PIN:
1. On the Users screen, select View under the column PIN Assignment for the user.
The User’s Name screen shows devices that the user’s PIN has been assigned to and the status of that
assignment.
• Programmed: Indicates that the user’s PIN has been assigned to the device for programming.
• Live: Indicates that the user’s PIN has been programmed into the device and can be used.
Deleting a User
To delete a user:
1. Select the Delete button next to a user’s name, the Delete User prompt appears.
2. Select the OK button, the user will be deleted.
Note: Deleted user’s PIN will be active in assigned Knox devices until they sync with KnoxConnect, at
which time the PIN is automatically removed from the device.
Note: When deleting a user, the user will no longer appear in searches or user lists, they are
automatically removed from all groups and the user can no longer log into KnoxConnect. KnoxConnect
event history and device audit trail events are retained for the deleted user.

KNOXCONNECT
®
| ADMIN USER GUIDE
KNOX COMPANY | 800-552-5669 | TEC[email protected] | KNOXBOX.COM | OPE-KSADMN-0290-G | PAGE 16 of 76
Creating Multiple Users (Upload utility)
Instead of manually adding each user in KnoxConnect, you can upload multiple users along with their passwords
and PINs. The template was improved in v2.5.3 to enable users with different roles to be uploaded in the same
template with a single upload.
1. Select the Import Users button at the bottom of the Users screen and the Create Users by Uploading a
File screen will display.
2. Select Download Template and save to your computer.
Open the template and complete the fields for the users you wish to create.
a. PINs assigned by Department:

KNOXCONNECT
®
| ADMIN USER GUIDE
KNOX COMPANY | 800-552-5669 | TEC[email protected] | KNOXBOX.COM | OPE-KSADMN-0290-G | PAGE 17 of 76
• NAME and PIN must be supplied for each user. ID, PHONE and JOBTITLE are optional.
• All PINs must be 8 digits and unique (no duplicates within your jurisdiction).
• If a PIN has leading zeros, the format of the Excel cell must be 'Text'.
• ROLE is assignedpin
Note: On spreadsheet view for Assigned PIN users, Required and Optional shown for emphasis
b. Combination of PIN assignments by Departments and Users:
• NAME and either PIN or (PINCREATION + EMAIL) are required for each user. ID, PHONE
and JOBTITLE are optional
• PINs must be 4-8 digits and unique. System generated PINs are 4-8 digits.
• If a PIN has leading zeros, the format of the Excel cell must be formatted as 'Text'
• The value for PINCREATION if provided must be either “user” or “system” (case sensitive)
and the PIN field must be blank
• The value for SUPERVISOR must be either standard, supervisor or dependent
Note: Supervisor capabilities enable the user to change device light settings and will
determine dual PIN behavior (future release)
• All email addresses if provided must be unique (no duplicates within the system)
• If an email address is supplied for a user with a role other than assignedpin, the user will
receive an email with instructions to setup their account with a username and password
Save the template and select Choose File from the Create Users by Uploading a File screen. Select and open
the file in the windows explorer screen.
3. Select the Upload button.
Note: Header titles must be on the first row. Users must start on the second row and there must be no
empty rows between users.
Tip: The file must be saved as an Excel (.xlsx) file or Comma Separated (.csv) file.
Tip: If there is an error in the file, the file will stop at the first error and reject the file.
Resend Registration Emails
Users with email addresses (other than PIN-only users) will receive a system-generated email inviting them to
complete their registration. Invitations expire after 14 days.
• To resend emails to all pending users, select the Resend invitation emails button on the Users screen.
• To resend an invitation email to a specific user, select the Resend invitation email button from the Edit
User screen for the select user.

KNOXCONNECT
®
| ADMIN USER GUIDE
KNOX COMPANY | 800-552-5669 | TEC[email protected] | KNOXBOX.COM | OPE-KSADMN-0290-G | PAGE 18 of 76
Username and Profile Setup
The following steps are completed by the user after they have been added as a user in KnoxConnect. They will
not be active in the system until they have completed the username and profile setup using the system generated
email that is sent to them.
Note: If a user cannot locate the email, have them check their junk/spam email folder. The new user has 14 days
to complete the process before the link expires. If expired see Resend Registration Emails section.
1. To complete the new user set up process, select the SET UP PROFILE link in the email.
2. The user will be redirected to the Set Up Profile screen. They will need to complete each of the fields and
answer the two security questions. The security questions will be used when attempting to restore their
username or to restore a forgotten password.
Note: Passwords must be 12 to 40 characters and contain 3 of 4 character types including upper case,
lower case, number or special characters.
3. When complete select the Submit button to save.
4. The screen will respond with Success or instructions to correct or include additional information.

KNOXCONNECT
®
| ADMIN USER GUIDE
KNOX COMPANY | 800-552-5669 | TEC[email protected] | KNOXBOX.COM | OPE-KSADMN-0290-G | PAGE 19 of 76
Username and Password Recovery
Username Recovery
1. To recover your username, select Forgot Username on the KnoxConnect Log In page.
2. Enter your email address and the answers to your security questions, the select the Submit button.
Note: The security questions were created when the user originally setup their profile.
3. After selecting submit using the correct information, the screen will show your information along with
“Success – An email was sent”.

KNOXCONNECT
®
| ADMIN USER GUIDE
KNOX COMPANY | 800-552-5669 | TEC[email protected] | KNOXBOX.COM | OPE-KSADMN-0290-G | PAGE 20 of 76
4. An email will be sent to the user’s email address if the email address provided matches the one listed in
the KnoxConnect user profile containing their Username.
Password Recovery
1. To recover your password, select Forgot Password on the KnoxConnect Log In page.
2. Enter your email address and the answers to the security questions and select the Submit button.
Note: The security questions were created when the user originally setup their profile.
3. After submitting with the correct information, the screen will show your information along with “Success –
An email was sent”.
4. The email will contain a link for resetting your password, select the link and follow the instructions for your
password reset.
Note: The Primary Admin can also generate a password reset by selecting the Reset password button on
the user’s edit page. If you cannot locate the email, check your junk/spam email folder.

KNOXCONNECT
®
| ADMIN USER GUIDE
KNOX COMPANY | 800-552-5669 | TEC[email protected] | KNOXBOX.COM | OPE-KSADMN-0290-G | PAGE 21 of 76
Updating Personal Profile
Users can update their own profiles after logging into KnoxConnect.
1. Select the user icon, located in the upper-right corner of the KnoxConnect screen.
2. From the dropdown menu select Profile.
3. Enter your current password (required when updating profile)
4. Edit your profile as needed. Note: To change name, PIN, User ID or Role, user must contact an admin.
5. Select the Update button to save changes.

KNOXCONNECT
®
| ADMIN USER GUIDE
KNOX COMPANY | 800-552-5669 | TEC[email protected] | KNOXBOX.COM | OPE-KSADMN-0290-G | PAGE 22 of 76
LOCK CODES
Lock Codes can be thought of as an electronic keyway. Lock Codes are issued to a jurisdiction by Knox
Company and each jurisdiction is initially provisioned with one Lock Code. Additional Lock Codes can be
obtained from Knox by using a process similar to requesting an additional mechanical keyway.
To use a Lock Code, it must first be assigned to eLocks and to eKeys.
Owned or shared Lock Codes can be viewed from the Lock Codes screen. The screen also allows the user to
name and share Lock Codes that are controlled by the user’s jurisdiction.
The Lock Codes screen columns contain the following information:
• Index: Unique identifier/Internal ID within database (not editable)
• Name: Lock code name (Lock codes editable for those assigned to your department; Lock codes shared from
another department are not editable)
• Shared From: Locks codes that are being shared with you from other jurisdictions (not editable)
Note: You cannot share lock codes that are being shared with you from other jurisdictions.
• Shared With: Lock codes you are sharing with one or more outside jurisdictions (editable)
• Edit: Users with permission to update the sharing of jurisdictions and the name of the lock code will see this
button.
Tip: You can sort any information column by selecting the title of the column

KNOXCONNECT
®
| ADMIN USER GUIDE
KNOX COMPANY | 800-552-5669 | TEC[email protected] | KNOXBOX.COM | OPE-KSADMN-0290-G | PAGE 23 of 76
Editing Lock Code Information
Lock Code sharing is available between jurisdictions.
To edit lock code sharing information:
1. In the Lock Codes screen, select Edit next to a lock code name to display the Edit Lock Code screen
2. Revise the lock code name in the Name field, if necessary.
3. Select a jurisdiction name from the Available Jurisdictions box and select the right arrow to move it to
the Shared Jurisdictions box. Continue to move jurisdiction names until all jurisdictions that will share
Lock Codes have been moved.
Note: If a jurisdiction with which you wish to share a lock code is not listed in the Available Jurisdictions
box, you will need to contact Knox support to have that jurisdiction added.
4. To remove sharing privileges, select a jurisdiction name from the Shared Jurisdictions box and select
the left arrow to move it back to the Available Jurisdictions box. Continue to move jurisdiction names
until all jurisdictions that will no longer share Lock Codes have been removed.
Note: When you remove a shared Jurisdiction lock code, the administrator of that Jurisdiction will receive
an email notification stating that you are no longer sharing that lock code with them. The lock code will be
removed from that Jurisdiction’s electronic keys the next time the ekeys sync with KnoxConnect
5. Select the Save button and then select Back to return to the Lock Codes main screen.
Note: To export a list, see section Exporting Lists.

KNOXCONNECT
®
| ADMIN USER GUIDE
KNOX COMPANY | 800-552-5669 | TEC[email protected] | KNOXBOX.COM | OPE-KSADMN-0290-G | PAGE 24 of 76
KNOX ELOCK CORES
This screen allows the user to configure information for Knox eLock cores in the user’s jurisdiction.
The Knox Locks screen contains the following information:
• Knox eLock Core SN: Knox eLock Core serial number
• KnoxBox SN: Knox-Box
®
serial number for assigned Knox eLock Core
• Install Address: KnoxBox with Knox eLock core street address
• City: Knox eLock Core city location
• State: Knox eLock Core state location
• Groups: Groups authorized to use this Knox eLock Core
NOTE: Only the Admin can create a group. Any user or device can belong to one or more groups.
• Lock FW: Knox eLock Core firmware version
• Lock Code: Lock code name (programmed into the Knox eLock Core by the Knox eKey)
• Edit: Available to authorized admin users to change or update lock box information
Note: KnoxBox SN, Install Address, City, and State will be populated using the Installation address provided
on the order if the elock core is shipped factory installed in the box. Retrofit eLock cores will require location
information feedback to be provided by the installer.
Note: You can sort any column where the title is underlined by selecting the title of the column. You can also
perform a search by entering or selecting a name or ID under each column name.

KNOXCONNECT
®
| ADMIN USER GUIDE
KNOX COMPANY | 800-552-5669 | TEC[email protected] | KNOXBOX.COM | OPE-KSADMN-0290-G | PAGE 25 of 76
Editing Knox eLock Core Information
To edit Knox eLock Core information:
1. In the Knox eLock Cores screen, select Edit next to a name under the Lock Code column.
The following screen appears.
2. Provide details about the location of the Lock Box / Knox eLock Core in the fields provided. At a
minimum, enter the Lock Box SN, the cross street or other identifying landmark (location), and the
Address/City/State/Zip.
3. If using Groups, select the group or groups (using the CTRL key) to which the lock belongs, to provide
access to the Lock Box and Knox eLock Core at the designated address.
4. Enter any notes into the Notes box which pertains to the usage of the Knox eLock Core, any restrictions
or limitations, and the location of the box and lock.
5. Select the Save button and then Back to return to the Knox Locks main screen.
Note: To export a list, see section Exporting Lists.

KNOXCONNECT
®
| ADMIN USER GUIDE
KNOX COMPANY | 800-552-5669 | TEC[email protected] | KNOXBOX.COM | OPE-KSADMN-0290-G | PAGE 26 of 76
Assign Lock Codes to Knox eLock Core
Set Up Programming Key
To lock and unlock the eLock, a lock code must be programmed into the lock using an eKey that has
Command Code 2 enabled for lock programming. eLocks are shipped default with no Lock Code.
1. From the Knox eKeys screen, identify the eKey that will used to assign the lock code and select the Edit
button for that eKey. eKeys in programming mode can program any eLock assigned to the jurisdiction.
2. In the Device Hardware Programming section under Command Code 2, select the button for “Action
Change Lock Code.
3. Next, select the lock code from New Lock Code dropdown list that will be assigned to the eLock core(s).
4. Then, select “None” from the Replaced Lock Code dropdown list if programming a lock for the first time.
5. Select the Save button.
6. Program the eLock: To physically assign the lock code to the lock core use the Knox eKey programmed
with the new lock code, enter the Command Code 2. See the eKey Admin Guide for more information
a) LEDs will flash green three (3) times (indicating correct code entered)
b) Insert ekey into elock and hold steady
c) LEDs will be solid blue
d) LEDs will flash green three (3) times (indicating programming was successful)
e) Lock core now programmed
7. Test the lock code by using Command Code 1 to open/close the box.
Note: You can only assign lock codes to eLock cores that belong to your jurisdiction. A shared lock code
can only be used to open/close boxes.
Note: Only the lock codes that have been assigned to the ekey and that belong to your jurisdiction can be
programmed

KNOXCONNECT
®
| ADMIN USER GUIDE
KNOX COMPANY | 800-552-5669 | TEC[email protected] | KNOXBOX.COM | OPE-KSADMN-0290-G | PAGE 27 of 76
KNOX EKEYS
This menu option allows users to configure Knox eKey parameters.
The Knox eKeys screen displays two columns with user-configurable parameters: Edit and Lock codes.
1. Identify the eKey serial number (SN) to configure.
2. Select the Edit button in the Edit column to display the Knox eKeys screen and configure Knox eKey
identity and hardware provisioning information or select the Edit button in the Lock codes column to
display and configure available and programmed lock codes for a specific key.
Note: To export a list, see section Exporting Lists.
The Knox eKeys screen contains the following information:
• Device serial number: Knox eKey serial number
• Location: Knox eKey location
• Assigned to: Knox eKey owner and user type
• Groups: List of groups assigned to the Knox eKey
Note: Only an Admin can create a group. Any user or device can belong to one or more groups.
• Online: When checked, indicates which Knox eKey devices are currently online
• Synced: When checked, indicates that the device has been updated with the latest user-updated or auto-
updated changes
Note: To update the device, place the key into a KnoxDock charger or KeySecure retention device.
• Enabled: If enabled, a checkmark is shown; if only a dash is shown, the ekey is disabled
• FW Version: Current Firmware version
• Edit: Available to authorized Admin users to change or update key information
• Lock codes: Available to authorized Admin users to change or update lock codes associated with the
key
• Apply to all keys Menu (button): Edit attributes and apply to a Knox eKey group or all Knox eKeys
Note: You can sort any column, where the title is underlined, by selecting the title of the column. You can
also perform a search by entering or selecting a name or ID under each column name.

KNOXCONNECT
®
| ADMIN USER GUIDE
KNOX COMPANY | 800-552-5669 | TEC[email protected] | KNOXBOX.COM | OPE-KSADMN-0290-G | PAGE 28 of 76
Editing Knox eKey Information
To edit Knox eKeys information:
1. On the Knox eKeys screen, select the Edit button under the Edit column for a specific eKey SN and the
following screen appears.
2. In the Device Information section, enter the Location in which the selected Knox eKey resides, the
Assigned User (owner), the Asset Number (if applicable); and then select the Assigned User Type and
the Group or Groups to which the key belongs and will be authorized to use the key.
3. In the Device Hardware Programming section, enter that eKey’s programming information into each
field, and check/uncheck each check box as required. Use the Notes column as a guide.
4. Select the Save button and then select the Back button to return to the Knox eKeys screen.
Note: You can temporarily disable the eKey by unchecking the Enabled checkbox and syncing with
KnoxConnect.

KNOXCONNECT
®
| ADMIN USER GUIDE
KNOX COMPANY | 800-552-5669 | TEC[email protected] | KNOXBOX.COM | OPE-KSADMN-0290-G | PAGE 29 of 76
Programming eKey Lock Codes
To program Lock Codes for a Knox eKey:
1. On the Knox eKeys main screen, select the Edit button under the Lock Codes column for a specific
eKey SN.
2. Changing Lock Codes
• Add Lock Code(s):
Select a Lock Code from the Available Lock Codes box and select the right arrow button to move it
to the Programmed Lock Codes box. Repeat for each available lock code that you want added to
the eKey.
• Remove Lock Code(s):
Select a Lock Code from the Programmed Lock Codes box and select the left arrow button to move
it back to the Available Lock Codes box. Repeat for each lock code that you want removed from the
eKey.
3. Select the Save button and then the Back button to return to the Knox eKeys screen.
Note: One Knox eKey can hold up to 100 lock codes and can open eLock cores with a corresponding
lock code.
Screen Glossary:
• Available Lock Codes: These are lock codes that can be assigned to the eKey.
• Programmed Lock Codes: These are lock codes that have been assigned to the eKey.
• Live Lock Codes – Match: These are lock codes that have been programmed into the eKey and are
available for use. Live lock codes are updated when the eKey has synced to KnoxConnect through a
KeySecure or a KnoxDock.

KNOXCONNECT
®
| ADMIN USER GUIDE
KNOX COMPANY | 800-552-5669 | TEC[email protected] | KNOXBOX.COM | OPE-KSADMN-0290-G | PAGE 30 of 76
Applying Changes to All Knox eKeys
To apply changes to all Knox eKeys:
1. Select the Apply to all keys Menu button on the Knox eKeys screen to configure attributes for specific
groups of eKeys or all eKeys. The Knox eKey Attributes screen appears.
2. Update values for eKey attribute fields or check boxes as needed. Use the Notes column as a guide.
3. Select the Save button under Apply to All to apply the changes to all eKeys or select a specific group
from the Apply to Group drop-down list to apply the changes to all eKeys in that group and then select the
Save button.
4. Select Back to return to the Knox eKeys main screen.

KNOXCONNECT
®
| ADMIN USER GUIDE
KNOX COMPANY | 800-552-5669 | TEC[email protected] | KNOXBOX.COM | OPE-KSADMN-0290-G | PAGE 31 of 76
KNOXDOCK PC APP
This menu selection allows user to configure KnoxDock software parameters.
Configuring KnoxDock
To edit the KnoxDock information:
1. On the KnoxDock Software PC App main screen, select the Edit button under the Edit column for a
specific KnoxDock SN and the following screen appears.
2. In the KnoxDock PC App Information section, update the Location and Groups as needed.
3. In the KnoxDock PC App Programming section, update the PIN Attempts Before Lockout, Lockout Time,
PIN Expiration Time, and Override Lockout as needed. Use the Notes column as a guide to your
changes.
4. Select the Save button and then Back to return to the KnoxDock Software PC App screen.
Note: When the KnoxDock Software PC App syncs with KnoxConnect the Actual Settings are updated
with the Programmed Settings.
TIP: You can sort any column, where the title is underlined, by selecting the title of the column. You can
also perform a search by entering or selecting a name or ID under each column name.
Note: KnoxDock Serial Numbers will not appear until the KnoxDock PC app has been installed on a PC
and Knox Dock connected via USB to PC.
Screen Glossary:
• Serial Number: KnoxDock Software application serial number
• Location: KnoxDock Software application location
• Groups: List of groups assigned to the PC application
Note: Only an Admin can create a group. Any user or device can belong to one or more groups.
• Online: When checked, indicates which KnoxDock applications are online.
• Synced: When checked, indicates that the software has been updated.

KNOXCONNECT
®
| ADMIN USER GUIDE
KNOX COMPANY | 800-552-5669 | TEC[email protected] | KNOXBOX.COM | OPE-KSADMN-0290-G | PAGE 32 of 76
• Software Version: Current software version.
• Edit: Available to authorized admin users to change or update software and group information.
• User PINs: Provides the PIN codes that need to be programmed in the KnoxDock Software PC
application.
• Apply to all KnoxDock Software PC Apps Menu (button): Edit attributes and apply to a KnoxDock
group or all KnoxDock PC applications.
Editing KnoxDock PINs
To configure which user PIN codes are programmed to release the Knox eKey from the KnoxDock:
1. Select the Edit button in the User PINs column of the KnoxDock Software PC App main screen and the
following screen displays. The following user lists are configurable: Available Users and Programmed
Users.
2. Changing KnoxDock Users and Groups
Note: You can select more than one user or group at a time by holding down the CTRL key on your
keyboard when selecting.
• Add User(s):
Select a User from the Available Users box and select the right arrow button to move them to the
Programmed Users box. Repeat for each available User that you want added to the KnoxDock.
• Remove User(s):
Select a User from the Programmed Users box and select the left arrow button to move them back to
the Available Users box. Repeat for each User that you want removed from the KnoxDock.
• Add Group(s):
Select a Group from the Available Groups box and select the right arrow button to move them to the
Programmed Groups box. Repeat for each available Group that you want added to the KnoxDock.
• Remove Group(s):
Select a Group from the Programmed Groups box and select the left arrow button to move them back
to the Available Groups box. Repeat for each Group that you want removed from the KnoxDock.
3. Select the Save button and select Back to return to the KnoxDock Software PC App main screen.
Note: When the KnoxDock Software PC App syncs with KnoxConnect the Actual Users and Groups are
updated with the Programmed Users and Groups.

KNOXCONNECT
®
| ADMIN USER GUIDE
KNOX COMPANY | 800-552-5669 | TEC[email protected] | KNOXBOX.COM | OPE-KSADMN-0290-G | PAGE 33 of 76
Applying Changes to all KnoxDocks
To apply changes to all KnoxDock Software PC applications:
1. On the KnoxDock PC App main screen select the Apply to all KnoxDock PC Apps Menu button to
configure attributes for all KnoxDocks or KnoxDocks in a specific group.
The KnoxDock PC App Attributes screen appears.
2. Update values for KnoxDock attribute fields as needed. Use the Notes column as a guide.
3. Select the Save button under Apply to All PC Apps to apply the changes to all KnoxDocks or select a
specific group from the Apply to PC Apps of Group drop-down list to apply the changes to all KnoxDocks
in that group and select the Save button.
4. Select Back to return to the KnoxDock Software PC App main screen.
Note: Refer to the KnoxDock PC App User Guide located in your account at knoxbox.com for
information on how to download and install the KnoxDock PC App Software and KnoxDock.

KNOXCONNECT
®
| ADMIN USER GUIDE
KNOX COMPANY | 800-552-5669 | TEC[email protected] | KNOXBOX.COM | OPE-KSADMN-0290-G | PAGE 34 of 76
KEYSECURE
The KeySecure menu option allows the user to configure KeySecure device parameters. The KeySecure screen
shows two columns with user-configurable parameters: Edit and User PINs.
KeySecure Screen Glossary:
• Device Serial Number: KeySecure serial number
• Device Location: Installation location/apparatus name of the KeySecure
• Groups: List of groups assigned to the KeySecure
• Online: When checked, indicates which KeySecure devices are connected to the network and can
communicate with the KnoxConnect website
• Synced: When checked, indicates that the device has been updated with the latest user-updated or auto-
updated changes
• Firmware Version: the revision of firmware currently running in the device
• Edit: Available to authorized Admin users to change or update device or group information
• User PINs: Provides the PIN codes that need to be programmed into the KeySecure
• Apply to all KeySecures Menu (button): Edit attributes and apply to a KeySecure group or all
KeySecure devices
Note: You can sort any column, where the title is underlined, by selecting the title of the column. You can also
perform a search by entering or selecting a name or ID under each column name. To export a list, see section
Exporting Lists.

KNOXCONNECT
®
| ADMIN USER GUIDE
KNOX COMPANY | 800-552-5669 | TEC[email protected] | KNOXBOX.COM | OPE-KSADMN-0290-G | PAGE 35 of 76
Editing KeySecure Information
1. On the KeySecure main screen, select Edit under the Edit column for a specific KeySecure SN and the
following screen is displayed.
2. In the Device Information section, update the Location, Asset Number, and Groups fields as needed.
Apparatus 4
Station 4 WiFi
Station 4 WiFi

KNOXCONNECT
®
| ADMIN USER GUIDE
KNOX COMPANY | 800-552-5669 | TEC[email protected] | KNOXBOX.COM | OPE-KSADMN-0290-G | PAGE 36 of 76
3. In the Device Hardware Programming section, update the Num Lockout Tries, Lockout Time fields and
select the Override Lockout checkbox and Disable eKey Retention as needed. Use the Notes column as
a guide.
4. Update network settings fields as needed. See the Knox KeySecure Networking Guide for details on
Network templates and configuring network settings.
5. Select the Save button and select Back to return to the KeySecure main screen
Note: When the KeySecure syncs with KnoxConnect the Actual Device settings will update with the
Programmed Device Settings.
Note: The Disable Key Retention feature should not be used to temporarily stop the “key not present”
notification LEDs from flashing while the key is in use. This setting is intended for use when a jurisdiction
wishes to turn off the “key not present” LED flashing light for an unused key retention port during times
when the key is out of service, for example: KeySecure installation, transition to eKey, or discontinuation
of mechanical key.
• If the eKey is retained when the Disable Key Retention Right is selected, the eKey will not be
removable until the eKey retention port is made active by deselecting the setting and syncing the
device with Knox Connect. The eKey retention port will not charge the eKey while the Disable
setting is in effect.
• If a mechanical key is retained or inserted when Disable Key Retention is selected for that
retention port, the mechanical key will not be removable until the key retention port is made active
by deselecting the setting and syncing the device with KnoxConnect.
Screen Glossary:
The Device Information section contains the following information:
• Model: The device profile given when the unit was created in KnoxConnect
• Hardware Revision: The hardware profile given when the device was created in KnoxConnect
• Serial Number: KeySecure serial number
• Device Location: An optional but recommended field identifying the installation location/apparatus name
of the KeySecure
• Asset Number: An optional field for entry of a department-assigned asset or inventory tracking number
• Groups: List of groups assigned to the KeySecure
The Device Hardware Status screen contains the following information:
• Online: System shows a checkmark when the KeySecure is connected to KnoxConnect
• Synced: System shows a checkmark when the device is current with the latest changes
• Last Server Contact: The last time-date the device was connected to KnoxConnect
• Hardware Configuration: shows the device’s key capacity
• Connected Knox eKey SN: The serial number of the eKey retained in the device
• Ethernet MAC address: identity assigned to the device by Knox
• WiFi MAC address: identity assigned to the device by Knox
• Internal IP address: dynamically updated field containing the LAN address the device is using
• Active SSID: The SSID that the device is currently using for the network connection.
The Device Hardware Programming section contains the following information:
• Programmed Device Settings: The most recent settings that have been entered.
• Actual Device Settings: The settings the device reported during its latest connection.
• Firmware Version: The revision of firmware currently running in the device. A difference between the
Programmed and Actual indicates syncing is required to install the update

KNOXCONNECT
®
| ADMIN USER GUIDE
KNOX COMPANY | 800-552-5669 | TEC[email protected] | KNOXBOX.COM | OPE-KSADMN-0290-G | PAGE 37 of 76
• PIN Attempts Before Lockout: The number of invalid PIN entries allowed before the device enters
lockout mode
• Lockout Time: The number of minutes the device will prevent PIN entry after the set number of invalid
attempts
• Override Lockout: Overrides a lockout, device must be online.
• Disable Key Retention Right: Suspends operation of the right key port and notification LEDs
• Disable Key Retention Left: Suspends operation of the left key port and notification LEDs
• Dual PIN Settings: Indicates if two PINs are required for the release of keys. This selection is only
available if Dual PIN has been enabled by the Primary Admin in the Admin settings. See the Dual PIN
feature section for more information.
• SecurePIN Settings: Indicates if use of SecurePIN dispatcher-generate access code feature is enabled
• SSL Certificate version: Dynamically updated field that shows the version of the installed KnoxConnect
SSL certificate
• KnoxConnect mode: Dynamically updated field indicating the implementation method of KnoxConnect
software in use
• Network Template: The selection box shows the network connections available for the device
• Static Ethernet IP: Field to enter a unique static ethernet IP address if used for the device connection
• Static WiFi IP: Field to enter a unique static WiFi IP address if used for the device connection
• Enterprise Identity: Field to enter the object name used for LDAP authentication
• Client Certificate: Selection box for certificate if using EAP-TLS
• Enterprise Password: The network password the device is using, populated from the network template
• Enterprise Anonymous Identity: Field to enter an optional anonymous identity for the device-- used with
certain types of Enterprise Security, populated from the network template
Editing KeySecure User PINs
To configure which users can release keys from a KeySecure (identified by serial number) using their PIN code:
1. On the KeySecure main screen, select the Edit button under User PINs for a specific KeySecure SN and
the following screen displays.
2. Changing KeySecure PINs, Users and Groups
Note: You can select more than one user or group at a time by holding down the CTRL key on your
keyboard when selecting.

KNOXCONNECT
®
| ADMIN USER GUIDE
KNOX COMPANY | 800-552-5669 | TEC[email protected] | KNOXBOX.COM | OPE-KSADMN-0290-G | PAGE 38 of 76
• Add User(s):
Select a User from the Available Users box and select the right arrow button to move them to the
Programmed Users box. Repeat for each available User that you want added to the KeySecure.
• Remove User(s):
Select a User from the Programmed Users box and select the left arrow button to move them
back to the Available Users box. Repeat for each User that you want removed from the
KeySecure.
• Add Group(s):
Select a Group from the Available Groups box and select the right arrow button to move them to
the Programmed Groups box. Repeat for each available Group that you want added to the
KeySecure.
• Remove Group(s):
Select a Group from the Programmed Groups box and select the left arrow button to move them
back to the Available Groups box. Repeat for each Group that you want removed from the
KeySecure.
3. Select the Save button and select Back to return to the KeySecure main screen.
Note: Users can be Programmed by a group. Changes to groups, following programming, won’t be
reflected in the device.
Note: When the KeySecure syncs with KnoxConnect the Actual Users and Groups are updated with the
Programmed Users and Groups.
Applying Changes to all KeySecure Devices
To make changes to all KeySecure devices at the same time:
1. On the KeySecure main screen, select the Apply to all KeySecures Menu button to configure attributes
for all KeySecure devices or KeySecure devices in a specific group.

KNOXCONNECT
®
| ADMIN USER GUIDE
KNOX COMPANY | 800-552-5669 | TEC[email protected] | KNOXBOX.COM | OPE-KSADMN-0290-G | PAGE 39 of 76
The KeySecure Attributes screen displays.
2. Update KeySecure attribute fields and checkboxes as needed.
3. To apply changes to all KeySecure devices, select the Save button under Apply to All Devices. To apply
changes to a specific group, select the group under the Apply to Devices of Group drop-down list and
select the Save button.
4. Select Back to return to the KeySecure main screen.

KNOXCONNECT
®
| ADMIN USER GUIDE
KNOX COMPANY | 800-552-5669 | TEC[email protected] | KNOXBOX.COM | OPE-KSADMN-0290-G | PAGE 40 of 76
MEDVAULT
The MedVault menu option allows the user to configure MedVault device parameters. The MedVault screen
shows two columns with user-configurable parameters: Edit and User PINs.
MedVault Screen Glossary:
• Serial Number: MedVault serial number
• Device Location: Installation location/apparatus name of the MedVault
• Groups: List of groups assigned to the MedVault
• Online: When checked, indicates which MedVault devices are connected to the network and can
communicate with the KnoxConnect website
• Synced: When checked, indicates that the device has been updated with the latest user-updated or auto-
updated changes
• Firmware Version: the revision of firmware currently running in the device
• Edit: Available to authorized Admin users to change or update device or group information
• User PINs: Provides the PIN codes that need to be programmed into the KeySecure
• Apply to all MedVault Menu (button): Edit attributes and apply to a MedVault group or all MedVault
devices
Note: You can sort any column, where the title is underlined, by selecting the title of the column. You can also
perform a search by entering or selecting a name or ID under each column name. To export a list, see section
Exporting Lists.

KNOXCONNECT
®
| ADMIN USER GUIDE
KNOX COMPANY | 800-552-5669 | TEC[email protected] | KNOXBOX.COM | OPE-KSADMN-0290-G | PAGE 41 of 76
Editing MedVault Information
1. On the MedVault main screen, select Edit under the Edit column for a specific MedVault SN and the
following screen is displayed.
2. In the Device Information section, update the Location, Asset Number, and Groups fields as needed.
3. In the Device Hardware Programming section, update the PIN Attempts before Lockout, Lockout Time
fields and select the Override Lockout checkbox. Use the Notes column as a guide.
Ambulance 4
Station 4
Station 4

KNOXCONNECT
®
| ADMIN USER GUIDE
KNOX COMPANY | 800-552-5669 | TEC[email protected] | KNOXBOX.COM | OPE-KSADMN-0290-G | PAGE 42 of 76
4. Update network settings fields as needed. See the Knox Device Networking Guide for details on Network
templates and configuring network settings.
5. Select the Save button and select Back to return to the MedVault main screen
Important: The MedVault door sensor must be initialized before first use and any time the door is replace.
Note: When the MedVault syncs with KnoxConnect the Actual Device settings will update with the Programmed
Device Settings. See information below and the MedVault Admin Guide for more information.
Screen Glossary:
The Device Information section contains the following information:
• Model: The device profile given when the unit was created in KnoxConnect
• Hardware Revision: The hardware profile given when the device was created in KnoxConnect
• Serial Number: MedVault serial number
• Device Location: An optional but recommended field identifying the installation location/apparatus name
of the MedVault
• Asset Number: An optional field for entry of a department-assigned asset or inventory tracking number
• Groups: List of groups assigned to the MedVault
The Device Hardware Status screen contains the following information:
• Online: System shows a checkmark when the MedVault is connected to KnoxConnect
• Synced: System shows a checkmark when the device is current with the latest changes
• Last Server Contact: The last time-date the device was connected to KnoxConnect
• Ethernet MAC address: identity assigned to the device by Knox
• WiFi MAC address: identity assigned to the device by Knox
• Internal IP address: dynamically updated field containing the LAN address the device is using
• Active SSID: The SSID that the device is currently using for the network connection.
The Device Hardware Programming section contains the following information:
• Programmed Device Settings: The most recent settings that have been entered.
• Actual Device Settings: The settings the device reported during its latest connection.
• Firmware Version: The revision of firmware currently running in the device. A difference between the
Programmed and Actual indicates syncing is required to install the update
• PIN Attempts Before Lockout: The number of invalid PIN entries allowed before the device enters
lockout mode
• Lockout Time: The number of minutes the device will prevent PIN entry after the set number of invalid
attempts
• Match Door to Chassis: Used to pair the high security door sensor with the chassis. Check this box
only when conducting door replacement. The device must be online to perform this update.
• Dual PIN Settings: Indicates if two PINs are required for the release of keys. This selection is only
available if Dual PIN has been enabled by the Primary Admin in the Admin settings. See the Dual PIN
feature section for more information
• Override Lockout: Overrides a lockout, device must be online.
• SSL Certificate version: Dynamically updated field that shows the version of the installed KnoxConnect
SSL certificate
• KnoxConnect mode: Dynamically updated field indicating the implementation method of KnoxConnect
software in use
• Network Template: The selection box shows the network connections available for the device
• Static Ethernet IP: Field to enter a unique static ethernet IP address if used for the device connection
• Static WiFi IP: Field to enter a unique static WiFi IP address if used for the device connection
• Enterprise Identity: Field to enter the object name used for LDAP authentication

KNOXCONNECT
®
| ADMIN USER GUIDE
KNOX COMPANY | 800-552-5669 | TEC[email protected] | KNOXBOX.COM | OPE-KSADMN-0290-G | PAGE 43 of 76
• Client Certificate: Selection box for certificate if using EAP-TLS
• Enterprise Password: The network password the device is using, populated from the network template
• Enterprise Anonymous Identity: Field to enter an optional anonymous identity for the device-- used with
certain types of Enterprise Security, populated from the network template
Editing MedVault User PINs
To configure which users can open the MedVault (identified by serial number) using their PIN code:
1. On the MedVault main screen, select the Edit button under User PINs for a specific MedVault SN and the
following screen displays.
2. Changing MedVault PINs, Users and Groups
Note: You can select more than one user or group at a time by holding down the CTRL key on your
keyboard when selecting.
• Add User(s):
Select a User from the Available Users box and select the right arrow button to move them to the
Programmed Users box. Repeat for each available User that you want added to the KeySecure.
• Remove User(s):
Select a User from the Programmed Users box and select the left arrow button to move them
back to the Available Users box. Repeat for each User that you want removed from the
KeySecure.
• Add Group(s):
Select a Group from the Available Groups box and select the right arrow button to move them to
the Programmed Groups box. Repeat for each available Group that you want added to the
KeySecure.
• Remove Group(s):
Select a Group from the Programmed Groups box and select the left arrow button to move them
back to the Available Groups box. Repeat for each Group that you want removed from the

KNOXCONNECT
®
| ADMIN USER GUIDE
KNOX COMPANY | 800-552-5669 | TEC[email protected] | KNOXBOX.COM | OPE-KSADMN-0290-G | PAGE 44 of 76
KeySecure.
3. Select the Save button and select Back to return to the MedVault main screen.
Note: Users can be Programmed by a group. Changes to groups, following programming, won’t be
reflected in the device.
Note: When the MedVault syncs with KnoxConnect the Actual Users and Groups are updated with the
Programmed Users and Groups.
Applying Changes to all MedVault Devices
To make changes to all MedVault devices at the same time:
1. On the MedVault main screen, select the Apply to all MedVault Menu button to configure attributes for
all MedVault devices or MedVault devices in a specific group.
The MedVault Attributes screen displays.

KNOXCONNECT
®
| ADMIN USER GUIDE
KNOX COMPANY | 800-552-5669 | TEC[email protected] | KNOXBOX.COM | OPE-KSADMN-0290-G | PAGE 45 of 76
2. Update MedVault attribute fields and checkboxes as needed.
3. To apply changes to all MedVault devices, select the Save button under Apply to All Devices. To apply
changes to a specific group, select the group under the Apply to Devices of Group drop-down list and
select the Save button.
4. Select Back to return to the MedVault main screen.
Initializing the Door Sensor
The MedVault door position sensor is a Virtual Interlock Validator (VIV) in the chassis door and frame that must
be paired if the door or circuit board is replaced. If the VIV is not paired, the MedVault’s display will show an error
UNLOCKED: VIV Fail and an error will appear in the Device Audit Trail on KnoxConnect. To pair the VIV to the
new circuit board, perform the following steps:
1. On the MedVault main screen, select the Edit button for the MedVault you wish to pair.
2. Navigate to the Device Hardware Programming section and check the box for Match door to chassis

KNOXCONNECT
®
| ADMIN USER GUIDE
KNOX COMPANY | 800-552-5669 | TEC[email protected] | KNOXBOX.COM | OPE-KSADMN-0290-G | PAGE 46 of 76
3. Select the Save button at the bottom of the screen.
4. At the MedVault keypad, press and hold the star (*) button for 5 seconds to force a network
sync with KnoxConnect to download the settings.
5. Confirm that the display of the MedVault show “Locked” when the door is closed.
6. Navigate to Device Audit Trail to confirm the configuration change. The audit trail for your
device serial number will contain the events shown below:
7. Navigate back to the Device Hardware Programming and uncheck the Match door to chassis
box.

KNOXCONNECT
®
| ADMIN USER GUIDE
KNOX COMPANY | 800-552-5669 | TEC[email protected] | KNOXBOX.COM | OPE-KSADMN-0290-G | PAGE 47 of 76
SecurePIN
The SecurePIN tab is used by Dispatch users and Secondary or Primary Admins to generate temporary access
codes for KeySecures. SecurePIN temporary access codes can be used to release keys from an enabled device
by users who do not have their own PIN.
A SecurePIN can be generated in advance or upon demand. SecurePINs are generated and used for the specific
device selected. It becomes inactive after it is used and will also deactivate any previously generated
SecurePINs generated for that device.
The device does not require a connection to KnoxConnect for a SecurePIN to be generated and used.
The feature can be used in conjunction with normal PIN use. For more information, see the SecurePIN Quick
Start Guide.
Generating a SecurePIN for a device
To generate a SecurePIN
1. Select the device by entering its Location name or serial number in the search box or select the device
from the device list.
2. In the Requestor Name box, Enter the name of the person who will use the SecurePIN .
3. Select the Generate SecurePIN button
4. A screen will appear with the SecurePIN. The SecurePIN number can be communicated verbally or can
be copied and pasted into the department CAD system by selecting the pages icon on the right
Note: The SecurePIN will no longer be viewable or retrievable once the pop-up window is close

KNOXCONNECT
®
| ADMIN USER GUIDE
KNOX COMPANY | 800-552-5669 | TEC[email protected] | KNOXBOX.COM | OPE-KSADMN-0290-G | PAGE 48 of 76
5. Information about the request can be recorded and saved in the Notes field.
6. Select OK to close the pop-up window.
Viewing SecurePIN Transaction History
To review SecurePIN transactions
1. Select the SecurePIN History tab for the device type
2. Select Get Records to refresh the information. Information can be filtered by Location, device serial
number, dispatcher or requester by selecting from the drop down boxes or sorted by Date/Time Requested.

KNOXCONNECT
®
| ADMIN USER GUIDE
KNOX COMPANY | 800-552-5669 | TEC[email protected] | KNOXBOX.COM | OPE-KSADMN-0290-G | PAGE 49 of 76
3. Select the View button next to a transaction to see details or add notes
Note: Admins can also view transaction history for SecurePIN generation in the KnoxConnect Event Log. History
of PIN use will be found in the Device Audit Trails for the device type.

KNOXCONNECT
®
| ADMIN USER GUIDE
KNOX COMPANY | 800-552-5669 | TEC[email protected] | KNOXBOX.COM | OPE-KSADMN-0290-G | PAGE 50 of 76
NETWORK SETTINGS
The Network Settings menu option allows configuration of network and security settings that are used by
KeySecure devices to connect to Ethernet and WiFi networks.
IMPORTANT: Before beginning setup, please consult your IT or IT Security personnel for assistance and
required information. You will need to know the type of Enterprise Security your organization uses for WiFi
connections and have the certificate information (if applicable) available in order to proceed.
For detailed instructions, see the Knox Networking Guide.
Network Template Tab
The Network Template tab allows new network connection configurations to be established as a template that can
be applied to individual KeySecure devices or groups of KeySecure devices. Templates can be added, edited or
viewed based on user permissions. KnoxConnect version 2.0.6 and higher supports use of network enterprise
security for WiFi, including EAP and PEAP and allows devices to be configured with connections to multiple
networks.

KNOXCONNECT
®
| ADMIN USER GUIDE
KNOX COMPANY | 800-552-5669 | TEC[email protected] | KNOXBOX.COM | OPE-KSADMN-0290-G | PAGE 51 of 76
Adding Network Templates
To begin, a default network template must be established. If using Enterprise Security for WiFi, certificates must
be added before proceeding.
1. From the Network Templates tab, select the Add Template button.
2. Provide a name in the Template Name field.
3. Select IP Assignment Type
•
If devices will get their IP addresses dynamically using DHCP when they connect to the network,
select the Dynamic radio button for the connection type you will be using (Ethernet or WiFi).
•
If using static IP addresses, select the Static radio button for the connection type you will be using
(Ethernet or WiFi) and populate the Gateway, Network Mask and DNS IP address fields.
Note: Templates can only be used for either Ethernet or WiFi, but not both. For connection type not
used, leave radio button defaulted to Dynamic.
4. Create Network Profiles
For each template, you will need to create at least one Profile. You can have up to seven network
profiles per template consisting of no more than one Ethernet profile or up to seven WiFi profiles.
Note: Network profile 0 must be populated.
Note: If using Ethernet, Profile 0 must be Profile Type Ethernet.
Note: If using EAP_PEAP-MSCHAP Profile 0 must be used for this Enterprise Security type.

KNOXCONNECT
®
| ADMIN USER GUIDE
KNOX COMPANY | 800-552-5669 | TEC[email protected] | KNOXBOX.COM | OPE-KSADMN-0290-G | PAGE 52 of 76
Certificate Authority Certificates Tab
If using network security that requires use of a Certificate Authority Certificates, the certificate must be added
before establishing the Network Template and profile. To add a certificate,
1. Select the Add button.
2. Provide a name and optional description for the Certificate.
3. Add the certificate:
•
To upload the certificate in PEM format, select the Upload a CA certificate in PEM format radio
button, then select Choose File button to select the file.
•
To add the certificate via text, select Upload a CA certificate by pasting in the PEM radio button and
paste the complete text of the PEM (including beginning and ending characters) in the provided field.
4. Select the Upload button to complete the installation process.
Note: You can navigate to the Certificate tab to verify the new certificate appears in the list.

KNOXCONNECT
®
| ADMIN USER GUIDE
KNOX COMPANY | 800-552-5669 | TEC[email protected] | KNOXBOX.COM | OPE-KSADMN-0290-G | PAGE 53 of 76
Enterprise Client Certificates Tab
If using network security that requires use of an Enterprise Client Certificate, the certificate must be added
before establishing the Network Template and profile. To add a certificate,
1. Select the Enterprise Client Certificates tab and then select the Add button.
2. Provide a name and optional description for the certificate.
3. Add the certificate:
• To upload the certificate, select the Upload a client certificate in PFX/PKCS12 format radio button,
then select Choose File to browse to the file location
• To add the certificate via text file, select the Upload a client certificate by pasting in the PEM radio
button and paste the complete text of the PEM text, including beginning and ending characters
4. Provide the private key password if required.
4. Select Upload to complete the installation process. A green success message will display when saved.
Note: You can navigate to the Enterprise Client Certificates tab to verify the new certificate appears in the
list

KNOXCONNECT
®
| ADMIN USER GUIDE
KNOX COMPANY | 800-552-5669 | TEC[email protected] | KNOXBOX.COM | OPE-KSADMN-0290-G | PAGE 54 of 76
Edit or Delete a Certificate
Only the name and description field of a certificate may be edited. Please consult the Knox Networking Guide
before deleting a certificate.
Warning: Deleting a certificate without following the proper procedures may prevent devices from
connecting to your networks and may require all devices to be reconfigured using a USB connection.
To edit the certificate information.
a. From the Network Settings page, select the Certificate Authority Certificates or Enterprise Client
Certificates tab. A list of certificates will be shown.
b. Select the Edit button for the certificate you wish to modify.
c. Make changes and select the Save button.
1. To delete the certificate.
a. Remove the certificate from all assigned network templates.
b. From the Network Settings page, select the Certificate Authority Certificates or Enterprise Client
Certificates tab. A list of certificates will be shown.
c. Select the Delete button for the certificate you wish to modify. Select OK on the dialogue box.

KNOXCONNECT
®
| ADMIN USER GUIDE
KNOX COMPANY | 800-552-5669 | TEC[email protected] | KNOXBOX.COM | OPE-KSADMN-0290-G | PAGE 55 of 76
DEVICE AUDIT TRAILS
This menu option opens to the KeySecure tab in audit trails. It shows KeySecure Audit Trail information and
includes additional tabs for other devices and information that you are authorized to view or edit. Users must
have the role of View-Only or Admin to view device audit trails.
IMPORTANT:
• The Report Settings function compiles reports for selected groups and filters; it does not include start and
end dates.
• When loading other report settings, the previously selected dates won’t change.
• When loading “default/clear,” the previously selected dates will change to the default (current day back
through the previous 30 days).
• Audit Trail settings can include groups and other selected filtered options that are explained under each
tabs’ procedure, Creating a Filtered Report.
• When the user creates and saves new settings for an audit trail report, the settings are saved and can be
easily retrieved for later application.
• When changing a Group on a tab’s main screen to generate a new group report, you must retrieve the
group records first by selecting Get Records. Then filter the report by selecting locations, events, users
and serial numbers.
• Report settings are stored by each unique username.
• Users can collect records from the archive for records older than 6 months. Select “Use Archive” on any
of the device tabs.

KNOXCONNECT
®
| ADMIN USER GUIDE
KNOX COMPANY | 800-552-5669 | TEC[email protected] | KNOXBOX.COM | OPE-KSADMN-0290-G | PAGE 56 of 76
KeySecure Tab
The KeySecure tab opens the Audit Trail information for the KeySecure device and device users.
Selecting and Viewing Audit Trails
To display a list of audit events based on selection criteria:
1. Enter or select the dates, time, and group for the audit trail that you wish to view. You can also limit
records to a specific event category, and even one specific KeySecure serial number (S/N).
1. Select the Get Records button to display a list of audit events that meet your criteria.
2. Filter by location, KeySecure S/N, Event Category, Knox eKey S/N or Mechanical Key, and User Name,
to view a more selective list.
• The Event drop-down list has the following options: All, Key Removed/Returned, Invalid PIN, Config
Change Success, Config Change Failed, Knox eKey Firmware Update Failed, Tamper Detected,
System Restart, Low Battery, Lockout, Bad Jurisdiction, Internal Error, KeyConfig Change, KeyComm
Error, Key Activation Failure, and Provision Mismatch
Note: To export a list, see section Exporting Lists.

KNOXCONNECT
®
| ADMIN USER GUIDE
KNOX COMPANY | 800-552-5669 | TEC[email protected] | KNOXBOX.COM | OPE-KSADMN-0290-G | PAGE 57 of 76
MedVault Tab
The MedVault tab opens the Audit Trail information for the MedVault device and device users.
Selecting and Viewing Audit Trails
To display a list of audit events based on selection criteria:
2. Enter or select the dates, time, and group for the audit trail that you wish to view. You can also limit
records to a specific event category, and even one specific MedVault serial number (S/N).
3. Select the Get Records button to display a list of audit events that meet your criteria.
4. Filter by location, MedVault S/N, Event Category, and User Name, to view a more selective list.
• The Event drop-down list has the following options: door open/close, configuration change success,
configuration change failed, invalid PIN, tamper detected, system restart, low battery, lockout, internal
error, VIV, provision mismatch
Note: To export a list, see section Exporting Lists.
KnoxDock Tab
The KnoxDock tab opens the Audit Trail information for the KnoxDock application and device users

KNOXCONNECT
®
| ADMIN USER GUIDE
KNOX COMPANY | 800-552-5669 | TEC[email protected] | KNOXBOX.COM | OPE-KSADMN-0290-G | PAGE 58 of 76
Selecting and Viewing Audit Trails
To display a list of audit events based on selection criteria:
1. Enter or select the dates, time, and group for the audit trail that you wish to view. You can also limit
records to a specific event category, and even one specific Knox eKey serial number (S/N).
2. Select the Get Records button to display a list of audit events that meet your criteria.
3. Filter by Device, KnoxDock PC App S/N, Event, Knox eKey S/N, User Name, KnoxDock ID.
• The Event drop-down list has the following options: All, Release Knox eKey, Knox eKey
Removed/Returned, Knox eKey Attached, USB Communication Error, PIN Lockout, PIN Expired,
Software Started, Software Stopped, Server Error, Key USB Port, Get Key Data Failed, Key Audit
Trail Collection, Lock Audit Trail Collection
Note: To export a list, see section Exporting Lists.
Knox eKey Tab
The Knox eKey tab opens the Audit Trail information for the Knox eKey device and users.
Selecting and Viewing Audit Trails
To display a list of audit events based on selection criteria:
1. Enter or select the dates, time, and group for the audit trail that you wish to view. You can also limit
records to a specific event category, and even one specific Knox eKey serial number (S/N).

KNOXCONNECT
®
| ADMIN USER GUIDE
KNOX COMPANY | 800-552-5669 | TEC[email protected] | KNOXBOX.COM | OPE-KSADMN-0290-G | PAGE 59 of 76
2. Select the Get Records button to display a list of audit events that meet your criteria.
3. Filter by Device, Knox eKey S/N, Event, Knox eLock Core S/N, and User Name to view a more selective
list.
•
The Event drop-down list has the following options: All, Lock Communication, Open Lock, Change
Lock Code, Collect Lock Audit, Report Lock Audit, Update Lock Firmware, Update Key Firmware,
Server Communication, Update Key Params, Internal Key Events, Key Authorization, Expiration
Timer Expired.
Note: To export a list, see section Exporting Lists.
Knox eLock Core
Tab
The Knox eLock Core tab opens the Audit Trail information for the Knox eLock Core device and users.
Selecting and Viewing Audit Trails
To display a list of audit events based on selection criteria:
1. Enter or select the dates, time, and group(s) for the audit events that you wish to view. You can also limit
records to a specific event category, and even one specific Knox eCore serial number (S/N).
2. Select the Get Records button to display a list of audit events that meet your criteria.

KNOXCONNECT
®
| ADMIN USER GUIDE
KNOX COMPANY | 800-552-5669 | TEC[email protected] | KNOXBOX.COM | OPE-KSADMN-0290-G | PAGE 60 of 76
3. Filter by Reporting Knox eKey S/N, Knox eLock Core S/N, Event, Knox eKey S/N, and User Name to view
a more selective list.
•
The Event drop-down list has the following options: All, Open Lock, Change Lock Code, Collect Audit
Trail, Update Lock Firmware, Alter Lock Info, Internal Lock Events, Errors
Note: To export a list, see section Exporting Lists.
KNOXCONNECT EVENT LOG
This menu option displays events that are occurring and being captured in KnoxConnect. Users must have the
role of View-Only or Admin to view the event log.
IMPORTANT:
• The Report Settings function compiles reports for selected groups and filters; it does not include start and
end dates.
• When loading other report settings, the previously selected dates won’t change.
• When loading “default/clear,” the previously selected dates will change to the default (current day back
through the previous 30 days).
• Event log settings can include groups and other selected filtered options that are explained under each
tabs’ procedure, Creating a Filtered Report.
• When the user creates and saves new settings for an event log
report, the settings are saved and can be easily retrieved for
later application.
• When changing a Group on a tab’s main screen to generate a
new group report, you must retrieve the group records first by
selecting Get Records. Then filter the report by selecting
locations, events, users and serial numbers.
• Report settings are stored by each unique username.
• Users can collect records from the archive for records older
than 2 months. Select “Use Archive” on any of the device tabs.

KNOXCONNECT
®
| ADMIN USER GUIDE
KNOX COMPANY | 800-552-5669 | TEC[email protected] | KNOXBOX.COM | OPE-KSADMN-0290-G | PAGE 61 of 76
Selecting and Viewing Event Logs
To bring up a list of Event Logs based on selection criteria:
1. On the main screen, enter or select the dates, time, and group(s) for the event log that you wish to view.
2. Select Get Records to bring up a list of event logs that meet your criteria.
3. Filter by event type, actor/subject type, actor/subject name and attribute name to view a more selective
list.
•
The Event Type drop-down list includes: All, Login, Update Database, Update Device, Update
Device w/o GetCommand, AuditUpload, AuditInventoryUpload, Create, Delete, SentEmail,
GetDisabledKeys, ConfigMismatch, SyncRequest, MigrateRequest
•
The Actor/Subject Type drop-down list includes: All, Server, User, Key, KeySecure, Lock, Lock
code, Group, KnoxDock SW, localServer, Factory, Customer
4. To export a list, see section Exporting Lists.
Selecting and Viewing an Existing Report
To select an existing report:
1. On the main screen, select the Report Settings button (under Get Records) to open the Event Log
Report Settings screen.

KNOXCONNECT
®
| ADMIN USER GUIDE
KNOX COMPANY | 800-552-5669 | TEC[email protected] | KNOXBOX.COM | OPE-KSADMN-0290-G | PAGE 62 of 76
2. Select the report name in the Load Report Settings field, then select the Load button.
The main screen will re-open and the event report name, with previously filtered information, will appear.
Note: To export a report, see section Exporting Lists.

KNOXCONNECT
®
| ADMIN USER GUIDE
KNOX COMPANY | 800-552-5669 | TEC[email protected] | KNOXBOX.COM | OPE-KSADMN-0290-G | PAGE 63 of 76
JURISDICTION
This menu option displays a jurisdiction’s location. It is viewable to all users with access to KnoxConnect.
Viewing Jurisdiction Details
1. Select Details to open a specific Jurisdiction screen to view that jurisdiction’s details.
The Jurisdiction Details screen appears.
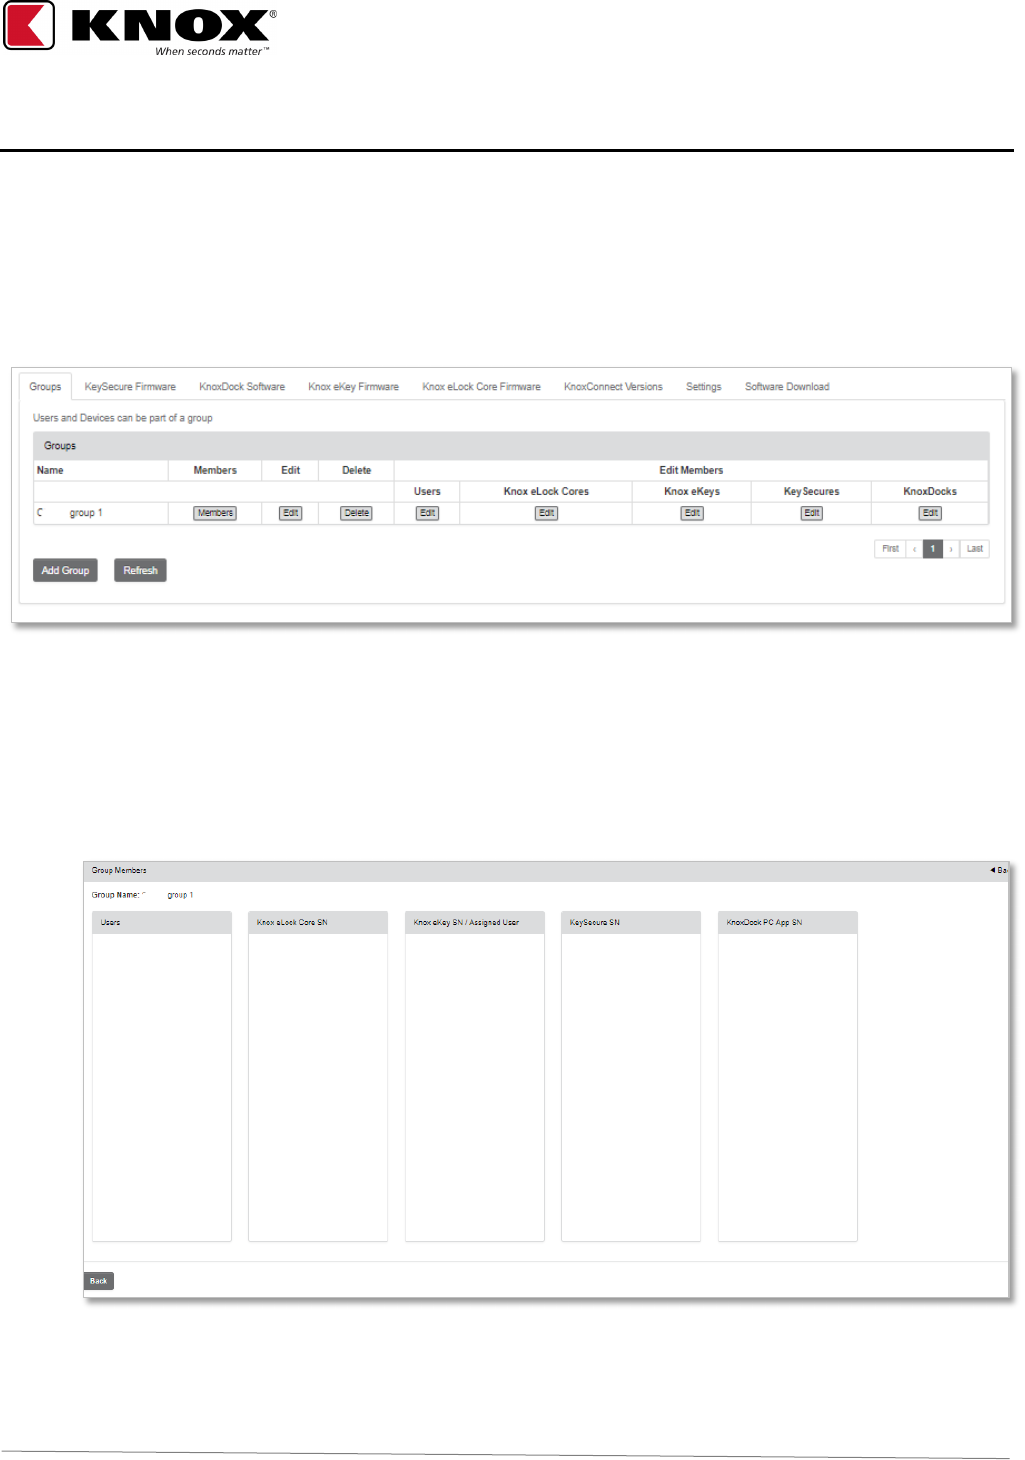
KNOXCONNECT
®
| ADMIN USER GUIDE
KNOX COMPANY | 800-552-5669 | TEC[email protected] | KNOXBOX.COM | OPE-KSADMN-0290-G | PAGE 64 of 76
ADMIN
This menu option opens to the Groups tab and displays tabs to manage firmware, software, hardware, shared
jurisdictions, certificates, settings, and software application downloads.
Groups Tab
The Groups tab displays a screen that allows authorized users to create groups and view a list of all members for
each group.
Viewing Group Members
To view a group’s members for a selected group:
1. On the Groups main screen, select the Members button next to a group listed under the Name column.
The Group Members screen displays and provides a list of users and device serial numbers for the
selected group.
2. Select Back to return to the main screen.
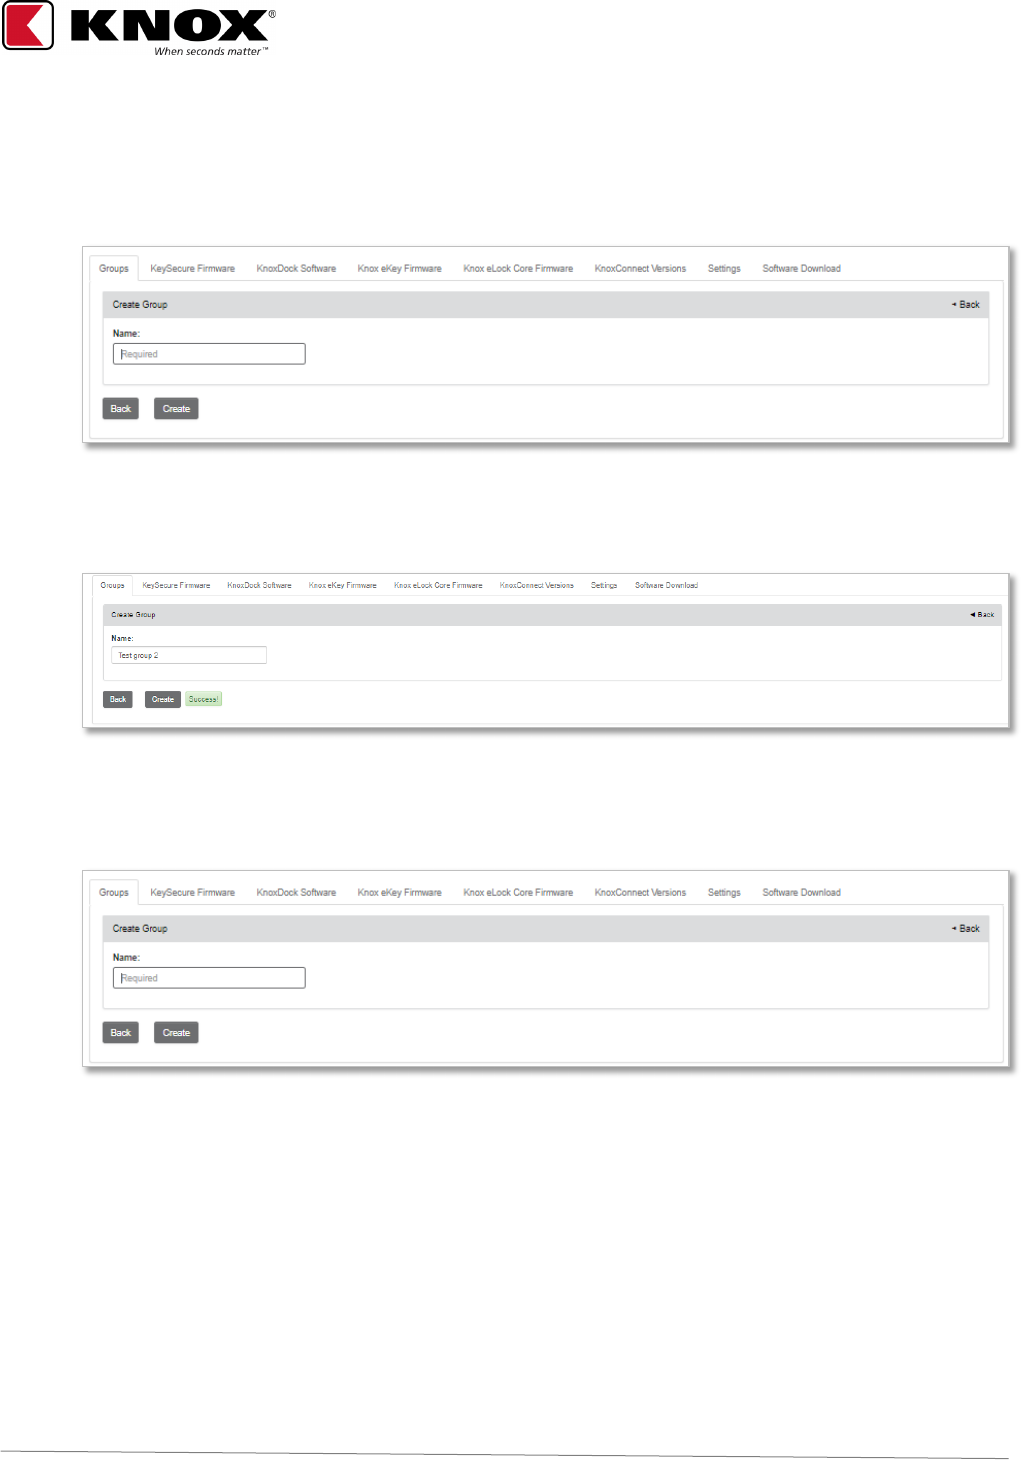
KNOXCONNECT
®
| ADMIN USER GUIDE
KNOX COMPANY | 800-552-5669 | TEC[email protected] | KNOXBOX.COM | OPE-KSADMN-0290-G | PAGE 65 of 76
Creating, Editing, and Deleting, Groups
To create a group:
1. On the Groups main screen, select the Add Group button to create a new group, the Create Group
screen displays.
2. Enter the name of a new group.
3. Select the Create button, then select Back to return to the Groups main screen to view the new group.
To edit a group:
1. On the Groups main screen, select the Edit button to edit a group’s name.
The Edit Group screen appears.
2. Change the name of the group and select the Save button.
3. Select Back to return to the main screen to view the name change.
To delete a group:
1. On the Groups main screen, select the Members button next to a group listed under the Name column.
2. Check to see if there are any members in the group. If so, unassign every user or device that is a
member of the group:
a. Use the menu and select Users or any of the “Device” names listed.
b. Select Edit under the Edit column and remove that user/device from the group. Where applicable,
select “none.”

KNOXCONNECT
®
| ADMIN USER GUIDE
KNOX COMPANY | 800-552-5669 | TEC[email protected] | KNOXBOX.COM | OPE-KSADMN-0290-G | PAGE 66 of 76
3. Then, on the Groups main screen, select the Delete button to delete a group’s name.
The Delete prompt appears.
4. Select OK to delete the group.
The group will be removed from the main screen.
Assigning Devices to a Group
To assign devices to a specific group:
1. On the Groups main screen, under Edit Members, select Edit under a device column for the desired
group.
The following screen appears for the specified group, with a list of available devices by SN (with device
location).
2. Select one device serial number or multiple device SNs (use Ctrl or Shift key) to highlight the device(s) to
move.
3. Select the right-arrow button to move the selected device(s) into the Knox eLock Cores which are
member of the group box. Select the left-arrow button to remove the devices.

KNOXCONNECT
®
| ADMIN USER GUIDE
KNOX COMPANY | 800-552-5669 | TEC[email protected] | KNOXBOX.COM | OPE-KSADMN-0290-G | PAGE 67 of 76
Firmware and Versions Tabs
The KeySecure Firmware, Knox eKey Firmware, Knox eLock Core Firmware, and KnoxConnect Versions Tabs
display a screen that allows authorized users to view Release Notes.
Each device (KeySecure, Knox eLock Core, KnoxDock, and KnoxConnect) tab shows the same format as shown
for the Knox eKey below.
Viewing Release Notes
To view Release Notes:
In the device Firmware screen, select the View button under the Release Notes column.

KNOXCONNECT
®
| ADMIN USER GUIDE
KNOX COMPANY | 800-552-5669 | TEC[email protected] | KNOXBOX.COM | OPE-KSADMN-0290-G | PAGE 68 of 76
Settings Tab
The Settings tab displays a screen that allows the user to manage automatic firmware updates for the devices
and configure PIN length settings.
Automatic Firmware Updates
The automatic firmware updates settings are selected by default. Knox recommends automatic firmware updates
to ensure devices maintain current release levels.
1. Select any device checkbox to disable the automatic firmware updates.
2. Select Save button to save the changes.
Note: Disabling automatic updates will prevent devices from receiving the latest feature and bug fixes
PIN Length Settings
System generated and user created PIN lengths can be configured between 4 and 8 digits in length. PIN
Minimum and Maximum length can be the same.
1. Input minimum and maximum PIN lengths in applicable fields.
Select Save button to save the changes.

KNOXCONNECT
®
| ADMIN USER GUIDE
KNOX COMPANY | 800-552-5669 | TEC[email protected] | KNOXBOX.COM | OPE-KSADMN-0290-G | PAGE 69 of 76
Dual PIN Feature
Enabling the Turn on Dual PIN checkbox for a device type will require all devices of that type to require valid
PINs from two separate named users to be entered into the keypad to allow access.
•
Single PIN Requires one valid standard or supervisor PIN for access. Dependent PINs always require a
second valid PIN entry. (Default value)
•
Dual PIN requires two valid user PINs of any type to allow access
•
Dual PIN -- Supervisor requires one valid user PIN of any type and one valid Supervisor PIN to allow
access.
Note: SecurePINs are temporary access codes and do not qualify as a second user PIN. A single valid
SecurePIN will authorize access regardless of Dual PIN settings.

KNOXCONNECT
®
| ADMIN USER GUIDE
KNOX COMPANY | 800-552-5669 | TEC[email protected] | KNOXBOX.COM | OPE-KSADMN-0290-G | PAGE 70 of 76
Software Download Tab
The Software Download tab opens to a list of downloadable software applications used to:
•
Enable the KnoxDock to communicate with KnoxConnect
•
Configure network settings for KeySecure devices
To download a software application:
1. Select one of the downloadable software applications to download the setup file.
2. Open the setup file and follow the prompts to install the software.
3. Note: See networking guide for Knox Device Sync and KnoxConfig software setup. See KnoxDock guide
for KnoxDock PC App software setup.

KNOXCONNECT
®
| ADMIN USER GUIDE
KNOX COMPANY | 800-552-5669 | TEC[email protected] | KNOXBOX.COM | OPE-KSADMN-0290-G | PAGE 71 of 76
VIEWING, CREATING, AND CHANGING REPORTS
Viewing an Existing Report
To view an existing report, it is the same process for each device type (KeySecure, KnoxDock, Knox eKey, Knox
eLock Core, MedVault).
1. On the device (KeySecure, KnoxDock, Knox eKey, Knox eLock Core, MedVault) tab, select the Report
Settings button (under Get Records).
The following screen appears:
2. Select the report name from the Load Report Settings field and select the Load button.
The Device (KeySecure, KnoxDock, Knox eKey, Knox eLock Core, MedVault) tab will re-open and the
report, with the filtered information, will display.
Note: To export a report, see section Exporting Lists.
Creating a Filtered Report
To create a filtered report:
1. On the Device (KeySecure, KnoxDock, Knox eKey, Knox eLock Core, MedVault) tab, select the Start
Date, End Date from the Audit Date Range From/To boxes, select from Device Group, select from Event
Category, and select from the S/N; then select the Get Records button.
2. Select your filtering criteria by location, serial numbers, event, and username.
3. Select the Report Settings button (under Get Records), and the following screen appears.

KNOXCONNECT
®
| ADMIN USER GUIDE
KNOX COMPANY | 800-552-5669 | TEC[email protected] | KNOXBOX.COM | OPE-KSADMN-0290-G | PAGE 72 of 76
4. Enter a new report name in the Save to New Report field and select the Save New button.
5. Select the Load button and the Device (KeySecure, KnoxDock, Knox eKey, Knox eLock Core, MedVault)
tab will re-open with the new report showing the requested filtered information
Note: To export a report, see section Exporting Lists.
Changing Report Settings
To change a report’s settings:
1. On the Device (KeySecure, KnoxDock, Knox eKey, Knox eLock Core, MedVault) tab, select the Report
Settings button (under Get Records).
2. Select a report name from the Load Report Settings field and select the Load button. The Device
(KeySecure, KnoxDock, Knox eKey, Knox eLock Core, MedVault) tab will re-open and the report with
previously filtered information will appear.
3. Select a new Group, if needed, then select the Get Records button to view a list of audit events for the
new Group.
Note: You must select and retrieve the Group first if you will be filtering by a group.
4. Change your filters by location, serial numbers, event, and username.
5. Select the Report Settings button again and ensure the report name is shown in the Save Report
Settings field.

KNOXCONNECT
®
| ADMIN USER GUIDE
KNOX COMPANY | 800-552-5669 | TEC[email protected] | KNOXBOX.COM | OPE-KSADMN-0290-G | PAGE 73 of 76
6. Then select the Save button, the report will now have the new settings.
Note: You can also save the revised settings as a new report. Enter a new name in the Save to New
Report field, and then select the Save New button as shown below.
7. Select Back to return to the Device (KeySecure, KnoxDock, Knox eKey, Knox eLock Core, MedVault) tab
to view the updated report.
Note: To export a list, see section Exporting Lists.
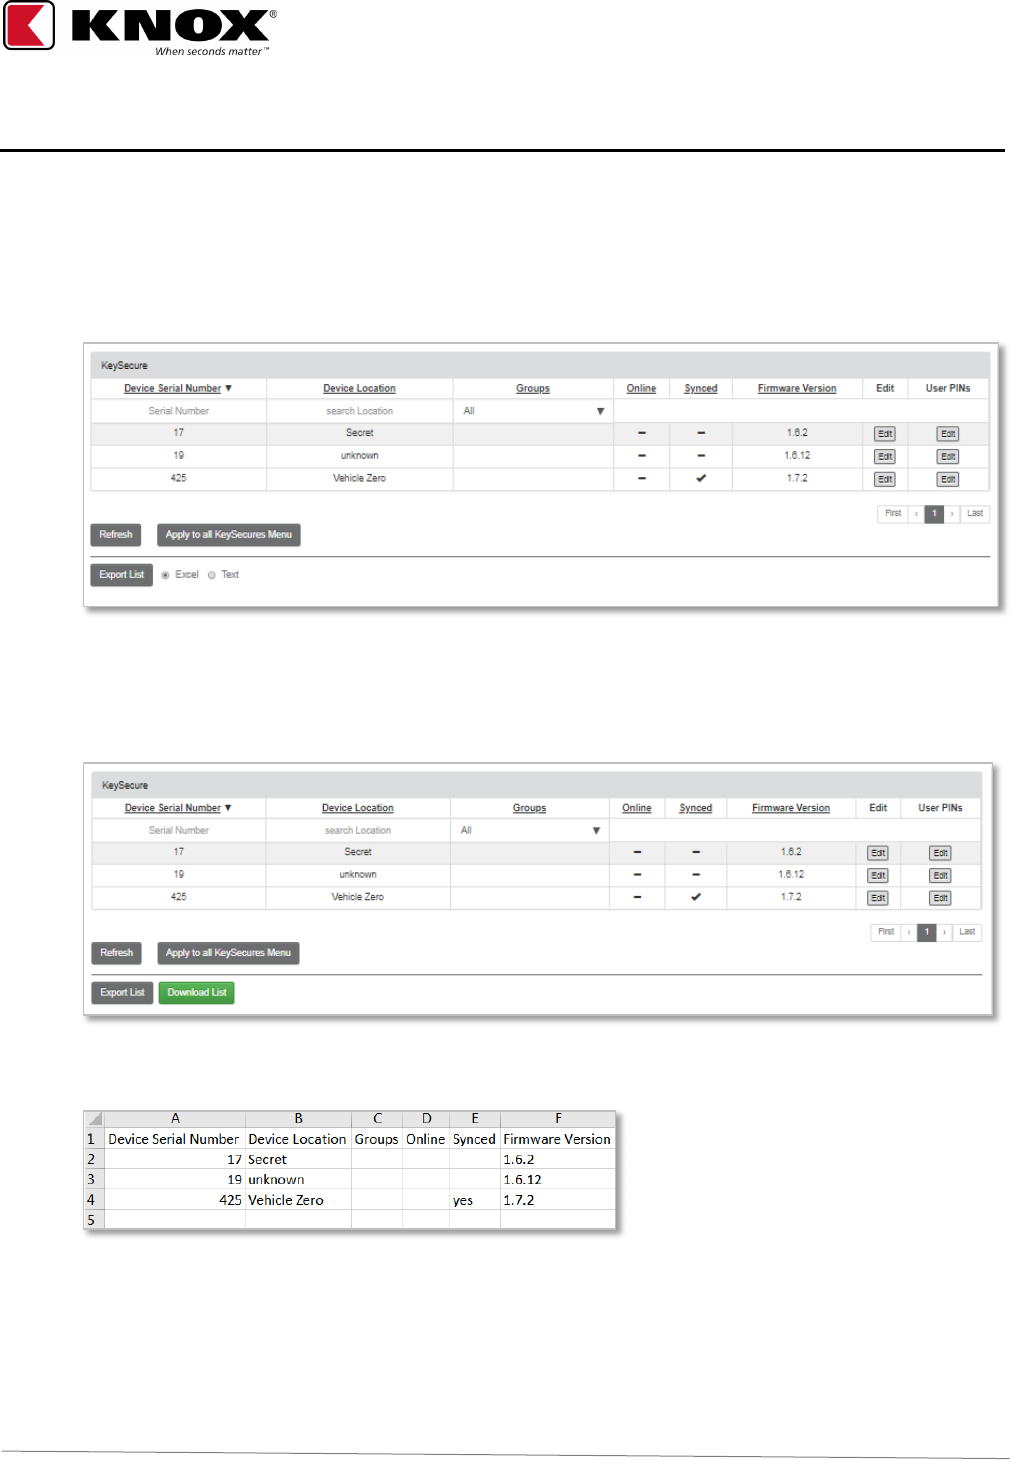
KNOXCONNECT
®
| ADMIN USER GUIDE
KNOX COMPANY | 800-552-5669 | TEC[email protected] | KNOXBOX.COM | OPE-KSADMN-0290-G | PAGE 74 of 76
EXPORTING LISTS
Many KnoxConnect screens provide an Export List button that you can use to export your updated lists.
To export a list:
1. Select the Excel, Text, or CSV radio button and then select the Export List button. An Excel (xlsx), tab-
delineated (txt), or comma-separated values (csv) file will be created.
Note: You can export 1000 records at one time. Select Next in the upper-right-hand corner of the export
function to retrieve the next 1000 items.
2. Select the Download List button to download the file to your computer.
3. Save the exported file.

KNOXCONNECT
®
| ADMIN USER GUIDE
KNOX COMPANY | 800-552-5669 | TEC[email protected] | KNOXBOX.COM | OPE-KSADMN-0290-G | PAGE 75 of 76
TROUBLESHOOTING
The following table presents potential usage issues that you could encounter when using the application.
If you cannot find a resolution, contact Technical Support at (800) 552-5669.
Frequently Asked Questions
Issue
Potential Cause
Resolution
Users and Groups
Cannot create a user PIN code.
PIN has already been assigned in
your jurisdiction.
Create another PIN code.
You are not authorized to create
PIN code
Find an Admin at a level higher than
the user to change the PIN code.
Cannot change user PIN code.
You are not authorized to change
PIN code.
Find an Admin at a level higher than
the user to change the PIN code.
Cannot delete a group.
Group still has members assigned.
Delete members from specific device
group; then delete the group.
When I add one or more groups
to use a device, the group(s)
that existed on that device’s
main screen disappears.
In addition to the new group(s),
you did not reselect the groups
that were already on the main
screen.
When you select your new group(s) to
add to a specific device, use the CTRL
key also to select the groups that are
currently on that device’s main screen.
Cannot delete a user from the
KnoxConnect Software
N/A
User will remain assigned to a device
until the next time the device syncs
with KnoxConnect
Forgot PIN code, passphrase,
or command code.
N/A
Contact an Admin at a higher level
who can reset the code.
Note: There is no auto-reset prompt to
set a new PIN code, passphrase, or
command code.
Can’t select multiple groups or
users
N/A
Press the CTRL key while you select
the groups or users.
PIN code won’t work for the
device.
You are using the wrong PIN
code.
Use the assigned command code for
the Knox eKey or Knox eLock Core not
your user PIN code.
Your PIN has been disabled.
Contact an Admin to activate your PIN
code.
You have forgotten your PIN code.
Contact an Admin to reset your PIN
code.
Knox eKeys
Currently Programmed for
device use but can’t release
Knox eKey or open Knox eLock
Cores.
Provisional assignment in software
hasn’t yet synced with the actual
device.
The device must be within wireless
range of PC router or directly
connected to the PC to sync with the
Knox device.
Knox eKey won’t unlock
KnoxBox.
Knox eKey has timed out.
Put the key in KnoxDock and use the
KnoxDock Software to reset the
expiration timer.

KNOXCONNECT
®
| ADMIN USER GUIDE
KNOX COMPANY | 800-552-5669 | TEC[email protected] | KNOXBOX.COM | OPE-KSADMN-0290-G | PAGE 76 of 76
Issue
Potential Cause
Resolution
Jurisdictions
Knox eKey won’t work in other
jurisdictions.
The key is not programmed to
work in other jurisdictions.
Program key with a lock code of the
other jurisdiction (this is possibly only if
the other jurisdiction shared their lock
code).
Can’t set up shared
jurisdictions.
You are not authorized to set up
shared jurisdictions.
Contact Knox to set up shared
jurisdictions. Sharing requires
permissions from and agreements
between the other jurisdictions.
Lock Codes
Can’t delete a lock code.
You are not authorized to delete a
lock code.
Contact Knox to delete lock codes.
Can’t add a lock code.
You are not authorized to delete a
lock code.
Contact Knox to set up lock codes.
Audit Trails
Why can’t I save a report on
KnoxConnect?
You cannot save a report, only
report settings.
You can save report settings by
selecting Report Settings, giving the
settings and associated records a
unique name, and saving the settings
to your PC. Retrieve the settings and
associated records by loading the
report by name and entering the dates
for the originally saved settings. Then
select Get Records. Export the
records as a PDF and save to your
PC.
General
When I select the back arrow
on my browser, I am not
navigated to the last screen I
was on.
You need to use the navigation
options in KnoxConnect.
At the top and bottom of each screen,
there is either or both a Back button
Or a Back prompt.
Select either one to go back to the
previous screen.
