
Cold Chain Monitoring Program
SensiWatch Tracks | TempTale GEO LTE
User Guide

Table of Content
Supplier Start & Placement Instructions ........................................................................... 3
LTE Ordering Information ................................................................................................. 4
SensiWatch Tracks Software Login and Logout ............................................................... 5
Create Shipment .............................................................................................................. 6
Alarm / Arrival Notifications & Return Instructions ............................................................ 7
Alarm Actions - Who Is Responsible?.............................................................................. 8
Tab Views - Basic Navigation ........................................................................................... 9
Map Tab View ................................................................................................................ 10
Directory Tab View ......................................................................................................... 11
Reports Tab View - Search ............................................................................................ 12
Search Results - Trip Detail View ................................................................................... 13
Sensitech Contact Information ....................................................................................... 14
Standard Operating Procedure ....................................................................................... 15
Procedures ..................................................................................................................... 16

Page 3 of 17
Cold Chain Monitoring Program
© 2022 Carrier. All Rights Reserved.
Supplier Start & Placement Instructions
1. Fill Out The TempTale
®
GEO LTE’s Label
Write the PO Number on the TempTale LTE label with a permanent marker.
3. Place The TempTale GEO LTE
Remove the protective paper from the adhesive strip on the back of the monitor and place it on the
TOP of the last pallet loaded on the passenger side of the trailer. Place a green “Monitor
Enclosed” label on the FRONT of the same pallet, facing the trailer door.
2. Start The TempTale GEO LTE
Press and hold the green Start (1) button until the Status LED (2) blinks rapidly for 30 to 60
seconds.
2
3
4
1
LED EXPLANATION
BLINK
PATTERN
STATUS LED (2)
GREEN
ERROR LED (3)
RED
4 Blinks Not Started
DO NOT USE
THE
TEMPTALE
GEO LTE
2 Blinks Started
1 Blink Stopped
Status Check
Press the blue Status (4) button to view the
status of the TempTale GEO LTE.
Note: You may press the Status button at any-
time to view the status.
Questions? Contact Jeff McCann

Page 4 of 17
Cold Chain Monitoring Program
© 2022 Carrier. All Rights Reserved.
LTE Ordering Information
To order monitors contact a Sensitech Client Services Representative.
Client Services
+1 800-843-8367
+1 978-927-7033
Supplier
Part Number
Description Low
Hig
h
Low
Alarm
Cumulative
High
Alarm
Cumulative
Graph
Length
Start
Delay
Fresh
beef
20 F 40 F 240 Min 240 Min 7 Days
Upon
Departure
TGL01-01-135*
*Order this CCN for all
fresh and refrigerated
product.
Fresh
bacon
20 F 42 F 240 Min 240 Min 7 Days
Upon
Departure
Refrigerated
produce
30 F 43 F 240 Min 240 Min 7 Days
Upon
Departure
Refrigerated
dairy
32 F 45 F N/A 240 Min 7 Days
Upon
Departure
Refrigerated
dressings, sauce
32 F 55 F 240 Min 240 Min 7 Days
Upon
Departure
Refrigerated
coffee
30 F 41 F 240 Min 240 Min 7 Days
Upon
Departure
Refrigerated
frosty
30 F 45 F 240 Min 240 Min 7 Days
Upon
Departure
TGL01-02-135
Frozen
fries, poultry, sauce, bak-
ery
-10
F
15 F N/A 240 Min 17 Days
Upon
Departure
Wendy’s LTE Custom Catalog Numbers
Questions? Contact Jeff McCann
No minimum order quantity, 6 month shelf life. .
TempTale GEO
Page 5 of 17
Cold Chain Monitoring Program
© 2022 Carrier. All Rights Reserved.
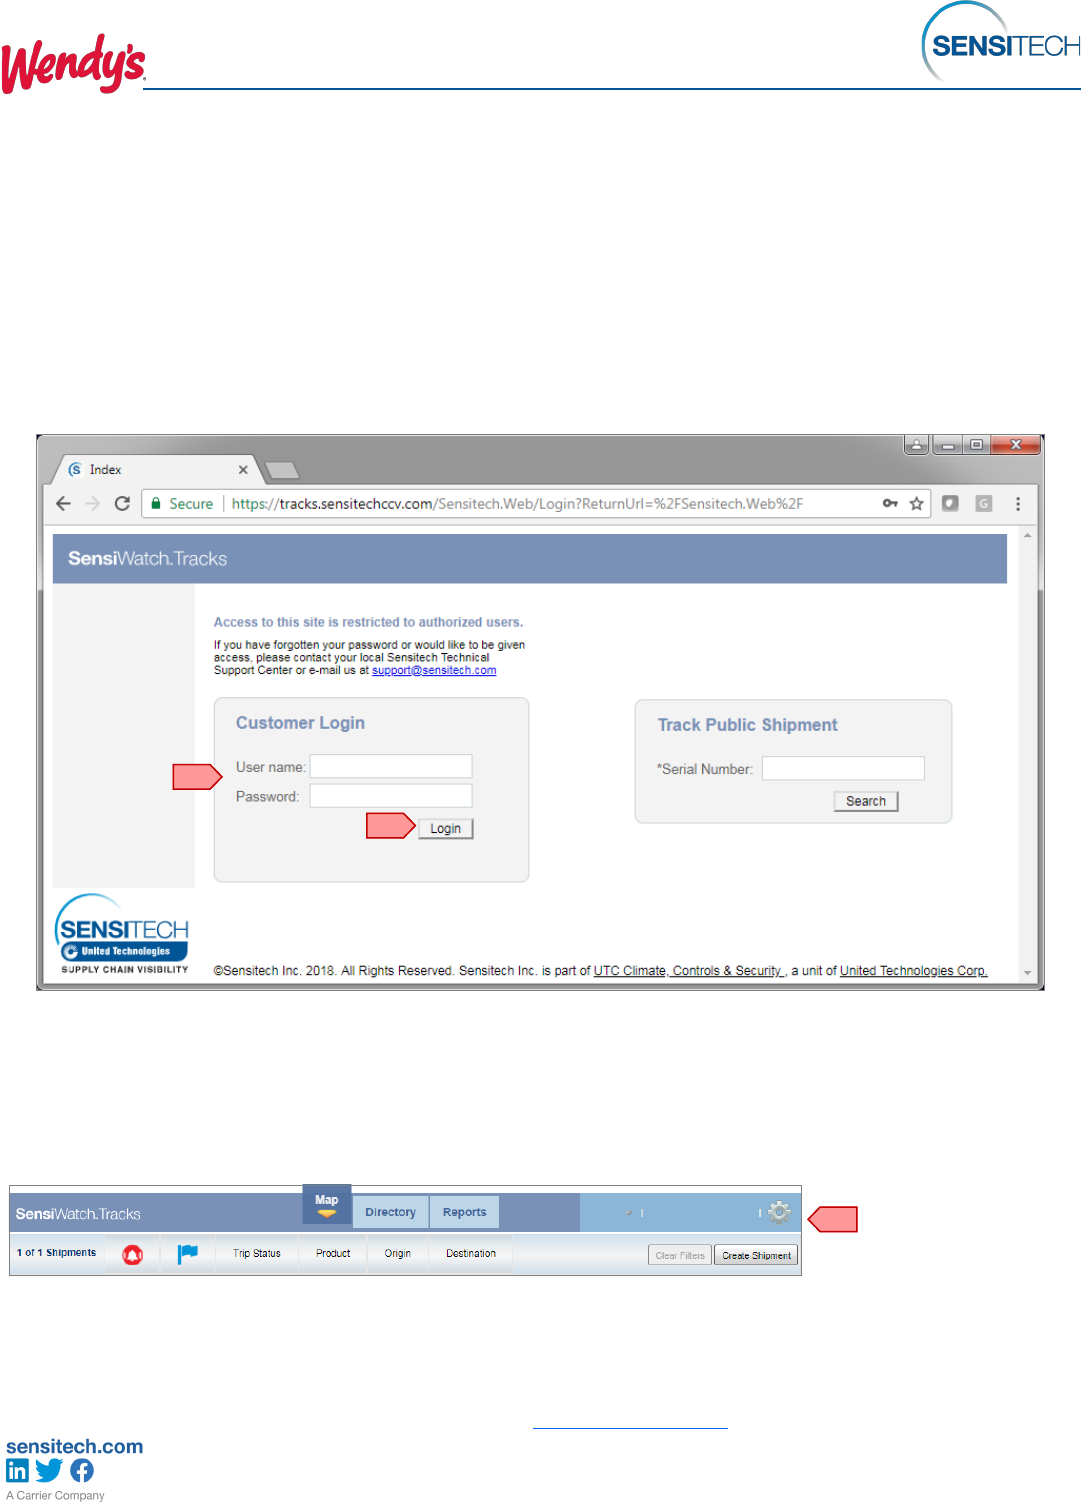
Login
Click the link to launch SensiWatch Tracks:
https://tracks.sensitechccv.com/
Enter your User Name and Password (1), click Login (2).
1
2
Questions? Contact Jeff McCann
Logout
Click the icon (1), click logout.
SensiWatch Tracks Software Login and Logout
1

Page 6 of 17
Cold Chain Monitoring Program
© 2022 Carrier. All Rights Reserved.
Create Shipment
From the Map view, click the Create Shipment button (2).
Enter Shipment Attributes
14
2 *Serial Number: Type, or scan, the serial
number (10 alphanumeric characters).
3 *Program: Click the down arrow to view
and select a program. The
program is the company that
requested the monitor.
4 *Product: Click the down arrow to view
and select a product.
5 *Origin: Click the down arrow to view
and select an origin.
6 *Destination: Click the down arrow to view
and select a destination.
7 *DC PO Number: Type the DC’s PO
number for this shipment.
8 Carrier: Type the Carrier name
for this shipment.
9 Planned Departure Time:
Optional field.
10 Planned Arrival Time:
Optional field.
11 *Freight Arranged
By: Click the down arrow to view
and select the name of the
company responsible for
arranging this shipment.
12 Trailer ID: Type the Trailer ID for this
shipment.
13 Shipment Notes: Optional field.
14 Save: Click Save.
15 Exit: Click icon to exit
Note: It is important for the shipment details to be entered PRIOR to the monitor being started and place on
the load.
* Indicates a required field.
1
2
3
4
5
6
7
8
9
10
11
12
13
15

Page 7 of 17
Cold Chain Monitoring Program
© 2022 Carrier. All Rights Reserved.
Alarm / Arrival Notifications & Return Instructions
TempTale GEO LTE monitors do not need to be stopped or downloaded however, upon receipt, please store
the monitors in a bright location as the monitors have light sensors and light is required to "arrive" the moni-
tors.
TempTale GEO LTE monitors do not have visible alarms. Email notifications will be sent to the Supplier and
Distribution Center contacts. The DC, supplier, serial number, order number and status is displayed within the
Subject line (1).
The shipment detail may be accessed directly from the link at the top of the notification (2) and allows for
corrective actions to be logged quickly.
If an arrival notification has not been received and the trip detail is not available from a Search, this indicates
the shipment was not created in SensiWatch Tracks prior to starting/placing the monitor.
Return The TempTale Monitors
All TempTale GEO LTEs must be returned using the prepaid return boxes from Sensitech. Return to Sen-
sitech when full or at the end of each month.
To order additional return boxes please contact a Sensitech Client Services Representative at:
+1-800-843-8367 or send an email to clientserv[email protected].
1
2
Alarmed Notification Email
Alarmed
1
2
Arrived Notification Email
Arrived

Page 8 of 17
Cold Chain Monitoring Program
© 2022 Carrier. All Rights Reserved.
Alarm Actions - Who Is Responsible?
All alarms must be acknowledged and corrective actions logged.
Supplier: If the supplier arranged the freight, the supplier is responsible for acknowledging the alarm in
SensiWatch Tracks.
Distribution Center (DC): If the DC arranged the freight, the DC is responsible for acknowledging the alarm
in SensiWatch Tracks.
Third Party Managing Carrier: If a Third Party Managing Carrier arranged the freight, they will be copied
on the alarm notification and will be responsible for acknowledging the alarm in SensiWatch Tracks.
To acknowledge an alarm click on the link (1) within the alarm notification email. This will launch the trip detail
view within SensiWatch Tracks.
Scroll down to the Alarm Definitions and Alarms (2) section to view/access the alarm (s). Click the alarm bell
(3) icon to access the note section for that alarm, type the corrective action taken (4), click Save (5). This
creates a log of corrective actions.
Acknowledge an Alarm
Alarmed Notification Email
Alarmed
1
2
Trip Detail
5
3
4
2

Page 9 of 17
Cold Chain Monitoring Program
© 2022 Carrier. All Rights Reserved.
Execute A Filter
(4). To set a filter click the box next to the data field to select or de-select an item. Selecting an item (green
check visible) includes that item in the results. De-selecting an item (no green check visible) omits that item
from the results. A filter icon indicates a filter is in place for that category.
View Map Options
Use the map tools (5) to move, zoom or change the map view settings.
Trip Tips
Click the text link Trip Tips (6) to show the Trip Tip boxes for all shipments on the map.
Center Map
Click the text link Center Map (7) to rescale the view and center the map so all shipments are visible.
Filters applied while viewing the Map view the same filtered results will apply when viewing the Directory
The Initial or Map view is visible after login and displays the location of monitors that are in transit or have
recently arrived at their destination. The navigation bar provides access to the following views:
Map Tab (1) - Provides a map view of shipments.
Directory Tab (2) - Provides a table or tabular view of shipments.
Reports Tab (3) - Provides access to reports and training videos.
Tab Views - Basic Navigation
Filtering Data
4
5
1
2 3
6 7

Page 10 of 17
Cold Chain Monitoring Program
© 2022 Carrier. All Rights Reserved.
A geographical view of active or recently arrived shipments represented by Pins on the map. Click on a Pin to
view its Trip Tip box (1) which contains the Serial Number, Optional data fields and the Most Recent Location
information. Click the magnifying glass icon or alarm icon, if visible, to access the Trip Detail view.
Click the flag icon to set the trip as flagged or un-flagged.
Map Tab View
1
Pin Legend
Current shipment location, no alarm (s)
triggered, flag set.
Current shipment location, alarm (s)
triggered, not acknowledged.
Current shipment location, alarm (s)
triggered, acknowledged.
Current shipment location, alarm (s)
triggered, not acknowledged, flag set.
Current shipment location, alarm (s)
triggered, acknowledged, flag set.
Shipment location, no alarm (s) triggered.
Current shipment location, arrived,
alarms (s) triggered, acknowledged.
Current shipment location, arrived,
alarm (s), triggered, not acknowledged.
Shipment location, arrived, no alarm (s)
triggered.
Current shipment location, arrived, alarm (s)
triggered, acknowledged, flag set.
Questions? Contact Jeff McCann

Page 11 of 17
Cold Chain Monitoring Program
© 2022 Carrier. All Rights Reserved.
The solid flag icon indicates the shipment has been flagged.
The outline flag icon indicates the shipment has not been flagged.
The magnifying glass icon provides access to the Trip Detail.
The map view icon provides access to the Map view of the trip.
The alarm icon indicates an alarm (s) triggered and has been acknowledged.
The Directory view reflects the Trip Status, Monitor Status, Serial Number, Product, Origin, Destination,
Order Number, Carrier, Actual Departure Time, Planned Arrival Time, Actual Arrival Time and Actions for
each trip/monitor in a table format.
All but the Actions column may sorted and filters applied by clicking on the column title.
Directory Tab View
Search Option
To initiate a search press “Ctrl F” to access the search window (1), type in the Serial Number, PO number,
or other search criteria, click Enter.
The alarm icon indicates an alarm (s) triggered and has not been acknowledged.
The alarm icon with a black star indicates the trip arrived, alarm (s) triggered and has not been
acknowledged.
No icon indicates the trip arrived with no alarm (s) or notifications.
1
Note: Shipments will remain in the Directory for 3 days after arriving at the DC.

Page 12 of 17
Cold Chain Monitoring Program
© 2022 Carrier. All Rights Reserved.
The Report tab view provides access to active and trips/reports that have been removed from the Directory.
The default is set to remove trips from the Directory 3 days after arrival at the destination (the number of days
may vary depending on your company’s settings). Trips removed from the Directory may be obtained by
executing a Search.
Note: Your reports view may be different than shown.
Note: Shipments that are no longer accessible from the Directory may be accessed from Reports.
1
To search for a record, click the Search (1) icon to access the Search criteria. Enter the Order, Serial
Number, Origin, Destination, Product or Carrier, click View Report (2).
You may enter a portion of the information preceded by, or followed by, an asterisk to execute a wild card
search.
Search Options
Search Criteria
2
Click the magnifying glass icon in the Trip Detail column to launch the Trip Detail view.
Search Results
Reports Tab View - Search

Page 13 of 17
Cold Chain Monitoring Program
© 2022 Carrier. All Rights Reserved.
Search Results - Trip Detail View

Page 14 of 17
Cold Chain Monitoring Program
© 2022 Carrier. All Rights Reserved.
Sensitech Contact Information
Account Manager
Jody Mercier
jmercier@carrier.com
Tel: +1 978-720-2743
Cell: +1 978-210-0645
Customer
• Reports, Analysis
• Notifications
• Program Support
• Order Placement:
Monitors, Readers,
Labels, Brackets,
Return Systems
Client Services
Sensitech.clientservices@carrier.com
+1 800-843-8367
+1 978-720-2650
Support Services
Sensitech.support@carrier.com
+1 800-843-8367
• Monitor Evals / Post Validation
• Installation / Training
• ColdStream / SensiWatch
Tracks Support
Program Manager
Jeff McCann
jmccann@carrier.com
+1 508-479-2085
Account Manager
Todd Thompson
tthompson@carrier.com
Tel: +1 830-368-4034
Cell: +1 713-582-5409

Page 15 of 17
Cold Chain Monitoring Program
© 2022 Carrier. All Rights Reserved.
Standard Operating Procedure
GEO TRACKERS
Required temperature monitoring and appropriate actions from Approved Wendy’s Suppliers to
Approved Wendy’s Distribution Centers
Trained Supplier loaders
Trained Freight Arrangers
Trained Distribution Center receiving
Trained QSCC Logistics
Trained Wendy’s QA Product Managers
Sensitech GEO Tracker
Internet Connectivity, Computers,
Training provided by *Sensitech
It is imperative when the devices are being prepared for shipment that all information be
completed in the SensiWatch
®
Tracks system.
DO NOT leave the carrier information blank.
Arranger of freight (Supplier, DC or QSCC) is responsible for notifying the carrier of any alarm
received (email alert) including implementing the immediate corrective action required
Supplier – Receives e-mail notices for information of all alarms.
QSCC – Receives notices and steps in as necessary.
DC – Receives notice via email for all alarms in transit and follows Wendy’s disposition protocol
upon arrival.
Wendy's QA Product Managers – Receives email (alert) notices on all alarmed arrival
loads. Responsible to accept/reject alarmed loads as needed (based on the information
provided by the Distribution Center following Wendy’s Disposition Flow Chart protocols).
Purpose:
How to handle communications, corrections and dispositions within Wendy’s Cold Chain
through GEO Tracker Implementation at Wendys
Scope:
Prerequisites
Responsibilities

Page 16 of 17
Cold Chain Monitoring Program
© 2022 Carrier. All Rights Reserved.
Supplier- places GEO Tracker on load (top of pallet). Following Sensitech’s procedures.
Alarms gets triggered.
1.0 ALARMS COMMUNICATIONS & EXPECTED ACTIONS. Temperature alarm recipients
are as follows:
Supplier – Receives notice via e-mail for all alarms in transit and arrived shipments. If Supplier
arranged the load - responsible for corrective action or disposition.
DC – Receives notice via e-mail for all alarms in transit and arrived shipments. If DC arranged
the load - responsible for corrective action or disposition.
QSCC – Receives notice via e-mail for all alarms in transit and arrived shipments. If QSCC
arranged load - responsible for corrective action or disposition.
Wendy's QA Product Managers – Receives notice via e-mail for all alarms on arrived
shipments only. Makes FINAL decision of product acceptance or disposition considering
Geo Tracker data and completion of Wendy’s Disposition Flow Chart (PAL form, pictures,
etc.)
1.1 ALARM ACKNOWLEDGEMENT. The alarm notification must be acknowledged by ar-
ranger of load or it will not get triggered again and send out a notification. However, it will contin-
ue to record location and temperature data throughout the trip.
1.1.1 The arranger of the freight (Supplier, DC or QSCC) will be responsible for notifying the
carrier of any alarm for immediate correction
1.1.2 When notice of an alarm is received select the link in the notification to go to
SensiWatch
®
Tracks to see the trip details
1.1.3 Click on the alarm icon and enter a note indicating the follow up action they performed,
then click Save.
1.1.4 The
alarm icon will now have a blue check on it to indicate that it has been acknowl-
Procedures

Page 17 of 17
Cold Chain Monitoring Program
© 2022 Carrier. All Rights Reserved.
Note: All notifications for actions on alarms must be documented in e-mail
between the supplier, QSCC, Wendy’s QA and Distribution Center.
The device will begin recording information in SensiWatch Tracks immediately upon
activation and will stop recording when the GEO tracker detects both a light spike and
destination ping for 30 minutes. In addition, if a monitor remains at the DC (geographic
final destination) for 48 hours and does not register light, it will automatically arrive the
shipment.
2.0 SHIPMENT ACCEPTANCE / REJECTION CRITERIA
Note: All refrigerated and frozen products must be inspected by DC and
have the product temperature taken upon receipt.
When a load of product is received at the distribution center and that load has had
one or more alarms in transit, the following steps must occur:
Follow the Wendy’s Disposition Flow Chart
Step 1 – Inspect: Review and validate all alarms and perform all required non-
destructive product temperature checks while product is on the truck.
Step 2 – Evaluate & Investigate: Review alarm data, graph, packaging/product tem-
perature abuse signs and non -destructive temperatures to determine if there are any
concerns:
No concerns are present – accept Load
Concerns are present - advance to step 3.
Step 3 – Confirm: Take destructive temperatures of the product at 6 different loca-
tions of the trailer to include front, middle and back locations.
Take photos of the thermometer in product while taking the temperatures.
If the internal (destructive) temperatures are with-in the acceptable tem-
perature range and/or the product or packaging shows no signs of
temperature abuse – accept the load
If the internal (destructive) temperatures are outside the acceptable tem-
perature range and/or the product or packaging shows any signs of
temperature abuse - advance to step 4
Step 4 – Notify: Send all information (listed below) to the product’s corresponding
Wendy’s QA & QSCC representative for disposition instructions.
1) Potentially Abused Load Information Sheet.
2) Pictures of internal product temperatures (showing both probe and product.
together in the same picture).
3) Pictures of signs of temperature abuse on product and/or packaging.
Step 5 – Rejection / Acceptance approval: At this step, the decision to reject or ac-
cept the load will be made by Wendy’s QA.
