

© 1999-2017 Citrix Systems, Inc. All rights reserved. p.2https://docs.citrix.com
About Citrix Receiver for Chrome 2.3
Mar 09, 20 17
Citrix Receiver for Chrome is a native Chrome packaged app which enables users to access virtual desktops and hosted
applications from Chrome devices. Resources delivered by XenApp and XenDesktop are aggregated in a StoreFront store
and made available through a Citrix Receiver for Web site.
With the Citrix Receiver for Chrome app installed, users can access desktops and applications within their web browsers; no
additional configuration or deployment options are required on StoreFront.
What's new in 2.3
Multi-monitor support
With this release, Citrix Receiver for Chrome supports multiple monitor display for remote applications and desktops in a
client session. You can use up to two monitors with Unified Desktop mode.
Each monitor in a multiple monitor configuration has its own resolution designed by its manufacturer. When monitors with
two different resolutions are used, Chrome OS stretches the resolution of the secondary monitor to match the height of
the Chromebook display.
For more information, see Configuring Multi-monitor display.
Support for selective use of H.264 in Thinwire
Citrix Receiver for Chrome now supports selective H.264 capability in Thinwire, which helps in a better user experience with
transient content. For example, video.
This feature is available only on VDAs Version 7.11 or later.
For more information on configuring selective H.264, see Configuring selective H.264.
Enhancement to caching behavior of video content in Thinwire
Thinwire can now bypass caching of server-rendered video content while at the same time retaining cached bitmaps for
other open windows using text-based data (for example Excel, Windows Explorer, desktop background), resulting in a 5%
reduction in bandwidth use. This enhancement is available in XenApp and XenDesktop 7.11 or later.
For more information on configuring Thinwire, see the XenApp and XenDesktop documentation.
HDX SDK for Chrome (Experimental API)
With this release, Citrix Receiver for Chrome provides an API that allows a third-party Chrome app to launch XenApp and
XenDesktop sessions.
Note: This feature has been verified with the launch of a single app or desktop only.
For more information, see HDX SDK for Chrome.
What's new in 2.2

© 1999-2017 Citrix Systems, Inc. All rights reserved. p.3https://docs.citrix.com
Configuring session reliability
Citrix Receiver for Chrome now allows administrators to configure the following policies using Citrix Studio:
1. Session reliability time-out
2. Reconnect user interface transparency level
For more information, see Configuring Session Reliability.
Time zone enhancement
With this release, Citrix Receiver for Chrome has extended support of both English and native languages in client time zone
redirection.
What's new in 2.1
Enhanced configuration
Citrix Receiver for Chrome provides additional functionality that gives you greater configuration control permitting new
ways to configure Receiver. With this release, you can configure Receiver using:
Google Admin Policy
Web.config in StoreFront
default.ica
configuration.js
Using these methods, the following session settings can be configured:
Show/hide the toolbar
Enable/disable NACL
Audio
Graphics
File Transfer
For more details, see Configuring Citrix Receiver.
Tip
The configuration.js file is located in the ChromeApp root folder. Administrator-level credentials are required to edit this file; after
editing the file, repackage the app to make additional modifications to toolbar elements.
Note
Citrix recommends that you back up the configuration.js file before making any changes to it.
Smart card authentication
Citrix Receiver for Chrome now allows users to authenticate using a Smart Card. Using this new feature, administrators can

© 1999-2017 Citrix Systems, Inc. All rights reserved. p.4https://docs.citrix.com
logon to Citrix Receiver using a smart card and can also sign e-mails or access websites in an ICA session using smart card
credentials.
For more details, see Configuring Citrix Receiver.
Serial port redirection
Citrix Receiver for Chrome allows users to redirect COM/serial port devices to XenApp and XenDesktop virtual apps and
desktops. With this functionality, users can view and access COM/serial port based devices in an active Receiver session.
For more details, see Configuring Citrix Receiver.
Note
By default, Citrix Receiver for Chrome maps COM5 as a preferred serial COM port for redirection.
Single Sign-on (SSON)
Citrix Receiver for Chrome now supports Single Sign-on (SSON) functionality on Chromebook as well as Citrix
XenApp/XenDesktop backend using Federated authentication.
With this functionality, users do not have to retype passwords within a Citrix environment. SSON works by setting up SAML
SSO into Chrome devices and Receiver sessions using the SAML cookies to login to NetScaler Gateway.
For more details, see Configuring Citrix Receiver.
More USB devices
This release supports a wider range of USB peripherals. With this added functionality, an administrator can create a Google
policy to identify the PID/VID of the device to enable its use in Citrix Receiver. This support extends to new USB devices,
including 3D Space mouse, additional composite devices, and Bloomberg keyboard.
Reload store URL button
A new button is added where store is loaded. By clicking the button, the cookies of the store get cleared and the store
page is reloaded.
Unique ID
Citrix Receiver for Chrome generates a unique name using the Directory API ID of the devices enrolled via Google Chrome
Management. The generated name looks like CRxxxxxxxxxxxxxxxx.
What's new in 2.0
Redesigned toolbar
Citrix Receiver for Chrome provides a redesigned toolbar to improve the user experience at this release. This enhancement
provides new options accessible from the toolbar to facilitate common tasks.
For more information, see Redesigned toolbar.
Connection Center

© 1999-2017 Citrix Systems, Inc. All rights reserved. p.5https://docs.citrix.com
Citrix Receiver for Chrome 2.0 introduces the Connection Center. This functionality facilitates application management
when using seamless sessions by providing a taskbar that lists all opened applications.
For more information, see Connection Center.
Seamless window integration
Citrix Receiver for Chrome improves the user experience by adding seamless integration of multiple apps hosted in separate
windows within an active session. Using this functionality, Citrix Receiver enables you to launch applications in an
independent UI compared to launching all applications for a session in a single window.
What's new in 1.9
Enhanced clipboard support
Citrix Receiver for HTML5 now supports HTML format in addition to plain text between client and a session. This support is
useful for Office apps and browsers. Enhanced clipboard support is only available on Chrome and Safari browsers.
For more information, see Enhanced clipboard support.
Hardware encode webcam support
Citrix Receiver for Chrome provides an enhancement to webcam redirection functionalty at this release. H.264 hardware
encoding for webcam input helps reduce CPU load and increases battery efficiency for Chromebook devices. These devices
have encoders for H.264, which leverage Intel functionality through the PPB_VideoEncoder API.

© 1999-2017 Citrix Systems, Inc. All rights reserved. p.6https://docs.citrix.com
Fixed issues
Mar 08 , 2017
Fixed issues in Citrix Receiver for Chrome 2.3
Compared to: Citrix Receiver for Chrome 2.2
Citrix Receiver for Chrome 2.3 contains all fixes that were included in Versions 2.2, 2.1, 1.9, 1.8, 1.7, 1.6, 1.5, and 1.4, plus the
following, new fix:
Launching a published application from a VDA running on Linux might freeze the session.
[#662083]
Fixed issues in Citrix Receiver for Chrome 2.1
Compared to: Citrix Receiver for Chrome 2.0
Citrix Receiver for Chrome 2.1 contains all fixes that were included in Versions 2.0, 1.9, 1.8, 1.7, 1.6, 1.5, and 1.4, plus the
following, new fixes:
A session failed to launch from RDP or Citrix ICA double hop scenarios.
[#653980]
Cannot connect to older versions of StoreFront or NetScaler Gateway; a session would open in a browser instead of
Citrix Receiver.
[#653981]
CTRL and SHIFT keys did not work when selecting files or text.
[#654185]

© 1999-2017 Citrix Systems, Inc. All rights reserved. p.7https://docs.citrix.com
Known issues
Mar 09, 20 17
Known issues in Citrix Receiver for Chrome 2.3
With legacy graphics mode enabled in XenDesktop 7.12 on a VDA running on Windows Server 2016, the ICA session
ignores the preferred color depth and the session gets terminated.
[RFHTMCRM-965]
In a multi-monitor configuration, the session might become unresponsive when you drag the session toolbar to the
secondary monitor.
[RFHTMCRM-1113]
With legacy graphics mode enabled in XenDesktop 7.12 on a VDA running on Windows Server 2016, resizing the session
window causes the following notification to appear:
Adjusting Screen Resolution - Please Wait
[RFHTMCRM-1118]
When you play audio in a session, switching from the active session window might cause the audio to get distorted.
[RFHTMCRM-1122]
In a desktop session, the quality and performance of a video degrades when you reposition the video player app multiple
times.
[RFHTMCRM-1167]
Known issues in Citrix Receiver for Chrome 2.2
The session freezes when launching published applications from a Linux VDA.
Workaround: Disable the toolbar when using published applications from a Linux VDA.
[#662083]
Known issues in Citrix Receiver for Chrome 2.1
In some cases, the Google smartcard connector may crash. To resolve this issue, disconnect then reconnect the session
to reenable smartcard redirection.
[#652697]
Known issues in Citrix Receiver for Chrome 2.0
A session may crash while copying and pasting a large amount of data inside a session. Citrix recommends copying less

© 1999-2017 Citrix Systems, Inc. All rights reserved. p.8https://docs.citrix.com
than 10 MB of data when using the clipboard.
[#586671]
Citrix Receiver for Chrome does not support cross language keyboard.
[#602652]
When contents are copied from a document on Google drive (Gdrive) to a session the format of the copied content may
not be maintained. To resolve this issue, open the document containing the copied content using the respective app (for
example, Google docs, Microsoft Word or Excel) and perform clipboard operations. This should reserve the format at the
session side.
[#606135]
The keyboard combination ALT+F4 does not work as expected within a session. Click the Search/Windows key along
with top row keys to simulate function keys on a Chrome book. You can also use the Keyboard settings option on the
Chrome book to enable the 'Treat top-row keys as function keys' to enable direct use of the top row keys to simulate
function keys.
[#607326]
Citrix recommends that you use an absolute path rather than a relative path in File Transfer registry settings.
[#607455]
The F5 key does not display the thumbprint view of apps, instead a thumbprint of VDAs displays all apps within a session.
[#615795]
The work area of an active session is not updated when the Chrome book shelf position is changed or hidden.
[#623585]
You might need to use Alt+Tab an extra time to switch between apps from different VDAs.

© 1999-2017 Citrix Systems, Inc. All rights reserved. p.9https://docs.citrix.com
System requirements
Mar 10, 20 17
User device requirements
All devices must meet the minimum hardware requirements for the installed operating system.
Users devices require the Google Chrome operating system (version 50 or later) to access desktops and apps using Citrix
Receiver for Chrome. Citrix recommends that you use Citrix Receiver for Chrome with releases from the Google Chrome
stable channel. Citrix Receiver for Chrome is supported only on Chrome OS.
Citrix supported server platforms
Citrix Receiver for Chrome supports access to desktops and applications through the following versions of StoreFront.
Stores must be accessed through Citrix Receiver for Web sites. Citrix Receiver for Chrome does not support direct access to
StoreFront stores, either using the store URL or the XenApp Services URL.
StoreFront 2.5 and later
Web Interface 5.4
Citrix Receiver for Chrome can be used to access desktops and applications delivered by the following product versions:
XenApp and XenDesktop 7.6 and later
XenApp 6.5
Secure user connections
In a production environment, Citrix recommends securing communications between Receiver for Web sites and users'
devices with NetScaler Gateway and HTTPS. Citrix recommends using SSL certificates with a key size of at least 1024 bits
throughout the environment in which Citrix Receiver for Chrome is deployed. Citrix Receiver for Chrome enables user access
to desktops and applications from public networks with the following versions of NetScaler Gateway.
NetScaler Gateway 10.5 and later
Citrix Receiver for Chrome supports CloudBridge disabling compression and printer compression as well as using HDX Insight
analytics to display in CloudBridge Insight Center.
CloudBridge 7.4 and later
Secure ICA
Starting with Version 2.1, Citrix Receiver for Chrome supports RC5 (128 bit) encryption.
Note
If any encryption format other than basic is set, Citrix Receiver for Chrome upgrades the encryption format to RC5 (128 bit).

© 1999-2017 Citrix Systems, Inc. All rights reserved. p.10https://docs.citrix.com
Tip
Citrix recommends that you use a SSL-enabled VDAs for end-to-end SSL encryption.

© 1999-2017 Citrix Systems, Inc. All rights reserved. p.11https://docs.citrix.com
Deploying Citrix Receiver for Chrome
Oct 18, 20 16
There are a number of options for deploying Citrix Receiver for Chrome.
You can use Google App management console to configure Citrix Receiver using Google policy. For more information on
Chrome configuration, see Knowledge Center article CTX141844.
You can repackage Citrix Receiver for Chrome to include a Citrix Receiver configuration (.cr) file you have generated. The
.cr file contains the connection details for NetScaler Gateway and the Citrix Receiver for Web site that provides users'
desktops and apps. Users browse to chrome://extensions and then drag and drop the repackaged app (.crx) file onto the
Chrome window to install Citrix Receiver for Chrome. Because the app is preconfigured, users can start working with
Citrix Receiver for Chrome as soon as they install it, without a need to perform additional configuration steps.
You can deliver your custom Citrix Receiver for Chrome application to users in the following ways:
Publish the repackaged application for users through Google Apps for Business using the Google Admin Console.
Provide the .crx file to users through other means, such as through email.
Users install Citrix Receiver for Chrome from the Chrome Web Store by searching for Citrix Receiver and clicking Add to
Chrome.
Once installed, Citrix Receiver for Chrome must be configured with connection details for NetScaler Gateway and the Citrix
Receiver for Web site providing that provides users' desktops and apps. This can be achieved in two ways:
Generate a .cr file containing the appropriate connection details and distribute this file to users. To configure Citrix
Receiver for Chrome, users double-click the .cr file and click Add when prompted. For more information about generating
.cr files from StoreFront, see Export store provisioning files for users.
Provide users with the URL they must enter manually when they first start Citrix Receiver for Chrome.
To repackage Citrix Receiver for Chrome
To simplify the deployment process for users, you can repackage Citrix Receiver for Chrome with a new .cr file to
preconfigure Citrix Receiver for Chrome with the appropriate connection details for your environment. Users can start
working with Citrix Receiver for Chrome as soon as they have installed it without the need to perform any additional
configuration steps.
1. Download the unpackaged version of Citrix Receiver for Chrome to a suitable location.
2. Download the sample configuration file and customize it as appropriate for your environment.
3. Rename the modified configuration file to default.cr and copy it to the Citrix Receiver for Chrome root directory.
Configuration files with different names or in other locations are not included when Citrix Receiver for Chrome is
repackaged.
4. If you want to enable the in-session toolbar that lets users send the CTRL+ALT+DELETE key combination to their
desktops and applications, complete the following steps.
Note: Citrix recommends that you back up the configuration.js file before making any changes to it.
1. Use a text editor to open the configuration.js file in the Citrix Receiver for ChromeApp root directory.
2. Locate the following section in the file.
'appPrefs':{
'chromeApp':{
'ui' : {

© 1999-2017 Citrix Systems, Inc. All rights reserved. p.12https://docs.citrix.com
'toolbar' : {
'menubar' :false,
'clipboard': false
3. Change the setting for the menubar attribute to true.
When you enable the in-session toolbar in this way, it is not necessary to enable the toolbar in the Receiver for Citrix
Web site configuration file.
5. By default, Citrix Receiver for Chrome can open any file extension in the Files App in a Chromebook intended for opening
files in Google Drive using the FileAccess component in the VDA. If an administrator wants to disable this option to
download the unpackaged version of Citrix Receiver for Chrome and edit the "file handlers" section in manifest.ison to
resemble the following:
"file handlers" : {
"text" :
"extensions" : [
"ica",
"cr"
]
}
}
6. In Chrome, browse to chrome://extensions, select the Developer mode check box in the top right corner of the page
and then click the Pack extension button.
For security reasons, StoreFront only accepts connections from known Citrix Receiver for Chrome instances. You must
whitelist your repackaged application to enable users to connect to a Citrix Receiver for Web site.
7. On the StoreFront server, use a text editor to open the web.config file for the Citrix Receiver for Web site, which is
typically located in the C:\inetpub\wwwroot\Citrix\
storename
Web directory, where
storename
is the name specified for
the store when it was created.
8. Locate the following element in the file.
<html5 ... chromeAppOri gins=" chrome-extension://haiffjcadagjlijoggckpgfnoeiflnem" ... />
9. Change the value of the chromeAppOrigins attribute to chrome-
extension://haiffjcadagjlijoggckpgfnoeiflnem|chrome-extension://
packageid
, where packageid is the ID generated for
your repackaged application.

© 1999-2017 Citrix Systems, Inc. All rights reserved. p.13https://docs.citrix.com
Configuring Citrix Receiver for Chrome
Jan 25, 20 17
To enable Citrix Receiver for Chrome users to access resources hosted on XenDesktop and XenApp, you must create a
StoreFront store. You must also enable WebSocket connections on NetScaler Gateway, XenApp, and XenDesktop, as
required.
Configuring Selective H.264
Configuring Selective H.264 using the web.config in StoreFront
To change the Selective H.264 configuration using the web.config file:
1. Open the web.config file for Citrix Receiver for Website.
This file is typically located in the C:\inetpub\wwwroot\Citrix\<Storename>Web folder, where
Storename
is the name
specified for the store when it was created.
2. Locate the chromeAppPreferences field and set its value with the configuration as a JSON string; for example:
chromeAppPreferences='{"graphics":{" selectiveH264":false}}
Configuring Selective H.264 using the configuration.js file
The configuration.js file is located in the ChromeApp root folder. Edit this file to make changes to Citrix Receiver for Chrome.
By default, selective H.264 is set to true.
Note: Citrix recommends that you back up the configuration.js file before making any changes to it.
Note: Citrix recommends using this method only when Citrix Receiver for Chrome is repackaged for users.
Note: Administrator -level credentials are required to edit the configuration.js file; after editing the file, repackage the app
to make additional modifications to toolbar elements.
To disable the Selective H.264 configuration using the configuration.js file:
1. Open the configuration.js file and set the selectiveH264 attribute to f alse.
For example:
Configuring multi-monitor display
Multi-monitor display can be configured in two ways.
By default, the multi-monitor feature is set to enabled.
Note
© 1999-2017 Citrix Systems, Inc. All rights reserved. p.14https://docs.citrix.com
If you are using Citrix Receiver for Chrome running on XenApp 6.5, set the shadowing policy to Disabled to use the multi-
monitor feature.
In a desktop session, when the window is set to full screen, the Display Resolution option in Preferences is deactivated.
UI dialogs and toolbars appear only on primary monitor. However, USB and smart card authentication dialogs span across
monitors.
To configure multi-monitor display using the Chrome browser:
1. Launch a web browser and enter the following command:
chrome://flags
2. From the list of flags, search for UnifiedDesktopMode and set it to Enabled.
To configure multi-monitor display using Google Admin Policy
1. Log on to the Google Admin Console.
2. Go to Device management > Chrome Management > User Settings.
3. Set the Unified Desktop policy to Make Unified Desktop mode available to user.
4. Click Save.
Multi-monitor display is available for both desktops and applications.
When using multi-monitor display, the desktop session can span across multiple monitors in two ways:
1. Windowed mode: The desktop session displays in single monitor mode.
2. Full-screen mode: When the desktop session is switched to full-screen mode, the session displays in multi-monitor mode.
In an application session, when two monitors are connected and the UnifiedDesktopMode is set to Enabled as described
above, the session automatically displays in a multi-monitor mode.
Note
When unified desktop mode is enabled, the Citrix Receiver for Chrome home page appears only on the primary monitor.
HDX SDK for Chrome (Experimental API)
Procedure to consume the API in the third-party Chrome app
1. Install the latest version of Citrix Receiver for Chrome. See Citrix downloads page for details.
2. Whitelist the third-party Chrome app by adding the policy file for Citrix Receiver for Chrome using Chrome management
settings.
For more details, see Manage Chrome Apps by organizational unit on Google support.
The Sample policy.txt file to whitelist the third-party Chrome app is as below:
command
COPY

© 1999-2017 Citrix Systems, Inc. All rights reserved. p.15https://docs.citrix.com
{
"set tings": {
"Value": {
"set t ings_version": "1.0",
"store_set tings": {
"externalApps": [“<3rdPart y_App1_ExtnID>”,“<3rdParty_App2_ExtnID>”]
}
}
}
}
Note
<3rdParty_App1_ExtnID>
is used as an example for the name of externalApps and can send messages to Citrix Receiver for
Chrome. Get your appid from the chrome://extensions site.
3. Launch the application or desktop session in Citrix Receiver for Chrome by following the steps below:
Get the receiverId
var receiverId = " haiffjcadagjlijoggckpgfnoeiflnem "; //
Note: In this example, receiverId indicates the store version of Citrix Receiver for Chrome. If you are using a repackaged
version of Citrix Receiver for Chrome, use the appropriate receiverId.
Convert ICA data from INI to JSON format.
Note: Typically, the ICA file is retrieved from StoreFront as an INI file. Use the following helper function to convert a ICA
INI file into JSON.

© 1999-2017 Citrix Systems, Inc. All rights reserved. p.16https://docs.citrix.com
//Helper function to convert ica in INI format to JSON
function convertICA_INI_TO_JSON(data){
var keyVals = {};
if (data) {
var dataArr;
if(data.indexOf('\r')==-1){
dataArr = data.split('\n');
}else{
dataArr = data.split('\r\n');
}
for (var i = 0; i < dataArr.length; i++) {
var nameValue = dataArr[i].split('=', 2);
if (nameValue.length === 2) {
keyVals[nameValue[0]] = nameValue[1];
}
// This is required as LaunchReference will contain '=' as well. The above split('=',2) will not provide
// the complete LaunchReference. Ideally, something like the following should be used generically as well
// because there can be other variables that use the '=' character as part of the value.
if (nameValue[0] === "LaunchReference") {
var index = dataArr[i].indexOf('=');
var value = dataArr[i].substr(index + 1);
keyVals[nameValue[0]] = value;
}
}
console.log(keyVals);//to remove
return keyVals;
}
return null;
}
Send an ICA message from the third-party Chrome app to Citrix Receiver for Chrome.
var icaFileJson = {...}; // ICA file passed as JSON key value pairs.
var message = {
"method" : "launchSession",
"icaData" : icaJSON
};
chrome.runtime.sendMessage(receiverId, message, function(launchStatus) {
if (launchStatus.success) {
// handle success.
console.log("Session launch was attempted successfully");
} else {
// handle errors.
console.log("error during session launch: ", launchStatus.message);
}
});

© 1999-2017 Citrix Systems, Inc. All rights reserved. p.17https://docs.citrix.com
For more details on sendmesage API commands, see the following links:
https://developer.chrome.com/extensions/runtime#event-onMessageExternal
https://developer.chrome.com/extensions/runtime#method-sendMessage
Configuring Citrix Receiver for Chrome
This section includes information about:
Google Admin Policy
Web.config in StoreFront
default.ica
configuration.js
Configuring Citrix Receiver f or Chrome using Google Admin Policy
Before Version 2.1, only store/beacon related configurations could be pushed through Google Admin Policy. For additional
information about this policy, see the Knowledge Center article CTX141844.
With Citrix Receiver for Chrome Version 2.1, other Chrome configurations can also be pushed through the Google Admin
Policy.
Note
Citrix recommends using this method only when Citrix Receiver for Chrome is repackaged for users.
For more information, see the sample policy text below:
{
"set tings": {
"Value": {
"set tings_version": "1.0",
"st ore_set tings": {
"name": "RTST",
"gateways": [
command
COPY

© 1999-2017 Citrix Systems, Inc. All rights reserved. p.18https://docs.citrix.com
{
"url":“htt ps://yourcompany.gateway.com",
"is_default": true
}
],
"beacons": {
"internal": [
{
"url":
“ht t p://yourcompany.internalwebsite.net "
}
],
"external": [
{
"url":
“ht t p://www.yourcompany.externalwebsit e.com"
}
]
},
"rf_web": {

© 1999-2017 Citrix Systems, Inc. All rights reserved. p.19https://docs.citrix.com
"url": “http://yourcompany.st orefrontstoreweb.net ”
}
},
"engine_set tings":{
"ui":{
"sessionsize": {
"windowstate": "fullscreen",
"available" : {
"default" : "Fit _To_Window",
"values" : ["Fit _To_Window", "Use_Device_Pixel_Ratio","1280x800","1440x900","1600x1200"]
}
},
"t oolbar": {
"menubar":true,
"usb": true,
"fileTransfer":true,
"about":t rue,
"lock":t rue,
"disconnect ":true,
"logoff":true,

© 1999-2017 Citrix Systems, Inc. All rights reserved. p.20https://docs.citrix.com
"fullscreen":true,
"multitouch":t rue,
"preferences":true,
"gestureGuide":true
}
},
“features”:{
“com”:{
“portname” :”COM5”
},
"graphics" : {
"features" : {
"graphics" : {
"jpegSupport" : true,
"h264Support" : {
"enabled" : true,
"losslessOverlays" : true,
"dirt yRegions" : true,
"yuv444Support" : false

© 1999-2017 Citrix Systems, Inc. All rights reserved. p.21https://docs.citrix.com
"yuv444Support" : false
}
},
"filet ransfer" : {
"allowupload" : true,
"allowdownload" : true,
"maxuploadsize" : 2147483647,
"maxdownloadsize" : 2147483647
}
},
"nacl" : {
"supportNacl" : true,
"graphics": {
"enable": true
},
"video": {
"enable": true
},
"audio": {
"enable": true

© 1999-2017 Citrix Systems, Inc. All rights reserved. p.22https://docs.citrix.com
}
}
}
}
}
}
Configuring Receiver for Chrome using Web.config in StoreFront
To change the configuration using the Web.config file:
1. Open the web.conf ig file for the Citrix Receiver for Website. This file is typically located in
C:\inetpub\wwwroot\Citrix\storenameWeb, where
storename
is the name specified for the store when it was
created.
2. Locate the chromeAppPreferences field and set its value with the configuration as a JSON string.
For example:
chromeAppPreferences = '{"ui": {"toolbar": {"menubar": false}}}'
Note
Citrix recommends that you use the web.config file method for configuration purposes only when a store version of Citrix
Receiver for Chrome is being used.
Configuring Receiver for Chrome using the def ault .ica file
To change the configuration using the def ault .ica file:
1. Open the default.ica file typically located at C:\inetpub\wwwroot\Citrix\<site name>\conf \def ault.ica for Web
interface customers, where sitename is the name specified for the site when it was created.
In case of Storefront customers, def ault.ica file is typically located at C:\inetpub\wwwroot\Citrix\
<Storename>\App_Data\def ault.ica, where storename is the name specified for the store when it was created.
2. Add a new key at the end of the file, chromeAppPref erences with its value set to configuration as the JSON object.
For example:
chromeAppPreferences={"ui":{"toolbar": {"menubar": false}}}
Note

© 1999-2017 Citrix Systems, Inc. All rights reserved. p.23https://docs.citrix.com
Citrix recommends that you use the default.ica file method for configuration purposes only for Web Interface users.
A sample def ault .ica file might resemble:
;
; ICA Override File
;
; Add ICA file settings that you want to be sent to client devices
; to this file. Settings contained in this file override any
; settings generated by Delivery Services.
;
[WFClient]
Version=2
RemoveICAFile=yes
ProxyTimeout=30000
ProxyFavorIEConnectionSetting=Yes
ProxyUseFQDN=Off
[ApplicationServers]
Application=
[Application]
TransportDriver=TCP/IP
DoNotUseDefaultCSL=On
BrowserProtocol=HTTPonTCP
LocHttpBrowserAddress=!
WinStationDriver=ICA 3.0
ProxyTimeout=30000

© 1999-2017 Citrix Systems, Inc. All rights reserved. p.24https://docs.citrix.com
AutologonAllowed=ON
;EncryptionLevelSession=RC5 (128 bit)
[EncRC5-0]
DriverNameWin16=pdc0w.dll
DriverNameWin32=pdc0n.dll
[EncRC5-40]
DriverNameWin16=pdc40w.dll
DriverNameWin32=pdc40n.dll
[EncRC5-56]
DriverNameWin16=pdc56w.dll
DriverNameWin32=pdc56n.dll
[EncRC5-128]
DriverNameWin16=pdc128w.dll
DriverNameWin32=pdc128n.dll
[Compress]
DriverNameWin16=pdcompw.dll
DriverNameWin32=pdcompn.dll
chromeAppPreferences={"ui" : {"toolbar" : { "menubar" : false}}}
Configuring Citrix Receiver f or Chrome using the configuration.js file
The configuration.js file is located in the ChromeApp root folder. Access this file directly to make changes to Citrix Receiver
for Chrome.
Note
Citrix recommends that you back up the configuration.js file before making any changes to it.
Administrator-level credentials are required to edit the configuration.js file; after editing the file, repackage the app to make

© 1999-2017 Citrix Systems, Inc. All rights reserved. p.25https://docs.citrix.com
additional modifications to toolbar elements.
In Kiosk mode, the toolbar is hidden by default. When editing the configuration.js file to enable the toolbar, ensure that Kiosk
mode is disabled. Citrix recommends that you use one of the alternative methods (for example, the default.ica file) to enable the
toolbar.
Enabling smart card authentication
Receiver for Chrome provides support for USB smart card readers with StoreFront. You can use smart cards for the
following purposes:
Smart card logon authentication to Receiver for Chrome.
Smart card-aware published apps to access local smart card devices.
Applications such as Microsoft Word and Outlook that are launched in ICA sessions can access smart cards for signing
documents and email.
Supported smart cards include:
PIV cards
common access cards
Prerequisites:
StoreFront versions 3.6 or later
Important
For smart card authentication to StoreFront 3.5 or earlier, users require a custom script to enable smart card authentication. Contact
Citrix Support for details.
XenDesktop 7.6 or later
XenApp 6.5 or later
To configure smart card support on your Chrome device:
1. Install the smart card connector application. Note that the smart card application is required for PCSC support on the
Chrome device. This application reads the smart card using the USB interface. You can install this application from the
Chrome website.
2. Install the middleware application. Note that a middleware application (for example, Charismathics, or CACKey) is required
because it serves as an interface that communicates with the smart card and other client certificates.
To install the Charismathics smart card extention or CACKey, see the instructions on the Chrome website.
For more information about middleware applications and smart card authentication, see the Google support site
3. Configure smart card authentication using NetScaler Gateway. For more details, see Configuring Smart Card
Authentication in NetScaler Gateway documentation.

© 1999-2017 Citrix Systems, Inc. All rights reserved. p.26https://docs.citrix.com
Important
Mandatory client authentication is required when a session launches. To prevent this from occurring, see the instructions in the
Third reduction (one PIN prompt) section in the NetScaler product documentation.
Smart card authentication support has the following limitations:
The smart card certificate is cached even after the smart card is removed from the Chrome device. This is a known issue
that exists in Google Chrome. Restart the Chrome device to clear the cache.
When Receiver for Chrome is repackaged, administrators should get the appID whitelisted by Google to ensure that the
smart card connector application passes through.
Only one smart card reader is supported at a time.
Configuring serial COM port redirection
To configure serial COM port redirection, enable the feature by applying XenApp/XenDesktop port redirection policy
settings. For more information on port redirection, see Port redirection policy settings.
Note
By default, Receiver for Chrome maps COM5 as a preferred serial COM port for redirection.
After enabling serial COM port redirection policy settings in XenApp or XenDesktop, configure Citrix Receiver for Chrome
using one of the following methods:
Google Admin Policy
Using the configuration.js file
Changing the default mapping by issuing a command in an active ICA session.
Using Google Admin Policy to conf igure COM port redirection
Use this method to redirect the serial COM port by editing the policy file.
Tip
Citrix recommends that you configure the COM port using the policy file only when Receiver for Chrome is repackaged.
Edit the Google Admin Policy by including the following:
{
"set tings": {
command
COPY

© 1999-2017 Citrix Systems, Inc. All rights reserved. p.27https://docs.citrix.com
"Value": {
"set t ings_version": "1.0",
"store_set tings": {
"rf_web": {
"url": "<http://YourStoreWebURL>"
}
},
"engine_settings":{
"features" : {
"com" : {
"portname" : "<COM4>", where COM4 indicates the port number that is set by the administ rator. }
}
}
}
}
}
Using the configuration.js file to configure COM port redirection
Use this method to redirect the serial COM port by editing the configuration.js file. Locate the portname field in the
configuration.js file and edit the value by changing the port number.

© 1999-2017 Citrix Systems, Inc. All rights reserved. p.28https://docs.citrix.com
For example:
"com" :{
"portname" : "COM4"
}
Note
Citrix recommends using the configuration.js file method to configure serial port redirection only when Receiver for Chrome is
repackaged and republished from StoreFront.
Issuing a command in an ICA session to configure COM port redirection
Use this method to redirect the serial COM port by executing the following command in an active ICA session:
net use COM4 : \\Client\COM5
Tip
In the example above, COM4 is the preferred serial port used for redirection.
Configuring Single Sign-on (SSON) with Google and Citrix using SAML authentication
To configure Single Sign-on:
1. Set up the third-party Identity provider (IdP) for SAML authentication if it is not already configured (for example, ADFS
2.0). For more information, see Knowledge Center article CTX133919.
2. Setup Single Sign-on with Google Apps using SAML IdP; this enables users to leverage third-party identity to use Google
apps instead of the Google Enterprise account. For more information, see Set up Single Sign-On (SSO) for Google Apps
accounts using third-party identity providers on Google support.
3. Configure Chrome devices to log on via SAML IdP.This enables users to log on to Chrome devices using a third-party
identity provider. For more information, see Configure SAML Single Sign-On for Chrome devices on Google support.
4. Configure NetScaler Gateway to log on via SAML IdP. This enables users to log on to NetScaler Gateway using a third-
party identity provider. For more information, see Configuring SAML Authentication.
5. Configure XenApp and XenDesktop for Federated Authentication to allow logons to XenApp and XenDesktop sessions
using dynamically generated certificates after the SAML logon process instead of typing username/password
combinations. For more information, see Federated Authentication.
6. Install and configure SAML SSO for Chrome app extension on Chrome devices. For more information, see the Google
command
COPY

© 1999-2017 Citrix Systems, Inc. All rights reserved. p.29https://docs.citrix.com
website. This extension retrieves SAML cookies from the browser and provides them to Citrix Receiver. This extension
must be configured with the following policy to allow Receiver to get SAML cookies.
{
"whitelist " : {
"Value" : [
{
"appId" : "haiffjcadagjlijoggckpgfnoeiflnem",
"domain" : "saml.yourcompany.com"
}
]
}
}
If you are repackaging Citrix Receiver for Chrome, change the appId accordingly. In addition, change the domain to your
company's SAML IdP domain.
7. Configure Receiver to use NetScaler Gateway configured for SAML logon. This enables users to use the NetScaler
Gateway configured for SAML logon. For more information on Chrome configuration, see Knowledge Center article
CTX141844.
Enabling Google Cloud printing and the Citrix Universal Print Driver
The Citrix PDF Universal Printer driver enables users to print documents opened with hosted applications or applications
running on virtual desktops delivered by XenDesktop 7.6 and XenApp 7.6 or later. When a user selects the Citrix PDF Printer
option, the driver converts the file to PDF and transfers the PDF to the local device. The PDF then opens in a new window
for viewing and printing through Google Cloud Print.
Important
Local PDF printing is supported only on XenApp and XenDesktop 7.6 or later.
command
COPY

© 1999-2017 Citrix Systems, Inc. All rights reserved. p.30https://docs.citrix.com
Requirements
To access the Citrix Receiver for Chrome download page, you need a MyCitrix account.
Download the Citrix PDF Printer from the Citrix Receiver for Chrome download page.
To enable users to print documents opened with hosted desktop and applications:
1. Download the Citrix PDF Printer and install the Citrix PDF Universal Printer driver on each machine that delivers desktops
or apps for Receiver for Chrome users. After installing the printer driver, restart the machine.
2. In Citrix Studio, select the Policy node in the left pane and either create a new policy or edit an existing policy.
For more information about configuring XenDesktop and XenApp policies, see Citrix policies.
3. Set the Auto-create PDF Universal Printer policy setting to Enabled.
Enabling and disabling access to Google Drive
With Google drive support your users can open, edit, and save Windows file types from a Chrome device running Citrix
Receiver. While running a Google Chrome device, your users can seamlessly use existing Windows-based applications (for
example, Microsoft Word) and access the files residing on Google Drive
For example, if a user opens a file in Google Drive (for instance, a .DOC file attachment downloaded from Gmail), edits it,
and saves it to Google Drive, the file can be accessed in a XenApp hosted application. The file can be viewed, edited, and
saved to Google Drive.
Prerequisites
To enable Google Drive access, you must install the Citrix File Access component (FileAccess.exe) on your VDA and enable
file type associations in Citrix Studio. You can download Citrix File Access from the Citrix Receiver for Chrome download
page.
To enable Google Drive access f rom Citrix Receiver
1. Install FileAccess.exe on each XenApp or XenDesktop VDA.
2. Configure the appropriate FTAs for published applications in Citrix Studio.
3. On the XenApp/XenDesktop VDA https://accounts.google.com and https://ssl.gstatic.com have to be trusted and
cookies from these sites should be enabled.
Only files from Google Drive can be opened using Citrix Receiver. To open a file from Google Drive, right-click and and open
the file using Citrix Receiver.
Citrix recommends that you associate one file type with only one published application.
To disable Google Drive access f rom Citrix Receiver
In the manifest.json file, replace:
"file_handlers" : {

© 1999-2017 Citrix Systems, Inc. All rights reserved. p.31https://docs.citrix.com
"all-file-types" : {
"extensions" : [
"*"
]
}
},
with:
"file_handlers" : {
"cr-file-t ype" : {
"extensions" : [
"cr",
"ica"
]
}
},
Enabling and configuring KIOSK mode
Citrix Receiver for Chrome kiosk mode provides the ability to run all apps in the same window. Using this feature, you can run
Citrix Receiver apps in kiosk mode, and then launch any Windows app or desktop using the same mode. In addition, kiosk
mode allows you to publish remote apps or desktops as a dedicated Chrome package using a persistent URL.
You can control this feature by adjusting the kiosk settings in the Chrome admin panel for managed Chrome devices.
See the Google support site for instructions on enabling the Receiver app to run in kiosk mode on managed and non-
managed Chrome devices.
If you are deploying a Receiver app, you should publish using the visibility options set to Public/unlisted to ensure
interoperability with KIOSK mode. Go to the Chrome Web Store Developer Dashboard.
Code
COPY

© 1999-2017 Citrix Systems, Inc. All rights reserved. p.32https://docs.citrix.com
The store URL is read-only when kiosk mode is active and cannot be edited using the Account settings screen. However,
you can change this setting by either repackaging the app with the .cr file or through Google Policy Management using the
Google Admin Console.
<Services version="1.0">
<Service>
<rfWeb>ht t p://your_RfWebURL_or_persist enturl</rfWeb>
<Name>Myst ore</Name>
<Gateways>
<Gateway>
<Location>https://yourcompany.gateway.com</Location>
</Gateway>
</Gateways>
<Beacons>
<Internal>
<Beacon>http://yourcompany.internalwebsit e.net</Beacon>
</Internal>
<External>
<Beacon>http://www.yourcompany.externalwebsit e.com</Beacon>
</External>
</Beacons>
.cr file example
COPY

© 1999-2017 Citrix Systems, Inc. All rights reserved. p.33https://docs.citrix.com
</Service>
</Services>
If you are using the Google Admin Console, edit the policy.txt file containing the Receiver configuration. Replace the value
of “url” under “rf_web” with a persistent URL.
{
"set tings": {
"Value": {
"set tings_version": "1.0",
"st ore_set tings": {
"beacons": {
"external": [
{
"url": "ht t p://www.yourcompany.externalwebsit e.com"
}
],
"internal": [
{
"url": "ht t p://yourcompany.internalwebsit e.net"
}
example
COPY

© 1999-2017 Citrix Systems, Inc. All rights reserved. p.34https://docs.citrix.com
]
},
"gateways": [
{
"is_default": true,
"url": "ht t ps://yourcompany.gateway.com"
}
],
"name": "mystore",
"rf_web": {
"url": " http://your_RfWebURL_or_persist enturl "
}
}
}
}
}
Session reliability
With session reliability, the session remains active on the server if connectivity is lost temporarily. To indicate that
connectivity is lost, the user’s display becomes unresponsive until connectivity resumes. The user continues to access the
display during the interruption and can resume interacting with the application when the network connection is restored.
Session Reliability reconnects users without reauthentication prompts.

© 1999-2017 Citrix Systems, Inc. All rights reserved. p.35https://docs.citrix.com
Note
You can use session reliability with Transport Layer Security (TLS).
Using session reliability policies
The session reliability connections policy setting allows or prevents session reliability.
The session reliability time-out policy setting has a default of 180 seconds, or three minutes. Though you can extend the
amount of time the session reliability keeps a session open, this feature is designed to be convenient to the user and it
does not, therefore, disconnect the session.
Tip
As you extend the amount of time a session is kept open, chances increase that a user might get distracted and walk away from the
user device, potentially leaving the session accessible to unauthorized users.
Incoming Session Reliability connections use port 2598- unless you change the port number defined in the session reliability
port number policy setting.
Note
Session reliability is enabled by default on the server. To disable this feature, configure the policy managed by the server.
Configuring session reliability
By default, session reliability is enabled.
To disable session reliability:
1. Launch Citrix Studio.
2. Open the Session Reliability connections policy.
3. Set the policy to Prohibited.

© 1999-2017 Citrix Systems, Inc. All rights reserved. p.36https://docs.citrix.com
Configuring session reliability time-out
Note
Session reliability time-out policy can be configured only with XenApp/XenDesktop 7.11 or later.
To modify session reliability time-out:
By default, session reliability time-out is set to 180 seconds.
1. Launch Citrix Studio.
2. Open the Session Reliability time-out policy.
3. Edit the time-out value.
4. Click OK.
Configuring the Reconnect user interface transparency level
The Session User Interface is displayed during a session reliabilitySession Reliability reconnect attempts. The transparency
level of the user interface can be modified using Studio policy.

© 1999-2017 Citrix Systems, Inc. All rights reserved. p.37https://docs.citrix.com
By default, Reconnect UI transparency is set to 80%.
To modify the Reconnect user interface transparency level:
1. Launch Citrix Studio.
2. Open the Reconnect UI transparency level policy.
3. Edit the value.
4. Click OK.
For XenApp and XenDesktop Version 7.11 or earlier, use the default.ica file in StoreFront to modify the connection time-
out for session.
Setting Example Def ault
SessionReliabilityTTL SessionReliabilityTTL=120 180
How session reliability works
When session reliability is enabled consider the following:
A session window is grayed out when a reconnection is in progress. When a session is timed out, it is disconnected.

© 1999-2017 Citrix Systems, Inc. All rights reserved. p.38https://docs.citrix.com
Note
You can alter the grayscale brightness used for an inactive session using Desktop Studio. By default, this value is set to 80. T he
maximum value cannot exceed 100 (indicates a transparent window) and the minimum value can be set to 0 (a fully blacked out
screen).
Enhanced clipboard support
Citrix Receiver for Chrome supports HTML format in addition to plain text between the client and the VDA in a session. This
support is useful when using Microsoft Office apps and browsers. Enhanced clipboard support is available only on Chrome
and Safari browsers.
Configuring clipboard
You can copy HTML content and retain formatting when copying a link in Chrome. An <img> tag is added in HTML format,
which allows you to copy images as well as text. This feature is richer than plain text.
To enable this feature, add the following registry entry to the VDA:
HKEY_LOCAL_MACHINE\SYSTEM\CurrentControlSet\Control\Citrix\wfshell\Virtual Clipboard\Additional Formats\HTML
Format
"Name"="HTML Format"

© 1999-2017 Citrix Systems, Inc. All rights reserved. p.39https://docs.citrix.com
Warning
Using Registry Editor incorrectly can cause serious problems that can require you to reinstall the operating system. Citrix cannot
guarantee that problems resulting from incorrect use of Registry Editor can be solved. Use Registry Editor at your own risk. Make
sure you back up the registry before you edit it.
Note
For additional information about the issues resolved by the introduction of this feature, see Knowledge Center article CTX112063
and CT X086028.
Configuring USB device redirection
Citrix Receiver for Chrome supports a wide range of USB peripherals. With this added functionality, administrator can create
a Google policy to identify the PID/VID of the device to enable its use in Citrix Receiver. This support extends to new USB
devices, including 3D Space mouse, additional composite devices, and Bloomberg keyboard.
For more information on configuring USB devices, see the Knowledge Center article CTX200825.
File transfer policies
Citrix Receiver for Chrome provides secure file transfer functionality between a user device and a virtual XenDesktop
session. This feature uses a file transfer virtual channel instead of client drive mapping.
By default, users can:
Upload files from a local download folder or attached peripheral
Seamlessly access data from their XenDesktop sessions.
Download files from their XenDesktop sessions to a local folder or a peripheral on their user device.
Administrators can configure file transfer, uploads, and downloads using policies in Citrix Studio.
Prerequisites
XenApp or XenDesktop 7.6 or later, with:
• Hotfix ICATS760WX64022.msp on server OS VDAs (Windows 2008 R2 or Windows 2012 R2)
• Hotfix ICAWS760WX86022.msp or ICAWS760WX64022.msp on client OS VDAs (Windows 7 or Windows 8.1)
To change file transfer policies: Group Policy Management (GPM) hotfix GPMx240WX64002.msi or
GPMx240WX86002.msi on machines running Citrix Studio.
Limitations
A user can upload or download a maximum of 10 files at a time.
Maximum file size:
• For uploads: 2147483647 bytes (2 GB)
• For downloads: 262144000 bytes (250 MB)

© 1999-2017 Citrix Systems, Inc. All rights reserved. p.40https://docs.citrix.com
If either the ‘Upload file to Desktop’ or the ‘Download file from Desktop’ policy is set to Disabled, the toolbar still
displays both the Upload and the Download icons but the functionality is based on the policy setting. However, if both
policies are set to Disabled, the Upload and Download icons are not displayed in the toolbar.
Configuring file transfer policies
To configure file transfer using a Citrix Studio policy
By default, file transfer is enabled.
Use Citrix Studio to change the following policies, located under User Setting > ICA > File Redirection.
CITRIX STUDIO POLICY DESCRIPTION
Allow file transfer between desktop and client To enable or disable the file transfer feature
Upload file to Desktop
To enable or disable file upload in the session. Requires the
“allow file transfer between desktop and client” policy to
be set to true.
Download file from Desktop
To enable or disable file download from the session.
Requires the “allow file transfer between desktop and
client” policy to be set to true.
To configure file transf er using configuration.js file
The configuration.js file is located in the ChromeApp root folder. Edit this file directly to make changes to Citrix Receiver for
Chrome.
Note: Citrix recommends that you back up the configuration.js file before making any changes to it.
Note: Administrator- level credentials are required to edit the configuration.js file; After editing the file, repackage the app
to make additional modifications to toolbar elements.
To change the file transf er configuration using the configuration.js file:
1. Open the configuration.js file and configure the settings as below:
FILE TRANSFER CLIENT SETTINGS DESCRIPTION
AllowUpload
To enable or disable upload from client-side. By default set to true
(enabled).
AllowDownload
To enable or disable download from the client-side. By default set to true
(enabled).
MaxUploadSize
To set the maximum size of the file that can be uploaded in bytes. By
default set to 2147483648 bytes (2GB)
To set the maximum size of the file that can be downloaded in bytes. By
© 1999-2017 Citrix Systems, Inc. All rights reserved. p.41https://docs.citrix.com
MaxDownloadSize default set to 2147483648 bytes (2GB).
Following are the behavior cases when the policy set in Citrix Studio and the client are different.
Citrix Studio Policy
Upload / Download
Client- side setting
Upload / Download
Resulting Behavior
DISABLED ENABLED DISABLED
DISABLED DISABLED DISABLED
ENABLED DISABLED DISABLED
ENABLED ENABLED ENABLED
Note
When there is a conflicting value set for Maximum File Size upload or download in the registry and in the client-side settings, the
minimum size value among the two is applied.
File transf er logs:
The file transfer logs can be retrieved from both the client and the server.
To retriever file transfer logs from the client:
1. Launch a browser.
2. Go to the following URL to start logging:
<storefronturl>/clients/html5client/src/viewlog.html
where
<storefronturl>
is the FQDN or IP address of the StoreFront server where the store is configured.
For more information on file transfer, see Receiver for HTML5 and Chrome File Transfer Explained.

© 1999-2017 Citrix Systems, Inc. All rights reserved. p.42https://docs.citrix.com
User experience
Mar 10, 20 17
After installing and configuring Citrix Receiver for Chrome, users click the Citrix Receiver icon in the Chrome apps list to start
Receiver for Chrome, as shown in the following figure. To remove Citrix Receiver for Chrome from their devices, your users
right-click the Citrix Receiver icon in the Chrome apps list and select Uninstall.
After they have logged on, users' desktops and applications appear.Users can search for resources and click an icon to start
a desktop or application in a new window.
When a user starts an additional application, Citrix Receiver for Chrome checks whether the application can be started
within an existing session before creating a new session. This enables users to access multiple applications over a single
connection so that the available resources are used more efficiently.
For session sharing to occur, the applications must be hosted on the same machine and must be configured in seamless
window mode with the same settings for parameters, such as window size, color depth, and encryption. Session sharing is
enabled by default when a hosted application is made available.
Users can use standard Windows shortcuts to copy data, including text, tables, and images, between hosted applications,
both within the same session and between different sessions. Only Unicode plain text can be copied and pasted between
hosted applications and the local clipboard on the device.
Users can use standard Windows keyboard shortcuts with Citrix Receiver for Chrome because these shortcuts are passed
from Chrome OS to hosted applications. Similarly, shortcuts specific to particular applications can also be used, provided
they do not conflict with any Chrome OS shortcuts. However, note that the Windows key must also be pressed for
function keys to be recognized, so an external keyboard is required. For more information about using Windows keyboards
with Chrome OS, see https://support.google.com/chromebook/answer/1047364. Citrix-specific shortcuts, such as those
for switching between sessions and windows, cannot be used with Citrix Receiver for Chrome.
When printing a document opened with a hosted application or an application running on a virtual desktop, the user is given
the option to print the document to PDF. The PDF is then transferred to the local device for viewing and printing from a
locally attached printer or Google Cloud Print. The file is not stored by Citrix Receiver for Chrome.
© 1999-2017 Citrix Systems, Inc. All rights reserved. p.43https://docs.citrix.com
To enable logging for Citrix Receiver for Chrome
To assist with troubleshooting connection issues, logs can be generated on both the user device and the machines
providing desktops and applications for users.
Enable logging on user devices
To capture logs on a user device:
1. On the user device, click the button with a settings image on it in the bottom-right corner of the Citrix Receiver for
Chrome logon page.
2. In the Settings dialog box, click Start Logging.
Details of the collected log files are listed in the Settings dialog box.
3. Click Stop Logging to end the collection of logs on the user device.
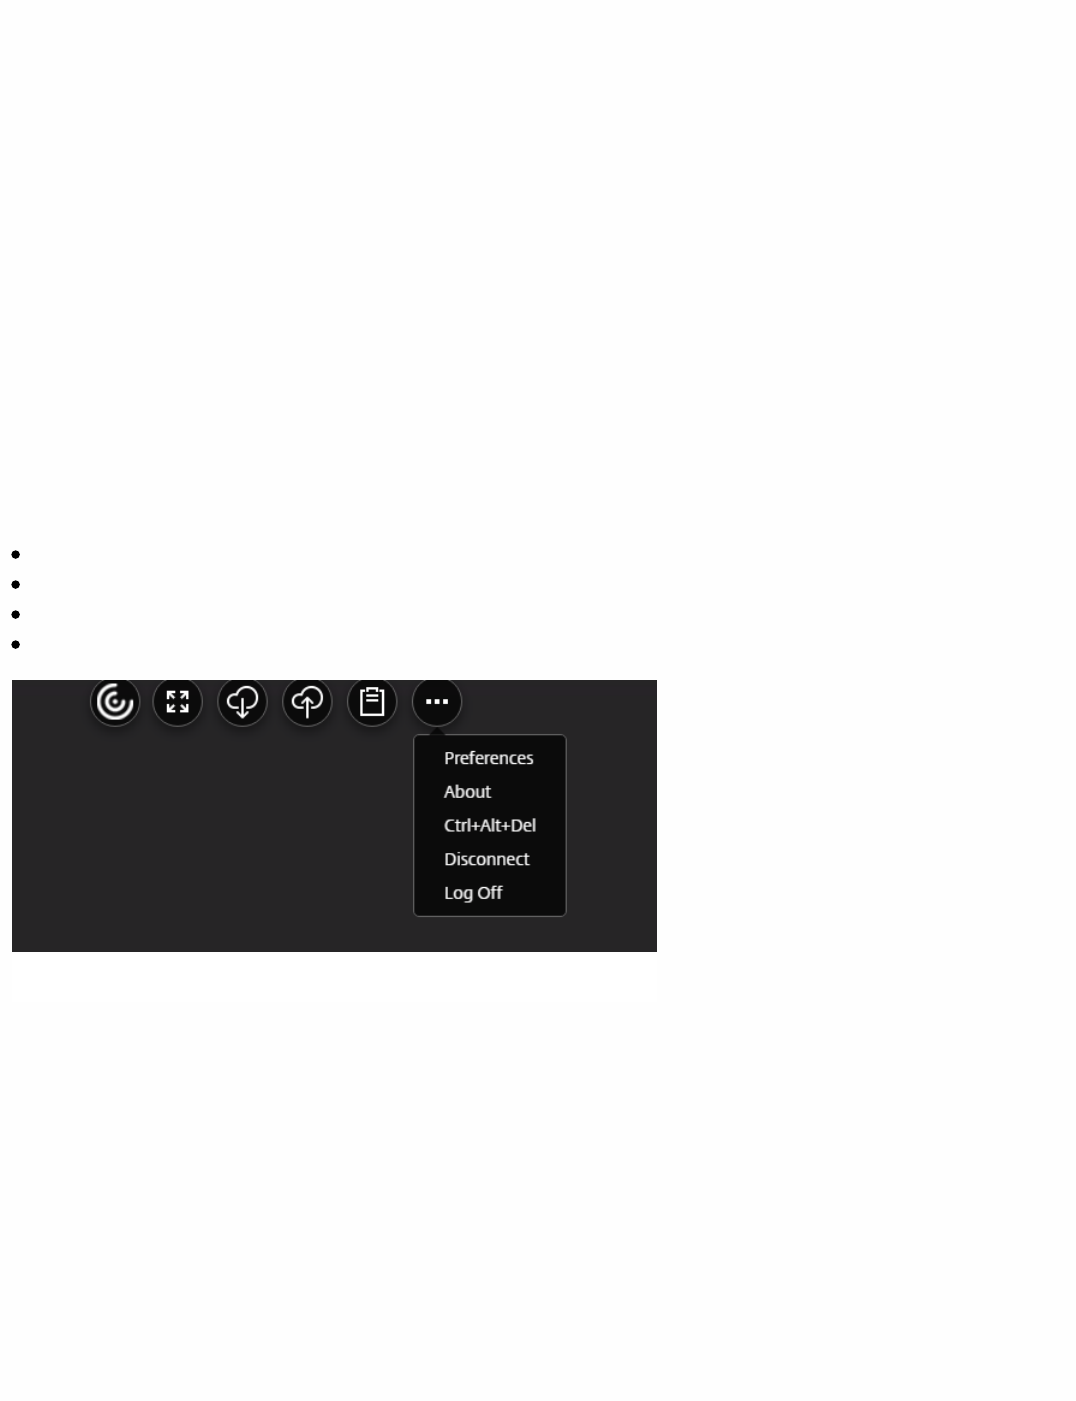
Redesigned toolbar
Citrix Receiver for Chrome provides a redesigned toolbar to improve the user experience. This enhancement provides new
options that are accessible from the toolbar to facilitate common tasks, such as:
switching to full-screen mode
upload or download a file
copy content from an active session to the clipboard to enable sharing between sessions
access additional options
Configuring the redesigned toolbar
By default, the enhanced toolbar is installed and enabled with Citrix Receiver for Chrome.
To hide the toolbar configuration using the configuration.js file:
The configuration.js file is located in the ChromeApp root folder. Edit this file directly to make changes to Citrix Receiver for
Chrome.
Note: Citrix recommends that you back up the configuration.js file before making any changes to it.
Note: Administrator- level credentials are required to edit the configuration.js file; after editing the file, repackage the app
to make additional modifications to toolbar elements
1. Open the configuration.js file and set the menubar attribute to false.

© 1999-2017 Citrix Systems, Inc. All rights reserved. p.44https://docs.citrix.com
You can also hide an individual icon to prevent it from displaying in the toolbar. For example, to hide the Ctrl+Alt+Del
button in the toolbar:
Open the configuration.js file and set the lock attribute to false.
Connection Center
Citrix Receiver for Chrome provides Connection Center functionality to facilitate application management in seamless
sessions. This is done by providing a taskbar that lists all opened applications.
To launch the Connection Center, right- click the Citrix Receiver icon and then click Connection Center.
Using the Connection Center dialog, users can select an application and:
1. Display devices.
2. Send a Crtl+Alt+Del command.
3. Disconnect from a session.
4. Logoff from the session.

© 1999-2017 Citrix Systems, Inc. All rights reserved. p.45https://docs.citrix.com
You can also terminate an app using the Connection Center by selecting the radio button of the corresponding application
and clicking Terminate.
Seamless window integration
Citrix Receiver for Chrome improves the user experience by adding seamless integration of multiple apps hosted in separate
windows within an active session. Using this functionality, Citrix Receiver for Chrome enables you to launch applications in
an independent user interface compared as opposed to launching all apps for a session in a single window.
Seamless applications can be hosted in separate windows; with this functionality, remote applications are run natively on
the client device.

© 1999-2017 Citrix Systems, Inc. All rights reserved. p.46https://docs.citrix.com
Limitations
Consider the following when using seamless functionality:
Extra entries appear in the Chrome task bar; click any of these to bring the selected session to the front.
All opened apps in an active session run in a single window; focusing on one app in an active session brings that window
into focus along with all other apps belonging to that session.
Use the seamless session taskbar to quickly move between apps:
Tip
All apps in one session run in a single window. When moving an app to a second monitor, all apps that are part of that session move
to the second monitor.

© 1999-2017 Citrix Systems, Inc. All rights reserved. p.47https://docs.citrix.com
Reload store URL button
In Citrix Receiver for Chrome window,a button is added for reload operation. By clicking the button, the cookies of the
store get cleared and the store page is reloaded.
Configuring Client Time Zone
To enable time zone on the client:
1. Launch Citrix Studio.
2. Open the Use local time of client policy.
3. Set the policy to Use client time zone.
