
COLAs Online
Create a New User Registration
Follow these steps to create a new user registration:
1. From your web browser, enter https://www.ttbonline.gov/ in the address field.
2. Press the Enter key. The TTB Online Portal page displays. See Figure 1.
Figure 1: TTB Online Portal
3. Select the Register for TTB Online link. A confirmation message box displays prompting
you to confirm your action. See Figure 2.

Create a New User Registration
Page 2
Figure 2: COLAs/FONL User Registration Confirmation
a. If you already use COLAs Online or Formulas Online, select the Cancel button.
b. If you are new to COLAs Online or Formulas Online or wish to reactivate an inactive
account, select OK button. The User Registration page displays with the Main tab
selected. See Figure 3.
Figure 3: User Registration – Main Tab

Create a New User Registration
Page 3
Type of Application
Figure 4: User Registration – Reactivating Inactive Account
Figure 5: User Registration – New Application
4. Select the radio button next to Type of Application (New Application or Reactivate an
Inactive Account).
a. If you are an existing COLAs Online user or an inactive Formulas Online user, select the
Reactivate an Inactive Account radio button and enter your user name (if you remember
it). See Figure 4.
b. If you are a new user, select the New Application radio button. See Figure 5.
Personal Information
Figure 6: User Registration – Personal Information (USPS Domestic)
Figure 7: User Registration – Personal Information (Foreign Address)

Create a New User Registration
Page 4
5. Enter your personal information in the available fields. See Figure 6. If you select Foreign
for Address Format, additional address fields display. See Figure 7.
►Note: Fields marked with asterisks (*) are required fields.
Business E-mail Addresses
Figure 8: User Registration – Business E-mail Addresses
6. Enter at least one valid business e-mail address in the available field(s). See Figure 8.
►Note: You may add up to three valid e-mail addresses, but then you must select which should
be used as the primary contact. E-mail notification will only be sent to the primary contact e-
mail address.
►Note: Fields marked with asterisks (*) are required fields.
Authentication Questions
Figure 9: User Registration – Authentication Questions
►Note: The system prompts you to select three different authentication questions from among
several available. It also prompts you to answer the questions you have selected. Your
selections and answers are protected by encryption technology and are unavailable to others.
This information is used by the system to allow you to activate your user name by setting your
initial password or change a forgotten password.
7. Select three different Authentication Questions from the drop-down lists. See Figure 9.
8. Enter your answers in the available fields.
►Note: Fields marked with asterisks (*) are required fields.
9. Select the Next button. The Company tab displays. See Figure 10.

Create a New User Registration
Page 5
Company Tab
Figure 10: User Registration – Company Tab
10. Select the access type from the COLAs Online System Access drop-down list if you are
requesting COLAs Online access. See Figure 10.
11. Select the Add button. The Company modal window displays. See Figure 11.
Company Information/System Information
Figure 11: User Registration – Company (System Information – COLAs Online)
Figure 12: User Registration – Company (System Information – Formulas Online)
►Note: If you selected an access type from the COLAs Online System Access drop-down list
(See Figure 10), the COLAs Online radio button next to System Requested is selectable. See
Figure 11. Otherwise, you may only select the Formulas Online radio button option. See Figure
12.
►Note: You may register to use COLAs Online or Formulas Online. Because access approval
for each system is done independently, you must complete two entries for that company: one for

Create a New User Registration
Page 6
COLAs Online access and one for Formulas Online access. This may be completed within the
same user registration request.
►Note: Fields marked with asterisks (*) are required fields.
12. If the System Requested is COLAs Online, the System Access displays based on the access
type selected from the COLAs Online System Access drop-down list. See Figure 10.
13. If the System Requested is Formulas Online, select the Submitter or Preparer / Reviewer
radio button next to System Access.
►Note: For Formulas Online, users may register as Submitter or Preparer/Reviewer at the
company level. For COLAs Online, users can only be either a Submitter or a Preparer/Reviewer
for all companies included in the user registration request.
14. If the System Requested is Formulas Online, select the Alcohol Beverage radio button or
Nonbeverage Product radio button next to Company Type.
►Note: The Nonbeverage Product Company Type is only applicable for a Nonbeverage
Product company.
Submitter Company Information
Figure 13: User Registration – Company (Company Information – Domestic)

Create a New User Registration
Page 7
Figure 14: User Registration – Company (Company Information – Foreign)
15. If registering as a Submitter or Preparer/Reviewer for an Alcohol Beverage company, enter
your permit number, registry number, or brewer’s number and date of permit issue in the
available fields.
►Note: The Company Code field is only applicable for a Nonbeverage Product company.
►Note: The Date of Permit Issue field format is MM/DD/YYYY. Enter it in manually or place
your cursor in the field to display a pop-up calendar to find the correct date.
16. If registering as a Submitter or Preparer/Reviewer for a Nonbeverage company, enter your
company code in the available field.
►Note: The Registry, Permit, or Brewer’s Notice field will not be required and the Date of
Permit Issue field will be hidden if you select the Nonbeverage Product radio button next to
Company Type.
17. Enter your company address information in the available fields. See Figure 13. If you select
Foreign for Address Format, additional address fields display. See Figure 14.

Create a New User Registration
Page 8
►Note: Fields marked with asterisks (*) are required fields.
Individual Information/Signature Authority or Power of Attorney Forms
Figure 15: User Registration – Company (Individual Information – Preparer/Reviewer)
Figure 16: User Registration – Company (Individual Information – Submitter)
Figure 17: User Registration – Company (Individual Information – SA/POA Selected,
Beverage)
Figure 18: User Registration – Company (Individual Information – SA/POA Selected,
Nonbeverage)
18. If registering as a Preparer/Reviewer, select the Employee or Representative radio button.
See Figure 15.
19. If registering as a Submitter, select the Employee or Representative radio button. See Figure
16.
20. If registering as a Submitter, select the Owner, Signing Authority, or Power of Attorney radio
button.
►Note: If you are registering for the first time as a Submitter on behalf of a beverage company,
unless you are an owner, you must acknowledge you have a valid SA or POA on file at the NRC

Create a New User Registration
Page 9
by selecting the “I agree” checkbox. See Figure 17. If registering for the first time as Submitter
on behalf of a nonbeverage company, unless you are an owner, you need to upload a signed
Power of Attorney form or a Signing Authority form. See Figure 18. You may download the
Power of Attorney form or Signing Authority form through the system for completion, or you
may upload your own completed, scanned form.
21. If the Signing Authority or Power of Attorney radio button was selected for a nonbeverage
company, select the POA Form or SA Form link in the action bar to download the form(s)
required. See Figure 19.
Figure 19: User Registration – Action Bar
22. Complete and scan the required form(s).
23. Upload the file through the Docs/Links Tab.
Approver Information
Figure 20: User Registration – Approver Information
24. If known, enter the Title and Name of the Company Approval Official in the available fields.
25. Select the OK button. The Company modal window closes and the company is added to the
user registration submission. See Figure 21.

Create a New User Registration
Page 10
Figure 21: User Registration – Company Tab with Company Added
►Note: Select the System link to display the Company modal window and edit the company
information. Select the checkbox next to the company and select the Delete button to delete the
company. A confirmation message box displays prompting you to confirm your action. See
Figure 22. Select the OK button to confirm.
Figure 22: User Registration – Delete Company Confirmation

Create a New User Registration
Page 11
Docs/Links Tab
Figure 23: User Registration – Docs/Links Tab
►Note: If registering for the first time as Submitter, unless you are an owner, you need to
upload a signed Power of Attorney form or a Signing Authority form. If you do not have any
attachments to upload, follow the steps in the Comments Tab
if you have any comments to add
to the user registration submission. If you do not have any comments to add, follow the steps in
User Registration Submission to submit your user registration.
26. Select the Next button. The Docs/Links tab displays. See Figure 23.
27. Select the Upload button. The Attachment modal window displays. See Figure 24.
Figure 24: User Registration – Attachment Modal Window
28. Enter a description for the file in the available field.
29. Select a type from the Type drop-down list.
►Note: Fields marked with asterisks (*) are required fields.

Create a New User Registration
Page 12
►Note: You must select the correct type. For example, if you selected Signing Authority as
the Signature Authorization in the Company modal window, you must select Signing Authority
from the Type drop-down list. If you selected Power of Attorney as the Signature
Authorization in the Company modal window, you must select Power of Attorney from the
Type drop-down list.
►Note: If you are reactivating a former COLAs Online or Formulas Online user name and
these items are on file, you will not need to file these again.
30. Select the Browse button to browse and select the signed Power of Attorney or Signing
Authority file.
31. Select the OK button. The Attachment modal window closes and the file is uploaded to the
user registration submission. See Figure 25.
Figure 25: User Registration – Docs/Links Tab with Attachment Uploaded
►Note: Select the edit link to display the Attachment modal window and edit the attachment
information. Select the checkbox next to the attachment and select the Delete button to delete
the attachment. A confirmation message box displays prompting you to confirm your action.
See Figure 26. Select the OK button to confirm.
Figure 26: User Registration – Delete Attachment Confirmation
Create a New User Registration
Page 13
Comments Tab
Figure 27: User Registration – Comments Tab
►Note: Adding comments to a user registration submission is optional. If you do not have any
comments to add, follow the steps in User Registration Submission to submit your user
registration.
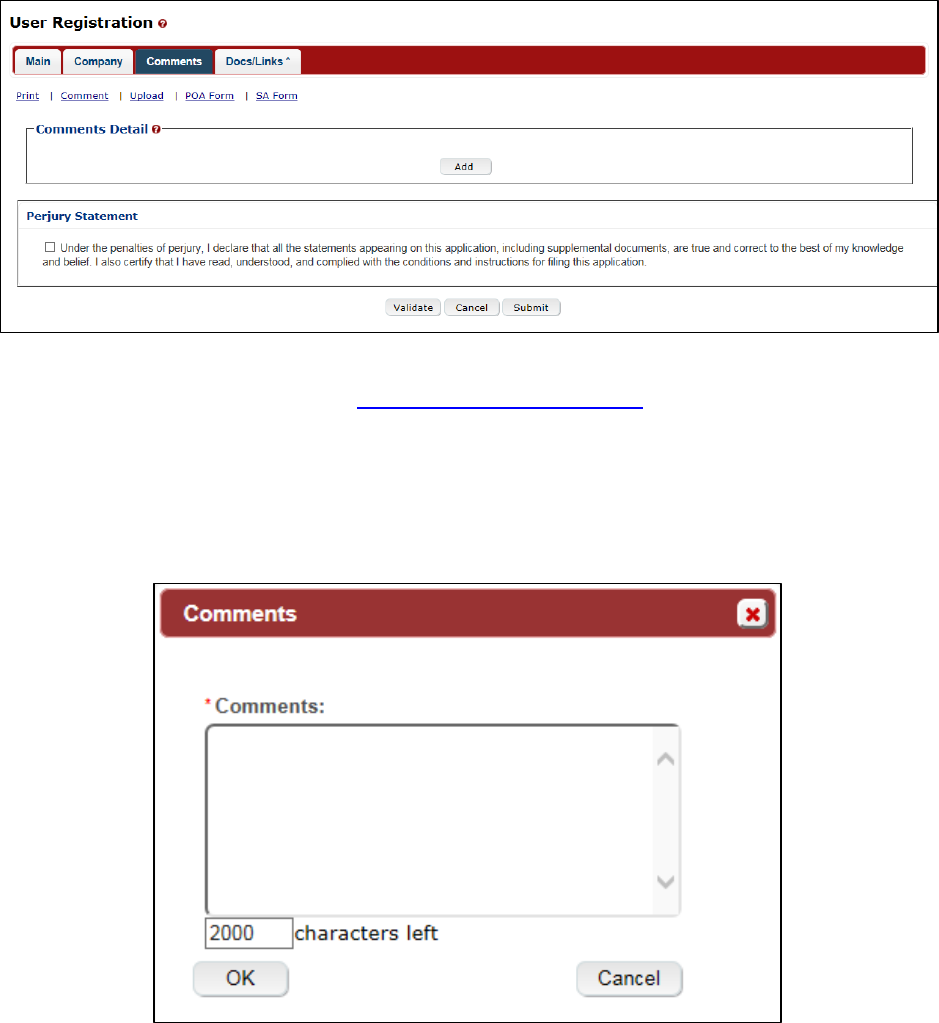
32. Select the Comments tab. The Comments tab displays. See Figure 27.
33. Select the Add button. The Comments modal window displays. See Figure 28.
Figure 28: User Registration – Comments Modal Window
34. Enter comments in the available field.
35. Select the OK button. The Comment modal window closes and the comments are added to
the user registration submission. See Figure 29.

Create a New User Registration
Page 14
Figure 29: User Registration – Comments Tab with Comment Added
►Note: Select the Comment link to display the Comment modal window and edit the comment
information. Select the checkbox next to the comment and select the Delete button to delete the
comment. A confirmation message box displays prompting you to confirm your action. See
Figure 30. Select the OK button to confirm.
Figure 30: User Registration – Delete Comment Confirmation
User Registration Submission
36. Select the Validate button. Red error messages display indicating any issues found with the
user registration submission. Fields with errors will also be highlighted red. See Figure 31.
Alternatively, a green message displays indicating no issues were found with the user
registration submission. See Figure 32. Correct any errors and repeat this step until the user
registration submission is successfully validated.

Create a New User Registration
Page 15
Figure 31: User Registration – Unsuccessful Validation Message
Figure 32: User Registration – Successful Validation Message
37. Select the Perjury Statement checkbox at the bottom of any tab to acknowledge you have
read, understood, and complied with instructions for filing the application. See Figure 33.
Figure 33: User Registration – Perjury Statement
38. Select the Submit button. The Submission Confirmation page displays with a submission ID
and the user registration submission is successfully submitted. See Figure 34.
Figure 34: User Registration – Submission Confirmation
TTB verifies your authorizations with the companies you are registering for and will contact
you by e-mail when a determination has been reached or if additional information is needed.

Create a New User Registration
Page 16
You should allow up to 20 days for processing and keep a record of the submission ID for
tracking purposes.
39. Select the Exit link in the main navigation banner. See Figure 35.
Figure 35: User Registration – Exit Link
A confirmation message box displays prompting you to confirm your action. See Figure 36.
Figure 36: User Registration – Exit Confirmation
40. Select the OK button to confirm. The confirmation message box closes and the TTB Online
Portal page displays. See Figure 1.
41. Follow the steps in Activate a User Name to activate your user name once TTB has contacted
you with the user name.
