
Target Analytics Guide
020212
©2007 Blackbaud, Inc. This publication, or any part thereof, may not be reproduced or
transmitted in any form or by any means, electronic, or mechanical, including photocopying,
recording, storage in an information retrieval system, or otherwise, without the prior written
permission of Blackbaud, Inc.
The information in this manual has been carefully checked and is believed to be accurate.
Blackbaud, Inc., assumes no responsibility for any inaccuracies, errors, or omissions in this
manual. In no event will Blackbaud, Inc., be liable for direct, indirect, special, incidental, or
consequential damages resulting from any defect or omission in this manual, even if advised of
the possibility of damages.
In the interest of continuing product development, Blackbaud, Inc., reserves the right to make
improvements in this manual and the products it describes at any time, without notice or
obligation.
The Raiser’s Edge, MatchFinder, ParaGon, RE:Alum, RE:Event, RE:Member, RE:Queue, RE:Tribute,
RE:Volunteer, RE:Zip, RE:Open, and Blackbaud are registered trademarks of Blackbaud, Inc.
All other products and company names mentioned herein are trademarks of their respective
holder.
RE7.83-TargetAnalytics-2012

Contents
T
ARGET
A
NALYTICS
. . . . . . . . . . . . . . . . . . . . . . . . . . . . . . . . . . . . . . . . . . . . . . . . . . . 1
Frequently Used Terms . . . . . . . . . . . . . . . . . . . . . . . . . . . . . . . . . . . . . . . . . . . . . . . . . . . . . . . . . . . . . . . . 2
Accessing Target Analytics . . . . . . . . . . . . . . . . . . . . . . . . . . . . . . . . . . . . . . . . . . . . . . . . . . . . . . . . . . . . . 2
Creating an Export File for Target Analytics Custom Modeling Services . . . . . . . . . . . . . . . . . . . . . . . . . 3
Sending an Export File to Target Analytics Custom Modeling Services . . . . . . . . . . . . . . . . . . . . . . . . . . 9
Receiving Update Files from Target Analytics Custom Modeling Services . . . . . . . . . . . . . . . . . . . . . . 10
Updating Constituents with Scores from Target Analytics . . . . . . . . . . . . . . . . . . . . . . . . . . . . . . . . . . . 12
Viewing Target Analytics Data in The Raiser’s Edge . . . . . . . . . . . . . . . . . . . . . . . . . . . . . . . . . . . . . . . . 15
I
NDEX
. . . . . . . . . . . . . . . . . . . . . . . . . . . . . . . . . . . . . . . . . . . . . . . . . . . . . . . . . . . 31

3chapter
Target Analytics
Frequently Used Terms . . . . . . . . . . . . . . . . . . . . . . . . . . . . . . . . . . . . . . . . . . . . . . . . . . . . . . . . . . . . . . . . . . . . . . . . 2
Accessing Target Analytics . . . . . . . . . . . . . . . . . . . . . . . . . . . . . . . . . . . . . . . . . . . . . . . . . . . . . . . . . . . . . . . . . . . . . . . . 2
Creating Export Files for Target Analytics Custom Modeling Services . . . . . . . . . . . . . . . . . . . . . . . . . . . . . . . . . . 3
Sending Export Files to Target Analytics Custom Modeling Services . . . . . . . . . . . . . . . . . . . . . . . . . . . . . . . . . . . 9
Receiving an Update File from Target Analytics Custom Modeling Services . . . . . . . . . . . . . . . . . . . . . . . . . . . .10
Updating Constituents with Scores from Target Analytics . . . . . . . . . . . . . . . . . . . . . . . . . . . . . . . . . . . . . . . . . . 12
Viewing Target Analytics Data in The Raiser’s Edge . . . . . . . . . . . . . . . . . . . . . . . . . . . . . . . . . . . . . . . . . . . . . . . . 15
Procedures
Opening Target Analytics . . . . . . . . . . . . . . . . . . . . . . . . . . . . . . . . . . . . . . . . . . . . . . . . . . . . . . . . . . . . . . . . . . . . . . . . . 3
Creating an export file . . . . . . . . . . . . . . . . . . . . . . . . . . . . . . . . . . . . . . . . . . . . . . . . . . . . . . . . . . . . . . . . . . . . . . . . . . . 3
Sending an export file . . . . . . . . . . . . . . . . . . . . . . . . . . . . . . . . . . . . . . . . . . . . . . . . . . . . . . . . . . . . . . . . . . . . . . . . . . . 9
Downloading updated files from the Target Analytics Custom Modeling Services FTP server . . . . . . . . . . . . . . . . 10
Updating constituent records with Target Analytics data . . . . . . . . . . . . . . . . . . . . . . . . . . . . . . . . . . . . . . . . . . . . . 12
Viewing scores in The Raiser’s Edge . . . . . . . . . . . . . . . . . . . . . . . . . . . . . . . . . . . . . . . . . . . . . . . . . . . . . . . . . . . . . . . 15
Viewing demographic information in The Raiser’s Edge . . . . . . . . . . . . . . . . . . . . . . . . . . . . . . . . . . . . . . . . . . . . . . 18
Viewing address information updated in The Raiser’s Edge . . . . . . . . . . . . . . . . . . . . . . . . . . . . . . . . . . . . . . . . . . . 19

2
C
HAPTER
Target Analytics services helps you put your constituent data to work. Using your Raiser’s Edge data, the service
identifies your best charitable giving prospects, helping you maximize your gift revenue. The services analyze
historic and current data, as well as behavioral trends. You learn which individuals are your best annual, major,
and planned giving prospects now and in the future.
Target Analytics services understands each client is unique. It builds a custom model of your donors by combining
your data with outside sources of demographic and wealth information. With these additional sources of
information, Target Analytics services can build models that best distinguish donors from non-donors and major
giving prospects from planned-giving prospects or annual giving prospects.
In addition to providing you with analytical services, Target also provides you with a utility to move information
back and forth between Target Analytics services and your Raiser’s Edge database. The Target Analytics link
takes you step-by-step through the process of creating an export file with all the necessary information, sending
the file to Target Analytics services, downloading the updated file from the Custom Modeling Services back into
your system, and finally updating constituent records.
The updated constituent records house the research results in the form of scores and demographic data. Scores
rate a constituent based on his annual gift likelihood, target gift dollar range, major gift likelihood, planned gift
likelihood, annuity likelihood, bequest likelihood, and charitable request/trust likelihood. Scores also include an
asset estimator, estimating the constituent’s wealth range. The demographics information Target Analytics
services can provide includes household income estimates, giving history, and information based on age and
gender groups.
Once you update your records with the score and demographic data provided by Target Analytics services
statisticians, you can view the new information on the constituent records.
The location of score information on the constituent record depends on whether you have the optional module
Prospect Research Management. If you have Prospect Research Management, all score information appears on
the Prospect tab in the Ratings category. If you do not have Prospect Research Management, the program
detects this during the update process and maps the scores to constituent attributes. You can then view score
information on the Attributes tab of the constituent record.
All demographic information appears on the Attributes tab, regardless of whether you have Prospect Research
Management or not. Scores also include an asset estimator, estimating constituent wealth range and income
range. The demographic information provided, includes summarized giving histories, age and gender.
Frequently Used Terms
This section defines words and phrases you need to know as you work with Target Analytics services and Target
Analytics. If you come across an unfamiliar term when reading this or any chapter in The Raiser’s Edge
documentation, make sure you check the online glossary in the help file.
Exceptions. An exception is a record the program failed to process. For example, when you create the export file
to send to Target Analytics services, any Raiser’s Edge constituent record the program failed to include in the
export is an exception.
Demographics. Demographic information offers a statistical overview of general characteristics of a group (age,
income, region). The demographic information Target Analytics services provides includes household income
estimates, giving history, and information based on age and gender groups.
FTP. FTP stands for File Transfer Protocol. A standard Internet protocol, FTP is the simplest way to exchange files
between computers on the Internet. FTP commonly transfers Web page files from their creator to a
computer acting as the files server for everyone on the Internet.
Prospect. The prospect is the source from whom your organization is cultivating a gift. For example, if you
discover Dr. Robert C. Hernadez has inherited $1,000,000 and your organization decides to pursue him for a
donation, Dr. Hernadez is a prospect.

T
ARGET
A
NALYTICS
3
Scores. Scores are detailed analyses of gift and constituent prospects. Scores rate a constituent based on his
annual gift likelihood, target gift dollar range, major gift likelihood, planned gift likelihood, annuity likelihood,
bequest likelihood, and charitable request/trust likelihood. Scores also include an asset estimator, estimating
the constituent’s wealth and income range.
Accessing Target Analytics
Target Analytics is accessed by clicking Admin on the Raiser’s Edge bar.
Opening Target Analytics
1. On the Raiser’s Edge bar, click Admin.
2. Click Target Analytics. The Target Analytics page appears.
3. From the Target Analytics page, you can create an export file, send the file to Target Analytics services,
download the updated file from Target Analytics services, and update your constituent records with the
new information.
Creating an Export File for Target Analytics
Custom Modeling Services
The Target Analytics Export Wizard, accessed through the Target Analytics page, simplifies the process of
extracting important analytical data from your Raiser’s Edge database. Arranged around four tabs — General,
Annual Funds, Capital Funds, and Address Types — the wizard tells you exactly what information is needed to
provide you with the best results.
Creating an export file
Note: For information about accessing the Target Analytics screen, see “Opening Target Analytics” on page 3.

4
C
HAPTER
1. From the Target Analytics screen, click Create an Export File for Target Analytics. The Target Analytics
Export Wizard screen appears, displaying the General tab.
2. To select the records you want to include in your export file, click the Include button. From the menu that
appears, you can choose to include All Records or Selected Records from your database that satisfy the
export criteria.
If you choose All Records all records in your Raiser’s Edge database that satisfy your export criteria are
included. If you choose Selected Records, the Open Query screen appears, so you can choose a query of
records to include in your export file.
•In the Find Queries that meet these criteria frame, you can enter criteria information to limit the
queries appearing in the grid
• Click Find Now. All constituent queries satisfying the criteria you entered appear.
• Select a query and click Open, or to create a new query, click Add New
After you select the records you want to include, you return to the Target Analytics Export Wizard screen.
The query name appears next to the Include button.
3. To include records of inactive constituents in your export file, mark the Include inactive constituents
checkbox.
4. To include constituent records in your export file even if the record has no valid address, mark the
Include constituents with no valid address checkbox.
5. In the Export File frame, a Name for the export file you are creating defaults. You should not change this
name. The default name is consistent with the Target Analytics services format and allows statisticians to
easily locate and identify your export file.
Note: For information about creating a query, see the Query chapter of the Query & Export Guide.

T
ARGET
A
NALYTICS
5
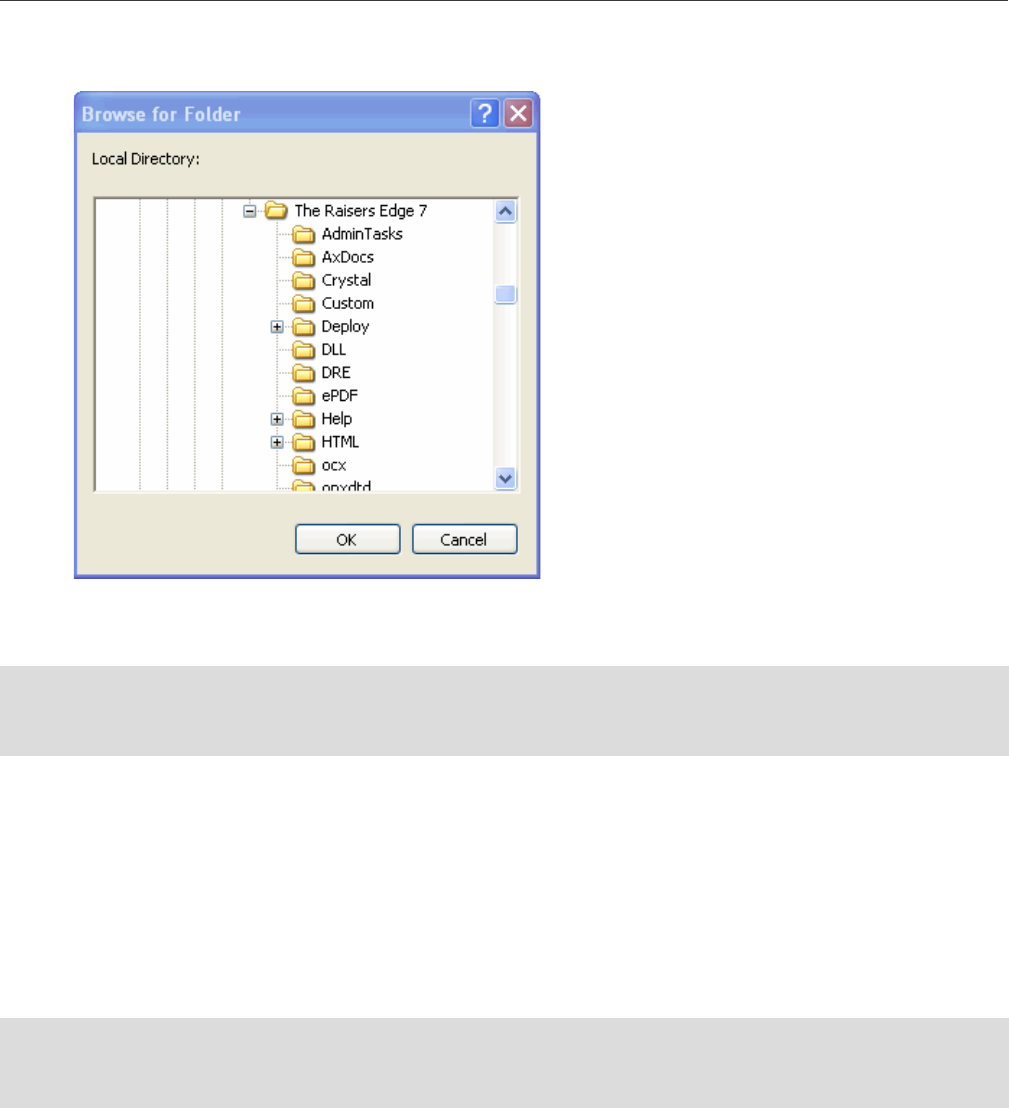
6. In the Location field, enter where in your system you want the export file saved. Click the ellipsis to access
the Browse for Folder screen and map to a location.
From the Browse for Folder screen, click OK to return to the Target Analytics Export Wizard screen.
7. To create a report detailing the criteria used to generate the export file and explaining any exceptions
encountered during processing, mark the Create control report checkbox.
8. To create a query of all records included in the export, mark the Create output query checkbox.
9. To create a query of exceptions, mark the Create query of exceptions checkbox. We recommend marking
this checkbox. The query may prove useful in identifying and correcting records the program could not
include in the export file.
10. To move to the Annual Funds tab, click Next.
On this tab you select the annual funds you want to include in the analysis. Gifts given to the selected
funds are exported.

6
C
HAPTER
11. To select a fund, highlight the fund in the box on the left side of your screen and click the single right
arrow. The fund appears in the Selected Annual Funds box on the right side of your screen.
If you do not want to scroll down the list of funds, you can enter search information in the Search by
Fund Description field and click Find Now. For example, if you want only funds for the year 2003, enter
“2003” in the Search by Fund Description field and click Find Now. The funds list then displays only funds
with “2003” in the title.
To include all annual funds in your export file, click the double right arrows. To remove a fund from the
Selected Annual Funds box, highlight the fund and click the single left arrow. To remove all funds from the
Selected Annual Funds box, click the double left arrows.
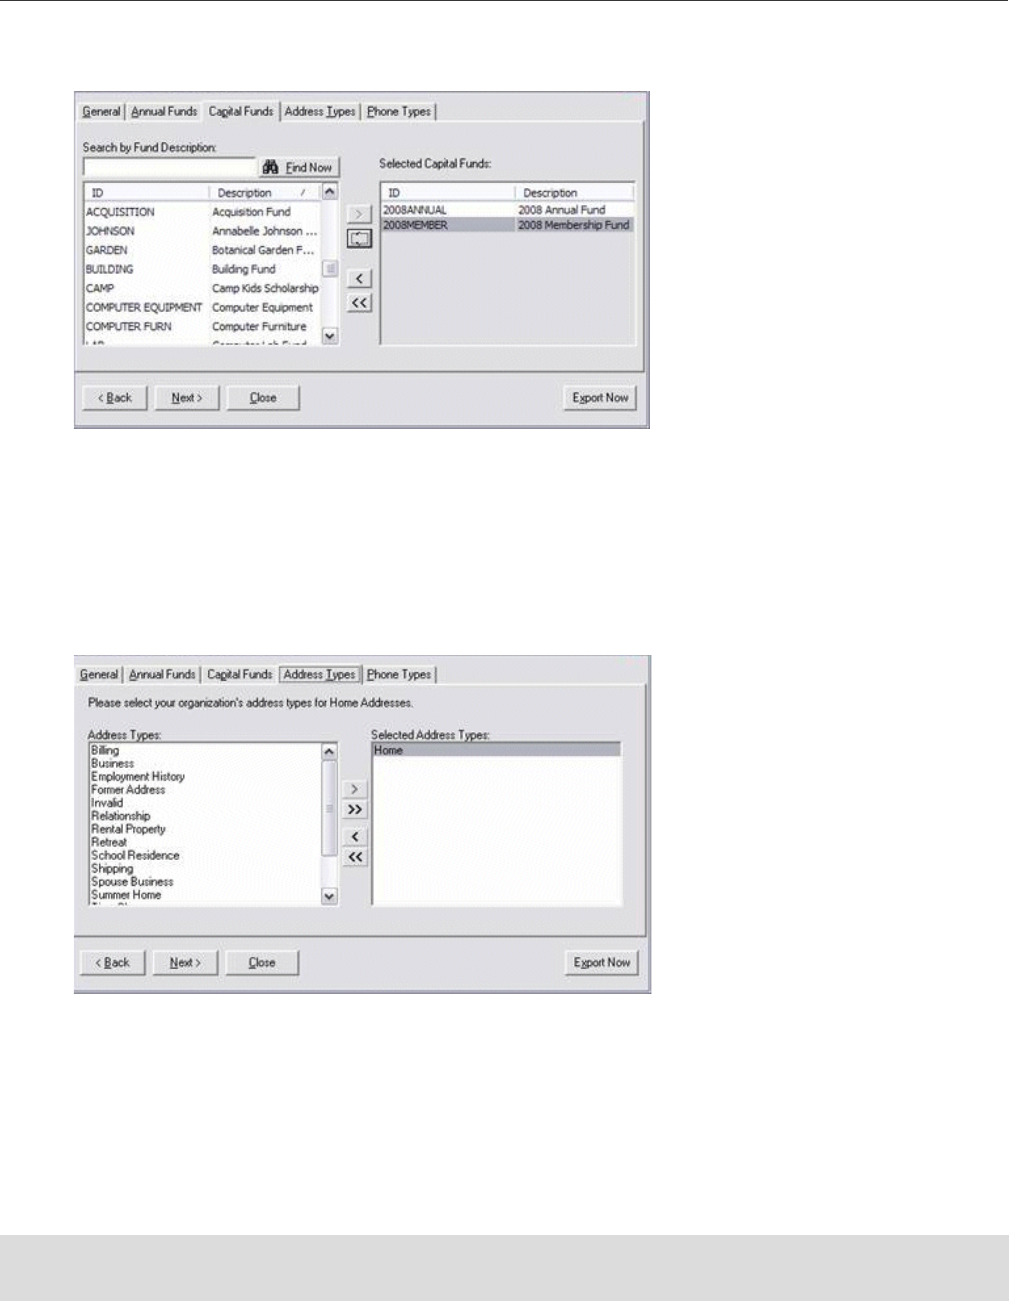
12. To move to the Capital Funds tab, click Next.
On this tab you select the capital funds you want to include in the analysis. Gifts given to the selected
funds are exported.
Note: Although Capital Fund information is not required to create a custom model of your prospective donors,
we recommend you include this information in your export file. The more information you provide Target
Analytics services, the better the prospect information you receive.
T
ARGET
A
NALYTICS
7
13. To select a fund, highlight the fund in the box on the left side of your screen and click the single right
arrow. The fund appears in the Selected Capital Funds box on the right side of your screen.
If you do not want to scroll down the list of funds, you can enter search information in the Search by
Fund Description field and click Find Now. For example, if you want only funds for the year 2003, enter
“2003” in the Search by Fund Description field and click Find Now. The funds list then displays only funds
with “2003” in the title.
To select all capital funds, click the double right arrows. To remove a fund from the Selected Capital Funds
box, highlight the fund and click the single left arrow. To remove all funds from the Selected Capital Funds
box, click the double left arrows.
14. To move to the Address Types tab, click Next.
On this tab you select the address types acceptable for analysis. The program exports only one valid
address, but to improve the chances of the program locating a valid address, you can include as many
address types as you like in the Selected Address Types box.
The program stops searching for a constituent address after it finds one valid address to export. For
example, you can include “Summer Home”, “Winter Home”, and “Former Address” in the Selected
Address Types box. During the export process, the program first searches for a “Summer Home” address.
If a valid “Summer Home” address is found, the program includes that address in the export file and stops
searching. If no “Summer Home” address exists on the constituent record, the program continues
searching for a “Winter Home” address.
Warning: Only U.S. address information can be exported. The program does not accept international or
Canadian addresses.

8
C
HAPTER
15. To select an address type, highlight the address type in the Address Types box on the left side of your
screen and click the single right arrow. The address type appears in the Selected Address Types box on
the right side of your screen.
To select all Address Types, click the double right arrows. To remove an address type from the Selected
Address Types box, highlight the address type and click the single left arrow. To remove all address types
from the Selected Address Types box, click the double left arrows.
16. To move to the Phone Types tab, click Next.
17. On this tab you select the phone types acceptable for analysis. The program exports only one valid
phone, but you can include as many phone types as you like in the Selected Phone Types box. The
program stops searching for a constituent phone after it finds one valid phone to export.
To select all Phone Types, click the double right arrows. To remove a phone type from the Selected Phone
Types box, highlight the phone type and click the single left arrow. To remove all phone types from the
Selected Phone Types box, click the double left arrows.
18. After you complete all Target Analytics Export Wizard tabs, click Export Now to create an export file in the
location you entered on the Location field on the General tab.
19. If on the General tab you marked the Create query of exceptions checkbox, the Save static query screen
appears.
Note: If you did not mark the Create control report checkbox on the General tab of the Target Analytics Export
Wizard screen, the Preview Report button does not appear on the Data Export Complete screen.

T
ARGET
A
NALYTICS
9
Enter a Query name and a Description that will help you identify the records included in the query. The
Query format field defaults to “Static” and cannot be changed. You can also allow others to execute or
modify the query file.
20. Click Save. The program processes the export file.
21. When the processing is complete, the Data Export Complete screen appears. This screen displays the
number of records processed and exported. It also displays the number of exceptions, if any.
22. To open the Control Report and view reasons for any exceptions, along with export results and criteria,
click Preview Report.
23. To close the report and return to the Target Analytics Export Wizard screen, click the “X” in the upper
right corner.
24. To exit the Target Analytics Export Wizard, click Close.
You are now ready to send the export file to Target Analytics services.
Sending an Export File to Target Analytics
Custom Modeling Services
After you create an export file using the Target Analytics Export Wizard, you send the file to the Target FTP server.
From there, statisticians download your data for analysis. To send the export file to the FTP server, use the Send
the Export File to Target Analytics for Analysis link provided on the Target Analytics screen in The Raiser’s Edge.
The program automatically creates a Zip file of your data, places it in the proper folder on the Target FTP server,
and sends an email to Target Analytics services, telling the statisticians your file is available.
Sending an export file
1. From the Target Analytics screen, click Send the Export File to Target Analytics for Analysis. The Target
Analytics Send File Wizard screen appears.
2. In the Export file field, the most recent export file you created appears. For more information about
creating export files, see “Creating an Export File for Target Analytics Custom Modeling Services” on
page 3.
Note: If you created an output query of exceptions when you generated your export file, you can use the
query to fix records listed as exceptions in the Control Report.

10
C
HAPTER
3. To search for a different file, click the ellipsis to access the Export File screen.
4. On this screen, you can map to a different export file and click Save to return to the Target Analytics Send
File Wizard screen. In the Export file field, the export file you selected appears.
5. After you complete the Target Analytics Send File Wizard screen, click Send File. The export file is copied
to the proper folder on the Target FTP server. A confirmation message appears, telling you when the
procedure is complete.
6. To return to the Target Analytics Send File Wizard screen, click OK.
7. To return to the Target Analytics page, click Close.
Target will contact you via email and tell you when your analyzed file is ready. You can then use the
Receive Update File from Target Analytics link on the Target Analytics screen to download the new
information.
Receiving Update Files from Target Analytics
Custom Modeling Services
After Target Analytics services creates your models and presents your results, the service sends you an email
message, announcing your scores and demographic information are ready to import into The Raiser’s Edge. You
can use the Receive Update File from Target Analytics link on the Target Analytics screen to download the new
file into your system. This does not update your Raiser’s Edge records; it just places the file back in your system,
from where you can later update your records.
Downloading updated files from the Target FTP server
1. From the Target Analytics screen, click Receive Update File from Target Analytics. The Target Analytics
Get File Wizard screen appears.

T
ARGET
A
NALYTICS
11
2. In the File Information frame, click the List Files button. Any Target Analytics files available in your pick
up folder on the FTP server appear in the FTP file name field.
3. In the FTP file name field, select the file you want to import back into The Raiser’s Edge.
4. In the Local directory field, enter a path to the location in your system where you want the FTP file
downloaded.
You can click the ellipsis to access the Browse for Folder screen and map to the directory and folder.
To return to the Target Analytics Send File Wizard screen, click OK.
The path you selected appears in the Local directory field.
5. After you complete the Target Analytics Get File Wizard screen, click Get File. The program downloads
the file to the selected directory. A confirmation screen appears when the process is finished.
6. If you want to update your constituent records now with the new information, click Yes. The Target
Analytics Update Records Wizard screen appears. For detailed instructions about updating records, see
“Updating Constituents with Scores from Target Analytics” on page 12.
7. If you want to wait, and maybe view the update file in Microsoft Excel or another spreadsheet program,
click No. You return to the Target Analytics Send File Wizard screen.
8. To return to the Target Analytics page, click Close.

12
C
HAPTER
Updating Constituents with Scores from Target
Analytics
After you download the Target Analytics services file, you can use the Update Constituents with Scores from
Target Analytics link on the Target Analytics screen to update your Raiser’s Edge constituent records. This
process adds the research information provided by Target Analytics services to your constituent records.
Updating constituent records with Target Analytics data
1. From the Target Analytics screen, click Update Constituents with Scores from Target Analytics. The
Target Analytics Update Records Wizard screen appears.
Warning: We strongly recommend you have a recent tape backup of your Raiser’s Edge database before you
run the updating process. This process permanently changes your constituent records. Restoring you database
from a backup is the only way to reverse the process should an error occur.

T
ARGET
A
NALYTICS
13
2. In the FTP file field, the document you most recently downloaded from the Target FTP server defaults. To
search for a different document, click the ellipsis to access the Import Target Analytics Data from screen.
Locate the downloaded Zip file and click Open to return to the Target Analytics Update Records Wizard
screen.
In the Update file field, the name of the update file you selected appears.
3. All files downloaded from Target’s FTP server are password-protected. In the Password field, enter the
password information that was included in the email message notifying you that your custom modeling
file was ready to download.
4. In the Create files in field, enter where in your system you want the program to save the file of
exceptions. Exceptions are records that for some reason, The Raiser’s Edge was unable to update.
14
C
HAPTER
You can click the ellipsis to access the Browse for Folder screen and map to the directory and folder in
which you want exceptions saved.
To return to the Target Analytics Update Records Wizard screen, click OK.
5. In the Update Options frame, choose from the following options or checkboxes:
• Create scores adds scores or rating information to all constituent records included in the custom
modeling file. If you have the optional module Prospect Research Management, this information
appears on the Prospect tab of the constituent records, in the Ratings category. If you do not have
Prospect Research Management, this information appears on the Attributes tab of the constituent
records.
• Update constituent address updates all constituent address information included in the custom
modeling file. For example, if the “Home” address is updated in the custom modeling file, the “Home”
address on the constituent record is updated; if the “Winter Home” address is updated in the custom
modeling file, the “Winter Home” address on the constituent record is updated.
• Both creates scores and updates constituent address information at the same time.
• Create query of exceptions creates a static query of all records the program could not update. The
Target Analytics Custom Modeling statisticians can use this information and research why these
records could not update.
• Create query of changed constituents creates a static query of all records the program updated.
• Create control report generates a report displaying the number of records processed and updated, the
number of exceptions, reasons for the exceptions, and the number of addresses updated.
6. After you complete the Target Analytics Update Records Wizard screen, click Update Records.
Warning: To better track changes made to your Raiser’s Edge constituent records, do not select to update
both address and score information at the same time. Running the procedures separately gives you separate
query files: one detailing all address information updated and the other detailing all score information added.
Warning: Because updated address information overwrites the existing information entered on the Addresses
tab of the constituent record, we recommend creating a query of changed constituents. You can use the query
to track constituent records affected by the update.

T
ARGET
A
NALYTICS
15
7. If you marked Create query of exceptions or Create query of changed constituents the Save Static Query
screen appears (once for each checkbox marked).
Enter a Query name and a Description that will help you identify the records included in the query. The
Query format field defaults to “Static” and cannot be changed. You can also allow others to execute or
modify the query file.
8. Click Save. The program processes the update request and a tracking screen appears.
When the update is complete, a screen appears, displaying information about the update.
9. The screen displays the number of Records Read, Records Imported, and Exceptions. It also shows the
Total Time the process took and the number of records updated per second (Records/sec).
10. If you marked the Create control report checkbox on the Target Analytics Update Records Wizard screen,
click Preview Report to open the report.
11. The report displays result information and details about any exceptions. Your can print a hardcopy of the
report by clicking the print icon at the top of the screen. To close the report and return to the Target
Analytics Update Records Wizard screen, click the “X” in the upper right corner.
12. From the Target Analytics Update Records Wizard screen, click Close. You return to the Target Analytics
page.
Viewing Target Analytics Data in The Raiser’s
Edge
Target Analytics updates Raiser’s Edge constituent records, adding research results provided by Target Analytics
services. Target Analytics enters this information in the form of scores and demographic data. Scores rate a
constituent based on his annual gift likelihood, target gift dollar range, major gift likelihood, planned gift
likelihood, annuity likelihood, bequest likelihood, and CRT likelihood. Scores also include an asset estimator,
estimating the constituent’s wealth and income range. The demographic information Target Analytics services
provide includes summarized giving history, age, and gender. The results you receive depend on your contract
with Target Analytics services and the information you provided the service.
Once you update your records with the score and demographic data provided by Target Analytics services
statisticians, you can view the new information on the constituent records.
The location of score information on the constituent record depends on whether you have the optional module
Prospect Research Management. If you have Prospect Research Management, all score information appears on
the Prospect tab in the Ratings category. If you do not have Prospect Research Management, the program
detects this during the update process and maps the scores to constituent attributes. You can then view score
information on the Attributes tab of the constituent record.
All demographic information appears on the Attributes tab, regardless of whether you have Prospect Research
Management or not. The program automatically creates all necessary ratings and attributes. You do not need to
have this set up ahead of time.
Viewing scores in The Raiser’s Edge
Note: If you did not mark the Create control report checkbox on the Target Analytics Update Records Wizard
screen, the Preview Report button does not appear on the Data Update Complete screen.
Note: For more information about working on the Prospect tab, see the Prospect Data Entry Guide.

16
C
HAPTER
1. If you have the optional module Prospect Research Management, from the constituent record for which
you want to view score information, select the Prospect tab.
2. On the left side of the screen, select the Ratings category. All score information provided by Target
Analytics services appears on the right side of the screen.

T
ARGET
A
NALYTICS
17
3. If you do not have Prospect Research Management, select the Attributes tab. Score information appears
on the Attributes tab along with the demographic data.
On both the Prospect and Attributes tabs, score information is arranged by columns:
•In the Source column, available on the Prospect tab, the source (Target Analytics Custom Modeling
Services [Target Analytics services]) that provided the ratings information appears
•In the Date column, the date Target Analytics services entered the ratings data appears
•In the Category column, the category scored appears. Target Analytics services scores constituents for
the following categories:
Annual Gift Likelihood with scores ranging from 1-1000 (1 = least likelihood to give and 1000 = most
likelihood to give)
Target Gift Dollar Range measures the capability of the prospect to make a gift in a particular dollar
range
Major Gift Likelihood with scores ranging from 1-1000 (1 = least likelihood to give and 1000 = most
likelihood to give)
Planned Gift Likelihood with scores ranging from 1-1000 (1 = least likelihood to give and 1000 = most
likelihood to give)
Asset Estimator estimates the prospect’s wealth range
Estimated Income estimates the prospect’s income range
Note: For more information about working on the Attributes tab, see the Constituent Data Entry Guide.
Note: For information about the demographic data included on the Attributes tab, see the “Viewing
demographic information in The Raiser’s Edge” on page 18.

18
C
HAPTER
•The Description column displays Target Analytics services ratings for each Category and Date
•The Notes column on the Prospect tab (not shown in screen shot) and the Comments column on the
Attributes tab, house any additional information the statistician may want to add about the score
Viewing demographic information in The Raiser’s Edge
1. From the constituent record for which you want to view demographics information, select the Attributes
tab.
2. All information downloaded from the Target Analytics services file begins with “Target Analytics
services”.
The Category information available for demographic data includes the following:
• Past Giver Type displays the prospect’s giving history, where 0 = non-giver, 1 = occasional giver, and 2 =
consistent giver
• Age combines all possible sources of age, including client information and outside sources of age
• Gender combines all possible sources of gender information, including client information and Target
Analytics services predicted gender.
3. In the Date column, the date Target Analytics services entered the data appears.
4. Target Analytics services enters any notes or comments related to the data in the Comments column.
For more information about working on the Attributes tab, see the Constituent Data Entry Guide. For
information about establishing attributes, see the Configuration chapter of the Configuration & Security
Guide.
Note: The results you receive depend on your contract with Target Analytics services and the information you
provided.
Note: If you do not have the optional module Prospect Research Management, score information also appears
on the Attributes tab. For more information about score data, see “Viewing scores in The Raiser’s Edge” on
page 15.

T
ARGET
A
NALYTICS
19
Viewing address information updated in The Raiser’s Edge
Address update information is posted directly to the Addresses tab of the constituent records. To view a list
of address information changed during the update process, open the query of changed constituents created
when you updated the records, using the Update Constituents with scores from Target Analytics link. You
can then open the affected constituent records and view the new address information.
1. On the Raiser’s Edge bar, click Query.
2. If you marked the Create query of changed constituents checkbox when you updated the records, the
“BBA Query of Changed Records” appears in the grid of available queries. Select the “BBA Query of
Changed Records” and click Open. The Records in BBA Query of Changed Records screen appears.
Note: For more information about working in Query, see the Query & Export Guide.
20
C
HAPTER
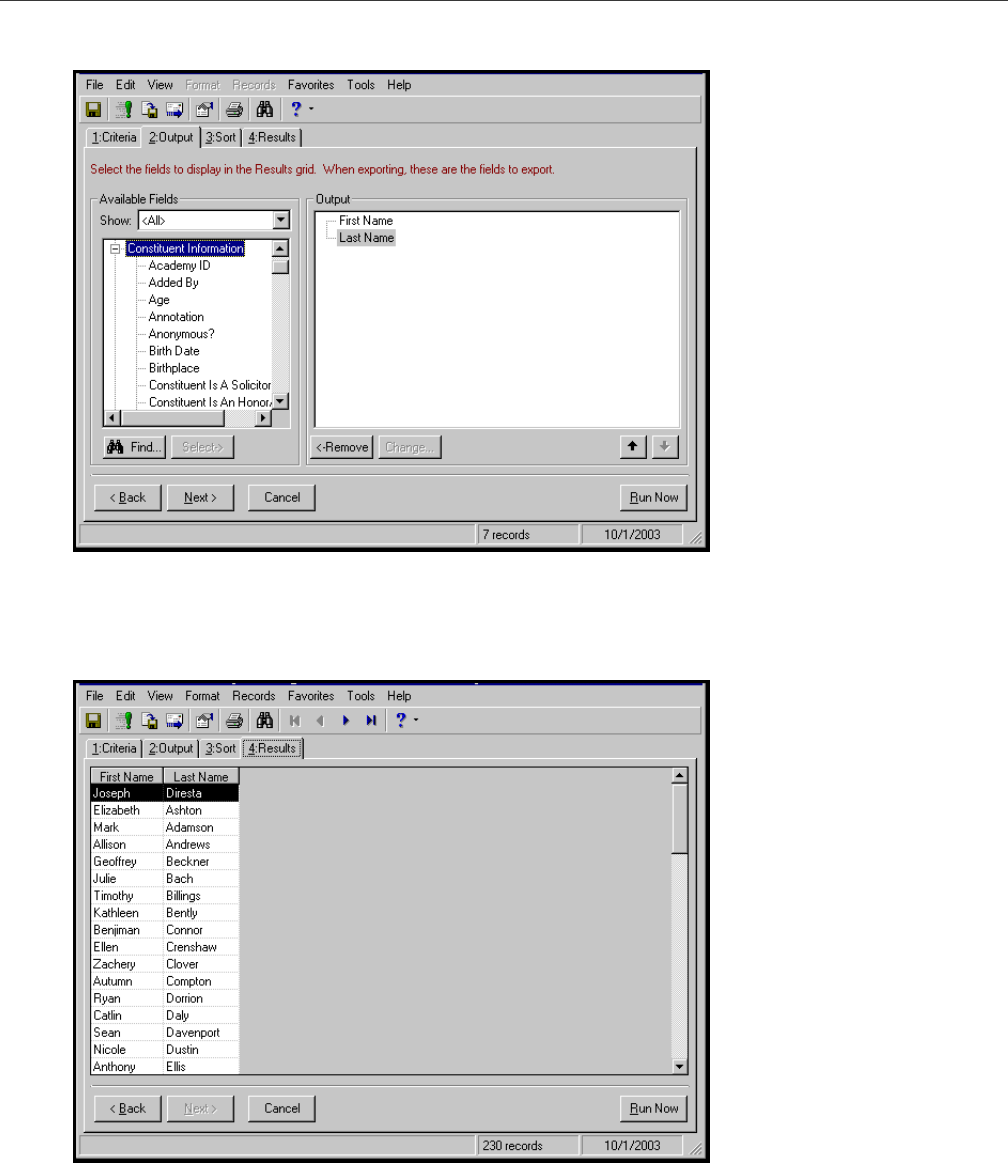
3. To display the list of changed records with the constituent names, select the Output tab.
4. On the left side of the screen, in the Available Fields box, under the Constituent Information category,
highlight “First Name” and click Select. Highlight “Last Name” and click Select. “First Name” and “Last
Name” appear in the Output box.
5. Select the Results tab.
A list of all records changed in the update appear, displaying First Name and Last Name.

T
ARGET
A
NALYTICS
21
6. To open a constituent record, double-click the name. The constituent record appears.
You can view the new address information. For more information about working in constituent records,
see the Constituent Data Entry Guide.

22
C
HAPTER

A
address
information, viewing
19
updating information
8
viewing updates
19
address type
8
age
18
annual funds
6
annual gift likelihood
17
asset estimator
17
C
capital funds
7
category column
17
comments column
18
constituent record
updating with Target Analytics data
12
create
control report
5
export file
4
query of exceptions
5
D
date column
17
,
18
demographics
category
18
defined
2
viewing in The Raiser’s Edge
18
demographics, viewing in The Raiser’s Edge
18
description column
18
downloading updated files
10
E
estimated income
17
,
18
exceptions, defined
2
export file
creating
3
creating in Target Analytics
3
sending to CMS
9
sending to Target Analytics
9
F
file transfer protocol, defined
2
FTP, see file transfer protocol
G
gender
18
I
include button
4
M
major gift likelihood
17
N
notes column
18
O
open
2
P
past giver type
18
planned gift likelihood
17
prospect, defined
2
R
receive update file from Target Analytics
10
S
scores
defined
2
updating from Target Analytics
12
viewing in The Raiser’s Edge
16
Index

32
sending the export file to Target Analytics for
analysis
9
source column
17
T
target gift dollar range
17
U
update constituent records
12
update options
14
updating addresses
7
updating constituents with scores from Target
Analytics
12
updating phone information
8
V
viewing data in The Raiser’s Edge
15
viewing Target Analytics data
15
