
Excel DHS Questionnaire User’s Guide
Contents
Introduction to Excel.............................................................................................1
Questionnaire structure..........................................................................................1
Adding new questions............................................................................................3
Deleting questions .................................................................................................4
Editing a question..................................................................................................5
Displaying numbers as text.................................................................................6
Dot leaders..........................................................................................................7
Making global changes.......................................................................................8
Toolkit ...................................................................................................................8
Skip arrows and boxes............................................................................................9
Printing ..................................................................................................................9
Tips ......................................................................................................................11
How to…
Add a new question ...............................................................................................3
Copy an entire section (worksheet) of the questionnaire..................................... 11
Change the text in a question ................................................................................6
Draw lines around questions.................................................................................. 2
Create new skip arrows and filter boxes................................................................. 9
Delete a question ................................................................................................... 4
Make a question longer by adding a row ............................................................... 4
What to do if…
A line of text is cut off on screen ........................................................................... 6
A line of text is cut off when printing but looks fine on screen........................... 10
You typed in “
01” and Excel changed it to “1” ...................................................... 7
You don’t see any solid blue lines........................................................................... 3
You see only one section of the questionnaire ....................................................... 2
The line underneath a question shows on screen but doesn’t print .....................10
The number you typed in displays as “
#” ...............................................................6
The page prints out too small, with very small text, boxes, and arrows............... 10

Excel DHS Questionnaire User’s Guide Page 1
Introduction to Excel
An Excel worksheet is a grid with columns and rows. The boxes with light gray
outlines where the columns and rows intersect are called cells. Every piece of text
in the questionnaire is contained in its own cell. To select a cell, click on it once.
You can then cut, copy, paste, or delete the contents of the cell. To replace the
text in a cell, just click on it once to select it, then start typing. Press Enter when
you’re finished. The new text you typed will replace the old text. To select more
than one cell at a time, click and drag over the cells you want to select to high-
light them.
Each column has a letter directly above it. To select a column, click on the
letter at the top of the column. Rows are designated by numbers to their left. To
select a row, click on the number to the left of the row. To select all the cells in
the Excel worksheet, click on the gray space above row 1 and to the left of col-
umn A.
Questionnaire structure
If you’ve used Excel before, you’ll notice the layout of the questionnaire is some-
what unusual, especially the column width and row height. Excel is being used
here as a kind of virtual graph paper. The text in the questionnaire is contained in
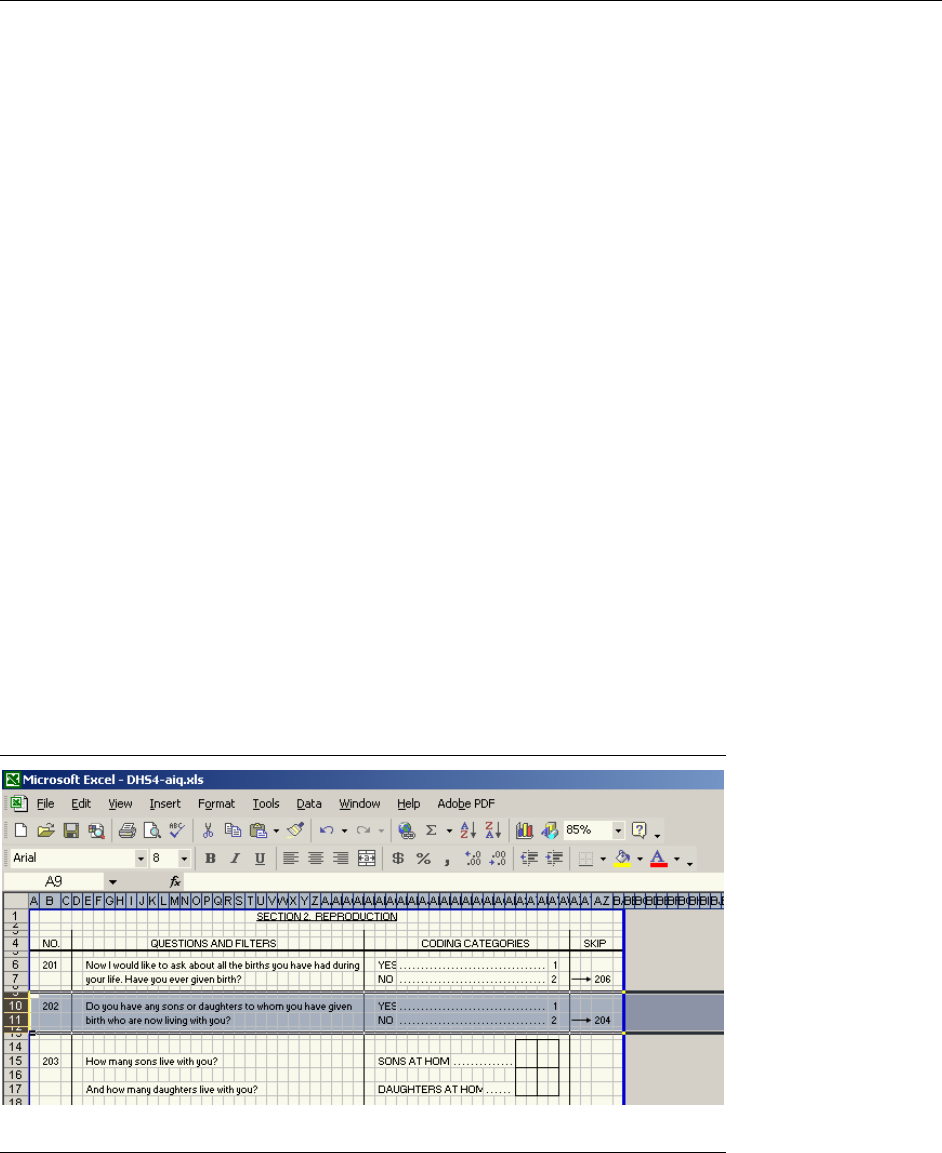
the cells, or the boxes of the virtual graph paper. For instance, in Figure 1, Cell
E6 contains the text “
Now I would like to ask about all the births you have had
during
”. Cell E7 directly below it contains the text “your life. Have you ever given
birth?
” Notice that these lines of text are much too long to fit completely inside
their cells. Excel allows text in a cell to overlap the cells to its right, as long as
nothing else is contained in the cells being overlapped.
Figure 1

Page 2 Excel DHS Questionnaire User’s Guide
The lines between questions are simply the edges of cells that have a border
drawn between them. To draw a border, select the cells to which you want to
apply a border, click on the arrow next to the Borders button on the Formatting
toolbar (see Figure 2), and choose the border style you want from the pull-down
menu. (Note: If you can’t see the Borders button, choose Customize from the
Tools menu, and on the Options tab, check or uncheck the relevant box to make
sure the Standard and Formatting toolbars are displayed on two separate rows.) If
you need to use a thicker line (for a filter question) or a dotted line, see the in-
structions on p. 5 under “Editing a question.”
Figure 2
The boxes where interviewers record numbers are also cells with a border as-
signed to them.
This graph-paper paradigm has several advantages. It allows text to be placed
precisely where it is wanted, it eliminates the need for the tables and text boxes
used in the Word version of the questionnaire, and it ensures a consistent format,
without any of the complicated formatting and instability of tab sets, nested ta-
bles and text boxes in Word. One disadvantage of the graph-paper layout is that
the gray cell outlines can be distracting. To view the questionnaire without the
cell gridlines, choose File > Print Preview.
The questionnaire is made up of several Excel worksheets. In general, there is
one section of the questionnaire per sheet. To move between worksheets, click on
the tabs near the bottom of the screen (see Figure 3).
Figure 3
H
ow to… draw
lines around
questions
What to do if… you
see only one section
of the questionnaire
Excel DHS Questionnaire User’s Guide Page 3
The questionnaires should be viewed in Page Break Preview (View > Page
Break Preview). In Page Break Preview, the solid blue lines around the question-
naire indicate page boundaries. Solid lines are manual page breaks. If a dotted
line appears, it indicates a soft page break—in other words, where Excel is going
to break the page unless a manual page break is inserted above it. All the page
breaks in the questionnaire should be manual page breaks; there’s no other way to
make sure page breaks don’t fall in the middle of a question.
To convert a soft (automatic) page break to a manual page break, click on the
dotted blue line and drag it up or down.
To move a manual page break, just click on the solid blue line and drag. If
you drag it too far, Excel will try to fit too much information on one page, and it
will print out too small to read. See p. 10 for information on correcting this prob-
lem.
The gray area outside the solid blue lines will not print, which means it’s a
good place to add comments that aren’t meant to print out.
Adding new questions
To insert a new question, it’s best to copy and paste an existing question. Here’s
how:
1. Choose a question to copy that’s formatted like the question you want to in-
sert. If you want to insert a question with several coding categories, choose a
question with several coding categories. If your new question can be an-
swered “yes” or “no,” choose a yes/no question to copy.
2. Highlight the rows of the question you’re copying (not just the cells) and
copy (File > Copy, or Ctrl-C) (see Figure 4).
Figure 4
3. Find the question that will come after your new question. Select the first row
of it by clicking on the number to the left of the row. It should be one of the
rows with a very short height. You may need to zoom in (View > Zoom) to
see what you’re doing.
What to do if… you
don’t see any solid
blue lines
H
ow to… add a
new question

Page 4 Excel DHS Questionnaire User’s Guide
4. Right-click anywhere inside the highlighted row and choose Insert Copied
Cells from the menu (see Figure 5).
Figure 5
5. Delete the content of the old question (highlight the cells and press Delete)
and type in the new question. If you need to delete a row, select it, right-
click, and choose Delete from the menu. To add a new row, select the row
below where you want the new row to appear, right-click, and choose Insert
from the menu.
Deleting questions
To delete a question, select all the rows of the question (not just the cells), right-
click on the highlighted rows, and choose Delete from the menu.
If you delete a question with a skip arrow or other shape in it (see p. 9), Excel
may not delete the skip arrow or other shape. You’ll have to delete it manually.
Just click on it and press Delete. If you delete several questions with shapes in
H
ow to… make a
question longer by
adding a row
H
ow to… delete a
question

Excel DHS Questionnaire User’s Guide Page 5
them, there will be several shapes to delete. Keep clicking on them and pressing
Delete until they’re gone.
Editing a question
As we saw above, the lines between questions are actually cell borders, and one
way to add or delete a line is discussed on p. 2. Another way to add or delete a
line is to select the cells bordering the line you want to change, click on Format >
Cells, and select the Border tab (see Figure 6).
Figure 6
The preview diagram shows what borders are currently applied to the cells
you have selected. To remove a border, just click on it in the preview diagram. To
add a border, first select the line style and width you want in the Style box to the
right of the preview diagram, then click on the preview diagram where you want
the border to appear. For the thin lines between questions, use the line style in
the bottom left-hand corner of the Style box. For the thick lines around filters,
use the line that’s highlighted in the Style box in Figure 6 (it’s in the right-hand
column, third from the bottom).

Page 6 Excel DHS Questionnaire User’s Guide
To insert text in an empty cell, just select the cell and start typing. To edit
text that’s already in a cell, select the cell, then press F2. Another way is to select
the cell and click inside the formula bar above the column letters.
Often, when you add or delete text from a cell, you’ll need to adjust the line
breaks. For instance, in Figure 1 on p. 1, Cell E6 contains the text “
Now I would
like to ask about all the births you have had during
”. Cell E7 directly below it
contains the text “
your life. Have you ever given birth?” If you replace the text
“
you have had during” with the word “in”, the first line of text will be too short.
Excel doesn’t adjust the lines automatically to make up for this, the way Word
does; you have to do it manually. Click on cell E7, press F2, highlight the first
few words, cut them (Ctrl-X or Edit > Cut), press Enter, click on cell E6, press
F2, position the cursor at the end of the line of text, and paste the cut text into
the cell.
If you need to completely erase the contents of a cell, it’s best to select a
blank cell from the gray non-printing area of the worksheet, copy it, select the
cell you want to erase, and paste. This ensures that you’re deleting all the cell
formatting as well as the contents of the cell.
As mentioned in the “Questionnaire structure” section, Excel will display text
that’s too big for the cell it’s in, but only if all the cells to its right are empty. If
one of the cells that the text is “covering up” has something in it, Excel will dis-
play that instead. For example, in Figure 7, the text in row 180 appears to be cut
off. This is because cell J180 has a space typed into it. Excel displays the space in
cell J180 and cuts off all the text to its left. To solve the problem, simply select
the cell where the text ends—J180 in this case—and press Delete.
Figure 7
Displaying numbers as text
Sometimes Excel will display “#” instead of a number you’ve typed in, if the
number is too long to display in just one cell (see Figure 8).
H
ow to… change
the text in a
question
What to do if… a
line of text is cut off
on screen
What to do if… the
number you typed
in displays as “#”

Excel DHS Questionnaire User’s Guide Page 7
Figure 8
Another related problem is that Excel will sometimes display “01” as “1”.
There are two ways to keep this from happening. One is to select the cell
with the long number in it, go to Format > Cells, and on the Number tab, choose
Text from the category list. If the number still displays incorrectly, try retyping it.
The other way is to type an apostrophe in front of the number (
'994), which
forces Excel to display the number as text.
Dot leaders
The row of dots leading to a category number (called a dot leader) is created using
only one dot, one space, and a special setting in the Format > Cells dialog box.
Here’s how to do it:
1. Type “
. ” (a period/full stop, followed by a space) in the first empty box to the
right of the text (see Figure 9). To avoid problems printing the questionnaire
out later, make sure the box you type in isn’t overlapping the text to its left at
all. For instance, in the second line of the question in Figure 9 (“
YES,
PIPE
”), if the dot were one square to the left, it would only be overlapping a
little bit, but on some printers that means the last “E” in “
PIPE” would be cut
off.
Figure 9
2. Select that cell and all the blank cells to its right, up to the coding category
itself.
What to do if… you
typed in “01” and
Excel changed it to
“1”

Page 8 Excel DHS Questionnaire User’s Guide
3. Go to Format > Cells, click on the Alignment tab, and under “Text align-
ment”, choose “Fill” from the “Horizontal” drop-down menu (see Figure 10).
Figure 10
A quicker way to create a dot leader is simply to copy one from elsewhere
and paste it into your question. For instance, in Figure 9, the easiest way to create
the dot leader would be to copy the first six cells after “
YES, PIPE” and paste
them into the space after “
YES, OTHER TOBACCO”.
Making global changes
To make changes that affect all the worksheets in a document at once—for in-
stance, to change the header or footer for the entire document—right-click on
any of the tabs at the bottom of the screen and choose Select All Sheets. Any
changes you make now apply to all sheets. This includes changes like deleting cell
contents, so be very careful what you do with multiple sheets selected. It’s gener-
ally a good idea to save your work before choosing Select All Sheets. When
you’ve finished making your changes, right-click on any tab and select Ungroup
Sheets from the menu.
Toolkit
After the last section of the questionnaire, there should be a toolkit section in the
gray non-printing section at the end. You may find it useful as a source of ques-

Excel DHS Questionnaire User’s Guide Page 9
tions to copy and paste. It’s also a good place to find skip arrows and boxes (see
below). You may want to delete it when you’ve finished developing the question-
naire.
Skip arrows and boxes
The skip arrows and filter boxes are Excel AutoShapes. The AutoShapes are an-
chored to the cells they’re in, so they should move with the question they’re at-
tached to when you add or delete questions around them.
Unless you need an entirely new shape, don’t create arrows or boxes from
scratch. Copy one that looks like what you need and modify it. The easiest way
to copy and paste AutoShapes is to select the cells they’re on top of, copy the
cells, and paste them where you need the new AutoShape.
To modify an existing AutoShape (for instance, to lengthen the arrow that
extends from a box), right-click on it and choose Edit Points from the menu.
Black squares will appear at the corners of the AutoShape. You can then drag the
black squares until you have the shape you want. You may find it useful to hold
down the Shift key as you drag the black squares; this will constrain the mouse to
horizontal or vertical movement.
Try to avoid changing the shape of an arrow or box by left-clicking on it and
dragging the handles that appear around it. This will distort its shape. It’s better
to right-click, choose Edit Points, and then make the changes you want.
To move an AutoShape, left-click on it to select it, position your cursor on
top of it until the cursor changes to a four-arrow shape, then click and drag. You
can also use the arrow keys to move an AutoShape when it’s selected.
To delete AutoShapes, click on them to select, and press Delete. If you select
the cells they’re anchored to and delete the cells, the shape usually won’t get de-
leted along with them. Just delete it manually, by clicking on it directly and
pressing Delete.
Printing
To print the questionnaire, go to File > Print, and under the “Print what” sec-
tion, choose “Entire workbook”. Then click OK. This will print the entire ques-
tionnaire. If you want to print just one section of the questionnaire, you can
choose the “Active sheet(s)” button instead, but when you print using this option,
the page numbering will be incorrect.
If you need to print just part of the questionnaire with the correct page num-
bers, go to File > Print, but don’t choose the “Active sheet(s)” button. Instead,
choose the “Entire workbook” button, then click the “Preview” button directly
underneath. Click on the page to zoom in so you can read the page numbers,
then use the “Next” and “Previous” buttons to read through the questionnaire
and determine which page numbers you wish to print. When you know what
pages you need, press the “Close” button. Return to File > Print, choose the “En-
tire workbook” option, then enter the page numbers you want under “Print
range” and click OK.
H
ow to… create
new skip arrows
and filter boxes
Page 10 Excel DHS Questionnaire User’s Guide
The questionnaires are formatted to fit on A4 paper. If you want to print
them on 8½ × 11 paper instead, go to File > Page Setup. Under Scaling, choose
the button next to “Adjust to __% normal size” and type “90” into the box. From
the Paper size drop-down menu, choose Letter. Then click OK, and print as you
normally would.
One common printing problem is text getting cut off, especially in the cod-
ing categories, where the end of the category can get cut off by the row of dots.
To avoid this, leave plenty of space between the end of the text and the begin-
ning of the row of dots (see p. 7 for information on formatting the dots).
If your pages are too big to fit on one sheet, you can adjust the manual page
breaks, or experiment in the File > Page Setup dialog box with the “Adjust to
__% normal size” settings. Setting it to 90% or 95% may take care of the prob-
lem.
Sometimes the “Adjust to __% normal size” setting gets set automatically to
a small percentage, which makes the page print at a very small size that is hard to
read. This often happens when you adjust the manual page breaks (see p. 3 for
information on page breaks). To set your page size back to normal, click on the
worksheet tab of the affected section, choose File > Page Setup, and set “Adjust
to __% normal size” to 100%. When you return to the worksheet, Excel will have
added dotted blue lines, or automatic page breaks, so you can see what size your
pages should be. Move the solid blue lines (manual page breaks) so that they
match the dotted blue lines as closely as possible without cutting off any of the
questions.
Another common printing problem is that the line below a question shows
on screen but does not print, as in Figure 11.
Figure 11
If this happens, select the cells above the missing border and choose For-
mat > Cells (Figure 12). The preview diagram will show a border below the cells,
even though it isn’t printing. Click on the border to remove it, and choose OK.
Now open Format > Cells again, and click on the preview diagram to replace the
border you just removed. When you print out the questionnaire again, the border
should reappear.
What to do if… a
line of text is cut off
when printing but
looks fine on screen
What to do if… the
page prints out too
small, with very
small text, boxes,
and arrows
What to do if… the
line underneath a
question shows on
screen but doesn’t
print

Excel DHS Questionnaire User’s Guide Page 11
Figure 12
Tips
1. Don’t reinvent the wheel. If you need to insert a question, start with an exist-
ing question, copy and paste. If you need to insert a new questionnaire sec-
tion, copy an existing worksheet, paste it, and use it as a template for your
new section (right-click on the worksheet tab, choose Move or Copy, check
the “Create a copy” box, and click OK). If you need a new skip arrow, look in
the toolkit that should be included in the non-printing gray area of the last
questionnaire section, or adapt an existing skip arrow. Every time you create
something from scratch instead of copying something that’s already there, it
makes the questionnaire less consistent.
2. Don’t change column width. If you change the width of a column, it affects
that whole section of the questionnaire. If it’s absolutely necessary to change
column width (for example, if you need to create a complicated table like the
household schedule in the household questionnaire), create a new worksheet
for that section and change the width of the columns for just that worksheet.
H
ow to… copy an
entire section
(worksheet) of the
questionnaire
