
Extending
ADOBE
®
DREAMWEAVER
®
CS5 & CS5.5


iii
Last updated 6/15/2011
Contents
Chapter 1: Introduction
About extensions . . . . . . . . . . . . . . . . . . . . . . . . . . . . . . . . . . . . . . . . . . . . . . . . . . . . . . . . . . . . . . . . . . . . . . . . . . . . . . . . . . . . . . . . . . . . . . . . . . . . . . 1
Install an extension . . . . . . . . . . . . . . . . . . . . . . . . . . . . . . . . . . . . . . . . . . . . . . . . . . . . . . . . . . . . . . . . . . . . . . . . . . . . . . . . . . . . . . . . . . . . . . . . . . . . 1
Creating an extension . . . . . . . . . . . . . . . . . . . . . . . . . . . . . . . . . . . . . . . . . . . . . . . . . . . . . . . . . . . . . . . . . . . . . . . . . . . . . . . . . . . . . . . . . . . . . . . . . 2
Additional resources for extension writers . . . . . . . . . . . . . . . . . . . . . . . . . . . . . . . . . . . . . . . . . . . . . . . . . . . . . . . . . . . . . . . . . . . . . . . . . . . . . . 2
New features in Dreamweaver CS5 . . . . . . . . . . . . . . . . . . . . . . . . . . . . . . . . . . . . . . . . . . . . . . . . . . . . . . . . . . . . . . . . . . . . . . . . . . . . . . . . . . . . . 2
Conventions used in this guide . . . . . . . . . . . . . . . . . . . . . . . . . . . . . . . . . . . . . . . . . . . . . . . . . . . . . . . . . . . . . . . . . . . . . . . . . . . . . . . . . . . . . . . . 3
Chapter 2: Customizing Dreamweaver
Ways to customize Dreamweaver . . . . . . . . . . . . . . . . . . . . . . . . . . . . . . . . . . . . . . . . . . . . . . . . . . . . . . . . . . . . . . . . . . . . . . . . . . . . . . . . . . . . . . 4
Customizing Dreamweaver in a multiuser environment . . . . . . . . . . . . . . . . . . . . . . . . . . . . . . . . . . . . . . . . . . . . . . . . . . . . . . . . . . . . . . . . 10
Changing FTP mappings . . . . . . . . . . . . . . . . . . . . . . . . . . . . . . . . . . . . . . . . . . . . . . . . . . . . . . . . . . . . . . . . . . . . . . . . . . . . . . . . . . . . . . . . . . . . . . 12
Extensible document types in Dreamweaver . . . . . . . . . . . . . . . . . . . . . . . . . . . . . . . . . . . . . . . . . . . . . . . . . . . . . . . . . . . . . . . . . . . . . . . . . . 13
Changing keyboard shortcut mappings . . . . . . . . . . . . . . . . . . . . . . . . . . . . . . . . . . . . . . . . . . . . . . . . . . . . . . . . . . . . . . . . . . . . . . . . . . . . . . . 27
Chapter 3: Customizing Code view
About code hints . . . . . . . . . . . . . . . . . . . . . . . . . . . . . . . . . . . . . . . . . . . . . . . . . . . . . . . . . . . . . . . . . . . . . . . . . . . . . . . . . . . . . . . . . . . . . . . . . . . . 30
About code coloring . . . . . . . . . . . . . . . . . . . . . . . . . . . . . . . . . . . . . . . . . . . . . . . . . . . . . . . . . . . . . . . . . . . . . . . . . . . . . . . . . . . . . . . . . . . . . . . . . . 44
About Code validation . . . . . . . . . . . . . . . . . . . . . . . . . . . . . . . . . . . . . . . . . . . . . . . . . . . . . . . . . . . . . . . . . . . . . . . . . . . . . . . . . . . . . . . . . . . . . . . . 67
Changing default HTML formatting . . . . . . . . . . . . . . . . . . . . . . . . . . . . . . . . . . . . . . . . . . . . . . . . . . . . . . . . . . . . . . . . . . . . . . . . . . . . . . . . . . . 70
About Vertical Split view . . . . . . . . . . . . . . . . . . . . . . . . . . . . . . . . . . . . . . . . . . . . . . . . . . . . . . . . . . . . . . . . . . . . . . . . . . . . . . . . . . . . . . . . . . . . . . 70
About related files . . . . . . . . . . . . . . . . . . . . . . . . . . . . . . . . . . . . . . . . . . . . . . . . . . . . . . . . . . . . . . . . . . . . . . . . . . . . . . . . . . . . . . . . . . . . . . . . . . . . 71
About Live view . . . . . . . . . . . . . . . . . . . . . . . . . . . . . . . . . . . . . . . . . . . . . . . . . . . . . . . . . . . . . . . . . . . . . . . . . . . . . . . . . . . . . . . . . . . . . . . . . . . . . . 73
Chapter 4: Extending Dreamweaver
Types of Dreamweaver extensions . . . . . . . . . . . . . . . . . . . . . . . . . . . . . . . . . . . . . . . . . . . . . . . . . . . . . . . . . . . . . . . . . . . . . . . . . . . . . . . . . . . . 75
Configuration folders and extensions . . . . . . . . . . . . . . . . . . . . . . . . . . . . . . . . . . . . . . . . . . . . . . . . . . . . . . . . . . . . . . . . . . . . . . . . . . . . . . . . . 77
Extension APIs . . . . . . . . . . . . . . . . . . . . . . . . . . . . . . . . . . . . . . . . . . . . . . . . . . . . . . . . . . . . . . . . . . . . . . . . . . . . . . . . . . . . . . . . . . . . . . . . . . . . . . . 79
Localizing an extension . . . . . . . . . . . . . . . . . . . . . . . . . . . . . . . . . . . . . . . . . . . . . . . . . . . . . . . . . . . . . . . . . . . . . . . . . . . . . . . . . . . . . . . . . . . . . . . 80
Working with the Extension Manager . . . . . . . . . . . . . . . . . . . . . . . . . . . . . . . . . . . . . . . . . . . . . . . . . . . . . . . . . . . . . . . . . . . . . . . . . . . . . . . . . 81
Chapter 5: User interfaces for extensions
Extension user interface designing guidelines . . . . . . . . . . . . . . . . . . . . . . . . . . . . . . . . . . . . . . . . . . . . . . . . . . . . . . . . . . . . . . . . . . . . . . . . . 82
Dreamweaver HTML rendering control . . . . . . . . . . . . . . . . . . . . . . . . . . . . . . . . . . . . . . . . . . . . . . . . . . . . . . . . . . . . . . . . . . . . . . . . . . . . . . . . 83
Custom UI controls in extensions . . . . . . . . . . . . . . . . . . . . . . . . . . . . . . . . . . . . . . . . . . . . . . . . . . . . . . . . . . . . . . . . . . . . . . . . . . . . . . . . . . . . . 83
Adding Flash content to Dreamweaver . . . . . . . . . . . . . . . . . . . . . . . . . . . . . . . . . . . . . . . . . . . . . . . . . . . . . . . . . . . . . . . . . . . . . . . . . . . . . . . . 91
Photoshop integration and Smart Objects . . . . . . . . . . . . . . . . . . . . . . . . . . . . . . . . . . . . . . . . . . . . . . . . . . . . . . . . . . . . . . . . . . . . . . . . . . . . . 93
Chapter 6: The Dreamweaver Document Object Model
About Dreamweaver DOM . . . . . . . . . . . . . . . . . . . . . . . . . . . . . . . . . . . . . . . . . . . . . . . . . . . . . . . . . . . . . . . . . . . . . . . . . . . . . . . . . . . . . . . . . . . . 95
Distinguishing between the user document and extension DOMs . . . . . . . . . . . . . . . . . . . . . . . . . . . . . . . . . . . . . . . . . . . . . . . . . . . . . . 95
The Dreamweaver DOM . . . . . . . . . . . . . . . . . . . . . . . . . . . . . . . . . . . . . . . . . . . . . . . . . . . . . . . . . . . . . . . . . . . . . . . . . . . . . . . . . . . . . . . . . . . . . . 96

iv
EXTENDING DREAMWEAVER
Contents
Last updated 6/15/2011
Chapter 7: Insert bar objects
How object files work . . . . . . . . . . . . . . . . . . . . . . . . . . . . . . . . . . . . . . . . . . . . . . . . . . . . . . . . . . . . . . . . . . . . . . . . . . . . . . . . . . . . . . . . . . . . . . . 104
The Insert bar definition file . . . . . . . . . . . . . . . . . . . . . . . . . . . . . . . . . . . . . . . . . . . . . . . . . . . . . . . . . . . . . . . . . . . . . . . . . . . . . . . . . . . . . . . . . . 105
Modifying the Insert bar . . . . . . . . . . . . . . . . . . . . . . . . . . . . . . . . . . . . . . . . . . . . . . . . . . . . . . . . . . . . . . . . . . . . . . . . . . . . . . . . . . . . . . . . . . . . . 111
A simple insert object example . . . . . . . . . . . . . . . . . . . . . . . . . . . . . . . . . . . . . . . . . . . . . . . . . . . . . . . . . . . . . . . . . . . . . . . . . . . . . . . . . . . . . . 112
The objects API functions . . . . . . . . . . . . . . . . . . . . . . . . . . . . . . . . . . . . . . . . . . . . . . . . . . . . . . . . . . . . . . . . . . . . . . . . . . . . . . . . . . . . . . . . . . . . 120
Chapter 8: Browser compatibility check issues API
How detection works . . . . . . . . . . . . . . . . . . . . . . . . . . . . . . . . . . . . . . . . . . . . . . . . . . . . . . . . . . . . . . . . . . . . . . . . . . . . . . . . . . . . . . . . . . . . . . . . 125
An Issues example . . . . . . . . . . . . . . . . . . . . . . . . . . . . . . . . . . . . . . . . . . . . . . . . . . . . . . . . . . . . . . . . . . . . . . . . . . . . . . . . . . . . . . . . . . . . . . . . . . . 125
The issues API functions . . . . . . . . . . . . . . . . . . . . . . . . . . . . . . . . . . . . . . . . . . . . . . . . . . . . . . . . . . . . . . . . . . . . . . . . . . . . . . . . . . . . . . . . . . . . . 127
Chapter 9: Commands
How commands work . . . . . . . . . . . . . . . . . . . . . . . . . . . . . . . . . . . . . . . . . . . . . . . . . . . . . . . . . . . . . . . . . . . . . . . . . . . . . . . . . . . . . . . . . . . . . . . 131
Adding commands to the Commands menu . . . . . . . . . . . . . . . . . . . . . . . . . . . . . . . . . . . . . . . . . . . . . . . . . . . . . . . . . . . . . . . . . . . . . . . . . 132
A simple command example . . . . . . . . . . . . . . . . . . . . . . . . . . . . . . . . . . . . . . . . . . . . . . . . . . . . . . . . . . . . . . . . . . . . . . . . . . . . . . . . . . . . . . . . 132
The commands API functions . . . . . . . . . . . . . . . . . . . . . . . . . . . . . . . . . . . . . . . . . . . . . . . . . . . . . . . . . . . . . . . . . . . . . . . . . . . . . . . . . . . . . . . . 137
Chapter 10: Menus and menu commands
The menus.xml file . . . . . . . . . . . . . . . . . . . . . . . . . . . . . . . . . . . . . . . . . . . . . . . . . . . . . . . . . . . . . . . . . . . . . . . . . . . . . . . . . . . . . . . . . . . . . . . . . . 141
Changing menus and menu commands . . . . . . . . . . . . . . . . . . . . . . . . . . . . . . . . . . . . . . . . . . . . . . . . . . . . . . . . . . . . . . . . . . . . . . . . . . . . . . 148
Menu commands . . . . . . . . . . . . . . . . . . . . . . . . . . . . . . . . . . . . . . . . . . . . . . . . . . . . . . . . . . . . . . . . . . . . . . . . . . . . . . . . . . . . . . . . . . . . . . . . . . . . 151
A simple menu command example . . . . . . . . . . . . . . . . . . . . . . . . . . . . . . . . . . . . . . . . . . . . . . . . . . . . . . . . . . . . . . . . . . . . . . . . . . . . . . . . . . 153
A dynamic menu example . . . . . . . . . . . . . . . . . . . . . . . . . . . . . . . . . . . . . . . . . . . . . . . . . . . . . . . . . . . . . . . . . . . . . . . . . . . . . . . . . . . . . . . . . . . 156
The menu commands API functions . . . . . . . . . . . . . . . . . . . . . . . . . . . . . . . . . . . . . . . . . . . . . . . . . . . . . . . . . . . . . . . . . . . . . . . . . . . . . . . . . . 161
Chapter 11: Toolbars
How toolbars work . . . . . . . . . . . . . . . . . . . . . . . . . . . . . . . . . . . . . . . . . . . . . . . . . . . . . . . . . . . . . . . . . . . . . . . . . . . . . . . . . . . . . . . . . . . . . . . . . . 167
A simple toolbar command file . . . . . . . . . . . . . . . . . . . . . . . . . . . . . . . . . . . . . . . . . . . . . . . . . . . . . . . . . . . . . . . . . . . . . . . . . . . . . . . . . . . . . . 169
The toolbar definition file . . . . . . . . . . . . . . . . . . . . . . . . . . . . . . . . . . . . . . . . . . . . . . . . . . . . . . . . . . . . . . . . . . . . . . . . . . . . . . . . . . . . . . . . . . . . 170
Toolbar item tags . . . . . . . . . . . . . . . . . . . . . . . . . . . . . . . . . . . . . . . . . . . . . . . . . . . . . . . . . . . . . . . . . . . . . . . . . . . . . . . . . . . . . . . . . . . . . . . . . . . . 175
Item tag attributes . . . . . . . . . . . . . . . . . . . . . . . . . . . . . . . . . . . . . . . . . . . . . . . . . . . . . . . . . . . . . . . . . . . . . . . . . . . . . . . . . . . . . . . . . . . . . . . . . . 180
The toolbar command API functions . . . . . . . . . . . . . . . . . . . . . . . . . . . . . . . . . . . . . . . . . . . . . . . . . . . . . . . . . . . . . . . . . . . . . . . . . . . . . . . . . 185
Chapter 12: Reports
Site reports . . . . . . . . . . . . . . . . . . . . . . . . . . . . . . . . . . . . . . . . . . . . . . . . . . . . . . . . . . . . . . . . . . . . . . . . . . . . . . . . . . . . . . . . . . . . . . . . . . . . . . . . . . 193
Stand-alone reports . . . . . . . . . . . . . . . . . . . . . . . . . . . . . . . . . . . . . . . . . . . . . . . . . . . . . . . . . . . . . . . . . . . . . . . . . . . . . . . . . . . . . . . . . . . . . . . . . 195
The reports API functions . . . . . . . . . . . . . . . . . . . . . . . . . . . . . . . . . . . . . . . . . . . . . . . . . . . . . . . . . . . . . . . . . . . . . . . . . . . . . . . . . . . . . . . . . . . . 198
Chapter 13: Tag libraries and editors
Tag library file format . . . . . . . . . . . . . . . . . . . . . . . . . . . . . . . . . . . . . . . . . . . . . . . . . . . . . . . . . . . . . . . . . . . . . . . . . . . . . . . . . . . . . . . . . . . . . . . . 203
The Tag Chooser . . . . . . . . . . . . . . . . . . . . . . . . . . . . . . . . . . . . . . . . . . . . . . . . . . . . . . . . . . . . . . . . . . . . . . . . . . . . . . . . . . . . . . . . . . . . . . . . . . . . 206
A simple example of creating a new tag editor . . . . . . . . . . . . . . . . . . . . . . . . . . . . . . . . . . . . . . . . . . . . . . . . . . . . . . . . . . . . . . . . . . . . . . . 208
The tag editor API functions . . . . . . . . . . . . . . . . . . . . . . . . . . . . . . . . . . . . . . . . . . . . . . . . . . . . . . . . . . . . . . . . . . . . . . . . . . . . . . . . . . . . . . . . . 212
Chapter 14: Property inspectors
Property inspector files . . . . . . . . . . . . . . . . . . . . . . . . . . . . . . . . . . . . . . . . . . . . . . . . . . . . . . . . . . . . . . . . . . . . . . . . . . . . . . . . . . . . . . . . . . . . . . 214
How Property inspector files work . . . . . . . . . . . . . . . . . . . . . . . . . . . . . . . . . . . . . . . . . . . . . . . . . . . . . . . . . . . . . . . . . . . . . . . . . . . . . . . . . . . 215

v
EXTENDING DREAMWEAVER
Contents
Last updated 6/15/2011
A simple Property inspector example . . . . . . . . . . . . . . . . . . . . . . . . . . . . . . . . . . . . . . . . . . . . . . . . . . . . . . . . . . . . . . . . . . . . . . . . . . . . . . . . 216
The Property inspector API functions . . . . . . . . . . . . . . . . . . . . . . . . . . . . . . . . . . . . . . . . . . . . . . . . . . . . . . . . . . . . . . . . . . . . . . . . . . . . . . . . . 219
Chapter 15: Floating panels
How floating panel files work . . . . . . . . . . . . . . . . . . . . . . . . . . . . . . . . . . . . . . . . . . . . . . . . . . . . . . . . . . . . . . . . . . . . . . . . . . . . . . . . . . . . . . . . 222
A simple floating panel example . . . . . . . . . . . . . . . . . . . . . . . . . . . . . . . . . . . . . . . . . . . . . . . . . . . . . . . . . . . . . . . . . . . . . . . . . . . . . . . . . . . . . 223
The floating panel API functions . . . . . . . . . . . . . . . . . . . . . . . . . . . . . . . . . . . . . . . . . . . . . . . . . . . . . . . . . . . . . . . . . . . . . . . . . . . . . . . . . . . . . 227
Chapter 16: Behaviors
How Behaviors work . . . . . . . . . . . . . . . . . . . . . . . . . . . . . . . . . . . . . . . . . . . . . . . . . . . . . . . . . . . . . . . . . . . . . . . . . . . . . . . . . . . . . . . . . . . . . . . . . 234
A simple behavior example . . . . . . . . . . . . . . . . . . . . . . . . . . . . . . . . . . . . . . . . . . . . . . . . . . . . . . . . . . . . . . . . . . . . . . . . . . . . . . . . . . . . . . . . . . 235
The behaviors API functions . . . . . . . . . . . . . . . . . . . . . . . . . . . . . . . . . . . . . . . . . . . . . . . . . . . . . . . . . . . . . . . . . . . . . . . . . . . . . . . . . . . . . . . . . 239
Chapter 17: Server behaviors
Server behavior terminology . . . . . . . . . . . . . . . . . . . . . . . . . . . . . . . . . . . . . . . . . . . . . . . . . . . . . . . . . . . . . . . . . . . . . . . . . . . . . . . . . . . . . . . . . 246
Dreamweaver architecture . . . . . . . . . . . . . . . . . . . . . . . . . . . . . . . . . . . . . . . . . . . . . . . . . . . . . . . . . . . . . . . . . . . . . . . . . . . . . . . . . . . . . . . . . . 247
A simple server behavior example . . . . . . . . . . . . . . . . . . . . . . . . . . . . . . . . . . . . . . . . . . . . . . . . . . . . . . . . . . . . . . . . . . . . . . . . . . . . . . . . . . . 248
Scenarios in which the server behavior API functions are called . . . . . . . . . . . . . . . . . . . . . . . . . . . . . . . . . . . . . . . . . . . . . . . . . . . . . . . 249
The server behavior API . . . . . . . . . . . . . . . . . . . . . . . . . . . . . . . . . . . . . . . . . . . . . . . . . . . . . . . . . . . . . . . . . . . . . . . . . . . . . . . . . . . . . . . . . . . . . . 251
Server behavior implementation functions . . . . . . . . . . . . . . . . . . . . . . . . . . . . . . . . . . . . . . . . . . . . . . . . . . . . . . . . . . . . . . . . . . . . . . . . . . . 256
EDML files . . . . . . . . . . . . . . . . . . . . . . . . . . . . . . . . . . . . . . . . . . . . . . . . . . . . . . . . . . . . . . . . . . . . . . . . . . . . . . . . . . . . . . . . . . . . . . . . . . . . . . . . . . . 258
Group EDML file tags . . . . . . . . . . . . . . . . . . . . . . . . . . . . . . . . . . . . . . . . . . . . . . . . . . . . . . . . . . . . . . . . . . . . . . . . . . . . . . . . . . . . . . . . . . . . . . . . 259
Participant EDML files . . . . . . . . . . . . . . . . . . . . . . . . . . . . . . . . . . . . . . . . . . . . . . . . . . . . . . . . . . . . . . . . . . . . . . . . . . . . . . . . . . . . . . . . . . . . . . . 265
Server behavior techniques . . . . . . . . . . . . . . . . . . . . . . . . . . . . . . . . . . . . . . . . . . . . . . . . . . . . . . . . . . . . . . . . . . . . . . . . . . . . . . . . . . . . . . . . . . 283
Chapter 18: Data sources
How data sources work . . . . . . . . . . . . . . . . . . . . . . . . . . . . . . . . . . . . . . . . . . . . . . . . . . . . . . . . . . . . . . . . . . . . . . . . . . . . . . . . . . . . . . . . . . . . . 290
A simple data source example . . . . . . . . . . . . . . . . . . . . . . . . . . . . . . . . . . . . . . . . . . . . . . . . . . . . . . . . . . . . . . . . . . . . . . . . . . . . . . . . . . . . . . . 292
The data sources API functions . . . . . . . . . . . . . . . . . . . . . . . . . . . . . . . . . . . . . . . . . . . . . . . . . . . . . . . . . . . . . . . . . . . . . . . . . . . . . . . . . . . . . . . 298
Chapter 19: Server formats
How data formatting works . . . . . . . . . . . . . . . . . . . . . . . . . . . . . . . . . . . . . . . . . . . . . . . . . . . . . . . . . . . . . . . . . . . . . . . . . . . . . . . . . . . . . . . . . 303
Scenarios in which the data formatting functions are called . . . . . . . . . . . . . . . . . . . . . . . . . . . . . . . . . . . . . . . . . . . . . . . . . . . . . . . . . . . 305
The server formats API functions . . . . . . . . . . . . . . . . . . . . . . . . . . . . . . . . . . . . . . . . . . . . . . . . . . . . . . . . . . . . . . . . . . . . . . . . . . . . . . . . . . . . . 305
Chapter 20: Components
About component basics . . . . . . . . . . . . . . . . . . . . . . . . . . . . . . . . . . . . . . . . . . . . . . . . . . . . . . . . . . . . . . . . . . . . . . . . . . . . . . . . . . . . . . . . . . . . 309
Extending the Components panel . . . . . . . . . . . . . . . . . . . . . . . . . . . . . . . . . . . . . . . . . . . . . . . . . . . . . . . . . . . . . . . . . . . . . . . . . . . . . . . . . . . 309
Customizing the Components panel . . . . . . . . . . . . . . . . . . . . . . . . . . . . . . . . . . . . . . . . . . . . . . . . . . . . . . . . . . . . . . . . . . . . . . . . . . . . . . . . . 310
Customizing Components panel files . . . . . . . . . . . . . . . . . . . . . . . . . . . . . . . . . . . . . . . . . . . . . . . . . . . . . . . . . . . . . . . . . . . . . . . . . . . . . . . . 310
Components panel API functions . . . . . . . . . . . . . . . . . . . . . . . . . . . . . . . . . . . . . . . . . . . . . . . . . . . . . . . . . . . . . . . . . . . . . . . . . . . . . . . . . . . . 312
Chapter 21: Server models
Customizing server models . . . . . . . . . . . . . . . . . . . . . . . . . . . . . . . . . . . . . . . . . . . . . . . . . . . . . . . . . . . . . . . . . . . . . . . . . . . . . . . . . . . . . . . . . . 322
The server model API functions . . . . . . . . . . . . . . . . . . . . . . . . . . . . . . . . . . . . . . . . . . . . . . . . . . . . . . . . . . . . . . . . . . . . . . . . . . . . . . . . . . . . . . 322
Chapter 22: Data translators
How data translators work . . . . . . . . . . . . . . . . . . . . . . . . . . . . . . . . . . . . . . . . . . . . . . . . . . . . . . . . . . . . . . . . . . . . . . . . . . . . . . . . . . . . . . . . . . . 329
Determining what kind of translator to use . . . . . . . . . . . . . . . . . . . . . . . . . . . . . . . . . . . . . . . . . . . . . . . . . . . . . . . . . . . . . . . . . . . . . . . . . . . 330

vi
EXTENDING DREAMWEAVER
Contents
Last updated 6/15/2011
Adding a translated attribute to a tag . . . . . . . . . . . . . . . . . . . . . . . . . . . . . . . . . . . . . . . . . . . . . . . . . . . . . . . . . . . . . . . . . . . . . . . . . . . . . . . . 330
Inspecting translated attributes . . . . . . . . . . . . . . . . . . . . . . . . . . . . . . . . . . . . . . . . . . . . . . . . . . . . . . . . . . . . . . . . . . . . . . . . . . . . . . . . . . . . . . 331
Locking translated tags or blocks of code . . . . . . . . . . . . . . . . . . . . . . . . . . . . . . . . . . . . . . . . . . . . . . . . . . . . . . . . . . . . . . . . . . . . . . . . . . . . 331
Creating Property inspectors for locked content . . . . . . . . . . . . . . . . . . . . . . . . . . . . . . . . . . . . . . . . . . . . . . . . . . . . . . . . . . . . . . . . . . . . . . 333
Finding bugs in your translator . . . . . . . . . . . . . . . . . . . . . . . . . . . . . . . . . . . . . . . . . . . . . . . . . . . . . . . . . . . . . . . . . . . . . . . . . . . . . . . . . . . . . . 335
A simple attribute translator example . . . . . . . . . . . . . . . . . . . . . . . . . . . . . . . . . . . . . . . . . . . . . . . . . . . . . . . . . . . . . . . . . . . . . . . . . . . . . . . . 336
A simple block/tag translator example . . . . . . . . . . . . . . . . . . . . . . . . . . . . . . . . . . . . . . . . . . . . . . . . . . . . . . . . . . . . . . . . . . . . . . . . . . . . . . . 339
The data translator API functions . . . . . . . . . . . . . . . . . . . . . . . . . . . . . . . . . . . . . . . . . . . . . . . . . . . . . . . . . . . . . . . . . . . . . . . . . . . . . . . . . . . . . 343
Chapter 23: C-level extensibility
How integrating C functions works . . . . . . . . . . . . . . . . . . . . . . . . . . . . . . . . . . . . . . . . . . . . . . . . . . . . . . . . . . . . . . . . . . . . . . . . . . . . . . . . . . . 347
C-level extensibility and the JavaScript interpreter . . . . . . . . . . . . . . . . . . . . . . . . . . . . . . . . . . . . . . . . . . . . . . . . . . . . . . . . . . . . . . . . . . . . 349
Data types . . . . . . . . . . . . . . . . . . . . . . . . . . . . . . . . . . . . . . . . . . . . . . . . . . . . . . . . . . . . . . . . . . . . . . . . . . . . . . . . . . . . . . . . . . . . . . . . . . . . . . . . . . 349
The C-level API . . . . . . . . . . . . . . . . . . . . . . . . . . . . . . . . . . . . . . . . . . . . . . . . . . . . . . . . . . . . . . . . . . . . . . . . . . . . . . . . . . . . . . . . . . . . . . . . . . . . . . 349
File access and multiuser configuration API . . . . . . . . . . . . . . . . . . . . . . . . . . . . . . . . . . . . . . . . . . . . . . . . . . . . . . . . . . . . . . . . . . . . . . . . . . 358
Calling a C function from JavaScript . . . . . . . . . . . . . . . . . . . . . . . . . . . . . . . . . . . . . . . . . . . . . . . . . . . . . . . . . . . . . . . . . . . . . . . . . . . . . . . . . . 364
Chapter 24: The Shared folder
The Shared folder contents . . . . . . . . . . . . . . . . . . . . . . . . . . . . . . . . . . . . . . . . . . . . . . . . . . . . . . . . . . . . . . . . . . . . . . . . . . . . . . . . . . . . . . . . . . 367
Using the Shared folder . . . . . . . . . . . . . . . . . . . . . . . . . . . . . . . . . . . . . . . . . . . . . . . . . . . . . . . . . . . . . . . . . . . . . . . . . . . . . . . . . . . . . . . . . . . . . 371

1
Last updated 6/15/2011
Chapter 1: Introduction
The Extending Dreamweaver CS5 guide describes the Adobe® Dreamweaver® CS5 framework and application
programming interface (API) that lets you build extensions to Dreamweaver. The Extending Dreamweaver CS5 guide
provides information about:
• How each type of extension works
• The API functions that Dreamweaver calls to implement the various objects
• Menus, floating panels, server behaviors, and so on, that make up the features of Dreamweaver
• A simple example of each type of extension
•
How to customize Dreamweaver by editing tags in various HTML and XML files to add commands or document types
For information on the Utility and general-purpose JavaScript™ APIs that you can use to perform various support
operations in your Dreamweaver extensions, see the Dreamweaver API Reference. If you plan to create extensions that
work with databases, review the topics in Using Dreamweaver about making connections to databases.
About extensions
Most Dreamweaver extensions are written in HTML and JavaScript. This guide assumes that you are familiar with
Dreamweaver, HTML, XML, and JavaScript programming. If you are implementing C extensions, the guide assumes
that you know how to create and use C dynamic link libraries (DLLs). If you are writing extensions for building web
applications, you should also be familiar with server-side scripting on at least one platform, such as Active Server Pages
(ASP), ASP.NET, PHP: Hypertext Preprocessor (PHP), Adobe® ColdFusion®, or JavaServer Pages (JSP).
Install an extension
To become familiar with the process of writing extensions, you might want to explore the extensions and resources
that are available on the Adobe Exchange website at
http://www.adobe.com/go/exchange. Installing an existing
extension introduces you to some of the tools that you need to work with in your own extensions.
1 Download and install the Adobe® Extension Manager, which is available on the Adobe Downloads website at
http://www.adobe.com/go/downloads.
2 Log on to the Adobe Exchange website at http://www.adobe.com/go/exchange.
3 From the available extensions, select one that you want to use. Click the Download link to download the extension
package.
4 Save the extension package in the Dreamweaver/Downloaded Extensions folder of your installed Dreamweaver
folder.
5 In the Extension Manager, select File > Install Extension. In Dreamweaver, select Commands > Manage Extensions
to start the Extension Manager.
The Extension Manager automatically installs the extension from the Downloaded Extensions folder into
Dreamweaver.

2
EXTENDING DREAMWEAVER
Introduction
Last updated 6/15/2011
Some extensions need Dreamweaver to restart before you can use them. If you are running Dreamweaver when you
install the extension, you might be prompted to quit and restart the application.
To view basic information on the extension after its installation, go to the Extension Manager (Commands > Manage
Extensions) in Dreamweaver.
Creating an extension
Before you create a Dreamweaver extension, go to the Adobe Exchange website at
http://www.adobe.com/go/exchange to see if the extension you plan to create already exists. If you do not find an
extension that meets your needs, you then perform the following steps to create the extension:
• Determine the type of extension you want to create. For more information about the extension types, see “Types of
Dreamweaver extensions” on page 75.
• Review the documentation for the type of extension you plan to create. To become familiar with creating that type
of extension, it’s a good idea to create the simple extension example in the appropriate topic.
• Determine which files you need to modify or create.
• Plan the user interface (UI), if any, for the extension.
• Create the necessary files and save them in the appropriate folders.
• Restart Dreamweaver so that it recognizes the new extension.
• Test the extension.
• Package the extension so that you can share it with others. For more information, see “Working with the Extension
Manager” on page 81.
Additional resources for extension writers
To communicate with other developers who are involved in writing extensions, join the Dreamweaver extensibility
newsgroup. You can access the Adobe website for this newsgroup at
http://www.adobe.com/cfusion/webforums/forum/categories.cfm?forumid=12&catid=190&entercat=y.
New features in Dreamweaver CS5
What’s New
Each of these features has new related functions that have been added to the Utility API and the JavaScript API. For
information on the new functions, see New functions in Dreamweaver CS5.
Documentation Resource Center
Improve your Dreamweaver skills with books from Adobe. Check out the latest content written by the experts at
http://www.adobe.com/support/documentation/buy_books.html.

3
EXTENDING DREAMWEAVER
Introduction
Last updated 6/15/2011
Deprecated functions
In Dreamweaver, several functions have been deprecated. For information on the functions that have been removed
from the Utility and JavaScript APIs, see the Dreamweaver API Reference.
Conventions used in this guide
The following typographical conventions are used in this guide:
• Code font indicates code fragments and API literals, including class names, method names, function names, type
names, scripts, SQL statements, and both HTML and XML tag and attribute names.
• Italic code font indicates replaceable items in code.
• The continuation symbol (¬ ) indicates that a long line of code has been broken across two or more lines. Due to
margin limits in this guide’s format, what is otherwise a continuous line of code must be split. When copying the
lines of code, eliminate the continuation symbol, and type the lines as one line.
• Curly braces ({ }) that surround a function argument indicate that the argument is optional.
• Function names that have the prefix dreamweaver. (as in dreamweaver.funcname) can be abbreviated to
dw.funcname when you are writing code. This manual uses the full dreamweaver. prefix when defining the
function and in the index. Many examples use the shorter
dw. prefix, however.
The following naming conventions are used in this guide:
• You—The developer who is responsible for writing extensions
• The user—The person using Dreamweaver
• The visitor—The person who views the web page that the user created

4
Last updated 6/15/2011
Chapter 2: Customizing Dreamweaver
In addition to creating and using Adobe Dreamweaver extensions, you can customize Dreamweaver in many ways,
which lets you work in a manner that’s familiar, comfortable, and efficient for you.
Ways to customize Dreamweaver
You can customize Dreamweaver through several general approaches. Some of these approaches are covered in Using
Dreamweaver. You can set preferences in a variety of areas. It includes accessibility, code coloring, fonts, highlighting,
and previewing in browsers, using the Preferences panel (Edit > Preferences, or Dreamweaver > Preferences (Mac OS
X)). You can also change keyboard shortcuts using the Keyboard Shortcut Editor (Edit > Keyboard Shortcuts) or by
editing a configuration file.
Customizing default documents
The DocumentTypes/NewDocuments folder contains a default (blank) document of each type that you can create
using Dreamweaver. When you create a new blank document by selecting File > New and selecting an item from the
Basic Page, Dynamic Page, or Other categories, Dreamweaver bases the new document on the appropriate default
document in this folder. To change what appears in a default document of a given type, edit the appropriate document
in this folder.
Note: If you want all the pages in your site to contain common elements (such as a copyright notice) or a common layout,
it’s better to use templates and library items than to change the default documents. For more information about templates
and library items, see Using Dreamweaver.
Customizing page designs
Dreamweaver provides a variety of predesigned Cascading Style Sheets, framesets, and page designs. You can create
pages based on these designs by selecting File > New.
To customize the available designs, edit the files in BuiltIn/css, BuiltIn/framesets, BuiltIn/Templates, and
BuiltIn/TemplatesAccessible folders.
Note: The designs listed in the Page Designs and Page Designs (Accessible) categories are Dreamweaver template files; for
more information on templates, see Using Dreamweaver.
You can also create custom page designs by adding files to the subfolders of the BuiltIn folder. To make a description
of the file appear in the New Document dialog box, create a Design Notes file (in the appropriate _notes folder) that
corresponds to the page design file.
Customizing the appearance of dialog boxes
The dialog box layouts for objects, commands, and behaviors are specified as HTML forms; they reside in HTML files
in the Configuration folder within the Dreamweaver application folder. You edit these forms as you would edit any
form in Dreamweaver. For more information, see Using Dreamweaver.
Note: In a multiuser operating system, you should edit copies of configuration files in your user Configuration folder
rather than editing Dreamweaver configuration files. For more information, see
“Multiuser Configuration folders” on
page 78.

5
EXTENDING DREAMWEAVER
Customizing Dreamweaver
Last updated 6/15/2011
Change the appearance of a dialog box
1 In Dreamweaver, select Edit > Preferences, and then select the Code Rewriting category.
2 Deselect the Rename Form Items When Pasting option.
Deselecting this option ensures that form items retain their original names when you copy and paste them.
3 Click OK to close the Preferences dialog box.
4 On your hard disk, find the appropriate HTM file in the Configuration/Objects, Configuration/Commands, or
Configuration/Behaviors folder.
5 Make a copy of the file somewhere other than the Configuration folder.
6 Open the copy in Dreamweaver, edit the form, and save it.
7 Quit Dreamweaver.
8 Copy the changed file back to the Configuration folder in place of the original. (It’s a good idea to first make a
backup of the original, so you can restore it later if needed.)
9 Restart Dreamweaver to see the changes.
You should change only the appearance of the dialog box, not how it works; it must still contain the same types of form
elements with the same names, so that the information Dreamweaver obtains from the dialog box can still be used in
the same way.
For example, the Comment object takes text input from a text area in a dialog box and uses a simple JavaScript function
to turn that text into an HTML comment and insert the comment into your document. The form that describes the
dialog box is in the Comment.htm file in the Configuration/Objects/Invisibles folder. You can open that file and
change the size and other attributes of the text area, but if you remove the
textarea tag entirely, or change the value
of its name attribute, the Comment object does not work properly.
Changing the default file type
By default, Dreamweaver shows all the file types it recognizes in the File > Open dialog box. You can use a pop-up
menu in that dialog box to limit the display to certain types of files. If most of your work involves a specific file type
(such as ASP files), you can change the default display. The file type listed on the first line of the Dreamweaver
Extensions.txt file becomes the default.
Note: If you want to see all file types in the File > Open dialog box (even the files Dreamweaver cannot open), select All
Files (*.*). It is different from All Documents, which shows only the files Dreamweaver can open.
Change the Dreamweaver default File > Open file type
1 Make a backup copy of the Extensions.txt file in the Configuration folder.
2 Open Extensions.txt in a text editor.
3 Cut the line corresponding to the new default. Then paste it at the beginning of the file so that it becomes the first
line of the file.
4 Save the file.
5 Restart Dreamweaver.
To see the new default, select File > Open, and look at the pop-up menu of file types.
Add new file types to the menu in the File > Open dialog box
1 Make a backup copy of the Extensions.txt file in the Configuration folder.

6
EXTENDING DREAMWEAVER
Customizing Dreamweaver
Last updated 6/15/2011
2 Open Extensions.txt in a text editor.
3 Add a new line for each new file type. In capital letters, enter the filename extensions that the new file type can have,
separated by commas. Then add a colon and a brief description to show in the pop-up menu for file types that
appear in the File > Open dialog box.
For example, for JPEG files, enter the following: JPG,JPEG,JFIF:JPEG Image Files
4 Save the file.
5 Restart Dreamweaver.
To see the changes, select File > Open, and click the pop-up menu of file types.
Customizing the interpretation of third-party tags
Server-side technologies such as ASP, Adobe ColdFusion, JSP, and PHP use special non-HTML code in HTML files;
servers create and serve HTML content based on that code. When Dreamweaver encounters non-HTML tags, it
compares them with information in its third-party tag files, which define how Dreamweaver reads and displays non-
HTML tags.
For example, in addition to regular HTML, ASP files contain ASP code for the server to interpret. ASP code looks
almost like an HTML tag, but is marked by a pair of delimiters: it begins with
<% and ends with %>. The Dreamweaver
Configuration/ThirdPartyTags folder contains a file named Tags.xml, which describes the format of various third-
party tags, including ASP code, and defines how Dreamweaver displays that code. Because of the way ASP code is
specified in Tags.xml, Dreamweaver does not try to interpret anything between the delimiters; instead, in Design view,
it displays an icon that indicates ASP code. Your own tag database files can define how Dreamweaver reads and
displays your tags. Create a new tag database file for each set of tags, to tell Dreamweaver how to display the tags.
Note: This section explains how to define the way Dreamweaver displays a custom tag, but doesn’t describe how to
provide a way to edit the content or properties of a custom tag. For information on how to create a Property inspector to
inspect and change the properties of a custom tag, see
“Property inspectors” on page 214.
Each tag database file defines the name, type, content model, rendering scheme, and icon for one or more custom tags.
You can create any number of tag database files, but all of them must reside in the Configuration/ThirdPartyTags
folder to be read and processed by Dreamweaver. Tag database files have the .xml file extension.
If you are working on several unrelated sites at once (for example, as a freelance developer), you can put all the tag
specifications for a particular site in one file. Then, include that tag database file with the custom icons and Property
inspectors that you hand over to the people who will maintain the site.
You define a tag specification with an XML tag called tagspec. For example, the following code describes the
specification for a tag named
happy:
<tagspec tag_name="happy" tag_type="nonempty" render_contents="false" content_model=
"marker_model" icon="happy.gif" icon_width="18" icon_height="18"></tagspec>
You can define two kinds of tags using tagspec:
• Normal HTML-style tags
The happy tag example is a normal HTML-style tag. It starts with an opening <happy> tag, contains data between
opening and closing tags, and ends with a closing
</happy> tag.
• String-delimited tags

7
EXTENDING DREAMWEAVER
Customizing Dreamweaver
Last updated 6/15/2011
String-delimited tags start with one string and end with another string. They are like empty HTML tags (such as
img) in that they don’t surround content and don’t have closing tags. If the happy tag were a string-delimited tag,
the tag specification would include the
start_string and end_string attributes. An ASP tag is a string-delimited
tag; it starts with the string
<% and ends with the string %>, and it has no closing tag.
The following information describes the attributes and valid values for the tagspec tag. Attributes marked with an
asterisk (*) are ignored for string-delimited tags. Optional attributes are marked in the attribute lists with curly braces
(
{}); all attributes not marked with curly braces are required.
<tagspec>
Description
Provides information about a third-party tag.
Attributes
tag_name, {tag_type}, {render_contents}, {content_model}, {start_string}, {end_string},
{detect_in_attribute}, {parse_attributes}, icon, icon_width, icon_height, {equivalent_tag},
{is_visual}, {server_model}
• tag_name is the name of the custom tag. For string-delimited tags, tag_name is used only to determine whether a
given Property inspector can be used for the tag. If the first line of the Property inspector contains this tag name
with an asterisk on each side, the inspector can be used for tags of this type. For example, the tag name for ASP code
is
ASP. Property inspectors that can examine ASP code should have *ASP* on the first line. For information on the
Property inspector API, see
“Property inspectors” on page 214.
• tag_type determines whether the tag is empty (as the img tag is), or whether it contains anything between its
opening and closing tags (as the
code tag does). This attribute is required for normal (nonstring-delimited) tags.
It’s ignored for string-delimited tags because they’re always empty. Valid values are
"empty" and "nonempty".
• render_contents determines whether the contents of the tag should appear in the Design view or whether the
specified icon should appear instead. This attribute is required for nonempty tags and is ignored for empty tags.
(Empty tags have no content.) This attribute applies only to tags that appear outside attributes. The contents of tags
that appear inside the values of attributes of other tags are not rendered. Valid values are
"true" and "false".
• content_model describes what kinds of content the tag can contain and where in an HTML file the tag can appear.
Valid values are
"block_model", "head_model", "marker_model", and "script_model".
• block_model specifies that the tag can contain block-level elements such as div and p, and that the tag can
appear only in the body section or inside other body-content tags such as
div, layer, or td.
• head_model specifies that the tag can contain text content and that it can appear only in the head section.
• marker_model specifies that the tag can contain any valid HTML code, and that it can appear anywhere in an
HTML file. The HTML validator in Dreamweaver ignores tags that are specified as
marker_model. However,
the validator doesn’t ignore the contents of such a tag; so even though the tag itself can appear anywhere, the
contents of the tag may result in invalid HTML in certain places. For example, plain text cannot appear (outside
a valid head element) in the head section of a document, so you can’t place a
marker_model tag that contains
plain text in the head section. (To place a custom tag containing plain text in the head section, specify the tag’s
content model as
head_model instead of marker_model.) Use marker_model for tags that should be displayed
inline (inside a block-level element such as
p or div—for example, inside a paragraph). If the tag should be
displayed as a paragraph of its own, with line breaks before and after it, don’t use this model.
• script_model lets the tag exist anywhere between the opening and closing HTML tags of a document. When
Dreamweaver encounters a tag with this model, it ignores all of the tag’s content. Use this tag for markup (such
as certain ColdFusion tags) that Dreamweaver shouldn’t parse.

8
EXTENDING DREAMWEAVER
Customizing Dreamweaver
Last updated 6/15/2011
• start_string specifies a delimiter that marks the beginning of a string-delimited tag. String-delimited tags can
appear anywhere in the document where a comment can appear. Dreamweaver does not parse tags or decode
entities or URLs between
start_string and end_string. This attribute is required if end_string is specified.
• end_string specifies a delimiter that marks the end of a string-delimited tag. This attribute is required if
start_string is specified.
• detect_in_attribute indicates whether to ignore everything between start_string and end_string (or
between opening and closing tags if those strings are not defined) even when those strings appear inside attribute
names or values. You should generally set this to
"true" for string-delimited tags. The default is "false". For
example, ASP tags sometimes appear inside attribute values, and sometimes contain quotation marks ("). Because
the ASP tag specification specifies
detect_in_attribute="true", Dreamweaver ignores the ASP tags, including
the internal quotation marks, when they appear inside attribute values.
• parse_attributes indicates whether to parse the attributes of the tag. If this is set to "true" (the default),
Dreamweaver parses the attributes; if it’s set to
"false", Dreamweaver ignores everything until the next closing
angle bracket that appears outside quotation marks. For example, this attribute should be set to
"false" for a tag
such as
cfif (as in <cfif a is 1>, which Dreamweaver cannot parse as a set of attribute name/value pairs).
• icon specifies the path and filename of the icon associated with the tag. This attribute is required for empty tags,
and for nonempty tags whose contents do not appear in the Document window’s Design view.
• icon_width specifies the width of the icon in pixels.
• icon_height specifies the height of the icon in pixels.
• equivalent_tag specifies simple HTML equivalents for certain ColdFusion form-related tags. This is not
intended for use with other tags.
• is_visual indicates whether the tag has a direct visual effect on the page. For example, the ColdFusion tag
cfgraph doesn’t specify a value for is_visual (so the value defaults to "true"); the ColdFusion tag cfset is
specified as having
is_visual set to "false". Visibility for server markup tags is controlled by the Invisible
Elements category of the Preferences dialog box; visibility for visual server markup tags can be set independently of
visibility for nonvisual server markup tags.
• server_model, if specified, indicates that the tagspec tag applies only on pages that belong to the specified server
model. If
server_model is not specified, the tagspec tag applies on all pages. For example, the delimiters for ASP
and JSP tags are the same, but the
tagspec tag for JSP specifies a server_model of "JSP", so when Dreamweaver
encounters code with the appropriate delimiters on a JSP page, it displays a JSP icon. When it encounters such code
on a non-JSP page, it displays an ASP icon.
Contents
None (empty tag).
Container
None.
Example
<tagspec tag_name="happy" tag_type="nonempty" render_contents="false" content_model=
"marker_model" icon="happy.gif" icon_width="18" icon_height="18"></tagspec>

9
EXTENDING DREAMWEAVER
Customizing Dreamweaver
Last updated 6/15/2011
How custom tags appear in the Design view
The way that custom tags appear in the Design view of the Document window depends on the values of the tag_type
and
render_contents attributes of the tagspec tag. If the value of tag_type is "empty", the icon specified in the
icon attribute appears. If the value of tag_type is "nonempty" but the value of render_contents is "false", the
icon appears as it would for an empty tag. The following example shows how an instance of the
happy tag defined
earlier might appear in the HTML:
<p>This is a paragraph that includes an instance of the <code>happy</code>
tag (<happy>Joe</happy>).</p>
Because render_contents is set to "false" in the tag specification, the contents of the happy tag (the word Joe) are
not rendered. Instead, the start and end tags and their contents appear as a single icon.
For nonempty tags that have a render_contents value of "true", the icon does not appear in the Design view;
instead, the content between the opening and closing tags (such as the text between the tags in
<mytag>This is the
content between the opening and closing tags</mytag>) appears. If View > Invisible Elements is enabled,
the content is highlighted using the third-party tag color specified in Highlighting preferences. (Highlighting applies
only to tags defined in tag database files.)
Change the highlighting color of third-party tags
1 Select Edit > Preferences, and select the Highlighting category.
2 Click the Third-Party Tags color box to display the color picker.
3 Select a color, and click OK to close the Preferences dialog box. For information about selecting a color, see Using
Dreamweaver.
Avoiding third-party tag overwrites
Dreamweaver corrects certain kinds of errors in HTML code. For details, see Using Dreamweaver. By default,
Dreamweaver refrains from changing HTML in files with certain filename extensions, including .asp (ASP), .cfm
(ColdFusion), .jsp (JSP), and .php (PHP). This default is set so that Dreamweaver does not accidentally modify the
code contained in any such non-HTML tags. You can change the Dreamweaver default rewriting behavior so that it
rewrites HTML when it opens such files, and you can add other file types to the list of types that Dreamweaver does
not rewrite.
Dreamweaver encodes certain special characters by replacing them with numerical values when you enter them in the
Property inspector. It’s usually best to let Dreamweaver perform this encoding because the special characters are more
likely to display correctly across platforms and browsers. However, because such encoding can interfere with third-
party tags, you may want to change the Dreamweaver encoding behavior when you’re working with files that contain
third-party tags.
Allow Dreamweaver to rewrite HTML in more kinds of files
1 Select Edit > Preferences, and select the Code Rewriting category.
2 Select either of the following options:
• Fix Invalidly Nested And Unclosed Tags
• Remove Extra Closing Tags
3 Do one of the following:
• Delete one or more extensions from the list of extensions in the Never Rewrite Code: In Files With Extensions
option.

10
EXTENDING DREAMWEAVER
Customizing Dreamweaver
Last updated 6/15/2011
• Deselect the Never Rewrite Code: In Files With Extensions option. (Deselecting this option lets Dreamweaver
rewrite HTML in all types of files.)
Add file types that Dreamweaver should not rewrite
1 Select Edit > Preferences, and select the Code Rewriting category.
2 Select either of the following options:
• Fix Invalidly Nested And Unclosed Tags
• Remove Extra Closing Tags
3 Make sure the Never Rewrite Code: In Files With Extensions option is selected, and add the new file extensions to
the list in the text field.
If the new file type doesn’t appear in the file-types pop-up menu in the File > Open dialog box, you might want to add
it to the Configuration/Extensions.txt file. For details, see
“Changing the default file type” on page 5.
Turn off Dreamweaver encoding options
1 Select Edit > Preferences, and select the Code Rewriting category.
2 Deselect either or both Special Characters options.
For information on the other Code Rewriting preferences, see Using Dreamweaver.
Customizing Dreamweaver in a multiuser environment
You can customize Dreamweaver in a multiuser operating system such as Microsoft® Windows® XP, Windows Vista,
or Mac OS® X. Dreamweaver prevents the customized configuration of any user from affecting the configurations of
other users. The first time you run Dreamweaver in a multiuser operating system, Dreamweaver copies configuration
files into a user Configuration folder. When you customize Dreamweaver by using dialog boxes and panels, the
application modifies your user Configuration files instead of modifying the Dreamweaver Configuration files. To
customize Dreamweaver in a multiuser environment, edit the appropriate user Configuration file, rather than the
Dreamweaver Configuration files. To make changes that affect most users, edit a Dreamweaver Configuration file.
However, users who already have corresponding user Configuration files do not see the change. To make changes that
affect all users, create an extension and install it using the Extension Manager.
Note: In older multiuser operating systems (Windows 98, Windows ME, and Mac OS 9.x), all users share a single set of
Dreamweaver Configuration files.
The location of the Configuration folder of the user depends on the platform of the user.
Windows XP platforms use the following location:
hard disk:\Documents and Settings\username\Application Data\Adobe\Dreamweaver CS5\Configuration
Note: It is possible that this folder is inside a hidden folder.
Windows Vista platforms use the following location:
hard disk:\Users\username\AppData\Roaming\Adobe\Dreamweaver CS5\Configuration
Mac OS X platforms use the following location:
hard disk:\Users/username/Library/Application Support/Adobe/Dreamweaver CS5/Configuration

11
EXTENDING DREAMWEAVER
Customizing Dreamweaver
Last updated 6/15/2011
Note: To install extensions that all users can use in a multiuser operating system, you must be logged in as Administrator
(Windows) or root (Mac OS X).
The first time you run Dreamweaver, it copies only some of the configuration files into your user Configuration folder.
(The files that it copies are specified in the version.xml file in the Configuration folder.) When you customize
Dreamweaver from within the application, Dreamweaver copies the configuration files into your user Configuration
folder. For example, Dreamweaver copies the files when you modify one of the predesigned code snippets in the
Snippets panel. The version of a file in your user Configuration folder always takes precedence over the version in the
Dreamweaver Configuration folder. To customize a configuration file, it must be present in the user Configuration
folder. If Dreamweaver has not copied the file already, copy and edit the file in the user Configuration folder.
Deleting configuration files in a multiuser environment
When working in a multiuser operating system, if you do something within Dreamweaver that would delete a
configuration file (for example, deleting a predesigned snippet from the Snippets panel), Dreamweaver creates a file
in your user Configuration folder called mm_deleted_files.xml. When a file is listed in mm_deleted_files.xml,
Dreamweaver behaves as if that file doesn’t exist.
Deactivate a configuration file
1 Quit Dreamweaver.
2 Using a text editor, edit mm_deleted_files.xml in your user Configuration folder; add an item tag to that file, giving
the path (relative to the Dreamweaver Configuration folder) of the configuration file to deactivate.
Note: Do not edit mm_deleted_files.xml in Dreamweaver.
3 Save and close mm_deleted_files.xml.
4 Start Dreamweaver again.
The mm_deleted_files.xml tag syntax
The mm_deleted_files.xml file contains a structured list of items that specify configuration files that Dreamweaver is
to ignore. These items are specified by XML tags, which you can edit in a text editor.
In the syntax descriptions of the mm_deleted_files.xml tags that follow, optional attributes are marked in the attribute
lists with curly braces (
{}); all attributes not marked with curly braces are required.
<deleteditems>
Description
Container tag that holds a list of items that Dreamweaver should treat as deleted.
Attributes
None.
Contents
This tag must contain one or more item tags.
Container
None.

12
EXTENDING DREAMWEAVER
Customizing Dreamweaver
Last updated 6/15/2011
Example
<deleteditems>
<!-- item tags here -->
</deleteditems>
<item>
Description
Specifies a configuration file that Dreamweaver should ignore.
Attributes
name
The name attribute specifies the path to the configuration file, relative to the Configuration folder. In Windows, use a
backslash (\) to separate parts of the path; on the Macintosh®, use a colon (:).
Contents
None (empty tag).
Container
This tag must be contained in a deleteditems tag.
Example
<item name="snippets\headers\5columnwith4links.csn" />
Reinstalling and uninstalling Dreamweaver in a multiuser environment
After you install Dreamweaver, if you later reinstall it or upgrade to a later version, Dreamweaver automatically makes
backup copies of existing user configuration files, so that if you’ve customized those files, you can still access the
changes you made. When you uninstall Dreamweaver from a multiuser system (which you can do only if you have
administrative privileges), Dreamweaver can remove each user Configuration folder for you.
Changing FTP mappings
The FTPExtensionMap.txt file (Windows) and the FTPExtensionMapMac.txt file (Macintosh) map filename
extensions to FTP transfer modes (ASCII or BINARY).
Each line in each of the two files includes a filename extension (such as GIF) and either the word ASCII or the word
BINARY, to indicate which of the two FTP transfer modes should be used when transferring a file with that extension.
On the Macintosh, each line also includes a creator code (such as DmWr) and a file type (such as TEXT). When you
download a file with the given filename extension on the Macintosh, Dreamweaver assigns the specified creator and
file type to the file.
If a file that you are transferring doesn’t have a filename extension, Dreamweaver uses the BINARY transfer mode.
Note: Dreamweaver cannot transfer files in Macbinary mode. If you need to transfer files in Macbinary mode, you must
use another FTP client.
The following example shows a line (from the Macintosh file) that indicates that files with the extension .html should
be transferred in ASCII mode:

13
EXTENDING DREAMWEAVER
Customizing Dreamweaver
Last updated 6/15/2011
HTML DmWr TEXT ASCII
In both the FTPExtensionMap.txt file and FTPExtensionMapMac.txt file (Macintosh), all elements on a given line are
separated by tabs. The extension and the transfer mode are in uppercase letters.
To change a default setting, edit the file in a text editor.
Add information about a new filename extension
1 Edit the extension-map file in a text editor.
2 On a blank line, enter the filename extension (in uppercase letters) and press Tab.
3 On the Macintosh, add the creator code, a tab, the file type, and another tab.
4 Enter ASCII or BINARY to set an FTP transfer mode.
5 Save the file.
Extensible document types in Dreamweaver
XML provides a rich system for defining complex documents and data structures. Dreamweaver uses several XML
schemas to organize information about server behaviors, tags and tag libraries, components, document types, and
reference information.
When you create and work with extensions in Dreamweaver, there are many instances in which you create or modify
existing XML files to manage the data that your extension uses. In many cases, you can copy an existing file from the
appropriate subfolder within the Configuration folder to use as a template.
Document type definition files
The central component of extensible document types is the document type definition file. There might be several
definition files, all of which are located in the Configuration/DocumentTypes folder. Each definition file contains
information about at least one document type. For each document type, essential information such as server model,
color coding style, descriptions, and so forth, is described.
Note: Do not confuse Dreamweaver document type definition files with the XML document type definition (DTD).
Document type definition files in Dreamweaver contain a set of
documenttype elements, each of which defines a
predefined collection of tags and attributes that are associated with a document type. When Dreamweaver starts, it parses
the document type definition files and creates an in-memory database of information regarding all defined document
types.
Dreamweaver provides an initial document type definition file. This file, named MMDocumentTypes.xml, contains
the document type definitions provided by Adobe:
Document type Server model Internal type File extensions Previous server model
ASP.NET C# ASP.NET-Csharp Dynamic aspx, ascx
ASP.NET VB ASP.NET-VB Dynamic aspx, ascx
ASP JavaScript ASP-JS Dynamic asp
ASP VBScript ASP-VB Dynamic asp
ColdFusion ColdFusion Dynamic cfm, cfml UltraDev 4 ColdFusion
ColdFusion Component Dynamic cfc

14
EXTENDING DREAMWEAVER
Customizing Dreamweaver
Last updated 6/15/2011
If you need to create a new document type, you can either add your entry to the document definition file that Adobe
provides (MMDocumentTypes.xml) or add a custom definition file to the Configuration/DocumentTypes folder.
Note: The NewDocuments subfolder resides in the Configuration/DocumentTypes folder. This subfolder contains default
pages (templates) for each document type.
Structure of document type definition files
The following example shows what a typical document type definition file looks like:
JSP JSP Dynamic jsp
PHP PHP Dynamic php, php3
Library Item DWExtension lbi
ASP.NET C# Template DWTemplate axcs.dwt
ASP.NET VB Template DWTemplate axvb.dwt
ASP JavaScript Template DWTemplate aspjs.dwt
ASP VBScript Template DWTemplate aspvb.dwt
ColdFusion Template DWTemplate cfm.dwt
HTML Template DWTemplate dwt
JSP Template DWTemplate jsp.dwt
PHP Template DWTemplate php.dwt
HTML HTML htm, html
ActionScript Text as
CSharp Text cs
CSS Text css
Java Text java
JavaScript Text js
VB Text vb
VBScript Text vbs
Text Text txt
EDML XML edml
TLD XML tld
VTML XML vtm, vtml
WML XML wml
XML XML xml
Document type Server model Internal type File extensions Previous server model

15
EXTENDING DREAMWEAVER
Customizing Dreamweaver
Last updated 6/15/2011
<?xml version="1.0" encoding="utf-8"?>
<documenttypes xmlns:MMString="http://www.adobe.com/schemes/data/string/">
<documenttype
id="dt-ASP-JS"
servermodel="ASP-JS"
internaltype="Dynamic"
winfileextension="asp,htm, html"
macfileextension="asp, html"
previewfile="default_aspjs_preview.htm"
file="default_aspjs.htm"
priorversionservermodel="UD4-ASP-JS" >
<title>
<loadString id="mmdocumenttypes_0title" />
</title>
<description>
<loadString id="mmdocumenttypes_0descr" />
</description>
</documenttype>
...
</documenttypes>
Note: Color coding for document types is specified in the XML files that reside in the Configuration/CodeColoring folder.
In the previous example, the loadString element identifies the localized strings that Dreamweaver uses for the title
and description for ASP-JS type documents. For more information about localized strings, see
“Providing localized
strings” on page 19.
The following table describes the tags and attributes that you can use within a document type definition file.
Tag Attribute Required Description
documenttype
(root)
Yes Parent node.
id Yes Unique identifier across all document type definition
files.
servermodel No Specifies the associated server model (case-sensitive);
by default, the following values are valid:
ASP.NET C#
ASP.NET VB
ASP VBScript
ASP JavaScript
ColdFusion
JSP
PHP MySQL
A call to the getServerModelDisplayName()
functions returns these names. The server model
implementation files are located in the
Configuration/ServerModels folder.
Extension developers can create new server models
by extending this list.

16
EXTENDING DREAMWEAVER
Customizing Dreamweaver
Last updated 6/15/2011
internaltype Yes A broad classification of how Dreamweaver treats a
file. The
internaltype identifies whether the
Design view is enabled for this document and handles
special cases such as Dreamweaver templates or
extensions.
The following values are valid:
Dynamic
DWExtension (has special display regions)
DWTemplate (has special display regions)
HTML
HTML4
Text (Code view only)
XHTML1
XML (Code view only)
All server model-related document types map to
Dynamic. HTML maps to HTML. Script files (such as
CSS, JS, VB, and CS) map to
Text.
If internaltype is DWTemplate, specify the
dynamicid. Otherwise, the Server Behavior or
Bindings panel does not recognize the new blank
template that the New Document dialog box creates.
Instances of this template are simply an HTML
template.
dynamicid No A reference to the unique identifier of a dynamic
document type. This attribute is meaningful only
when
internaltype is DWTemplate. This attribute
lets you associate a dynamic template with a dynamic
document type.
winfileextension Yes The filename extension that is associated with the
document type on Windows. You specify multiple
filename extensions by using a comma-separated list.
The first extension in the list is the extension that
Dreamweaver uses when the user saves a
documenttype document.
If two nonserver model-related document types have
the same filename extension, Dreamweaver
recognizes the first one as the document type for the
extension.
macfileextension Yes The filename extension that is associated with the
document type on the Macintosh. You specify
multiple filename extensions by using a comma-
separated list. The first extension in the list is the
extension that Dreamweaver uses when the user
saves a
documenttype document.
If two nonserver model-associated document types
have the same filename extension, Dreamweaver
recognizes the first one as the document type for the
extension.
previewfile No The file that is rendered in the Preview area of the New
Document dialog box.
Tag Attribute Required Description

17
EXTENDING DREAMWEAVER
Customizing Dreamweaver
Last updated 6/15/2011
Note: When the user saves a new document, Dreamweaver examines the list of extensions for the current platform that
are associated with the document type. For example,
winfileextension and macfileextension. Dreamweaver
selects the first string in the list and uses it as the default filename extension. To change this default filename extension,
reorder the extensions in the comma-separated list so the new default is listed first.
When Dreamweaver starts, it reads all document type definition files and builds a list of valid document types.
Dreamweaver treats any entries within the definition files that have nonexistent server models as nonserver model
document types. Dreamweaver ignores entries that have bad contents or IDs that are not unique.
If document type definition files are corrupt or are not available in the Configuration/DocumentTypes folder,
Dreamweaver closes with an error message.
Defining dynamic templates
You can create templates that are based on dynamic document types. These templates are called dynamic templates.
The following two elements are essential to defining a dynamic template:
• The value of the internaltype attribute for the new document type must be DWTemplate.
• The dynamicid attribute must be set, and the value must be a reference to the identifier of an existing dynamic
document type.
The following example defines a dynamic document type:
file Yes The file that is located in the
DocumentTypes/NewDocuments folder that contains
template content for new
documenttype
documents.
priorversionservermodel No If the server model of this document has a
Dreamweaver UltraDev 4 equivalent, specify the
name of the older version of the server model.
UltraDev 4 ColdFusion is a valid prior server model.
title
(subtag)
Yes The string that appears as a category item under Blank
Document in the New Document dialog box. You can
place this string directly in the definition file or point
to it indirectly for localization purposes. For more
information on localizing this string, see
“Providing
localized strings” on page 19.
Formatting is not allowed, so HTML tags cannot be
specified.
description
(subtag)
No The string that describes the document type. You can
place this string directly in the definition file or point
to it indirectly for localization purposes. For more
information on localizing this string, see
“Providing
localized strings” on page 19.
Formatting is allowed, so HTML tags can be specified.
Tag Attribute Required Description

18
EXTENDING DREAMWEAVER
Customizing Dreamweaver
Last updated 6/15/2011
<documenttype
id="PHP_MySQL"
servermodel="PHP MySQL"
internaltype="Dynamic"
winfileextension="php,php3"
macfileextension="php,php3"
file="Default.php">
<title>PHP</title>
<description><![CDATA[PHP document]]></description>
</documenttype>
Now, you can define the following dynamic template, which is based on this PHP_MySQL dynamic document type:
<documenttype
id="DWTemplate_PHP"
internaltype="DWTemplate"
dynamicid="PHP_MySQL"
winfileextension="php.dwt"
macfileextension="php.dwt"
file="Default.php.dwt">
<title>PHP Template</title>
<description><![CDATA[Dreamweaver PHP Template document]]></description>
</documenttype>
When a Dreamweaver user creates a new blank template of type DWTemplate_PHP, Dreamweaver lets the user create
PHP server behaviors in the file. Furthermore, when the user creates instances of the new template, the user can create
PHP server behaviors in the instance.
In the previous example, when the user saves the template, Dreamweaver automatically adds a .php.dwt extension to
the file. When the user saves an instance of the template, Dreamweaver adds the .php extension to the file.
Adding and modifying document extensions and file types
By default, Dreamweaver shows all the file types it recognizes in the File > Open dialog box. After creating a document
type, extension developers must update the appropriate Extensions.txt file. At times, the user maybe on a multiuser
system (such as Windows XP, Windows Vista, or Mac OS X). In such cases, another Extensions.txt file exists in the
user Configuration folder. The user must update the Extensions.txt file because it is the instance that Dreamweaver
looks for and parses.
The location of the Configuration folder of the user depends on the platform of the user.
Windows XP platform uses the following location:
hard disk:\Documents and Settings\username\Application Data\Adobe\Dreamweaver CS5\Configuration
Note: It is possible that this folder is inside a hidden folder.
Windows Vista platform uses the following location:
hard disk:\Users\username\AppData\Roaming\Adobe\Dreamweaver CS5\Configuration
Mac OS X platform uses the following location:
hard disk:\Users/username/Library/Application Support/Adobe/Dreamweaver CS5/Configuration
If Dreamweaver cannot find the Extensions.txt file in the Configuration folder of the user, Dreamweaver looks for it
in the Dreamweaver Configuration folder.

19
EXTENDING DREAMWEAVER
Customizing Dreamweaver
Last updated 6/15/2011
Note: On multiuser platforms, Dreamweaver parses the copy of the Extensions.txt file in the Configuration folder of the
user, not the file in the Dreamweaver Configuration folder. So, if you edit the copy of Extensions.txt that resides in the
Dreamweaver Configuration folder, Dreamweaver is not aware of the changes.
To create a document extension, you can either add the new extension to an existing document type or create a
document type.
Add a new extension to an existing document type
1 Edit MMDocumentTypes.xml.
2
Add the new extension to the
winfileextension
and
macfileextension
attributes of the existing document type.
Add a new document type
1 Make a backup copy of the Extensions.txt file in the Configuration folder.
2 Open Extensions.txt in a text editor.
3 Add a new line for each new file type. In capital letters, enter the filename extensions that the new file type can have,
separated by commas. Then, add a colon and a brief descriptive phrase to show in the pop-up menu for file types.
The pop-up menu appears in the File > Open dialog box.
For example, for JPEG files, enter JPG,JPEG,JFIF:JPEG Image Files
4 Save the Extensions.txt file.
5 Restart Dreamweaver.
To see the changes, select File > Open and click the pop-up menu of file types.
Change the Dreamweaver default File > 0pen file type
1 Make a backup copy of the Extensions.txt file in the Configuration folder.
2 Open Extensions.txt in a text editor.
3 Cut the line that corresponds to the new default. Then, paste it at the beginning of the file to make it the first line
of the file.
4 Save the Extensions.txt file.
5 Restart Dreamweaver.
To see the changes, select File > Open and click the pop-up menu of file types.
More Help topics
http://www.adobe.com/go/16410
Providing localized strings
Within a document type definition file, the <title> and <description> subtags specify the display title and
description for the document type. You can use the
MMString:loadstring directive in the subtags as a placeholder
for providing localized strings for the two subtags. This process is similar to server-side scripting where you specify a
particular string to use in your page by using a string identifier as a placeholder. For the placeholder, you can use a
special tag or you can specify a tag attribute whose value is replaced.
Provide localized strings
1 Place the following statement at the beginning of the document type definition file:

20
EXTENDING DREAMWEAVER
Customizing Dreamweaver
Last updated 6/15/2011
<?xml version="1.0" encoding="utf-8"?>
2 Declare the MMString namespace in the <documenttypes> tag:
<documenttypes
xmlns:MMString="http://www.adobe.com/schemes/data/string/">
3 At the location in the document type definition file where you want to provide a localized string, use the
MMString:loadstring directive to define a placeholder for the localized string. You can specify this placeholder
in one of the following ways:
<description>
<loadstring>myJSPDocType/Description</loadstring>
</description>
Or
<description>
<loadstring id="myJSPDocType/Description" />
</description>
In these examples, myJSPDocType/Description is a unique string identifier that acts as a placeholder for the
localized string. The localized string is defined in the next step.
4 In the Configuration/Strings folder, create a new XML file (or edit an existing file) that defines the localized string.
For example, the following code, when placed in the Configuration/Strings/strings.xml file, defines the
myJSPDocType/Description string:
<strings>
...
<string id="myJSPDocType/Description"
value=
"<![CDATA[JavaServer Page with <em>special</em> features]]>"
/>
...
</strings>
Note: String identifiers, such as myJSPDocType/Description in the previous example, must be unique within the
application. Dreamweaver, when it starts, parses all XML files within the Configuration/Strings folder and loads these
unique strings.
Rules for document type definition files
Dreamweaver lets document types that are associated with a server model share file extensions. For example, ASP-JS
and ASP-VB can claim .asp as their file extension. (For information on which server model gets preference, see
“canRecognizeDocument()” on page 322.)
Dreamweaver does not let document types that are not associated with a server model share file extensions.
If a file extension is claimed by two document types where one type is associated with a server model and the other is
not, the latter document type gets preference. Suppose you have a document type called SAM, which is not associated
with a server model, that has a file extension of .sam, and you add this file extension to the ASP-JS document type.
When a Dreamweaver user opens a file that has a .sam extension, Dreamweaver assigns the SAM document type to it,
not ASP-JS.

21
EXTENDING DREAMWEAVER
Customizing Dreamweaver
Last updated 6/15/2011
Defining document declarations
Dreamweaver lets setting DTDs for documents through the MMDocumentTypeDeclarations.xml file available in the
Configuration/DocumentTypes folder. The list of available DTDs and the documents they apply to is defined in the
MMDocumentTypeDeclarations.xml file.
Opening a document in Dreamweaver
When a user opens a document file, Dreamweaver follows a series of steps to identify the document type based on the
file’s extension.
If Dreamweaver successfully finds a unique document type, Dreamweaver uses that type and loads the associated
server model (if any) for the document that the user is opening. If the user has selected to use Dreamweaver UltraDev
4 server behaviors, Dreamweaver loads the appropriate UltraDev 4 server model.
If the file extension maps to more than one document type, Dreamweaver performs the following actions:
• If a static document type is among the list of document types, it gets preference.
• If all the document types are dynamic, Dreamweaver creates an alphabetical list of the server models that are
associated with these document types and then calls the
canRecognizeDocument() function in each server model
(see
“canRecognizeDocument()” on page 322). Dreamweaver collects the return values and determines which
server model returned the highest valued positive integer. The document type whose server model returns the
highest integer is the document type that Dreamweaver assigns to the document being opened. If, however, more
than one server model returns the same integer, Dreamweaver goes through the alphabetical list of those server
models, picks the first in the list, and uses that document type. For example, if both ASP-JS and ASP-VB claim an
ASP document and if their respective
canRecognizeDocument() functions return equal values, Dreamweaver
assigns the document to ASP-JS (because, alphabetically, ASP-JS is first).
If Dreamweaver cannot map the file extension to a document type, Dreamweaver opens the document as a text file.
Customizing workspace layouts
Dreamweaver lets you customize the workspace layout, including which panels are in the specified layout, as well as
other attributes such as the positions and sizes of the panels, their collapsed or expanded states, the position and size
of the application window, and the position and size of the Document window.
The workspace layout is specified in XML files stored in the Configuration/Workspace layouts folder. The following
sections describe the syntax of the XML tags. Optional attributes are marked in the attribute lists with curly braces (
{});
all attributes not marked with curly braces are required.
<panelset>
Description
Outermost tag, which signals the start of the panel set description.
Attributes
None.
Contents
This tag may contain one or more application, document, or panelset tags.

22
EXTENDING DREAMWEAVER
Customizing Dreamweaver
Last updated 6/15/2011
Container
None.
Example
<panelset>
<!-- panelset tags here -->
</panelset>
<application>
Description
Specifies the application window’s initial position and size.
Attributes
rect, maximize
• rect specifies the position and size of the application window. The string is in the form “left top right bottom”
specified as integers.
• maximize is a Boolean value: true if the application window should be maximized on startup; false otherwise.
The default value is
true.
Contents
None.
Container
This tag must be contained in a panelset tag.
Example
<panelset>
<application rect="0 0 1000 1200" maximize="false">
</application>
</panelset>
<document>
Description
Specifies the Document window’s initial position and size.
Attributes
rect, maximize
• rect specifies the position and size of the Document window. The string is in the form “left top right bottom”
specified as integers. If the
maximize value is true, the rect value is ignored.
• maximize is a Boolean value: true if the Document window should be maximized on startup; false otherwise.
The default value is
true.
Contents
None.

23
EXTENDING DREAMWEAVER
Customizing Dreamweaver
Last updated 6/15/2011
Container
This tag must be contained in a panelset tag.
Example
<panelset>
<document rect="100 257 1043 1200" maximize="false">
</document>
</panelset>
<panelframe>
Description
Describes an entire panel group.
Attributes
x, y, {width, height}, dock, collapse
• x specifies the left position of the panel group. Its value can be an integer or a value that is relative to the screen. If
the integer value is not on the screen, the panel group appears in the closest screen position possible to make it
visible on the screen. Relative values can be “left” or “right”; these values indicate which edge of the panel group to
align with which edge of the virtual screen.
• y specifies the top position of the panel group. Its value can be an integer or a value that is relative to the screen. If
the integer value is not on the screen, the panel group appears in the closest screen position possible to make it
visible on the screen. Relative values can be “top” or “bottom”; these values indicate which edge of the panel group
to align with which edge of the virtual screen.
• width is the width, in pixels, of the panel group. This attribute is optional. If the width is not specified, the built-in
default for the panel group is used.
• height is the height, in pixels, of the panel group. This attribute is optional. If the height is not specified, the built-
in default for the panel group is used.
• dock is a string value that specifies to which edge of the application frame to dock the panel group. This attribute
is ignored on the Macintosh because panel groups cannot be docked.
• collapse is a Boolean value: true indicates that the panel group is collapsed: false indicates that the panel group
is expanded. This attribute is ignored on the Macintosh because panels are floating.
Contents
This tag must contain one or more panelcontainer tags.
Container
This tag must be contained in a panelset tag.
Example
<panelset>
<panelframe rect="196 453 661 987" visible="true" dock="floating">
<!-- panelcontainer tags here -->
</panelframe>
</panelset>

24
EXTENDING DREAMWEAVER
Customizing Dreamweaver
Last updated 6/15/2011
<panelcontainer>
Description
Describes an entire panel group.
Attributes
expanded, title,{ height,} activepanel, visible, maximize, maxRestorePanel, maxRestoreIndex,
maxRect, tabsinheader
• expanded is a Boolean value: true if the panel is expanded; false otherwise.
• title is a string that specifies the title of the panel.
• height is an integer that specifies the height of the panel in pixels. This attribute is optional. If height is not
specified, the build-in default for each panel is used.
Note: Width is inherited from the parent.
• activepanel is a number that is the ID of the front panel.
• visible is a Boolean value: true if the panel is visible; false otherwise.
• maximize is a Boolean value: true if the panel should be maximized when it appears initially; false otherwise.
• maxRestorePanel is a number that is the ID of the panel to restore to.
• maxRect is a string that indicates the position and size of the panel when it is maximized. The string is in the form
“left top right bottom”, specified as integers.
• tabsinheader is a Boolean value: true indicates that tabs should be positioned in the header instead of below the
header bar;
false otherwise.
Contents
This tag must contain one or more panel tags.
Container
This tag must be contained in a panelframe tag.
Example
<panelset>
<panelframe rect="196 453 661 987" visible="true" dock="floating">
<panelcontainer title="Color" height="250" visible="true" expanded="true"
activepanel="20">
<!-- panel tags here --->
</panelcontainer>
</panelframe>
</panelset>
<panel>
Description
Specifies the panel that appears in the panel container.

25
EXTENDING DREAMWEAVER
Customizing Dreamweaver
Last updated 6/15/2011
Attributes
id, visibleTab
• id is a number that indicates the ID for the panel. The following table contains a list of values:
• visibleTab is a Boolean value: true if the tab and the panel should be visible; false otherwise.
Contents
None.
Container
This tag must be contained in a panelcontainer tag.
Software ID Panel
Adobe® Flash® 1 Properties
2 Actions
3 Align
4 Behaviors
5 Components
6 Component Inspector
7 Color Mixer
8 Color Swatches
9 History
10 Info
11 Library
12 Movie Explorer
13 Output
14 Properties
15 Project
16 Transform
17 Scene
18 Strings
19 Debugger
101–110 Library
Dreamweaver 1 Properties
Flex Builder 1 Properties

26
EXTENDING DREAMWEAVER
Customizing Dreamweaver
Last updated 6/15/2011
Example
<panelset>
<panelframe rect="196 453 661 987" visible="true" dock="floating">
<panelcontainer title="Color" height="250" visible="true" expanded="true"
activepanel="20">
<panel id="20"></panel>
</panelcontainer>
</panelframe>
</panelset>
Customizing the Coding toolbar
The Coding toolbar displays 15 buttons initially. This is a subset of the buttons that are available. You can customize
the Coding toolbar by changing the buttons that appear on the toolbar and the order in which they appear by editing
the file Configuration/Toolbars/Toolbars.xml. You can also insert your own buttons into the toolbar through the
Extension Manager.
Change the order of buttons
1 Open the file Configuration/Toolbars/toolbars.xml.
2 Locate the Code view toolbar section by searching for the following comment:
<!-- Code view toolbar -->
3 Copy and paste the button tags so that they appear in the order you want on the toolbar.
4 Save the file.
Remove a button
1 Open the file Configuration/Toolbars/toolbars.xml.
2 Locate the Coding toolbar section by searching for the following comment:
<!-- Code view toolbar -->
3 Surround the button you want to remove with a comment.
The following example shows a button that is surrounded by comments so that it does not appear on the toolbar:
<!-- remove button from Coding toolbar
<button id="DW_ExpandAll"
image="Toolbars/images/MM/T_ExpandAll_Sm_N.png"
disabledImage="Toolbars/images/MM/T_ExpandAll_Sm_D.png"
tooltip="Expand All"
domRequired="false"
enabled="dw.getFocus(true) == 'textView' || dw.getFocus(true) == 'html'¬
"command="if (dw.getFocus(true) == 'textView' || dw.getFocus(true) ¬
== 'html') dw.getDocumentDOM().source.expandAllCodeFragments();"
update="onViewChange" />
-->
4 Save the file.
To make any buttons that are not visible in the toolbar appear, you remove the comment that surrounds a button in
the XML file.

27
EXTENDING DREAMWEAVER
Customizing Dreamweaver
Last updated 6/15/2011
Changing keyboard shortcut mappings
Dreamweaver includes many keyboard shortcuts to Dreamweaver features. The default keyboard shortcuts are listed
in the menus.xml file and are created for the U.S. keyboard. Due to the number of shortcuts provided in Dreamweaver,
certain nonalphanumeric shortcuts (characters other than a-z or 0-9) require remapping for international keyboards.
For this purpose, Dreamweaver comes with a number of XML files that define keyboard shortcut mappings for
international keyboards. These files are located in the Configuration\Menus\Adaptive Sets folder. When
Dreamweaver detects an international keyboard connected to the computer, it automatically resets the keyboard
shortcuts to the mappings file for that keyboard. If the appropriate file is not available for the keyboard layout,
Dreamweaver removes any shortcuts that do not work on that keyboard layout.
The keyboard shortcut mappings files are named using a two-letter language code of the keyboard layout they
represent. For example, the file for the German keyboard layout is de.xml. If a language has different keyboard layouts
for different countries, then the mappings file uses the two-letter language code followed by a dash (“-”) and a two-
letter country code as its file name. For example, fr-ca.xml is the file name for the Canadian French keyboard layout.
The two-letter language codes are defined in ISO 639 (http://en.wikipedia.org/wiki/List_of_ISO_639_codes) and the
country codes are defined in ISO 3166 (http://en.wikipedia.org/wiki/ISO_3166-1_alpha-2).
When the active keyboard language setting changes in your computer, Dreamweaver checks whether an appropriate
keyboard shortcut mappings file exists for that keyboard’s country and language. Dreamweaver checks for a country-
specific mappings file first, and then, if the file does not exist, Dreamweaver checks for a file for that language. For
example, if you have connected a Canadian French keyboard to your computer, Dreamweaver first looks for fr-ca.xml
for Canadian French keyboard layout. If it does not exist, Dreamweaver looks for fr.xml. The following table lists the
mappings files provided with Dreamweaver.
If you are using a keyboard layout other than those provided by Dreamweaver, you can create a mappings file for your
specific keyboard and place it in the Configuration\Menus\Adaptive Sets folder.
Filename Windows platform Macintosh platform
ca.xml Catalan Catalan Spanish
de.xml German (Germany, Austria) Austrian, German
de-ch.xml German (Switzerland) Swiss German
es.xml Spanish (International Sort) Spanish (Traditional Sort) Spanish - ISO
fr.xml French (France) French
fr-ca.xml French (Canada) Canadian - CSA
fr-ch.xml French (Switzerland) Swiss French
it.xml Italian (Italy) Italian (Switzerland) Italian - Pro
it-mac.xml N/A Italian
ja.xml Japanese Japanese
nl-be.xml Dutch (Belgium) French (Belgium) Belgian
zh-cn.xml Chinese (PRC) Chinese (Singapore) Simplified Chinese

28
EXTENDING DREAMWEAVER
Customizing Dreamweaver
Last updated 6/15/2011
Create a keyboard mappings file
1 Make a copy of one of the keyboard mappings files in the Configuration\Menus\Adaptive Sets folder, and name the
file using the appropriate 2-letter language name for your keyboard layout with .xml extension.
When making a copy of an existing file, you should copy a keyboard mappings file that is close to your keyboard
layout. For example, if you are creating a keyboard mappings file for the Swedish keyboard, you might want to copy
the de.xml because the Swedish keyboard layout is similar to the German keyboard layout.
2 Move the new keyboard mappings file you just created to a folder other than the Configuration\Menus\Adaptive
Sets folder.
3 Open the keyboard mappings file in Dreamweaver.
4 Remove or add shortcut tags for your keyboard layout.
To help you decide on the keyboard shortcut tags you want to modify, you can compare the shortcuts set for the
U.S. keyboard with those set for your language. (The next procedure describes comparing shortcuts from two
keyboard layouts.)
5 After making your changes to the keyboard shortcuts, save the file and move it back to the
Configuration\Menus\Adaptive Sets folder.
Determine the keyboard shortcut tags you want to modify
1 Switch the active keyboard language setting of your computer to your language, if it is not already set. (This is set
through the operating system of your computer. For example, in Windows you can select the language through the
Control Panels.)
2 Start the Dreamweaver Keyboard Shortcut Editor by selecting Edit > Keyboard Shortcuts.
3 Click the third image button in the upper right of the dialog box. (If you place the pointer over the button, you will
see the tooltip "Export set as HTML.")
The Save As HTML file dialog appears prompting you to enter a name for the keyboard shortcut summary file of
your current keyboard layout.
4 After saving the summary file, dismiss the Keyboard Shortcut Editor dialog box.
5 Switch the keyboard layout to the U.S. keyboard (through your computer’s operating system).
6 Start the Dreamweaver Keyboard Shortcut Editor by selecting Edit > Keyboard Shortcuts.
7 Click the third image button in the upper right of the dialog box to export the set as an HTML file.
8 After saving the summary file, close the Keyboard Shortcut Editor dialog box.
9 Now, you can print the two keyboard shortcut summary files and compare them to see all the shortcuts that
Dreamweaver removed for your language keyboard layout. These are the shortcuts that you have to reassign with
new shortcuts using keys available only on your keyboard layout.
With the information you get from comparing the two files, you can update your keyboard layout mappings file by
adding or removing shortcut tags for each shortcut that you want to reassign.
The keyboard layout mapping XML files
The following example shows the format of the French keyboard mappings file (fr.xml):

29
EXTENDING DREAMWEAVER
Customizing Dreamweaver
Last updated 6/15/2011
<shortcutset language="French">
<shortcut key="Cmd+[" newkey="Cmd+ù"/>
<shortcut key="Cmd+]" newkey="Cmd+)"/>
<shortcut platform="win" key="Cmd+Shift+>" newkey="Cmd+Opt+Shift+,"/>
<shortcut platform="mac" key="Cmd+Shift+>" newkey="Cmd+<"/>
<shortcut platform="win" key="Cmd+Shift+<" newkey="Cmd+Shift+,"/>
<shortcut key="Cmd+'" newkey="Cmd+Shift+=" />
...
</shortcutset>
The syntax for the keyboard layout XML file:
<shortcutset language="language_name">
<shortcut key="key_combination" newkey="key_combination"/>
<shortcut platform="op_system" key="key_combination" newkey="key_combination"/>
</shortcutset>
Where:
• language_name is the language of the keyboard, such as French, Spanish, German, etc.
• key_combination is the keyboard shortcut, such as Cmd+[, Cmd+Shift+>, Ctrl+$.
• key specifies the keyboard shortcut to be replaced.
• newkey specifies the keyboard shortcut to replace the key.
• platform=op_system is the system for which the shortcut applies. Specify either win or mac. If no platform is
specified, the shortcut applies to both platforms.

30
Last updated 6/15/2011
Chapter 3: Customizing Code view
Adobe Dreamweaver uses two devices in Code view that help you enter code quickly and make your code readable and
accurate. These two devices are code hints and code coloring. In addition, Dreamweaver validates your code for the
target browsers that you specify and allows you to change default HTML formatting.
You can customize code hints and code coloring by modifying the XML files that implement them. You can add items
to the code hints menu by adding entries to the CodeHints.xml or SpryCodeHints.xml file. You can modify color
schemes by modifying the code coloring style file, Colors.xml, or you can change code coloring schemes or add new
ones by modifying one of the code coloring syntax files, such as CodeColoring.xml. You can also modify the Cascading
Style Sheet (CSS) profile file for your target browser to affect how Dreamweaver validates CSS properties and values.
You can also change the Dreamweaver default HTML formatting through the Preferences dialog box. The following
sections describe how to customize these features.
About code hints
Code hints are menus that Dreamweaver opens when you type certain character patterns in the Code view. Code hints
offer a typing shortcut by providing a list of strings that potentially complete the string you are typing. If the string you
are typing appears in the menu, you can scroll to it and press Enter or Return to complete your entry. For example,
when you type <, a pop-up menu shows a list of tag names. Instead of typing the rest of the tag name, you can select
the tag from the menu to include it in your text. Dreamweaver also provides code hints for the Spry framework.
Dreamweaver loads code hints menus from the CodeHints.xml file and any other XML files in the
Configuration/CodeHints folder. You can add code hints menus to Dreamweaver by defining them in your own XML
files using the XML schema format described in this topic, and placing them in the Configuration/CodeHints folder.
After Dreamweaver loads the contents of a code hints file, you can also add new code hints menus dynamically through
JavaScript. For example, JavaScript code populates the list of session variables in the Bindings panel. You can use the
same code to add a code hints menu, so when a user types "Session." in Code view, Dreamweaver displays a menu of
session variables. For information on using JavaScript to add or modify a code hints menu, see “Code Functions” in
the Dreamweaver API Reference.
Dreamweaver cannot express some types of code hints menus through the XML file or the JavaScript API. The
CodeHints.xml file, the SpryCodeHints.xml file, and the JavaScript API expose a useful subset of the code hints engine,
but some Dreamweaver functionality is not accessible. For example, there is no JavaScript hook to open a color picker,
so Dreamweaver cannot express the Attribute Values menu using JavaScript. You can only open a menu of text items
from which you can insert text.
Note: When you insert text, the insertion point is placed after the inserted string.
The CodeHints.xml file
The CodeHints.xml file contains the following entities:
• A list of all the menu groups
Dreamweaver displays the list of menu groups when you select the code hints category from the Preferences dialog
box. You can open the Preferences dialog box by selecting Edit > Preferences. Dreamweaver provides the following
menu groups or types of code hints menus: Tag Names, Attribute Names, Attribute Values, Function Arguments,
Object Methods and Variables, and HTML Entities.

31
EXTENDING DREAMWEAVER
Customizing Code view
Last updated 6/15/2011
• The description for each menu group
The description appears in the Preferences dialog box for the code hints category when you select the menu group
in the list. The description for the selected entry appears below the menu group list.
• code hints menus
A menu consists of a pattern that triggers the code hints menu and a list of commands. For example, a pattern such
as
& could trigger a menu such as &, >, <.
The following example shows the format of the CodeHints.xml file (The tags in bold are described in “Code hints
tags” on page 35):
<codehints>
<menugroup name="HTML Entities" enabled="true" id="CodeHints_HTML_Entities">
<description>
<![CDATA[ When you type a '&', a pop-up menu shows
a list of HTML entities. The list of HTML entities
is stored in Configuration/CodeHints.xml. ]]>
</description>
<menu pattern="&">
<menuitem value="&amp;" texticon="&"/>
<menuitem value="&lt;" icon="lessThan.gif"/>
</menu>
</menugroup>
<menugroup name="Tag Names" enabled="true" id="CodeHints_Tag_Names">
<description>
<![CDATA[ When you type '<', a pop-up menu shows
all possible tag names.0You can edit the list of tag
names using the
<a href="javascript:dw.popupTagLibraryEditor()"> Tag Library
Editor </a>]]>
</description>
</menugroup>
<menugroup name="Function Arguments" enabled="true"
id="CodeHints_Function_Arguments">
<description>
...
</description>
<function pattern="ArraySort(array, sort_type, sort_order)"
doctypes="CFML"/>
<function pattern="Response.addCookie(Cookie cookie)"
doctypes="JSP"/>
</menugroup>
</codehints>
JavaScript code hinting
Dreamweaver supports code hinting for the Spry framework. The Spry code hinting file (SpryCodeHints.xml) has the
same basic format as CodeHints.xml. It uses certain new keywords, such as
method, and there is a new attribute
classpattern to associate the class member list with the class (for example, Spry.Data.XMLDataSet). The class
member list for the classes is nested inside the menu (methods, properties, and events).

32
EXTENDING DREAMWEAVER
Customizing Code view
Last updated 6/15/2011
The <method> tag and its attributes are similar to the function tag and its attributes, but the parent menu tag needs
to have the
classpattern attribute to drive the association. Also there is a property tag for properties and an event
tag for events, and they are represented by their corresponding icons in the code hints pop-up menu. There are also
parammenu and parammenuitem tags to support parameter hinting.
The following example shows the format of a SpryCodeHints.xml file. (The tags in bold are described in “Code hints
tags” on page 35.):
<function pattern="XMLDataSet(xmlsource, xpath, {options})"
caseSensitive="true" />
<menu classpattern="Spry.Data.XMLDataSet">
<property pattern="url" icon="shared/mm/images/hintMisc.gif" />
<property pattern="xpath" icon="shared/mm/images/hintMisc.gif" />
...
...
<method pattern="getData()" icon="shared/mm/images/hintMisc.gif" />
<method pattern="getData()" icon="shared/mm/images/hintMisc.gif" />
<method pattern="loadData()" icon="shared/mm/images/hintMisc.gif" />
<method pattern="getCurrentRow()" icon= ".../hintMisc.gif" />
<method pattern="setCurrentRow(rowID)" icon= ".../hintMisc.gif" />
<method pattern="setCurrentRowNumber(rowNumber)" icon= ".../hintMisc.gif" />
<method pattern="getRowNumber(rowObj)" icon= ".../hintMisc.gif" />
<method pattern="setColumnType(columnName, columnType)" icon= ".../hintMisc.gif" />
<parammenu pattern='"' name="columnName" index="0" type="spryDataReferences">
</parammenu>
<parammenu pattern='"' name="columnType" index="1" type="enumerated">
<parammenuitem label="integer" value="integer" icon=".../hintMisc.gif"/>
<parammenuitem label="image" value="image" icon=".../hintMisc.gif"/>
<parammenuitem label="date" value="date" icon=".../hintMisc.gif"/>
<parammenuitem label="string" value="string" icon=".../hintMisc.gif"/>
</parammenu>
</method>
<method pattern="getColumnType(columnName)" icon= ".../hintMisc.gif" />
<method pattern="distinct()" icon= ".../hintMisc.gif" />
<method pattern="getSortColumn()" icon= ".../hintMisc.gif" />
<method pattern="sort()" icon= ".../hintMisc.gif" />
...
...
<event pattern="onCurrentRowChanged" icon= ".../hintMisc.gif" />
<event pattern="onDataChanged" icon= ".../hintMisc.gif" />
...
...
</menu>
<function pattern="Accordion(element,{options})" caseSensitive="true" />
<menu classpattern="Spry.Widget.Accordion">
<method pattern="openNextPanel()" icon= ".../hintMisc.gif" />
<method pattern="openPreviousPanel()" icon= ".../hintMisc.gif" />

33
EXTENDING DREAMWEAVER
Customizing Code view
Last updated 6/15/2011
<method pattern="openFirstPanel()" icon= ".../hintMisc.gif" />
...
...
</menu>
</function>
<function pattern="XMLDataSet(xmlsource, xpath, {options})" caseSensitive="true">
<parammenu pattern='{,' name="options" index="2" type="optionArray"
allowwhitespaceprefix="true">
<parammenuitem label="sortOnLoad" value="sortOnLoad:"
icon="shared/mm/images/hintMisc.gif" datatype="string"/>
<optionparammenu pattern="sortOrderOnLoad" label="sortOrderOnLoad"
value="sortOrderOnLoad:" icon="shared/mm/images/hintMisc.gif"
type="enumerated" datatype="string">
<optionparammenuitem label="ascending" value="ascending"
icon="shared/mm/images/hintMisc.gif"/>
<optionparammenuitem label="descending" value="descending"
icon="shared/mm/images/hintMisc.gif"/>
</optionparammenu>
</parammenu>
</function>
Declaring classes
The following format declares a class by associating a variable to the class:
<variablename>[space][= operator][new keyword][space]<classname>
For example:
var dsFoo = new Spry.Data.XMLDataSet("products.xml", "products/product");
var fooAccordion = new Spry.Widget.Accordion("accordionDivId");
In the case of the Spry.XML.DataSet class name, you must redeclare it in the ColorCoding.xml file so that the coloring
state engine recognizes that it is an instance of a class and takes the variable name defined on the left side of the
declaration and stores it in the list of variables with their corresponding class types for that page (such as the variable
fooAccordion and the class type Spry.Widget.Accordion from the previous example).
The syntax for redeclaring the class name in CodeColoring.xml:
<classlibrary name="Spry Keywords" id="CodeColor_JavascriptSpry">
<class>Spry.Data.XMLDataSet</class>
<class>Spry.Widget.Accordion</class>
</classlibrary>
Where:
• classlibrary is a new tag to group the classes into the color id "CodeColor_JavascriptSpry"
class is used to list each individual class available in the class library. The list of classes can grow to include other
spry classes from different spry packages (such as: Debug, Data, Utils, Widgets, and Effects), or other
Asynchronous JavaScript and XML (Ajax) toolkits or JavaScript libraries.
Crosstag attributes code hinting
Dreamweaver provides code hinting for the Spry attribute names and values. Since these attributes are common across
tags, instead of opening each tag.vtm file and adding the Spry attribute list, Dreamweaver has a new XML format for
attribute groups (for example: spry:region, spry:repeat) and tag groups which can be applied in a single VTM file
named Spry.vtm in the Configuration/TagLibraries directory.

34
EXTENDING DREAMWEAVER
Customizing Code view
Last updated 6/15/2011
Spry attribute grouping format
The following code shows the format of the .vtm file. This format allows you to specify the attributes that apply to
certain tags.
Note: The format for Spry attribute grouping can also be used outside the Spry framework.
<crosstag_attributes>
<attributegroup id="group_id_1" name="group_name_1">
<attrib name = "fooAttr1">
<attrib name = "barAttr1">
...
<taggroup>
<tag name = "fooTag1">
<tag name = "barTag1">
...
</taggroup>
</attribgroup>
<attributegroup id="group_id_2" name="group_name_2">
<attrib name = "fooAttr2">
<attrib name = "barAttr2">
...
<taggroup>
<tag name = "fooTag2">
<tag name = "barTag2">
...
</taggroup>
</attribgroup>
</crosstag_attributes>
Where:
• attributegroup lists the attributes for the tag group that follows.
• taggroup lists the tags to which the preceding attributes apply.

35
EXTENDING DREAMWEAVER
Customizing Code view
Last updated 6/15/2011
Example
<crosstag_attributes>
<attribgroup id="spryRegionAttrs" name="Spry1.2">
<attrib name="spry:region" type="spryDataSet" allowmultiplevalues="yes"/>
<attrib name="spry:detailregion" type="spryDataSet" allowmultiplevalues="yes"/>
<attrib name="spry:content"/>
<attrib name="spry:if"/>
<attrib name="spry:choose">
<attrib name="spry:when"/>
<attrib name="spry:default"/>
<attrib name="spry:state" type="Enumerated">
<attriboption value="read" caption="read"/>
<attriboption value="loading" caption="loading"/>
<attriboption value="failed" caption="failed"/>
</attrib>
<taggroup>
<tag name="div"/>
<tag name="span"/>
...
</taggroup>
</attribgroup>
<attribgroup id="spryBehaviorAttrs" name="Spry1.2">
<attrib name="spry:hover" type="cssStyle"/>
<attrib name="spry:select" type="cssStyle"/>
<attrib name="spry:odd" type="cssStyle"/>
<attrib name="spry:even" type="cssStyle"/>
<taggroup>
<tag name="a"/>
<tag name="abbr"/>
<tag name="acronym"/>
...
</taggroup>
</attribgroup>
</crosstag_attributes>
Code hints tags
The code hints XML files use the following tags, which define code hints menus. You can use these tags to define
additional code hints menus.
<codehints>
Description
The codehints tag is the root of the CodeHints.xml and SpryCodeHints.xmlfiles.
Attributes
None.
Contents
One or more menugroup tags.
Container
None.

36
EXTENDING DREAMWEAVER
Customizing Code view
Last updated 6/15/2011
Example
<codehints>
<menugroup>
Description
Each menugroup tag corresponds to a type of menu. You can see the menu types that Dreamweaver defines by selecting
the code hints category from the Preferences dialog box. Select Preferences from the Edit menu to display the
Preferences dialog box.
You can create a new menu group or add to an existing group. Menu groups are logical collections of menus that the
user might want to enable or disable using the Preferences dialog box.
Attributes
name,enabled,id,version
• The name attribute is the localized name that appears in the list of menu groups in the code hints category of the
Preferences dialog box.
• The enabled attribute indicates whether the menu group is currently checked or enabled. A menu group that is
enabled appears with a check mark next to it in the code hints category of the Preferences dialog box. Assign a
true
value to enable the menu group or a
false value to disable a menu group.
• The id attribute is a nonlocalized identifier that refers to the menu group.
Contents
The description, menu, and function tags.
Container
The codehints tag.
Example
<menugroup name="Session Variables" enabled="true" id="Session_Code_Hints" version="1.4.2">
<description>
Description
The description tag contains text that Dreamweaver displays when you select the menu group from the Preferences
dialog box. The description text displays below the list of menu groups. The description text might optionally contain
a single
a tag where the href attribute must be a JavaScript URL that Dreamweaver executes if the user clicks the link.
Use the XML CDATA construct to enclose any special or illegal characters in the string so that Dreamweaver treats
them as text.
Attributes
None.
Contents
Description text.

37
EXTENDING DREAMWEAVER
Customizing Code view
Last updated 6/15/2011
Container
The menugroup tag.
Example
<description>
<![CDATA[ To add or remove tags and attributes, use the
<a href="javascript:dw.tagLibrary.showTagLibraryEditor()">Tag Library Editor</a>.]]>
</description>
<menu>
Description
This tag describes a single pop-up menu. Dreamweaver opens the menu whenever the user types the last character of
the string of the pattern attribute. For example, the menu that shows the contents of a Session variable could have a
pattern attribute that is equal to "
Session.".
Attributes
pattern, doctypes, casesensitive, classpattern, displayrestriction, alias
• The pattern attribute specifies the pattern of typed characters that cause Dreamweaver to open the code hints
menu. If the first character of the pattern is a letter, number, or underscore, Dreamweaver displays the menu only
if the character that precedes the pattern in the document is not a letter, number, or underscore. For example, if the
pattern is "
Session.", Dreamweaver does not display the menu if the user types "my_Session.".
• The doctypes attribute specifies that the menu is active only for the specified document types. This attribute lets
you specify different lists of function names for ASP-JavaScript (ASP-JS), Java Server Pages (JSP), Adobe
ColdFusion, and so on. You can specify the
doctypes attribute as a comma-separated list of document type IDs.
See the Dreamweaver Configuration/Documenttypes/MMDocumentTypes.xml file for a list of Dreamweaver
document types.
• The casesensitive attribute specifies whether the pattern is case-sensitive. The possible values for the
casesensitive attribute are true, false, or a subset of the comma-separated list that you specify for the
doctypes attribute. The list of document types lets you specify that the pattern is case-sensitive for some document
types, but not for others. The value defaults to
false if you omit this attribute. If the casesensitive attribute is a
value of
true, the code hints menu opens only if the text that the user types exactly match the pattern that the
pattern attribute specifies. If the
casesensitive attribute is a value of false, the menu appears even if the pattern
is lowercase and the text is uppercase.
• The classpattern attribute associates the class member list with the class.
• The displayrestriction attribute is used to restrict the code hinting menu to a specific programming language
syntax block based on color coding schemes defined in CodeColoring.xml. For example, if
displayrestriction=
"JavaScript", then the code hinting menu is restricted to JavaScript syntax block.
• The alias argument is used to invoke code hints with an alternate pattern other than the one listed in pattern or
classpattern argument . This argument is optional.
Contents
The menuitem tag.
Container
The menugroup tag.

38
EXTENDING DREAMWEAVER
Customizing Code view
Last updated 6/15/2011
Example
<menu pattern="CGI." doctypes="ColdFusion">
<menuitem>
Description
This tag specifies the text for an item in a code hints pop-up menu. The menuitem tag also specifies the value you must
insert into the text when you select the item.
Attributes
label, value, {icon}, {texticon}, object, source
• The label attribute is the string that Dreamweaver displays in the pop-up menu.
• The value attribute is the string that Dreamweaver inserts in the document when you select the command. When
the user selects the item from the menu and presses Enter or Return, Dreamweaver replaces all the text that the user
typed since the menu opened. The user typed the pattern-matching characters before the menu opened, so
Dreamweaver does not insert them again. For example, if you want to insert
&, which is the HTML entity for
ampersand (&), you can define the following
menu and menuitem tags:
<menu pattern="&">
<menuitem label="&amp;" value="amp;" texticon="&"/>
The value attribute does not include the ampersand (&) character because the user typed it before the menu opened.
• The icon attribute, which is optional, specifies the path to an image file that Dreamweaver displays as an icon to
the left of the menu text. The location is expressed as a URL, relative to the Configuration folder.
• The texticon attribute, which is optional, specifies a text string to appear in the icon area instead of an image file.
This attribute is used for the HTML Entities menu.
• The object attribute refers to the type the menuitem belongs to. For example, Built-In Data Type: String or user-
defined data type custom JavaScript file.
• The source attribute refers to the location in which it is defined or originates from. For example, DOM/Javascript/
custom file.js.
Contents
None.
Container
The menu tag.
Example
<menuitem label="CONTENT_TYPE" value=""CONTENT_TYPE")
" icon="shared/mm/images/hintMisc.gif" />

39
EXTENDING DREAMWEAVER
Customizing Code view
Last updated 6/15/2011
<function>
Description
Used in the CodeHints.xml file. This tag replaces the menu tag for specifying function arguments and object methods
for a code hints pop-up menu. When you type a function or method name in Code view, Dreamweaver opens a menu
of function prototypes, displaying the current argument in bold. Each time you type a comma, Dreamweaver updates
the menu to display the next argument in bold. For example, if you typed the function name
ArrayAppend in a
ColdFusion document, the code hints menu would display
ArrayAppend(array, value). After you type the comma
following
array, the menu updates to show ArrayAppend(array, value).
For object methods, when you type the object name, Dreamweaver opens a menu of the methods that are defined for
that object.
The recognized functions are stored in the XML files in the Configuration/CodeHints folder.
Attributes
pattern, doctypes, casesensitive
• The pattern attribute specifies the name of the function and its argument list. For methods, the pattern attribute
describes the name of the object, the name of the method, and the method’s arguments. For a function name, the
code hints menu appears when the user types
functionname(). The menu shows the list of arguments for the
function. For an object method, the code hints menu appears when the user types
objectname. (including the
period). This menu shows the methods that have been specified for the object. After that, the code hints menu
opens a list of the arguments for the method in the same way it does for a function.
• The doctypes attribute specifies that the menu is active only for the specified document types. This attribute lets
you specify different lists of function names for ASP-JavaScript (ASP-JS), Java Server Pages (JSP), Macromedia
ColdFusion, and so on. You can specify the
doctypes attribute as a comma-separated list of document type IDs.
For a list of Dreamweaver document types, see the Dreamweaver
Configuration/Documenttypes/MMDocumentTypes.xml file.
• The casesensitive attribute specifies whether the pattern is case-sensitive. The possible values for the
casesensitive attribute are true, false, or a subset of the comma-separated list that you specify for the
doctypes attribute. The list of document types lets you specify that the pattern is case-sensitive for some document
types but not for others. The value defaults to
false if you omit this attribute. If the casesensitive attribute is a
value of
true, the code hints menu appears only if the text that the user types exactly matches the pattern that the
pattern attribute specifies. If the
casesensitive attribute is a value of false, the menu appears even if the pattern
is lowercase and the text is uppercase.
Contents
None.
Container
The menugroup tag.
Example
// function example
<function pattern="CreateDate(year, month, day)" DOCTYPES="ColdFusion" />
// object method example
<function pattern="application.getAttribute(String name)" DOCTYPES="JSP" />

40
EXTENDING DREAMWEAVER
Customizing Code view
Last updated 6/15/2011
<method>
Description
Used for the Spry framework. This tag replaces the menu tag for specifying methods for a code hints pop-up menu.
When you type a method name in Code view, Dreamweaver opens a menu of method prototypes that provides a list
of parameters for the method. It then tracks the sequence of parameters as they are being filled. For methods that don't
have parameters, Dreamweaver closes the method call by adding the parentheses "()" characters.
The current argument is displayed in bold. Each time you type a comma, Dreamweaver updates the menu to display
the next argument in bold. For object methods, when you type an object name, Dreamweaver opens a menu of the
methods that are defined for that object.
Attributes
pattern, icon, object, source, constructor, static, retType
• The pattern attribute specifies the name of the method and its argument list. It also describes the names of the
object and the method, and the arguments of the method. The menu shows the list of arguments for the method.
The code hints menu appears when the user types
objectname. (including the period). This menu shows the
methods that have been specified for the object. Then, the code hints menu opens a list of the arguments for the
method, as it does for a function.
• The icon attribute specifies which icon to use.
• The object attribute refers to the type to which the command belongs. For example, Built-In Data Type: String or
user-defined data type custom JavaScript file.
• The source attribute refers to the location in which it is defined or originates from. For example,
DOM/Javascript/custom file.js.
• The constructor attribute is a Boolean value. constructor = true refers to the method which constructs the
object instance and is marked separately compared to other object methods.
• The static attribute is a Boolean value. static = true indicates that the method does not work on specific object
instance, but works on object type itself. For example,
Date.parse(dateString)
• The retType attribute refers to the method return type which in turn can be an object type to support a cascade of
code hints.
Contents
None.
Container
The menu tag.
<parammenu>
Description
Used for any object (JavaScript) to specify parameter hinting for the parameters that the method or function takes.

41
EXTENDING DREAMWEAVER
Customizing Code view
Last updated 6/15/2011
Attributes
pattern, name, index, type
• The pattern attribute specifies the character(s) that trigger the code hints menu. This argument is required.
• The name attribute specifies the name of the parameter. This argument is required.
• The index attribute specifies the index number of the parameter being hinted (zero-based). This argument is
required.
• The type attribute specifies the data type. The following data types are supported:
• enumerated (the default), which indicates a list of nested <optionparammenuitem> to display.
• spryDataReferences, which indicates a list of Spry data set columns.
• cssStyle, which indicates a list of CSS classes available to the page.
• cssId, which indicates a list of CSS selector ID rules available to the page.
• optionArray, which indicates a list of nested <optionparammenu> and <parammenuitem> to display (used to
support options array parameter type).
Contents
None.
Container
The method or function tag.
<parammenuitem>
Description
For any object (JavaScript) to specify parameter hinting for the parameters that the method or function takes.
Attributes
label, value, icon, {datatype}, object, source
• The label attribute specifies the name Dreamweaver must display. This argument is required.
• The value attribute specifies the value Dreamweaver must drop when the item is selected in the code hints menu.
This argument is required.
• The icon attribute specifies the icon Dreamwaever must use in the code hints menu. This argument is required.
• The datatype attribute enables you to specify string, which indicates that closing quotation marks must be added
when the user selects a value from the code hints menu. This argument is optional.
• The object attribute refers to the type to which the command belongs. For example, Built-In Data Type: String or
user-defined data type custom JavaScript file.
• The source attribute refers to the location in which it is defined or originates from. For example,
DOM/Javascript/custom file.js.
Contents
None.
Container
The parammenu tag.

42
EXTENDING DREAMWEAVER
Customizing Code view
Last updated 6/15/2011
<optionparammenu>
Description
Used for any object (JavaScript) to specify options array hinting for the arguments that the method or function takes.
An options array is an argument that can have subarguments in the form of
option:value. Most Spry objects use an
options array argument to allow users to configure the behavior of an object (for example, a data set, widget, or effect).
Options arrays generally appear as
{option1: value1, option2: value2, option3: value3, ...}
Attributes
pattern, label, value, icon, type
• The pattern attribute specifies the character(s) that trigger the code hints menu. This argument is required.
• The label attribute specifies the name of the parameter. This argument is required.
• The value attribute specifies the value of the parameter to insert when the user selects the code hint. This argument
is required.
• The icon attribute specifies the icon to be used. This argument is required.
• The type attribute specifies the data type. The following data types are supported:
• enumerated (the default), which indicates a list of nested optionparammenuitem to display.
• spryDataReferences, which indicates a list of Spry data set columns.
• cssStyle, which indicates a list of CSS classes available to the page.
• cssId, which indicates a list of CSS selector ID rules available to the page.
Contents
None.
Container
The parammenu tag of type optionArray.
<optionparammenuitem>
Description
Used for any object (JavaScript) to specify parameter hinting for the parameters that the method or function takes.
Attributes
label, value, icon, {datatype}
• The label attribute specifies the name to display. This argument is required.
• The value attribute specifies value to drop when the item is selected in the code hints menu. This argument is
required.
• The icon attribute specifies the icon to be used in the code hints menu. This argument is required.
• The datatype attribute allows you to specify string, which indicates that closing quotation marks are to be added
when the user selects a value from the code hints menu. This argument is optional.
Contents
None.

43
EXTENDING DREAMWEAVER
Customizing Code view
Last updated 6/15/2011
Container
The <optionparammenu> tag.
<property>
Description
This tag describes properties or fields of an object and has the following standard attributes.
Attributes
label, value, icon, object, source, static, propType, item
• The label attribute is the string that Dreamweaver displays in the pop-up menu.
• The value attribute is the string that Dreamweaver inserts in the document when you select the command. When
the user selects the item from the menu and presses Enter or Return, Dreamweaver replaces all the text that the user
typed since the menu opened. The user typed the pattern-matching characters before the menu opened, so
Dreamweaver does not insert them again.
• The icon attribute, which is optional, specifies the path to an image file that Dreamweaver displays as an icon to
the left of the menu text. The location is expressed as a URL, relative to the Configuration folder.
• The object attribute refers to the type the menuitem belongs to. For example, Built-In Data Type: String or user-
defined data type custom JavaScript file.
• The source attribute refers to the location in which it is defined or originates from. For example, DOM/Javascript/
custom file.js.
• The static attribute is a Boolean value. static = true indicates that the method does not work on specific object
instance, but works on object type itself. For example,
Number.MAX_VALUE
• The propType attribute refers to property type, which in turn can be an object type to support cascaded hinting of
properties. For example,
domElement.innerHTML.<code hints for String type>
• The item attribute refers to the type of element when propType attribute is the collection container type. The item
specifies what type each item in the container is (assuming it is a homogenous set, that is, elements of the same
type).
Contents
None.
Container
The menu tag.
<event>
Description
This tag describes events of an object and has the following standard attributes.

44
EXTENDING DREAMWEAVER
Customizing Code view
Last updated 6/15/2011
Attributes
label, icon, source, object
• The label attribute is the name of the event.
• The icon attribute specifies the path to an image file that Dreamweaver displays as an icon beside the menu text.
• The source attribute refers to the location in which it is defined or originates from.
• The object attribute refers to the type the command belongs to.
Container
The menu tag.
Example
<event label="onblur" source="DOM 1&2" icon="shared/mm/images/codeHintEvent.gif"/>
About code coloring
Dreamweaver lets you customize or extend the code coloring schemes that you see in Code view so that you can add
new keywords to a scheme or add code coloring schemes for new document types. If you develop JavaScript functions
to use in your client-side script, for example, you can add the names of these functions to the keywords section so that
they display in the color that is specified in the Preferences dialog box. Likewise, if you develop a new programming
language for an application server and you want to distribute a new document type to help Dreamweaver users build
pages with it, you could add a code coloring scheme for the document type.
Dreamweaver provides the JavaScript function dreamweaver.reloadCodeColoring(), which enables you to reload
code coloring XML files that might have been edited manually. For more information on this function, see the
Dreamweaver API Reference.
To update a code coloring scheme or add a new scheme, you must modify the code coloring definition files.
Code coloring files
Dreamweaver defines code coloring styles and schemes in XML files that reside in the Configuration/CodeColoring
folder. A code coloring style file defines styles for fields that are defined in syntax definitions. It has a root node of
<codeColors>. A code coloring scheme file defines code coloring syntax and has a root node of <codeColoring>.
The code coloring style file that Dreamweaver provides is Colors.xml. The code coloring syntax files that Dreamweaver
provides are CodeColoring.xml, ASP JavaScript.xml, ASP VBScript.xml, ASP.NET CSharp.xml, and ASP.NET
VB.xml.
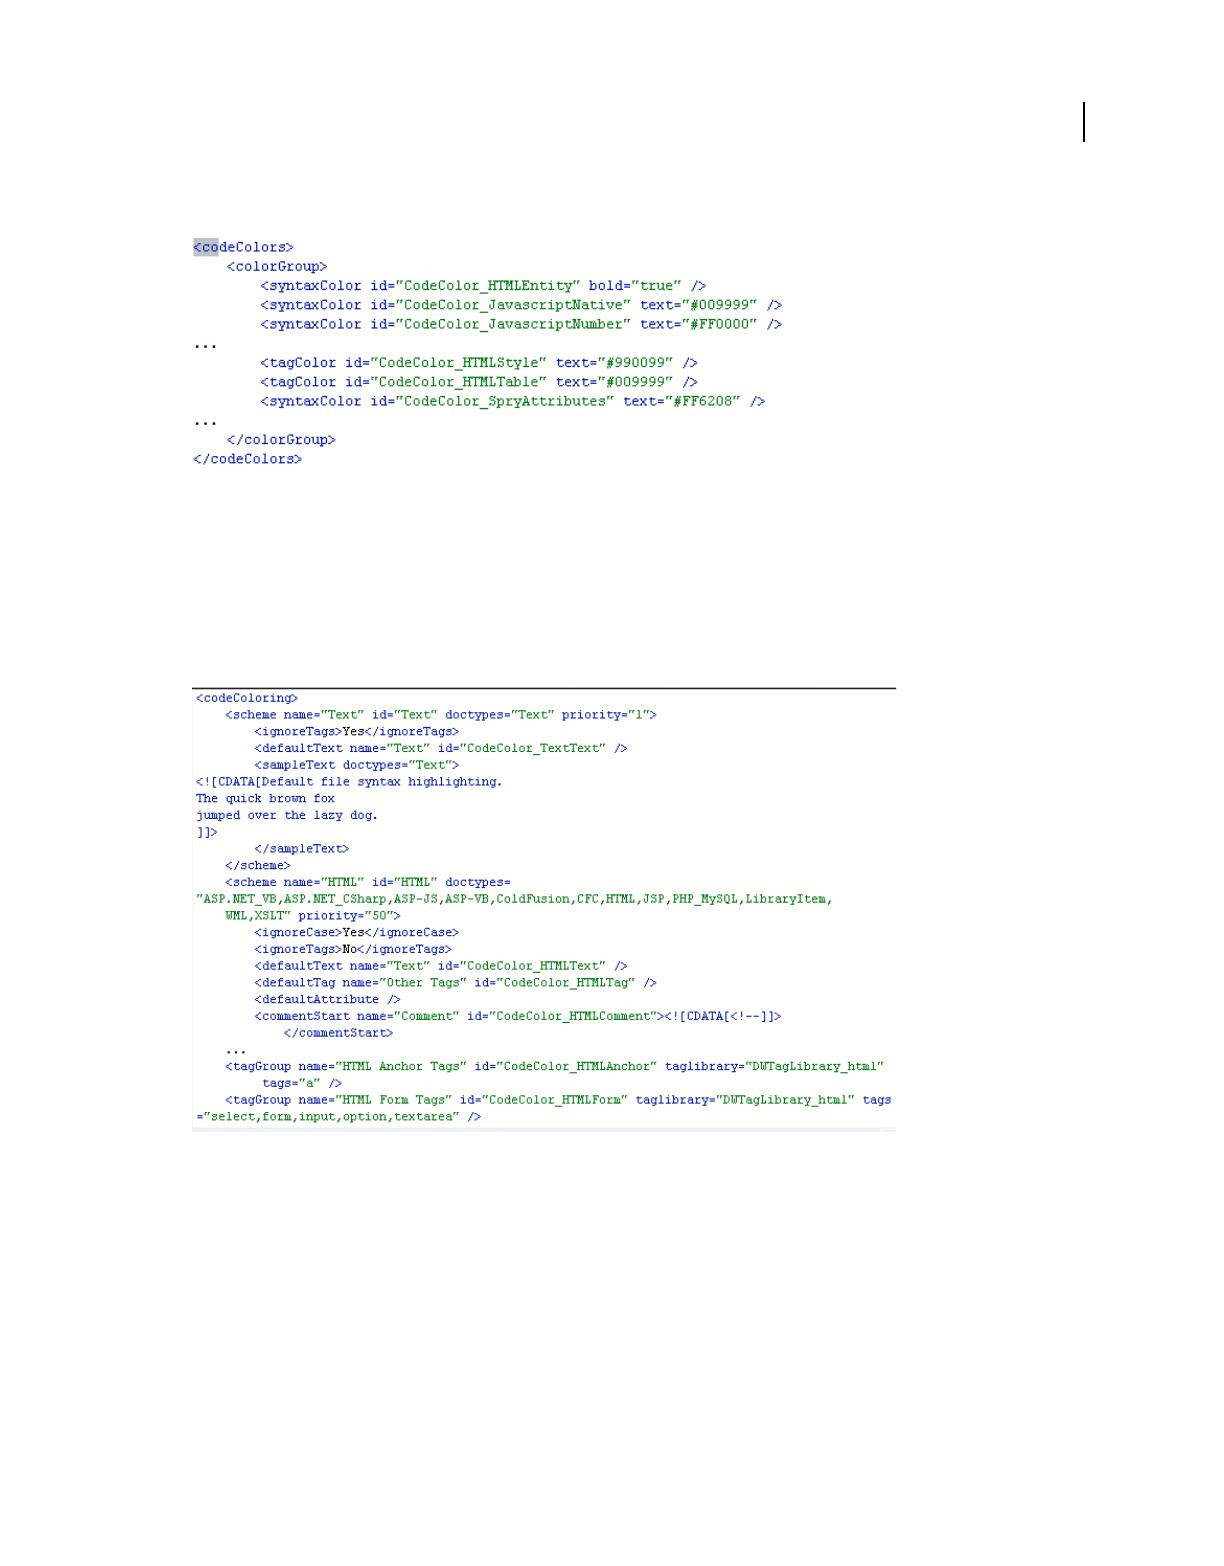
45
EXTENDING DREAMWEAVER
Customizing Code view
Last updated 6/15/2011
The following excerpt from the Colors.xml file illustrates the hierarchy of tags in a code coloring style file:
Colors are specified in red-green-blue (RGB) hexadecimal values. For example, the statement text="009999" in the
preceding XML code assigns a blue-green (teal) color to the ID
"CodeColor_JavascriptNative".
The following excerpt from the CodeColoring.xml file illustrates the hierarchy of tags in a code coloring scheme file,
and it also illustrates the relationship between the code coloring styles file and the code coloring scheme file:
Notice that the syntaxColor and tagColor tags in the Colors.xml file assign color and style values to an id string
value. The
id value is then used in the CodeColoring.xml file to assign a style to a scheme tag. For example, the
defaultTag tag in the CodeColoring.xml excerpt has an id of "CodeColor_HTMLComment". In the Colors.xml file,
the
id value of "CodeColor_HTMLComment" is assigned a text= value of "#999999", which is gray.
Dreamweaver includes the following code coloring schemes: Default, HTML, JavaScript, ASP_JavaScript,
ASP_VBScript, JSP, and ColdFusion. The Default scheme has an
id value equal to "Text", Dreamweaver uses the
Default scheme for document types that do not have a defined code coloring scheme.
A code coloring file contains the following tags, described below:

46
EXTENDING DREAMWEAVER
Customizing Code view
Last updated 6/15/2011
scheme, blockEnd, blockStart, brackets, charStart, charEnd, charEsc, commentStart, commentEnd,
cssImport/, cssMedia/, cssProperty/, cssSelector/, cssValue/, defaultAttribute, defaultTag,
defaultText/, endOfLineComment, entity/, functionKeyword, idChar1, idCharRest, ignoreCase,
ignoreMMTParams, ignoreTags, isLocked, keyword, keywords, numbers/, operators, regexp,
sampleText, searchPattern, stringStart, stringEnd, stringEsc, tagGroup
<scheme>
Description
The scheme tag specifies code coloring for a block of code text. You can have multiple schemes within a file to specify
different coloring for different scripting or tag languages. Each scheme has a priority that lets you nest a block of text
with one scheme inside a block of text with a different scheme.
Starting with Dreamweaver CS4, the Code Coloring parser now merges <scheme> tags with the same id. All non-
conflicting tags are added to the existing <scheme>. The scheme with the newest file date wins any conflicts.
Attributes
name, id, priority, {doctypes}
• name="scheme_name" A string that assigns a name to the scheme. Dreamweaver shows the scheme name in the
Edit Coloring Scheme dialog box. Dreamweaver shows a combination of scheme name and field name, such as
HTML Comment. If you do not specify a name, the fields for the scheme do not appear in the Edit Coloring Scheme
dialog box. For more information about the Edit Coloring Scheme dialog box, see
“Editing schemes” on page 63.
• id="id_string" Required. An identifier string that maps color and style to this syntax item.
• priority="string" The value ranges from "1" to "99". Highest priority is "1". Specifies the precedence of the
scheme. Blocks that are inside blocks with higher priority are ignored; blocks that are inside blocks with the same
or lower priority take precedence. The priority has the default value of "50" if you do not specify one.
• doctypes="doc_list" Optional. Specifies a comma-separated list of the document types to which this code
coloring scheme applies. This value is necessary to resolve conflicts in which different start and end blocks use the
same extensions.
Contents
blockEnd, blockStart, brackets, charStart, charEnd, charEsc, commentStart, commentEnd,
cssProperty/, cssSelector/, cssValue/, defaultAttribute, defaultText/, endOfLineComment,
entity/, functionKeyword, idChar1, idCharRest, ignoreCase, ignoreMMTParam, ignoreTags,
keywords, numbers/, operators, regexp, sampleText, searchPattern, stringStart, stringEnd,
stringEsc, urlProtocol, urlProtocols
Container
The codeColoring tag.
Example
<scheme name="Text" id="Text" doctypes="Text" priority="1">

47
EXTENDING DREAMWEAVER
Customizing Code view
Last updated 6/15/2011
<blockEnd>
Description
Optional. Text values that delimit the end of the text block for this scheme. The blockEnd and blockStart tags must
be paired and the combination must be unique. Values are not evaluated as case-sensitive. The
blockEnd value can be
one character. Multiple instances of this tag are allowed. For more information on
blockEnd strings, see “Wildcard
characters” on page 61.
Attributes
None.
Example
<blockEnd><![CDATA[--->]]></blockEnd>
<blockStart>
Description
Optional. Specified only if the coloring scheme can be embedded inside a different coloring scheme. The blockStart
and
blockEnd tags must be paired, and the combination must be unique. Values are not evaluated as case-sensitive.
The
blockStart value must be two or more characters in length. Multiple instances of this tag are allowed. For more
information on
blockStart strings, see “Wildcard characters” on page 61. For information on the
blockStartscheme attribute, see “Scheme block delimiter coloring” on page 58.
Attributes
canNest, doctypes, id, name, scheme
• canNest Specifies whether the scheme can nest inside itself. Values are Yes or No. The default value is No.
• doctypes="doc_type1, doc_type2,… " Required. Specifies a comma-separated list of document types into
which you can nest this code coloring scheme. Document types are defined in the Dreamweaver
Configuration/Document Types/MMDocumentTypes.xml file.
• id="id_string" Required when scheme="customText". An identifier string that maps color and style to this
syntax item.
• name="display_name" A string that appears in the Edit Coloring Scheme dialog box when
scheme="customText".
• scheme Required. This defines how the blockStart and blockEnd strings are colored. For information on the
possible values for the scheme attribute, see
“Scheme block delimiter coloring” on page 58.
Example
<blockStart doctypes="ColdFusion,CFC" scheme="innerText" canNest="Yes"><![CDATA[<!---]]>
</blockStart>
<brackets>
Description
A list of characters that represent brackets.

48
EXTENDING DREAMWEAVER
Customizing Code view
Last updated 6/15/2011
Attributes
name, id
• name="bracket_name" A string that assigns a name to the list of brackets.
• id="id_string" Required. An identifier string that maps color and style to this syntax item.
Example
<brackets name="Bracket" id="CodeColor_JavaBracket"><![CDATA[{[()]}]]>
</brackets>
<charStart>
Description
Contains a text string that represents the delimiter of the start of a character. You must specify the charStart and
charEnd tags in pairs. Multiple charStart … charEnd pairs are allowed.
Attributes
None.
Example
<charStart><![CDATA[']]></charStart>
<charEnd>
Description
Contains a text string that represents the delimiter of the end of a character. You must specify the charStart and
charEnd tags in pairs. Multiple charStart … charEnd pairs are allowed.
Attributes
None.
Example
<charEnd><![CDATA[']]></charEnd>
<charEsc>
Description
Contains a text string that represents an escape character. Multiple charEsc tags are allowed.
Attributes
None.
Example
<charEsc><![CDATA[\]]></charEsc>

49
EXTENDING DREAMWEAVER
Customizing Code view
Last updated 6/15/2011
<commentStart>
Description
A text string that delimits the start of a comment block. You must specify the commentStart and commentEnd tags in
pairs. Multiple
commentStart… /commentEnd pairs are allowed.
Attributes
None.
Example
<commentStart><![CDATA[<%--]]></commentStart>
<commentEnd>
Description
A text string that delimits the end of a comment block. You must specify the commentStart and commentEnd tags in
pairs. Multiple
commentStart… /commentEnd pairs are allowed.
Attributes
None.
Example
<commentEnd><![CDATA[--%>]]></commentEnd>
<cssImport/>
Description
An empty tag that indicates the code coloring rule for the @import function of the style element in a CSS.
Attributes
name, id
• name="cssImport_name" A string that assigns a name to the CSS @import function.
• id="id_string" Required. An identifier string that maps color and style to this syntax item.
Example
<cssImport name="@import" id="CodeColor_CSSImport" />
<cssMedia/>
Description
An empty tag that indicates the code coloring rule for the @media function of the style element in a CSS.
Attributes
name, id
• name="cssMedia_name" A string that assigns a name to the CSS @media function.
• id="id_string" Required. An identifier string that maps color and style to this syntax item.

50
EXTENDING DREAMWEAVER
Customizing Code view
Last updated 6/15/2011
Example
<cssMedia name="@media" id="CodeColor_CSSMedia" />
<cssProperty/>
Description
An empty tag that indicates CSS rules and holds code coloring attributes.
Attributes
name, id
• name="cssProperty_name" A string that assigns a name to the CSS property.
• id="id_string" Required. An identifier string that maps color and style to this syntax item.
Code Color Preference
CSS Property
Example
<cssProperty name="Property" id="CodeColor_CSSProperty" />
<cssSelector/>
Description
An empty tag that indicates CSS rules and holds code coloring attributes.
Attributes
name, id
• name="cssSelector_name" A string that assigns a name to the CSS Selector.
• id="id_string" Required. An identifier string that maps color and style to this syntax item.
Example
<cssSelector name="Selector" id="CodeColor_CSSSelector" />
<cssValue/>
Description
An empty tag that indicates CSS rules and holds code coloring attributes.
Attributes
name, id
• name="cssValue_name" A string that assigns a name to the CSS value.
• id="id_string" Required. An identifier string that maps color and style to this syntax item.
Example
<cssValue name="Value" id="CodeColor_CSSValue" />

51
EXTENDING DREAMWEAVER
Customizing Code view
Last updated 6/15/2011
<defaultAttribute>
Description
Optional. This tag applies only to tag-based syntax (that is, where ignoreTags="No"). If this tag is present, then all tag
attributes are colored according to the style assigned to this tag. If this tag is omitted, then attributes are colored the
same as the tag.
Attributes
name •A string that assigns a name to the default attribute.
Example
<defaultAttribute name="Attribute"/>
<defaultTag>
Description
This tag is used to specify the default color and style for tags in a scheme.
Attributes
name, id
• name="display_name" A string that Dreamweaver displays in the code color editor.
• id="id_string" Required. An identifier string that maps color and style to this syntax item.
Example
<defaultTag name="Other Tags" id="CodeColor_HTMLTag" />
<defaultText/>
Description
Optional. If this tag is present, all text that is not defined by any other tag is colored according to the style assigned to
this tag. If this tag is omitted, black text is used.
Attributes
name, id
• name="cssSelector_name" A string that assigns a name to the CSS Selector.
• id="id_string" Required. An identifier string that maps color and style to this syntax item.
Example
<defaultText name="Text" id="CodeColor_TextText" />
<endOfLineComment>
Description
A text string that delimits the start of a comment that continues until the end of the current line. Multiple
endOfLineComment… /endOfLineComment tags are allowed.

52
EXTENDING DREAMWEAVER
Customizing Code view
Last updated 6/15/2011
Attributes
None.
Example
<endOfLineComment><![CDATA[//]]></endOfLineComment>
<entity/>
Description
An empty tag that indicates that HTML special characters should be recognized and hold coloring attributes.
Attributes
name, id
• name="entity_name" A string that assigns a name to the entity.
• id="id_string" Required. An identifier string that maps color and style to this syntax item.
Example
<entity name="Special Characters" id="CodeColor_HTMLEntity" />
<functionKeyword>
Description
Identifies keywords that define a function. Dreamweaver uses these keywords to perform code navigation. Multiple
functionKeyword tags are allowed.
Attributes
name, id
• name="functionKeyword_name" A string that assigns a name to the functionKeyword block.
• id="id_string" Required. An identifier string that maps color and style to this syntax item.
Example
<functionKeyword name="Function Keyword"
id="CodeColor_JavascriptFunction">function</functionKeyword>
<idChar1>
Description
A list of characters, each of which Dreamweaver can recognize as the first character in an identifier.
Attributes
includeAlpha, includeDecimal, includeHiAscii
All attributes are boolean in nature and can take a value of true or false.
Example
<identifier name="Identifier" id="CodeColor_JavascriptIdentifier">
<idChar1>_$abcdefghijklmnopqrstuvwxyzABCDEFGHIJKLMNOPQRSTUVWXYZ</idChar1> </identifier>

53
EXTENDING DREAMWEAVER
Customizing Code view
Last updated 6/15/2011
<idCharRest>
Description
A list of characters that are to be recognized as the remaining characters in an identifier. If idChar1 is not specified,
all characters of the identifier are validated against this list.
Attributes
includeAlpha, includeDecimal, includeHiAscii
All attributes are boolean in nature and can take a value of true or false.
Example
<identifier name="Identifier" id="CodeColor_JavascriptIdentifier"> <idCharRest>
_$abcdefghijklmnopqrstuvwxyzABCDEFGHIJKLMNOPQRSTUVWXYZ0123456789</idCharRest>
</identifier>
<identifier>
Description
The <idChar1> and <idCharRest> nodes should be surrounded with an <identifier> node. The name and id
attributes should be moved from
<idCharRest>/<idChar1> to the <identifier> node that wraps them
If you define more than one kind of identifier, ensure that you specify distinct values for idChar1 for all these
identifiers. If this rule is not obeyed, the resulting coloring is random for identifiers that start with a character included
in two overlapping styles. For example:
<identifier name="N1" id="I1">
<idchar1>a</idchar1>
<idcharrest includeAlpha="true" includeDecimal="true"
includeHiAscii="true">_</idCharRest>
</identifier>
<identifier name="N2" id="I2">
<idchar1 includeAlpha="true" >$_</idchar1> // ERROR!!! text that starts with "a"
can be either N1 or N2, the coloring will be random for it!
<idcharrest includeAlpha="true" includeDecimal="true"
includeHiAscii="true">_</idCharRest>
</identifier>
The sytax previous to Dreamweaver CS5 (without the <identifier> node) is still supported. However, do not mix
the old and new syntax in the same file. If you mix styles, the old syntax styles are ignored. That is, if the syntax scheme
contains an
<identifier> node, all the idChar1/idCharRest nodes that are not wrapped in an <identifier> node
are ignored .
Attributes
name, id
• name="idCharRest_name" A string that assigns a name to the stringStart block.
• id="id_string" Required. An identifier string that maps color and style to this syntax item.
Example
<identifier name="Identifier" id="CodeColor_JavascriptIdentifier"> <idCharRest>
_$abcdefghijklmnopqrstuvwxyzABCDEFGHIJKLMNOPQRSTUVWXYZ0123456789</idCharRest></identifier

54
EXTENDING DREAMWEAVER
Customizing Code view
Last updated 6/15/2011
<ignoreCase>
Description
Specifies whether case should be ignored when comparing tokens to keywords. Values are
Yes
or
No
. The default is
Yes
.
Attributes
None.
Example
<ignoreCase>Yes</ignoreCase>
<ignoreMMTParams>
Description
Specifies whether the MMTInstance:Param, <!-- InstanceParam, or <!-- #InstanceParam tag should be colored
specially. Values are
Yes and No;the default is Yes. This handles proper coloring in pages that use templates.
Attributes
None.
Example
<ignoreMMTParams>No</ignoreMMTParams>
<ignoreTags>
Description
Specifies whether markup tags should be ignored. Values are Yes and No;the default is Yes. Set to No when syntax is
for tag markup language that is delimited by
< and >. Set to Yes when syntax is for a programming language.
Attributes
None.
Example
<ignoreTags>No</ignoreTags>
<isLocked>
Description
Specifies whether the text that is matched by this scheme is locked from being edited in the Code view. Values are Yes
and
No. Default is No.
Attributes
None.
Example
<isLocked>Yes</isLocked>

55
EXTENDING DREAMWEAVER
Customizing Code view
Last updated 6/15/2011
<keyword>
Description
A string of text that defines a keyword. Multiple keyword tags are allowed. A keyword may start with any character,
but subsequent characters may only be
a-z, A-Z, 0-9, _, $, or @.
The code color is specified by the containing keyword tags.
Attributes
None.
Example
<keyword>.getdate</keyword>
<keywords>
Description
List of keywords for type specified in category attribute. Multiple keywords tags are allowed.
Attributes
name, id
• name="keywords_name" A string that assigns a name to the list of keywords.
• id="id_string" Required. An identifier string that maps color and style to this syntax item.
Contents
<keyword></keyword>
Example
<keywords name="Reserved Keywords" id="CodeColor_JavascriptReserved">
<keyword>break</keyword>
<keyword>case</keyword>
</keywords>
<numbers/>
Description
An empty tag that specifies numbers that should be recognized and also holds color attributes.
Attributes
name, id
• name="number_name" A string that assigns a name to the numbers tag.
• id="id_string" Required. An identifier string that maps color and style to this syntax item.
Example
<numbers name="Number" id="CodeColor_CFScriptNumber" />

56
EXTENDING DREAMWEAVER
Customizing Code view
Last updated 6/15/2011
<operators>
Description
A list of characters to be recognized as operators.
Attributes
name, id
• name="operator_name" A string that assigns a name to the list of operator characters.
• id="id_string" Required. An identifier string that maps color and style to this syntax item.
Example
<operators name="Operator" id="CodeColor_JavaOperator"><![CDATA[+-
*/%<>!?:=&|^~]]></operators>
<regexp>
Description
Specifies a list of searchPattern tags.
Attributes
name, id, delimiter, escape
• name="stringStart_name" A string that assigns a name to the list of search pattern strings.
• id="id_string" Required. An identifier string that maps color and style to this syntax item.
• delimiter The character or string that starts and ends a regular expression.
• escape The character or string that signals special character processing, known as the escape character or string.
Contents
<searchPattern></searchPattern>
Example
<regexp name="RegExp" id="CodeColor_JavascriptRegexp" delimiter="/" escape="\\">
<searchPattern><![CDATA[(\s*/\e*\\/]]></searchPattern>
<searchPattern><![CDATA[=\s*/\e*\\/]]></searchPattern>
</regexp>
<sampleText>
Description
Representative text that appears in the Preview window of the Edit Coloring Scheme dialog box. For more information
on the Edit Coloring Scheme dialog box, see
“Editing schemes” on page 63.
Attributes
doctypes
• doctypes="doc_type1, doc_type2,..." The document types for which this sample text appears.

57
EXTENDING DREAMWEAVER
Customizing Code view
Last updated 6/15/2011
Example
<sampleText doctypes="JavaScript"><![CDATA[/* JavaScript */
function displayWords(arrayWords) {
for (i=0; i < arrayWords.length(); i++) {
// inline comment
alert("Word " + i + " is " + arrayWords[i]);
}
}
var tokens = new Array("Hello", "world");
displayWords(tokens);
]]></sampleText>
<searchPattern>
Description
A string of characters that define a regular search pattern using supported wildcard characters. Multiple
searchPattern tags are allowed.
Attributes
None.
Container
The regexp tag.
Example
<searchPattern><![CDATA[(\s*/\e*\\/]]></searchPattern>
<stringStart>
Description
These tags contain a text string that represents the delimiter of the start of a string. You must specify the stringStart
and
stringEnd tags in pairs. Multiple stringStart … stringEnd pairs are allowed.
Attributes
name, id, wrap
• name="stringStart_name" A string that assigns a name to the stringStart block.
• id="id_string" Required. An identifier string that maps color and style to this syntax item.
• wrap="true" or "false". Defines whether code coloring recognizes text strings that wrap to the next line. The
default is
"true".
Example
<stringStart name="Attribute Value" id="CodeColor_HTMLString"><![CDATA["]]></stringStart>

58
EXTENDING DREAMWEAVER
Customizing Code view
Last updated 6/15/2011
<stringEnd>
Description
Contains a text string that represents the delimiter of the end of a code string. You must specify the stringStart and
stringEnd tags in pairs. Multiple stringStart … stringEnd pairs are allowed.
Attributes
None.
Example
<stringEnd><![CDATA["]]></stringEnd>
<stringEsc>
Description
Contains a text string that represents the delimiter of a string escape character. Multiple stringEsc tags are allowed.
Attributes
None.
Example
<stringEsc><![CDATA[\]]></stringEsc>
<tagGroup>
Description
This tag groups one or more tags to which you can assign a unique color and style.
Attributes
id, name, taglibrary, tags
• id="id_string" Required. An identifier string that maps color and style to this syntax item.
• name="display_name" A string that Dreamweaver displays in the code color editor.
• taglibrary="tag_library_id" The identifier of the tag library to which this group of tags belongs.
• tags="tag_list" A tag or comma-separated list of tags that comprise the tag group.
Example
<tagGroup name="HTML Table Tags" id="CodeColor_HTMLTable" taglibrary="DWTagLibrary_html"
tags="table,tbody,td,tfoot,th,thead,tr,vspec,colw,hspec" />
Scheme block delimiter coloring
The blockStart scheme attribute controls the coloring of block opening and closing strings or block delimiters. The
following values are valid values for the
blockStart attribute.
Note: Do not confuse the blockStart.scheme attribute with the scheme tag.

59
EXTENDING DREAMWEAVER
Customizing Code view
Last updated 6/15/2011
innerText
This value tells Dreamweaver to color the block delimiters the same as the default text of the scheme inside them.
The Template scheme provides an example of the effect of this scheme. The Template scheme matches blocks of read-
only code that are colored gray because you cannot edit them. The block delimiters, which are the
<!#EndEditable
-->-- and <!-- #BeginEditable "..." --> strings, are also colored gray because they also are not editable.
Sample code
<!-- #EndEditable -->
<p><b><font size="+2">header</font></b></p>
<!-- #BeginEditable "test" -->
<p>Here's some editable text </p>
<p> </p>
<!-- #EndEditable -->
Example
<blockStart doctypes="ASP-JS,ASP-VB, ASP.NET_CSharp, ASP.NET_VB, ColdFusion,CFC, HTML,
JSP,LibraryItem,PHP_MySQL" scheme="innerText"><![CDATA[<!--\s*#BeginTemplate]]>
</blockStart>
customText
This value tells Dreamweaver to use custom colors to color the block delimiters.
Sample code
The delimiters for blocks of PHP script, which appear in red, provide an example of the effect of the customText value:
<?php
if ($loginMsg <> "")
echo $loginMsg;
?>
Example
<blockStart name="Block Delimiter" id="CodeColor_JavaBlock" doctypes="JSP"
scheme="customText"><![CDATA[<%]]></blockStart>
outerTag
The outerTag value specifies that both the blockStart and blockEnd tags are complete tags and that Dreamweaver
should color them as tags would be colored in the scheme that surrounds them.
The JavaScript scheme, in which <script> and </script> strings are the blockStart and blockEnd tags, provides
an example of this value. This scheme matches blocks of JavaScript code, which does not recognize tags, so the
delimiters need to be colored by the scheme that surrounds them.
Sample code
<script language="JavaScript">
// comment
if (true)
window.alert("Hello, World");
</script>

60
EXTENDING DREAMWEAVER
Customizing Code view
Last updated 6/15/2011
Example
<blockStart doctypes="PHP_MySQL" scheme="outerTag">
<![CDATA[<script\s+language="php">]]></blockStart>
innerTag
This value is identical to the outerTag value, except that the tag coloring is taken from the scheme inside the
delimiters. This is currently used for the
html tag.
nameTag
This value specifies that the blockStart string is the opening of a tag and blockEnd string is the closing of a tag, and
these delimiters are to be colored based on the tag settings of the scheme.
This type of scheme displays tags that can be embedded inside other tags, such as the cfoutput tag.
Sample code
<input type="text" name="zip"
<cfif newRecord IS "no">
<cfoutput query="employee"> Value="#zip#" </cfoutput>
</cfif>
>
Example
<blockStart doctypes="ColdFusion,CFC" scheme="nameTag">
<![CDATA[<cfoutput\n]]></blockStart>
nameTagScript
This value is identical to the nameTag scheme; however, the content is script, such as assignment statements or
expressions, as opposed to attribute
name=value pairs.
This type of scheme displays a unique type of tag that contains script inside the tag itself, such as the ColdFusion cfset,
cfif, and cfifelse tags, and can be embedded inside other tags.
Sample Code
See the sample text for “nameTag” on page 60.
Example
<blockStart doctypes="ColdFusion,CFC"
scheme="nameTagScript"><![CDATA[<cfset\n]]></blockStart>
Scheme processing
Dreamweaver has three basic code coloring modes: CSS mode, Script mode, and Tags mode.
In each mode, Dreamweaver applies code coloring only to particular fields. The following chart indicates which fields
are subject to code coloring in each mode.

61
EXTENDING DREAMWEAVER
Customizing Code view
Last updated 6/15/2011
To make the process of defining schemes more flexible, Dreamweaver lets you specify wildcard and escape characters.
Wildcard characters
The following is a list of wildcard characters that Dreamweaver supports, along with the strings to specify them and
descriptions of their usage.
Field CSS Tags Script
defaultText X X
defaultTag X
defaultAttribute X
comment X X X
string X X X
cssProperty X
cssSelector X
cssValue X
character X X
function keyword X
identifier X
number X X
operator X
brackets X X
keywords X X
Wildcard Escape string Description
Wildcard \* Skip all characters in the rule until the character that follows the wildcard is found. For
example, use
<MMTInstance:Editable name="\*"> to match all tags of this type that
have the name attribute specified.

62
EXTENDING DREAMWEAVER
Customizing Code view
Last updated 6/15/2011
Escape characters
The following is a list of escape characters that Dreamweaver supports, along with the strings to specify them and
descriptions of their usage.
Maximum string length
The maximum length allowed for a data string is 100 characters. For example, the following blockEnd tag contains a
wildcard character.
<blockEnd><![CDATA[<!--\s*#BeginEditable\s*"\*"\s*-->]]></blockEnd>
Assuming the optional white space wildcard strings (\s*) are a single space character, which Dreamweaver generates
automatically, then the data string is 26 characters long, plus a wildcard string (
\*) for the name.
<!-- #BeginEditable "\*" -->
This leaves an editable region name that can be as many as 74 characters, which is the maximum of 100 characters
minus 26.
Wildcard with escape character \e*x Where x is the escape character.
This is the same as the wildcard, except that an escape character can be specified. The
character following any escape character is ignored. This lets the character following the
wildcard appear in the string without matching the criteria to end wildcard processing.
For example, /\e*\\/ is used to recognize a JavaScript regular expression that starts and
ends with a forward slash (/) and can contain forward slashes that are preceded by a
backslash (\). Because the backslash is the code coloring escape character, you must precede
it with a backslash when you specify it in code coloring XML.
Optional white space \s* This matches zero or more white space or newline characters.
For example, <!--\s*#include is used to match ASP include directives whether they have
any white space preceding the
#include token or not because either case is valid.
The white space wildcards match any combination of white space and newline characters.
Required white space \s+ This matches one or more white space or newline characters.
For example, <!--#include\s+virtual is used to match ASP include directives with any
combination of white space between
#include and virtual. White space must be
specified between these tokens, but it can be any combination of valid white-space
characters.
The white space wildcards match any combination of white space and newline characters.
Escape character Escape
string
Description
Backslash \\ The backslash character (\) is the code coloring escape character, so it must be escaped to be
specified in a code coloring rule.
White space \s This escape character matches any non-visible characters, except those listed that match the
newline escape character, such as space and tab characters.
The optional white space and required white space wildcards match both the white space
and newline characters.
Newline \n This escape character matches the newline (also known as linefeed) and carriage-return
characters.
Wildcard Escape string Description

63
EXTENDING DREAMWEAVER
Customizing Code view
Last updated 6/15/2011
Scheme precedence
Dreamweaver uses the following algorithm to color text syntax in Code view:
1 Dreamweaver determines the initial syntax scheme based on the document type of the current file. The file
document type is matched against the
scheme.documentType attribute. If no match is found, the scheme where
scheme.documentType = "Text" is used.
2 Schemes can be nested if they specify blockStart… blockEnd pairs. All nestable schemes that have the current
file extension listed in one of the
blockStart.doctypes attribute are enabled for the current file and all others are
disabled.
Note: All blockStart/blockEnd combinations should be unique.
Schemes can nest within another scheme only if the scheme.priority is equal to or greater than the outer scheme.
If the priority is equal, the scheme can nest only in the body state of the outer scheme. For example, the
<script>...</script> block can nest only inside the <html>...</html> block where tags are legal—not inside
a tag, attribute, string, comment, and so on.
Schemes with a higher priority than the outer scheme can nest almost anywhere within the outer scheme. For
example, in addition to nesting in the body state of the
<html>...</html> block, the <%...%> block can also nest
inside a tag, attribute, string, comment, and so on.
The maximum nesting level is 4.
3 When matching blockStart strings, Dreamweaver always uses the longest match.
4 After reaching the blockEnd string for the current scheme, syntax coloring returns to the state where the
blockStart string is detected. For example, if a <%...%> block is found within an HTML string, then coloring
resumes with the HTML string color.
Editing schemes
You can edit the styles for a code coloring scheme either by editing the code coloring file or by selecting the Code
Coloring category in the Dreamweaver Preferences dialog box, as shown in the following figure:
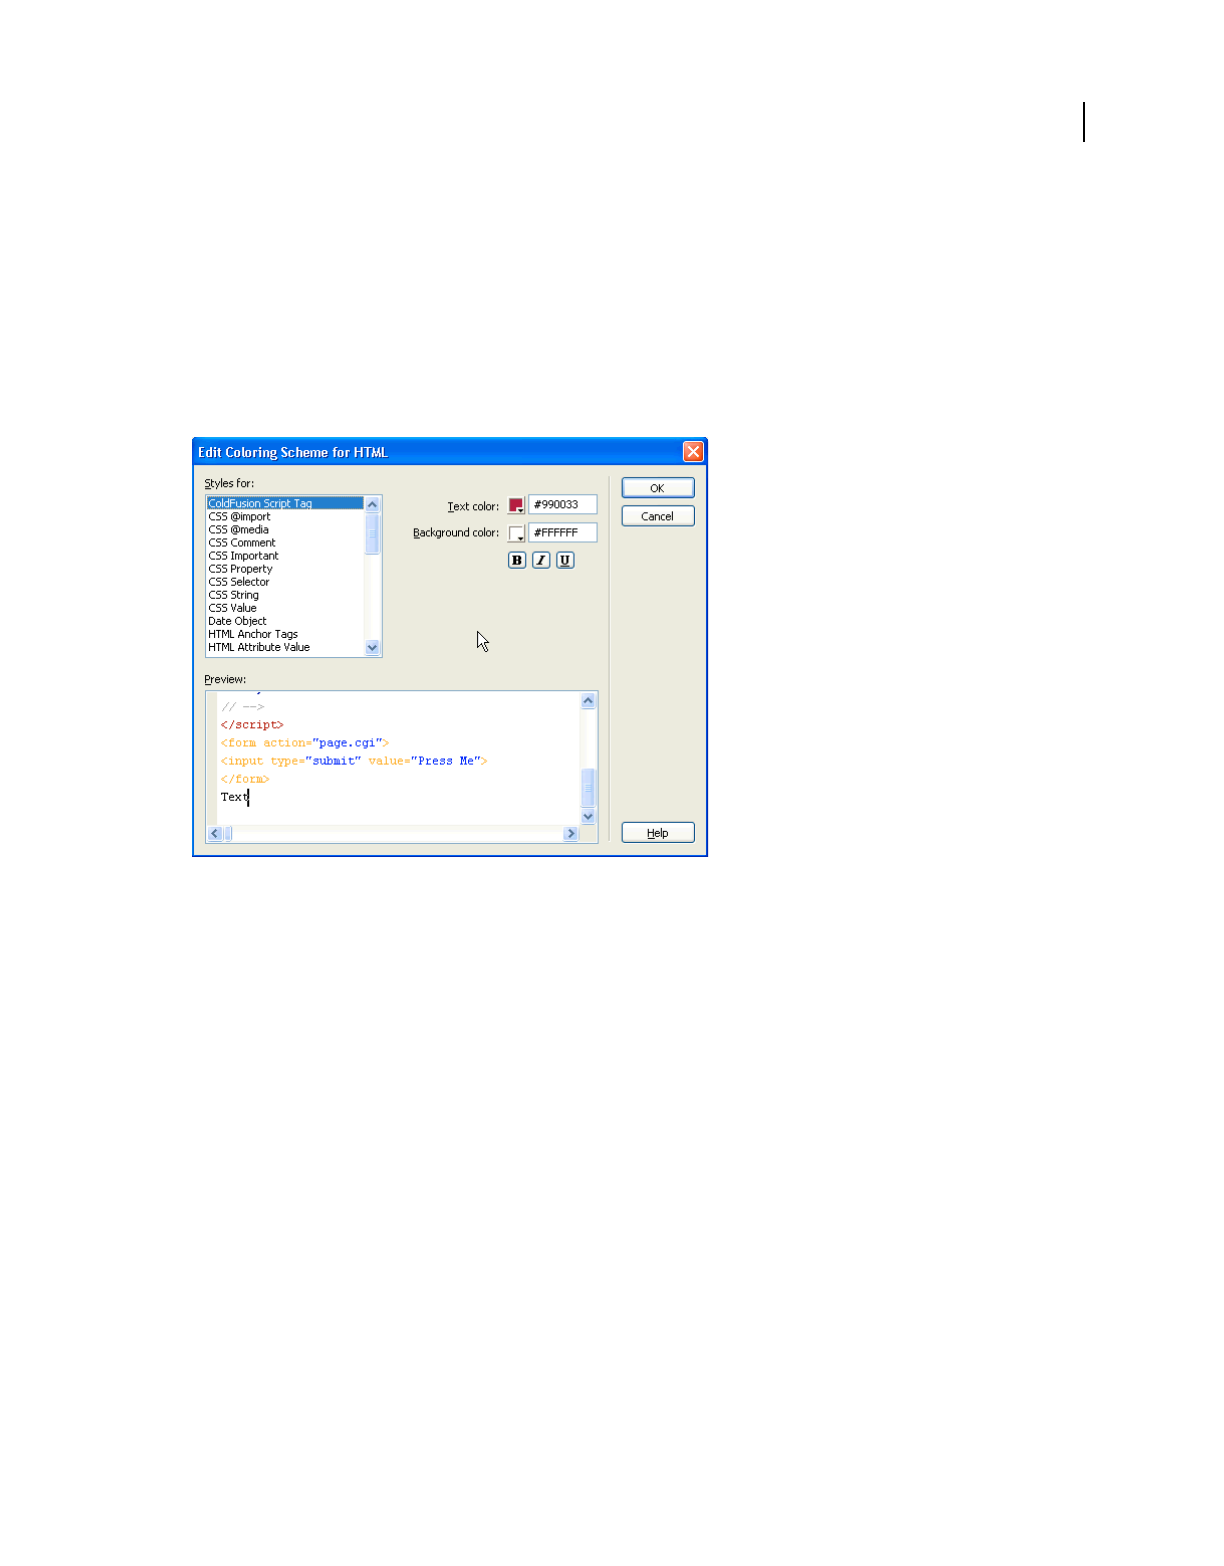
64
EXTENDING DREAMWEAVER
Customizing Code view
Last updated 6/15/2011
For fields that you can specify more than once, such as stringStart, specify color and style settings only on the first
tag. Data will be lost when you split color and style settings across tags and you later edit the colors or styles by using
the Preferences dialog box.
Note: Adobe recommends that you create backup copies of all XML files before you make changes. You should verify all
manual changes before you edit color and style settings using the Preferences dialog box. Data will be lost if you edit an
invalid XML file using the Preferences dialog box.
To edit styles for a scheme using the Code Coloring category in the Preferences dialog box, double-click a document
type, or click the Edit Coloring Scheme button, to open the Edit Coloring Scheme dialog box.
To edit the style for a particular element, select it in the Styles For list. The items listed in the Styles For pane include
the fields for the scheme being edited and also the schemes that might appear as blocks within this scheme. For
example, if you edit the HTML scheme, the fields for CSS and JavaScript blocks are also listed.
The fields listed for a scheme correspond to the fields defined in the XML file. The value of the scheme.name attribute
precedes each field listed in the Styles For pane. Fields that do not have a name are not listed.
The style or format for a particular element includes bold, italic, underline, and background color in addition to code
coloring. After you select an element in the Styles For pane, you can change any of these style characteristics.
The Preview area displays how sample text would appear with the current settings. The sample text is taken from the
sampleText setting for the scheme.
Select an element in the Preview area to change the selection in the Styles For list.
If you change the setting for an element of a scheme, Dreamweaver stores the value in the code coloring file and
overrides the original setting. When you click OK, Dreamweaver reloads all code coloring changes automatically.
Code coloring examples
The following code coloring examples illustrate the code coloring schemes for a cascading style document and a
JavaScript document. The lists of keywords in the JavaScript example are abbreviated for the sake of keeping the
example short.

65
EXTENDING DREAMWEAVER
Customizing Code view
Last updated 6/15/2011
CSS code coloring
<scheme name="CSS" id="CSS" doctypes="CSS" priority="50">
<ignoreCase>Yes</ignoreCase>
<ignoreTags>Yes</ignoreTags>
<blockStart doctypes="ASP-JS,ASP-VB,ASP.NET_CSharp,ASP.NET_VB,ColdFusion,
CFC,HTML,JSP,LibraryItem,DWTemplate,PHP_MySQL" scheme="outerTag">
<![CDATA[<style>]]></blockStart>
<blockEnd><![CDATA[</style>]]></blockEnd>
<blockStart doctypes="ASP-JS,ASP-VB,ASP.NET_CSharp,ASP.NET_VB,ColdFusion,
CFC,HTML,JSP,LibraryItem,DWTemplate,PHP_MySQL" scheme="outerTag">
<![CDATA[<style\s+\*>]]></blockStart>
<blockEnd><![CDATA[</style>]]></blockEnd>
<commentStart name="Comment" id="CodeColor_CSSComment"><![CDATA[ /*]]></commentStart>
<commentEnd><![CDATA[*/]]></commentEnd>
<endOfLineComment><![CDATA[<!--]]></endOfLineComment>
<endOfLineComment><![CDATA[-->]]></endOfLineComment>
<stringStart name="String" id="CodeColor_CSSString"><![CDATA["]]></stringStart>
<stringEnd><![CDATA["]]></stringEnd>
<stringStart><![CDATA[']]></stringStart>
<stringEnd><![CDATA[']]></stringEnd>
<stringEsc><![CDATA[\]]></stringEsc>
<cssSelector name="Selector" id="CodeColor_CSSSelector" />
<cssProperty name="Property" id="CodeColor_CSSProperty" />
<cssValue name="Value" id="CodeColor_CSSValue" />
<sampleText doctypes="CSS"><![CDATA[/* Comment */
H2, .head2 {
font-family : 'Sans-Serif';
font-weight : bold;
color : #339999;
}]]>
</sampleText>
</scheme>
CSS sample text
The following sample text for the CSS scheme illustrates the CSS code coloring scheme:
/* Comment */
H2, .head2 {
font-family : 'Sans-Serif';
font-weight : bold;
color : #339999;
}
The following lines from the Colors.xml file provide the color and style values that are seen in the sample text and were
assigned by the code coloring scheme:
<syntaxColor id="CodeColor_CSSSelector" text="#FF00FF" />
<syntaxColor id="CodeColor_CSSProperty" text="#000099" />
<syntaxColor id="CodeColor_CSSValue" text="#0000FF" />
JavaScript code coloring

66
EXTENDING DREAMWEAVER
Customizing Code view
Last updated 6/15/2011
<scheme name="JavaScript" id="JavaScript" doctypes="JavaScript" priority="50">
<ignoreCase>No</ignoreCase>
<ignoreTags>Yes</ignoreTags>
<blockStart doctypes="ASP-JS,ASP-VB,ASP.NET_CSharp,ASP.NET_VB,ColdFusion,
CFC,HTML,JSP,LibraryItem,DWTemplate,PHP_MySQL" scheme="outerTag">
<![CDATA[<script>]]></blockStart>
<blockEnd><![CDATA[</script>]]></blockEnd>
<blockStart doctypes="ASP-JS,ASP-VB,ASP.NET_CSharp,ASP.NET_VB,ColdFusion,
CFC,HTML,JSP,LibraryItem,DWTemplate,PHP_MySQL" scheme="outerTag">
<![CDATA[<script\s+\*>]]></blockStart>
<blockEnd><![CDATA[</script>]]></blockEnd>
<commentStart name="Comment" id="CodeColor_JavascriptComment">
<![CDATA[/*]]></commentStart>
<commentEnd><![CDATA[*/]]></commentEnd>
<endOfLineComment><![CDATA[//]]></endOfLineComment>
<endOfLineComment><![CDATA[<!--]]></endOfLineComment>
<endOfLineComment><![CDATA[-->]]></endOfLineComment>
<stringStart name="String" id="CodeColor_JavascriptString">
<![CDATA["]]></stringStart>
<stringEnd><![CDATA["]]></stringEnd>
<stringStart><![CDATA[']]></stringStart>
<stringEnd><![CDATA[']]></stringEnd>
<stringEsc><![CDATA[\]]></stringEsc>
<brackets name="Bracket" id="CodeColor_JavascriptBracket">
<![CDATA[{[()]}]]></brackets>
<operators name="Operator" id="CodeColor_JavascriptOperator">
<![CDATA[+-*/%<>!?:=&|^]]></operators>
<numbers name="Number" id="CodeColor_JavascriptNumber" />
<regexp name="RegExp" id="CodeColor_JavascriptRegexp" delimiter="/" escape="\\">
<searchPattern><![CDATA[(\s*/\e*\\/]]></searchPattern>
<searchPattern><![CDATA[=\s*/\e*\\/]]></searchPattern>
</regexp>
<idChar1>_$abcdefghijklmnopqrstuvwxyzABCDEFGHIJKLMNOPQRSTUVWXYZ</idChar1>
<idCharRest name="Identifier" id="CodeColor_JavascriptIdentifier">
_$abcdefghijklmnopqrstuvwxyzABCDEFGHIJKLMNOPQRSTUVWXYZ0123456789</idCharRest>
<functionKeyword name="Function Keyword" id="CodeColor_JavascriptFunction">
function</functionKeyword>
<keywords name="Reserved Keywords" id="CodeColor_JavascriptReserved">
<keyword>break</keyword>
. . .
</keywords>
<keywords name="Native Keywords" id="CodeColor_JavascriptNative">
<keyword>abs</keyword>
. . .

67
EXTENDING DREAMWEAVER
Customizing Code view
Last updated 6/15/2011
</keywords>
<keywords id="CodeColor_JavascriptNumber">
<keyword>Infinity</keyword>
<keyword>Nan</keyword>
</keywords>
<keywords name="Client Keywords" id="CodeColor_JavascriptClient">
<keyword>alert</keyword>
. . .
</keywords>
<sampleText><![CDATA[/* JavaScript */
function displayWords(arrayWords) {
for (i=0; i < arrayWords.length(); i++) {
// inline comment
alert("Word " + i + " is " + arrayWords[i]);
}
}
var tokens = new Array("Hello", "world");
displayWords(tokens);
]]></sampleText>
</scheme>
JavaScript sample text
The sample text for the JavaScript scheme illustrates the JavaScript code coloring scheme as follows:
/* JavaScript */ function displayWords(arrayWords) {
for (i=0; i < arrayWords.length(); i++) {
// inline comment
alert("Word " + i + " is " + arrayWords[i]);
}
}
var tokens = new Array("Hello", "world");
displayWords(tokens);
The following lines from the Colors.xml file provide the color and style values that are seen in the sample text and were
assigned by the code coloring scheme:
<syntaxColor id="CodeColor_JavascriptComment" text="#999999" italic="true" />
<syntaxColor id="CodeColor_JavascriptFunction" text="#000000" bold="true" />
<syntaxColor id="CodeColor_JavascriptBracket" text="#000099" bold="true" />
<syntaxColor id="CodeColor_JavascriptNumber" text="#FF0000" />
<syntaxColor id="CodeColor_JavascriptClient" text="#990099" />
<syntaxColor id="CodeColor_JavascriptNative" text="#009999" />
About Code validation
When opening a document in Code view, Dreamweaver automatically validates that the document is not using any
tags, attributes, CSS properties, or CSS values that are not available in the target browsers that the user selected.
Dreamweaver underlines errors with a wavy red line.
Dreamweaver also has a new browser compatibility check feature that locates combinations of HTML and CSS that
can trigger browser rendering problems.

68
EXTENDING DREAMWEAVER
Customizing Code view
Last updated 6/15/2011
Dreamweaver stores browser profiles in the Browser Profile folder inside the Dreamweaver Configuration folder. Each
browser profile is defined as a text file that is named for the browser. For example, the browser profile for Internet
Explorer version 6.0 is Internet_Explorer_6.0.txt. To support target browser checking for CSS, Dreamweaver stores
CSS profile information for a browser in an XML file whose name corresponds to the browser profile but with a suffix
of _CSS.xml. For example, the CSS profile for Internet Explorer 6.0 is Internet_Explorer_6.0_CSS.xml. You might
want to make changes to a CSS profile file if you find that Dreamweaver is reporting an error that you do not want.
The CSS profile file consists of three XML tags: css-support, property, and value. The following sections describe
these tags.
<css-support>
Description
This tag is the root node for a set of property and value tags that are supported by a particular browser.
Attributes
None.
Contents
The property and value tags.
Container
None.
Example
<css-support>
. . .
</css-support>
<property>
Description
Defines a supported CSS property for the browser profile.
Attributes
name, names, supportlevel, message
• name="property_name"The name of the property for which you are specifying support.
• names="property_name, property_name,..." A comma-separated list of property names for which you are
specifying support.
The names attribute is a kind of shorthand. For example, the following names attribute is a shorthand method of
defining the
name attribute that follows it:

69
EXTENDING DREAMWEAVER
Customizing Code view
Last updated 6/15/2011
<property names="foo,bar">
<value type="named" name="top"/>
<value type="named" name="bottom"/>
</property>
<property name="foo">
<value type="named" name="top"/>
<value type="named" name="bottom"/>
</property>
<property name="bar">
<value type="named" name="top"/>
<value type="named" name="bottom"/>
</property>
• supportlevel="error", "warning", "info", or "supported"Specifies the level of support for the property.
If not specified,
"supported" is assumed. If you specify a support level other than "supported" and omit the
message attribute, Dreamweaver uses the default message, “CSS property name property_name is not supported.”
• message="message_string" The message attribute defines a message string that Dreamweaver displays when it
finds the property in a document. The message string describes possible limitations or workarounds for the
property value.
Contents
value
Container
css-support
Example
<property name="background-color" supportLevel="supported">
<value>
Description
Defines a list of values supported by the current property.
Attributes
type, name, names, supportlevel, message
• type="any", "named", "units", "color", "string", or "function" Specifies the type of value. If you
specify
"named", "units", or "color", then either the name or names attribute must specify the value IDs to match
for this item. The
"units" value matches a numeric value, followed by one of the units values specified in the names
attribute.
• name="value_name"A CSS value identifier. No spaces or punctuation are allowed other than a hyphen (-). The
name of one of the values that are valid for the CSS property is named in the parent property node. This can identify
either a specific value or a units specifier.
• names="name1, name2, . . ."Specifies a comma-separated list of value IDs.
• supportlevel="error", "warning", "info", or "supported"Specifies the level of support for this value in
the browser. If not specified, the value
"supported" is assumed.

70
EXTENDING DREAMWEAVER
Customizing Code view
Last updated 6/15/2011
• message="message_string" The message attribute defines a message string that Dreamweaver displays when it
finds the property value in a document. If the
message attribute is omitted, Dreamweaver displays a message string
of “value_name is not supported.”
Contents
None.
Container
property
Example
<property name="margin">
<value type="units" name="ex" supportlevel="warning"
message="The implementation of ex units is buggy in Safari 1.0."/>
<value type="units" names="%,em,px,in,cm,mm,pt,pc"/>
<value type="named" name="auto"/>
<value type="named" name="inherit"/>
</property>
Changing default HTML formatting
To change general code formatting preferences, use the Code Format category of the Preferences dialog box. To
change the format of specific tags and attributes, use the Tag Library Editor (Edit > Tag Libraries). For more
information, see Using Dreamweaver on the Dreamweaver Help menu.
You can also edit the formatting for a tag by editing the VTM file that corresponds to the tag (in a subfolder of the Tag
Libraries configuration folder), but it’s much easier to change formatting within Dreamweaver.
If you add or remove a VTM file, you must edit the TagLibraries.vtm file; Dreamweaver ignores any VTM file that is
not listed in TagLibraries.vtm.
Note: Edit this file in a text editor, not in Dreamweaver.
About Vertical Split view
The Vertical Split view feature supports a side-by-side view of either code and design or code and code layout modes.
Users with dual screen workstation setups can use this feature to display code on one monitor while using their second
monitor for working in Design view.
The Vertical Split view feature enables the user to:
• Choose the orientation of Code and Design view (horizontal or vertical).
• Switch between horizontal and vertical orientations of the Code and Design view and Split code.
Restarting Dreamweaver and opening or creating a document shows the document in the Code and Design view with
the last used size and orientation. The
dreamweaver.setSplitViewOrientation() function sets the orientation and
dreamweaver.setPrimaryView() sets the primary view. For information on using these functions, see "Vertical Split
view functions" in the Dreamweaver API Reference.

71
EXTENDING DREAMWEAVER
Customizing Code view
Last updated 6/15/2011
About related files
The related files feature provides users access to the supporting and related files that are associated with the file they
are working on. Related files can be CSS, script, Server-side Include (SSI), or XML files.
For example, if a CSS file is associated with the main file, this feature facilitates viewing and editing this CSS file. The
user can also view the main file while editing the related file.
How related files work
Related files enhance editing experience of users by assisting them in the following tasks:
• Users can view and access the related files while viewing the main file. When viewing a page that has related files
(for example, a CSS file), you can see the following:
• Design of the page on one side
• Related file on the other
• The related files bar contains the documents that affect the generation of parent HTML. The users can see the
source HTML, generated HTML, and first- level child documents.
• Selecting any related file shown in the related files bar enables users to do the following tasks:
• View and edit the related file in Code view
• View the parent page in Design view
• Selecting content in the Design view and making changes in the related file does not dismiss the selection when the
user refreshes the Design view.
• If you change the related file code, the changes are reflected in the Design view.
When a file is not found, a file not found message is displayed in a bar at the top of the empty window frame.
Related files terminology
The following terms are commonly used in association with related files:
Term Description Example
Top-level document Any document opened by the user
Parent document Any top-level document rendered in Design
view.
• HTML — including .lbi, .dwt
• CFML
• PHP

72
EXTENDING DREAMWEAVER
Customizing Code view
Last updated 6/15/2011
The following related files are supported:
Related files APIs
You can customize the related files menu to display the following:
• Filenames of the related file
• Source HTML and Generated Source code
The dreamweaver.openRelatedFile() function displays the related file in the Code view and the
dreamweaver.getActiveRelatedFilePath() function displays the path for the currently opened related file. For
more information on using these APIs, see "Related files functions" in the Dreamweaver API Reference.
First-level child document Any document that is one level deep from the
parent document. These documents affect
generation of HTML code, except for CSS. CSS
files can include other CSS files, but all of them
together determine the final styles applied to
the page.
• Script file specified by <SCRIPT src="file.js">
• Server-side Include
• External CSS
• Spry XML and HTML data sets
• Library item
• <iframe> - remote source
• Object tag
Deeper-level child document Any document that is more than two levels away
from the parent document. These documents
affect generation of HTML code.
• PHP within PHP
• DTDs
• Templates
Non-related file Any document which does not affect generation
of HTML code or any files that a user does not
actively edit.
• Image files
• Media files
• Externally linked files by an <a> tag
Type Description Nesting level
Client-side script All languages 1 (nesting script is not possible)
Server-side includes When all of the following extensible conditions are true:
• Defined Server Model
• Defined SSI statement (that is pattern)
• Defined DW doctype
Exception: Apache-style include file statements (<!--
#include ... -->
) in HTML documents is recognized.
1
Spry data set 1 (nesting script is not possible)
CSS
• All external CSS for all media types
• DTSS
Infinite
Term Description Example

73
EXTENDING DREAMWEAVER
Customizing Code view
Last updated 6/15/2011
About Live view
The Live view feature facilitates previewing your web pages as it would appear in a browser, without leaving
Dreamweaver. Users can retain direct access to the code and edit the code. Any changes to the code are reflected
instantly. It enables users to view the changed web page instantly. If the user edits CSS files, the current state of the file
is maintained, but the CSS changes are applied. Users can also interact with the page and view JavaScript effects like
rollovers without having to switch from Dreamweaver to a web browser.
Live view feature uses the system Flash Plug-in (%SYSTEM%/Macromed/Flash, /Library/Internet Plug-Ins/). At times,
it can fallback to any Firefox version if the system version of the plug-in is not available.
A notification is displayed in the Information bar if the plug-in is not found. The CSS panel always shows the current
relevant CSS for what is displayed in Live view, even if the source is generated from a different location. Users can add
or remove style sheets. However, other edits to inline CSS or CSS in the <head> is locked. Rules in the CSS panel that
cannot be edited are marked as read only.
You can use the Dreamweaver API for the following purposes:
• Getting and setting the Design view mode
• Getting and setting the Live view mode using the server
• Getting Live view defaults
• Getting and setting Live view dependents
• Viewing the Live view parameters
For more information about these APIs, see "Live view functions" in the Dreamweaver API Reference.
A simple Live view example
In this example, you use Dreamweaver to create a command that creates a simple browser when the user clicks the
command in the Commands menu. For specific information about creating commands before trying this example, see
“Commands” on page 131 on page 142. In Dreamweaver, open a new basic HTML file (this file is your Command
definition file) and save the file as liveviewexample.htm. Your Command definition file looks like the following
example:
<!DOCTYPE HTML SYSTEM "-//Adobe//DWExtension layout-engine 10.0// dialog"> <html
xmlns="http://www.w3.org/1999/xhtml">
<head>
<meta http-equiv="Content-Type" content="text/html; charset=utf-8" />
<title>Browser Test</title>
<script type="text/javascript">
var browserLoad = function(e)
{
var uri = document.getElementById("uri");
uri.value = e.currentBrowserLocation;
}
var promptToNavigate = function (e)
{
if( ! confirm(" Is it ok to go from \n" + e.currentBrowserLocation + " to page \n " +
e.requestedBrowserLocation ) )
{
e.preventDefault();
}
}
function initUI()

74
EXTENDING DREAMWEAVER
Customizing Code view
Last updated 6/15/2011
{
var browser = document.getElementById("browser");
browser.addEventListener("BrowserControlBeforeNavigation",
promptToNavigate, true);
browser.addEventListener("BrowserControlLoad", browserLoad, true);
browser.openURL("http://www.adobe.com");
}
function loadUri()
{
var uri = document.getElementById("uri");
var browser = document.getElementById("browser");
browser.openURL(uri.value);
}
function showSource(){
var browser = document.getElementById("browser");
alert(browser.getWindowObj().document.documentElement.outerHTML);
}
function commandButtons() {
return new Array( "Close", "window.close()",
"Load URI", "loadUri()",
"Show Source", "showSource()"
);
}
</script>
</head>
<body onLoad="initUI()">
<form>
<p>
<label>
<input id="uri" type="text" style="width:500px">
</label>
</p> <mm:browsercontrol id="browser" style="width:500px; height:300px;"/> </form> </body>
</html>

75
Last updated 6/15/2011
Chapter 4: Extending Dreamweaver
Dreamweaver provides an extensive set of tools that you can use to add to or customize its functionality.
When you create a Dreamweaver extension, follow the steps outlined in “Creating an extension” on page 2.
The following features of Dreamweaver let you create extensions:
• An HTML parser (also called a renderer) makes it possible to design user interfaces (UIs) for extensions. The parser
uses form fields, absolutely positioned elements, images, and other HTML elements. Dreamweaver has its own
HTML parser.
• A tree of folders that organize and store the files that implement and configure Dreamweaver elements and
extensions.
• A series of application programming interfaces (APIs) that provide access to Dreamweaver functionality through
JavaScript.
• A JavaScript interpreter, which executes the JavaScript code in extension files. Dreamweaver uses the Netscape
JavaScript version 1.5 interpreter. For more information about changes between this version of the interpreter and
previous versions, see
“How Dreamweaver processes JavaScript in extensions” on page 79.
Types of Dreamweaver extensions
The following list describes the types of Dreamweaver extensions:
Insert bar object extensions create changes in the Insert bar. An object is typically used to automate inserting code into
a document. It can also contain a form that gathers input from the user and JavaScript that processes the input. Object
files are stored in the Configuration/Objects folder.
Command extensions can perform almost any specific task, with or without input from the user. Command files are
typically started from the Commands menu, but they can also be called from other extensions. Command files are
stored in the Configuration/Commands folder.
Menu command extensions expand the command API to accomplish tasks related to calling a command from a menu.
The menu commands API also lets you create a dynamic submenu.
Toolbar extensions can add elements to existing toolbars or create new toolbars in the Dreamweaver user interface.
New toolbars appear below the default toolbar. Toolbar files are stored in the Configuration/Toolbars folder.
Report extensions can add custom site reports or modify the set of prewritten reports that come with Dreamweaver.
You can also use the results window API to create a stand-alone report.
Tag Library and Editor extensions work with the associated tag library files. Tag Library and Editor extensions can
modify attributes of existing tag dialogs, create new tag dialogs, and add tags to the tag library. Tag Library and Editor
extension files are stored in the Configuration/TagLibraries folder.
Property inspector extensions appear in the Property inspector panel. Most of the inspectors in Dreamweaver are part
of the core product code. These inspectors cannot be modified. But, custom Property inspector files can override the
built-in Dreamweaver Property inspector interfaces or create new ones to inspect custom tags. Inspectors are stored
in the Configuration/Inspectors folder.

76
EXTENDING DREAMWEAVER
Extending Dreamweaver
Last updated 6/15/2011
Floating panel extensions add floating panels to the Dreamweaver user interface. Floating panels can interact with the
selection, the document, or the task. They can also display useful information. Floating panel files are stored in the
Configuration/Floaters folder.
Behavior extensions let users add JavaScript code to their documents. The JavaScript code performs a specific task in
response to an event when the document is viewed in a browser. Behavior extensions appear on the Plus (+) menu of
the Dreamweaver Behaviors panel. Behavior files are stored in the Configuration/Behaviors/Actions folder.
Server Behaviors extensions add blocks of server-side code (ASP or ColdFusion) to the document. The server-side
code performs tasks on the server when the document is viewed in a browser. Server behaviors appear on the Plus (
+)
menu of the Dreamweaver Server Behaviors panel. Server behavior files are stored in the Configuration/Server
Behaviors folder.
Data source extensions let you build a connection to dynamic data stored in a database. Data source extensions appear
on the Plus (
+) menu of the Bindings panel. Data source extension files are stored in the Configuration/Data Sources
folder.
Server format extensions let you define formatting for dynamic data.
Component extensions let you add new types of components to the Components panel. Components is the term that
Dreamweaver uses for some of the more popular and modern encapsulation strategies such as ColdFusion
components (CFCs).
Server model extensions let you add support for new server models. Dreamweaver supports the most common server
models (ASP, JSP, ColdFusion, PHP, and ASP.NET). Server model extensions are needed only for custom server
solutions, different languages, or a customized server. Server model files are stored in the Configuration/ServerModels
folder.
Data translator extensions convert non-HTML code into HTML that appears in the Design view of the document
window. These extensions also lock the non-HTML code to prevent Dreamweaver from parsing it. Translator files are
stored in the Configuration/Translators folder.
Other ways to extend Dreamweaver
You can also extend the following elements of Dreamweaver to expand its capabilities or tailor it to your needs.
Document types define how Dreamweaver works with different server models. Information about document types for
server models is stored in the Configuration/DocumentTypes folder. For more information, see
“Extensible document
types in Dreamweaver” on page 13.
Code snippets are reusable blocks of code that are stored as code snippet (CSN) files in the Dreamweaver
Configuration/Snippets folder and which Dreamweaver makes accessible in the Snippets panel. You can create
additional code snippet files and install them into the Snippets folder to make them available.
Code hints are menus that offer a typing shortcut by displaying a list of strings that potentially complete the string you
are typing. If one of the strings in the menu matches the string that you started to type, you can select it to insert it in
place of the string that you are typing. Code hints menus are defined in the codehints.xml file in the
Configuration/CodeHints folder, and you can add new code hints menus to it for new tags or functions that you have
defined.
Menus are defined in the menus.xml file in the Configuration/Menus folder. You can add new Dreamweaver menus
for your extensions by adding the menu tags for them to the menus.xml file. For more information, see
“Menus and
menu commands” on page 141.

77
EXTENDING DREAMWEAVER
Extending Dreamweaver
Last updated 6/15/2011
Configuration folders and extensions
The folders and files that are stored in the Dreamweaver Configuration folder contain the extensions that come with
Dreamweaver. When you write an extension, you must save the files in the proper folder for Dreamweaver to recognize
them. For example, if you create a Property inspector extension, you save the files in the Configuration/Inspectors
folder. If you download and install an extension from the Adobe Exchange website (
www.adobe.com/go/exchange),
the Extension Manager automatically saves the extension files to the proper folders.
You can use the files in the Dreamweaver Configuration folder as examples, but these files are generally more complex
than the average extension that is available on the Adobe Exchange website. For more information on the contents of
each subfolder within the Configuration folder, see the Configuration_ReadMe.htm file.
The Configuration/Shared folder does not correspond to a specific extension type. It is the central repository for utility
functions, classes, and images that are used by more than one extension. The files in the
Configuration/Shared/Common folder are designed to be useful to a broad range of extensions. These files are useful
as examples of JavaScript techniques and as utilities. Look here first for the functions that perform specific tasks, such
as creating a valid Document Object Model (DOM) reference to an object, testing whether the current selection is
inside a particular tag, escaping special characters in strings, and more. If you create common files, you should create
a separate subfolder in the Configuration/Shared/Common folder, which is shown in the following figure, and store
them there.
Configuration/Shared/Common/Scripts folder structure
For more information about the Shared folder, see “The Shared folder” on page 367.

78
EXTENDING DREAMWEAVER
Extending Dreamweaver
Last updated 6/15/2011
Multiuser Configuration folders
For the multiuser operating systems of Windows XP, Windows 2000, and Macintosh OS X, Dreamweaver creates a
separate Configuration folder for each user in addition to the Dreamweaver Configuration folder. Any time
Dreamweaver or a JavaScript extension writes to the Configuration folder, Dreamweaver automatically writes to the
user Configuration folder instead. This practice lets each Dreamweaver user customize configuration settings without
disturbing the configuration settings of other users. For more information, see
“Customizing Dreamweaver in a
multiuser environment” on page 10 and “File Access and Multiuser Configuration API” in the Dreamweaver API
Reference.
Running scripts at startup or shutdown
If you place a command file in the Configuration/Startup folder, the command runs as Dreamweaver starts up. Startup
commands load before the menus.xml file, before the files in the ThirdPartyTags folder, and before any other
commands, objects, behaviors, inspectors, floating panels, or translators. You can use startup commands to modify the
menus.xml file or other extension files. You can also show warnings, prompt the user for information, or call the
dreamweaver.runCommand() function. However, from within the Startup folder, you cannot call a command that
expects a valid Document Object Model (DOM). For information about the Dreamweaver DOM, see
“The
Dreamweaver Document Object Model” on page 95.
Similarly, if you place a command file in the Configuration/Shutdown folder, the command runs as Dreamweaver
shuts down. From the shutdown commands, you can call
dreamweaver.runCommand() function, show warnings, or
prompt the user for information, but you cannot stop the shutdown process.
For more information about commands, see “Commands” on page 131. For more information about the
dreamweaver.runCommand() function, see the Dreamweaver API Reference.
Reloading extensions
If you edit an extension while you are working in Dreamweaver, you can reload the extensions so that Dreamweaver
recognizes the change.
Reload extensions
1 Control-click (Windows) or Option-click (Macintosh) the Categories menu in the title bar of the Insert panel.
Note: This option is not visible when you are in Tabs mode. If you are in the Tabs mode, right click Panel menu (top-
left). Select Show as Menu, then Ctrl-click on Common to get the menu with the Reload Extensions command.
2 Select Reload Extensions.
Note: In a multiuser operating system, edit copies of configuration files in your user Configuration folder rather than
editing master configuration files. For more information, see
“Configuration folders and extensions” on page 77.

79
EXTENDING DREAMWEAVER
Extending Dreamweaver
Last updated 6/15/2011
Extension APIs
The extension APIs provide you with the functions that Dreamweaver calls to implement each type of extension. You
must write the bodies of these functions as described for each extension type and specify the return values that
Dreamweaver expects.
If you are a developer who wants to work directly in the C programming language, there is a C extensibility API that
lets you create dynamic link libraries (DLLs). The functionality that is provided in these APIs wraps your C DLLs in
JavaScript so that your extension can work seamlessly in Dreamweaver.
The documentation of extension APIs outlines what each function does, when Dreamweaver calls it, and what value
Dreamweaver expects it to return.
See the Dreamweaver API Reference for information about the Utility API and the JavaScript API, which provide
functions that you can use to perform specific tasks in your extensions.
How Dreamweaver processes JavaScript in extensions
Dreamweaver checks the Configuration/extension_type folder during startup. If it encounters an extension file within
the folder, Dreamweaver processes the JavaScript by completing the following steps:
• Compiling everything between the beginning and ending SCRIPT tags
• Executing any code within SCRIPT tags that is not part of a function declaration
Note: This procedure is necessary during startup because some extensions might require global variables to initialize.
Dreamweaver performs the following actions for any external JavaScript files that are specified in the SRC attributes of
SCRIPT tags:
• Reads in the file
• Compiles the code
• Executes the procedures
Note: If any JavaScript code in your extension file contains the string ", the JavaScript interpreter reads the string as an
ending
script tag and reports an unterminated string literal error. To avoid this problem, break the string into pieces
and concatenate them like this:
"<' + '/SCRIPT>".
Dreamweaver executes code in the onLoad event handler (if one appears in the body tag) when the user selects the
command or action from a menu for the Command and Behavior action extension types.
Dreamweaver executes code in the onLoad event handler in the body tag if the body of the document contains a form
for object extensions.
Dreamweaver ignores the onLoad handler on the body tag in the following extensions:
• Data translator
• Property inspector
• Floating panel
For all extensions, Dreamweaver executes code in other event handlers (for example, onBlur="alert('This is a
required field.')") when the user interacts with the form fields to which they are attached.
Dreamweaver supports the use of event handlers within links. Event handlers in links must use syntax, as shown in the
following example:
<a href="#" onMouseDown=alert('hi')>link text</a>

80
EXTENDING DREAMWEAVER
Extending Dreamweaver
Last updated 6/15/2011
Plug-ins (set to play at all times) are supported in the BODY of extensions. The document.write() statement, Java
applets, and Microsoft ActiveX controls are not supported in extensions.
Displaying Help
The displayHelp() function, which is part of several extension APIs, causes Dreamweaver to do the following two
things when you include it in your extension:
• Add a Help button to the interface.
• Call displayHelp() when the user clicks the Help button.
You must write the body of the displayHelp() function to display Help. How you code the displayHelp() function
determines how your extension displays Help. You can call the
dreamweaver.browseDocument() function to open
a file in a browser or devise a custom way to display Help such as displaying messages in another absolutely positioned
element in alert boxes.
The following example uses the displayHelp() function to display Help by calling
dreamweaver.browseDocument():
// The following instance of displayHelp() opens a browser to display a file
// that explains how to use the extension.
function displayHelp() {
var myHelpFile = dw.getConfigurationPath() + "ExtensionsHelp/myExtHelp.htm";
dw.browseDocument(myHelpFile);
}
Localizing an extension
Use the following techniques to make it easier to translate your extensions into local languages.
• Separate extensions into HTML and JavaScript files. The HTML files can be replicated and localized; the JavaScript
files are not localized.
• Do not define display strings in the JavaScript files (check for alerts and UI code). Extract all localizable strings into
separate XML files in the Dreamweaver Configuration/Strings folder.
• Do not write JavaScript code in the HTML files except for required event handlers. This eliminates the need to fix
a bug multiple times for multiple translations after the HTML files are replicated and translated into other
languages.
XML string files
Store all strings in XML files in the Dreamweaver Configuration/Strings folder. If you install many related extension
files, this lets you share all strings in a single XML file. If applicable, this also lets you refer to the same string from both
C++ and JavaScript extensions.
You could create a file called myExtensionStrings.xml. The following example shows the format of the file:

81
EXTENDING DREAMWEAVER
Extending Dreamweaver
Last updated 6/15/2011
<strings>
<!-- errors for feature X -->
<string id="featureX/subProblemY" value="There was a with X when you did Y. Try not to
do Y!"/>
<string id="featureX/subProblemZ" value="There was another problem with X, regarding Z.
Don't ever do Z!"/>
</strings>
Now your JavaScript files can refer to these translatable strings by calling the dw.loadString() function, as shown in
the following example:
function initializeUI()
{
...
if (problemYhasOccured)
{
alert(dw.loadString("featureX/subProblemY");
}
}
You can use slash (/) characters in your string identifiers, but do not use spaces. Using slashes, you can create a
hierarchy to suit your needs, and include all the strings in a single XML file.
Note: Files that begin with cc in the Configuration/Strings folder are Contribute files. For example, the file
ccSiteStrings.xml is a Contribute file.
Localizable strings with embedded values
Some display strings have values embedded in them. You can use the errMsg() function to display these strings. You
can find the
errMsg() function, which is similar to the printf() function in C, in the string.js file in the
Configuration/Shared/MM/Scripts/CMNfolder. Use the placeholder characters percent sign (
%) and s to indicate
where values should appear in the string and then pass the string and variable names as arguments to
errMsg(). For
example:
<string id="featureX/fileNotFoundInFolder" value="File %s could not be found in folder %s."/>
The following example shows how the string, along with any variables to embed, is passed to the alert() function.
if (fileMissing)
{
alert( errMsg(dw.loadString("featureX/fileNotFoundInFolder"),fileName,
folderName) );
}
Working with the Extension Manager
If you create extensions for others users, you must package them according to the guidelines on the Adobe Exchange
website (
www.adobe.com/go/exchange) under the Help > How to Create an Extension category. After you have
written and tested an extension in the Extension Manager, select File > Package Extension. After the extension is
packaged, you can submit it to the Exchange from the Extension Manager by selecting File > Submit Extension.
The Adobe Extension Manager comes with Dreamweaver. Details about its use are available in its Help files and on
the Adobe Exchange website.

82
Last updated 6/15/2011
Chapter 5: User interfaces for extensions
Most extensions are built to receive information from the user through a user interface (UI). For example, if you create
a Property inspector extension for the
marquee tag, you need to create a way for the user to specify attributes like
direction and height. If you plan to submit your extension for Adobe certification, you need to follow the guidelines
that are available within the Extension Manager files on the Adobe Exchange website (
www.adobe.com/go/exchange).
These guidelines are not intended to limit your creativity. Their purpose is to ensure that certified extensions work
effectively within the Adobe Dreamweaver user interface (UI) and that the extension UI design does not detract from
its functionality.
Extension user interface designing guidelines
Typically, you create an extension to perform a task that users encounter frequently. Certain parts of the task are
repetitive; by creating an extension, you can automate the repetitive actions. Some steps in the task can change, or
specific attributes of the code that the extension processes can change. To receive user inputs for these variable values,
you build a UI.
For example, you might create an extension to update a web catalog. Users periodically need to change values for image
sources, item descriptions, and prices. Although the values change, the procedures for getting these values and
formatting the information for display on the website remain the same. A simple extension can automate the
formatting while letting users manually input the new, updated values for image sources, item descriptions, and prices.
A more robust extension can retrieve these values periodically from a database.
The purpose of your extension UI is to receive information that the user inputs. This information handles the variable
aspects of a repetitive task that the extension performs. Dreamweaver supports HTML and JavaScript form elements
as the basic building blocks for creating extension UI controls and displays the UI using its own HTML renderer.
Therefore, an extension UI can be as simple as an HTML file that contains a two-column table with text descriptions
and form input fields.
When you design an extension, you should determine what variables are necessary and what form elements can best
handle them.
Consider the following basic guidelines when you design an extension UI:
• To name your extension, place the name in the title tag of your HTML file. Dreamweaver displays the name in
the extension title bar.
• Keep text labels on the left side of your UI, aligned right, with text boxes on the right side, aligned left. This
arrangement lets the user’s eyes easily locate the beginning of any text box. Minimal text can follow the text box as
explanation or units of measure.
• Keep check box and radio button labels on the right side of your UI, aligned left.
• For readable code, assign logical names to your text boxes. If you use Dreamweaver to create your extension UI,
you can use the Property inspector or the Quick Tag Editor to assign names to the fields.
In a typical scenario, after you create the UI, you test the extension code to see that it properly performs the following
UI-related tasks:
• Getting the values from the text boxes
• Setting default values for the text boxes or gathering values from the selection

83
EXTENDING DREAMWEAVER
User interfaces for extensions
Last updated 6/15/2011
• Applying changes to the user document
Dreamweaver HTML rendering control
In earlier versions of Dreamweaver (up to Dreamweaver 4), Dreamweaver rendered more space around form controls
than Microsoft Internet Explorer and Netscape Navigator do. Form controls in extension UIs are rendered with extra
space around them because Dreamweaver uses its HTML rendering engine to display extension UIs.
In later versions of Dreamweaver, the form-control rendering more closely matches the browsers. To take advantage
of the rendering improvements, use one of three new
DOCTYPE statements in your extension files, as shown in the
following examples:
<!DOCTYPE HTML SYSTEM "-//Adobe//DWExtension layout-engine 10.0//dialog">
<!DOCTYPE HTML SYSTEM "-//Adobe//DWExtension layout-engine 10.0//floater">
<!DOCTYPE HTML SYSTEM "-//Adobe//DWExtension layout-engine 10.0//pi">
In most cases, DOCTYPE statements must go on the first line of a document. However, to avoid conflicts with extension-
specific directives,
DOCTYPE statements and directives can now be in any order. But, they must appear before the
opening HTML tag. In previous versions, extension-specific directives were required to be on the first line of a file. For
example, the comment at the top of a Property inspector file, or the
MENU-LOCATION=NONE directive in a command.
The new DOCTYPE statements let you view your extensions in the Dreamweaver Design view. You can see them as they
would appear when viewed by users.
You can see three examples where the dialog case is used in the following files in the Configuration/Commands folder:
CFLoginWizard.htm, TeamAdminDlgDates.html, and TeamAdminDlgDays.html.
The following examples show the Base Property inspector without the DOCTYPE statement, which improves form-
control rendering, and then with the
DOCTYPE statement.
Custom UI controls in extensions
In addition to the standard HTML form elements, Dreamweaver supports custom controls to help you create flexible,
professional-looking interfaces.
Editable select lists
Editable select lists (also known as combo boxes) lets you combine the functionality of a select list with the
functionality of a text box.
Extension UIs often contain pop-up menus that are defined using the select tag. In Dreamweaver, you can make
pop-up menus in extensions editable by adding
editable="true" to the select tag. To set a default value, set the
editText attribute and the value that you want the select list to display.
84
EXTENDING DREAMWEAVER
User interfaces for extensions
Last updated 6/15/2011
The following example shows the settings for an editable select list:
<select name="travelOptions" style="width:250px" editable="true" editText="other
(please specify)">
<option value="plane">plane</option>
<option value="car">car</option>
<option value="bus">bus</option>
</select>
When you use select lists in your extensions, check for the presence and value of the editable attribute. If no value is
present, the select list returns the default value of
false, which indicates that the select list is not editable.
As with standard noneditable select lists, editable select lists have a selectedIndex property (see “Objects, properties,
and methods of the Dreamweaver DOM” on page 96). This property returns -1 if the text box is selected.
To read the value of an active editable text box into an extension, read the value of the editText property. The
editText property returns the string that the user entered into the editable text box or the value of the editText
attribute. If no text has been entered and no value has been specified for
editText, it returns an empty string.
Dreamweaver adds the following custom attributes for the select tag to control editable pop-up menus:
Note: Editable select lists are available in Dreamweaver.
The following example creates a Command extension that contains an editable select list using common JavaScript
functions:
Create the example
1 Create a new blank file in a text editor.
2 Enter the following code:
<html>
<head>
<title>Editable Dropdown Test</title>
<script language="javascript">
function getAlert()
{
var i=document.myForm.mySelect.selectedIndex;
if (i>=0)
{
alert("Selected index: " + i + "\n" + "Selected text " +
document.myForm.mySelect.options[i].text);
}
else
{
alert("Nothing is selected" + "\n" + "or you entered a value");
}
}
function commandButtons()
{
return new Array("OK", "getAlert()", "Cancel", "window.close()");
}
Attribute name Description Accepted values
editable Declares that the pop-up menu has an editable text area A Boolean value of true or false
editText Holds or sets text within the editable text area A string of any value

85
EXTENDING DREAMWEAVER
User interfaces for extensions
Last updated 6/15/2011
</script>
</head>
<body>
<div name="test">
<form name="myForm">
<table>
<tr>
<td colspan="2">
<h4>Select your favorite</h4>
</td>
</tr>
<tr>
<td>Sport:</td>
<td>
<select name="mySelect" editable="true" style="width:150px"
editText="Editable Text">
<option> Baseball</option>
<option> Football </option>
<option> Soccer </option>
</select>
</td>
</tr>
</table>
</form>
</div>
</body>
</html>
3 Save the file as EditableSelectTest.htm in the Dreamweaver Configuration/Commands folder.
Test the example
1 Restart Dreamweaver.
2 Select Commands > EditableSelectTest.
When you select a value from the list, an alert message displays the index of the value and the text. If you enter a
value, an alert message indicates that nothing is selected.
Database controls
Database controls facilitate the display of data hierarchies and fields.
Using Dreamweaver, you can extend the HTML select tag to create a database tree control. You can also add a
variable grid control. The database tree control displays database schema, and the variable grid control displays tabular
information.

86
EXTENDING DREAMWEAVER
User interfaces for extensions
Last updated 6/15/2011
The following figure shows an advanced Recordset dialog box that uses a database tree control and a variable grid
control:
Adding a database tree control
The database tree control has the following attributes:
Any option tags that are placed inside the select tag are ignored.
To add a database tree control to a dialog box, you can use the following sample code with appropriate substitutions
for quoted variables:
<select name="DBTree" style="width:400px;height:110px" ¬
type="mmdatabasetree" connection="connectionName" noexpandbuttons showHeaders></select>
Attribute name Description
name Name of the database tree control
control.style Width and height, in pixels
type Type of control
connection Name of the database connection that is defined in the Connection Manager; if empty, the control is empty.
noexpandbuttons When this attribute is specified, the tree control does not draw the expand Plus (+) or collapse Minus (-)
indicators or the associated arrows on the Macintosh. This attribute is useful for drawing multicolumn list
controls.
showheaders When this attribute is specified, the tree control displays a header at the top that lists the name of each
column.

87
EXTENDING DREAMWEAVER
User interfaces for extensions
Last updated 6/15/2011
You can change the connection attribute to retrieve selected data and display it in the tree. You can use the
DBTreeControl attribute as a JavaScript wrapper object for the new tag. For more examples, see the
DBTreeControlClass.js file in the Configuration/Shared/Common/Scripts folder.
Adding a variable grid control
The variable grid control has the following attributes:
The following example adds a simple variable grid control to a dialog box:
<select name="ParamList" style="width:515px;" ¬
type="mmparameterlist columns"="Name,SQL Data ¬
Type,Direction,Default Value,Run-time Value" size=6></select>
The following example creates a variable grid control that is 500 pixels wide, with five columns of various widths:
<select
name="ParamList"
style="width:500px;"
type="mmparameterlist"
columns="Name,SQL Data Type,Direction, Default Value,Run-time Value"
columnWidth="100,25,11,"
size=6>
This example creates two blank columns that are 182 pixels wide. (The specified columns total 136. The total width of
the variable grid control is 500. The remaining space after the first three columns are placed is 364. Two columns
remain; 364 divided by 2 is 182.)
This variable grid control also has a JavaScript wrapper object that should be used to access and manipulate the variable
grid control’s data. You can find the implementation in the GridControlClass.js file in the
Configuration/Shared/MM/Scripts/Class folder.
Tree controls
Tree controls organize information into expandable and collapsible nodes.
Attribute name Description
name Name of the variable grid control
style Width of the control, in pixels
type Type of control
columns Each column must have a name, separated by a comma
columnWidth Width of each column, each separated by a comma. The columns are of equal width if you do not specify
widths.

88
EXTENDING DREAMWEAVER
User interfaces for extensions
Last updated 6/15/2011
Tree controls display data in a hierarchical format and let users expand and collapse nodes in the tree. The
MM:TREECONTROL tag lets you create tree controls for any type of information. Unlike the database tree control that is
described in
“Adding a database tree control” on page 86, no association with a database is required. The Dreamweaver
Keyboard Shortcuts editor uses the tree control, as shown in the following figure:
Creating a tree control
The MM:TREECONTROL tag creates a tree control and can use one or more tags to add structure, as described in the
following list:
• MM:TREECOLUMN is an empty, optional tag that defines a column in the tree control.
• MM:TREENODE is an optional tag that defines a node in the tree. It is a nonempty tag that can contain only other
MM:TREENODE tags.
MM:TREECONTROL tags have the following attributes:
MM:TREECOLUMN tags have the following attributes:
Attribute name Description
name Name of the tree control
size Optional. Number of rows that show in the control; default is 5 rows
theControl Optional. If the number of nodes in the theControl attribute exceeds the value of the size attribute,
scrollbars appear
multiple Optional. Allows multiple selections; default is single-selection
style Optional. Style definition for height and width of tree control; if specified, takes precedence over the size
attribute
noheaders Optional. Specifies that the column headers should not appear

89
EXTENDING DREAMWEAVER
User interfaces for extensions
Last updated 6/15/2011
For readability, TREECOLUMN tags should follow immediately after the MM:TREECONTROL tag, as shown in the following
example:
<MM:TREECONTROL name="tree1">
<MM:TREECOLUMN name="Column1" width="100" state="visible">
<MM:TREECOLUMN name="Column2" width="80" state="visible">
...
</MM:TREECONTROL>
The MM:TREENODE attributes are described in the following table:
For example, the following tree control has all its nodes expanded:
<mm:treecontrol name="test" style="height:300px;width:300px">
<mm:treenode value="rootnode1" state="expanded">
<mm:treenode value="node1" state="expanded"></mm:treenode>
<mm:treenode value="node3" state="expanded"></mm:treenode>
</mm:treenode>
<mm:treenode value="rootnode2"0state="expanded">
<mm:treenode value="node2" state="expanded"></mm:treenode>
<mm:treenode value="node4" state="expanded"></mm:treenode>
</mm:treenode>
</mm:treecontrol>
Attribute name Description
name Name of the column
value String to appear in column header
width Width of the column in pixels (percentage not supported); default is 100
align Optional. Specifies whether the text in the column should be aligned left, right, or center; default is left
state Specifies whether the column is visible or hidden
Attribute name Description
name Name of the node
value Contains the content for the given node. For more than one column, this is a pipe-delimited string. To
specify an empty column, place a single space character before the pipe (|).
state Specifies that the node is expanded or collapsed with the strings "expanded" or "collapsed".
selected You can select multiple nodes by setting this attribute on more than one tree node, if the tree has a
MULTIPLE attribute.
icon Optional. The index of built-in icon to use, starting with 0:
0 = no icon; 1 = Dreamweaver document icon; 2 = multidocument icon

90
EXTENDING DREAMWEAVER
User interfaces for extensions
Last updated 6/15/2011
Manipulating content within a tree control
Tree controls and the nodes within them are implemented as HTML tags. They are parsed by Dreamweaver and stored
in the document tree. These tags can be manipulated in the same way as any other document node. For more
information on
DOM functions and methods, see “The Dreamweaver Document Object Model” on page 95.
Add a node To add a node to an existing tree control programmatically, set the innerHTML property of the
MM:TREECONTROL tag or one of the existing MM:TREENODE tags. Setting the inner HTML property of a tree node creates
a nested node.
The following example adds a node to the top level of a tree:
var tree = document.myTreeControl;
//add a top-level node to the bottom of the tree
tree.innerHTML = tree.innerHTML + '<mm:treenode name="node3" value="node3">';
Add a child node To add a child node to the currently selected node, set the innerHTML property of the selected node.
The following example adds a child node to the currently selected node:
var tree = document.myTreeControl;
var selNode = tree.selectedNodes[0];
//deselect the node, so we can select the new one
selnode.removeAttribute("selected");
//add the new node to the top of the selected node's children
selNode.innerHTML = '<mm:treenode name="item10" value="New item11" expanded selected>' + ¬
selNode.innerHTML;
Delete a node To delete the currently selected node from the document structure, use the innerHTML or outerHTML
properties.
The following example deletes the entire selected node and any children:
var tree = document.myTreeControl;
var selNode = tree.selectedNodes[0];
selNode.outerHTML = "";
Adding a color button control
Color button controls let you add color picker interfaces to your extensions.
In addition to the standard input types such as text, check box, and button, Dreamweaver supports mmcolorbutton,
an additional input type in extensions.
Specifying <input type="mmcolorbutton"> in your code causes a color picker to appear in the user interface. You
can set the default color for the color picker by setting a value attribute on the input tag. If you do not set a value, the
color picker appears gray by default and the value property of the input object returns an empty string.
The following example shows a valid mmcolorbutton tag:
<input type="mmcolorbutton" name="colorbutton" value="#FF0000">
<input type="mmcolorbutton" name="colorbutton" value="teal">
A color button has one event, onChange, which is triggered when the color changes.
Keep a text box and the color picker synchronized. The following example creates a text box that synchronizes the
color of the text box with the color of the color picker:
<input type = "mmcolorbutton" name="fgcolorPicker"
onChange="document.fgcolorText.value=this.value">
<input type = "test" name="fgcolorText" onBlur="document.fgColorPicker.value=this.value">

91
EXTENDING DREAMWEAVER
User interfaces for extensions
Last updated 6/15/2011
In this example, the user changes the value of the text box and then tabs or clicks elsewhere. Then, the color picker
updates to show the color that is specified in the text box. Whenever the user selects a new color with the color picker,
the text box updates to show the hexadecimal value for that color.
Adding Flash content to Dreamweaver
Flash content (SWF files) can display in the Dreamweaver interface either as part of an object or command. This Flash
support is especially useful if you build extensions that use Flash forms, animations, ActionScript or other Flash
content.
Basically, you leverage the ability for Dreamweaver objects and commands to display dialogs (see “Insert bar objects”
on page 104 for more information about building objects, and “Commands” on page 131 for information about
commands) using the form tag with the object tag to embed your Flash content in a Dreamweaver dialog box.
A simple Flash dialog box example
In this example, you use Dreamweaver to create a command. The command created displays a SWF file called
myFlash.swf when the user clicks the command in the Commands menu. For specific information about creating
commands before trying this example, see
“Commands” on page 131.
Note: This example assumes that you already have a SWF file called myFlash.swf in the Configuration/Commands folder
of your Dreamweaver application installation folder. To test it with your own SWF file, save the SWF file to the
application Commands folder, and substitute your filename in all instances of myFlash.swf.
In Dreamweaver, open a new basic HTML file (this file is your Command definition file). Between the opening and
closing
title tags, enter My Flash Movie, so that the head of your page reads as follows:
<!DOCTYPE HTML PUBLIC "-//W3C//DTD HTML 4.01 Transitional//EN">
<html>
<head>
<title>My Flash Movie</title>
<meta http-equiv="Content-Type" content="text/html; charset=iso-8859-1">
</head>
Now, save the file as My Flash Movie.htm in the application Configuration/Commands folder (but do not close the file
yet). Save the file now, so that you can embed your SWF file with a relative path; otherwise Dreamweaver uses an
absolute path.
Back in the HTML document, between the opening and closing body tags, add an opening and closing form tag. Then,
within the
form tags, use the Insert > Media > Flash option to add your SWF file to the Command definition file. When
prompted, select the SWF file in the Commands folder, and click OK. Your Command definition file now looks like
the following example (the
width and height attributes could differ, depending on your SWF file properties):

92
EXTENDING DREAMWEAVER
User interfaces for extensions
Last updated 6/15/2011
<!DOCTYPE HTML PUBLIC "-//W3C//DTD HTML 4.01 Transitional//EN">
<html>
<head>
<title>My Flash Movie</title>
<meta http-equiv="Content-Type" content="text/html; charset=iso-8859-1">
</head>
<body>
<body>
<form>
<object id="FlashID" classid="clsid:D27CDB6E-AE6D-11cf-96B8-444553540000" width="700"
height="150">
<param name="movie" value="myFlash.swf">
<!--[if !IE]>-->
<object type="application/x-shockwave-flash" data="myFlash.swf" width="700"
height="150">
<!--<![endif]-->
<param name="quality" value="high"/>
<param name="wmode" value="opaque" />
<param name="swfversion" value="8.0.35.0" />
<!-- This param tag prompts users with Flash Player 6.0 r65 and higher to download the
latest version of Flash Player. Delete it if you don't want users to see the prompt. -->
<param name="expressinstall"
value="../../../../../ColdFusion8/wwwroot/lr/Scripts/expressInstall.swf" />
<!-- The browser displays the following alternative content for users with Flash Player
6.0 and older. -->
<div>
<h4>Content on this page requires a newer version of Adobe Flash Player.</h4>
<p><a href="http://www.adobe.com/go/getflashplayer"><img
src="http://www.adobe.com/images/shared/download_buttons/get_flash_player.gif" alt="Get
Adobe Flash player" width="112" height="33" /></a></p>
</div>
<!--[if !IE]>-->
</object>
<!--<![endif]-->
</object>
</form>
</body>
</html>
Save the file again. Next, exit, and restart Dreamweaver. Select the Command > My Flash Movie option, and your SWF
file appears in a Dreamweaver dialog box, as shown in the following figure:

93
EXTENDING DREAMWEAVER
User interfaces for extensions
Last updated 6/15/2011
This example shows a simple implementation of the SWF file support of Dreamweaver. After you are familiar with
building objects and commands as well as more sophisticated forms, you can integrate SWF files into your
Dreamweaver extensions.The integration provides for a more dynamic user experience. For more information, see
“Commands” on page 131 about writing a commandButtons() function to add buttons to the dialog box that displays
your SWF files.
Photoshop integration and Smart Objects
Adobe® Dreamweaver CS5® imports and handles Photoshop files as Smart Objects. Any modification done to the
original image using Photoshop is immediately reflected in Dreamweaver. For more information about APIs
integrating Photoshop to Dreamweaver, see "Photoshop integration" in the Dreamweaver API Reference.
A Smart Object example
In this example, you use Dreamweaver to create a command that updates a Photoshop file (PSD) when the user clicks
the command in the Commands menu. To enable this command to work, ensure that you have a Smart Object web
image on your HTML page. For specific information about creating commands before trying this example, see
“Commands” on page 131.
In Dreamweaver, open a new basic HTML file (this file is your Command definition file). Your Command definition
file looks like the following example:

94
EXTENDING DREAMWEAVER
User interfaces for extensions
Last updated 6/15/2011
<html xmlns:MMStr ing="http://www.adobe.com /schemes/data/ string/">
<head>
<title> Smart Objects API</ title >
<SC RIPT SRC="../Shared/Common/Scripts /dwscripts.js"></SC RIPT>
<SCRIPT LANGUAGE="Javascript">
function invokeSmartObjectJavaScriptAPICall() {
var selection = dw.getSelection();
if (!selection) {
alert("Err: No selection!");
return;
}
var node = dw.offsetsToNode(selection[0], selection[1]);
if (!node) {
alert("Err: No Node!");
return;
}
var imageSrc = node.getAttribute("src");
if (!imageSrc) {
alert("Err: No src attribute!");
return;
}
var fullPath = getFullPath(imageSrc);
if (!fullPath) {
alert("Err: No path!");
return;
}
//alert(fullPath);
alert("updateSmartObjectFromOriginal");
dw.updateSmartObjectFromOriginal(fullPath);
}
<script>
</head>
<body onload="invokeSmartObjectJavaScriptAPICall()">
</body>
</html>
Now, save the file as smartobjects.htm in the application Configuration/Commands folder. When prompted, select the
SWF file in the Commands folder, and click OK.

95
Last updated 6/15/2011
Chapter 6: The Dreamweaver Document
Object Model
In Adobe Dreamweaver, the Document Object Model (DOM) is a critically important structure for extension builders.
A DOM defines the composition of documents that are created using a markup language. By representing tags and
attributes as objects and properties, the DOM lets programming languages access and manipulate documents and their
components.
About Dreamweaver DOM
The structure of an HTML document can be seen as a document tree. The root is the html tag, and the two largest
trunks are the
head tag and the body tag. Offshoots of the head tag include the title, style, script, isindex, base,
meta, and link tags. Offshoots of the body tag include:
• Headings (h1, h2, and so on)
• Block-level elements (p, div, form, and so on)
• Inline elements (br, img, and so on)
• Other element types
Leaves on these offshoots include attributes such as width, height, alt, and others.
In a DOM, the tree structure is preserved and presented as a hierarchy of parent nodes and child nodes. The root node
has no parent, and leaf nodes have no children. At each level within the HTML structure, the HTML element can be
exposed to JavaScript as a node. Using this structure, you can access the document or any element within it.
In JavaScript, you can mention any object in the document by name or by index. For example, consider that a Submit
button with the name or ID “
myButton” is the second element in the first form in the document. Then, both of the
following references to the button are valid:
• By name, as in document.myForm.myButton
• By index, as in document.forms[0].elements[1]
The objects with the same name, such as a group of options, are collapsed into an array. You can access a particular
object in the array by incrementing the index with zero as the origin. For example, the first option with the name
“
myRadioGroup” inside a form called “myForm” is referenced as document.myForm.myRadioGroup[0].
Distinguishing between the user document and
extension DOMs
It is important to distinguish between the DOM of the user’s document and the DOM of the extension. The
information in this topic applies to both types of Dreamweaver documents, but the way that you reference each DOM
is different.

96
EXTENDING DREAMWEAVER
The Dreamweaver Document Object Model
Last updated 6/15/2011
If you are familiar with JavaScript in browsers, you can reference objects in the active document by writing document.
(for example,
document.forms[0]). In Dreamweaver, document refers to the extension file; document.forms[0]
refers to the first form in the extension UI. To reference objects in the user’s document, you must call
dw.getDocumentDOM(), dw.createDocument(), or another function that returns a user document object.
For example, to refer to the first image in the active document, you can write dw.getDocumentDOM().images[0].
You can also store the document object in a variable and use that variable in future references, as shown in the
following example:
var dom = dw.getDocumentDOM(); //get the dom of the current document
var firstImg = dom.images[0];
firstImg.src = "myImages.gif";
This kind of notation is common in files throughout the Configuration folder, especially in command files. For more
information about the
dw.getDocumentDOM() method, see the dreamweaver.getDocumentDOM() function in the
Dreamweaver API Reference.
The Dreamweaver DOM
The Dreamweaver DOM contains a subset of objects, properties, and methods from the World Wide Web Consortium
(W3C) DOM Level 1 specification, which are combined with some properties of the Microsoft Internet Explorer 4.0 DOM.
Objects, properties, and methods of the Dreamweaver DOM
The following table lists the objects, properties, methods, and events that the Dreamweaver DOM supports. Some
properties are read-only when they are accessed as properties of a specific object. A bullet (•) indicates properties that
are read-only when they are used in the listed context.

97
EXTENDING DREAMWEAVER
The Dreamweaver Document Object Model
Last updated 6/15/2011
Object Properties Methods Events
window navigator •
document •
innerWidth •
innerHeight •
screenX •
screenY •
alert()
confirm()
escape()
unescape()
close()
setTimeout()
clearTimeout()
setInterval()
clearInterval()
resizeTo()
onResize
navigator platform • None None
document forms • (an array of form objects)
images • (an array of image
objects)
layers • (an array of LAYER,
ILAYER, and absolutely positioned
elements)
child objects by name •
nodeType •
parentNode •
childNodes •
previousSibling •
nextSibling •
documentElement •
body •
URL •
parentWindow •
getElementsByTagName()
getElementsByAttributeName()
getElementById()
hasChildNodes()
onLoad
all tags/ elements nodeType •
parentNode •
childNodes •
tagName •
previousSibling •
nextSibling •
attributes by name
innerHTML
outerHTML
getAttribute()
setAttribute()
removeAttribute()
getElementsByTagName()
getElementsByAttributeName()
hasChildNodes()

98
EXTENDING DREAMWEAVER
The Dreamweaver Document Object Model
Last updated 6/15/2011
form In addition to the properties that
are available for all tags:
tags:elements • (an array of
button, checkbox,
password, radio, reset,
select, submit, text,
file, hidden, image
, and
textarea objects)
mmcolorbutton
child objects by name •
Only those methods available to all tags None
layer In addition to the properties that
are available for all tags:
visibility
left
top
width
height
zIndex
Only those methods that are available to all tags None
image In addition to the properties that
are available for all tags:
src
Only those methods that are available to all tags onMouseOver
onMouseOut
onMouseDown
onMouseUp
button reset submit In addition to the properties that
are available for all tags:
form •
In addition to the methods that are available for all
tags:
blur()
focus()
onClick
checkbox radio In addition to the properties that
are available for all tags:
checked •
form •
In addition to the methods that are available for all
tags:
blur()
focus()
onClick
password text file
hidden image (field)
textarea
In addition to the properties that
are available for all tags:
form •
value
In addition to the methods that are available for all
tags:
blur()
focus()
select()
onBlur onFocus
select In addition to the properties that
are available for all tags:
form •
options •(an array of
option objects)
selectedIndex
In addition to the methods that are available for all
tags:
blur() (Windows only)
focus() (Windows only)
onBlur (Windows
only)
onChange
onFocus
(Windows
only)
option In addition to the properties that
are available for all tags:
text
Only those methods that are available to all tags None
Object Properties Methods Events

99
EXTENDING DREAMWEAVER
The Dreamweaver Document Object Model
Last updated 6/15/2011
Properties and methods of the document object
The following table details the properties and methods of the document object that are supported in Dreamweaver. A
bullet (•) marks read-only properties.
mmcolorbutton In addition to the properties that
are available for all tags:
name
value
None onChange
array
boolean
date
function
number
object
string
regexp
Matches Netscape Navigator 4.0 Matches Netscape Navigator 4.0 None
text nodeType •
parentNode •
childNodes •
previousSibling •
nextSibling •
data
hasChildNodes() None
comment nodeType •
parentNode •
childNodes •
previousSibling •
nextSibling •
data
hasChildNodes() None
NodeList length • item() None
NamedNodeMap length • item() None
Property or method Return value
nodeType • Node.DOCUMENT_NODE
parentNode • null
parentWindow • The JavaScript object that corresponds to the document’s parent
window. (This property is defined in the Microsoft Internet Explorer
4.0 DOM, but is not part of DOM Level 1 or 2.)
childNodes • A NodeList that contains all the immediate children of the
document object. Typically the document has a single child, the
HTML object.
Object Properties Methods Events

100
EXTENDING DREAMWEAVER
The Dreamweaver Document Object Model
Last updated 6/15/2011
Properties and methods of HTML
The following table lists the properties and methods of HTML elements in Dreamweaver, along with their return
values or explanations. A bullet (•) marks read-only properties.
previousSibling • null
nextSibling • null
documentElement • The JavaScript object that corresponds to the html tag. This
property is shorthand for getting the value of
document.childNodes and extracting the HTML tag from the
NodeList.
body • The JavaScript object that corresponds to the body tag. This
property is shorthand for calling
document.documentElement.childNodes and extracting the
body tag from the NodeList. For frameset documents, this
property returns the node for the outermost frameset.
URL • The file://URL for the document or, if the file has not been saved,
an empty string.
getElementsByTagName(tagName) A NodeList that can be used to step through tags of type tagName
(for example,
img, div, and so on).
If the tagName argument is “LAYER”, the function returns all LAYER
and
ILAYER tags and all absolutely positioned elements.
If the tagName argument is “INPUT”, the function returns all form
elements. (If a name attribute is specified for one or more
tagName
objects, it must begin with a letter, which the HTML 4.01
specification requires, or the length of the array that this function
returns is incorrect.)
getElementsById(Id) Gets the element node with the specified id. Where id is a string
containing the ID of the element to get.
var dom = dw.getDocumentDOM(); var contObj =
dom.getElementById('content'); alert("The element
with the id 'content' is a " + contObj.tagName);
getElementsByAttributeName(attrName) A NodeList that can be used to step through elements with an
attribute
attrName (for example, all elements with the attribute
"for"). Not part of DOM Level 1 or 2.
getElementById(id) The HTML element with the specified ID.
hasChildNodes() true
Property or method Return value
nodeType • Node.ELEMENT_NODE
parentNode • The parent tag. If this is the HTML tag, the document object returns.
childNodes • A NodeList that contains all the immediate children of the tag.
previousSibling • The sibling node immediately prior to this one. For example, in an HTML
document the
previousSibling for the body element is the head element.
Property or method Return value

101
EXTENDING DREAMWEAVER
The Dreamweaver Document Object Model
Last updated 6/15/2011
nextSibling • The sibling node immediately following this one. For example, in an HTML
document the
nextSibling for the head element is the body element. (Any
script, style, or meta tags in the head would be child nodes of the head
element.)
tagName • The HTML tagName for the element, such as IMG, A, or DIV. The value returned
is always in uppercase letters.
attrName A string that contains the value of the specified tag attribute.The
tag.attrName cannot be used if the attrName attribute is a reserved word
in the JavaScript language (for example,
class). In this case, use
getAttribute() and setAttribute().
innerHTML The source code that is contained between the opening tag and the closing
tag. For example, in the code
<p><b>Hello</b>, World!</p>,
p.innerHTML returns <b>Hello</b>, World!. If you write to this property,
the DOM tree immediately updates to reflect the new structure of the
document. (This property is defined in the Microsoft Internet Explorer 4.0 DOM,
but is not part of DOM Level 1 or 2.)
outerHTML The source code for this tag, including the tag. For the previous example code,
p.outerHTML returns <p><b>Hello</b>, World!</p>. If you write to this
property, the DOM tree immediately updates to reflect the new structure of the
document. (This property is defined in the Microsoft Internet Explorer 4.0 DOM,
but is not part of DOM Level 1 or 2.)
getAttribute(attrName)
The value of the specified attribute if it is explicitly specified; null otherwise.
getTranslatedAttribute(attrName)
The translated value of the specified attribute or the same value that
getAttribute() returns if the attribute’s value is not translated. (This
property is not included in DOM Level 1; it was added to Dreamweaver 3 to
support attribute translation.)
setAttribute(attrName, attrValue)
Does not return a value. Sets the specified attribute to the specified value
example,
img.setAttribute("src", "image/roses.gif").
removeAttribute(attrName)
Does not return a value. Removes the specified attribute and its value from the
HTML for this tag.
getElementsByTagName(tagName)
A NodeList that can be used to step through child tags of type tagName (for
example,
IMG, DIV, and so on).
If the tagName argument is “layer”, the function returns all LAYER and ILAYER
tags and all absolutely positioned elements.
If the tagName argument is “input”, the function returns all form elements. (If a
name attribute is specified for one or more
tagName objects, it must begin
with a letter, which the HTML 4.01 specification requires, or the length of the
array that this function returns is incorrect.)
getElementsByAttributeName(attrName) A NodeList that can be used to step through elements with an attribute
attrName (for example, all elements with the attribute "for"). Not part of DOM
Level 1 or 2.
hasChildNodes() A Boolean value that indicates whether the tag has any children.
hasTranslatedAttributes() A Boolean value that indicates whether the tag has any translated attributes.
(This property is not included in DOM Level 1; it was added to Dreamweaver 3
to support attribute translation.)
Property or method Return value
102
EXTENDING DREAMWEAVER
The Dreamweaver Document Object Model
Last updated 6/15/2011
Properties and methods of text objects
Each contiguous block of text in an HTML document (for example, the text within a p tag) is represented by a
JavaScript object. Text objects never have children. The following table describes the properties and methods of text
objects that are taken from DOM Level 1 and used in Dreamweaver. A bullet (•) marks read-only properties.
Properties and methods of comment objects
A JavaScript object represents each HTML comment. The following table details the properties and methods of
comment objects that are taken from DOM Level 1 and are used in Dreamweaver. A bullet (•) marks read-only
properties.
The dreamweaver and site objects
Dreamweaver implements the standard objects that are accessible through the DOM and adds two custom objects:
dreamweaver and site. These custom objects are widely used within the APIs and in writing extensions. For more
information on the methods of the
dreamweaver and site objects, see the Dreamweaver API Reference.
Properties of the dreamweaver object
The dreamweaver object has two read-only properties, which are described in the following list:
• The appName property has the value "Dreamweaver".
Property or method Return value
nodeType • Node.TEXT_NODE
parentNode • The parent tag
child Nodes • An empty
previousSibling • The sibling node immediately prior to this one. For example, in the code <p>blah<br
/>blah</p>
, the <p> tag has three child nodes (text node, element node, text node). The
previousSibling of the third child is the <br /> tag; the previousSibling of the first
child is
null.
nextSibling • The sibling node immediately following this one. For example, in the code <p>blah<br
/>blah</p>
, the nextSibling of the first child of the p tag is the <br /> tag; the
nextSibling of the third child is null.
data The actual text string. Entities in the text are represented as a single character (for example,
the text
Joseph & I is returned as Joseph & I).
hasChildNodes() false
Property or method Return value
nodeType • Node.COMMENT_NODE
parentNode • The parent tag
childNodes • An empty NodeList array
previousSibling • The sibling node immediately prior to this one.
nextSibling • The sibling node immediately following this one.
data The text string between the comment markers (<!-- and -->)
hasChildNodes() false

103
EXTENDING DREAMWEAVER
The Dreamweaver Document Object Model
Last updated 6/15/2011
• The appVersion property has a value of the form
"versionNumber.releaseNumber.buildNumber[languageCode] (platform)".
As an example, the value of the appVersion property for the Swedish Windows version of Dreamweaver is
"8.0.XXXX [se] (Win32)"; the value for the English Macintosh version is "8.0.XXXX [en] (MacPPC)".
Note: You can find the version and build number by selecting the Help > About menu item.
The appName and appVersion properties were implemented in Dreamweaver 3 and are not available in earlier
versions of Dreamweaver.
To find the specific version of Dreamweaver, check first for the existence of appVersion and then for the version
number, as shown in the following example:
if (dreamweaver.appVersion && dreamweaver.appVersion.indexOf('3.01') != -1){¬
// execute code
}
The dreamweaver object has a property called systemScript that lets you query the language of the user’s operating
system. Use this property if you need to include special cases in your extension code for localized operating systems,
as shown in the following example:
if (dreamweaver,systemScript && (dreamweaver.systemScript.indexOf('ja')!=-1){¬
SpecialCase }
The systemScript property returns the following values for localized operating systems:
Operating systems for all European languages return 'en'.
The site object
The site object has no properties. For information about the methods of the site object, see the Dreamweaver API
Reference.
Language Value
Japanese ja
Korean ko
TChinese zh_tw
SChinese zh_cn

104
Last updated 6/15/2011
Chapter 7: Insert bar objects
You can add items to the Insert bar to automate repetitive tasks for your users or even create dialog boxes for users to
set specific attributes.
Objects reside in the Configuration/Objects folder inside the Dreamweaver application folder. The Objects subfolders
are grouped according to their location on the Insert bar, and you can open these files to see the construction of current
objects. For example, you can open the Configuration/Objects/Common/Hyperlink.htm file to see the code that
corresponds to the hypertext link object button on the Insert bar.
The following table lists the files you use to create an object:
How object files work
Objects insert specific strings of code into a user document. Objects let users add content, such as images, absolutely
positioned (AP) elements, and tables, by clicking icons or options on the menu.
Objects have the following components:
• The HTML file that defines what is inserted into a document
The head section of an Object file contains JavaScript functions (or references external JavaScript files) that process
form input from the body section and control what content is added to the user document. The body of an Object
file can contain an HTML form that accepts parameters for the object (for example, the number of rows and
columns to insert in a table) and activates a dialog box for users to input attributes.
Note: The simplest objects contain only the HTML to insert, without body and head tags. For more information, see
“Customizing Dreamweaver” on the Adobe Support Center.
• The 18 x 18 pixel image that appears on the Insert bar
• Additions to the insertbar.xml file. The insertbar.xml file defines where the object appears on the Insert bar.
A user can select an object by clicking an icon on the Insert bar or by selecting an item on the Insert menu. When
a user selects an object, the following events occur:
1 Adobe Dreamweaver calls the canInsertObject() function to determine whether to show a dialog box.
The Object file is scanned for a form tag. If a form exists and you select the Show Dialog When Inserting Objects
option in the General Preferences dialog box, Dreamweaver calls the
windowDimensions() function, if it is
defined. Dreamwaver calls the function to determine the size of the dialog box in which to display the form. If
no form exists in the Object file, Dreamweaver does not display a dialog box, and skips step 2.
Path File Description
Configuration/Objects/objecttype/ objectname.htm Specifies what to insert in the document.
Configuration/Objects/objecttype/ objectname.js Contains the functions to execute.
Configuration/Objects/objecttype/ objectname.gif Contains the image that appears on the Insert bar.
Configuration/Objects insertbar.xml Specifies the objects that appear, and their order, on the
Insert bar.

105
EXTENDING DREAMWEAVER
Insert bar objects
Last updated 6/15/2011
2 If Dreamweaver displays a dialog box in step 1, the user enters parameters for the object (such as the number of
rows and columns in a table) in the dialog box text fields and clicks OK.
3 Dreamweaver calls the objectTag() function and inserts its return value in the document after the current
selection. (It does not replace the current selection.)
4 If Dreamweaver does not find the objectTag() function, it looks for an insertObject() function and calls
that function instead.
The Insert bar definition file
The Configuration/Objects/insertbar.xml file defines the Insert bar properties. This XML file contains definitions for
each individual object, in the order in which the objects appear.
The first time a user starts Dreamweaver, the Insert bar appears horizontally above the document. After that, its
visibility and position are saved in the registry.
The Insertbar.xml tag hierarchy
The following example shows the format and hierarchy of nested tags in the insertbar.xml file:
<?xml version="1.0" ?>
<!DOCTYPE insertbarset SYSTEM "-//Adobe//DWExtension insertbar 10.0">
<insertbar xmlns:MMString="http://www.adobe.com/schemes/data/string/">
<category id="DW_Insertbar_Common" MMString:name="insertbar/categorycommon" folder="Common">
<button id="DW_Hyperlink" image="Common\Hyperlink.png"
MMString:name="insertbar/hyperlink" file="Common\Hyperlink.htm" />
<button id="DW_Email" image="Common\E-Mail Link.png"
MMString:name="insertbar/email" file="Common\E-Mail Link.htm" />
<separator />
<menubutton id="DW_Images" MMString:name="insertbar/images"
image="Common\Image.png">
<button id="DW_Image" image="Common\Image.png"
MMString:name="insertbar/image" file="Common\Image.htm" />
...
</menubutton>
<separator />
<button id="DW_TagChooser" MMString:name="insertbar/tagChooser"
image="Common\Tag Chooser.gif" command="dw.showTagChooser()"
codeOnly="TRUE"/>
</category>
...
</insertbar>
Note: The insertbar and category tags use </insertbar> and </category> closing tags to denote the end of their
content. The tags button, checkbutton, and separator use a slash (/) before the closing bracket to denote the end of their
attributes and content.
Insert bar definition tags
The insertbar.xml file contains the following tags and attributes:

106
EXTENDING DREAMWEAVER
Insert bar objects
Last updated 6/15/2011
<insertbar>
Description
This tag signals the content of the Insert bar definition file. The </insertbar> closing tag specifies the end of the
content.
Attributes
None.
Example
<insertbar>
<category id="DW_Insertbar_Common" folder="Common">
<button id="DW_Hyperlink" image="Common\Hyperlink.gif"
file="Common\Hyperlink.htm"/>0
...
</insertbar>
<category>
Description
This tag defines a category on the Insert bar (such as Common, Forms, or HTML). The </category> closing tag
specifies the end of the category content.
Note: By default, the Insert bar is organized into categories of use (such as Common, Forms, or HTML). In previous
versions of Dreamweaver, the Insert bar was organized similarly by tabs. Users can set their own preferences for how the
Insert bar objects are organized (by category or tab). If the user has selected the tab organization, the category tag defines
each tab.
Attributes
id, {folder}, {showIf}
Example
<category id="DW_Insertbar_Common" folder="Common">
<button id="DW_Hyperlink" image="Common\Hyperlink.gif"
file="Common\Hyperlink.htm"/>
</category>
<menubutton>
Description
This tag defines a pop-up menu for the Insert bar.
Attributes
id, image, {showIf}, {name}, {folder}

107
EXTENDING DREAMWEAVER
Insert bar objects
Last updated 6/15/2011
Example
<menubutton
id="DW_ImageMenu"
name="Images"
image="Common\imagemenu.gif"
folder="Images">
<button id="DW_Image"
image="Common\Image.gif"
enabled=""
showIf=""
file="Common\Image.htm" />
</menubutton>
<button />
Description
This tag defines a button on the Insert bar that the user clicks to execute the code that the command or file attributes
specify.
Attributes
id, image, name, {canDrag}, {showIf}, {enabled}, {command}, {file}, {tag}, {codeOnly}
Example
<button id="DW_Object"
image="Common\Object.gif"
name="Object"
enabled="true"
showIf=""
file="Common\Obect.htm"
/>
<checkbutton />
Description
A checkbutton is a button that has a checked or unchecked state. When clicked, a checkbutton appears pressed in and
highlighted. When it is unchecked, a checkbutton appears flat. Dreamweaver has Mouse-over, Pressed, Mouse-over-
while-pressed, and Disabled-while-pressed states. The command must ensure that clicking the checkbutton causes its
state to change.
Attributes
id, image, checked, {showIf}, {enabled}, {command}, {file}, {tag}, {name}, {codeOnly}
Example
<checkbutton id="DW_StandardView"
name = "Standard View"
image="Tools\Standard View.gif"
checked="_View_Standard"
command="dw.getDocumentDOM().setShowLayoutView(false)"/>

108
EXTENDING DREAMWEAVER
Insert bar objects
Last updated 6/15/2011
<separator />
Description
This tag displays a vertical line on the Insert bar.
Attributes
{showIf}
Example
<separator showIf="_VIEW_CODE"/>
Insert bar definition tag attributes
The attributes for the Insert bar definition tags have the following meanings:
id="unique id"
Description
The id attribute is an identifier for the buttons that appear on the Insert bar. The id attribute must be unique for the
element within the file.
Example
id="DW_Anchor"
image="image_path”
Description
This attribute specifies the path, relative to the Dreamweaver Configuration folder, to the icon file that appears on the
Insert bar. The icon can be in any format that Dreamweaver can render, but typically it is in GIF or JPEG file format,
with a size of 18 x 18 pixels.
Example
image="Common/table.gif"
canDrag="Boolean”
Description
This attribute specifies whether the user can drag the icon into the code or workspace to insert the object into a
document. If omitted, the default value is
true.
Example
canDrag="false"

109
EXTENDING DREAMWEAVER
Insert bar objects
Last updated 6/15/2011
showIf="enabler"
Description
This attribute specifies that this button should appear on the Insert bar only if the given Dreamweaver enabler is a true
value. If you do not specify
showIf, the button always appears. The possible enablers are _SERVERMODEL_ASP,
_SERVERMODEL_ASPNET, _SERVERMODEL_JSP, _SERVERMODEL_CFML (for all versions of Adobe ColdFusion),
_SERVERMODEL_CFML_UD4 (only for UltraDev version 4 of Adobe ColdFusion), _SERVERMODEL_PHP,
_FILE_TEMPLATE, _VIEW_CODE, _VIEW_DESIGN, _VIEW_LAYOUT, _VIEW_EXPANDED_TABLES, and
_VIEW_STANDARD.
To specify multiple enablers, place a comma (which means AND) between the enablers. To specify NOT, use an
exclamation point (
!).
Example
If you want a button to appear only in Code view for an ASP page, specify the enablers as follows:
showIf="_VIEW_CODE, _SERVERMODEL_ASP"
enabled="enabler"
Description
This attribute specifies that the item is available to the user if the DW_enabler value is true. If you do not specify the
enabled function, the item defaults to always enabled. The possible enablers are _SERVERMODEL_ASP,
_
SERVERMODEL_ASPNET, _SERVERMODEL_JSP, _SERVERMODEL_CFML (for all versions of ColdFusion),
_
SERVERMODEL_CFML_UD4 (only for UltraDev version 4 of ColdFusion), _SERVERMODEL_PHP, _FILE_TEMPLATE,
_VIEW_CODE, _VIEW_DESIGN, _VIEW_LAYOUT, _VIEW_EXPANDED_TABLES, and _VIEW_STANDARD.
To specify multiple enablers, place a comma (which means AND) between the enablers. To specify NOT, use an
exclamation point (
!).
Example
If you want the button to be available only in Code view, specify the following:
enabled="_VIEW_CODE"
This dims the button in other views.
checked="enabler"
Description
The checked attribute is required if you use the checkbutton tag.
The item is checked if the DW_enabler value is true. The possible enablers are _SERVERMODEL_ASP,
_SERVERMODEL_ASPNET, _SERVERMODEL_JSP, _SERVERMODEL_CFML (for all versions of ColdFusion),
_SERVERMODEL_CFML_UD4 (only for UltraDev version 4 of ColdFusion), _SERVERMODEL_PHP, _FILE_TEMPLATE,
_VIEW_CODE, _VIEW_DESIGN, _VIEW_LAYOUT, _VIEW_EXPANDED_TABLES, and _VIEW_STANDARD.
To specify multiple enablers, place a comma (which means AND) between them. To specify NOT, use an exclamation
point (
!).
Example
checked="_View_Layout"

110
EXTENDING DREAMWEAVER
Insert bar objects
Last updated 6/15/2011
command="API_function"
Description
Instead of referring Dreamweaver to an HTML file that contains the code to insert, you use this tag to specify a
command that Dreamweaver performs when the button is clicked.
Example
command="dw.showTagChooser()"
file="file_path"
Description
The file attribute specifies the path, relative to the Dreamweaver Configuration folder, of an object file. Dreamweaver
derives the tooltip for the object icon from the title of the object file, unless you specify the
name attribute.
Example
file="Templates/Editable.htm"
tag="editor"
Description
This attribute tells Dreamweaver to invoke a Tag editor. In Code view, if the tag attribute is defined and the user clicks
the object, Dreamweaver invokes the Tag dialog box. In Code view, if you specify the
tag and command attributes,
Dreamweaver invokes the Tag editor. In Design view, if
codeOnly="TRUE" and you do not specify the file attribute,
Dreamweaver invokes Code and Design view, places focus in the code, and invokes the Tag editor.
Example
tag = "form"
name="tooltip_text"
Description
The name attribute specifies the tooltip that appears when the mouse pointer rests over the object. If you specify an
object file but do not specify the
name attribute, Dreamweaver uses the name of the object file for the tooltip.
Note: If the name attribute is not provided, the object will not be available for grouping in the Favorites category on the
Insert bar UI.
Some Insert bar objects use a variation of the name attribute with prefix MMString. The MMString denotes a localized
string; these values are explained in
“Localizing an extension” on page 80.
Example
name = "cfoutput"

111
EXTENDING DREAMWEAVER
Insert bar objects
Last updated 6/15/2011
Modifying the Insert bar
You can move objects from one category to another, rename categories, and completely remove objects from the panel.
To make the changes appear in the Insert bar, you must either restart Dreamweaver or reload extensions. For
information on reloading extensions, see
“Reloading extensions” on page 78.
Move or copy an object from one Insert bar category to another or to a new location within a category
1 Save a backup copy of insertbar.xml (with a name such as insertbar.backup.xml).
2 Open the original insertbar.xml file.
3 Find the button tag that represents the object you want to move or copy. For example, to move the Image object
from its location in the Common category, find the
button tag that has an id attribute of "DW_Image".
4 Cut or copy the entire button tag.
5 Find the category tag that represents the category in which you want to move or copy the object.
6 Find the location within the category where you want the object to appear.
7 Paste the copied button tag.
8 Save the insertbar.xml file.
9 Reload extensions.
Remove an object from the Insert bar
1 Save a backup copy of insertbar.xml (with a name such as insertbar.backup.xml).
2 Open the original insertbar.xml file.
3 Find the button tag that represents the object you want to remove.
4 Delete the entire button tag.
5 Save the insertbar.xml file.
6 On your disk, move the object’s HTML, GIF, and JavaScript files out of their current folder, and put them into a
folder that isn’t listed in the insertbar.xml file. For example, you can create a new folder in the
Configuration/Objects folder named Unused, and move the object’s files there. (If you’re certain you want to
remove the object, you can delete those files entirely; however, it’s a good idea to keep backups of those files in case
you need to restore the object later.)
7 Reload extensions.
Change the order of categories in the Insert bar
1 Save a backup copy of insertbar.xml (with a name such as insertbar.backup.xml).
2 Open the original insertbar.xml file.
3 Find the category tag that corresponds to the category you want to move, and select that tag, including all the tags
it contains.
4 Cut that tag.
5 Paste the tag into its new location. Be sure to paste the tag in a location that isn’t inside any other category tag.
6 Save the insertbar.xml file.
7 Reload extensions.

112
EXTENDING DREAMWEAVER
Insert bar objects
Last updated 6/15/2011
Create a new category
1 Save a backup copy of insertbar.xml (with a name such as “insertbar.backup.xml”).
2 Open the original insertbar.xml file.
3 Create a new category tag, specifying the default folder for the category and a set of objects to appear in the category.
4 For information on the syntax of the tags in insertbar.xml, see “Insert bar definition tags” on page 105.
5 Save the insertbar.xml file.
6 Reload extensions.
Add a new object to the Insert bar
You can add objects to the Insert bar. To make the changes appear in the Insert bar, you must either restart
Dreamweaver or reload extensions. For information on reloading extensions, see
“Reloading extensions” on page 78.
1 Define the specific string of code for the user’s document by using HTML and, optionally, JavaScript.
2 Identify or create an image (18 x 18 pixels) for the button in the Dreamweaver interface.
If you create a larger image, Dreamweaver scales it to 18 x 18 pixels. If you do not create an image for your object,
a default object icon with a question mark (?) appears on the Insert bar.
3 Add the new files to the Configuration/Objects folder.
4 Edit the insertbar.xml file to identify the location of these new files and set attributes (see “The Insert bar definition
file” on page 105) for the button’s appearance.
5 Restart Dreamweaver or reload extensions.
The new object appears on the Insert bar in the specified location.
Note: Although you can store Object files in separate folders, it’s important that each filename be unique. The
dom.insertObject() function, for example, looks for files anywhere within the Objects folder without regard to
subfolders (for more information about the
dom.insertObject() function, see the Dreamweaver API Reference). If a
file called Button.htm exists in the Forms folder and another object file called Button.htm is in the MyObjects folder,
Dreamweaver cannot distinguish between them. If two separate instances of Button.htm exist,
dom.insertObject()
displays two objects called Button, and the user might not recognize any difference.
Adding objects to the Insert menu
To add or control the position of an object on the Insert menu (or any other menu), modify the menus.xml file. This
file controls the entire menu structure for Dreamweaver. For more information about modifying the menus.xml file,
see
“Menus and menu commands” on page 141.
If you plan to distribute the extension to other Dreamweaver users, see “Working with the Extension Manager” on
page 81 to learn more about packaging extensions.
A simple insert object example
This example adds an object to the Insert bar so users can add a line through (strike through) selected text by clicking
a button. This object is useful if a user needs to make editorial comments in a document.

113
EXTENDING DREAMWEAVER
Insert bar objects
Last updated 6/15/2011
Because this example performs text manipulation, you may want to explore some of the objects from the Text pop-up
menu in the HTML category on the Insert bar as models. For example, look at the Bold, Emphasis, and Heading object
files to see similar functionality, where Dreamweaver wraps a tag around selected text.
You will perform the following steps to create the strike-through insert object:
Create the HTML file
The title of the object is specified between the opening and closing title tags. You also specify that the scripting
language is JavaScript.
1 Create a new blank file.
2 Add the following code:
<html>
<head>
<title>Strikethrough</title>
<script language="javascript">
</script>
</head>
<body>
</body>
</html>
3 Save the file as Strikethrough.htm in the Configuration/Objects/Text folder.
Adding the JavaScript functions
In this example, the JavaScript functions define the behavior and insert code for the Strikethrough object. You must
place all the API functions in the head section of the file. The existing object files, such as
Configuration/Objects/Text/Em.htm, follow a similar pattern of functions and comments.
The first function the object definition file uses is isDOMRequired(), which tells whether the Design view needs to be
synchronized to the existing Code view before execution continues. However, because the Superscript object might be
used with many other objects in the Code view, it does not require a forced synchronization.
Add the isDOMRequired() function
1 In the head section of the Strikethrough.htm file, between the opening and closing script tags, add the following
function:
<script language="javascript">
function isDOMRequired() {
// Return false, indicating that this object is available in Code view.
return false;
}
</script>
2 Save the file.
Next, decide whether to use objectTag() or insertObject() for the next function. The Strikethrough object simply
wraps the
s tag around the selected text, so it doesn’t meet the criteria for using the insertObject() function (see
“insertObject()” on page 122).

114
EXTENDING DREAMWEAVER
Insert bar objects
Last updated 6/15/2011
Within the objectTag() function, use dw.getFocus() to determine whether the Code view is the current view. If the
Code view has input focus, the function should wrap the appropriate (uppercase or lowercase) tag around the selected
text. If the Design view has input focus, the function can use
dom.applyCharacterMarkup() to assign the formatting
to the selected text. Remember that this function works only for supported tags (see
dom.applyCharacterMarkup()
in the Dreamweaver API Reference). For other tags or operations, you may need to use other API functions. After
Dreamweaver applies the formatting, it should return the insertion point (cursor) to the document without any
messages or prompting. The following procedure shows how the
objectTag() function now reads.
Add the objectTag() function
1 In the head section of the Strikethrough.htm file, after the isDOMRequired() function, add the following function:
function objectTag() {
// Determine if the user is in Code view.
var dom = dw.getDocumentDOM();
if (dw.getFocus() == 'textView' || dw.getFocus(true) == 'html'){
var upCaseTag = (dw.getPreferenceString("Source Format", "Tags Upper Case", "") ==
'TRUE');
// Manually wrap tags around selection.
if (upCaseTag){
dom.source.wrapSelection('<S>','</S>');
}else{
dom.source.wrapSelection('<s>','</s>');
}
// If the user is not in Code view, apply the formatting in Design view.
}else if (dw.getFocus() == 'document'){
dom.applyCharacterMarkup("s");
}
// Just return--don't do anything else.
return;
}
2 Save the file as Strikethrough.htm in the Configuration/Objects/Text folder.
Instead of including the JavaScript functions in the head section of the HTML file, you can create a separate JavaScript
file. This separate organization is useful for objects that contain several functions, or functions that might be shared
by other objects.
Separate the HTML object definition file from the supporting JavaScript functions
1 Create a new blank file.
2 Paste all the JavaScript functions into the file.
3 Remove the functions from Strikethrough.htm, and add the JavaScript filename to the src attribute of the script
tag, as shown in the following example:
<html>
<head>
<title>Strikethrough</title>
<script language="javascript" src="Strikethrough.js">
</script>
</head>
<body>
</body>
</html>
4 Save the Strikethrough.htm file.

115
EXTENDING DREAMWEAVER
Insert bar objects
Last updated 6/15/2011
5 Save the file that now contains the JavaScript functions as Strikethrough.js in the Configuration/Objects/Text
folder.
Create the image for the Insert bar
1 Create a GIF image (18 x 18 pixels), as shown in the following figure:
2 Save the file as Strikethrough.gif in the Configuration/Objects/Text folder.
Editing the insertbar.xml file
Next, you need to edit the insertbar.xml file so Dreamweaver can associate these two items with the Insert bar interface.
Note: Before you edit the insertbar.xml file, you might want to copy the original one as insertbar.xml.bak, so you have a
backup.
The code within the insertbar.xml file identifies all the existing objects on the Insert bar.
• Each category tag in the XML file creates a category in the interface.
• Each menubutton tag creates a pop-up menu on the Insert bar.
• Each button tag in the XML file places an icon on the Insert bar and connects it to the proper HTML file or
function.
Add the new object to the Insert bar
1 Find the following line near the beginning of the insertbar.xml file:
<category id="DW_Insertbar_Common" MMString:name="insertbar/category/common"
folder="Common">
This line identifies the beginning of the Common category on the Insert bar.
2 Start a new line after the category tag; then insert the button tag and assign it the id, image, and file attributes
for the Strikethrough object.
The ID must be a unique name for the button (following standard naming conventions, use
DW_Text_Strikethrough for this object). The image and file attributes simply tell Dreamweaver the location of
the supporting files, as shown here:
<button id="DW_Text_Strikethrough"
image="Text\Strikethrough.gif"
file="Text\Strikethrough.htm"/>
3 Save the insertbar.xml file.
4 Reload the extensions (see “Reloading extensions” on page 78).
The new object appears at the beginning of the Common category on the Insert bar.

116
EXTENDING DREAMWEAVER
Insert bar objects
Last updated 6/15/2011
Adding a dialog box
You can add a form to your object to let the user enter parameters before Dreamweaver inserts the specified code (for
example, the Hyperlink object requests the text, link, target, category index, title, and access key values from the user).
In this example, you add a form to the Strikethrough object from the previous example. The form opens a dialog box
that provides the user with the option to change the text color to red as well as to add the strike-through tag.
This example assumes you have already created a separate JavaScript file called Strikethrough.js.
First, in Strikethrough.js, you add the function that the form calls if the user changes the text color. This function is
similar to the
objectTag() function for the Strikethrough object, but is an optional function.
Create the function
1 After the objectTag() function in Strikethrough.js, create a function called fontColorRed() by entering the
following code:
function fontColorRed(){
var dom = dw.getDocumentDOM();
if (dw.getFocus() == 'textView' || dw.getFocus(true) == 'html'){
var upCaseTag = (dw.getPreferenceString("Source Format", "Tags Upper Case", "")
== 'TRUE');
// Manually wrap tags around selection.
if (upCaseTag){
dom.source.wrapSelection('<FONT COLOR="#FF0000">','</FONT>');
}else{
dom.source.wrapSelection('<font color="#FF0000">','</font>');
}
}else if (dw.getFocus() == 'document'){
dom.applyFontMarkup("color", "#FF0000");
}
// Just return -- don't do anything else.
return;
}
Note: Because dom.applyCharacterMarkup() doesn’t support font color changes, you need to find the appropriate
API function for font color changes. (For more information, see
dom.applyFontMarkup() in the Dreamweaver API
Reference).
2 Save the file as Strikethrough.js.
Next, in the Strikethrough.htm file, you add the form. The form for this example is a simple check box that calls the
fontColorRed() function when the user clicks on it. You use the form tag to define your form, and the table tag for
layout control (otherwise, the dialog box might wrap words or size awkwardly).
Add the form
1 After the body tag, add the following code:
<form>
<table border="0" height="100" width="100">
<tr valign="baseline">
<td align="left" nowrap>
<input type="checkbox" name="red" onClick=fontColorRed()>Red text</input>
</td>
</tr>
</table>
</form>

117
EXTENDING DREAMWEAVER
Insert bar objects
Last updated 6/15/2011
2 Save the file as Strikethrough.htm.
3 Reload the extensions (see “Reloading extensions” on page 78).
Test the dialog box
1 Select the Red Text check box.
2 Click OK to perform the objectTag() function, which adds the strike-through:
Building an Insert bar pop-up menu
The Dreamweaver Insert bar introduces a new organization for objects. The Insert bar now supports pop-up menus
to help organize objects into smaller groups, as shown in the following figure.
The following example builds a new category on the Insert bar called Editorial and then adds a pop-up menu to that
category. The pop-up menu contains the Strikethrough object you already created and groups it with a Blue Text object
you create. The objects in the Editorial category let users:
• Make editorial comments in a file

118
EXTENDING DREAMWEAVER
Insert bar objects
Last updated 6/15/2011
• Strike through the content they want to remove or make new content blue
Organize the files
1 Create a new Configuration/Objects/Editorial folder in your Dreamweaver installation folder.
2 Copy the files for the Strikethrough object example you created (Strikethrough.htm, Strikethrough.js, and
Strikethrough.gif) to the Editorial folder.
Create the Blue Text object
1 Create an HTML file.
2 Add the following code:
<html>
<head>
<title>Blue Text</title>
<script language="javascript">
//--------------- API FUNCTIONS---------------
function isDOMRequired() {
// Return false, indicating that this object is available in Code view.
return false;
}
function objectTag() {
// Manually wrap tags around selection.
var dom = dw.getDocumentDOM();
if (dw.getFocus() == 'textView' || dw.getFocus(true) == 'html'){
var upCaseTag = (dw.getPreferenceString("Source Format", "Tags Upper Case", "") ==
'TRUE');
// Manually wrap tags around selection.
if (upCaseTag){
dom.source.wrapSelection('<FONT COLOR="#0000FF">','</FONT>');
}else{
dom.source.wrapSelection('<font color="#0000FF">','</font>');
}
}else if (dw.getFocus() == 'document'){
dom.applyFontMarkup("color", "#0000FF");
}
// Just return -- don't do anything else.
return;
}
</script>
</head>
<body>
</body>
</html>
3 Save the file as AddBlue.htm in the Editorial folder.
Now you can create an image for the Blue Text Object.

119
EXTENDING DREAMWEAVER
Insert bar objects
Last updated 6/15/2011
Create the image
1 Create a GIF file that is 18 x 18 pixels, which looks like the following figure:
2 Save the image as AddBlue.gif in the Editorial folder.
Next, you edit the insertbar.xml file. This file defines the objects on the Insert bar and their locations. Notice the
various
menubutton tags and their attributes within the category tags; these menubutton tags define each pop-up
menu in the HTML category. Within the
menubutton tags, each button tag defines an item in the pop-up menu.
Edit the insertbar.xml
1 Find the following line of code near the beginning of the file:
<insertbar xmlns:MMString="http://www.adobe.com/schemes/data/string/">
The insertbar tag defines the beginning of all the Insert bar contents.
2 After that line, add a new category tag for the Editorial category you want to create. Give it a unique ID, name,
and folder attributes, and add a closing
category tag, as shown in the following example:
<category id="DW_Insertbar_Editorial" name="Editorial" folder="Editorial">
</category>
3 Reload extensions. For information on reloading extensions, see “Reloading extensions” on page 78.
The Editorial category appears on the Insert bar:
4 Within the opening and closing category tags, add the pop-up menu by using the menubutton tag and the
following attributes, including a unique ID.
<menubutton id="DW_Insertbar_Markup" name="markup" image="Editorial\Strikethrough.gif"
folder="Editorial">
For more information about attributes, see “Insert bar definition tag attributes” on page 108.
5 Add the objects for the new pop-up menu using the button tag, as follows:
<button id="DW_Editorial_Strikethrough" image="Editorial\Strikethrough.gif"
file="Editorial\Strikethrough.htm"/>
6 After the Strikethrough object button tag, add the hypertext object, as follows:

120
EXTENDING DREAMWEAVER
Insert bar objects
Last updated 6/15/2011
<button id="DW_Blue_Text" image="Editorial\AddBlue.gif name="Blue Text"
file="Editorial\AddBlue.htm"/>
Note: The button tag does not have a separate closing tag; it simply ends with "/>" .
7 End the pop-up menu with the </menubutton> closing tag.
The following code shows your entire category with the pop-up menu and the two objects:
<category id="DW_Insertbar_Editorial" name="Editorial" folder="Editorial">
<menubutton id="DW_Insertbar_Markup" name="markup"
image="Editorial\Strikethrough.gif" folder="Editorial">
<button id="DW_Editorial_Strikethrough"
image="Editorial\Strikethrough.gif" file="Editorial\Strikethrough.htm"/>
<button id="DW_Blue_Text" image="Editorial\AddBlue.gif" name="Blue Text"
file="Editorial\AddBlue.htm"/>
</menubutton>
</category>
Test the new pop-up menu
1 Reload extensions. For information on reloading extensions, see “Reloading extensions” on page 78.
2 Click the Editorial menu.
The following pop-up menu appears:
The objects API functions
This section describes the functions in the objects API. You must define either the insertObject() or the
objectTag() function. For details about these functions, see “insertObject()” on page 122. The remaining functions
are optional.
canInsertObject()
Availability
Dreamweaver MX.
Description
This function determines whether to display the Object dialog box.
Arguments
None.
Returns
Dreamweaver expects a Boolean value.

121
EXTENDING DREAMWEAVER
Insert bar objects
Last updated 6/15/2011
Example
The following code tells Dreamweaver to check to see that the document contains a particular string before allowing
the user to insert the selected object:
function canInsertObject(){
var docStr = dw.getDocumentDOM().documentElement.outerHTML;
var patt = /hava/;
var found = ( docStr.search(patt) != -1 );
var insertionIsValid = true;
if (!found){
insertionIsValid = false;
alert("the document must contain a 'hava' string to use this object.");}
return insertionIsValid;}
displayHelp()
Description
If you define this function, it displays a Help button below the OK and Cancel buttons in the Parameters dialog box.
This function is called when the user clicks the Help button.
Arguments
None.
Returns
Dreamweaver expects nothing.
Example
The following example opens the myObjectHelp.htm file in a browser; this file explains how to use the extension:
function displayHelp(){
var myHelpFile = dw.getConfigurationPath() +
'/ExtensionsHelp/myObjectHelp.htm';
dw.browseDocument(myHelpFile);
}
isDOMRequired()
Description
This function determines whether the object requires a valid DOM to operate. If this function returns a true value or
if the function is not defined, Dreamweaver assumes that the command requires a valid DOM and synchronizes the
Code and Design views for the document before executing. Synchronization causes all edits in the Code view to be
updated in the Design view.
Arguments
None.
Returns
Dreamweaver expects a true value if a command requires a valid DOM to operate; false otherwise.

122
EXTENDING DREAMWEAVER
Insert bar objects
Last updated 6/15/2011
insertObject()
Availability
Dreamweaver MX.
Description
This function is required if the objectTag() function is not defined. It is called when the user clicks OK. It either
inserts code into the user’s document and closes the dialog box or displays an error message and leaves the dialog box
open. This works as an alternate function to use in objects instead of the
objectTag() function. It does not assume
that the user is inserting text at the current insertion point and allows data validation when the user clicks OK. You
should use the
insertObject() function if one of the following conditions exists:
• You need to insert code in more than one place.
• You need to insert code somewhere other than the insertion point.
• You need to validate input before inserting code.
If none of these conditions apply, use the objectTag() function.
Arguments
None.
Returns
Dreamweaver expects a string that contains an error message or an empty string. If it returns an empty string, the
Object dialog box closes when the user clicks OK. If it is not empty, Dreamweaver displays the error message and the
dialog box remains.
Enabler
canInsertObject()
Example
The following example uses the insertObject() function because it needs to validate input before inserting code:
function insertObject() {
var theForm = document.forms[0];
var nameVal = theForm.firstField.value;
var passwordVal = theForm.secondField.value;
var errMsg = "",
var isValid = true;
// ensure that field values are complete and valid
if (nameVal == "" || passwordVal == "") {
errMsg = "Complete all values or click Cancel."
} else if (nameVal.length < 4 || passwordVal.length < 6) {
errMsg = "Your name must be at least four characters, and your password at
least six";
}
if (!errMsg) {
// do some document manipulation here. Exercise left to the reader
}
return errMsg;
}

123
EXTENDING DREAMWEAVER
Insert bar objects
Last updated 6/15/2011
objectTag()
Description
The objectTag() and insertObject() functions are mutually exclusive: If both are defined in a document, the
objectTag() function is used. For more information, see “insertObject()” on page 122.
This function inserts a string of code into the user’s document. Returning an empty string, or a null value (also known
as "
return"), is a signal to Dreamweaver to do nothing.
Note: The assumption is that edits have been made manually before the return statement, so doing nothing in this case
is not equivalent to clicking Cancel.
In Dreamweaver, if the focus is in Code view and the selection is a range (meaning that it is not an insertion point),
the range is replaced by the string that the
objectTag() function returns. This is the value true, even if the
objectTag() function returns an empty string or returns nothing. The objectTag() function returns an empty
string or a
null value because edits to the document have already been made manually. Otherwise, double quotation
marks (" ") often delete the edit by replacing the selection.
Arguments
None.
Returns
Dreamweaver expects the string to insert into the user’s document.
Example
The following example of the objectTag() function inserts an OBJECT/EMBED combination for a specific ActiveX
control and plug-in:
function objectTag() {
return '\n' +
'<OBJECT CLASSID="clsid:166F1OOB-3A9R-11FB-8075444553540000" \n'¬
+ 'CODEBASE="http://www.mysite.com/product/cabs/¬
myproduct.cab#version=1,0,0,0" \n' + 'NAME="MyProductName"> \n' ¬
+ '<PARAM NAME="SRC" VALUE=""> \n' + '<EMBED SRC="" HEIGHT="" ¬
WIDTH="" NAME="MyProductName"> \n' + '</OBJECT>'
}
windowDimensions()
Description
This function sets specific dimensions for the Options dialog box. If this function is not defined, the window
dimensions are computed automatically.
Note: Do not define this function unless you want an Options dialog box that is larger than 640 x 480 pixels.
Arguments
platform
• The value of the platform argument is either "macintosh" or "windows", depending on the user’s platform.

124
EXTENDING DREAMWEAVER
Insert bar objects
Last updated 6/15/2011
Returns
Dreamweaver expects a string of the form "widthInPixels,heightInPixels".
The returned dimensions are smaller than the size of the entire dialog box because they do not include the area for the
OK and Cancel buttons. If the returned dimensions do not accommodate all options, scroll bars appear.
Example
The following example of the windowDimensions() function sets the dimensions of the Parameters dialog box to 648
x 520 pixels for Windows and 660 x 580 pixels for the Macintosh:
function windowDimensions(platform){
var retval = ""
if (platform = = "windows"){
retval = "648, 520";
}else{
retval = "660, 580";
}
return retval;
}

125
Last updated 6/15/2011
Chapter 8: Browser compatibility check
issues API
In Adobe Dreamweaver, the browser compatibility check (BCC) feature helps you create page layouts that work well
(that is, the page layouts have the same look and function) across multiple browsers by locating combinations of
HTML and CSS that can trigger browser rendering bugs. The feature uses JavaScript to search the user’s document for
the problematic combinations of HTML and CSS. The JavaScript code is stored in HTML files called Issue detection
files; these files must be saved in the Configuration/BrowserProfiles/Issues/ folder to work properly.
How detection works
The first time a user chooses to run a browser compatibility check (and anytime the user clicks OK in the Target
Browsers dialog box), the following events occur:
1 Dreamweaver reads in the profiles for the chosen browsers from the Configuration/BrowserProfiles/ folder.
2 Dreamweaver calls the getIssueID() function in each Issue file in the Configuration/BrowserProfiles/Issues/
folder to get the unique ID of each Issue.
3 Dreamweaver calls the getAffectedBrowserDisplayNames() function, if defined, for each Issue.
4 Dreamweaver calls the getAffectedBrowserProfiles() function for each Issue to determine whether the Issue
affects one or more of the chosen browsers.
5 Dreamweaver calls the getIssueName() function for each Issue to determine the name to display in the Results
panel when the Issue is detected.
6 Dreamweaver calls the getIssueDescription function for each Issue to determine the text to display in the right
side of the Results panel and in the tooltip when the user mouses over an Issue squiggly in Code view, if the Issue
is detected.
The following events occur for each browser chosen in the BCC Settings dialog box after step 6 in the preceding
procedure and for each subsequent browser compatibility check.
Sequence of events
1 Dreamweaver parses the styles that apply to the current document, whether defined inline, in the head, or in an
external style sheet, as the affected browser would read them.
2 Dreamweaver calls the findIssue() function in each Issue file that applies to the affected browser.
An Issues example
The following examples are the files ColAndColgroupCapturedByCaption.htm and
ColAndColgroupCapturedByCaption.js located in the Configuration/BrowserProfiles/Issues/ folder.

126
EXTENDING DREAMWEAVER
Browser compatibility check issues API
Last updated 6/15/2011
ColAndColgroupCapturedByCaption.htm
<!DOCTYPE HTML SYSTEM "-//
//DWExtension layout-engine 5.0//dialog">
<html>
<head>
<title>Col and Colgroup Captured by Caption</title>
<script src="../../Shared/Common/Scripts/dwscripts.js"></script>
<script src="issue_utils.js"></script>
<script src="ColAndColgroupCapturedByCaption.js"></script>
<script>
//--------------- LOCALIZEABLE GLOBALS------------------
var ISSUE_NAME = "Col and Colgroup/Caption Conflict";
var ISSUE_DESC = "If the caption tag is placed directly after the opening table tag as required
by the HTML 4.01 specification, any styles applied to col and colgroup tags in the same table
are ignored.";
//--------------- END LOCALIZEABLE---------------
</script>
</head>
<body>
</body>
</html>
ColAndColgroupCapturedByCaption.js
function findIssue(){
var DOM = dw.getDocumentDOM();
var issueNodes = new Array();
if (DOM){
// first see if there are any caption tags in the doc.
var captions = DOM.getElementsByTagName('caption');
// declare a mess of variables that we'll need in the
// for loop below.
var currCap = null, props = null, parentTable = null;
var colgroups = null, cols = null, allcol = null;
var property = "", definedStyles = new Array();
// ok, now loop through all the captions, if any.
for (var i=0; i < captions.length; i++){
currCap = captions[i];
parentTable = currCap.parentNode;
// the caption is only a problem if it's in the valid
// spot (i.e., the first child of the table)
if (currCap == parentTable.childNodes[0]){
// find all colgroup and col tags that are in the
// same table as the caption.
colgroups = parentTable.getElementsByTagName('colgroup');
cols = parentTable.getElementsByTagName('col');
allcol = colgroups.concat(cols);
for (var x=0; x < allcol.length; x++){

127
EXTENDING DREAMWEAVER
Browser compatibility check issues API
Last updated 6/15/2011
// if styles are declared for any colgroup or col
// tag in this table, we have a problem node. don't
// bother looking further.
props = window.getDeclaredStyle(allcol[x]);
property = "";
definedStyles.length = 0;
for (property in props) {
definedStyles.push(property);
}
if (definedStyles.length > 0){
issueNodes.push(currCap);
break;
}
}
}
}
}
return issueNodes;
}
function getAffectedBrowserDisplayNames(){
return new Array("Safari 2.0");
}
function getAffectedBrowserProfiles(){
return new Array("Safari 2.0");
}
function getIssueID(){
return "COL_AND_COLGROUP_CAPTURED_BY_CAPTION";
}
function getIssueName(){
return ISSUE_NAME;
}
function getIssueDescription(){
return ISSUE_DESC;
}
function getConfidenceLevel(){
//DETCON 4
return issueUtils.CONFIDENCE_HIGH;
}
The issues API functions
All of the functions in the issues API are required except for getAffectedBrowserDisplayNames(). As with all
extension APIs, you are responsible for writing the body of each function and returning an appropriate value to
Dreamweaver. For information about browser compatibility check functions, see the “Page Content” topic in the
Dreamweaver API Reference.
findIssue()
Availability
Dreamweaver CS3.

128
EXTENDING DREAMWEAVER
Browser compatibility check issues API
Last updated 6/15/2011
Description
Searches the document for the combination of CSS and HTML that will trigger a specific browser rendering issue.
Arguments
None.
Returns
An array of element nodes that exhibit (or otherwise represent) the problem. Dreamweaver selects these nodes as the
user navigates from one browser compatibility issue to the next.
Example
The following findIssue() function returns an array of <button> tags to which float: left or float: right has
been applied:
function findIssue(){
var DOM = dw.getDocumentDOM();
var issueNodes = new Array();
var buttons = DOM.getElementsByTagName('button');
var props = null;
for (var i=0; i < buttons.length; i++){
props = window.getDeclaredStyle(buttons[i]);
if (props.cssFloat == "left" || props.cssFloat == "right"){
issueNodes.push(buttons[i]);
}
}
return issueNodes;
}
getAffectedBrowserProfiles()
Availability
Dreamweaver CS3.
Description
Provides Dreamweaver with a list of browsers for which this issue is relevant.
Arguments
None.
Returns
An array of browser names, each of which must match exactly the first line in a valid browser profile (see the TXT files
in the Configuration/BrowserProfiles folder).
Example
function getAffectedBrowsers(){
return new Array("Microsoft Internet Explorer 5.0",
"Microsoft Internet Explorer 5.5",
"Microsoft Internet Explorer 6.0");
}

129
EXTENDING DREAMWEAVER
Browser compatibility check issues API
Last updated 6/15/2011
getAffectedBrowserDisplayNames()
Availability
Dreamweaver CS3.
Description
Provides Dreamweaver with a list of user-visible browser names for which this issue is relevant. This function is
optional; if not supplied, the profile names supplied by
getAffectedBrowserProfiles() will be used instead.
Arguments
None.
Returns
An array of browser names. This array must be parallel to the one returned by getAffectedBrowserProfiles().
Example
function getAffectedBrowsers(){
return new Array("IE/Win 5.0",
"IE/Win 5.5",
"IE/Win 6.0");
}
getIssueID()
Availability
Dreamweaver CS3.
Description
Provides Dreamweaver with a unique ID for the issue.
Arguments
None.
Returns
A string with a unique issue identifier.
Example
function getIssueID() {
return "EXPANDING_BOX_PROBLEM";
}
getIssueName()
Availability
Dreamweaver CS3.

130
EXTENDING DREAMWEAVER
Browser compatibility check issues API
Last updated 6/15/2011
Description
Provides Dreamweaver with the name or a short description of the issue.
Arguments
None.
Returns
A string containing the name or a short description of the issue.
Example
function getIssueName(){
return "The Expanding Box Problem";
}
getIssueDescription()
Availability
Dreamweaver CS3.
Description
Provides Dreamweaver with a detailed description of the issue.
Arguments
None.
Returns
A string containing the name or a short description of the issue.
Example
function getIssueDescription(){
return "Fixed-dimension boxes will incorrectly expand to fit their
content instead of clipping content at the specified width
or height.";
}

131
Last updated 6/15/2011
Chapter 9: Commands
Adobe Dreamweaver commands can perform almost any kind of edit to a user’s current document, other open
documents, or any HTML document on a local drive. Commands can insert, remove, or rearrange HTML tags and
attributes, comments, and text.
Commands are HTML files. The body section of a command file can contain an HTML form that accepts options for
the command (for example, how a table should be sorted and by which column). The head section of a command file
contains JavaScript functions that process form input from the body section and control what edits are made to the
user’s document.
The following table lists the files you use to create a command:
How commands work
When a user clicks a menu that contains a command, the following events occur:
1 Dreamweaver calls the canAcceptCommand() function to determine whether the menu item should be disabled. If
the
canAcceptCommand() function returns a false value, the command is dimmed in the menu, and the
procedure stops. If the
canAcceptCommand() function returns a true value, the procedure can continue.
2 The user selects a command from the menu.
3 Dreamweaver calls the receiveArguments() function, if defined, in the selected command file to let the command
process any arguments that pass from the menu item or from the
dreamweaver.runCommand() function. For more
information on the
dreamweaver.runCommand() function, see the Dreamweaver API Reference.
4 Dreamweaver calls the commandButtons() function, if defined, to determine which buttons appear on the right
side of the Options dialog box and what code should execute when the user clicks the buttons.
5 Dreamweaver scans the command file for a form tag. If a form exists, Dreamweaver calls the windowDimensions()
function, which sizes the Options dialog box that contains the body elements of the file. If the
windowDimensions() function is not defined, Dreamweaver automatically sizes the dialog box.
6 If the command file’s body tag contains an onLoad handler, Dreamweaver executes it (whether or not a dialog box
appears). If no dialog box appears, the remaining steps do not occur.
7 The user selects options for the command. Dreamweaver executes event handlers that are associated with the fields
as the user encounters them.
8 The user clicks one of the buttons that is defined by the commandButtons() function.
9 Dreamweaver executes the associated code. The dialog box remains visible until one of the scripts in the command
calls the
window.close() function.
Path File Description
Configuration/Commands/ commandname.htm Specifies the user interface.
Configuration/Commands/ commandname.js Contains the functions to execute.

132
EXTENDING DREAMWEAVER
Commands
Last updated 6/15/2011
Adding commands to the Commands menu
Dreamweaver automatically adds any files that are inside the Configuration/Commands folder to the bottom of the
Commands menu. To prevent a command from appearing in the Commands menu, insert the following comment on
the first line of the file:
<!-- MENU-LOCATION=NONE -->
When this line is present, Dreamweaver does not create a menu item for the file, and you must call dw.runCommand()
to execute the command.
A simple command example
This simple extension adds an item to the Commands menu and lets you convert selected text in your document to
either uppercase or lowercase. When you click the menu item, it activates a three-button interface that lets you submit
your choice.
To create this extension, you create the UI, write the JavaScript code, and test the extension.
This example creates two files in the Commands folder: Change Case.htm, which contains the UI, and Change Case.js,
which contains the JavaScript code. If you prefer, you can create only the Change Case.htm file and put the JavaScript
code in the head section.
Create the user interface
The user interface is a form that contains two options that let the user select uppercase or lowercase.
1 Create a blank file.
2 Add the following code to the file to create the form:

133
EXTENDING DREAMWEAVER
Commands
Last updated 6/15/2011
<!DOCTYPE HTML SYSTEM "-//Adobe//DWExtension layout-engine 10.0//dialog">
<HTML>
<HEAD>
<Title>Make Uppercase or Lowercase</Title>
<SCRIPT SRC="Change Selection Case.js"></SCRIPT>
</HEAD>
<BODY>
<form name="uorl">
<table border="0">
<!--DWLayoutTable-->
<tr>
<td valign="top" nowrap> <p>
<label>
<input type="radio" name="RadioGroup1" value="uppercase" checked>
Uppercase</label>
<br>
<label>
<input type="radio" name="RadioGroup1" value="lowercase">
Lowercase</label>
</p></td>
</tr>
</table>
</form>
</BODY>
</HTML>
3 Save the file as Change Case.htm in the Configuration/Commands folder.
The contents of the Title tag, Make Uppercase or Lowercase, appears in the top bar of the dialog box. Within the
form, a table with two cells controls the layout of the elements. Within the table cells are the two options, Uppercase
and Lowercase. The Uppercase option has the
checked attribute, making it the default selection and ensuring that the
user selects one of the two options or cancels the command.
The form looks like the following figure:
The commandButtons() function supplies the OK and Cancel buttons that let the user submit the choice or cancel the
operation. For more information, see
“commandButtons()” on page 138.
Writing the JavaScript code
The following example consists of two extension API functions, canAcceptCommand() and commandButtons(),
which Dreamweaver calls, and one user-defined function,
changeCase(), which is called from the
commandButtons() function.
In this example, you will write JavaScript to perform the following tasks:

134
EXTENDING DREAMWEAVER
Commands
Last updated 6/15/2011
Determine whether the command should be enabled or dimmed
The first task in creating a command is to determine when the item should be active and when it should be dimmed.
When a user clicks the Commands menu, Dreamweaver calls the
canAcceptCommand() function for each menu item
to determine whether it should be enabled. If
canAcceptCommand() returns the value true, Dreamweaver displays
the menu item text as active or enabled. If
canAcceptCommand() returns the value false, Dreamweaver dims the
menu item. In this example, the menu item is active when the user has selected text in the document.
1 Create a new blank file.
2 Add the following code:
function canAcceptCommand(){
var theDOM = dw.getDocumentDOM(); // Get the DOM of the current document
var theSel = theDOM.getSelection(); // Get start and end of selection
var theSelNode = theDOM.getSelectedNode(); // Get the selected node
var theChildren = theSelNode.childNodes; // Get children of selected node
return (theSel[0] != theSel[1] && (theSelNode.nodeType == Node.TEXT_NODE¬
|| theSelNode.hasChildNodes() && (theChildren[0].nodeType == ¬
Node.TEXT_NODE)));
}
3 Save the file as Change Case.js in the Configuration/Commands folder.
The first lines of the canAcceptCommand() function retrieve the selected text by retrieving the DOM for the user’s
document and calling the
getSelection() function on the document object. Next, the function retrieves the node
that contains the selected text, followed by any children of the node, as shown in the following code. Then, the last line
checks to see if the selection or its first child is text and returns the result as a value of
true or false.
The first part of the return statement (theSel[0] != theSel[1]) checks if the user has selected anything in the
document. The variable
theSel is a two-slot array that holds the beginning and ending offsets of the selection within
the document. If the two values are not equal, content has been selected. If the values in the two slots are equal, there
is only an insertion point and nothing has been selected.
The next part of the return statement (&& (theSelNode.nodeType == Node.TEXT_NODE) checks to see if the
selected node type is text. If so, the
canAcceptCommand() function returns the value true. If the node type is not text,
the test continues to see if the node has children (
|| theSelNode.hasChildNodes()) and if the type of the first child
node is text (
&& (theChildren[0].nodeType == Node.TEXT_NODE))). If both conditions are true,
canAcceptCommand() returns the value true, and Dreamweaver enables the menu item at the bottom of the
Commands menu, as shown in the following figure:

135
EXTENDING DREAMWEAVER
Commands
Last updated 6/15/2011
Otherwise, canAcceptCommand() returns the value false and Dreamweaver dims the item, as shown in the following
figure:
Link functions to the OK and Cancel buttons
When the user clicks OK or Cancel, the extension needs to perform the appropriate action. You determine the
appropriate action by specifying which JavaScript function to perform when either button is clicked.
1 Open the file Change Case.js in the Configuration/Commands folder.
2 At the end of the file, add the following code:
function commandButtons() {
return new Array("OK", "changeCase()", "Cancel", "window.close()");
}
3 Save the file.
The commandButtons() function causes Dreamweaver to supply the OK and Cancel buttons and tells Dreamweaver
what to do when the user clicks them. The
commandButtons() function tells Dreamweaver to call changeCase()
when the user clicks OK and to call
window.close() when the user clicks Cancel.
Let the user specify uppercase or lowercase
When the user clicks a menu item, the extension needs a mechanism to let the user select uppercase or lowercase. The
UI provides this mechanism by defining two radio buttons to let the user make that choice.
1 Open the file Change Case.js.
2 At the end of the file, add the following code:

136
EXTENDING DREAMWEAVER
Commands
Last updated 6/15/2011
function changeCase() {
var uorl;
// Check whether user requested uppercase or lowercase.
if (document.forms[0].elements[0].checked)
uorl = 'u';
else
uorl = 'l';
// Get the DOM.
var theDOM = dw.getDocumentDOM();
// Get the outerHTML of the HTML tag (the
// entire contents of the document).
var theDocEl = theDOM.documentElement;
var theWholeDoc = theDocEl.outerHTML;
// Get the node that contains the selection.
var theSelNode = theDOM.getSelectedNode();
// Get the children of the selected node.
var theChildren = theSelNode.childNodes;
var i = 0;
if (theSelNode.hasChildNodes()){
while (i < theChildren.length){
if (theChildren[i].nodeType == Node.TEXT_NODE){
var selText = theChildren[i].data;
var theSel = theDOM.nodeToOffsets(theChildren[0]);
break;
}
++i;
}
}
else {
// Get the offsets of the selection
var theSel = theDOM.getSelection();
// Extract the selection
var selText = theWholeDoc.substring(theSel[0],theSel[1]);
}
if (uorl == 'u'){
theDocEl.outerHTML = theWholeDoc.substring(0,theSel[0]) +
selText.toUpperCase() + theWholeDoc.substring(theSel[1]);
}
else {
theDocEl.outerHTML = theWholeDoc.substring(0,theSel[0]) +
selText.toLowerCase() + theWholeDoc.substring(theSel[1]);
}
// Set the selection back to where it was when you started
theDOM.setSelection(theSel[0],theSel[1]);
window.close(); // close extension UI
}
3 Save the file as Change Case.js in the Configuration/Commands folder.
The changeCase() function is a user-defined function that is called by the commandButtons() function when the
user clicks OK. This function changes the selected text to uppercase or lowercase. Because the UI uses radio buttons,
the code can rely on one choice or the other being checked; it does not need to test for the possibility that the user
makes neither choice.

137
EXTENDING DREAMWEAVER
Commands
Last updated 6/15/2011
The changeCase() function first tests the property document.forms[0].elements[0].checked. The
document.forms[0].elements[0] property refers to the first element in the first form of the current document
object, which is the UI for the extension. The
checked property has the value true if the element is checked (or
enabled) and
false if it is not. In the interface, elements[0] refers to the first radio button, which is the Uppercase
button. Because one of the radio buttons is always checked when the user clicks OK, the code assumes that if the choice
is not uppercase, it must be lowercase. The function sets the variable
uorl to u or l to store the user’s response.
The remaining code in the function retrieves the selected text, converts it to the specified case, and copies it back in
place in the document.
To retrieve the selected text for the user’s document, the function gets the DOM. It then gets the root element of the
document, which is the
html tag. Finally, it extracts the whole document into the theWholeDoc variable.
Next, changeCase() calls getSelectedNode() to retrieve the node that contains the selected text. It also retrieves any
child nodes (
theSelNode.childNodes) in case the selection is a tag that contains text, such as <b>text</b>.
If there are child nodes (hasChildNodes() returns the value true), the command loops through the children looking
for a text node. If one is found, the text (
theChildren[i].data) is stored in selText, and the offsets of the text node
are stored in
theSel.
If there are no child nodes, the command calls getSelection() and stores the beginning and ending offsets of the
selection in
theSel. It then extracts the string between those two offsets and stores it in selText.
The function then checks the uorl variable to determine whether the user selected uppercase. If so, the function writes
the HTML code back to the document in sections: first, the beginning of the document to the beginning of the
selection; then the selected text, converting it to uppercase (
selText.toUppercase()); and last, the end of the
selected text to the end of the document.
If the user selects lowercase, the function performs the same operation, but calls selText.toLowerCase() to convert
the selected text to lowercase.
Finally, changeCase() resets the selection and calls window.close() to close the UI.
Test the extension
After you place the files in the Commands folder, you can test the extension.
1 Restart Dreamweaver or reload extensions. For information on reloading extensions, see “Reloading extensions”
on page 78.
The Change Case entry should now appear on the Commands menu.
2 Type some text in a document.
3 Select the text.
Note: Change Case is dimmed until the user selects text in the document.
4 Select Change Case from the Commands menu.
The text changes case.
The commands API functions
The custom functions in the commands API are not required.

138
EXTENDING DREAMWEAVER
Commands
Last updated 6/15/2011
canAcceptCommand()
Description
This function determines whether the command is appropriate for the current selection.
Note: Do not define canAcceptCommand() unless it returns a value of false in at least one case. If the function is not
defined, the command is assumed to be appropriate. Making this assumption saves time and improves performance.
Arguments
None.
Returns
Dreamweaver expects a true value if the command is allowed; if the value is false, Dreamweaver dims the command
in the menu.
Example
The following example of the canAcceptCommand() function makes the command available only when the selection
is a table:
function canAcceptCommand(){
var retval=false;
var selObj=dw.getDocumentDOM.getSelectedNode();
return (selObj.nodeType == Node.ELEMENT_NODE && ¬
selObj.tagName=="TABLE");{
retval=true;
}
return retval;
}
commandButtons()
Description
This function defines the buttons that appear on the Options dialog box and their behaviors when they are clicked. If
this function is not defined, no buttons appear and the body section of the command file expands to fill the entire
dialog box.
By default, these buttons appear at the top of the dialog box. You can choose to display these buttons at the bottom of
the dialog box by specifying two additional values in the
commandButtons() function.
Buttons are right-aligned by default. Specifying the value, PutButtonOnLeft, aligns subsequent buttons to the left on
the same line.
Arguments
None.
Returns
Dreamweaver expects an array that contains an even number of elements. The first element is a string that contains
the label for the topmost button. The second element is a string of JavaScript code that defines the behavior of the
topmost button when it is clicked. The remaining elements define additional buttons in the same way.

139
EXTENDING DREAMWEAVER
Commands
Last updated 6/15/2011
Example
The following instance of commandButtons() defines three buttons: OK, Cancel, and Help that appear at the upper-
right corner (default position) of the dialog box:
function commandButtons(){
return new Array("OK" , "doCommand()" ,
"Cancel" , "window.close()" ,
"Help" , "showHelp()");
}
You can customize the placement and alignment of the buttons.
Example
The following instance of commandButtons() displays the buttons at the bottom of the dialog box. When the first
value in the return array is
PutButtonsOnBottom, you can specify the second value as defaultButton along with one
of the button names. This button is selected by default and used when the Enter key is pressed. In this example, the
OKbutton is defined as the default.
function commandButtons(){
return new Array("PutButtonsOnBottom" , "OkButton defaultButton" ,
"OK" , "doCommand()" ,
"Cancel" , "window.close()" ,
"Help" , "showHelp()");
}
Example
In the following example, the Help button is left-aligned using the PutButtonOnLeft.
function commandButtons(){
return new Array("PutButtonsOnBottom", "OkButton defaultButton",
"OK", "doCommand()",
"Cancel", "window.close()",
"PutButtonOnLeft",
"Help" , "showHelp()");}
isDOMRequired()
Description
This function determines whether the command requires a valid DOM to operate. If this function returns a value of
true or if the function is not defined, Dreamweaver assumes that the command requires a valid DOM and
synchronizes the Design and Code views of the document before executing. Synchronization causes all edits in the
Code view to update in the Design view.
Arguments
None.
Returns
Dreamweaver expects a true value if a command requires a valid DOM to operate; false otherwise.

140
EXTENDING DREAMWEAVER
Commands
Last updated 6/15/2011
receiveArguments()
Description
This function processes any arguments that pass from a menu item or from the dw.runCommand() function.
Arguments
{arg1}, {arg2},...{argN}
• If the arguments attribute is defined for a menuitem tag, the value of that attribute passes to the
receiveArguments() function as one or more arguments. Arguments can also pass to a command by the
dw.runCommand() function.
Returns
Dreamweaver expects nothing.
windowDimensions()
Description
This function sets specific dimensions for the Parameters dialog box. If this function is not defined, the window
dimensions are computed automatically.
Note: Do not define this function unless you want an Options dialog box that is larger than 640 x 480 pixels.
Arguments
platform
• The value of the platform argument is either "macintosh" or "windows", depending on the user’s platform.
Returns
Dreamweaver expects a string of the form "widthInPixels,heightInPixels".
The returned dimensions are smaller than the size of the entire dialog box because they do not include the area for the
OK and Cancel buttons. If the returned dimensions do not accommodate all options, scroll bars appear.
Example
The following example of the windowDimensions() function sets the dimensions of the Parameters dialog box to 648
x 520 pixels:
function windowDimensions(){
return "648,520";
}

141
Last updated 6/15/2011
Chapter 10: Menus and menu commands
Adobe Dreamweaver creates all its menus from the structure defined in the menus.xml file in the Dreamweaver
Configuration/Menus folder. You can rearrange, rename, and remove menu commands by editing the menus.xml file.
You can also add, change, and remove keyboard shortcuts for menu commands. But, in most cases it is easier to edit
keyboard shortcuts using the Keyboard Shortcut Editor (see Dreamweaver Help). Changes to the Dreamweaver menus
take effect the next time you start Dreamweaver or reload extensions.
The menus.xml file
The menus.xml file contains a structured list of menu bars, menus, menu commands, separators, shortcut lists, and
keyboard shortcuts. XML tags describe these items and you can edit them in a text editor.
Note: Be careful when changing menus. Dreamweaver ignores any menu or menu command that contains an XML
syntax error.
In a multiuser operating system, you can make changes within Dreamweaver that result in changes to menus.xml. For
example, changing keyboard shortcuts using the Keyboard Shortcut Editor. In such cases, Dreamweaver creates a
menus.xml file in your user Configuration folder. To customize menus.xml in a multiuser operating system, edit the
copy of the file in your user Configuration folder. Otherwise, copy the master menus.xml file to your user
Configuration folder if Dreamweaver hasn’t yet created a version there. For more information, see
“Multiuser
Configuration folders” on page 78.
If you open menus.xml in an XML editor, sometimes you see error messages regarding the ampersands (&) in the
menus.xml file. It’s best to edit menus.xml in a text editor; do not edit it in Dreamweaver. For basic information about
XML, see Dreamweaver Help.
Note: Always make a backup copy of the current menus.xml file, or any other Dreamweaver configuration file, before you
modify it. In case you forget to make a backup, replace menus.xml with a copy of menus.bak in the Configuration folder .
A menu bar (tagged with opening and closing menu bar tags) is a discrete menu or set of menus. For example, there’s
a main menu bar, a separate Site panel menu bar (which appears only on Windows, not the Macintosh), and a menu
bar for each context menu. Each menu bar contains one or more menus; a menu is contained in a menu tag. Each menu
contains one or more menu commands, each described by a
menuitem tag and its attributes. A menu can also contain
separators (described by separator tags) and submenus.
In addition to the primary keyboard shortcuts associated with menu commands, Dreamweaver provides alternate and
context-specific shortcuts. For example, Control+Y (Windows) or Command+Y (Macintosh) is the shortcut for Redo.
At the same time, Control+Shift+Z or Command+Shift+Z is an alternate shortcut for Redo. These alternates and
context-specific shortcuts that can’t be represented in the tags for menu commands are defined in the shortcut lists in
the menus.xml file. Each shortcut list (described by a
shortcutlist tag) contains one or more shortcuts, each of
which a shortcut tag describes.
The next sections describe the syntax of the tags in the menus.xml file. Optional attributes are marked in the attribute
lists with curly brackets ({ }); all attributes not marked with curly brackets are required.

142
EXTENDING DREAMWEAVER
Menus and menu commands
Last updated 6/15/2011
<menubar>
Description
Provides information about a menu bar in the Dreamweaver menu structure.
Attributes
name, {app}, id, {platform}
• name The name of the menu bar. Although name is a required attribute, you can give it the value "".
• app The name of the application in which the menu bar is available. Not currently used.
• id The menu ID for the menu bar. Each menu ID in the menus.xml file should be unique.
• platform Indicates that the menu bar should appear only on the given platform. Valid values are "win" and "mac".
Contents
This tag must contain one or more menu tags.
Container
None.
Example
The main (Document window) menu bar uses the following menubar tag:
<menubar name="Main Window" id="DWMainWindow">
<!-- menu tags here -->
</menubar>
<menu>
Description
Provides information about a menu or submenu to appear in the Dreamweaver menu structure.
Attributes
name, {app}, id, {platform}, {showIf}
• name The name of the menu as it will appear on the menu bar. To set the menu’s access key (mnemonic) in
Windows, use an underscore (_) before the access letter. The underscore is automatically removed on the
Macintosh.
• app The name of the application in which the menu is available. Not currently used.
• id The menu ID for the menu. Every ID in the file should be unique.
• platform Indicates that the menu should appear only on the given platform. Valid values are "win" and "mac".
• showIf Specifies that the menu should appear only if the given Dreamweaver enabler is the value true. The
possible enablers are:
_SERVERMODEL_ASP, _SERVERMODEL_ASPNET, _SERVERMODEL_JSP,
_SERVERMODEL_CFML (for all versions of Adobe ColdFusion), _SERVERMODEL_CFML_UD4 (for UltraDev version 4 of
ColdFusion),
_SERVERMODEL_PHP, _FILE_TEMPLATE, _VIEW_CODE, _VIEW_DESIGN, _VIEW_LAYOUT,
_VIEW_EXPANDED_TABLES, and _VIEW_STANDARD. You can specify multiple enablers by placing a comma (which
means AND) between the enablers. You can specify NOT with
"!". For example, if you want the menu to appear
only in Code view for an ASP page, specify the attribute as
showIf="_VIEW_CODE, _SERVERMODEL_ASP".

143
EXTENDING DREAMWEAVER
Menus and menu commands
Last updated 6/15/2011
Contents
This tag can contain one or more menuitem tags, and one or more separator tags. It can also contain other menu tags
(to create submenus) and standard HTML comment tags.
Container
This tag must be contained in a menubar tag.
Example
<menu name="_File" id="DWMenu_File">
<!-- menuitem, separator, menu, and comment tags here -->
</menu>
<menuitem>
Description
Defines a menu command for a Dreamweaver menu.
Attributes
name, id, {app}, {key}, {platform}, {enabled}, {arguments}, {command}, {file}, {checked},
{dynamic}, {isdomrequired}, {showIf}
• name The menu command name that appears in the menu. An underscore indicates that the following letter is
the command’s access key (mnemonic), for Windows only.
• id Used by Dreamweaver to identify the item. This ID must be unique throughout the menu structure. If you add
new menu commands to menus.xml, ensure uniqueness by using your company name or another unique string as
a prefix for each menu command’s ID.
• app The name of the application in which the menu command is available. Not currently used.
• key The keyboard shortcut for the command, if any. Use the following strings to specify modifier keys:
• Cmd specifies the Control key (Windows) or Command key (Macintosh).
• Alt and Opt interchangeably specify the Alt key (Windows) or Option key (Macintosh).
• Shift specifies the Shift key on both platforms.
• Ctrl specifies the Control key on both platforms.
• A Plus (+) sign separates modifier keys if a given shortcut uses more than one modifier. For example, Cmd+Opt+5
in the
key attribute means the menu command is executed when the user presses Control+Alt+5 (Windows) or
Command+Option+5 (Macintosh).
• Special keys are specified by name: F1 through F12, PgDn, PgUp, Home, End, Ins, Del, Tab, Esc, BkSp, and Space.
Modifier keys can also be applied to special keys.
• platform Indicates on which platform the item appears. Valid values are "win", meaning Windows, or "mac",
meaning Macintosh. If you don’t specify the
platform attribute, the menu command appears on both platforms.
If you want a menu command to behave differently on different platforms, supply two menu commands with the
same name (but different IDs): one with
platform="win" and the other with platform="mac".
• enabled Provides JavaScript code (usually a JavaScript function call) that determines whether the menu
command is currently enabled. If the function returns the value
false, the menu command is dimmed. The default
value is
"true", but it’s best to always specify a value for clarity even if the value is "true".

144
EXTENDING DREAMWEAVER
Menus and menu commands
Last updated 6/15/2011
• arguments Provides arguments for Dreamweaver to pass to the code in the JavaScript file that you specify in the
file attribute. Enclose arguments in single quotation marks ('), inside the double quotation marks (") used to
delimit an attribute’s value.
• command Specifies a JavaScript expression that’s executed when the user selects this item from the menu. For
complex JavaScript code, use a JavaScript file (specified in the
file attribute) instead. You must specify either file
or
command for each menu command.
• file The name of an HTML file containing JavaScript that controls the menu command. Specify a path to the
file relative to the Configuration folder. (For example, the Help > Welcome menu command specifies
file="Commands/Welcome.htm".) The file attribute overrides the command, enabled, and checked attributes.
You must specify either
file or command for each menu command. For information on creating a command file
using the History panel, see Dreamweaver Help. For information on writing your own JavaScript commands, see
“Commands” on page 131.
• checked A JavaScript expression that indicates whether the menu command has a check mark next to it in the
menu; if the expression evaluates as true, the item appears with a check mark.
• dynamic If present, indicates that a menu command is to be determined dynamically by an HTML file; the file
contains JavaScript code to set the text and state of the menu command. If you specify a tag as
dynamic, you must
also specify a
file attribute.
• isdomrequired Indicates whether to synchronize the Design view and the Code view before executing the code
for this menu command. Valid values are "
true" (the default) and "false". If you set this attribute to "false", it
means that the changes to the file that this menu command makes do not use the Dreamweaver DOM. For
information about the DOM, see
“The Dreamweaver Document Object Model” on page 95).
• showIf Specifies that the menuitem should appear only if the given Dreamweaver enabler has value true. The
possible enablers are:
_SERVERMODEL_ASP, _SERVERMODEL_ASPNET, _SERVERMODEL_JSP,
_SERVERMODEL_CFML (for all versions of Adobe ColdFusion), _SERVERMODEL_CFML_UD4 (for UltraDev version 4 of
ColdFusion),
_SERVERMODEL_PHP, _FILE_TEMPLATE, _VIEW_CODE, _VIEW_DESIGN, _VIEW_LAYOUT,
_VIEW_EXPANDED_TABLES, and _VIEW_STANDARD. You can specify multiple enablers by placing a comma (which
means AND) between the enablers. You can specify NOT with
"!". For example, if you want the menu command
to appear in Code view but not for a ColdFusion page, specify the attribute as
showIf="_VIEW_CODE,
!_SERVERMODEL_CFML".
Contents
None (empty tag).
Container
This tag must be contained in a menu tag.
Example
<menuitem name="_New" key="Cmd+N" enabled="true" command="dw.createDocument()"
id="DWMenu_File_New" />
<separator>
Description
Indicates that a separator should appear at the corresponding location in the menu.

145
EXTENDING DREAMWEAVER
Menus and menu commands
Last updated 6/15/2011
Attributes
{app}
app The name of the application in which the separator is shown. Not currently used.
Contents
None (empty tag).
Container
This tag must be contained in a menu tag.
Example
<separator />
<shortcutlist>
Description
Specifies a shortcut list in the menus.xml file.
Attributes
{app}, id, {platform}
• app The name of the application in which the shortcut list is available. Not currently used.
• id The ID for the shortcut list. It should be the same as the menu ID for the menu bar (or context menu) in
Dreamweaver that the shortcuts are associated with. Valid values are
"DWMainWindow", "DWMainSite",
"DWTimelineContext", and "DWHTMLContext".
• platform Indicates that the shortcut list should appear only on the given platform. Valid values are "win" and
"
mac".
Contents
This tag can contain one or more shortcut tags. It can also contain one or more comment tags (which use the same
syntax as HTML comment tags).
Container
None.
Example
<shortcutlist id="DWMainWindow">
<!-- shortcut and comment tags here -->
</shortcutlist>
<shortcut>
Description
Specifies a keyboard shortcut in the menus.xml file.

146
EXTENDING DREAMWEAVER
Menus and menu commands
Last updated 6/15/2011
Attributes
key, {app}, {platform}, {file}, {arguments}, {command}, id, {name}
• key The key combination that activates the keyboard shortcut. For syntax details, see “<menuitem>” on page 143.
• app The name of the application in which the shortcut is available. Not currently used.
• platform Specifies that the shortcut works only on the indicated platform. Valid values are "win" and "mac". If
you do not specify this attribute, the shortcut works on both platforms.
• file The path to a file containing the JavaScript code that Dreamweaver executes when you use the keyboard
shortcut. The
file attribute overrides the command attribute. You must specify either file or command for each
shortcut.
• arguments Provides arguments for Dreamweaver to pass to the code in the JavaScript file that you specify in the
file attribute. Enclose arguments in single quotation marks ('), inside the double quotation marks (") used to
delimit an attribute’s value.
• command The JavaScript code that Dreamweaver executes when you use the keyboard shortcut. Specify either
file or command for each shortcut.
• id A unique identifier for a shortcut.
• name A name for the command executed by the keyboard shortcut, in the style of a menu command name. For
example, the
name attribute for the F12 shortcut is "Preview in Primary Browser".
Contents
None (empty tag).
Container
This tag must be contained in a shortcutlist tag.
Example
<shortcut key="Cmd+Shift+Z" file="Menus/MM/Edit_Clipboard.htm"
arguments="'redo'" id="DWShortcuts_Edit_Redo" />
<tool>
Description
Represents one tool; it contains all the shortcuts for the tool as subtags in the menus.xml file.
Attributes
{name}, id
• name A localized version of the tool name.
• id The internal tool identifier that identifies the tool to which the shortcuts apply.
Contents
This tag can contain one or more activate, override, or action tags.
Container
This tag must be contained in a menu tag.

147
EXTENDING DREAMWEAVER
Menus and menu commands
Last updated 6/15/2011
Example
<tool name="Hand tool" id="com.Macromedia.dreamweaver.tools.hand">
<!-- tool tags here -->
</tool>
<action>
Description
Contains the key combination and JavaScript to execute when the tool is active and the key combination is pressed.
Attributes
{name}, key, command, id
• name A localized version of the action.
• key The key combination used to execute the action. For syntax details, see “<menuitem>” on page 143.
• command The JavaScript statements to execute. This attribute has the same format as the command attribute of
“<shortcut>” on page 145.
• id A unique ID used to reference the action.
Contents
None (empty tag).
Container
This tag must be contained in a tool tag.
Example
<action name="Set magnification to 50%" key="5" command="dw.activeViewScale = 0.50" id
="DWTools_Zoom_50" />
<activate>
Description
Contains the key combination to activate the tool.
Attributes
{name}, key, id
• name A localized version of the action.
• key The key combination used to activate the tool. For syntax details, see “<menuitem>” on page 143.
• id A unique ID used to reference the action.
Contents
None (empty tag).
Container
This tag must be contained in a tool tag.

148
EXTENDING DREAMWEAVER
Menus and menu commands
Last updated 6/15/2011
Example
<activate name="Switch to Hand tool" key="H" id="DWTools_Hand_Active1" />
<override>
Description
Contains the key combination to temporarily activate the tool. While in another modal tool, the user can press and
hold this key to switch to this tool.
Attributes
{name}, key, id
• name A localized version of the action.
• key The key combination used to quickly activate the tool. For syntax details, see “<menuitem>” on page 143.
• id A unique ID used to reference the action.
Contents
None (empty tag).
Container
This tag must be contained in a tool tag.
Example
<override name="Quick switch to Hand tool" key="Space" id="DWTools_Hand_Override" />
Changing menus and menu commands
By editing the menus.xml file, you can move menu commands within a menu or from one menu to another, add
separators to or remove them from menus, and move menus within a menu bar or even from one menu bar to another.
You can move items into or out of context menus using the same procedure as for other menus.
For information, see “The menus.xml file” on page 141.
Move a menu command
1 Quit Dreamweaver.
2 Make a backup copy of the menus.xml file.
3 Open menus.xml in a text editor such as BBEdit, Macromedia® HomeSite,® or Wordpad. (Don’t open it in
Dreamweaver.)
4 Cut an entire menuitem tag, from the <menuitem at the beginning to the /> at the end.
5 Place the insertion point at the new location for the menu command. (Make sure it’s between a menu tag and the
corresponding
/menu tag.)
6 Paste the menu command into its new location.

149
EXTENDING DREAMWEAVER
Menus and menu commands
Last updated 6/15/2011
Create a submenu while moving a menu command
1 Place the insertion point inside a menu (somewhere between a menu tag and the corresponding /menu tag).
2 Insert a new menu tag and /menu tag pair inside the menu.
3 Add new menu commands to the new submenu.
Insert a separator between two menu commands
• Place a separator/ tag between the two menuitem tags.
Remove an existing separator
• Delete the corresponding separator/ line.
Move a menu
1 Quit Dreamweaver.
2 Make a backup copy of the menus.xml file.
3 Open menus.xml in a text editor such as BBEdit, HomeSite, or Wordpad. (Don’t open it in Dreamweaver.)
4 Cut an entire menu and its contents, from the opening menu tag to the closing /menu tag.
5 Place the insertion point at the new location for the menu. (Make sure it’s between a menubar tag and the
corresponding
/menubar tag.)
6 Paste the menu into its new location.
Change the name of a menu command or menu
You can easily change the name of any menu command or menu by editing the menus.xml file.
1 Quit Dreamweaver.
2 Make a backup copy of the menus.xml file.
3 Open menus.xml in a text editor such as HomeSite, BBEdit, or Wordpad. (Don’t open it in Dreamweaver.)
4 If you’re changing a menu command, find the appropriate menuitem tag, and change the value of its name attribute.
If you are changing a menu, find the appropriate
menu tag, and change the value of its name attribute. In either case,
do not change the
id attribute.
5 Save and close menus.xml; then start Dreamweaver again to see your changes.
Change keyboard shortcuts
If the default keyboard shortcuts aren’t convenient for you, you can change or remove existing shortcuts or add new
ones. The easiest way to do this is to use the Keyboard Shortcut Editor. (For more information, see Dreamweaver
Help). However, you can also modify keyboard shortcuts directly in menus.xml if you prefer, but it’s much easier to
make mistakes entering shortcuts in menus.xml than in the Keyboard Shortcut Editor.
1 Quit Dreamweaver.
2 Make a backup copy of the menus.xml file.
3 Open menus.xml in a text editor such as BBEdit, HomeSite, or Wordpad. (Don’t open it in Dreamweaver.)
4 Look at the Keyboard Shortcut Matrix (available from the Dreamweaver Support Center at
http://www.adobe.com/go/dreamweaver_support) and find a shortcut that is not being used or one that you want
to reassign.

150
EXTENDING DREAMWEAVER
Menus and menu commands
Last updated 6/15/2011
If you reassign a keyboard shortcut, change it on a printed copy of the matrix for future reference.
5 If you’re reassigning a keyboard shortcut, find the menu command that the shortcut is assigned to, and remove the
key="shortcut" attribute from that menu command.
6 Find the menu command to assign or reassign the keyboard shortcut.
7 If the menu command already has a keyboard shortcut, find the key attribute on that line. If it doesn’t already have
a shortcut, add
key="" anywhere between attributes inside the menuitem tag.
8 Between the double quotation marks (") of the key attribute, enter the new keyboard shortcut.
Use a Plus (+) sign between the keys in a key combination. For more information about modifiers, see the
description of the
menuitem tag in “<menuitem>” on page 143.
If the keyboard shortcut is in use elsewhere and you didn’t remove its other use, the shortcut applies only to the first
menu command that uses it in menus.xml.
Note: You can use the same keyboard shortcut for a Windows-only menu command and for a Macintosh-only menu
command.
9 Write your new shortcut in the appropriate location in the Keyboard Shortcut Matrix.
Pop-up menus and context menus
Dreamweaver provides pop-up menus and context menus in many of its panels and dialog boxes. Some context menus
are defined in the menus.xml file; others are defined in other XML files. You can add, remove, or modify items in those
menus, although in most cases it’s better to write an extension to make such changes.
The following pop-up menus and context menus in Dreamweaver are specified in XML files, using the same tags as
menus.xml:
• Data sources (listed in the Plus (+) pop-up menu on the Bindings panel) are specified in DataSources.xml files, in
subfolders of the DataSources folder.
• Server behaviors (listed in the Plus (+) pop-up menu on the Server Behaviors panel) are specified in
ServerBehaviors.xml files, in subfolders of the ServerBehaviors folder.
• Server formats (listed in the Plus (+) pop-up menu in the Edit Format List dialog box) are specified in
ServerFormats.xml files, in subfolders of the ServerFormats folder.
• Items in the formats pop-up menu for a binding in the Bindings panel are specified in Formats.xml files, in
subfolders of the ServerFormats folder. You can add entries to this menu from inside Dreamweaver by using the
Add Format dialog box.
• The Tag Library Editor dialog box menu commands are specified in the
TagLibraries/TagImporters/TagImporters.xml file.
• Menu commands for parameters in the Generate Behavior dialog box, which is part of the Server Behavior Builder,
are specified in Shared/Controls/String Menu/Controls.xml.
• Items for context menus associated with ColdFusion Components are specified in
Components/ColdFusion/CFCs/CFCsMenus.xml.
• Items for context menus associated with ColdFusion data sources are specified in
Components/ColdFusion/DataSources/DataSourcesMenus.xml.
• Items for context menus associated with various server components are specified in XML files, in subfolders of the
Components folder.

151
EXTENDING DREAMWEAVER
Menus and menu commands
Last updated 6/15/2011
Menu commands
Menu commands make menus more flexible and dynamic. Menu commands can perform almost any edit to the
current document, other open documents, or any HTML document on a local hard drive.
Menu commands are HTML files that are referenced in the file attribute of a menuitem tag in the menus.xml file.
The body section of a menu commands file can contain an HTML form that accepts options for the command. For
example, how to sort a table and by which column. The head section of a menu commands file contains JavaScript
functions. The functions process form input from the body section and control the edits to the document of the user.
Menu commands are stored in the Configuration/Menus folder inside the Dreamweaver application folder.
Note: Commands on Mac OS X 10.3 are stored in youUser/Library/Application Support/Adobe/Dreamweaver
9/Commands/yourcommandname.html.
The following table lists the files you use to create a menu command.
Note: If you add custom menu commands to Dreamweaver, add them at the top level of the Menus folder or create a
subfolder. The MM folder is reserved for the menu commands that come with Dreamweaver.
Modifying the Commands menu
You can add certain kinds of commands to the Commands menu, and change their names, without editing the
menus.xml file. For more information about menus.xml, see
“Changing menus and menu commands” on page 148.
Note: The term command has two meanings in Dreamweaver. Strictly speaking, a command is a particular kind of
extension. In some contexts, however, command is used interchangeably with menu item to mean any item that appears
in a Dreamweaver menu, no matter what it does or how it’s implemented.
To create new commands that are automatically placed in the Commands menu, use the History panel. Alternatively,
you can use the Extension Manager to install new extensions, including commands. For more information, see
Dreamweaver Help.
To reorder the items in the Commands menu, or to move items between menus, you must edit the menus.xml file.
Rename a command you’ve created
1 Select Commands > Edit Command List.
A dialog box appears, listing all the commands whose names you can change. (Commands that are in the default
Commands menu don’t appear on this list and can’t be edited using this approach.)
2 Select a command to rename.
3 Enter a new name for it.
4 Click Close.
The command is renamed in the Commands menu.
Path File Description
Configuration/Menus/ menus.xml Contains a structured list of menu bars, menus, menu
commands, separators, shortcut lists, and keyboard
shortcuts. Modify this file to add new menus and menu
commands.
Configuration/Menus/ commandname.htm Contains the functions required by the menu command.

152
EXTENDING DREAMWEAVER
Menus and menu commands
Last updated 6/15/2011
Delete a command you’ve created
1 Select Commands > Edit Command List.
A dialog box appears, listing all the commands you can delete. (Commands that are in the default Commands menu
don’t appear on this list and can’t be deleted using this approach.)
2 Select a command to delete.
3 Click Delete, and then confirm that you want to delete the command.
The command is deleted. The file that contains the code for the command is also deleted; deleting a command does
not simply remove the menu command from the menu. Be certain that you really want to delete the command
before you use this approach. If you want to remove it from the Commands menu without deleting the file, you can
find the file in Configuration/Commands and move it to another folder.
4 Click Close.
How menu commands work
When the user clicks a menu with a menu item that contains a menu command, the following events occur:
1 If any menuitem tag in the menu contains the dynamic attribute, Dreamweaver calls the getDynamicContent()
function in the associated menu commands file to populate the menu.
2 Dreamweaver calls the canAcceptCommand() function in each menu commands file that is referenced in the menu
to check whether the command is appropriate for the selection.
• If the canAcceptCommand() function returns a false value, the menu item is dimmed.
• If the canAcceptCommand() function returns a true value or is not defined, Dreamweaver calls the
isCommandChecked() function to determine whether to display a check mark next to the menu item. If the
isCommandChecked() function is not defined, no check mark appears.
3 Dreamweaver calls the setMenuText() function to determine the text that should appear in the menu.
If the setMenuText() function is not defined, Dreamweaver uses the text that is specified in the menuitem tag.
4 The user selects an item from the menu.
5 Dreamweaver calls the receiveArguments() function, if defined, in the selected menu commands file to let the
command process any arguments that pass from the menu item.
Note: If it is a dynamic menu item, the ID of the menu item passes as the only argument.
6 Dreamweaver calls the commandButtons() function, if defined, to determine which buttons appear on the right
side of the Options dialog box and what code should execute when the user clicks the buttons.
7 Dreamweaver scans the menu commands file for a form tag.
• If a form exists, Dreamweaver calls the windowDimensions() function to determine the size of the Options
dialog box that contains the
BODY elements of the file.
• If the windowDimensions() function is not defined, Dreamweaver automatically sizes the dialog box.
8 If the menu commands file’s body tag contains an onLoad handler, Dreamweaver executes the associated code
(whether or not a dialog box appears). If no dialog box appears, the remaining steps do not occur.
9 The user selects options in the dialog box. Dreamweaver executes event handlers that are associated with the fields
as the user encounters them.
10 The user clicks one of the buttons that are defined by the commandButtons() function.
11 Dreamweaver executes the code that is associated with the clicked button.

153
EXTENDING DREAMWEAVER
Menus and menu commands
Last updated 6/15/2011
12 The dialog box remains visible until one of the scripts in the menu commands file calls the window.close()
function.
A simple menu command example
This simple menu command example shows how Undo and Redo menu commands might work. The Undo menu
command reverses the effect of a user’s editing operation, and the Redo item reverses an Undo operation and restores
the effect of the user’s last editing operation.
You implement this example by creating the menu commands, writing the JavaScript code, and placing the command
file in the Menu folder.
Create a menu command
To create a menu called MyMenu that contains the Undo and Redo menu commands, add the following HTML menu
tags. Add the tags after the last closing
</menu> in menus.xml.
<menu name="MyMenu" id="MyMenu_Edit">
<menuitem name="MyUndo" key="Cmd+Z" file="Menus/MyMenu.htm" arguments="'undo'"
id="MyMenu_Edit_Undo" />
<menuitem name="MyRedo" key="Cmd+Y" file="Menus/MyMenu.htm" arguments="'redo'"
id="MyMenu_Edit_Redo" />
</menu>
The key attribute defines keyboard shortcuts that the user can type to load the menu command. The file attribute
specifies the name of the menu command file that Dreamweaver executes when Dreamweaver loads the command.
The value of the
arguments attribute defines the arguments that Dreamweaver passes when it calls the
receiveArguments() function.
The following figure shows these menu commands:
JavaScript code for the menu
When the user selects either Undo or Redo on the MyMenu menu, Dreamweaver calls the MyMenu.htm command
file, which is specified by the
file attribute of the menuitem tag. Create the MyMenu.htm command file in the
Dreamweaver Configuration/Menus folder and add the three menu command API functions,
canAcceptCommand(),
receiveArguments(), and setMenuText(), to implement the logic associated with the Undo and Redo menu items.
The following sections describe these functions.
canAcceptCommand()
Dreamweaver calls the canAcceptCommand() function for each menu item in the MyMenu menu to determine
whether it should be enabled or disabled. In the MyMenu.htm file, the
canAcceptCommand() function checks the
value of
arguments[0] to determine whether Dreamweaver is processing a Redo menu item or an Undo menu item.
If the argument is
"undo", the canAcceptCommand() function calls the enabler function dw.canUndo() and returns
the returned value, which is either
true or false. Likewise, if the argument is "redo", the canAcceptCommand()
function calls the enabler function
dw.canRedo() and returns its value to Dreamweaver. If the canAcceptCommand()
function returns the value
false, Dreamweaver dims the menu item for which it called the function. The following
example shows the code for the
canAcceptCommand() function:

154
EXTENDING DREAMWEAVER
Menus and menu commands
Last updated 6/15/2011
function canAcceptCommand()
{
var selarray;
if (arguments.length != 1) return false;
var bResult = false;
var whatToDo = arguments[0];
if (whatToDo == "undo")
{
bResult = dw.canUndo();
}
else if (whatToDo == "redo")
{
bResult = dw.canRedo();
}
return bResult;
}
receiveArguments()
Dreamweaver calls the receiveArguments() function to process any arguments that you defined for the menuitem
tag. For the Undo and Redo menu items, the
receiveArguments() function calls either the dw.undo() function or
the
dw.redo() function, depending on whether the value of the argument, arguments[0], is "undo" or "redo". The
dw.undo() function undoes the previous step that the user performed in the document window, dialog box, or panel
that has focus. The
dw.redo() function redoes the last operation that was undone.
The receiveArguments() function looks like the following example code:
function receiveArguments()
{
if (arguments.length != 1) return;
var whatToDo = arguments[0];
if (whatToDo == "undo")
{
dw.undo();
}
else if (whatToDo == "redo")
{
dw.redo();
}
}
In this command, the receiveArguments() function processes the arguments and executes the command. More
complex menu commands might call different functions to execute the command. For example, the following code
checks whether the first argument is
"foo"; if it is, it calls the doOperationX() function and passes it the second
argument. If the first argument is
"bar", it calls the doOperationY() function and passes it the second argument. The
doOperationX() or doOperationY() function is responsible for executing the command.

155
EXTENDING DREAMWEAVER
Menus and menu commands
Last updated 6/15/2011
function receiveArguments(){
if (arguments.length != 2) return;
var whatToDo = arguments[0];
if (whatToDo == "foo"){
doOperationX(arguments[1]);
}else if (whatToDo == "bar"){
doOperationX(arguments[1]);
}
}
setMenuText()
Dreamweaver calls the setMenuText() function to determine what text appears for the menu item. If you do not
define the
setMenuText() function, Dreamweaver uses the text that you specified in the name attribute of the
menuitem tag.
The setMenuText() function checks the value of the argument that Dreamweaver passes, arguments[0]. If the value
of the argument is
"undo", Dreamweaver calls the dw.getUndoText() function; if it is "redo", Dreamweaver calls
dw.getRedoText(). The dw.getUndoText() function returns text that specifies the operation that Dreamweaver will
undo. For example, if the user executes multiple Redo operations,
dw.getUndoText() could return the menu text
“Undo Edit Source.” Likewise, the
dw.getRedoText() function returns text that specifies the operation that
Dreamweaver will redo. If the user executes multiple Undo operations, the
dw.RedoText() function could return the
menu text “Redo Edit Source.”
The setMenuText() function looks like the following example code:
function setMenuText()
{
if (arguments.length != 1) return "";
var whatToDo = arguments[0];
if (whatToDo == "undo")
return dw.getUndoText();
else if (whatToDo == "redo")
return dw.getRedoText();
else return "";
}
Placing the command file in the Menu folder
To implement the menu Undo and Redo menu items, you must save the MyMenu.htm command file in the
Dreamweaver Configuration/Menus folder or a subfolder that you create. The location of the file must agree with the
location that you specified in the
menuitem tag. To make it accessible to Dreamweaver, either restart Dreamweaver or
reload extensions. For information on how to reload extensions, see
“Reloading extensions” on page 78.
To run the menu commands, select the menu item when it is enabled. Dreamweaver will invoke the functions in the
command file, as described in
“How menu commands work” on page 152.

156
EXTENDING DREAMWEAVER
Menus and menu commands
Last updated 6/15/2011
A dynamic menu example
This example implements the Dreamweaver Preview In Browser submenu that displays a list of available browsers. The
example also opens the current file, or the selected files in the Site panel, in the user-specified browser. Implementing
this dynamic menu, you create the dynamic menu items and write the JavaScript code.
Create dynamic menu items
The following menu tags in the menus.xml file define the Preview In Browser submenu of the File menu:
<menu name="_Preview in Browser" id="DWMenu_File_PIB">
<menuitem dynamic name="No Browsers Selected"
file="Menus/MM/PIB_Dynamic.htm" arguments="'No Browsers'"
id="DWMenu_File_PIB_Default" />
<separator />
<menuitem name="_Edit Browser List..." enabled="true"
command="dw.editBrowserList()" id="DWMenu_File_PIB_EditBrowserList" />
</menu>
The first menuitem tag defines the default menu item No Browsers Selected, which appears on the submenu if you have
not specified any browsers for the Preview In Browser item in the Preferences dialog box. If you specified the Microsoft
Internet Explorer browser, however, the submenu would look like the following figure:
The name attribute for the first menu item specifies the command file PIB_Dynamic.htm. This file contains the
following line:
<SCRIPT LANGUAGE="javascript" SRC="PIB_Dynamic.js"></SCRIPT>
The script tag includes the JavaScript code in the PIB_Dynamic.js file, which supplies the JavaScript code that
interacts with the Preview in Browser submenu. This code could be saved directly in the PIB_Dynamic.htm file, but
storing it in a separate file allows multiple commands to include the same code.
JavaScript code for the dynamic menu item
Because the first menuitem tag contains the dynamic attribute, Dreamweaver calls the getDynamicContent()
function in the PIB_Dynamic.js file, which is shown in the following example:

157
EXTENDING DREAMWEAVER
Menus and menu commands
Last updated 6/15/2011
function getDynamicContent(itemID)
{
var browsers = null;
var PIB = null;
var i;
var j=0;
browsers = new Array();
PIB = dw.getBrowserList();
for (i=0; i<PIB.length; i=i+2)
{
browsers[j] = new String(PIB[i]);
if (dw.getPrimaryBrowser() == PIB[i+1])
browsers[j] += "\tF12";
else if (dw.getSecondaryBrowser() == PIB[i+1])
browsers[j] += "\tCmd+F12";
browsers[j] += ";id='"+escQuotes(PIB[i])+"'";
if (itemID == "DWPopup_PIB_Default")
browsers[j] = MENU_strPreviewIn + browsers[j];
j = j+1;
}
return browsers;
}
The getDynamicContent() function calls the dw.getBrowserList() function to obtain an array of the browser
names that have been specified in the Preview In Browser section of the Preferences dialog box. This array contains
the name of each browser and the path to the executable file. Next, for each item in the array
(i=0; i<PIB.length;
i=i+2), the getDynamicContents() function moves the name of the browser (PIB[i]) into a second array called
browsers (browsers[j] = new String(PIB[i]);). If the browser has been designated as the primary or secondary
browser, the function appends the names of the keyboard shortcut keys that invoke them. Next it appends the string
";id=" followed by the name of the browser in single quotation marks (for example, ;id='iexplore'). If the itemID
argument is "
DWPopup_PIB_Default", the function prefixes the array item with the string Preview in. After it
constructs an entry for each browser listed in the Preferences dialog box, the
getDynamicContent() function returns
the array
browsers to Dreamweaver. If no browsers have been selected, the function returns the value null, and
Dreamweaver displays No Browsers Selected in the menu.
canAcceptCommand()
Dreamweaver next calls the canAcceptCommand() function for each menuitem tag that references a command file
with the
file attribute. If the canAcceptCommand() function returns the value false, the menu item is dimmed. If
the
canAcceptCommand() function returns the value true, Dreamweaver enables the item on the menu. If the
function returns
true or is not defined, Dreamweaver calls the isCommandChecked() function to determine whether
to display a check mark next to the menu item. If the
isCommandChecked() function is not defined, no check mark
appears.

158
EXTENDING DREAMWEAVER
Menus and menu commands
Last updated 6/15/2011
function canAcceptCommand()
{
var PIB = dw.getBrowserList();
if (arguments[0] == 'primary' || arguments[0] == 'secondary')
return havePreviewTarget();
return havePreviewTarget() && (PIB.length > 0);
}
The canAcceptCommand() function in the PIB_Dynamic.js file again retrieves the browser list that was created in the
Preferences dialog box. Then it checks whether the first argument (
arguments[0]) is primary or secondary. If so, it
returns the value returned by the
havePreviewTarget() function. If not, it tests the call to the
havePreviewTarget() function and tests whether any browsers have been specified (PIB.length > 0). If both tests
are true, the function returns the value
true. If either or both of the tests are false, the function returns the value
false.
havePreviewTarget()
The havePreviewTarget() function is a user-defined function that returns the value true if Dreamweaver has a valid
target to display in the browser. A valid target is a document or a selected group of files in the Site panel. The
havePreviewTarget() function looks like the following example:
function havePreviewTarget()
{
var bHavePreviewTarget = false;
if (dw.getFocus(true) == 'site')
{
if (site.getFocus() == 'remote')
{
bHavePreviewTarget = site.getRemoteSelection().length > 0 &&
site.canBrowseDocument();
}
else if (site.getFocus() != 'none')
{
var selFiles = site.getSelection();
if (selFiles.length > 0)
{
var i;
bHavePreviewTarget = true;
for (i = 0; i < selFiles.length; i++)
{
var selFile = selFiles[i];
// For server connections, the files will
// already be remote URLs.
if (selFile.indexOf("://") == (-1))
{
var urlPrefix = "file:///";
var strTemp = selFile.substr(urlPrefix.length);
if (selFile.indexOf(urlPrefix) == -1)

159
EXTENDING DREAMWEAVER
Menus and menu commands
Last updated 6/15/2011
bHavePreviewTarget = false;
else if (strTemp.indexOf("/") == -1)
bHavePreviewTarget = false;
else if (!DWfile.exists(selFile))
bHavePreviewTarget = false;
else if (DWfile.getAttributes(selFile).indexOf("D") != -1)
bHavePreviewTarget = false;
}
else
{
bHavePreviewTarget = true;
}
}
}
}
}
else if (dw.getFocus() == 'document' ||
dw.getFocus() == 'textView' || dw.getFocus("true") == 'html' )
{
var dom = dw.getDocumentDOM('document');
if (dom != null)
{
var parseMode = dom.getParseMode();
if (parseMode == 'html' || parseMode == 'xml')
bHavePreviewTarget = true;
}
}
return bHavePreviewTarget;
}
The havePreviewTarget() function sets the value bHavePreviewTarget to false as the default return value. The
function performs two basic tests calling the
dw.getFocus() function to determine what part of the application
currently has input focus. The first test checks whether the Site panel has focus (if (dw.getFocus(true) == 'site')). If the
Site panel does not have focus, the second test checks to see if a document (dw.getFocus() == 'document'), Text view
(dw.getFocus() == 'textView'), or the Code inspector (dw.getFocus("true") == 'html') has focus. If neither test is true,
the function returns the value
false.
If the Site panel has focus, the function checks whether the view setting is Remote view. If it is, the function sets
bHavePreviewTarget to true if there are remote files (site.getRemoteSelection().length > 0) and the files can be
opened in a browser (site.canBrowseDocument()). If the view setting is not Remote view, and if the view is not None,
the function gets a list of the selected files (var selFiles = site.getSelection();) in the form of
file:/// URLs.
For each item in the selected list, the function tests for the presence of the character string "://". If it is not found, the
code performs a series of tests on the list item. If the item is not in the form of a
file:/// URL (if
(selFile.indexOf(urlPrefix) == -1)), it sets the return value to
false. If the remainder of the string following the
file:/// prefix does not contain a slash (/) (if (strTemp.indexOf("/") == -1)), it sets the return value to false. If the
file does not exist (else if (!DWfile.exists(selFile))), it sets the return value to
false. Last, it checks to see if the specified
file is a folder (else if (DWfile.getAttributes(selFile).indexOf("D") != -1)). If
selfile is a folder, the function returns
the value
false. Otherwise, if the target is a file, the function sets bHavePreviewTarget to the value true.
If a document, Text view, or the Code inspector has input focus (else if (dw.getFocus() == 'document' ||
dw.getFocus() == 'textView' || dw.getFocus("true") == 'html' )), the function gets the DOM and checks to see if the
document is an HTML or an XML document. If so, the function sets
bHavePreviewTarget to true. Finally, the
function returns the value stored in
bHavePreviewTarget.

160
EXTENDING DREAMWEAVER
Menus and menu commands
Last updated 6/15/2011
receiveArguments()
Dreamweaver calls the receiveArguments() function to let the command process any arguments that pass from the
menu item. For the Preview in Browsers menu, the
receiveArguments() function invokes the browser that the user
selects. The
receiveArguments() function looks like the following example:
function receiveArguments()
{
var whichBrowser = arguments[0];
var theBrowser = null;
var i=0;
var browserList = null;
var result = false;
if (havePreviewTarget())
{
// Code to check if we were called from a shortcut key
if (whichBrowser == 'primary' || whichBrowser == 'secondary')
{
// get the path of the selected browser
if (whichBrowser == 'primary')
{
theBrowser = dw.getPrimaryBrowser();
}
else if (whichBrowser == 'secondary')
{
theBrowser = dw.getSecondaryBrowser();
}
// Match the path with the name of the corresponding browser
// that appears in the menu.
browserList = dw.getBrowserList();
while(i < browserList.length)
{
if (browserList[i+1] == theBrowser)
theBrowser = browserList[i];
i+=2;
}
}
else
theBrowser = whichBrowser;
// Only launch the browser if we have a valid browser selected.
if (theBrowser != "file:///" && typeof(theBrowser) != "undefined" &&
theBrowser.length > 0)
{
if (dw.getFocus(true) == 'site')
{
// Only get the first item of the selection because
// browseDocument() can't take an array.
//dw.browseDocument(site.getSelection()[0],theBrowser);
site.browseDocument(theBrowser);
}
else
dw.browseDocument(dw.getDocumentPath('document'),theBrowser);

161
EXTENDING DREAMWEAVER
Menus and menu commands
Last updated 6/15/2011
}
else
{
// Otherwise, F12 or Ctrl+F12 was pressed, ask if the user wants
// to specify a primary or secondary browser now.
if (whichBrowser == 'primary')
{
result = window.confirm(MSG_NoPrimaryBrowserDefined);
}
else if (whichBrowser == 'secondary')
{
result = window.confirm(MSG_NoSecondaryBrowserDefined);
}
// If the user clicked OK, show the prefs dialog with the browser panel.
if (result)
dw.showPreferencesDialog('browsers');
}
}
}
The function first sets the variable whichBrowser to the value that Dreamweaver passes, arguments[0]. Along with
setting other default values, the function also sets
result to a default value of false.
After variables are initialized, the receiveArguments() function calls the user-defined function
havePreviewTarget() and tests the result. If the result of the test is true, the function checks to see if the user selected
the primary or secondary browser. If so, the function sets the variable
theBrowser to the path of the executable file
that starts the browser (
dw.getPrimaryBrowser() or dw.getSecondaryBrowser()). The function then performs a
loop that examines the list of browsers returned by
dw.getBrowsersList(). If the path to a browser in the list
matches the path to the primary or secondary browser, the function sets the variable
theBrowser to the matching
value in
browserList. This value contains the name of the browser and the path to the executable file that starts the
browser. If
havePreviewTarget() returns the value false, the function sets the variable theBrowser to the value of
the variable
whichBrowser.
Next, the receiveArguments() function tests the variable theBrowser to make sure that it does not begin with a
path, that it is not
"undefined", and that it has a length greater than 0. If all these conditions are true, and if the Site
panel has focus, the
receiveArguments() function calls the site.browseDocument() function to invoke the
selected browser with the files selected in the Site panel. If the Site panel does not have focus, the
receiveArguments()
function calls the function
dw.browseDocument() and passes it the path of the current document and the value of the
variable
theBrowser, which specifies the name of the browser with which to open the document.
If the user pressed the shortcut keys (F12 or Ctrl+F12) and no primary or secondary browser has been specified, a
dialog box appears to inform the user. If the user clicks OK, the function calls the function
dw.showPreferencesDialog() with the browsers argument to let the user specify a browser at that point.
The menu commands API functions
The custom functions in the menu commands API are not required.

162
EXTENDING DREAMWEAVER
Menus and menu commands
Last updated 6/15/2011
canAcceptCommand()
Description
Determines whether the menu item is active or dimmed.
Arguments
{arg1}, {arg2},...{argN}}
If it is a dynamic menu item, the unique ID that the getDynamicContents() function specifies is the only argument.
Otherwise, if the
arguments attribute is defined for a menuitem tag, the value of that attribute passes to the
canAcceptCommand() function (and to the “isCommandChecked()” on page 163, “receiveArguments()” on page 164,
and “setMenuText()” on page 165 functions) as one or more arguments. The arguments attribute is useful for
distinguishing between two menu items that call the same menu command.
Note: The arguments attribute is ignored for dynamic menu items.
Returns
Dreamweaver expects a Boolean value: true if the item should be enabled; false otherwise.
commandButtons()
Description
Defines the buttons that appear on the right side of the Options dialog box and their behavior when they are clicked.
If this function is not defined, no buttons appear, and the body section of the Menu Commands file expands to fill the
entire dialog box.
Arguments
None.
Returns
Dreamweaver expects an array that contains an even number of elements. The first element is a string that contains
the label for the topmost button. The second element is a string of JavaScript code that defines the behavior of the
topmost button when it is clicked. The remaining elements define additional buttons in the same manner.
Example
The following example of the commandButtons() function defines the OK, Cancel, and Help buttons:
function commandButtons(){
return new Array("OK" , "doCommand()" , "Cancel" , ¬
"window.close()" , "Help" , "showHelp()");
}
getDynamicContent()
Description
Retrieves the content for the dynamic portion of the menu.

163
EXTENDING DREAMWEAVER
Menus and menu commands
Last updated 6/15/2011
Arguments
menuID
The menuIDargument is the value of the id attribute in the menuitem tag that is associated with the item.
Returns
Dreamweaver expects an array of strings where each string contains the name of a menu item and its unique ID,
separated by a semicolon. If the function returns a
null value, the menu does not change.
Example
The following example of the getDynamicContent() function returns an array of four menu items (My Menu Item
1, My Menu Item 2, My Menu Item 3, and My Menu Item 4):
function getDynamicContent(){
var stringArray= new Array();
var i=0;
var numItems = 4;
for (i=0; i<numItems;i++)
stringArray[i] = new String("My Menu Item " + i + ";¬
id='My-MenuItem" + i + "'");
return stringArray;
}
isCommandChecked()
Description
Determines whether to display a check mark next to the menu item.
Arguments
{arg1}, {arg2},...{argN}
If it is a dynamic menu item, the unique ID that the getDynamicContents() function specifies is the only argument.
Otherwise, if the
arguments attribute is defined for a menuitem tag, the value of that attribute passes to the
isCommandChecked() function (and to the “canAcceptCommand()” on page 162, “receiveArguments()” on page 164,
and “setMenuText()” on page 165 functions) as one or more arguments. The arguments attribute is useful for
distinguishing between two menu items that call the same menu command.
Note: The arguments attribute is ignored for dynamic menu items.
Returns
Dreamweaver expects a Boolean value: true if a check mark should appear next to the menu item; false otherwise.

164
EXTENDING DREAMWEAVER
Menus and menu commands
Last updated 6/15/2011
Example
function isCommandChecked()
{
var bChecked = false;
var cssStyle = arguments[0];
if (dw.getDocumentDOM() == null)
return false;
if (cssStyle == "(None)")
{
return dw.cssStylePalette.getSelectedStyle() == '';
}
else
{
return dw.cssStylePalette.getSelectedStyle() == cssStyle;
}
return bChecked;
}
receiveArguments()
Description
Processes any arguments passed from a menu item or from the dw.runCommand() function. If it is a dynamic menu
item, it processes the dynamic menu item ID.
Arguments
{arg1}, {arg2},...{argN}
If it is a dynamic menu item, the unique ID that the getDynamicContents() function specifies is the only argument.
Otherwise, if the
arguments attribute is defined for a menuitem tag, the value of that attribute passes to the
receiveArguments() function (and to the “canAcceptCommand()” on page 162, “isCommandChecked()” on
page 163, and “setMenuText()” on page 165 functions) as one or more arguments. The arguments attribute is useful
for distinguishing between two menu items that call the same menu command.
Note: The arguments attribute is ignored for dynamic menu items.
Returns
Dreamweaver expects nothing.
Example
function receiveArguments()
{
var styleName = arguments[0];
if (styleName == "(None)")
dw.getDocumentDOM('document').applyCSSStyle('','');
else
dw.getDocumentDOM('document').applyCSSStyle('',styleName);
}

165
EXTENDING DREAMWEAVER
Menus and menu commands
Last updated 6/15/2011
setMenuText()
Description
Specifies the text that should appear in the menu.
Note: Do not use this function if you are using “getDynamicContent()” on page 162.
Arguments
{arg1}, {arg2},...{argN}
If the arguments attribute is defined for a menuitem tag, the value of that attribute passes to the setMenuText()
function (and to the
“canAcceptCommand()” on page 162, “isCommandChecked()” on page 163, and
“receiveArguments()” on page 164 functions) as one or more arguments. The arguments attribute is useful for
distinguishing between two menu items that call the same menu command.
Returns
Dreamweaver expects the string that should appear in the menu.
Example
function setMenuText()
{
if (arguments.length != 1) return "";
var whatToDo = arguments[0];
if (whatToDo == "undo")
return dw.getUndoText();
else if (whatToDo == "redo")
return dw.getRedoText();
else return "";
}
windowDimensions()
Description
Sets specific dimensions for the Parameters dialog box. If this function is not defined, the window dimensions are
computed automatically.
Note: Do not define this function unless you want a dialog box that is larger than 640 x 480 pixels.
Arguments
platform
The value of the platform argument is either "macintosh" or "windows", depending on the user’s platform.
Returns
Dreamweaver expects a string of the form "widthInPixels,heightInPixels".
The returned dimensions are smaller than the size of the entire dialog box because they do not include the area for the
OK and Cancel buttons. If the returned dimensions do not accommodate all options, scroll bars appear.

166
EXTENDING DREAMWEAVER
Menus and menu commands
Last updated 6/15/2011
Example
The following example of windowDimensions() sets the dimensions of the Parameters dialog box to 648 x 520 pixels:
function windowDimensions(){
return "648,520";
}

167
Last updated 6/15/2011
Chapter 11: Toolbars
You can create a toolbar for Adobe Dreamweaver simply by creating a file that defines the toolbar and placing that file
in the Configuration/Toolbars folder.
The following table lists the files you use to create a toolbar:
How toolbars work
Toolbars are defined by XML and image files that are stored in the Toolbars folder of the main Dreamweaver
Configuration folder. The default Dreamweaver toolbars are stored in the toolbars.xml file in the
Configuration/Toolbars folder. When Dreamweaver starts, it loads all the toolbar files in the Toolbars folder. You can
add new toolbars simply by copying a file into the Toolbars folder rather than modifying the original toolbars.xml file.
Toolbar XML files define one or more toolbars and their toolbar items. A toolbar is a list of items such as buttons, text
boxes, pop-up menus, and so on. A toolbar item represents a single control that a user can access in a toolbar.
Some types of toolbar controls, such as push buttons and pop-up menus, have icon images associated with them. Icon
images are stored in an images folder in the Toolbars folder. Images can be in any format that Dreamweaver can render
but are typically GIF or JPEG file formats. Images for Adobe-authored toolbars are stored in the Toolbars/images/MM
folder.
As with menus, you can specify the functionality of individual toolbar items either through the item attributes or
through a command file. Adobe-authored toolbar command files are stored in the Toolbars/MM folder.
The toolbar API is compatible with the menu commands API, so toolbar controls can reuse menu commands files.
Unlike menus, you can define toolbar items independently from the toolbars that use them. This flexibility lets you use
toolbar items in multiple toolbars by using the
itemref tag.
The first time Dreamweaver loads a toolbar, its visibility and position are set by the toolbar definition. After that, its
visibility and position are saved in and restored from the registry (Windows) or the Dreamweaver Preferences file
(Macintosh).
How toolbars behave
In Windows, Dreamweaver toolbars generally act the same as standard Windows toolbars. Dreamweaver toolbars
have the following characteristics:
• You can drag and drop toolbars to dock them, undock them, and reposition them relative to other toolbars.
• You can horizontally dock toolbars to the top or bottom of the frame window.
Path File Description
Configuration/Toolbars/ toolbars.xml Edit this file to change the contents of the toolbar.
Configuration/Toolbars/ newtoolbar.xml Create this file to create a toolbar.
Configuration/Toolbars/ imagefile.gif Icon image for toolbar control.
Configuration/Commands/ MyCommand.htm Command file associated with toolbar item.

168
EXTENDING DREAMWEAVER
Toolbars
Last updated 6/15/2011
• Toolbars remain a fixed size. A toolbar does not shrink if the container shrinks or if other toolbars are placed next
to it.
• You can show or hide toolbars from the View >Toolbars menu.
• Toolbars cannot overlap.
• Only the outline of the toolbar appears while you drag it.
On the Macintosh, toolbars are always attached to the document window. They can be shown or hidden from the
menu, but you cannot drag and drop, rearrange, or undock them.
In the Dreamweaver workspace, which integrates all the Dreamweaver document windows within a single parent
frame, you can specify whether toolbars dock to the workspace frame or to the document window.
For toolbars that dock to the Dreamweaver workspace frame, there is only one instance of each toolbar. In this case,
the toolbars always operate on the document in front. In the Dreamweaver workspace, you can dock toolbars above,
below, or to the left or right of the Insert toolbar. Toolbars that are attached to the Dreamweaver workspace frame do
not automatically disable when there is no document window. The toolbar items determine whether they are enabled
when no document is open.
When toolbars stay docked to the document window, there is one instance for each window. Toolbars that are attached
to a document window completely disable themselves when their window is not the front document and rerun all their
update handlers when their window comes to the front.
You cannot drag and drop toolbars between the document window and the Dreamweaver workspace frame.
How toolbar commands work
When Dreamweaver draws a toolbar, the following events occur:
1 For each toolbar control item, Dreamweaver determines whether the file attribute exists.
2 If the file attribute exists, Dreamweaver calls the canAcceptCommand() function to determine whether it should
enable the control in the current context of the document.
For the Document Title text box in the Dreamweaver toolbar, for example, the canAcceptCommand() function
checks to see if there is a current DOM and if the current document is an HTML file. If both these conditions are
true, the function returns
true and Dreamweaver enables the text box on the toolbar.
3 If the file attribute exists, Dreamweaver ignores the following attributes, if they are specified: checked, command,
DOMRequired, enabled, script, showif, update, and value.
4 If the file attribute does not exist, Dreamweaver processes the attributes that are set for the toolbar control item:
checked, command, DomRequired, and so on.
For more information on specific item tag attributes, see “Item tag attributes” on page 180.
5 Dreamweaver calls the getCurrentValue() function on every update cycle, as specified by the update attribute,
to determine what value to display for the control.
6 The user selects an item on the toolbar.
7 Dreamweaver calls the receiveArguments() function to process any arguments that the arguments attribute of
the toolbar item specifies.
For more information on the purpose of specific functions in the toolbar command API, see “The toolbar command
API functions” on page 185.

169
EXTENDING DREAMWEAVER
Toolbars
Last updated 6/15/2011
A simple toolbar command file
This simple example implements a Title text box item as seen on the Dreamweaver Document toolbar. The text box
item lets the user enter a name for the current Dreamweaver document. You can implement this toolbar example by
performing the following steps:
Create the text box
To add a toolbar to Dreamweaver, you place an XML file that contains the toolbar definition in the Toolbars folder
inside the Dreamweaver Configuration folder.
The following figure shows the Title text box:
The following toolbar editcontrol item defines a text box that is labeled Title:
<EDITCONTROL ID="DW_SetTitle"
label="Title: "
tooltip="Document Title"
width="150"
file="Toolbars/MM/EditTitle.htm"/>
The tooltip attribute causes Dreamweaver to display Document Title in a tooltip box when the user places the mouse
pointer over the text box. The
width attribute specifies the size of the field in pixels. The file attribute specifies that
the EditTitle.htm file contains the JavaScript functions that operate on the text box. To see the full definition of the
Dreamweaver Document toolbar, see the main toolbar (
id="DW_Toolbar_Main") in the toolbars.xml file.
JavaScript code for the text box
When the user interacts with the text box, it causes Dreamweaver to invoke the EditTitle.htm command file in the
Toolbars/MM folder. This file contains three JavaScript functions that operate on the Title text box. These functions
are
canAcceptCommand(), receiveArguments(), and getCurrentValue().
canAcceptCommand(): enable the toolbar item
The canAcceptCommand() function consists of one line of code that checks to see whether there is a current
Document Object Model (DOM) and whether the document is parsed as HTML. The function returns the results of
those tests. If the conditions are
true, Dreamweaver enables the text box item on the toolbar. If the function returns
the value
false, Dreamweaver disables the item.
The function is as follows:
function canAcceptCommand()
{
return (dw.getDocumentDOM() != null && dw.getDocumentDOM().getParseMode() == 'html');
}
receiveArguments(): set the title
Dreamweaver invokes the receiveArguments() function, shown in the following example, when the user enters a
value in the Title text box and presses the Enter key or moves the focus away from the control.
The function is as follows:

170
EXTENDING DREAMWEAVER
Toolbars
Last updated 6/15/2011
function receiveArguments(newTitle)
{
var dom = dw.getDocumentDOM();
if (dom)
dom.setTitle(newTitle);
}
Dreamweaver passes newTitle, which is the value that the user enters, to the receiveArguments() function. The
receiveArguments() function first checks to see whether a current DOM exists. If it does, the receiveArguments()
function sets the new document title by passing
newTitle to the dom.setTitle() function.
getCurrentValue(): get the title
Whenever an update cycle occurs, as determined by the default update frequency of the onEdit event handler,
Dreamweaver calls the
getCurrentValue() function to determine what value to display for the control. The default
update frequency of the
onEdit handler determines the update frequency because the Title text edit control has no
update attribute.
For the Title text box, the following getCurrentValue() function calls the JavaScript application programming
interface (API) function
dom.getTitle() to obtain and return the current title.
The function is as follows:
function getCurrentValue()
{
var title = "";
var dom = dw.getDocumentDOM();
if (dom)
title = dom.getTitle();
return title;
}
Until the user enters a title for the document, the getTitle() function returns Untitled Document, which appears in
the text box. After the user enters a title, the
getTitle() function returns that value, and Dreamweaver displays it as
the new document title.
To see the complete HTML file that contains the JavaScript functions for the Title text box, see the EditTitle.htm file
in the Toolbars/MM folder.
The MM folder is reserved for Adobe files. Create another folder inside the Toolbars folder, and place your JavaScript
code in that folder.
The toolbar definition file
A toolbar is simply a list of radio buttons, check buttons, edit boxes, and other toolbar items, optionally divided by
separator tags. Each toolbar item can be a reference to an item using the itemref tag, a separator using the
separator tag, or a complete toolbar item definition for a check box or an edit box; for example, as described in
“Toolbar item tags” on page 175.
Each toolbar definition file starts with the following declarations:
<?xml version="1.0" encoding="optional_encoding"?>
<!DOCTYPE toolbarset SYSTEM "-//Macromedia//DWExtension toolbar 5.0">
If the encoding is omitted, Dreamweaver uses the default encoding of the operating system.

171
EXTENDING DREAMWEAVER
Toolbars
Last updated 6/15/2011
After the declarations, the file consists of a single toolbarset tag, which contains any number of the following tags:
toolbar, itemref, separator, include, and itemtype tags, where itemtype is a button, checkbutton,
radiobutton, menubutton, dropdown, combobox, editcontrol, or colorpicker. The following example, which is
an abbreviated excerpt from the toolbars.xml file, illustrates the hierarchy of tags in the toolbar file. The example
substitutes ellipses (. . .) for the description of the toolbar item attributes.
<?xml version="1.0"?>
<!DOCTYPE toolbarset SYSTEM "-//Adobe//DWExtension toolbar 10.0">
<toolbarset>
<!-- main toolbar -->
<toolbar id="DW_Toolbar_Main" label="Document">
<radiobutton id="DW_CodeView" . . ./>
<radiobutton id="DW_SplitView" . . ./>
<radiobutton id="DW_DesignView" . . ./>
<separator/>
<checkbutton id="DW_LiveDebug" . . ./>
<checkbutton id="DW_LiveDataView" . . ./>
<separator/>
<editcontrol id="DW_SetTitle" . . ./>
<menubutton id="DW_FileTransfer" . . ./>
<menubutton id="DW_Preview" . . ./>
<separator/>
<button id="DW_DocRefresh" . . ./>
<button id="DW_Reference" . . ./>
<menubutton id="DW_CodeNav" . . ./>
<menubutton id="DW_ViewOptions" . . ./>
</toolbar>
</toolbarset>
The following are descriptions of each of the toolbar tags.
<toolbar>
Description
Defines a toolbar. Dreamweaver displays the items and separators from left to right in the specified order, laying out
the items automatically. The toolbar file does not specify control over the spacing between the items, but you can
specify the widths of certain kinds of items.
Attributes
id, label, {container}, {initiallyVisible}, {initialPosition}, {relativeTo}
• id="unique_id" Required. An identifier string must be unique within a file and within all files that the file
includes. The JavaScript API functions that manipulate a toolbar refer to it by its ID. For more information on these
functions, see the Dreamweaver API Reference. If two toolbars that are included in the same file have the same ID,
Dreamweaver displays an error.
• label="string" Required. The label attribute specifies the label, which is a character string, that Dreamweaver
displays to the user. The label appears in the View >Toolbars menu and in the title bar of the toolbar when it’s
floating.

172
EXTENDING DREAMWEAVER
Toolbars
Last updated 6/15/2011
• container="mainframe" or "document" Defaults to "mainframe". Specifies where the toolbar should dock in
the Dreamweaver workspace on Windows. If the container is set to
"mainframe", the toolbar appears in the outer
workspace frame and operates on the front document. If the container is set to
"document", the toolbar appears in
each document window. On the Macintosh, all toolbars appear in each document window.
• initiallyVisible="true" or "false". This tag specifies whether the toolbar should be visible the first time that
Dreamweaver loads it from the Toolbars folder. After the first time, the user controls visibility. Dreamweaver saves
the current state to the system registry (Windows) or the Dreamweaver Preferences file (Macintosh) when the user
quits Dreamweaver. Dreamweaver restores the setting from the registry or the Preferences file when it restarts. You
can manipulate toolbar visibility using the
dom.getToolbarVisibility() and dom.setToolbarVisibility()
functions, as described in the Dreamweaver API Reference. If you do not set the
initiallyVisible attribute, it
defaults to
true.
• initialPosition="top", "below", or "floating". Specifies where Dreamweaver initially positions the toolbar,
relative to other toolbars, the first time that Dreamweaver loads it. The possible values for
intialPosition are
described in the following list:
• top This is the default position, so the toolbar appears at the top of the document window. If multiple toolbars
specify
top for a given window type, the toolbars appear in the order that Dreamweaver encounters them during
loading, which might not be predictable, if the toolbars reside in separate files.
• below The toolbar appears at the beginning of the row immediately below the toolbar that the relativeTo
attribute specifies. Dreamweaver reports an error if the
relativeTo toolbar isn’t found. If multiple toolbars specify
below relative to the same toolbar, they appear in the order that Dreamweaver encounters them during loading,
which might not be predictable if the toolbars reside in separate files.
• floating Toolbar is not initially docked to the window; it floats above the document. Dreamweaver automatically
places the toolbar so it is offset from other floating toolbars. On the Macintosh,
floating is treated the same as top.
As with the initiallyVisible attribute, the initialPosition attribute applies only the first time that
Dreamweaver loads the toolbar. After that, the toolbar’s position is saved to the registry or the Dreamweaver
Preferences file. You can reset the position of the toolbar by using the
dom.setToolbarPosition() function. For
more information on the
dom.setToolbarPosition() function, see the Dreamweaver API Reference.
If you do not specify the initialPosition attribute, Dreamweaver positions the toolbar in the order that it is
encountered during loading.
• relativeTo="toolbar_id" This attribute is required if the initialPosition attribute specifies below.
Otherwise, it is ignored. Specifies the ID of the toolbar below which this toolbar should be positioned.
Contents
The toolbar tag contains include, itemref, and separator tags as well as individual item definitions such as
button, combobox, dropdown, and so on. For descriptions of the item definitions that you can specify, see “Toolbar
item tags” on page 175.
Container
The toolbarset tag.
Example
<toolbar id="MyDWedit_toolbar" label="Edit">

173
EXTENDING DREAMWEAVER
Toolbars
Last updated 6/15/2011
<include/>
Description
Loads toolbar items from the specified file before continuing to load the current file. Toolbar items that are defined in
the included file can be referenced in the current file. If a file attempts to recursively include another file, Dreamweaver
displays an error message and ignores the recursive include. Any
toolbar tags in the included file are skipped,
although toolbar items in those toolbars are available for reference in the current file.
Attributes
• The file path, relative to the Toolbars folder, of the toolbar XML file to include.
Contents
None.
Container
The toolbar tag or the toolbarset tag.
Example
<include file="mine/editbar.xml"/>
<itemtype/>
Description
Defines a single toolbar item. Toolbar items include buttons, radio buttons, check buttons, combo boxes, pop-up
menus, and so on. For a list of the types of toolbar items that you can define, see
“Toolbar item tags” on page 175.
Attributes
The attributes vary, depending on the item that you define. For a complete list of the attributes that you can specify for
toolbar items, see
“Item tag attributes” on page 180.
Contents
None.
Container
The toolbar tag or the toolbarset tag.
Example
<button id="strikeout_button" .../>
<itemref/>
Description
Refers to (and includes in the current toolbar) a toolbar item that was defined either inside a previous toolbar or
outside of all toolbars.

174
EXTENDING DREAMWEAVER
Toolbars
Last updated 6/15/2011
Attributes
id, {showIf}
• id="id_reference" Required. Must be the ID of an item that was previously defined or included in the file.
Dreamweaver does not allow forward references. If a toolbar item tag references an undefined ID, Dreamweaver
reports an error and ignores the reference.
• showIf="script" Specifies that this item appears on the toolbar only if the specified script returns a true value.
For example, you can use
showIf to show certain buttons only in a given application or only when a page is written
in a server-side language such as Adobe ColdFusion, ASP, or JSP. If you do not specify
showIf, the item always
appears. Dreamweaver checks this property whenever the item’s enabler runs; that is, according to the value of the
update attribute. You should use this attribute sparingly. The attribute can be used either in the item definition or
in a reference to the item from a toolbar. If both the definition and the reference specify the
showIf attribute,
Dreamweaver shows the item only if both conditions are true. The
showIf attribute is equivalent to the showIf()
function in a command file.
Contents
None.
Container
The toolbar tag or the toolbarset tag.
Example
<itemref id="strikeout_button">
<separator/>
Description
Inserts a separator at the current location in the toolbar.
Attributes
{showIf}
• The showif attribute specifies that the separator should appear only on the toolbar if the given script returns true.
For example, you can use the
showIf attribute to show the separator only in a given application or only when the
page has a certain document type. If the
showIf attribute is unspecified, the separator always appears.
Contents
None.
Container
The toolbar tag.
Example
<separator/>

175
EXTENDING DREAMWEAVER
Toolbars
Last updated 6/15/2011
Toolbar item tags
Each type of toolbar item has its own tag and set of required and optional attributes. You can define toolbar items
either inside or outside of toolbars. In general, it is better to define them outside of toolbars and refer to them within
toolbars using the
itemref tag.
You can define the following types of items in a toolbar.
<button>
Description
This push button executes a specific command when you click it. It looks and acts the same as the Reference button
on the Dreamweaver toolbar.
Attributes
id, image, tooltip, command, {showIf}, {disabledImage}, {overImage}, {label}, {file},
{domRequired}, {enabled}, {update}, {arguments}
For a description of each attribute, see “Item tag attributes” on page 180.
Contents
None.
Container
The toolbar tag or the toolbarset tag.
Example
<BUTTON ID="DW_DocRefresh"
image="Toolbars/images/MM/refresh.gif"
disabledImage="Toolbars/images/MM/refresh_dis.gif"
tooltip="Refresh Design View (F5)"
enabled="((dw.getDocumentDOM() != null) && (dw.getDocumentDOM().getView() != 'browse')
&& (!dw.getDocumentDOM().isDesignViewUpdated()))"
command="dw.getDocumentDOM().synchronizeDocument()"
update="onViewChange,onCodeViewSyncChange"/>
<checkbutton>
Description
A check button is a button that has a checked or unchecked state and that executes a specific command when clicked.
When it is checked, it appears pressed in and highlighted. When it is not checked, it appears flat. Dreamweaver
implements the following states for the check button: Mouse-over, Pressed, Mouse-over-while-pressed, and Disabled-
while-pressed. The handler that is specified by the
checked attribute or the isCommandChecked() function must
ensure that clicking the check button causes the button’s state to toggle.
Attributes
id, {showIf}, image, {disabledImage}, {overImage}, tooltip, {label}, {file}, {domRequired},
{enabled}, checked, {update}, command, {arguments}

176
EXTENDING DREAMWEAVER
Toolbars
Last updated 6/15/2011
For a description of each attribute, see “Item tag attributes” on page 180.
Contents
None.
Container
The toolbar tag or the toolbarset tag.
Example
<CHECKBUTTON ID="DW_LiveDebug"
image="Toolbars/images/MM/debugview.gif"
disabledImage="Toolbars/images/MM/globe_dis.gif"
tooltip="Live Debug"
enabled="dw.canLiveDebug()"
checked="dw.getDocumentDOM() != null && dw.getDocumentDOM().getView() == 'browse'"
command="dw.toggleLiveDebug()"
showIf="dw.canLiveDebug()"
update="onViewChange"/>
<radiobutton>
Description
A radio button is exactly the same as a check button, except that when it is off, it appears as a raised button.
Dreamweaver implements the following states for the radio button: Mouse-over, Pressed, Mouse-over-while-pressed,
and Disabled-while-pressed. Dreamweaver does not enforce mutual exclusion between radio buttons. The handler
that the
checked attribute or the isCommandChecked() function specifies must ensure that the checked and
unchecked states of radio buttons are consistent with each other.
Radio buttons act the same as the Code view, Design view, and Code and Design view buttons on the Dreamweaver
document toolbar.
Attributes
id, image, tooltip, checked, command, {showIf}, {disabledImage}, {overImage}, {label}, {file},
{domRequired}, {enabled}, {update}, {arguments}
For a description of each attribute, see “Item tag attributes” on page 180.
Contents
None.
Container
The toolbar tag or the toolbarset tag.

177
EXTENDING DREAMWEAVER
Toolbars
Last updated 6/15/2011
Example
<RADIOBUTTON ID="DW_CodeView"
image="Toolbars/images/MM/codeView.gif"
disabledImage="Toolbars/images/MM/codeView_dis.gif"
tooltip="Show Code View"
domRequired="false"
enabled="dw.getDocumentDOM() != null"
checked="dw.getDocumentDOM() != null && dw.getDocumentDOM().getView() == 'code'"
command="dw.getDocumentDOM().setView('code')"
update="onViewChange"/>
<menubutton>
Description
A menu button is a button that invokes the context menu that is specified by the menuid attribute. Dreamweaver
implements Mouse-over and Pressed states for menu buttons. Dreamweaver does not draw the menu arrow, which is
the downward-pointing arrow that indicates menu items are attached to the button; you must include it in your icon.
The File Management and Code Navigation buttons on the Dreamweaver document toolbar are examples of menu
buttons.
Attributes
id, image, tooltip, menuID, domRequired, enabled, {showIf}, {disabledImage}, {overImage},
{label}, {file}, {update}
For a description of each attribute, see “Item tag attributes” on page 180.
Contents
None.
Container
The toolbar tag or the toolbarset tag.
Example
<MENUBUTTON ID="DW_CodeNav"
image="Toolbars/images/MM/codenav.gif"
disabledImage="Toolbars/images/MM/codenav_dis.gif"
tooltip="Code Navigation"
enabled="dw.getFocus() == 'textView' || dw.getFocus() == 'html'"
menuID="DWCodeNavPopup"
update="onViewChange"/>
<dropdown>
Description
A drop-down menu (or pop-up menu) is a noneditable menu that executes a specific command when you select an
entry and the menu updates itself, based on an attached JavaScript function. The drop-down menu looks and acts the
same as the Format control in the Text Property inspector, except it’s a standard size instead of the small Property
inspector size.

178
EXTENDING DREAMWEAVER
Toolbars
Last updated 6/15/2011
Attributes
id, tooltip, file, enabled, checked, value, command, {showIf}, {label}, {width},
{domRequired}, {update}, {arguments}
For a description of each attribute, see “Item tag attributes” on page 180.
Contents
None.
Container
The toolbar tag or the toolbarset tag.
Example
<dropdown id="Font_Example"
width="115"
tooltip="Font"
domRequired="false"
file="Toolbars/mine/fontExample.htm"
update="onSelChange"/>
<combobox>
Description
A combo box is an editable pop-up menu that executes its command when you select an entry or when the user makes
an edit in the text box and switches focus. The menu looks and acts the same as the Font control on the Text Property
inspector, except it’s a standard size instead of the small Property inspector size.
Attributes
id, file, tooltip, enabled, value, command, {showiI}, {label}, {width}, {domRequired},
{update}, {arguments}
For a description of each attribute, see “Item tag attributes” on page 180.
Contents
None.
Container
The toolbar tag or the toolbarset tag.
Example
<COMBOBOX ID="Address_URL"
width="300"
tooltip="Address"
label="Address: "
file="Toolbars/MM/AddressURL.htm"
update="onBrowserPageBusyChange"/>

179
EXTENDING DREAMWEAVER
Toolbars
Last updated 6/15/2011
<editcontrol>
Description
An edit control box is a text-editing box that executes its command when the user changes text in the box and switches
focus.
Attributes
id, tooltip, file, value, command, {showIf}, {label}, {width}, {domRequired}, {enabled},
{update}, {arguments}
For a description of each attribute, see “Item tag attributes” on page 180.
Contents
None.
Container
The toolbar tag or the toolbarset tag.
Example
<EDITCONTROL ID="DW_SetTitle"
label="Title: "
tooltip="Document Title"
width="150"
file="Toolbars/MM/EditTitle.htm"/>
<colorpicker>
Description
A color picker is a panel of colors that does not have an associated text box that executes its command when the user
selects a new color. This panel looks and acts the same as the color picker on the Dreamweaver Property inspector.
You can specify a different icon to replace the default icon.
Attributes
id, tooltip, value, command, {showIf}, {image}, {disabledImage}, {overImage}, {label},
{colorRect}, {file}, {domRequired}, {enabled}, {update}, {arguments}
For a description of each attribute, see “Item tag attributes” on page 180.
Contents
None.
Container
The toolbar tag or the toolbarset tag.

180
EXTENDING DREAMWEAVER
Toolbars
Last updated 6/15/2011
Example
<colorpicker id="Color_Example"
image="Toolbars/images/colorpickerIcon.gif"
disabledImage="Toolbars/images/colorpickerIconD.gif"
colorRect="0 12 16 16"
tooltip="Text Color"
domRequired="false"
file="Toolbars/mine/colorExample.htm"
update="onSelChange"/>
Item tag attributes
You can assign attributes and commands to toolbar items to specify how they look and behave. You can also include
other toolbar files and reference toolbar items that are defined in other toolbars. The attributes for toolbar item tags
have the following meanings:
id="unique_id"
Required. The id attribute is an identifier for the toolbar item. The id attribute must be unique within the current file
and all files that are included within the current file. The
itemref tag uses the item id to indicate and include an item
within a toolbar.
Example
<button id="DW_DocRerefresh" . . . >
showIf="script"
Optional. This attribute specifies that the item appears in the toolbar only if the script returns a true value. For
example, you can use the
showIf attribute to show certain buttons only when a page is written in a certain server-side
language such as Adobe ColdFusion, ASP, or JSP. If you do not specify
showIf, the item always appears.
The showIf attribute is checked whenever the item enabler runs; that is, according to the value of the update attribute.
Use the
showIf attribute sparingly.
You can specify the showIf attribute in the item definition and in a reference to the item on an itemref tag. If the
definition and the reference specify the
showIf attribute, the item shows only if both conditions are true. The showIf
attribute is the same as the
showIf() function in a toolbar command file. If you specify both the showIf attribute and
the
showif() function, the function overrides the attribute.
Example
showIf="dw.canLiveDebug()"
image="image_path"
This attribute is required for buttons, check buttons, radio buttons, menu buttons, and combo buttons. The image
attribute is optional for color pickers and is ignored for other item types. The
image attribute specifies the path, relative
to the Configuration folder, of the icon file that displays on the button. The icon can be in any format that
Dreamweaver can render, but typically it is a GIF or JPEG file format.
If an icon is specified for a color picker, the icon replaces the color picker entirely. If the colorRect attribute is also
set, the current color appears on top of the icon in the specified rectangle.

181
EXTENDING DREAMWEAVER
Toolbars
Last updated 6/15/2011
Example
image="Toolbars/images/MM/codenav.gif"
disabledImage="image_path"
Optional. Dreamweaver ignores the disabledImage attribute for items other than buttons, check buttons, radio
buttons, menu buttons, color pickers, and combo buttons. This attribute specifies the path, relative to the
Configuration folder, of the icon file that Dreamweaver displays if the button is disabled. If you do not specify the
disabledImage attribute, Dreamweaver displays the image that is specified in the image attribute when the button is
disabled.
Example
disabledImage="Toolbars/images/MM/codenav_dis.gif"
overImage="image_path"
Optional. Dreamweaver ignores the overImage attribute for items other than buttons, check buttons, radio buttons,
menu buttons, color pickers, and combo buttons. This attribute specifies the path, relative to the Configuration folder,
of the icon file that Dreamweaver displays when the user moves the mouse over the button. If you do not specify the
overImage attribute, the button does not change when the user moves the mouse over it, except for a ring that
Dreamweaver draws around the button.
Example
overImage="Toolbars/images/MM/codenav_ovr.gif"
tooltip="tooltip string"
Required. This attribute specifies the identifying text, or tool tip, that appears when the mouse pointer hovers over the
toolbar item.
Example
tooltip="Code Navigation"
label="label string"
Optional. This attribute specifies a label that displays next to the item. Dreamweaver does not automatically add a
colon to labels. Labels for nonbutton items are always positioned on the left of the item. Dreamweaver places labels for
buttons, check buttons, radio buttons, menu buttons, and combo buttons inside the button and to the right of the icon.
Example
label="Title: "
width="number"
Optional. This attribute applies only to text box, pop-up menu, and combo box items by specifying the width of the
item in pixels. If you do not specify the
width attribute, Dreamweaver uses a reasonable default width.
Example
width="150"

182
EXTENDING DREAMWEAVER
Toolbars
Last updated 6/15/2011
menuID="menu_id"
This attribute is required for menu buttons and combo buttons, unless you specify the getMenuID() function in an
associated command file. Dreamweaver ignores the
menuID attribute for other types of items. This attribute specifies
the ID of the menu bar that contains the context menu to pop up when the user clicks the button, menu button, or
combo button. The ID comes from the ID attribute of a
menubar tag in the menus.xml file.
Example
menuID="DWCodeNavPopup"
colorRect="left top right bottom"
This attribute is optional for color pickers that have an image attribute. The colorRect attribute is ignored for other
types of items and for color pickers that do not specify an image. If you specify the
colorRect attribute, Dreamweaver
displays the color that is currently selected in the color picker in the rectangle, relative to the left or top of the icon. If
you do not specify the
colorRect attribute, Dreamweaver does not display the current color on the image.
Example
colorRect="0 12 16 16"
file="command_file_path"
Required for pop-up menus and combo boxes. The file attribute is optional for other types of items. The file
attribute specifies the path, relative to the Configuration folder, of a command file that contains JavaScript functions
to populate, update, and execute the item. The
file attribute overrides the enabled, checked, value, update,
domRequired, menuID, showIf, and command attributes. In general, if you specify a command file with the file
attribute, Dreamweaver ignores all the equivalent attributes that are specified in the tag. For more information about
command files, see
“The toolbar command API functions” on page 185.
Example
file="Toolbars/MM/EditTitle.htm"
domRequired="true" or "false"
Optional. As with menus, the domRequired attribute specifies whether the Design view should be synchronized with
the Code view before Dreamweaver runs the associated command. If you do not specify this attribute, it defaults to a
true value. This attribute is equivalent to the isDOMRequired() function in a toolbar command file.
Example
domRequired="false"
enabled="script"
Optional. As with menus, the script returns a value that specifies whether the item is enabled. If you do not specify this
attribute, it defaults to enabled. The
enabled attribute is equivalent to the canAcceptCommand() function in a toolbar
command file.
Example
enabled="dw.getFocus() =='textView' || dw.getFocus() == 'html'"

183
EXTENDING DREAMWEAVER
Toolbars
Last updated 6/15/2011
checked="script"
This attribute is required for check buttons and radio buttons. Dreamweaver ignores the checked attribute for other
types of items. As with menus, the script returns a value that specifies whether the item is checked or unchecked. The
checked attribute is equivalent to isCommandChecked() in a toolbar command file. If you do not specify this
attribute, it defaults to unchecked.
Example
checked="dw.getDocumentDOM() != null && dw.getDocumentDOM().getView() == 'code'"
value="script"
This attribute is required for pop-up menus, combo boxes, text boxes, and color pickers. Dreamweaver ignores the
value attribute for other types of items.
To determine what value to display for pop-up menus and combo boxes, Dreamweaver first calls
isCommandchecked() for each item in the menu. If the isCommandchecked() function returns a true value for any
items, Dreamweaver displays the value for the first one. If no items return a
true value or the isCommandChecked()
function is not defined, Dreamweaver calls the
getCurrentValue() function or executes the script that the value
attribute specifies. If the control is a combo box, Dreamweaver displays the returned value. If the control is a pop-up
menu, Dreamweaver temporarily adds the returned value to the list and displays it.
In all other cases, the script returns the current value to display. For pop-up menus or combo boxes, this value should
be one of the items in the menu list. For combo boxes and text boxes, the value can be any string that the script returns.
For color pickers, the value should be a valid color but Dreamweaver does not enforce this.
The value attribute is equivalent to the getCurrentValue() function in a toolbar command file.
update="update_frequency_list"
Optional. This attribute specifies how often the enabled, checked, showif, and value handlers should run to update
the visible state of the item. The
update attribute is equivalent to the getUpdateFrequency() function in a toolbar
command file.
You must specify the update frequency for toolbar items because these items are always visible, unlike menu items. For
this reason, you should always select the lowest frequency possible and make sure your handlers for the
enabled,
checked, and value handlers are as simple as possible.
The following list shows the possible handlers for update_frequency_list, from least to most frequent. If you do not
specify the
update attribute, the update frequency defaults to onEdit frequency. You can specify multiple update
frequencies, separated by commas. The handlers run on any of the following specified events:
• onServerModelChange executes when the server model of the current page changes.
• onCodeViewSyncChange executes when the Code view becomes in or out of sync with the Design view.
• onViewChange executes whenever the user switches focus between Code view and Design view or when the user
changes between Code view, Design view, or Code and Design view.
• onEdit executes whenever the document is edited in Design view. Changes that you make in Code view do not
trigger this event.
• onSelChange executes whenever the selection changes in Design view. Changes that you make in Code view do not
trigger this event.

184
EXTENDING DREAMWEAVER
Toolbars
Last updated 6/15/2011
• onEveryIdle executes regularly when the application is idle. This can be time-consuming because the
enabler/checked/showif/value handlers are running often. It should be used only for buttons that need to have
their enable state changed at special times, and handlers should be quick.
Note: In all these cases, Dreamweaver actually executes the handlers after the specified event occurs, when the
application is in a quiescent state. It is not guaranteed that your handlers run after every edit or selection change; your
handlers run soon after a batch of edits or selection changes occur. The handlers are guaranteed to run when the user
clicks on a toolbar item.
Example
update="onViewChange"
command="script"
This attribute is required for all items except menu buttons. Dreamweaver ignores the command attribute for menu
buttons. Specifies the JavaScript function to execute when the user performs one of the following actions:
• Clicks a button
• Selects an item from a pop-up menu or combo box
• Tabs out of, presses Return in, or clicks away from a text box or combo box
• Selects a color from a color picker
The command attribute is equivalent to the receiveArguments() function in a toolbar command file.
Example
command="dw.toggleLiveDebug()"
arguments="argument_list"
Optional. This attribute specifies the comma-separated list of arguments to pass to the receiveArguments() function
in a toolbar command file. If you do not specify the
arguments attribute, Dreamweaver passes the ID of the toolbar
item. In addition, pop-up menus, combo boxes, text boxes, and color pickers pass their current value as the first
argument, before any arguments that the
arguments attribute specifies, and before the item ID if no arguments are
specified.
Example
On a toolbar that has Undo and Redo buttons, each button calls the menu commands file, Edit_Clipboard.htm, and
passes an argument that specifies the action, as shown in the following example:

185
EXTENDING DREAMWEAVER
Toolbars
Last updated 6/15/2011
<button id="DW_Undo"
image="Toolbars/images/MM/undo.gif"
disabledImage="Toolbars/images/MM/undo_dis.gif"
tooltip="Undo"
file="Menus/MM/Edit_Clipboard.htm"
arguments="'undo'"
update="onEveryIdle"/>
<button id="DW_Redo"
image="Toolbars/images/MM/redo.gif"
disabledImage="Toolbars/images/MM/redo_dis.gif"
tooltip="Redo"
file="Menus/MM/Edit_Clipboard.htm"
arguments="'redo'"
update="onEveryIdle"/>
The toolbar command API functions
In many cases where you specify a script for an attribute, you can also implement the attribute through a JavaScript
function in a command file. This action is necessary when the functions need to take arguments, as in the command
handler for a text box. It is required for pop-up menus and combo boxes.
The command file API for toolbar items is an extension of the menu commands file API, so you can reuse menu
commands files directly as toolbar command files, perhaps with some additional functions that are specific to toolbars.
canAcceptCommand()
Availability
Dreamweaver MX.
Description
Determines whether the toolbar item is enabled. The enabled state is the default condition for an item, so you should
not define this function unless it returns a
false value in at least one case.
Arguments
For pop-up menus, combo boxes, text boxes, and color pickers, the first argument is the current value within the
control. The
getDynamicContent() function can optionally attach individual IDs to items within a pop-up menu. If
the selected item in the pop-up menu has an ID attached, Dreamweaver passes that ID to
canAcceptCommand()
instead of the value. For combo boxes, if the current contents of the text box do not match an entry in the pop-up
menu, Dreamweaver passes the contents of the text box. Dreamweaver compares against the pop-up menu without
case-sensitivity to determine whether the contents of the text box match an entry in the list.
If you specify the arguments attribute for this toolbar item in the toolbars.xml file, those arguments are passed next.
If you did not specify the
arguments attribute, Dreamweaver passes the ID of the item.
Returns
Dreamweaver expects a Boolean value; true if the item is enabled; false otherwise.

186
EXTENDING DREAMWEAVER
Toolbars
Last updated 6/15/2011
Example
function canAcceptCommand()
{
return (dw.getDocumentDOM() != null);
}
getCurrentValue()
Availability
Dreamweaver MX.
Description
Returns the current value to display in the item. Dreamweaver calls the getCurrentValue() function for pop-up
menus, combo boxes, text boxes, and color pickers. For pop-up menus, the current value should be one of the items
in the menu. If the value is not in the pop-up menu, Dreamweaver selects the first item. For combo boxes and text
boxes, this value can be any string that the function returns. For color pickers, the value should be a valid color, but
Dreamweaver does not enforce this. This function is equivalent to the
value attribute.
Arguments
None.
Returns
Dreamweaver expects a string that contains the current value to display. For the color picker, the string contains the
RGB form of the selected color (for example, #FFFFFF for the color white).
Example
function getCurrentValue()
{
var title = "";
var dom = dw.getDocumentDOM();
if (dom)
title = dom.getTitle();
return title;
}
getDynamicContent()
Availability
Dreamweaver MX.
Description
This function is required for pop-up menus and combo boxes. As with menus, this function returns an array of strings
that populate the pop-up menu. Each string can optionally end with
";id=id". If an ID is specified, Dreamweaver
passes the ID to the
receiveArguments() function instead of the actual string to appear in the menu.

187
EXTENDING DREAMWEAVER
Toolbars
Last updated 6/15/2011
The name getDynamicContent() is a misnomer because this function should be used even if the list of entries in the
menu is fixed. For example, the Text_Size.htm file in the Configuration/Menus/MM folder is not a dynamic menu; it
is designed to be called from each one of a set of static menu items. By adding a
getDynamicContent() function that
simply returns the list of possible font sizes, however, the same command file can also be used for a toolbar pop-up
menu. Toolbar items ignore underscores in the strings in a returned array, so you can reuse menu commands files. In
the menu commands file, Dreamweaver ignores the
getDynamicContent() function because the menu item is not
marked as dynamic.
Arguments
None.
Returns
Dreamweaver expects an array of strings with which to populate the menu.
Example
function getDynamicContent()
{
var items = new Array;
var filename = dw.getConfigurationPath() + "/Toolbars/MM/AddressList.xml";
var location = MMNotes.localURLToFilePath(filename);
if (DWfile.exists(location))
{
var addressData = DWfile.read(location);
var addressDOM = dw.getDocumentDOM(dw.getConfigurationPath() +
'/Shared/MM/Cache/empty.htm');
addressDOM.documentElement.outerHTML = addressData;
var addressNodes = addressDOM.getElementsByTagName("url");
if (addressNodes.length)
{
for (var i=0; i < addressNodes.length ; i++ )
{
items[i] = addressNodes[i].address + ";id='" +
addressNodes[i].address + "'";
}
}
}
return items;
getMenuID()
Availability
Dreamweaver MX.
Description
Only valid for menu buttons. Dreamweaver calls the getMenuID() function to get the ID of the menu that should
appear when the user clicks the button.
Arguments
None.

188
EXTENDING DREAMWEAVER
Toolbars
Last updated 6/15/2011
Returns
Dreamweaver expects a string that contains a menu ID, which is defined in the menus.xml file.
Example
function getMenuID()
{
var dom = dw.getDocumentDOM();
var menuID = '';
if (dom)
{
var view = dom.getView();
var focus = dw.getFocus();
if (view == 'design')
{
menuID = 'DWDesignOnlyOptionsPopup';
}
else if (view == 'split')
{
if (focus == 'textView')
{
menuID = 'DWSplitCodeOptionsPopup';
}
else
{
menuID = 'DWSplitDesignOptionsPopup';
}
}
else if (view == 'code')
{
menuID = 'DWCodeOnlyOptionsPopup';
}
else
{
menuID = 'DWBrowseOptionsPopup';
}
}
return menuID;
}
getUpdateFrequency()
Availability
Dreamweaver MX.
Description
Specifies how often to run the handlers for the enabled, checked, showIf, and value attributes to update the visible
state of the item.
You must specify the update frequency for toolbar items because they are always visible, unlike menus. For this reason,
you should always select the lowest frequency possible and make sure your
enabled, checked, and value handlers are
as simple as possible.
This function is equivalent to the update attribute in a toolbar item.

189
EXTENDING DREAMWEAVER
Toolbars
Last updated 6/15/2011
Arguments
None.
Returns
Dreamweaver expects a string that contains a comma-separated list of update handlers. For a complete list of the
possible update handlers, see
“update="update_frequency_list"” on page 183.
Example
function getUpdateFrequency()
{
return onSelChange";
}
isCommandChecked()
Availability
Dreamweaver MX.
Description
Returns a value that specifies whether the item is selected. For a button, checked means that the button appears on or
depressed. The
isCommandChecked() function is equivalent to the checked attribute in a toolbar item tag.
Arguments
For pop-up menus, combo boxes, text boxes, and color pickers, the first argument is the current value within the
control. The
getDynamicContent() function can optionally attach individual IDs to items within a pop-up menu. If
the selected item in the menu has an ID attached, Dreamweaver passes that ID to the
isCommandChecked() function
instead of the value. For combo boxes, if the current contents of the text box do not match an entry in the pop-up
menu, Dreamweaver passes the contents of the text box. For determining whether the text box matches, Dreamweaver
compares against the menu without case-sensitivity.
If you specified the arguments attribute, those arguments are passed next. If you do not specify the arguments
attribute, Dreamweaver passes the ID of the item.
Returns
Dreamweaver expects a Boolean value: true if the item is checked; false otherwise.
Example
The following example determines which item, if any, should be checked in a pop-up menu of paragraph formats and
CSS styles:

190
EXTENDING DREAMWEAVER
Toolbars
Last updated 6/15/2011
function isCommandChecked()
{
var bChecked = false;
var style = arguments[0];
var textFormat = dw.getDocumentDOM().getTextFormat();
if (dw.getDocumentDOM() == null)
bChecked = false;
if (style == "(None)")
bChecked = (dw.cssStylePalette.getSelectedStyle() == '' || textFormat ==
"" || textFormat == "P" || textFormat == "PRE");
else if (style == "Heading 1")
bChecked =0(textFormat == "h1");
else if (style == "Heading 2")
bChecked =0(textFormat == "h2");
else if (style == "Heading 3")
bChecked =0(textFormat == "h3");
else if (style == "Heading 4")
bChecked =0(textFormat == "h4");
else if (style == "Heading 5")
bChecked =0(textFormat == "h5");
else if (style == "Heading 6")
bChecked =0(textFormat == "h6");
else
bChecked = (dw.cssStylePalette.getSelectedStyle() == style);
return bChecked;
}
isDOMRequired()
Availability
Dreamweaver MX.
Description
Specifies whether the toolbar command requires a valid DOM to operate. If this function returns a true value or if the
function is not defined, Dreamweaver assumes that the command requires a valid DOM and synchronizes the Code
view and Design view for the document before executing the associated command. This function is equivalent to the
domRequired attribute in a toolbar item tag.
Arguments
None.
Returns
Dreamweaver expects a Boolean value: true if the DOM is required; false otherwise.
Example
function isDOMRequired()
{
return false;
}

191
EXTENDING DREAMWEAVER
Toolbars
Last updated 6/15/2011
receiveArguments()
Availability
Dreamweaver MX.
Description
Processes any arguments that pass from a toolbar item. The receiveArguments() function is equivalent to the
command attribute in a toolbar item tag.
Arguments
For pop-up menus, combo boxes, text boxes, and color pickers, the first argument is the current value within the
control. The
getDynamicContent() function can optionally attach individual IDs to items within a pop-up menu. If
the selected item in the pop-up menu has an ID attached, Dreamweaver passes that ID to the
receiveArguments()
function instead of the value. For combo boxes, if the current contents of the text box do not match an entry in the
pop-up menu, Dreamweaver passes the contents of the text box. To determine whether the text box matches,
Dreamweaver compares against the pop-up menu without case-sensitivity.
If you specified the arguments attribute, those arguments are passed next. If you did not specify the arguments
attribute, Dreamweaver passes the ID of the item.
Returns
Dreamweaver expects nothing.
Example
function receiveArguments(newTitle)
{
var dom = dw.getDocumentDOM();
if (dom)
dom.setTitle(newTitle);
}
showIf()
Availability
Dreamweaver MX.
Description
Specifies that an item appears on the toolbar only if the function returns a
true
value. For example, you can use the
showIf()
function to show certain buttons only when the page has a certain server model. If the
showif()
function is
not defined, the item always appears. The
showIf()
function is the same as the
showIf
attribute in a toolbar item tag.
The showIf() function is called whenever the item’s enabler runs; that is, according to the value that the
getUpdateFrequency() function returns.
Arguments
None.
Returns
Dreamweaver expects a Boolean value: true if the item appears; false otherwise.

192
EXTENDING DREAMWEAVER
Toolbars
Last updated 6/15/2011
Example
function showif()
{
var retval = false;
var dom = dw.getDocumentDOM();
if(dom)
{
var view = dom.getView();
if(view == 'design')
{
retval = true;
}
}
return retval;
}

193
Last updated 6/15/2011
Chapter 12: Reports
Adobe Dreamweaver supports two types of reports: site reports and stand-alone reports.
Site reports
You use the reports API to create custom site reports or modify the set of prewritten reports that come with
Dreamweaver. You can access site reports only through the Reports dialog box.
Site reports reside in the Dreamweaver Configuration/Reports folder. The Reports folder has subfolders that represent
report categories. Each report can belong to only one category. The category name cannot exceed 31 characters. Each
subfolder can have a file in it named _foldername.txt. If this file is present, Dreamweaver uses its contents as the
category name. If _foldername.txt is not present, Dreamweaver uses the folder name as the category name.
When the user selects multiple site reports from the Reports dialog box, Dreamweaver places all the results in the same
Results window under the Site Reports tab of the Results panel. Dreamweaver replaces these results the next time the
user runs any site report.
The following table lists the files you use to create a site report:
How site reports work
1 Reports are accessible through the Site > Reports command. When it is selected, this command displays a dialog
box from which the user selects reports to run on a choice of targets.
2 The user selects which files to run the selected reports on using the Report On: pop-up menu. This menu contains
the Current Document, Entire Current Local Site, Selected Files In Site, and Folder commands. When the user
selects the Folder command, a Browse button and text field appear, so the user can select a folder.
3 The user can customize reports that have parameters by clicking the Settings button and entering values for the
parameters. To let a user set report parameters, a report must contain a Settings dialog box. This dialog box is
optional; not every report requires the user to set the report’s parameters. If a report does not have a Settings dialog
box, the Settings button is dimmed when a user selects the report in the list.
4 After selecting the reports and specifying the settings, the user clicks the Run button.
Note: If a report has the preventFileActivity handler, Dreamweaver prevents the user from performing any other
file activity while this report is being run.
At this point, Dreamweaver clears all items from the Site Reports tab of the Results panel. Dreamweaver calls the
beginReporting() function in each report before the reporting process begins. If a report returns a false value
from this function, it is removed from the report run.
Path File Description
Configuration/Reports/{type/} reportname.js Contains the functions to generate the contents of the
report.
Configuration/Reports/{type/} reportname.htm Calls the appropriate JavaScript files. Defines the user
interface (UI) of the Settings dialog box for the report, if
needed.
Configuration/Reports/ Reports.js Provides common functions used in generating reports.

194
EXTENDING DREAMWEAVER
Reports
Last updated 6/15/2011
5 Each file is passed to each report that was selected in the Reports dialog box using the processFile() function. If
the report needs to include information about this file in the results list, it should call the
dw.resultsPalette.siteReports.addResultItem() function. This process continues until all files that
pertain to the user’s selection are processed or the user clicks the Stop button in the bottom of the window.
Dreamweaver displays the name of each file being processed and the number of files that remain to be processed.
6 Dreamweaver calls the endReporting() function in each report after all the files have been processed and the
reporting process completes.
A simple site report example
The simple extension example lists all the images referenced in a particular file, an entire site, selected files, or a folder
and displays the report in the Results window under the Site Results tab.
To create this extension, you create the report definition and write the JavaScript code.
This example creates two files in the HTML Reports folder: List images.htm, which contains the report definition, and
List Images.js, which contains the JavaScript code specific to this report. In addition, you reference the Reports.js file,
which is included with Dreamweaver.
Create the report definition
The report definition specifies the name of the report as it appears in the Reports dialog box, calls any JavaScript files
required, and defines the user interface of the Settings dialog box, if needed.
1 Create the file Configuration/Reports/HTML Reports/List images.htm.
2 Add the following to specify the name of the report that you want to appear in the Reports dialog box in the title of
the HTML page.
<html>
<head>
<title>List Images</title>
3 At the end of the file, add the script tag and specify the Reports.js file in the src attribute.
<script src="../Reports.js"></script>
4 At the end of the file, add another script tag and specify the List Images.js file, which you will create next, in the
src attribute.
<html>
<head>
<title>List Images</title>
<script src="../Reports.js"></script>
<script src="List Images.js"></script>
5 Close the head tag, include opening and closing body tags, and close the html tag.
</head>
<body>
</body>
</html>
6 Save the file as List Images.js in the Configuration/Reports/HTML Reports folder.

195
EXTENDING DREAMWEAVER
Reports
Last updated 6/15/2011
Write the JavaScript code
Dreamweaver includes the Reports.js file. You can call any of the functions in Reports.js. However, you also have to
create the JavaScript file that contains any functions that are specific to your custom site report.
1 Create the file Configuration/Reports/HTML Reports/List Images.js, with the following content:
// Function: configureSettings
// Description: Standard report API, used to initialize and load
//the default values. Does not initialize the UI.
//
function configureSettings() {
return false;
}
// Function: processFile
// Description: Report command API called during file processing.
//
function processFile (fileURL) {
if (!isHTMLType(fileURL)) //If the file isn't an HTML file
return; //skip it.
var curDOM = dw.getDocumentDOM(fileURL); // Variable for DOM
var tagList = curDOM.getElementsByTagName('img'); // Variable for img tags
var imgfilename; // Variable for file name specified in img tag
for (var i=0; i < tagList.length; i++) { // For img tag list
imgfilename = tagList[i].getAttribute('src'); // Get image filename
if (imgfilename != null) { // If a filename is specified
// Print the appropriate icon, HTML filename,
// image filename, and line number
reportItem(REP_ITEM_CUSTOM, fileURL, imgfilename,
curDOM.nodeToSourceViewOffsets(tagList[i])); }
}
}
2 Save the file as List Images.js in the Configuration/Reports/HTML Reports folder.
Stand-alone reports
You can use the results window API to create a stand-alone report. Stand-alone reports are regular commands that
directly use the results window API rather than the reports API. You can access a stand-alone report the same way you
access any other command, through the menus or through another command.
Stand-alone reports reside in the Dreamweaver Configuration/Commands folder. A custom command for a stand-
alone report appears on the Commands menu.
Dreamweaver creates a new Results window each time the user runs a new stand-alone report.
Path File Description
Configuration/Commands commandname.htm Defines the UI for the dialog box that appears when the
user selects the command and contains the JavaScript
code or a reference to the JavaScript file that performs the
actions needed to generate the report.
Configuration/Commands commandname.js Generates a Results window and puts the report in it.

196
EXTENDING DREAMWEAVER
Reports
Last updated 6/15/2011
How stand-alone reports work
1 The custom command, which is the command you create to generate the report, opens a new results window by
calling the
dw.createResultsWindow() function and storing the returned results object in a window variable. The
remaining functions in this process should be called as methods of this object.
2 The custom command initializes the title and format of the Results window by calling the setTitle() and
SetColumnWidths() functions as methods of the Results window object.
3 The command can either start adding items to the Results window immediately by calling the addItem() function,
or it can begin iterating through a list of files by calling the
setFileList() and startProcessing() functions as
methods of the Results window object.
4 When the command calls resWin.startProcessing(), Dreamweaver calls the processFile() function for each
file URL in the list. Define the
processFile() function in the stand-alone command. It receives the file URL as its
only argument. Use the
setCallbackCommands() function of the Results window object if you want Dreamweaver
to call the
processFile() function in some other command.
5 To call the addItem() function, the processFile() function needs to have access to the Results window that was
created by the stand-alone command. The
processFile() function can also call the stopProcessing() function
of the Results window object to stop processing the list of files.
A simple stand-alone report example
The simple stand-alone report extension lists all the images referenced in a particular file and displays the report in the
Results window.
You create this extension by creating the dialog box UI and writing the JavaScript code.
This example creates two files in the Configuration/Commands folder: List images.htm, which defines the UI of the
dialog box that appears when the user selects the custom command, and Listimages.js, which contains the JavaScript
code specific to this report.
Create the dialog box UI
The body section of the HTML file specifies the contents of the dialog box that appears when the user selects the
custom command and calls any JavaScript files required.
1 Create the Configuration/Commands/Listimages.htm file.
2 Enter the following in the Listimages.htm file:

197
EXTENDING DREAMWEAVER
Reports
Last updated 6/15/2011
<html>
<head>
<title>Standalone report example</title>
<script src="Listimages.js">
</script>
</head>
<body>
<div name="test">
<form name="myForm">
<table>
<tr>
<td>Click OK to display the standalone report.</td>
</tr>
</table>
</form>
</div>
</body>
3 Save the file as Listimages.htm in the Configuration/Commands folder.
Write the JavaScript code
Create the JavaScript file that contains any functions that are specific to your stand-alone report.
1 Create the Listimages.js file in the Configuration/Commands folder with the following code:

198
EXTENDING DREAMWEAVER
Reports
Last updated 6/15/2011
function stdaloneresultwin()
{
var curDOM = dw.getDocumentDOM("document");
var tagList = curDOM.getElementsByTagName('img');
var imgfilename;
var iOffset = 0;
var iLineNumber = 0;
var resWin = dw.createResultsWindow("Images in File", ["Line", "Image"]);
for (var i=0; i < tagList.length; i++)
{
// Get the name of the source file.
imgfilename = tagList[i].getAttribute('src');
// Get the character offset from the start of the file
// to the start of the img tag.
iOffset = curDOM.nodeToOffsets(curDOM.images[i]);
// Based on the offset, figure out what line in the file
// the img tag is on.
iLineNumber = curDOM.getLineFromOffset(iOffset[0]);
// As long as the src attribute specifies a file name,
if (imgfilename != null)
{ // display the line number, and image path.
resWin.addItem(resWin, "0", "Images in Current File", null, ¬
null, null, [iLineNumber, imgfilename]);
}
}
return;
}
// add buttons to dialog
function commandButtons()
{
return new Array("OK", "stdaloneresultwin()", "Cancel", "window.close()");
}
2 Save the file as Listimages.js in the Configuration/Commands folder.
The reports API functions
The only required function for the reports API is the processFile() function. All other functions are optional.
processFile()
Availability
Dreamweaver 4.
Description
This function is called when there is a file to process. The Report command should process the file without modifying
it and use the
dw.ResultsPalette.SiteReports() function, the addResultItem() function, or the
resWin.addItem() function to return information about the file. Dreamweaver automatically releases each file’s
DOM when it finishes.

199
EXTENDING DREAMWEAVER
Reports
Last updated 6/15/2011
Arguments
strFilePath
The strFilePath argument is the full path and filename of the file to process.
Returns
Dreamweaver expects nothing.
beginReporting()
Availability
Dreamweaver 4.
Description
This function is called at the start of the reporting process, before any reports are run. If the Report command returns
a
false value from this function, the Report command is excluded from the report run.
Arguments
target
The target argument is a string that indicates the target of the report session. It can be one of the following values:
"CurrentDoc", "CurrentSite", "CurrentSiteSelection" (for the selected files in a site), or "Folder:+ the path
to the folder the user selected" (for example,
"Folder:c:temp").
Returns
Dreamweaver expects a Boolean value:
true
if the report runs successfully;
false
if target is excluded from the report run.
endReporting()
Availability
Dreamweaver 4.
Description
This function is called at the end of the Report process.
Arguments
None.
Returns
Dreamweaver expects nothing.
commandButtons()
Availability
Dreamweaver 4.

200
EXTENDING DREAMWEAVER
Reports
Last updated 6/15/2011
Description
Defines the buttons that should appear on the right side of the Options dialog box and their behavior when they are
clicked. If this function is not defined, no buttons appear, and the body section of the report file expands to fill the
entire dialog box.
Arguments
None.
Returns
Dreamweaver expects an array that contains an even number of elements. The first element is a string that contains
the label for the topmost button. The second element is a string of JavaScript code that defines the behavior of the
topmost button when it is clicked. The remaining elements define additional buttons in the same manner.
Example
The following instance of the commandButtons() function defines the OK, Cancel, and Help buttons.
function commandButtons(){
return new Array("OK" , "doCommand()" , "Cancel" , ¬
"window.close()" , "Help" , "showHelp()");
}
configureSettings()
Availability
Dreamweaver 4.
Description
Determines whether the Report Settings button should be enabled in the Reports dialog box when this report is
selected.
Arguments
None.
Returns
Dreamweaver expects a Boolean value: true if the Report Settings button should be enabled; false otherwise.
windowDimensions()
Availability
Dreamweaver 4.
Description
Sets specific dimensions for the Parameters dialog box. If this function is not defined, the window dimensions are
computed automatically.
Note: Do not define this function unless you want an Options dialog box that is larger than 640 x 480 pixels.

201
EXTENDING DREAMWEAVER
Reports
Last updated 6/15/2011
Arguments
platform
The value of the platform argument is either "macintosh" or "windows", depending on the user’s platform.
Returns
Dreamweaver expects a string of the form "widthInPixels,heightInPixels".
The returned dimensions are smaller than the size of the entire dialog box because they do not include the area for the
OK and Cancel buttons. If the returned dimensions do not accommodate all options, scroll bars appear.
Example
The following instance of the windowDimensions() function sets the dimensions of the Parameters dialog box to 648
x 520 pixels:
function windowDimensions(){
return "648,520";
}

202
Last updated 6/15/2011
Chapter 13: Tag libraries and editors
Dreamweaver stores information about each tag, including all tag attributes, in a set of subfolders that reside in the
Configuration/TagLibraries folder. The Tag editor and Tag Chooser functions use the information that is stored in this
folder when manipulating and editing tags.
Dreamweaver comes with editors for the following languages: HTML, ASP.NET, CFML, JRun, and JSP. You can
customize tag editors that come with Dreamweaver, and you can create new tag editors. You can also add new tags to
the tag libraries.
Before you can create custom tag editors, understand the tag library structure. The following table lists the files you
use to create a tag library:
Path File Description
Configuration/TagLibraries/ TagLibraries.vtm Lists every installed tag.
Configuration/TagLibraries/language/ tag.vtm Includes information about tags (for example, tag
attributes, whether the tag has a closing tag, and
formatting rules).
Configuration/TagLibraries/language/ Tagimagefile.gif Optional file to display in the Property inspector.

203
EXTENDING DREAMWEAVER
Tag libraries and editors
Last updated 6/15/2011
Tag library file format
A tag library consists of a single root file, the TagLibraries.vtm file that lists every installed tag, plus a VTML file for
each tag in the tag library. The TagLibraries.vtm file functions as a table of contents and contains pointers to each
individual tag’s VTML file. The following figure shows how Dreamweaver organizes the VTML files by markup
language:
Users of Macromedia HomeSite from Adobe can recognize the VTML file structure, but Dreamweaver does not use
VTML files in the same way as HomeSite. The most important difference is that Dreamweaver contains its own HTML
renderer that displays extension user interfaces (UIs), so the Dreamweaver VTML files are not used in the user
interface (UI) rendering process.
The following example illustrates the structure of the TagLibraries.vtm file:
<taglibraries>
<taglibrary name="Name of tag library" doctypes="HTML,ASP-JS,ASP-VB" tagchooser="relative
path to TagChooser.xml file" id="DWTagLibrary_html">
<tagref name="tag name" file="relative path to tag .vtm file"/>
</taglibrary>
<taglibrary name="CFML Tags" doctypes="ColdFusion" servermodel="Cold Fusion"
tagchooser="cfml/TagChooser.xml" id="DWTagLibrary_cfml">
<tagref name="cfabort" file="cfml/cfabort.vtm"/>
</taglibrary>
<taglibrary name="ASP.NET Tags" doctypes="ASP.NET_CSharp,ASP.NET_VB" servermodel="ASPNet"
prefix="<asp:" tagchooser="ASPNet/TagChooser.xml" id="DWTagLibrary_aspnet">
<tagref name="dataset" file="aspnet/dataset.vtm" prefix="<mm:dataset"/>
</taglibrary>
</taglibraries>

204
EXTENDING DREAMWEAVER
Tag libraries and editors
Last updated 6/15/2011
The taglibrary tag groups one or more tags into a tag library. When you import tags or create a new set of tags, you
can group them into tag libraries. Typically, a
taglibrary grouping corresponds to a set of tags that are defined in a
JavaServer Pages (JSP) TLD file, an XML document type definition (DTD) file, an ASP.NET namespace, or some other
logical grouping.
The following table lists the taglibrary attributes:
The following table lists tagref attributes:
Because the tagref.prefix attribute can override the taglibrary.prefix attribute, the relationship between the
two attributes can be confusing. The following table shows the relationship between the
taglibrary.prefix and
tagref.prefix attributes:
Attribute Description Mandatory/optional
taglibrary.name Used to refer to the tag library in the UI. Mandatory
taglibrary.doctypes Indicates the document types for which this library is active. When
the library is active, library tags appear in the code hints menu. Not
all tag libraries can be active at the same time because name
conflicts can occur (for example, HTML and WML files are
incompatible).
Mandatory
taglibrary.prefix When specified, tags within the tag library have the form
taglibrary.prefix + tagref.name. For example, if the
taglibrary.prefix is "<jrun:" and the tagref.name is
"if", then the tag is of the form "<jrun:if". This can be
overridden for a particular tag.
Optional
taglibrary.servermodel If the tags in the tag library execute on an application server, the
servermodel attribute identifies the server model of the tag. If
the tags are client-side tags (not server-side tags), the
servermodel attribute is omitted. The servermodel attribute is
also used for Check Target Browsers.
Optional
taglibrary.id This can be any string that is different from the taglibrary.ID
attributes of other tag libraries in the file. The Extension Manager
uses the ID attribute, so the MXP files can insert a new
taglibrary and the tags files into the TagLibraries.vtm file.
Optional
taglibrary.tagchooser A relative path to the TagChooser.xml file that is associated with
this tag library.
Optional
Attribute Description Mandatory/optional
tagref.name Used to refer to the tag in the UI. Mandatory
tagref.prefix Specifies how the tag appears in Code view. When used, the
tagref.prefix attribute determines the prefix of the current
tag. When the attribute is defined, it overrides the value specified
for the
taglibrary.prefix attribute.
Optional
tagref.file References the VTML file for the tag. Optional
Is the taglibrary.prefix defined? Is the tagref.prefix defined? Resulting tag prefix
No No '<' + tagref.name
Yes No taglibrary.prefix + tagref.name
No Yes tagref.prefix
Yes Yes tagref.prefix

205
EXTENDING DREAMWEAVER
Tag libraries and editors
Last updated 6/15/2011
To define tags, Dreamweaver uses a modified version of the VTML file format. The following example demonstrates
all the elements that Dreamweaver must use to define an individual tag:
<tag name="input" bind="value" casesensitive="no" endtag="no">
<tagformat indentcontents="yes" formatcontents="yes" nlbeforetag nlbeforecontents=0
nlaftercontents=0 nlaftertag=1 />
<tagdialog file = "input.HTM"/>
<attributes>
<attrib name="name"/>
<attrib name="wrap" type="Enumerated">
<attriboption value="off"/>
<attriboption value="soft"/>
<attriboption value="hard"/>
/attrib>
<attrib name="onFocus" casesensitive="yes"/>
<event name="onFocus"/>
</attributes>
</tag>
The following table lists the attributes that define tags:
Attribute Description Mandatory/optional
tag.bind Used by the Data Binding panel. When you select a tag of this
type, the
bind attribute indicates the default attribute for
data binding.
Optional
tag.casesensitive Specifies whether the tag name is case-sensitive. If the tag is
case-sensitive, it is inserted into the user’s document using
exactly the case that the tag library specifies. If the tag is not
case-sensitive, it is inserted using the default case that is
specified in the Code Format tab in the Preferences dialog
box. If
casesensitive is omitted, the tag is assumed to be
case-insensitive.
Optional
tag.endtag Specifies whether the tag has both an opening and a closing
tag. For example, the
input tag has no closing tag; there is
no matching
/input tag. If the closing tag is optional, the
ENDTAG attribute should be set to Yes.tag. Specify xml to
enforce XML syntax for an empty tag. For example,
<tag
name="foo" endtag="xml" tagtype="empty">
inserts
<foo/>.
Optional
tagformat Specifies the tag’s formatting rules. In Dreamweaver versions
before Dreamweaver MX, these rules were stored in the
SourceFormat.txt file.
Optional
tagformat.indentcontents Specifies whether the contents of this tag should be
indented.
Optional
tagformat.formatcontents Specifies whether the contents of this tag should be parsed.
This attribute is set to
No for tags such as SCRIPT and STYLE,
for which content is something other than HTML.
Optional
tagformat.nlbeforetag Specifies whether to insert a newline character before this
tag. The value
0 indicates no, and the value 1 indicates yes.
Optional
tagformat.nlbeforecontents The number of newline characters to insert before the
contents of this tag.
Optional
tagformat.nlaftercontents The number of newline characters to insert after the
contents of this tag.
Optional

206
EXTENDING DREAMWEAVER
Tag libraries and editors
Last updated 6/15/2011
Note: In versions before Dreamweaver MX, tag information is stored in the Configuration/TagAttributeList.txt file.
The Tag Chooser
The Tag Chooser lets you view tags in functional groups so you can easily access frequently used tags. In order to add
a tag or a set of tags to the Tag Chooser, you must add it to the tag library. You can do this by using the Tag Library
Editor dialog box or by installing a Dreamweaver extension, which is packaged in an MXP file
.
TagChooser.xml files
The TagChooser.xml files provide the metadata for organizing tag groupings that appear in the Tag Chooser. Each tag
that comes with Dreamweaver is stored in a functional grouping and is available in the Tag Chooser. By editing the
TagChooser.xml files, you can regroup existing tags and group new tags. You can customize how tags are organized
for your users by creating subcategories so they can easily access their most important tags.
The TagLibraries.vtm files support the use of the taglibrary.tagchooser attribute, which points to the
TagChooser.xml files. If you change existing TagChooser.xml files or create new ones, the
taglibrary.tagchooser
attribute must point to the correct location for the Tag Chooser to be fully functional.
If there is no taglibrary.tagchooser attribute, the Tag Chooser displays the tree structure that is in the
TagLibraries.vtm file.
TagChooser.xml files are stored in the Configuration/TagLibraries/TagLibraryName folder. The following example
shows the structure of TagChooser.xml files:
tagformat.nlaftertag Specifies whether to insert a newline character after this tag.
The value
0 indicates no, and the value 1 indicates yes.
Optional
attrib.name The name of the attribute, as it appears in the source code. Mandatory
attrib.type If omitted, attrib.type is "text". It can have the
following values:
TEXT—free text content ENUMERATED—a
list of enumerated values
COLOR—a color value (name or
hexadecimal)
FONT—font name or font family STYLE—CSS
styles attribute
CSSSTYLE—CSS class name CSSID—CSS
class ID
FILEPATH —a full file path DIRECTORY—a folder
path
FILENAME—filename only RELATIVEPATH —a
relative representation of the path
FLAG —an ON/OFF
attribute that contains no value.
Optional
attrib.casesensitive Specifies whether the attribute name is case-sensitive. If the
CASESENSITIVE attribute is missing, the attribute name is
case-insensitive.
Optional
Attribute Description Mandatory/optional

207
EXTENDING DREAMWEAVER
Tag libraries and editors
Last updated 6/15/2011
<?xml version="1.0" encoding="iso-8859-1" standalone="yes" ?>
<tclibrary name="Friendly name for library node" desc='Description for incorporated
reference' reference="Language[,Topic[,Subtopic]]">
<category name="Friendly name for category node" desc='Description for incorporated
reference' reference="Language[,Topic[,Subtopic]]" id="Unique id">
<category name="Friendly name for subcategory node" ICON="Relative path"
desc='Description for incorporated reference' reference="Language,Topic[,Subtopic]"
id="Unique id">
<element name="Friendly name for list item" value='Value to pass to visual dialog
editors' desc='Description for incorporated reference'
reference="Language[,Topic[,Subtopic]]" id="Unique id"/>
... more elements to display in the list view ...
</category>
... more subcategories ...
</category>
... more categories ...
</tclibrary>
The following table lists the tags that are available for use in the TagChooser.xml files:
The category tag represents all other nodes in the Tree view under the tclibrary’s node, as shown in the following
table:
The following table lists the attributes of the element tag, which represents the tag to insert:
Tag Description Mandatory/Optional
tclibrary The tag is the outermost tag, which encapsulates this tag library’s Tag
Chooser structure.
Mandatory
tclibrary.name Value appears in the Tree view node. Mandatory
tclibrary.desc Value is an HTML string and appears in the Tag Info section of the Tag
Chooser dialog box. If there is no
desc attribute, the information for Tag
Info comes from the Reference panel. Interchangeable with
tclibrary.reference.
Optional (desc and reference
are mutually exclusive)
tclibrary.reference Value describes the language, topic, and subtopic to display in the Tag
Info section of the Tag Chooser dialog box. Interchangeable with
tclibrary.desc.
Optional (desc and reference
are mutually exclusive)
Tag Description Mandatory/Optional
category.name Value appears in the Tree view node. Mandatory
category.desc Value is an HTML string that appears in the Tag Info section of the Tag
Chooser dialog box. If neither
desc nor reference attr is specified,
nothing appears in the Tag info section.
Optional (desc and reference
are mutually exclusive)
category.reference Value describes the language, topic, and subtopic to display in the Tag
info section.
Optional (desc and reference
are mutually exclusive)
category.icon Value is a relative path to an icon GIF. Optional
category.id Any string that is different from the category.id attributes of other
categories in this file.
Mandatory

208
EXTENDING DREAMWEAVER
Tag libraries and editors
Last updated 6/15/2011
A simple example of creating a new tag editor
The examples in this section use cfweather, a hypothetical Adobe ColdFusion tag designed to extract the current
temperature from a weather database, to illustrate the steps necessary to create a new tag editor.
The attributes for the cfweather tag are described in the following table:
You create this new tag editor by registering the tag, creating a tag definition, creating a tag editor UI, and adding a tag
to the Tag Chooser.
Registering the tag in the tag library
For Dreamweaver to recognize the new tag, it must be identified in the TagLibraries.vtm file, which is located in the
Configuration/TagLibraries folder. However, the user could be on a multiuser platform such as Windows XP,
Windows 2000, Windows NT, and Mac OS X. If the user is on a multiuser platform, there is another TagLibraries.vtm
file in the user Configuration folder. This file is the one that must be updated because this file is the instance that
Dreamweaver searches for and parses.
The location of the user Configuration folder depends on the user platform.
For Windows 2000 and Windows XP platforms:
<drive>:\Documents and Settings\<username>\Application Data\Adobe\\xc2
Dreamweaver CS5\Configuration
Note: It is possible that in Windows XP, this folder is inside a hidden folder.
For Mac OS X platforms:
<drive>:Users:<username>:Library:Application Support:Adobe:¬
Dreamweaver CS5:Configuration
Attribute Description Mandatory/Optional
element.name Value appears as a List view item. Mandatory
element.value Value that is either placed directly into the code or a parameter that passes
into visual dialog boxes.
Mandatory
element.desc Value is an HTML string and appears in the incorporated Reference panel.
If not specified, the
reference attribute displays reference content in the
incorporated Reference panel.
Optional (desc and reference
are mutually exclusive)
element.reference As many as three strings separated by commas that describe the
language, topic, and subtopic, respectively. This information appears in
the Reference panel. The first string is mandatory. The second string is
mandatory for the
element tag only; optional for category and
tclibrary tags. The third string is optional.
Optional (desc and reference
are mutually exclusive)
element.id Any string that is different from the element.id attributes of other
elements in this file.
Optional
Attribute Description
zip A five-digit ZIP code
tempaturescale The temperature scale (Celsius or Fahrenheit)

209
EXTENDING DREAMWEAVER
Tag libraries and editors
Last updated 6/15/2011
If Dreamweaver cannot find the TagLibraries.vtm file in the user Configuration folder, it searches for the file in the
Dreamweaver Configuration folder.
Note: On multiuser platforms, if you edit the copy of TagLibraries.vtm that resides in the Dreamweaver Configuration
folder, Dreamweaver is not aware of the changes. Dreamweaver parses the copy of the TagLibraries.vtm file in the user
Configuration folder, not the one in the Dreamweaver Configuration folder.
The cfweather tag is a ColdFusion tag, so an appropriate tag library group exists that you can use to register the
cfweather tag.
1 Open the TagLibraries.vtm file in a text editor.
2 Scroll through the existing tag libraries to find the CFML tags.
3 Add a new tag reference element, as shown in the following example:
<tagref name="cfweather" file="cfml/cfweather.vtm"/>
4 Save the file.
The tag is now registered in the tag library, and it has a file pointer to the cfweather.vtm tag definition file.
Create a tag definition (VTML) file
When a user selects a registered tag using the Tag Chooser or a tag editor, Dreamweaver searches for a corresponding
VTML file for the tag definition.
1 In a text editor, create a file with the following contents:
<TAG NAME="cfweather" endtag="no">
<TAGFORMAT NLBEFORETAG="1" NLAFTERTAG="1"/>
<TAGDIALOG FILE="cfweather.htm"/>
<ATTRIBUTES>
<ATTRIB NAME="zip" TYPE="TEXT"/>
<ATTRIB NAME="tempaturescale" TYPE="ENUMERATED">
<ATTRIBOPTION VALUE="Celsius"/>
<ATTRIBOPTION VALUE="Fahrenheit"/>
</ATTRIB>
</ATTRIBUTES>
</TAG>
2 Save the cfweather.vtm file in the Configuration/TagLibraries/CFML folder.
Using the tag definition file, Dreamweaver can perform code hinting, code completion, and tag formatting
functionality for the
cfweather tag.
Create a tag editor UI
1 Save the cfweather.htm file in the Configuration/TagLibraries/CFML folder:

210
EXTENDING DREAMWEAVER
Tag libraries and editors
Last updated 6/15/2011
<!DOCTYPE HTML SYSTEM "-//Adobe//DWExtension layout-engine 10.0//dialog">
<html>
<head>
<title>CFWEATHER</title>
<script src="../../Shared/Common/Scripts/dwscripts.js"></script>
<script src="../../Shared/Common/Scripts/ListControlClass.js"></script>
<script src="../../Shared/Common/Scripts/tagDialogsCmn.js"></script>
<script>
/************************* GLOBAL VARS **************************/
var TEMPATURESCALELIST; // tempaurelist control (initialized in initializeUI())
var theUIObjects; // array of UI objects used by common API functions
/****************************************************************/
// inspectTag() API function defined (required by all tag editors)
function inspectTag(tagNodeObj)
{
// call into a common library version of inspectTagCommon defined
// in tagDialogCmns.js (note that it's been included)
// For more information about this function, look at the comments
// for inspectTagCommon in tagDialogCmn.js
tagDialog.inspectTagCommon(tagNodeObj, theUIObjects);
}
function applyTag(tagNodeObj)
{
// call into a common library version of applyTagCommon defined
// in tagDialogCmns.js (note that it's been included)
// For more information about this function, look at the comments
// for applyTagCommon in tagDialogCmn.js
tagDialog.applyTagCommon(tagNodeObj, theUIObjects);
}
function initializeUI()
{
// define two arrays for the values and display captions for the list
control
var theTempatureScaleCap = new Array("celsius","fahrenheit");
var theTempatureScaleVal = new Array("celsius","fahrenheit");
// instantiate a new list control
TEMPATURESCALELIST = new ListControl("thetempaturescale");
// add the tempaturescalelist dropdown list control to the uiobjects
theUIObjects0= new Array(TEMPATURESCALELIST);
// call common populateDropDownList function defined in tagDialogCmn.js to
// populate the tempaturescale list control
tagDialog.populateDropDownList(TEMPATURESCALELIST, theTempatureScaleCap,
theTempatureScaleVal, 1);
}
</script>
</head>
<body onLoad="initializeUI()">
<div name="General">

211
EXTENDING DREAMWEAVER
Tag libraries and editors
Last updated 6/15/2011
<table border="0" cellspacing="4">
<tr>
<td valign="baseline" align="right" nowrap="nowrap">Zip Code: </td>
<td nowrap="nowrap">
<input type="text" id="attr:cfargument:zip" name="thezip" attname="zip"
style="width:100px"0/>
</td>
</tr>
<tr>
<td valign="baseline" align="right" nowrap="nowrap">Type: </td>
<td nowrap="nowrap">
<select name="thetempaturescale" id="attr:cfargument:tempaturescale"
attname="tempaturescale" editable="false" style="width:200px">
</select>
</td>
</tr>
</table>
</div>
</body>
</html>
Next, you’ll verify that the tag editor is working.
2 Launch Dreamweaver.
3 Type cfweather in Code view.
4 Right-click on the tag.
5 Select Edit Tag cfweather from the Context menu.
If the tag editor launches, it has been created successfully.
Add a tag to Tag Chooser
1 Modify the TagChooser.xml file in the Configuration/TagLibraries/CFML folder by adding a new category called
Third Party Tags, which features the
cfweather tag, as shown in the following example:
<category name="Third Party Tags" icon="icons/Elements.gif" reference='CFML'>
<element name="cfweather" value='cfweather zip="" temperaturescale="fahrenheit">' />
</category>
Note: On multiuser platforms, the TagChooser.xml file also exists in the user’s Configuration folder. For more
information regarding multiuser platforms, see the discussion in
“Registering the tag in the tag library” on page 208.
Next, you’ll verify the cfweather tag now appears in the Tag Chooser.
2 Select Insert > Tag.
3 Expand the CFML Tags group.
4 Select the Third Party Tags group that appears at the bottom of the Tag Chooser. The cfweather tag appears in the
list box on the right.
5 Select cfweather, and click the Insert button.
The tag editor should appear.

212
EXTENDING DREAMWEAVER
Tag libraries and editors
Last updated 6/15/2011
The tag editor API functions
In order to create a new tag editor, you must provide an implementation for the inspectTag(), validateTag(), and
applyTag() functions. For an example of an implementation, see “Create a tag editor UI” on page 209.
inspectTag()
Availability
Dreamweaver MX.
Description
The function is called when the tag editor first appears. The function receives as an argument the tag that the user is
editing, which is expressed as a
dom object. The function extracts attribute values from the tag that is being edited and
uses these values to initialize form elements in the tag editor.
Arguments
tag
• The tag argument is the DOM node of the edited tag.
Returns
Dreamweaver expects nothing.
Example
Suppose the user edits the following tag:
<crfweather zip = "94065"/>
If the editor contains a text field for editing the zip attribute, the function needs to initialize the form element so that
the user sees the actual ZIP code in the text field, rather than an empty field.
The following code performs the initialization:
function inspectTag(tag)
{
document.forms[0].zip.value = tag.zip
}
validateTag()
Availability
Dreamweaver MX.
Description
When a user clicks on a node in the tree control or clicks OK, the function performs input validation on the currently
displayed HTML form elements.
Arguments
None.

213
EXTENDING DREAMWEAVER
Tag libraries and editors
Last updated 6/15/2011
Returns
Dreamweaver expects a Boolean value: true if the input for HTML form elements is valid; false if input values are
not valid.
Example
When the user creates a table, a negative integer is entered for the number of table rows. The validateTag() function
detects the invalid input, displays an alert message, and returns a
false value.
applyTag()
Availability
Dreamweaver MX.
Description
When the user clicks OK, Dreamweaver calls the validateTag() function. If the validateTag() function returns a
true value, Dreamweaver calls this function and passes the dom object that represents the current tag (the tag that is
being edited). The function reads the values out of the form elements and writes them into the
dom object.
Arguments
tag
• The tag argument is the DOM node of the tag being edited.
Returns
Dreamweaver expects nothing.
Example
Continuing the cfweather example, in the following code, if the user changes the ZIP code from 94065 to 53402, in
order to update the user’s document to use the new ZIP code, the
dom object must be updated:
function applyTag(tag)
{
tag.zip = document.forms[0].zip.value
}

214
Last updated 6/15/2011
Chapter 14: Property inspectors
The Property inspector is perhaps the most familiar floating panel in the interface. The Property inspector is
indispensable for defining, reviewing, and changing the name, size, appearance, and other attributes of the selection.
It is also used for launching internal and external editors for the selected element.
The following table lists the files you use to create a Property inspector:
Property inspector files
Dreamweaver has several built-in interfaces for the Property inspector that let you set properties for many standard
HTML tags. Because these built-in inspectors are part of the core Dreamweaver code, you cannot find corresponding
Property inspector files for them in the Configuration folder. However, custom Property inspector files let you
override these built-in interfaces or create new ones to inspect custom tags. Custom Property inspector files reside in
the Configuration/Inspectors folder inside the Dreamweaver application folder.
The Property inspector HTML file must contain a comment (in addition to the doctype comment) immediately
preceding the opening HTML tag. It is shown in the following example:
<!-- tag:serverModel:tagNameOrKeyword,priority:1to10,selection:¬ exactOrWithin,hline,vline,
serverModel-->
<!DOCTYPE HTML SYSTEM "-//Adobe//DWExtension layout-engine 10.0//pi">
This comment has the following elements:
• The serverModel element specifies that Dreamweaver must load this Property inspector only when the server
model specified is active.
• The tagNameOrKeywordelement is the tag that is inspected or one of the following keywords: *COMMENT* (for
comments),
*LOCKED* (for locked regions), or *ASP* (for ASP tags).
• The 1to10 element is the priority of the Property inspector file. 1 indicates that this inspector is used only when no
others can inspect the selection.
10 indicates that this inspector takes precedence over all others that can inspect the
selection.
• The exactOrWithin element indicates whether the selection can be within the tag (within) or must exactly
contain the tag (
exact).
• The hline element (optional) indicates that a horizontal gray line must appear between the upper and lower halves
of the inspector in expanded mode.
• The vline element (optional) indicates that a vertical gray line must appear between the tag name field and the rest
of the properties in the inspector.
Path File Description
Configuration/Inspectors/ Propertyinspectorname.htm Defines the user interface (UI) of the Property inspector.
Configuration/Inspectors/ Propertyinspectorname.js Contains the functions required by the Property inspector.
Configuration/Inspectors/ Tagimagefile.gif Optional file to display in the Property inspector.

215
EXTENDING DREAMWEAVER
Property inspectors
Last updated 6/15/2011
• The serverModel element (optional) indicates the server model of the Property inspector. The server model of the
Property inspector must be the same as the Property inspector of the document. If not, Dreamweaver does not use
the Property inspector to display the properties of the current selection. For example, consider, the server model of
a document is Adobe ColdFusion. But, the server model of the Property inspector is ASP. Then, Dreamweaver does
not use that Property inspector for selections in the document.
The following comment is appropriate for an inspector that is designed to inspect the happy tag:
<!-- tag:happy, priority:8,selection:exact,hline,vline,serverModel:ASP -->
In some cases, specifying that your extension uses only Dreamweaver extension rendering and not the previous
rendering engine is a must. You can do it by inserting the following line immediately before the tag comment, as shown
in the following example:
<!--DOCTYPE HTML SYSTEM "-//Adobe//DWExtension layout-engine 10.0//pi"-->
The body section of a Property inspector file contains an HTML form. Instead of displaying the form contents in a
dialog box, Dreamweaver uses the form to define the input areas and layout of the Property inspector.
The head section of a Property inspector file contains JavaScript functions or a reference to the JavaScript file or files.
How Property inspector files work
At start-up, Dreamweaver reads the first line of each HTM and HTML file in the Configuration/Inspectors folder,
searching for the comment string that defines the type, priority, and selection type of a Property inspector. Files that
do not have this comment as their first line are ignored.
When the user makes a selection in Dreamweaver or moves the insertion point to a different location, the following
events occur:
1 Dreamweaver searches for any inspectors that have a within selection type.
2 If there are any within inspectors, Dreamweaver searches up the document tree from the currently selected tag to
check whether there are inspectors for any tags that surround the selection. If there are no
within inspectors,
Dreamweaver searches for any inspectors that have a selection type of
exact.
3 For the first tag that has one or more inspectors, Dreamweaver calls each inspector’s canInspectSelection()
function. If this function returns the value
false, Dreamweaver no longer considers the inspector a candidate for
inspecting the selection.
4 If more than one potential inspector remains after calling the canInspectSelection() function, Dreamweaver
sorts the remaining inspectors by priority.
5
If more than one potential inspector shares the same priority, Dreamweaver selects an inspector alphabetically by name.
6 The selected inspector appears in the Property inspector floating panel. If the Property inspector file defines the
displayHelp() function, a small question mark (?) icon appears in the upper-right corner of the inspector.
7 Dreamweaver calls the inspectSelection() function to gather information about the current selection and
populate the inspector’s fields.
8 Event handlers attached to the fields in the Property inspector interface execute as the user encounters them. (For
example, you might have an
onBlur event that calls the setAttribute() function to set an attribute to the value
that the user enters.)

216
EXTENDING DREAMWEAVER
Property inspectors
Last updated 6/15/2011
A simple Property inspector example
The following Property inspector inspects the marquee tag, which is available only in Microsoft Internet Explorer. The
example lets you set the value of the
direction attribute in the Property inspector. To set the value of the marquee
tag’s other attributes, use this example as a model.
To create this extension, you create the user interface, write the JavaScript code, create the image, and test.
Create the user interface
You create an HTML file that contains a form, which appears in the Property inspector.
1 Create a new blank file.
2 As the first line of the file, add the comment that identifies the Property inspector, as follows:
<!-- tag:MARQUEE,priority:9,selection:exact,vline,hline -->
3 To specify the document title and the JavaScript file that you will create, add the following after the comment:
<HTML>
<HEAD>
<TITLE>Marquee Inspector</TITLE>
<SCRIPT src="marquee.js"></SCRIPT>
</HEAD>
<BODY>
</BODY>
</HTML>
4 To specify what appears in the Property inspector, add the following between the opening and closing body tags:

217
EXTENDING DREAMWEAVER
Property inspectors
Last updated 6/15/2011
<!-- Specify the image that will appear in the Property inspector -->
<SPAN ID="image" STYLE="position:absolute; width:23px; height:17px; ¬
z-index:16; left: 3px; top: 2px">
<IMG SRC="marquee.png" WIDTH="36" HEIGHT="36" NAME="marqueeImage">
</SPAN>
<SPAN ID="label" STYLE="position:absolute; width:23px; height:17px; ¬
z-index:16; left: 44px; top: 5px">Marquee</SPAN>
<!-- If your form fields are in different AP elements, you must ¬
create a separate form inside each AP element and reference it as ¬
shown in the inspectSelection() and setInterjectionTag() functions. -->
<SPAN ID="topLayer" STYLE="position:absolute; z-index:1; left: 125px; ¬
top: 3px; width: 431px; height: 32px">
<FORM NAME="topLayerForm">
<TABLE BORDER="0" CELLPADDING="0" CELLSPACING="0">
<TR>
<TD VALIGN="baseline" ALIGN="right">Direction:</TD>
<TD VALIGN="baseline" ALIGN="right">
<SELECT NAME="marqDirection" STYLE="width:86"
onChange="setMarqueeTag()">
<OPTION VALUE="left">Left</OPTION>
<OPTION VALUE="right">Right</OPTION>
</SELECT>
</TR>
</TABLE>
</FORM>
</SPAN>
5 Save the file as marquee.htm in the Configuration/Inspectors folder.
Write the JavaScript code
You need to add JavaScript functions to make sure you can inspect the selection, to inspect the selection, and to enter
the appropriate values in the Property inspector.
1 Create a new blank file.
2 To specify that the Property inspector appears whenever the selection contains the marquee tag, add the following
function:
function canInspectSelection(){
return true;
}
3 To refresh the value of the direction attribute that appears in the text field, add the following function at the end
of the file:

218
EXTENDING DREAMWEAVER
Property inspectors
Last updated 6/15/2011
function inspectSelection(){
// Get the DOM of the current document.
var theDOM = dw.getDocumentDOM();
// Get the selected node.
var theObj = theDOM.getSelectedNode();
// Get the value of the DIRECTION attribute on the MARQUEE tag.
var theDirection = theObj.getAttribute('direction');
// Initialize a variable for the DIRECTION attribute to -1.
// This is used to store the menu index that corresponds to
// the value of the attribute.
// var typeIndex = -1;
var directionIndex = -1;
// If there was a DIRECTION attribute...
if (theDirection){
// If the value of DIRECTION is "left", set typeIndex to 0.
if (theDirection.toLowerCase() == "left"){
directionIndex = 0;
// If the value of DIRECTION is "right", set typeIndex to 1.
}else if (theDirection.toLowerCase() == "right"){
directionIndex = 1;
}
}
// If the value of the DIRECTION attribute was "left"
// or "right", choose the corresponding
// option from the pop-up menu in the interface.
if (directionIndex != -1){
document.topLayer.document.topLayerForm.marqDirection.selectedIndex =¬
directionIndex;
}
}
4 To get the current selection and make the text box in the Property inspector display the direction attribute’s
value, add the following function at the end of the file:
function setMarqueeTag(){
// Get the DOM of the current document.
var theDOM = dw.getDocumentDOM();
// Get the selected node.
var theObj = theDOM.getSelectedNode();
// Get the index of the selected option in the pop-up menu
// in the interface.
var directionIndex = ¬
document.topLayer.document.topLayerForm.marqDirection.selectedIndex;
// Get the value of the selected option in the pop-up menu
// in the interface.
var theDirection = ¬
document.topLayer.document.topLayerForm.marqDirection.¬
options[directionIndex].value;
// Set the value of the direction attribute to theDirection.
theObj.setAttribute('direction',theDirection);
}
5 Save the file as marquee.js in the Configuration/Inspectors folder.

219
EXTENDING DREAMWEAVER
Property inspectors
Last updated 6/15/2011
Create the image
You can optionally create the image that appears in the Property inspector.
1 Create an image that is 36 pixels wide and 36 pixels high.
2 Save the image as marquee.gif in Configuration/Inspectors.
In general, you can save images for Property inspectors in any format that Dreamweaver supports.
Test the Property inspector
Finally, you can test the Property inspector.
1 Restart Dreamweaver.
2 Create a new HTML page, or open an existing HTML page.
3 Add the following in the body section of the page:
<MARQUEE></MARQUEE>
4 Highlight the text you just added.
The Property inspector you created for the marquee tag appears.
5 Enter a value for the direction attribute in the Property inspector.
The tag on your page changes to include the direction attribute and the value you entered in the Property inspector.
The Property inspector API functions
Two of the Property inspector API functions (canInspectSelection() and inspectSelection()) are required.
canInspectSelection()
Description
Determines whether the Property inspector is appropriate for the current selection.
Arguments
None.
Note: Use dom.getSelectedNode() to get the current selection as a JavaScript object (for more information about
dom.getSelectedNode(), see the Dreamweaver API Reference).
Returns
Dreamweaver expects a Boolean value: true if the inspector can inspect the current selection; false otherwise.
Example
The following instance of the canInspectSelection() function returns a true value if the selection contains the
CLASSID attribute, and the value of that attribute is "clsid:D27CDB6E-AE6D-11cf-96B8-444553540000" (the class
ID for Adobe Flash Player):

220
EXTENDING DREAMWEAVER
Property inspectors
Last updated 6/15/2011
function canInspectSelection(){3
var theDOM = dw.getDocumentDOM();
var theObj = theDOM.getSelectedNode();
return (theObj.nodeType == Node.ELEMENT_NODE && ¬
theObj.hasAttribute("classid") && ¬
theObj.getAttribute("classid").toLowerCase()== ¬
"clsid:D27CDB6E-AE6D-11cf-96B8-444553540000");
}
displayHelp()
Description
If this function is defined, a question mark (?) icon appears in the upper-right corner of the Property inspector. This
function is called when the user clicks the icon.
Arguments
None.
Returns
Dreamweaver expects nothing.
Example
The following example of the displayHelp() function opens a file in a browser window. The file explains the fields
of the Property inspector.
function displayHelp(){
dw.browseDocument('http://www.hooha.com/dw/inspectors/inspHelp.html');
}
inspectSelection()
Description
Refreshes the contents of the text fields based on the attributes of the current selection.
Arguments
maxOrMin
• The maxOrMin argument is either max or min, depending on whether the Property inspector is in its expanded or
contracted state.
Returns
Dreamweaver expects nothing.
Example
The following example of the inspectSelection() function gets the value of the content attribute and uses it to
populate a form field called
keywords:

221
EXTENDING DREAMWEAVER
Property inspectors
Last updated 6/15/2011
function inspectSelection(){
var dom = dreamweaver.getDocumentDOM();
var theObj = dom.getSelectedNode();
document.forms[0].keywords.value = theObj.getAttribute("content");
}

222
Last updated 6/15/2011
Chapter 15: Floating panels
You can create floating panels or inspectors without the size and layout limitations of Property inspectors.
A custom Property inspector must be your first choice for setting the properties of the current selection. But, custom
floating panels offer more room and flexibility for displaying information about the entire document or multiple
selections.
You can create custom panels and add them to the Window menu. For more information on adding items to the menu
system, see
“Menus and menu commands” on page 141.
The following table lists the files you use to create a floating panel:
How floating panel files work
Custom floating panel files are HTML files that reside in the Configuration/Floaters folder inside the application
folder. The
body section of a floating panel file contains an HTML form. Event handlers that are attached to form
elements can call JavaScript code that performs arbitrary edits to the current document.
Dreamweaver has several built-in floating panels that are accessible from the Window menu. (These built-in panels
are part of the core Dreamweaver code and do not have corresponding floating panel files for them in the
Configuration/Floaters folder.)
Custom floating panels can be moved, resized, and tabbed together the same way as the floating panels that are built
into Dreamweaver. Custom floating panels differ from built-in floating panels in the following ways:
• Custom floating panels display in the default gray. Setting the bgcolor attribute in the body tag has no effect.
• All custom floating panels either appear in front of the Document window or float behind it when inactive. Where
the floating panels appear depends on the setting for All Other Floaters in the Panels preferences.
Floating panel files also differ somewhat from other extensions. Unlike other extension files, Dreamweaver does not
load floating panel files into memory at startup unless the floating panels were visible when Dreamweaver last shut
down. If the floating panels are not visible when Dreamweaver shut down, reference from one of the following
functions to load the files that define the panels.
• dreamweaver.getFloaterVisibility()
• dreamweaver.setFloaterVisibility()
• dreamweaver.toggleFloater()
For more information on these functions, see the Dreamweaver API Reference.
Path File Description
Configuration/Floaters/ panelname.htm Specifies the text that appears in the title bar of the floating panel, defines
the floating panel, and contains the required JavaScript functions.
Configuration/Menus/ menus.xml Adds a command to a menu.

223
EXTENDING DREAMWEAVER
Floating panels
Last updated 6/15/2011
When one of the files inside the Configuration folder calls the dw.getFloaterVisibility(floaterName),
dw.setFloaterVisibility(floaterName), or dw.toggleFloater(floaterName) functions, the following events
occur:
1 If floaterName is not one of the reserved floating panel names, Dreamweaver searches the Configuration/Floaters
folder for a file called floaterName.htm. (For a complete list of reserved floating panel names, see the
dreamweaver.getFloaterVisibility() function in the Dreamweaver API Reference. If floaterName.htm is not
found, Dreamweaver searches for floaterName.html. If no file is found, nothing happens.
2 When the floating panel file is loaded for the first time, the initialPosition() function is called, if it is defined,
to determine the default position of the floating panel on the screen. In the same manner, the
initialTabs()
function is called, if it is defined, to determine the default tab grouping of the floating panel.
3 The selectionChanged() and documentEdited() functions are called on the assumption that changes probably
occurred while the floating panel was hidden.
4 When the floating panel is visible, the following actions occur:
• When the selection changes, the selectionChanged() function is called, if it is defined.
• When the user changes the document, the documentEdited() function is called, if it is defined.
• Event handlers that are attached to the fields in the floating panel interface execute as the user encounters them.
(For example, a button with an
onClick event handler that executes
dw.getDocumentDOM().body.innerHTML='' removes everything between the opening and closing body tags
in the document when it is clicked.)
Floating panels support two special events on the body tag: onShow() and onHide().
5 When the user quits Dreamweaver, the current visibility, position, and tab grouping of the floating panel are saved.
The next time Dreamweaver starts up, it loads the floating panel files for any floating panels that were visible at the
last shutdown. Then Dreamweaver displays the floating panels in their last position and tab grouping.
A simple floating panel example
In this example, you create a Script Editor extension that creates a floating panel to display the JavaScript code that
underlies a selected script marker in Design view. The Script Editor displays the JavaScript code in the
textarea
element of an HTML form that is defined in a floating panel called
scriptlayer. If you make changes to the selected
code in the floating panel, the extension calls the
updateScript() function to save your changes. If you have not
selected a script marker when you invoke the Script Editor, the extension displays
(no script selected) in a
floating panel called
blanklayer.
You create this extension by creating floating panels, writing JavaScript code, and creating a menu item.
Creating the floating panels
The beginning of the HTML file for this extension contains the standard document header information and a title
tag that puts the words Script Editor in the title bar of the floating panels.
Create the HTML file header
1 Create a new blank document.
2 Enter the following:

224
EXTENDING DREAMWEAVER
Floating panels
Last updated 6/15/2011
<!doctype html public "-//W3C//DTD HTML 4.01 Transitional//EN">
<html>
<head>
<title>Script Editor</title>
<script language="JavaScript">
The extension defines two floating panels that display either (no script selected) if the user has not selected a
script marker or the JavaScript code that underlies a selected script marker. The following code defines these two
floating panels, or absolutely positioned (AP) elements, called
blanklayer and scriptlayer:
Create the two floating panels
1 Add the following code after the header in the HTML file:
<body>
<div id="blanklayer" style="position:absolute; width:422px; ¬
height:181px; z-index:1; left: 8px; top: 11px; ¬
visibility: hidden">
<center>
<br>
<br>
<br>
<br>
<br>
(no script selected)
</center>
</div>
<div id="scriptlayer" style="position:absolute; width:422px; ¬
height:181px; z-index:1; left: 8px; top: 11px; ¬
visibility: visible">
<form name="theForm">
<textarea name="scriptCode" cols="80" rows="20" wrap="VIRTUAL" ¬
onBlur="updateScript()"></textarea>
</form>
</div>
</body>
</html>
2 Save the file as scriptEditor.htm in the Configuration/Floaters folder.
Both div tags use the style attribute to specify the position (absolute), size (width:422px and height:181px),
and default
visibility setting (visible) of the floating panels. The blanklayer panel uses the center attribute
and a series of break (
br) tags to position the text in the center of the panel. The scriptlayer panel creates a form
with a single
textarea to display the selected JavaScript code. The textarea tag also specifies that when an onBlur
event occurs, indicating that the selected code has changed, the
updateScript() function is called to write the
changed text back to the document.
Writing the JavaScript code
The JavaScript code for the Script Editor consists of one floating panel function that Dreamweaver calls,
selectionchanged(), and one user-defined function, updateScript().

225
EXTENDING DREAMWEAVER
Floating panels
Last updated 6/15/2011
selectionChanged(): is a script marker selected?
The
selectionChanged()
function determines whether a script marker has been selected in Design view. A script
marker appears in Design view if there is a JavaScript routine in the body section of a document and if Scripts is selected
on the Invisible Elements section of the Preferences dialog box. The following figure shows a script marker icon:
The selectionChanged() function first calls the dw.getDocumentDOM() function to get the Document Object
Model (DOM) for the user’s document. It then calls the
getSelectedNode() function to see if the selected node for
that document is, first, an element and, second, a
SCRIPT tag. If both these conditions are true, the
selectionChanged() function makes the scripteditor floating panel visible and loads it with the underlying
JavaScript code. It also sets the
visibility property of the blanklayer floating panel to the value hidden. The
following figure shows the
scriptlayer floating panel with the selected JavaScript code:
If the selected node is not an element, or it is not a script tag, the selectionChanged() function makes the
blanklayer floating panel visible and hides the scriptlayer panel. The blanklayer floating panel displays the text
(no script selected), as shown in the following figure:
Add the selectionChanged() function
1 Open the file scriptEditor.htm that is in the Configuration/Floaters folder.

226
EXTENDING DREAMWEAVER
Floating panels
Last updated 6/15/2011
2 Enter the following code in the header section of the file.
function selectionChanged(){
/* get the selected node */
var theDOM = dw.getDocumentDOM();
var theNode = theDOM.getSelectedNode();
/* check to see if the node is a script marker */
if (theNode.nodeType == Node.ELEMENT_NODE && ¬
theNode.tagName == "SCRIPT"){
document.layers['scriptlayer'].visibility = 'visible';
document.layers['scriptlayer'].document.theForm.¬
scriptCode.value = theNode.innerHTML;
document.layers['blanklayer'].visibility = 'hidden';
}else{
document.layers['scriptlayer'].visibility = 'hidden';
document.layers['blanklayer'].visibility = 'visible';
}
}
3 Save the file.
updateScript(): write back changes
The updateScript() function writes back the selected script when an onBlur event occurs in the textarea of the
scriptlayer panel. The textarea form element contains the JavaScript code, and the onBlur event occurs when
textarea loses input focus.
1 Open the scriptEditor.htm file that is in the Configuration/Floaters folder.
2 Enter the following code in the header section of the file.
/* update the document with any changes made by
the user in the textarea */
function updateScript(){
var theDOM = dw.getDocumentDOM();
var theNode = theDOM.getSelectedNode();
theNode.innerHTML = document.layers['scriptlayer'].document.¬
theForm.scriptCode.value;
}
</script>
</head>
3 Save the file.

227
EXTENDING DREAMWEAVER
Floating panels
Last updated 6/15/2011
Creating a menu item
It is not sufficient to save the Script Editor code in the Configuration/Floaters folder. You must also call either the
dw.setFloaterVisibility('scriptEditor',true) function or the dw.toggleFloater('scriptEditor')
function to load the floating panel and make it visible. The most obvious place from which to invoke the Script Editor
is from the Window menu, which is defined in the menus.xml file. You need to create the
menuitem tag that creates
an entry for the Script Editor extension on the Window menu, as shown in the following figure:
If you select a script marker in Design view for the current document and then select the Script Editor menu item,
Dreamweaver invokes the Script Editor floating panel and displays the JavaScript code that underlies the script marker.
If you select the menu item when a script marker has not been selected, Dreamweaver displays the
blanklayer panel
that contains the text
(no script selected).
1 Open the menus.xml file in the Configuration/Menus folder.
2 locate the tag that begins <menuitem name="Tile _Vertically" and position the insertion point after the closing
/> of the tag.
3 On a new line, insert the following:
<menuitem name="Script Editor" enabled="true" ¬
command="dw.toggleFloater('scriptEditor')"¬
checked="dw.getFloaterVisibility('scriptEditor')" />
4 Save the file.
The floating panel API functions
All the custom functions in the floating panel API are optional.
Some of the functions in this section operate only on the Windows operating system. The description of the function
indicates whether this is the case.
displayHelp()
Description
If this function is defined, a Help button appears below the OK and Cancel buttons in your dialog box. This function
is called when the user clicks the Help button.
Arguments
None.
Returns
Dreamweaver expects nothing.

228
EXTENDING DREAMWEAVER
Floating panels
Last updated 6/15/2011
Example
// the following instance of displayHelp() opens
// in a browser a file that explains how to use
// the extension.
function displayHelp(){
var myHelpFile = dw.getConfigurationPath() +
'/ExtensionsHelp/superDuperHelp.htm';
dw.browseDocument(myHelpFile);
}
documentEdited()
Description
This function is called when the floating panel becomes visible and after the current series of edits is complete; that is,
multiple edits might occur before this function is called. This function should be defined only if the floating panel must
track edits to the document.
Note: Define the documentEdited() function only if you require it because its existence impacts performance.
Arguments
None.
Returns
Dreamweaver expects nothing.
Example
The following example of the documentEdited() function scans the document for AP elements and updates a text
field that displays the number of AP elements in the document:
function documentEdited(){
/* create a list of all the AP elements in the document */
var theDOM = dw.getDocumentDOM();
var layersInDoc = theDOM.getElementsByTagName("layer");
var layerCount = layersInDoc.length;
/* update the numOfLayers field with the new layercount */
document.theForm.numOfLayers.value = layerCount;
}
getDockingSide()
Availability
Dreamweaver MX.
Description
Specifies the locations at which a floating panel can dock. The function returns a string that contains some
combination of the words "
left", "right", "top", and "bottom". If the label is in the string, you can dock a floating
panel to that side. If the function is missing, you cannot dock a floating panel to any side.
You can use this function to prevent certain panels from docking on a certain side of the Dreamweaver workspace or
to each other.

229
EXTENDING DREAMWEAVER
Floating panels
Last updated 6/15/2011
Arguments
None.
Returns
Dreamweaver expects a string containing the words "left", "right", "top", and "bottom", or a combination of them,
that specifies where Dreamweaver can dock the floating panel.
Example
getDockingSide()
{
return dock_side = "left top";
}
initialPosition()
Description
Determines the initial position of the floating panel the first time it is called. If this function is not defined, the default
position is the center of the screen.
Arguments
platform
• The platform argument has a value of either "Mac" or "Win", depending on the user’s platform.
Returns
Dreamweaver expects a string of the form "leftPosInPixels,topPosInPixels".
Example
The following example of the initialPosition() function specifies that the first time the floating panel appears, it
should be 420 pixels from the left and 20 pixels from the top in Windows, and 390 pixels from the left side of the screen
and 20 pixels from the top of the screen on the Macintosh:
function initialPosition(platform){
var initPos = "420,20";
if (platform == "macintosh"){
initPos = "390,20";
}
return initPos;
}
initialTabs()
Description
Determines which other floating panels are tabbed together the first time that this floating panel appears. If any listed
floating panel has appeared previously, it is not included in the tab group. To ensure that two custom floating panels
are tabbed together, each panel should reference the other with the
initialTabs() function.
Arguments
None.

230
EXTENDING DREAMWEAVER
Floating panels
Last updated 6/15/2011
Returns
Dreamweaver expects a string of the form "floaterName1,floaterName2,...floaterNameN".
Example
The following example of the initialTabs() function specifies that the first time the floating panel appears, it should
be tabbed with the scriptEditor floating panel:
function initialTabs(){
return "scriptEditor";
}
isATarget()
Availability
Dreamweaver MX (Windows only).
Description
Specifies whether other panels can dock to this floating panel. If the isATarget() function is not specified,
Dreamweaver prevents other panels from docking to this one. Dreamweaver calls this function when the user tries to
combine this panel with others.
Arguments
None.
Returns
Dreamweaver expects a Boolean value: true if other floating panels can dock to this one; false otherwise.
Example
isATarget()
{
return true;
}
isAvailableInCodeView()
Description
Determines whether the floating panel should be enabled when Code view is selected. If this function is not defined,
the floating panel is disabled in the Code view.
Arguments
None.
Returns
Dreamweaver expects a Boolean value: true if the floating panel should be enabled in Code view; false otherwise.

231
EXTENDING DREAMWEAVER
Floating panels
Last updated 6/15/2011
isResizable()
Availability
Dreamweaver 4.
Description
Determines whether a user can resize a floating panel. If the function is not defined or returns a true value, the user
can resize the floating panel. If the function returns a
false value, the user cannot resize the floating panel.
Arguments
None.
Returns
Dreamweaver expects a Boolean value: true if the user can resize the floating panel; false otherwise.
Example
The following example prevents the user from resizing the floating panel:
function isResizable()
{
return false;
}
selectionChanged()
Description
Called when the floating panel becomes visible and when the selection changes (when focus switches to a new
document or when the insertion point moves to a new location in the current document). This function should be
defined only if the floating panel must track the selection.
Note: Define selectionChanged() only if you absolutely require it because its existence impacts performance.
Arguments
None.
Returns
Dreamweaver expects nothing.
Example
The following example of selectionChanged() shows a different AP element in the floating panel, depending on
whether the selection is a script marker. If the selection is a script marker, Dreamweaver makes the
scriptlayer AP
element visible. Otherwise, Dreamweaver makes the
blanklayer AP element visible.

232
EXTENDING DREAMWEAVER
Floating panels
Last updated 6/15/2011
function selectionChanged(){
/* get the selected node */
var theDOM = dw.getDocumentDOM();
var theNode = theDOM.getSelectedNode();
/* check to see if the node is a script marker */
if (theNode.nodeType == Node.ELEMENT_NODE && ¬
theNode.tagName == "SCRIPT"){
document.layers['blanklayer'].visibility = 'hidden';
document.layers['scriptlayer'].visibility = 'visible';}
else{
document.layers['scriptlayer'].visibility = 'hidden';
document.layers['blanklayer'].visibility = 'visible';
}
}
About performance
Declaring the selectionChanged() or documentEdited() function in your custom floating panels can impact
Dreamweaver performance adversely. Consider that the
documentEdited() and selectionChanged() functions are
called after every keystroke and mouse click when Dreamweaver is idle for more than one-tenth of a second. It’s
important to use different scenarios to test your floating panel, using large documents (100 KB or more of HTML)
whenever possible, to test performance impact.
To help avoid performance penalties, use the setTimeout() function. As in the browsers, the setTimeout() function
takes two arguments: the JavaScript to be called and the amount of time in milliseconds to wait before calling it.
The setTimeout() method lets you build pauses into your processing. These pauses let the user continue interacting
with the application. You must build in these pauses explicitly because the screen freezes while scripts process, which
prevents the user from performing further edits. The pauses also prevent you from updating the interface or the
floating panel.
The following example is from a floating panel that displays information about every AP element in the document. It
uses the
setTimeout() method to pause for half a second after processing each AP element.

233
EXTENDING DREAMWEAVER
Floating panels
Last updated 6/15/2011
/* create a flag that specifies whether an edit is being processed, and set it to false.*/
document.running = false;
/* this function called when document is edited */
function documentEdited(){
/* create a list of all the AP elements to be processed */
var dom = dw.getDocumentDOM();
document.layers = dom.getElementsByTagName("layer");
document.numLayers = document.layers.length;
document.numProcessed = 0;
/* set a timer to call processLayer(); if we didn't get
* to finish processing the previous edit, then the timer
* is already set. */
if (document.running = false){
setTimeout("processLayer()", 500);
}
/* set the processing flag to true */
document.running = true;
}
/* process one AP element*/
function processLayer(){
/* display information for the next unprocessed AP element.
displayLayer() is a function you would write to
perform the "magic".0*/
displayLayer(document.layers[document.numProcessed]);
/* if there's more work to do, set a timeout to process
* the next layer.0.If we're finished, set the document.running
* flag to false. */
document.numProcessed = document.numProcessed + 1;
if (document.numProcessed < document.numLayers){
setTimeout("processLayer()", 500);
}else{
document.running = false;
}
}

234
Last updated 6/15/2011
Chapter 16: Behaviors
The term behavior refers to the combination of an event and an action. onClick, onLoad, and onSubmit are examples
of events. Check Plug-in, Go to URL, and Swap Image are examples of actions. The browser determines which HTML
elements accept which events. Files that list events that each browser supports are stored in the
Configuration/Behaviors/Events folder within the Adobe Dreamweaver application folder.
The body section of an Action file generally contains an HTML form. The HTML form accepts parameters for the
action (for example, parameters that indicate which absolutely positioned elements to display or hide). The head
section of an Action file contains JavaScript functions that process form input from the body content. They also control
the functions, arguments, and event handlers that are inserted into the document of a user.
Write behavior actions when you want to share functions with users or when you want to insert the same JavaScript
function repeatedly. Ensure that you change the parameters each time.
Note: You cannot use behaviors to insert VBScript functions directly. However, you can add a VBScript function
indirectly by editing the Document Object Model (DOM) in the
applyBehavior() function.
The following table lists the files you use to create behavior actions:
Note: For information about server behaviors that provide web application functionality, see “Server behaviors” on
page 246.
How Behaviors work
When a user selects an HTML element in a Dreamweaver document and clicks the Plus (+) button on the Behaviors
panel, the following events occur:
1 Dreamweaver calls the canAcceptBehavior() function in each Action file to see whether this action is appropriate
for the document or the selected element.
If the return value of this function is false, Dreamweaver dims the action in the Actions pop-up menu. (For
example, the Control Shockwave action is dimmed when the user’s document has no SWF files.) If the return value
is a list of events, Dreamweaver compares each event with the valid events for the currently selected HTML element
and target browser until it finds a match. Dreamweaver populates the Events pop-up menu with the matched event
from the
canAcceptBehavior() function at the top of the list. If no match exists, the default event for the HTML
element (marked in the Event file with an asterisk [*]) becomes the top item. The remaining events in the menu are
assembled from the Event file.
2 The user selects an action from the Actions pop-up menu.
3 Dreamweaver calls the windowDimensions() function to determine the size of the Parameters dialog box. If the
windowDimensions() function is not defined, the size is determined automatically.
A dialog box always appears, with OK and Cancel buttons at the right edge, regardless of the contents of the body
element.
Path File Description
Configuration/Behaviors/Actions/ behavior action.htm The body of the file contains an HTML form for the parameters of
the action. The head of the file contains the JavaScript functions.

235
EXTENDING DREAMWEAVER
Behaviors
Last updated 6/15/2011
4 Dreamweaver displays a dialog box that contains the BODY elements of the Action file. If the Action file’s body tag
contains an
onLoad handler, Dreamweaver executes it.
5 The user fills in the parameters for the action. Dreamweaver executes event handlers that are associated with the
form fields as the user encounters them.
6 The user clicks OK.
7 Dreamweaver calls the behaviorFunction() and applyBehavior() functions in the selected Action file. These
functions return strings that are inserted into the user’s document.
8 If the user later double-clicks the action in the Actions column, Dreamweaver reopens the Parameters dialog box
and executes the
onLoad handler. Dreamweaver then calls the inspectBehavior() function in the selected Action
file, which fills in the fields with the data that the user previously entered.
Inserting multiple functions in the user’s file
Actions can insert multiple functions—the main behavior function plus any number of helper functions—into the
head section. Two or more behaviors can even share helper functions as long as the function definition is exactly the
same in each Action file. One way of ensuring that shared functions are identical is to store each helper function in an
external JavaScript file and insert it into the appropriate Action files using
<SCRIPT SRC="externalFile.js">.
When the user deletes a behavior, Dreamweaver attempts to remove any unused helper functions that are associated
with the behavior. If other behaviors are using a helper function, it is not deleted. Because the algorithm for deleting
helper functions errs on the side of caution, Dreamweaver might occasionally leave an unused function in the user’s
document.
Handling actions that require return value
Sometimes an event handler must have a return value (for example, onMouseOver="window.status='This is a
link'; return true"). But if Dreamweaver inserts the "return behaviorName(args)" action into the event
handler, behaviors later in the list are skipped.
To get around this limitation, set the document.MM_returnValue variable to the desired return value within the string
that the
behaviorFunction() function returns. This setting causes Dreamweaver to insert return
document.MM_returnValue at the end of the list of actions in the event handler. For an example that uses the
MM_returnValue variable, see the Validate Form.js file in the Configuration/Behaviors/Actions folder within the
Dreamweaver application folder.
A simple behavior example
To understand how behaviors work and how you can create one, it’s helpful to look at an example. The
Configuration/Behaviors/Actions folder inside the Dreamweaver application folder contains examples; however,
many are very complex. This example is simpler so that you can learn about creating behaviors. Start with the simple
Action file Call JavaScript.htm (along with its counterpart, Call JavaScript.js, which contains all the JavaScript
functions).
To create the behavior, you create an extension, create the HTML files to browse, and test the behavior.

236
EXTENDING DREAMWEAVER
Behaviors
Last updated 6/15/2011
Create the behavior extension
The following code presents a relatively simple example. The code checks the brand of the browser. The code opens
one page if the brand is Netscape Navigator and another if the brand is Microsoft Internet Explorer. This code can
easily be expanded to check for other brands such as Opera and WebTV and modified to perform actions other than
going to URLs.
1 Create a new blank file.
2 Add the following to the file:
<!DOCTYPE HTML SYSTEM "-//Adobe//DWExtension layout-engine 10.0//dialog">
<html>
<head>
<title>behavior "Check Browser Brand"</title>
<meta http-equiv="Content-Type" content="text/html">
<script language="JavaScript">
// The function that will be inserted into the
// HEAD of the user's document
function checkBrowserBrand(netscapeURL,explorerURL) {
if (navigator.appName == "Netscape") {
if (netscapeURL) location.href = netscapeURL;
}else if (navigator.appName == "Microsoft Internet Explorer") {
if (explorerURL) location.href = explorerURL;
}
}
//******************* API **********************
function canAcceptBehavior(){
return true;
}
// Return the name of the function to be inserted into
// the HEAD of the user's document
function behaviorFunction(){
return "checkBrowserBrand";
}
// Create the function call that will be inserted
// with the event handler
function applyBehavior() {
var nsURL = escape(document.theForm.nsURL.value);
var ieURL = escape(document.theForm.ieURL.value);
if (nsURL && ieURL) {
return "checkBrowserBrand(\'" + nsURL + "\',\'" + ieURL + "\')";
}else{
return "Please enter URLs in both fields."
}
}
// Extract the arguments from the function call
// in the event handler and repopulate the
// parameters form
function inspectBehavior(fnCall){
var argArray = getTokens(fnCall, "()',");
var nsURL = unescape(argArray[1]);

237
EXTENDING DREAMWEAVER
Behaviors
Last updated 6/15/2011
var ieURL = unescape(argArray[2]);
document.theForm.nsURL.value = nsURL;
document.theForm.ieURL.value = ieURL;
}
//***************** LOCAL FUNCTIONS ******************
// Put the pointer in the first text field
// and select the contents, if any
function initializeUI(){
document.theForm.nsURL.focus();
document.theForm.nsURL.select();
}
// Let the user browse to the Navigator and
// IE URLs
function browseForURLs(whichButton){
var theURL = dreamweaver.browseForFileURL();
if (whichButton == "nsURL"){
document.theForm.nsURL.value = theURL;
}else{
document.theForm.ieURL.value = theURL;
}
}
//*************** END OF JAVASCRIPT *****************
</script>
</head>
<body>
<form method="post" action="" name="theForm">
<table border="0" cellpadding="8">
<tr>
<td nowrap="nowrap"> Go to this URL if the browser is ¬
Netscape Navigator:<br>
<input type="text" name="nsURL" size="50" value="">
<input type="button" name="nsBrowse" value="Browse..." ¬
onClick="browseForURLs('nsURL')"></td>
</tr>
<tr>
<td nowrap="nowrap"> Go to this URL is the browser is ¬
Microsoft Internet Explorer:<br>
<input type="text" name="ieURL" size="50" value="">
<input type="button" name="ieBrowse" value="Browse..." ¬
onClick="browseForURLs('ieURL')"></td>
</tr>
</table>
</form>
</body>
</html>
3 Save the file as Configuration/Behaviors/Actions/BrowserDependentURL.htm.

238
EXTENDING DREAMWEAVER
Behaviors
Last updated 6/15/2011
Create the HTML files to browse (deprecated)
Create the HTML files to browse, the file to go to if the browser is Internet Explorer, and the file to go to if the browser
is Netscape Navigator.
1 Create a file with the following content:
<!DOCTYPE HTML PUBLIC "-//W3C//DTD HTML 4.01 Transitional//EN"
"http://www.w3.org/TR/html4/loose.dtd">
<html>
<head>
<meta http-equiv="Content-Type" content="text/html; charset=iso-8859-1">
<title>Internet Explorer Only</title>
</head>
<body>
This is the page to go to if you are using Internet Explorer.
</body>
</html>
2 Save the file as iecontent.htm in a site on your computer.
3 Create another file with the following content:
<!DOCTYPE HTML PUBLIC "-//W3C//DTD HTML 4.01 Transitional//EN"
"http://www.w3.org/TR/html4/loose.dtd">
<html>
<head>
<meta http-equiv="Content-Type" content="text/html; charset=iso-8859-1">
<title>Netscape Navigator content</title>
</head>
<body>
This is the page to go to if you are using Netscape Navigator.
</body>
</html>
4 Save the file as netscapecontent.htm in the same folder as the iecontent.htm file.
5 Restart Dreamweaver.
6 Create an HTML file with the following content:
<!DOCTYPE HTML PUBLIC "-//W3C//DTD HTML 4.01 Transitional//EN"
"http://www.w3.org/TR/html4/loose.dtd">
<html>
<head>
<meta http-equiv="Content-Type" content="text/html; charset=iso-8859-1">
<title>Which browser</title>
</head>
<body>
</body>
</html>
7 Save the file as whichbrowser.htm in the same folder as the iecontent.htm file.
8 Click the Plus (+) button on the Behaviors panel and select the Check Browser Band behavior.
9 Click the Browse button next to the Go to the URL option and select the netscapecontent.htm file, if the browser is
Netscape Navigator. If the browser is Internet Explorer, select the iecontent.htm file.

239
EXTENDING DREAMWEAVER
Behaviors
Last updated 6/15/2011
10 Click OK.
Dreamweaver adds the specified JavaScript to the whichbrowser.htm file, so that the file appears as follows:
<!DOCTYPE HTML PUBLIC "-//W3C//DTD HTML 4.01 Transitional//EN"
"http://www.w3.org/TR/html4/loose.dtd">
<html>
<head>
<meta http-equiv="Content-Type" content="text/html; charset=iso-8859-1">
<title>Which browser</title>
<script language="JavaScript" type="text/JavaScript">
<!--
function checkBrowserBrand(netscapeURL,explorerURL) {
if (navigator.appName == "Netscape") {
if (netscapeURL) location.href = netscapeURL;
}else if (navigator.appName == "Microsoft Internet Explorer") {
if (explorerURL) location.href = explorerURL;
}
}
//-->
</script>
</head>
<body onLoad="checkBrowserBrand('netscaptecontent.htm','iecontent.htm')">
</body>
</html>
Test the behavior
1 View the file whichbrowser.htm in your browser.
2 Depending on which browser you are using, either iecontent.htm or netscapecontent.htm appears.
The behaviors API functions
Two behaviors API functions are required (applyBehavior() and behaviorFunction()); the rest are optional.
applyBehavior()
Description
This function inserts into the user’s document an event handler that calls the function that behaviorFunction()
inserts. The
applyBehavior() function can also perform other edits on the user’s document, but it must not delete
the object to which the behavior is being applied or the object that receives the action.
When you write the applyBehavior() function, you must decide how you want to edit the user's document. For
example, you might decide to insert some code inside script tags in the body of the document. You would do this using
the standard DOM editing APIs.
Arguments
uniqueName

240
EXTENDING DREAMWEAVER
Behaviors
Last updated 6/15/2011
The argument is a unique identifier among all instances of all behaviors in the user’s document. Its format is
functionNameInteger, where functionName is the name of the function that
behaviorFunction() inserts. This
argument is useful if you insert a tag into the user’s document and you want to assign a unique value to its
NAME
attribute.
Returns
Dreamweaver expects a string that contains the function call to be inserted in the user’s document, usually after
accepting parameters from the user. If the
applyBehavior() function determines that the user made an invalid entry,
the function can return an error string instead of the function call. If the string is empty (
return "";), Dreamweaver
does not report an error; if the string is not empty and not a function call, Dreamweaver displays a dialog box with the
text Invalid input supplied for this behavior: and the string returned from
applyBehavior(). If the return value is null
(
return;), Dreamweaver indicates that an error occurred but gives no specific information.
Note: Quotation marks ("") within the returned string must be preceded by a backslash (\) to avoid errors that the
JavaScript interpreter reports.
Example
The following example of the applyBehavior() function returns a call to the MM_openBrWindow() function and
passes user-specified parameters (the height and width of the window; whether the window should have scroll bars, a
toolbar, a location bar, and other features; and the URL that should open in the window):
function applyBehavior() {
var i,theURL,theName,arrayIndex = 0;
var argArray = new Array(); //use array to produce correct ¬
number of commas w/o spaces
var checkBoxNames = new Array("toolbar","location",¬
"status","menubar","scrollbars","resizable");
for (i=0; i<checkBoxNames.length; i++) {
theCheckBox = eval("document.theForm." + checkBoxNames[i]);
if (theCheckBox.checked) argArray[arrayIndex++] = (checkBoxNames[i] + "=yes");
}
if (document.theForm.width.value)
argArray[arrayIndex++] = ("width=" + document.theForm.width.value);
if (document.theForm.height.value)
argArray[arrayIndex++] = ("height=" + document.theForm.height.value);
theURL = escape(document.theForm.URL.value);
theName = document.theForm.winName.value;
return "MM_openBrWindow('"+theURL+"','"+theName+"','"+argArray.join()+"')";
}
behaviorFunction()
Description
This function inserts one or more functions—surrounded by the following tags, if they don’t yet exist—into the head
section of the user’s document:
<SCRIPT LANGUAGE="JavaScript"></SCRIPT>
Arguments
None.

241
EXTENDING DREAMWEAVER
Behaviors
Last updated 6/15/2011
Returns
Dreamweaver expects either a string that contains the JavaScript functions or a string that contains the names of the
functions to be inserted in the user’s document. This value must be exactly the same every time (it cannot depend on
user input). The functions are inserted only once, regardless of how many times the action is applied to elements in
the document.
Note: Quotation marks ("")within the returned string must be preceded by a backslash (\) escape character to avoid
errors that the JavaScript interpreter reports.
Example
The following instance of the behaviorFunction() function returns the MM_popupMsg() function:
function behaviorFunction(){
return ""+
"function MM_popupMsg(theMsg) { //v1.0\n"+
"alert(theMsg);\n"+
"}";
}
The following example is equivalent to the preceding behaviorFunction() declaration and is the method used to
declare the
behaviorFunction() function in all behaviors that come with Dreamweaver:
function MM_popupMsg(theMsg){ //v1.0
alert(theMsg);
}
function behaviorFunction(){
return "MM_popupMsg";
}
canAcceptBehavior()
Description
This function determines whether the action is allowed for the selected HTML element and specifies the default event
that should trigger the action. Can also check for the existence of certain objects (such as SWF files) in the user’s
document and not allow the action if these objects do not appear.
Arguments
HTMLElement
The argument is the selected HTML element.
Returns
Dreamweaver expects one of the following values:
• A true value if the action is allowed but has no preferred events.
• A list of preferred events (in descending order of preference) for this action. Specifying preferred events overrides
the default event (as denoted with an asterisk [*] in the Event file) for the selected object. See step 1 in
“How
Behaviors work” on page 234.
• A false value if the action is not allowed.
If the canAcceptBehavior() function returns a false value, the action is dimmed in the Actions pop-up menu
on the Behaviors panel.

242
EXTENDING DREAMWEAVER
Behaviors
Last updated 6/15/2011
Example
The following instance of the canAcceptBehavior() function returns a list of preferred events for the behavior if the
document has any named images:
function canAcceptBehavior(){
var theDOM = dreamweaver.getDocumentDOM();
// Get an array of all images in the document
var allImages = theDOM.getElementsByTagName('IMG');
if (allImages.length > 0){
return "onMouseOver, onClick, onMouseDown";
}else{
return false;
}
}
displayHelp()
Description
If this function is defined, a Help button appears below the OK and Cancel buttons in the Parameters dialog box. This
function is called when the user clicks the Help button.
Arguments
None.
Returns
Dreamweaver expects nothing.
Example
// the following instance of displayHelp() opens
// in a browser a file that explains how to use
// the extension.
function displayHelp(){
var myHelpFile = dw.getConfigurationPath() +
'/ExtensionsHelp/superDuperHelp.htm';
dw.browseDocument(myHelpFile);
}
deleteBehavior()
Description
This function undoes any edits that the applyBehavior() function performed.
Note: Dreamweaver automatically deletes the function declaration and the event handler that are associated with a
behavior when the user deletes the behavior in the Behaviors panel. It is necessary to define the
deleteBehavior()function only if the applyBehavior() function performs additional edits on the user’s document
(for example, if it inserts a tag).
Arguments
applyBehaviorString
This argument is the string that the applyBehavior() function returns.

243
EXTENDING DREAMWEAVER
Behaviors
Last updated 6/15/2011
Returns
Dreamweaver expects nothing.
identifyBehaviorArguments()
Description
This function identifies arguments from a behavior function call as navigation links, dependent files, URLs, Netscape
Navigator 4.0-style references, or object names so that URLs in behaviors can update if the user saves the document to
another location and so the referenced files can appear in the site map and be considered dependent files for the
purposes of uploading to and downloading from a server.
Arguments
theFunctionCall
This argument is the string that the applyBehavior() function returns.
Returns
Dreamweaver expects a string that contains a comma-separated list of the types of arguments in the function call. The
length of the list must equal the number of arguments in the function call. Argument types must be one of the following
types:
• The nav argument type specifies that the argument is a navigational URL, and therefore, it should appear in the site map.
• The dep argument type specifies that the argument is a dependent file URL, and therefore, it should be included
with all other dependent files when a document that contains this behavior is downloaded from or uploaded to a
server.
• The URL argument type specifies that the argument is both a navigational URL and a dependent URL or that it is a
URL of an unknown type and should appear in the site map and be considered a dependent file when downloading
from or uploading to a server.
• The NS4.0ref argument type specifies that the argument is a Netscape Navigator 4.0-style object reference.
• The IE4.0ref argument type specifies that the argument is an Internet Explorer DOM 4.0-style object reference.
• The objName argument type specifies that the argument is a simple object name, as specified in the NAME attribute
for the object. This type was added in Dreamweaver 3.
• The other argument type specifies that the argument is none of the above types.
Example
This simple example of the identifyBehaviorArguments() function works for the Open Browser Window behavior
action, which returns a function that always has three arguments (the URL to open, the name of the new window, and
the list of window properties):
function identifyBehaviorArguments(fnCallStr) {
return "URL,other,other";
}
A more complex version of the identifyBehaviorArguments() function is necessary for behavior functions that
have a variable number of arguments (such as Show/Hide Layer). For this example version of the
identifyBehaviorArguments() function, there is a minimum number of arguments, and additional arguments
always come in multiples of the minimum number. In other words, a function with a minimum number of arguments
of 4 may have 4, 8, or 12 arguments, but it cannot have 10 arguments:

244
EXTENDING DREAMWEAVER
Behaviors
Last updated 6/15/2011
function identifyBehaviorArguments(fnCallStr) {
var listOfArgTypes;
var itemArray = dreamweaver.getTokens(fnCallStr, '(),');
// The array of items returned by getTokens() includes the
// function name, so the number of *arguments* in the array
// is the length of the array minus one. Divide by 4 to get the
// number of groups of arguments.
var numArgGroups = ((itemArray.length - 1)/4);
// For each group of arguments
for (i=0; i < numArgGroups; i++){
// Add a comma and "NS4.0ref,IE4.0ref,other,dep" (because this
// hypothetical behavior function has a minimum of four
// arguments the Netscape object reference, the IE object
// reference, a dependent URL, and perhaps a property value
// such as "show" or "hide") to the existing list of argument
// types, or if no list yet exists, add only
// "NS4.0ref,IE4.0ref,other,dep"
var listOfArgTypes += ((listOfArgTypes)?",":"") + ¬
"NS4.0ref,IE4.0ref,other,dep";
}
}
inspectBehavior()
Description
This function inspects the function call for a previously applied behavior in the user’s document and sets the values of
the options in the Parameters dialog box accordingly. If the
inspectBehavior() function is not defined, the default
option values appear.
Note: The inspectBehavior() function must rely solely on information that the applyBehaviorString argument
passes to it. Do not attempt to obtain other information about the user’s document (for example, using
dreamweaver.getDocumentDOM()) within this function.
Arguments
applyBehaviorString
This argument is the string that the applyBehavior() function returns.
Note: If the HTML element contains code that is similar to 'onClick="someBehavior(); return
document.MM_returnValue;"', and you add a new behavior from the behavior menu, Dreamweaver calls
inspectBehavior() as soon as the new behavior UI pops up, and passes an empty string as the parameter.
Consequently, be sure to check the
applyBehaviorString parameter, as shown in the following example:
function inspectBehavior(enteredStr){
if(enteredStr){
//do your work here
}
}
Returns
Dreamweaver expects nothing.

245
EXTENDING DREAMWEAVER
Behaviors
Last updated 6/15/2011
Example
The following instance of the inspectBehavior() function, taken from the Display Status Message.htm file, fills in
the Message field in the Parameters dialog box with the message that the user selected when the behavior was originally
applied:
function inspectBehavior(msgStr){
var startStr = msgStr.indexOf("'") + 1;
var endStr = msgStr.lastIndexOf("'");
if (startStr > 0 && endStr > startStr) {
document.theForm.message.value = ¬
unescQuotes(msgStr.substring(startStr,endStr));
}
}
Note: For more information about the unescQuotes() function, see the dwscripts.js file in the
Configuration/Shared/Common/Scripts/CMN folder.
windowDimensions()
Description
This function sets specific dimensions for the Parameters dialog box. If this function is not defined, the window
dimensions are computed automatically.
Note: Do not define this function unless you want a Parameters dialog box that is larger than 640 x 480 pixels.
Arguments
platform
The value of the platform argument is either macintosh or windows, depending on the platform of the user.
Returns
Dreamweaver expects a string of the form widthInPixels,heightInPixels.
The returned dimensions are smaller than the size of the entire dialog box because they do not include the area for the
OK and Cancel buttons. If the returned dimensions do not accommodate all options, scroll bars appear.
Example
The following instance of windowDimensions() sets the dimensions of the Parameters dialog box to 648 x 520 pixels:
function windowDimensions(){
return "648,520";
}

246
Last updated 6/15/2011
Chapter 17: Server behaviors
Adobe® Dreamweaver® provides users with an interface for adding server behaviors into their documents to perform
server-side tasks such as the following:
• Filtering records based on user criteria
• Paging through records
• Linking result lists to details pages
• Inserting records into a result set
While using Dreamweaver, at times you insert the same runtime code repeatedly into the documents. In such cases,
create an extension to automate the procedure of updating the document with the frequently used code blocks. For
details about working with the Server Behavior Builder interface to implement a custom server behavior, see “Adding
Custom Server Behaviors” in Getting Started with Dreamweaver. Then, read the Server behaviors chapter for details
about working with the supporting server behavior files and the functions that interact with established server
behaviors. For individual function information, see “Server Behavior functions” and “Extension Data Manager
functions” in the Dreamweaver API Reference. Dreamweaver currently supports server behaviors extensions that add
runtime code for the following server models: ASP/JavaScript, ASP/VBScript, ColdFusion, and PHP/MySQL.
Server behavior terminology
The following terms are commonly used in association with server behavior:
Server behaviors extension The server behaviors extension is the interface between server-side code and
Dreamweaver. A server behaviors extension consists of JavaScript, HTML, and Extension Data Markup Language
(EDML), which is XML that is created specifically for extension data. Examples of these files reside in your installation
folder in the Configuration/ServerBehaviors folder, arranged according to server model. When you write script for an
extension, use the
dwscripts.applySB() function to instruct Dreamweaver to read the EDML files, retrieve the
components of your extension, and add the appropriate code blocks to the user document.
Server behavior instance When Dreamweaver adds code blocks to a user document, the inserted code constitutes an
instance of the server behavior. The user can apply most server behaviors more than once, which results in multiple
server behavior instances. Each server behavior instance is listed in the Server Behaviors panel of the Dreamweaver
interface.
Runtime code Runtime code is the set of code blocks that are added to a document when a server behavior is applied.
These code blocks usually include some server-side code, such as ASP script that is enclosed in
<% ... %> tags.
Participants Your server behaviors extension inserts code blocks into the user document. A code block is a single,
continuous block of script. For example, a server-side tag, an HTML tag, or an attribute that adds server-side
functionality to a web page. An EDML file defines each code block as a participant. All the participants for a given
server behavior make up one participant group.
Note: For information about participants, participant groups, and how Dreamweaver EDML files are structured, see
“Extension Data Markup Language” on page 247.

247
EXTENDING DREAMWEAVER
Server behaviors
Last updated 6/15/2011
Dreamweaver architecture
When you use the Server Behavior Builder to create a Dreamweaver-specific extension, Dreamweaver creates several
files (EDML and HTML script files) that support inserting the server behavior code into a Dreamweaver document
(some behaviors also reference JavaScript files for additional functionality). The architecture simplifies your
implementation of the API and also separates your runtime code from how Dreamweaver deploys it. This topic
discusses ways of modifying these files.
Server behavior folders and files
The user interface (UI) for each server behavior resides in the Configuration/ServerBehaviors/ServerModelName
folder, where
ServerModelName is one of the following server types: ASP_Js (JavaScript), ASP_Vbs (VBScript),
ColdFusion, PHP_MySQL, or Shared (cross-server model implementations).
Extension Data Markup Language
Dreamweaver generates two EDML files when you use the Server Behavior Builder: a group EDML file and a
participant EDML file corresponding to the names that you provide in the Server Behavior Builder. The group file
defines the relevant participants, which represent code blocks, and the groups define which participants are combined
to make an individual server behavior.
Group files
Group files contain a list of participants, and participant files have all server-model-specific code data. Participant files
can be used by more than one extension, so several group files can refer to the same participant file.
The following example shows a high-level view of the Server Behavior Group EDML file. For a complete list of
elements and attributes, see
“Group EDML file tags” on page 259.
<group serverBehavior="Go To Detail Page.htm" dataSource="Recordset.htm">
<groupParticipants selectParticipant="goToDetailPage_attr">
<groupParticipant name="moveTo_declareParam"0partType="member"/>
<groupParticipant name="moveTo_keepParams"0partType="member"/>
<groupParticipant name="goToDetailPage_attr" partType="identifier" />
</groupParticipants>
</group>
In the groupParticipants block tag, each groupParticipant tag indicates the EDML participant file that contains
the code block to use. The value of the
name attribute is the participant file name minus the .edml extension (for
example, the
moveTo_declareParam attribute).
Participant files
A participant represents a single code block on the page, such as a server tag, an HTML tag, or an attribute. A
participant file must be listed in a group file to be available to a Dreamweaver document author. Several group files
can use a single participant file.
For example, the moveTo_declareParam.edml file contains the following code:

248
EXTENDING DREAMWEAVER
Server behaviors
Last updated 6/15/2011
<participant>
<quickSearch><![CDATA[MM_paramName]]></quickSearch>
<insertText location="aboveHTML+80">
<![CDATA[
<% var MM_paramName = ""; %>
]]>
</insertText>
<searchPatterns whereToSearch="directive">
<searchPattern><![CDATA[/var\s*MM_paramName/]]></searchPattern>
</searchPatterns>
</participant>
When Dreamweaver adds a server behavior to a document, it needs to have detailed information, including where to
insert the code, what the code looks like, and what parameters the Dreamweaver author or data replaced at runtime.
Each participant EDML file describes these details for each block of code. Specifically, the participant file describes the
following data:
• The code and where to put the unique instance are defined by the insertText tag parameters, as shown in the
following example:
<insertText location="aboveHTML+80">
• How to recognize instances already on the page are defined by the searchPatterns tag, as shown in the following
example:
<searchPatterns whereToSearch="directive">
<searchPattern><![CDATA[/var\s*MM_paramName/]]></searchPattern>
</searchPatterns>
In the searchPatterns block tag, each searchPattern tag contains a pattern that finds instances of runtime code
and extracts specific parameters. For more details, see
“Server behavior techniques” on page 283.
The script file
Each server behavior also has an HTML file that contains functions and links to the scripts that manage the integration
of the server behavior code with the Dreamweaver interface. The functions that are available for editing in this file are
discussed in
“Server behavior implementation functions” on page 256.
A simple server behavior example
This example shows the process of creating a new server behavior so you can see the files that Dreamweaver generates
and how to handle them. For details about working with the Server Behavior Builder interface, see “Adding Custom
Server Behaviors” in Getting Started with Dreamweaver. The example displays “Hello World” from the ASP server. The
Hello World behavior has only one participant (a single ASP tag) and does not modify or add anything else on the page.
To create the behavior, you create the dynamic page document, define the new server behavior, and define the code to
insert.
Creating the dynamic page document
1 In Dreamweaver, select the File > New menu option.
2 In the New Document dialog box, select Category: Dynamic Page, and Dynamic Page: ASP JavaScript.
3 Click Create.

249
EXTENDING DREAMWEAVER
Server behaviors
Last updated 6/15/2011
Defining the new server behavior
Note: If the Server Behaviors panel is not open and visible, select the Window > Server Behaviors menu option.
1 In the Server Behaviors panel, select the Plus (+) button, and then select the New Server Behavior menu option.
2 In the New Server Behavior dialog box, select Document Type: ASP JavaScript, and Name: Hello World. (Leave the
“Copy existing server behavior” check box unchecked.)
3 Click OK.
Defining the code to insert
1 Select the Plus (+) button for Code Blocks to Insert.
2 In the Create A New Code Block dialog box, enter Hello_World_block1 (Dreamweaver might automatically enter
this information for you).
3 Click OK.
4 In the Code Block text field, enter <% Response.Write(“Hello World”) %>.
5 In the Insert Code pop-up menu, select Relative To The Selection so the user can control where this code goes in
the document.
6 In the Relative Position pop-up menu, select After The Selection.
7 Click OK.
In the Server Behaviors panel, you can see that the Plus (+) menu contains the new server behavior in the pop-up list.
Also, in the installation folder for your Dreamweaver files, the Configuration/ServerBehaviors/ASP_Js folder now
contains the following three files:
• The group file: Hello World.edml
• The participant file: Hello World_block1.edml
• A script file: Hello World.htm
Note: If you are working in a multiuser configuration, these files appear in your Application Data folder.
Scenarios in which the server behavior API functions are
called
The server behavior API functions are called in the following scenarios:
• The findServerBehaviors() function is called when the document opens and again when the participant is
edited. It searches the user’s document for instances of the server behavior. For each instance it finds, the
findServerBehaviors() function creates a JavaScript object, and uses JavaScript properties to attach state
information to the object.
• If it is implemented, Dreamweaver calls the analyzeServerBehavior() function for each behavior instance that
is found in the user’s document after all the
findServerBehaviors() functions are called.

250
EXTENDING DREAMWEAVER
Server behaviors
Last updated 6/15/2011
When the findServerBehaviors() function creates a behavior object, it usually sets the four properties
(
incomplete, participants, selectedNode, and title). However, it is sometimes easier to delay setting some
of the properties until all the other server behaviors find instances of themselves. For example, the Move To Next
Record behavior has two participants: a link object and a recordset object. Rather than finding the recordset object
in its
findServerBehaviors() function, wait until the recordset behavior’s findServerBehaviors() function
runs because the recordset finds all instances of itself.
When the Move To Next Record behavior’s analyzeServerBehavior() function is called, it gets an array that
contains all the server behavior objects in the document. The function can look through the array for its recordset
object.
Sometimes, during analysis, a single tag in the user’s document is identified by two or more behaviors as being an
instance of that behavior. For example, the
findServerBehaviors() function for the Dynamic Attribute behavior
might detect an instance of the Dynamic Attribute behavior that is associated with an
input tag in the user’s
document. At the same time, the
findServerBehaviors() function for the Dynamic Textfield behavior might
look at the same
input tag and detect an instance of the Dynamic Textfield behavior. As a result, the Server
Behaviors panel shows the Dynamic Attribute block and the Dynamic Textfield. To correct this problem, the
analyzeServerBehavior() functions need to delete all but one of these redundant server behaviors.
To delete a server behavior, an analyzeServerBehavior() function can set the deleted property of any server
behavior to the value
true. If the deleted property still has the value true when Dreamweaver finishes calling the
analyzeServerBehavior() functions, the behavior is deleted from the list.
• When the user clicks the Plus (+) button in the Server Behaviors panel, the pop-up menu appears.
To determine the content of the menu, Dreamweaver first looks for a ServerBehaviors.xml file in the same folder
as the behaviors. ServerBehaviors.xml references the HTML files that should appear in the menu.
If the referenced HTML file contains a title tag, the contents of the title tag appear in the menu. For example, if the
ServerBehaviors/ASP_Js/ GetRecords.htm file contains the tag
<title>Get More Records</title>, the text Get
More Records appears in the menu.
If the file does not contain a title tag, the filename appears in the menu. For example, if GetRecords.htm does not
contain a title tag, the text GetRecords appears in the menu.
If there is no ServerBehaviors.xml file or the folder contains one or more HTML files that are not mentioned in
ServerBehaviors.xml, Dreamweaver checks each file for a title tag and uses the title tag or filename to populate the
menu.
If you do not want a file that is in the ServerBehaviors folder to appear in the menu, put the following statement on
the first line in the HTML file:
<!-- MENU-LOCATION=NONE -->
• When the user selects an item from the menu, the canApplyServerBehavior() function is called. If that function
returns a
true value, a dialog box appears. When the user clicks OK, the applyServerBehavior() function is
called.
• If the user edits an existing server behavior by double-clicking it, Dreamweaver displays the dialog box, executes
the
onLoad handler on the body tag, if one exists, and then calls the inspectServerBehavior() function. The
inspectServerBehavior() function populates the form elements with the current argument values. When the
user clicks OK, Dreamweaver calls the
applyServerBehavior() function again.
• If the user clicks the Minus (-) button, the deleteServerBehavior() function is called. The
deleteServerBehavior() function removes the behavior from the document.

251
EXTENDING DREAMWEAVER
Server behaviors
Last updated 6/15/2011
• When the user selects a server behavior and uses the Cut or Copy commands, Dreamweaver passes the object that
represents the server behavior to its
copyServerBehavior() function. The copyServerBehavior() function
adds any other properties to the server behavior object that are needed to paste it later.
After the copyServerBehavior() function returns, Dreamweaver converts the server behavior object to a form
that can be put on the Clipboard. When Dreamweaver converts the object, it deletes all the properties that reference
objects; every property on the object that is not a number, Boolean value, or string is lost.
When the user uses the Paste command, Dreamweaver unpacks the contents of the Clipboard and generates a new
server behavior object. The new object is identical to the original, except that it does not have properties that
reference objects. Dreamweaver passes the new server behavior object to the
pasteServerBehavior() function.
The
pasteServerBehavior() function adds the behavior to the user’s document. After the
pasteServerBehavior() function returns, Dreamweaver calls the findServerBehaviors() function to get a
new list of all the server behaviors in the user’s document.
Users can copy and paste behaviors from one document to another. The copyServerBehavior() and
pasteServerBehavior() functions should rely only on properties on the behavior object to exchange
information.
The server behavior API
You can manage server behaviors with the following API functions.
analyzeServerBehavior()
Availability
Dreamweaver UltraDev 1.
Description
Lets server behaviors set their incomplete and deleted properties.
After the findServerBehaviors() function is called for every server behavior on the page, an array of all the
behaviors in the user’s document appears. The
analyzeServerBehavior() function is called for each JavaScript
object in this array. For example, for a Dynamic Text behavior, Dreamweaver calls the
analyzeServerBehavior()
function in the DynamicText.htm (or DynamicText.js) file.
One purpose of the analyzeServerBehavior() function is to finish setting all the properties (incomplete,
participants, selectedNode, and title) on the behavior object. Sometimes it’s easier to perform this task after the
findServerBehaviors() function generates the complete list of server behaviors in the user’s document.
The other purpose of the analyzeServerBehavior() function is to notice when two or more behaviors refer to the
same tag in the user’s document. In this case, the
deleted property removes all but one behavior from the array.
Suppose the Recordset1, DynamicText1, and DynamicText2 server behaviors are on a page. Both the DynamicText
server behaviors need Recordset1 to exist on the page. After the server behaviors are found with the
findServerBehaviors() function, Dreamweaver calls the analyzeServerBehavior() function for the three server
behaviors. When the
analyzeServerBehavior() function is called for DynamicText1, the function searches the
array of all the server behavior objects on the page, looking for the one that belongs to Recordset1. If a server behavior

252
EXTENDING DREAMWEAVER
Server behaviors
Last updated 6/15/2011
object that belongs to Recordset1 cannot be found, the incomplete property is set to the value true so that an
exclamation point appears in the Server Behaviors panel, which alerts the user that a problem exists. Similarly, when
the
analyzeServerBehavior() function is called for DynamicText2, the function searches for the object that belongs
to Recordset1. Because Recordset1 does not depend on other server behaviors, it does not need to define the
analyzeServerBehavior() function in this example.
Arguments
serverBehavior, {serverBehaviorArray}
• The serverBehavior argument is a JavaScript object that represents the behavior to analyze.
• The {serverBehaviorArray} argument is an array of JavaScript objects that represents all the server behaviors
that are found on a page.
Returns
Dreamweaver expects nothing.
applyServerBehavior()
Availability
Dreamweaver UltraDev 1.
Description
Reads values from the form elements in the dialog box and adds the behavior to the user’s document. Dreamweaver
calls this function when the user clicks OK in the Server Behaviors dialog box. If this function returns successfully, the
Server Behaviors dialog box closes. If this function fails, it displays an error message without closing the Server
Behaviors dialog box. This function can edit a user’s document.
For more information, see “dwscripts.applySB()” on page 256.
Arguments
serverBehavior
The serverBehavior JavaScript object represents the server behavior; it is necessary to modify an existing behavior. If
this is a new behavior, the argument is
null.
Returns
Dreamweaver expects an empty string if successful or an error message if this function fails.
canApplyServerBehavior()
Availability
Dreamweaver UltraDev 1.
Description
Determines whether a behavior can be applied. Dreamweaver calls this function before the Server Behaviors dialog box
appears. If this function returns a
true value, the Server Behaviors dialog box appears. If this function returns a false
value, the Server Behaviors dialog box does not appear and the attempt to add a server behavior stops.

253
EXTENDING DREAMWEAVER
Server behaviors
Last updated 6/15/2011
Arguments
serverBehavior
The serverBehavior JavaScript object represents the behavior; it is necessary to modify an existing behavior. If this is a
new behavior, the argument is
null.
Returns
Dreamweaver expects a Boolean value: true if the behavior can be applied; false otherwise.
copyServerBehavior()
Availability
Dreamweaver UltraDev 1.
Description
Implementing the copyServerBehavior() function is optional. Users can copy instances of the specified server
behavior. In the following example, this function is implemented for recordsets. If a user selects a recordset in the
Server Behaviors panel or the Data Bindings panel, using the Copy command copies the behavior to the Clipboard;
using the Cut command cuts the behavior to the Clipboard. For server behaviors that do not implement this function,
the Copy and Cut commands do nothing. For more information, see
“Scenarios in which the server behavior API
functions are called” on page 249.
The copyServerBehavior() function should rely only on behavior object properties that can be converted into
strings to exchange information with the
pasteServerBehavior() function. The Clipboard stores only raw text, so
participant nodes in the document should be resolved and the resulting raw text should be saved into a secondary
property.
Note: The pasteServerBehavior() function must also be implemented to let the user paste the behavior into any
Dreamweaver document.
Arguments
serverBehavior
• The serverBehavior JavaScript object represents the behavior.
Returns
Dreamweaver expects a Boolean value: true if the behavior copies successfully to the Clipboard; false otherwise.
deleteServerBehavior()
Availability
Dreamweaver UltraDev 1.
Description
Removes the behavior from the user’s document. It is called when the user clicks the Minus (-) button on the Server
Behaviors panel. It can edit a user’s document.
For more information, see “dwscripts.deleteSB()” on page 257.

254
EXTENDING DREAMWEAVER
Server behaviors
Last updated 6/15/2011
Arguments
serverBehavior
• The serverBehavior JavaScript object represents the behavior.
Returns
Dreamweaver expects nothing.
displayHelp()
Description
If this function is defined, a Help button appears below the OK and Cancel buttons in the dialog box. This function is
called when the user clicks the Help button.
Arguments
None.
Returns
Dreamweaver expects nothing.
Example
// the following instance of displayHelp() opens
// in a browser a file that explains how to use
// the extension.
function displayHelp(){
var myHelpFile = dw.getConfigurationPath() +
'/ExtensionsHelp/superDuperHelp.htm';
dw.browseDocument(myHelpFile);
}
findServerBehaviors()
Availability
Dreamweaver UltraDev 1.
Description
Searches the user’s document for instances of itself. For each instance it finds, the findServerBehaviors() function
creates a JavaScript object, and it attaches state information as JavaScript properties of the object.
The four required properties are incomplete, participants, title, and selectedNode. You can set additional
properties as necessary.
For more information, see “dwscripts.findSBs()” on page 256 and dreamweaver.getParticipants() in the
Dreamweaver API Reference.
Arguments
None.

255
EXTENDING DREAMWEAVER
Server behaviors
Last updated 6/15/2011
Returns
Dreamweaver expects an array of JavaScript objects; the length of the array is equal to the number of behavior instances
that are found in the page.
inspectServerBehavior()
Availability
Dreamweaver UltraDev 1.
Description
Determines the settings for the Server Behaviors dialog box, based on the specified behavior object. Dreamweaver calls
the
inspectServerBehavior() function when a user opens a Server Behaviors dialog box. Dreamweaver calls this
function only when a user edits an existing behavior.
Arguments
serverBehavior
The serverBehavior argument is a JavaScript object that represents the behavior. It is the same object that
findServerBehaviors() returns.
Returns
Dreamweaver expects nothing.
pasteServerBehavior()
Availability
Dreamweaver UltraDev 1.
Description
If this function is implemented, users can paste instances of the specified server behavior using the
pasteServerBehavior() function. When the user pastes the server behavior, Dreamweaver organizes the contents
of the Clipboard and generates a new behavior object. The new object is identical to the original, except that it lacks
pointer properties. Dreamweaver passes the new behavior object to the
pasteServerBehavior() function. The
pasteServerBehavior() function relies on the properties of the behavior object to determine what to add to the
user’s document. The
pasteServerBehavior() function then adds the behavior to the user’s document. After
pasteServerBehavior() returns, Dreamweaver calls the findServerBehaviors() functions to get a new list of all
the server behaviors in the user’s document.
Implementing the pasteServerBehavior() function is optional. For more information, see “Scenarios in which the
server behavior API functions are called” on page 249.
Note: If you implement this function, you must also implement the copyServerBehavior() function.
Arguments
behavior
The behavior JavaScript object represents the behavior.

256
EXTENDING DREAMWEAVER
Server behaviors
Last updated 6/15/2011
Returns
Dreamweaver expects a Boolean value: true if the behavior pastes successfully from the Clipboard; false otherwise.
Server behavior implementation functions
These functions can be added or edited within the HTML script files or the specified JavaScript files that are listed
within the HTML script file.
dwscripts.findSBs()
Availability
Dreamweaver MX (this function replaces the findSBs() function from earlier versions of Dreamweaver).
Description
Finds all instances of a server behavior and all the participants on the current page. It sets the title, type, participants
array, weights array, types array,
selectedNode value, and incomplete flag. This function also creates a parameter
object that holds an array of user-definable properties such as recordset, name, and column name. You can return this
array from the
findServerBehaviors() function.
Arguments
serverBehaviorTitle
The serverBehaviorTitle argument is an optional title string that is used if no title is specified in the EDML title, which
is useful for localization.
Returns
Dreamweaver expects an array of JavaScript objects where the required properties are defined. Returns an empty array
if no instances of the server behavior appear on the page.
Example
The following example searches for all instances of a particular server behavior in the current user document:
function findServerBehaviors() {
allMySBs = dwscripts.findSBs();
return allMySBs;
}
dwscripts.applySB()
Availability
Dreamweaver MX (this function replaces the applySB() function from earlier versions of Dreamweaver).
Description
Inserts or updates runtime code for the server behavior. If the sbObj argument has a null value, it inserts new runtime
code; otherwise, it updates existing runtime code that is indicated by the sbObj object. User settings should be set as
properties on a JavaScript object and passed in as paramObj. These settings should match all the arguments that are
declared as
@@paramName@@ in the EDML insertion text.

257
EXTENDING DREAMWEAVER
Server behaviors
Last updated 6/15/2011
Arguments
paramObj, sbObj
• The paramObj argument is the object that contains the user settings.
• The sbObj argument is the prior server behavior object if you are updating an existing server behavior; null
otherwise.
Returns
Dreamweaver expects a Boolean value: true if the server behavior is added successfully to the user’s document; false
otherwise.
Example
In the following example, you fill the paramObj object with the user’s input and call the dwscripts.applySB()
function, passing in the input and your server behavior,
sbObj:
function applyServerBehaviors(sbObj) {
// get all UI values here...
paramObj = new Object();
paramObj.rs= rsName.value;
paramObj.col = colName.value;
paramObj.url = urlPath.value;
paramObj.form__tag = formObj;
dwscripts.applySB(paramObj, sbObj);
}
dwscripts.deleteSB()
Availability
Dreamweaver MX (this function replaces the deleteSB() function from earlier versions of Dreamweaver).
Description
Deletes all the participants of the sbObj server behavior instance. The entire participant is deleted, unless the EDML
file indicates special delete instructions with the
delete tag. It does not delete participants that belong to more than
one server behavior instance (reference count > 1).
Arguments
sbObj
• The sbObj argument is the server behavior object instance that you want to remove from the user’s document.
Returns
Dreamweaver expects nothing.
Example
The following example deletes all the participants of the sbObj server behavior, except the participants that are
protected by the EDML file’s
delete tag.
function deleteServerBehavior(sbObj) {
dwscripts.deleteSB(sbObj);
}

258
EXTENDING DREAMWEAVER
Server behaviors
Last updated 6/15/2011
EDML files
You must maintain Dreamweaver coding conventions when you edit a file. Pay attention to the dependency of one
element upon another. For example, if you update the tags that are being inserted, you might also need to update the
search patterns.
Note: EDML files were new in Dreamweaver MX. If you are working with legacy server behaviors, see the earlier versions
of the Extending Dreamweaver manuals.
Regular expressions
You must understand regular expressions as they are implemented in JavaScript 1.5. You must also know when it is
appropriate to use them in the server behavior EDML files. For example, regular expressions cannot be used in
quickSearch values, but they are used in the content of the searchPattern tag to find and extract data.
Regular expressions describe text strings by using characters that are assigned with special meanings (metacharacters)
to represent the text, break it up, and process it according to predefined rules. Regular expressions are powerful parsing
and processing tools because they provide a generalized way to represent a pattern.
Good reference books on JavaScript 1.5 have a regular expression section or chapter. This section examines how
Dreamweaver server behavior EDML files use regular expressions in order to find arguments in your runtime code
and extract their values. Each time a user edits a server behavior, prior argument values need to be extracted from the
instances of the runtime code. You use regular expressions for the extraction process.
You should understand a few metacharacters and metasequences (special character groupings) that are useful in server
behavior EDML files, as described in the following table:
The EDML tag <searchPatterns whereToSearch="directive"> declares that runtime code needs to be searched.
Each
<searchPattern>...</searchPattern> subtag defines one pattern in the runtime code that must be
identified. For the Redirect If Empty example, there are two patterns.
In the following example, to extract argument values from <% if (@@rs@@.EOF)
Response.Redirect("@@new__url@@"); %>,write a regular expression that identifies any string rs and new__url:
<searchPattern paramNames="rs,new__url">
/if d ((\w+)\.EOF\) Response\.Redirect\("([^\r\n]*)"\)/i
</searchPattern>
This process searches the user’s document and, if there is a match, extracts the argument values. The first parenthetical
subexpression (
\w+) extracts the value for rs. The second subexpression ([^\r\n]*) extracts the value for new_url.
Note: The character sequence "[^\r\n]*" matches any character that is not a linefeed, for the Macintosh and Windows
platforms.
Regular expression Description
\ Escapes special characters. For example: \. reverts the metacharacter back to a literal period; \/ reverts the forward
slash to its literal meaning; and, \) reverts the parenthesis to its literal meaning.
/ ... /i Ignores case when searching for the metasequence.
( ...) Creates a parenthetical subexpression within the metasequence.
\s* Searches for white spaces.

259
EXTENDING DREAMWEAVER
Server behaviors
Last updated 6/15/2011
EDML structure
You should use a unique filename to identify your server behavior group. If only one group file uses an associated
participant file, match the participant filename with the group name. Using this convention, the server behavior group
file
updateRecord.edml works with the participant file updateRecord_init.edml. When participant files might be
shared among server behavior groups, assign unique descriptive names.
Note: The EDML name space is shared, regardless of folder structure. Make sure you use unique filenames. Filenames
should not exceed 31 characters (including the .edml extension), due to Macintosh limitations.
The runtime code for your server behavior resides inside the EDML files. The EDML parser should not confuse any of
your runtime code with EDML markup, so the
CDATA tag must wrap around your runtime code. The CDATA tag
represents character data and is any text that is not EDML markup. When you use the
CDATA tag, the EDML parser
won’t try to interpret it as markup, but instead, considers it as a block of plain text. The
CDATA-marked blocks begin
with
<![CDATA[ and end with ]]>.
If you insert the text Hello, World, it is simple to specify your EDML, as shown in the following example:
<insertText>Hello, World</insertText>
However, if you insert content that has tags in it, such as <img src='foo.gif'>, it can confuse the EDML parser. In
that case, embed it in the
CDATA construct, as shown in the following example:
<insertText><![CDATA[<img src='foo.gif'>]]></insertText>
The ASP runtime code is wrapped within the CDATA tag, as shown in the following example:
<![CDATA[
<% if (@@rs@@.EOF) Response.Redirect("@@new__url@@"); %>
]]
Because of the CDATA tag, the ASP tags <%= %>, along with the other content within the tag, aren’t processed. Instead,
the Extension Data Manager (EDM) receives the uninterpreted text, as shown in the following example:
<% if (Recordset1.EOF) Response.Redirect("http://www.Adobe.com"); %>
In the following EDML definitions, the locations where the CDATA tag is recommended are indicated in the examples.
Group EDML file tags
These tags and attributes are valid within the EDML group files.
<group>
Description
This tag contains all the specifications for a group of participants.
Parent
None.
Type
Block tag.

260
EXTENDING DREAMWEAVER
Server behaviors
Last updated 6/15/2011
Required
Yes.
<group> attributes
The following items are valid attributes of the group tag.
version
Description
This attribute defines which version of Dreamweaver server behavior processing the current server behavior targets.
For Dreamweaver CS3, the version number is 9. If no version is specified, Dreamweaver assumes version 7. For this
release of Dreamweaver, all groups and participants that the Server Behavior Builder creates have the version attribute
set to 9.0. The group version of this attribute currently has no effect.
Parent
group
Type
Attribute.
Required
No.
serverBehavior
Description
The serverBehavior attribute indicates which server behavior can use the group. When any of the group’s
participant
quickSearch strings are found in the document, the server behavior that is indicated by the
serverBehavior attribute has Dreamweaver call the findServerBehaviors() function.
In some cases, if multiple groups are associated with a single server behavior, the server behavior must resolve which
particular group to use.
Parent
group
Type
Attribute.
Required
No.
Value
The value is the exact name (without a path) of any server behavior HTML file within a Configuration/ServerBehaviors
folder, as shown in the following example:
<group serverBehavior="redirectIfEmpty.htm">

261
EXTENDING DREAMWEAVER
Server behaviors
Last updated 6/15/2011
dataSource
Description
This advanced feature supports new data sources that can be added to Dreamweaver.
Multiple versions of a server behavior can differ, depending on which data source you use. For example, the Repeat
Region server behavior is designed for the standard Recordset.htm data source. If Dreamweaver is extended to support
a new type of data source (such as a COM object), you can set
dataSource="COM.htm" in a group file with a different
implementation of Repeat Region. The Repeat Region server behavior then applies the new implementation of Repeat
Region if you select the new data source.
Parent
group
Type
Attribute.
Required
No.
Value
The exact name of a data source file within a Configuration/DataSources folder, as shown in the following example:
<group serverBehavior="Repeat Region.htm" dataSource="myCOMdataSource.htm">
This group defines a new implementation of the Repeat Region server behavior to use if you use the COM data source.
In the
applyServerBehaviors() function, you can indicate that this group should be applied by setting the
MM_dataSource property on the parameter object, as shown in the following example:
function applyServerBehavior(ssRec) {
var paramObj = new Object();
paramObj.rs = getComObjectName();
paramObj.MM_dataSource = "myCOMdataSource.htm";
dwscripts.applySB(paramObj, sbObj);
}
subType
Description
This advanced feature supports multiple implementations of a server behavior.
Multiple versions of a server behavior might differ, depending on user selection. When a server behavior is applied,
but multiple group files are relevant, the correct group file can be selected by passing in a
subType value. The group
with that specific
subType value is applied.
Parent
group
Type
Attribute.

262
EXTENDING DREAMWEAVER
Server behaviors
Last updated 6/15/2011
Required
No.
Value
The value is a unique string that determines which group to apply, as shown in the following example:
<group serverBehavior="myServerBehavior.htm" subType="longVersion">
This group attribute defines the long version of the myServerBehavior subtype. You would also have a version with
the
subType="shortVersion" attribute. In the applyServerBehaviors() function, you can indicate which group
should be applied by setting the
MM_subType property on the parameter object, as shown in the following example:
function applyServerBehavior(ssRec) {
var paramObj = new Object();
if (longVersionChecked) {
paramObj.MM_subType = "longVersion";
} else {
paramObj.MM_subType = "shortVersion";
}
dwscripts.applySB(paramObj, sbObj);
}
<title>
Description
This string appears in the Server Behaviors panel for each server behavior instance that is found in the current
document.
Parent
group
Type
Block tag.
Required
No.
Value
The value is a plain text string that can include argument names to make each instance unique, as shown in the
following example:
<title>Redirect If Empty (@@recordsetName@@)</title>
<groupParticipants>
Description
This tag contains an array of groupParticipant declarations.
Parent
group

263
EXTENDING DREAMWEAVER
Server behaviors
Last updated 6/15/2011
Type
Block tag.
Required
Yes.
<groupParticipants> attributes
The following items are valid attributes of the groupParticipants tag.
selectParticipant
Description
Indicates which participant should be selected and highlighted in the document when an instance is selected in the
Server Behaviors panel. The server behavior instances that are listed in this panel are ordered by the selected
participant, so set the
selectParticipant attribute even if the participant is not visible.
Parent
groupParticipants
Type
Attribute.
Required
No.
Value
The participantName value is the exact name (without the .edml extension) of a single participant file that is listed as
a group participant, as shown in the following example. For more information, see
“name” on page 264.
<groupParticipants selectParticipant="redirectIfEmpty_link">
<groupParticipant>
Description
This tag represents the inclusion of a single participant in the group.
Parent
groupParticipants
Type
Tag.
Required
Yes (at least one).

264
EXTENDING DREAMWEAVER
Server behaviors
Last updated 6/15/2011
<groupParticipant> attributes
The following items are valid attributes of the groupParticipant tag.
name
Description
This attribute names a particular participant to be included in the group. The name attribute on the
groupParticipant tag should be the same as the filename of the participant (without the .edml file extension).
Parent
groupParticipant
Type
Attribute.
Required
Yes.
Value
The value is the exact name (without the .edml extension) of any participant file, as shown in the following example:
<groupParticipant name="redirectIfEmpty_init">
This example refers to the redirectIfEmpty_init.edml file.
partType
Description
This attribute indicates the type of participant.
Parent
groupParticipant
Type
Attribute.
Required
No.
Values
identifier, member, option, multiple, data
• The identifier value is a participant that identifies the entire group. If this participant is found in the document, the
group is considered to exist. This is the default value if the
partType attribute is not specified.
• The member value is a normal member of a group. If it is found by itself, it does not identify a group. If it is not
found in a group, the group is considered incomplete.
• The option value indicates that the participant is optional. If it is not found, the group is still considered complete
and no incomplete flag is set in the Server Behaviors panel.

265
EXTENDING DREAMWEAVER
Server behaviors
Last updated 6/15/2011
• The multiple value indicates that the participant is optional and multiple copies of it can be associated with the
server behavior. Any arguments that are unique to this participant are not used when grouping participants because
they might have different values.
• The data value is a nonstandard participant that is used by programmers as a repository for additional group data.
It is ignored by everything else.
Participant EDML files
These tags and attributes are valid within the EDML participant files.
<participant>
Description
This tag contains all the specifications for a single participant.
Parent
None.
Type
Block tag.
Required
Yes.
<participant> attributes
The following items are valid attributes of the participant tag.
version
Description
This attribute defines which version of Dreamweaver server behavior processing the current server behavior targets.
For Dreamweaver CS3, the version number is 9. If no version is specified, Dreamweaver assumes version 7. For this
release of Dreamweaver, all groups and participants that the Server Behavior Builder creates have the version attribute
set to 0.0.
Note: The participant version attribute overrides the group version attribute if they are different. But, the participant file
will use the group version attribute if the participant does not specify one.
For participant files, this attribute determines if code-block merging should occur. For participants without this
attribute (or have it set to 4 or earlier), the inserted code blocks are not merged with other code blocks on the page.
Participants that have this set to version 5 or later are merged with other code blocks on the page when possible. Please
note that code-block merging occurs only for participants above and below the HTML tag.
Parent
participant

266
EXTENDING DREAMWEAVER
Server behaviors
Last updated 6/15/2011
Type
Attribute.
Required
No.
<quickSearch>
Description
This tag is a simple search string that is used for performance reasons. It cannot be a regular expression. If the string
is found in the current document, the rest of the search patterns are called to locate specific instances. This string can
be empty to always use the search patterns.
Parent
participant
Type
Block tag.
Required
No.
Value
The searchString value is a literal string that exists on the page if the participant exists. The string should be as unique
as possible to maximize performance, but the string does not have to be definitively unique. It is not case-sensitive, but
be careful with nonessential spaces that can be changed by the user, as shown in the following example:
<quickSearch>Response.Redirect</quickSearch>
If the quickSearch tag is empty, it is considered to match, and more precise searches use the regular expressions that
are defined in the
searchPattern tags. This is helpful if a simple string cannot be used to express a reliable search
pattern and regular expressions are required.
<insertText>
Description
This tag provides information about what to insert in the document and where to insert it. It contains the text to insert.
Parts of the text that are customized should be indicated by using the
@@parameterName@@ format.
In some cases, such as a translator-only participant, you might not need this tag.
Parent
implementation
Type
Block tag.

267
EXTENDING DREAMWEAVER
Server behaviors
Last updated 6/15/2011
Required
No.
Value
The value is the text to insert in the document. If any parts of the text need customizing, they can be passed in later as
parameters. Arguments should be embedded within two at (
@@) signs. Because this text can interfere with the EDML
structure, it should use the
CDATA construct, as shown in the following example:
<insertText location="aboveHTML">
<![CDATA[<%= @@recordset@@).cursorType %>]]>
</insertText>
When the text is inserted, the @@recordset@@ argument is replaced by a recordset name that the user supplies. For
more information on conditional and repeating code blocks, see “Adding Custom Server Behaviors” in Getting Started
with Dreamweaver.
<insertText> attributes
The following items are valid attributes of the insertText tag.
location
Description
This attribute specifies where the participant text should be inserted. The insert location is related to the
whereToSearch attribute of the searchPatterns tag, so be sure to set both carefully (see “whereToSearch” on
page 269).
Parent
insertText
Type
Attribute.
Required
Yes.
Values
aboveHTML[+weight], belowHTML[+weight], beforeSelection, replaceSelection, wrapSelection, afterSelection,
beforeNode, replaceNode, afterNode, firstChildOfNode, lastChildOfNode, nodeAttribute[+attribute]
• The aboveHTML[+weight] value inserts the text above the HTML tag (suitable only for server code). The weight
can be an integer from
1 to 99 and is used to preserve relative order among different participants. By convention,
recordsets have a weight of
50, so if a participant refers to recordset variables, it needs a heavier weight, such as 60,
so the code is inserted below the recordset, as shown in the following example:
<insert location="aboveHTML+60">
If no weight is provided, it is internally assigned a weight of 100 and is added below all specifically weighted
participants, as shown in the following example:
<insert location="aboveHTML">

268
EXTENDING DREAMWEAVER
Server behaviors
Last updated 6/15/2011
• The belowHTML[+weight] value is similar to the aboveHTML value, except that participants are added below the
closing
/HTML tag.
• The beforeSelection value inserts the text before the current selection or insertion point. If there is no selection, it
inserts the text at the end of the
body tag.
• The replaceSelection value replaces the current selection with the text. If there is no selection, it inserts the text at
the end of the
body tag.
• The wrapSelection value balances the current selection, inserts a block tag before the selection, and adds the
appropriate closing tag after the selection.
• The afterSelection value inserts the text after the current selection or insertion point. If there is no selection, it
inserts the text at the end of the
body tag.
• The beforeNode value inserts the text before a node, which is a specific location in the DOM. When a function such
as
dwscripts.applySB() is called to make the insertion, the node pointer must pass in as a paramObj parameter.
The user-definable name of this parameter must be specified by the
nodeParamName attribute (see
“nodeParamName” on page 268).
In summary, if your location includes the word node, make sure that you declare the nodeParamName tag.
• The replaceNode value replaces a node with the text.
• The afterNode value inserts the text after a node.
• The firstChildOfNode value inserts the text as the first child of a block tag; for example, if you want to insert
something at the beginning of a
FORM tag.
• lastChildOfNode inserts the text as the last child of a block tag; for example, if you want to insert code at the end of
a
FORM tag, which is useful for adding hidden form fields.
• nodeAttribute[+attribute] sets an attribute of a tag node. If the attribute does not already exist, this value creates it.
For example, use <insert location="nodeAttribute+ACTION" nodeParamName="form"> to set the ACTION
attribute of a form. This variation changes the user’s
FORM tag from <form> to <form action="myText">.
If you do not specify an attribute, the nodeAttribute location causes the text to be added directly to the open tag. For
example, use
insert location="nodeAttribute" to add an optional attribute to a tag. This can be used to
change a user’s
INPUT tag from <input type="checkbox"> to <input type="checkbox"
<%if(foo)Reponse.Write("CHECKED")%>>.
Note: For the location="nodeAttribute" attribute value, the last search pattern determines where the attribute starts
and ends. Make sure that the last pattern finds the entire statement.
nodeParamName
Description
This attribute is used only for node-relative insert locations. It indicates the name of the parameter that passes the node
in at insertion time.
Parent
insertText
Type
Attribute.

269
EXTENDING DREAMWEAVER
Server behaviors
Last updated 6/15/2011
Required
This attribute is required only if the insert location contains the word node.
Value
The tagtype_Tag value is a user-specified name for the node parameter that passes with the parameter object to the
dwscripts.applySB() function. For example, if you insert some text into a form, you might use a form_tag
parameter. In your server behavior
applyServerBehavior() function, you could use the form_tag parameter to
indicate the exact form to update, as shown in the following example:
function applyServerBehavior(ssRec) {
var paramObj = new Object();
paramObj.rs = getRecordsetName();
paramObj.form_tag = getFormNode();
dwscripts.applySB(paramObj, sbObj);
}
You can indicate the form_tag node parameter in your EDML file, as shown in the following example:
<insertText location="lastChildOfNode" nodeParamName="form_tag">
<![CDATA[<input type="hidden" name="MY_DATA">]]>
</insertText>
The text is inserted as the lastChildOfNode value, and the specific node passes in using the form_tag property of the
parameter object.
<searchPatterns>
Description
This tag provides information about finding the participant text in the document, and it contains a list of patterns that
are used when searching for a participant. If multiple search patterns are defined, they must all be found within the
text being searched (the search patterns have a logical AND relationship), unless they are marked as optional using the
isOptional flag.
Parent
implementation
Type
Block tag.
Required
No.
<searchPatterns> attributes
The following items are valid attributes of the searchPatterns tag.
whereToSearch
Description
This attribute specifies where to search for the participant text. This attribute is related to the insert location, so be sure
to set each attribute carefully (see
“location” on page 267).

270
EXTENDING DREAMWEAVER
Server behaviors
Last updated 6/15/2011
Parent
searchPatterns
Type
Attribute.
Required
Yes.
Values
directive, tag+tagName, tag+*, comment, text
• The directive value searches all server directives (server-specific tags). For ASP and JSP, this means search all <%
... %> script blocks.
Note: Tag attributes are not searched, even if they contain directives.
• The tag+tagName value searches the contents of a specified tag, as shown in the following example:
<searchPatterns whereToSearch="tag+FORM">
This example searches only form tags. By default, the entire outerHTML node is searched. For INPUT tags, specify
the type after a slash (/). In the following example, to search all submit buttons, use the following code:
<searchPatterns whereToSearch="tag+INPUT/SUBMIT">.
• The tag+* value searches the contents of any tag, as shown in the following example:
<searchPatterns whereToSearch="tag+*">
This example searches all tags.
• The comment value searches only within the HTML comments <! ... >, as shown in the following example:
<searchPatterns whereToSearch="comment">
This example searches tags such as <!-- my comment here -->.
• The text value searches only within raw text sections, as shown in the following example:
<searchPatterns whereToSearch="text">
<searchPattern>XYZ</searchPattern>
</searchPatterns>
This example finds a text node that contains the text XYZ.
<searchPattern>
Description
This tag is a pattern that identifies participant text and extracts parameter values from it. Each parameter
subexpression must be enclosed in parentheses ().
You can have patterns with no parameters (which are used to identify participant text), patterns with one parameter,
or patterns with many parameters. All non-optional patterns must be found, and each parameter must be named and
found exactly once.
For more information about using the searchPattern tag, see “Finding server behaviors” on page 283.

271
EXTENDING DREAMWEAVER
Server behaviors
Last updated 6/15/2011
Parent
searchPatterns
Type
Block tag.
Required
Yes.
Values
searchString, /regularExpression/, <empty>
• The searchString value is a simple search string that is case-sensitive. It cannot be used to extract parameters.
• The /regularExpression/ value is a regular expression search pattern.
• The <empty> value is used if no pattern is given. It is always considered a match, and the entire value is assigned to
the first parameter.
In the following example, to identify the participant text <%= RS1.Field.Items("author_id") %>, you can define
a simple pattern, followed by a precise pattern that also extracts the two parameter values:
<searchPattern>Field.Items</searchPattern>
<searchPattern paramNames="rs,col">
<![CDATA[
/<%=\s*(\w+)\.Field\.Items\("(\w+)"\)/
]]>
</searchPattern>
This example matches the pattern precisely and assigns the value of the first subexpression (\w+) to parameter rs and
the second subexpression (
\w+) to parameter col.
Note: It is important that regular expressions start and end with a slash (/). Otherwise, the expression is used as a literal
string search. Regular expressions can be followed by the regular-expression modifier
i to indicate case-insensitivity (as
in
/pattern/i). For example, VBScript is not case-sensitive, so it should use /pattern/i. JavaScript is case-sensitive
and should use
/pattern/.
Sometimes you might want to assign the entire contents of the limited search location to a parameter. In that case,
provide no pattern, as shown in the following example:
<searchPatterns whereToSearch="tag+OPTION">
<searchPattern>MY_OPTION_NAME</searchPattern>
<searchPattern paramNames="optionLabel" limitSearch="innerOnly">
</searchPattern>
</searchPatterns>
This example sets the optionLabel parameter to the entire innerHTML contents of an OPTION tag.
<searchPattern> attributes
The following items are valid attributes of the searchPattern tag.

272
EXTENDING DREAMWEAVER
Server behaviors
Last updated 6/15/2011
paramNames
Description
This attribute is a comma-separated list of parameter names whose values are being extracted. These parameters are
assigned in the order of the subexpression. You can assign single parameters or use a comma-separated list to assign
multiple parameters. If other parenthetical expressions are used but do not indicate parameters, extra commas can be
used as placeholders in the Parameter Name list.
The parameter names should match the ones that are specified in the insertion text and the update parameters.
Parent
searchPattern
Type
Attribute.
Required
Yes.
Values
paramName1, paramName2, ...
Each parameter name should be the exact name of a parameter that is used in the insertion text. For example, if the
insertion text contains
@@p1@@, you should define exactly one parameter with that name:
<searchPattern paramNames="p1">patterns</searchPattern>
To extract multiple parameters using a single pattern, use a comma-separated list of parameter names, in the order
that the subexpressions appear in the pattern. Suppose the following example shows your search pattern:
<searchPattern paramName="p1,,p2">/(\w+)_(BIG|SMALL)_(\w+)/</searchPattern>
There are two parameters (with some text in between them) to extract. Given the text: <%= a_BIG_b %>, the first
subexpression in the search pattern matches
a, so p1="a". The second subexpression is ignored (notice the ,, in the
paramName value). The third subexpression matches b, so p2="b".
limitSearch
Description
This attribute limits the search to some part of the whereToSearch tag.
Parent
searchPattern
Type
Attribute.
Required
No.

273
EXTENDING DREAMWEAVER
Server behaviors
Last updated 6/15/2011
Values
all, attribute+attribName, tagOnly, innerOnly
• The all value (default) searches the entire tag that is specified in the whereToSearch attribute.
• The attribute+attribName value searches only within the value of the specified attribute, as shown in the following
example:
<searchPatterns whereToSearch="tag+FORM">
<searchPattern limitSearch="attribute+ACTION">
/MY_PATTERN/
</searchPattern>
</searchPatterns>
This example indicates that only the value of the ACTION attribute of FORM tags should be searched. If that attribute
is not defined, the tag is ignored.
• The tagOnly value searches only the outer tag and ignores the innerHTML tag. This value is valid only if
whereToSearch is a tag.
• The innerOnly value searches only the innerHTML tag and ignores the outer tag. This value is valid only if
whereToSearch is a tag.
isOptional
Description
This attribute is a flag that indicates that the search pattern is not required to find the participant. This is useful for
complex participants that might have non-critical parameters to extract. You can create some patterns for distinctly
identifying a participant and have some optional patterns for extracting non-critical parameters.
Parent
searchPattern
Type
Attribute.
Required
No.
Values
true, false
• The value is true if the searchPattern is not necessary to identify the participant.
• The value is false (default) if the searchPattern tag is required.
For example, consider the following simple recordset string:
<%
var Recordset1 = Server.CreateObject("ADODB.Recordset");
Recordset1.ActiveConnection = "dsn=andescoffee;";
Recordset1.Source = "SELECT * FROM PressReleases";
Recordset1.CursorType = 3;
Recordset1.Open();
%>

274
EXTENDING DREAMWEAVER
Server behaviors
Last updated 6/15/2011
The search patterns must identify the participant and extract several parameters. However, if a parameter such as
cursorType is not found, you should still recognize this pattern as a recordset. The cursor parameter is optional. In the
EDML, the search patterns might look like the following example:
<searchPattern paramNames="rs">/var (\w+) = Server.CreateObject/
</searchPattern>
<searchPattern paramNames="src">/ActiveConnection = "([^\r\n]*)"/</searchPattern>
<searchPattern paramNames="conn">/Source = "([^\r\n]*)"/</searchPattern>
<searchPattern paramNames="cursor" isOptional="true">/CursorType = (\d+)/
</searchPattern>
The first three patterns are required to identify the recordset. If the last parameter is not found, the recordset is still
identified.
<updatePatterns>
Description
This optional advanced feature lets you update the participant precisely. Without this tag, the participant is updated
automatically by replacing the entire participant text each time. If you specify an
updatePatterns tag, it must contain
specific patterns to find and replace each parameter within the participant.
This tag is beneficial if the user edits the participant text. It performs precise updates only to the parts of the text that
need changing.
Parent
implementation
Type
Block tag.
Required
No.
<updatePattern>
Description
This tag is a specific type of regular expression that lets you update participant text precisely. There should be at least
one update pattern definition for every unique parameter that is declared in the insertion text (of the form
@@paramName@@).
Parent
updatePatterns
Type
Block tag.
Required
Yes (at least one, if you declare the updatePatterns tag).

275
EXTENDING DREAMWEAVER
Server behaviors
Last updated 6/15/2011
Values
The value is a regular expression that finds a parameter between two parenthetical subexpressions, in the form /(pre-
pattern)parameter-pattern(post-pattern)/. You need to define at least one update pattern for each unique
@@paramName@@ in the insertion text. The following example shows how your insertion text might look:
<insertText location="afterSelection">
<![CDATA[<%= @@rs@@.Field.Items("@@col@@") %>]]>
</insertText>
A particular instance of the insertion text on a page might look like the following example:
<%= RS1.Field.Items("author_id") %>
There are two parameters, rs and col. To update this text after you insert it on the page, you need two update pattern
definitions:
<updatePattern paramName="rs" >
/(\b)\w+(\.Field\.Items)/
</updatePattern>
<updatePattern paramName="col">
/(\bItems\(")\w+("\))/
</updatePattern>
The literal parentheses, as well as other special regular expression characters, are escaped by preceding them with a
backslash (\). The middle expression, defined as
\w+, is updated with the latest value that passed in for parameters rs
and
col, respectively. The values RS1 and author_id can be precisely updated with new values.
Multiple occurrences of the same pattern can be updated simultaneously by using the regular expression global flag g
after the closing slash (such as /pattern/g).
If the participant text is long and complex, you might need multiple patterns to update a single parameter, as shown
in the following example:
<% ...
Recordset1.CursorType = 0;
Recordset1.CursorLocation = 2;
Recordset1.LockType = 3;
%>
To update the recordset name in all three positions, you need three update patterns for a single parameter, as shown
in the following example:
<updatePattern paramName="rs">
/(\b)\w+(\.CursorType)/
</updatePattern>
<updatePattern paramName="rs">
/(\b)\w+(\.CursorLocation)/
</updatePattern>
<updatePattern paramName="rs">
/(\b)\w+(\.LockType)/
</updatePattern>
Now you can pass in a new value for the recordset, and it is precisely updated in three locations.
<updatePattern> attributes
The following items are valid attributes of the updatePattern tag.

276
EXTENDING DREAMWEAVER
Server behaviors
Last updated 6/15/2011
paramName
Description
This attribute indicates the name of the parameter whose value is used to update the participant. This parameter
should match the ones that are specified in the insertion text and search parameters.
Parent
updatePattern
Type
Attribute.
Required
Yes.
Values
The value is the exact name of a parameter that is used in the insertion text. In the following example, if the insertion
text contains an
@@rs@@ value, you should have a parameter with that name:
<updatePattern paramName="rs">pattern</updatePattern>
<delete>
Description
This tag is an optional advanced feature that lets you control how to delete a participant. Without this tag, the
participant is deleted by removing it completely but only if no server behaviors refer to it. By specifying a
delete tag,
you can specify that it should never be deleted or that only portions should be deleted.
Parent
implementation
Type
Tag.
Required
No.
<delete> attributes
The following items are valid attributes of the delete tag.
deleteType
Description
This attribute is used to indicate the type of delete to perform. It has different meanings, depending on whether the
participant is a directive, a tag, or an attribute. By default, the entire participant is deleted.

277
EXTENDING DREAMWEAVER
Server behaviors
Last updated 6/15/2011
Parent
delete
Type
Attribute.
Required
No.
Values
all, none, tagOnly, innerOnly, attribute+attribName, attribute+*
• The all value (default) deletes the entire directive or tag. For attributes, it deletes the entire definition.
• The none value is never automatically deleted.
• The tagOnly value removes only the outer tag but leaves the contents of the innerHTML tag intact. For attributes, it
also removes the outer tag if it is a block tag. It is meaningless for directives.
• The innerOnly value, when applied to tags, removes only the contents (the innerHTML tag). For attributes, it
removes only the value. It is meaningless for directives.
• The attribute+attribName value, when applied to tags, removes only the specified attribute. It is meaningless for
directives and attributes.
• The attribute+* value removes all attributes for tags. It is meaningless for directives and attributes.
If your server behavior converts selected text into a link, you can remove the link by removing the outer tag only, as
shown in the following example:
<delete deleteType="tagOnly"/>
This example changes a link participant from <A HREF="...">HELLO</A> to HELLO.
<translator>
Description
This tag provides information for translating a participant so that it can be rendered differently and have a custom
Property inspector.
Parent
implementation
Type
Block tag.
Required
No.

278
EXTENDING DREAMWEAVER
Server behaviors
Last updated 6/15/2011
<searchPatterns>
Description
This tag lets Dreamweaver find each specified instance in a document. If multiple search patterns are defined, they
must all be found within the text being searched (the search patterns have a logical AND relationship), unless they are
marked as optional using the
isOptional flag.
Parent
translator
Type
Block tag.
Required
Yes.
<translations>
Description
This tag contains a list of translation instructions where each instruction indicates where to search for the participant
and what to do with the participant.
Parent
translator
Type
Block tag.
Required
No.
<translation>
Description
This tag contains a single translation instruction that includes the location for the participant, what type of translation
to perform, and the content that should replace the participant text.
Parent
translations
Type
Block tag.
Required
No.

279
EXTENDING DREAMWEAVER
Server behaviors
Last updated 6/15/2011
<translation> attributes
The following items are valid attributes of the translation tag.
whereToSearch
Description
This attribute specifies where to search for the text, which is related to the insert location, so be sure to set each location
carefully (see
“location” on page 267).
Parent
translation
Type
Attribute.
Required
Yes.
limitSearch
Description
This attribute limits the search to some part of the whereToSearch tag.
Parent
translation
Type
Attribute.
Required
No.
translationType
Description
This attribute indicates the type of translation to perform. These types are preset and give the translation specific
functionality. For example, if you specify
dynamic data, any data that is translated should behave the same as
Dreamweaver dynamic data; that is, it should have the dynamic data placeholder look in the Design view (curly braces
({ }) notation with dynamic background color) and appear in the Server Behaviors panel.
Parent
translation
Type
Attribute.

280
EXTENDING DREAMWEAVER
Server behaviors
Last updated 6/15/2011
Required
Yes.
Values
dynamic data, dynamic image, dynamic source, tabbed region start, tabbed region end, custom
• The dynamic data value indicates that the translated directives look and behave the same as Dreamweaver dynamic
data, as shown in the following example:
<translation whereToSearch="tag+IMAGE"
limitSearch="attribute+SRC"
translationType="dynamic data">
• The dynamic image value indicates that the translated attributes should look and behave the same as Dreamweaver
dynamic images, as shown in the following example:
<translation whereToSearch="IMAGE+SRC"
translationType="dynamic image">
• The dynamic source value indicates that the translated directives should behave the same as Dreamweaver dynamic
sources, as shown in the following example:
<translation whereToSearch="directive"
translationType="dynamic source">
• The tabbed region start value indicates that the translated <CFLOOP> tags define the beginning of a tabbed
outline, as shown in the following example:
<translation whereToSearch="CFLOOP"
translationType="tabbed region start">
• The tabbed region end value indicates that the translated </CFLOOP> tags define the end of a tabbed outline, as
shown in the following example:
<translation whereToSearch="CFLOOP"
translationType="tabbed region end">
• The custom value is the default case in which no internal Dreamweaver functionality is added to the translation. It
is often used when specifying a tag to insert for a custom Property inspector, as shown in the following example:
<translation whereToSearch="directive"
translationType="custom">
<openTag>
Description
This optional tag can be inserted at the beginning of the translation section. This tag lets certain other extensions, such
as custom Property inspectors, find the translation.
Parent
translation
Type
Block tag.

281
EXTENDING DREAMWEAVER
Server behaviors
Last updated 6/15/2011
Required
No.
Values
The tagName value is a valid tag name. It should be unique to prevent conflicts with known tag types. For example, if
you specify
<openTag>MM_DYNAMIC_CONTENT</openTag> the dynamic data is translated to the
MM_DYNAMIC_CONTENT tag.
<attributes>
Description
This tag contains a list of attributes to add to the translated tag that is specified by the openTag tag. Alternatively, if
the
openTag tag is not defined and the searchPattern tag specifies tag, this tag contains a list of translated attributes
to add to the tag that is found.
Parent
translation
Type
Block tag.
Required
No.
<attribute>
Description
This tag specifies a single attribute (or translated attribute) to add to the translated tag.
Parent
attributes
Type
Block tag.
Required
Yes (at least one).
Values
The attributeName="attributeValue" specification sets an attribute to a value. Typically, the attribute name is fixed,
and the value contains some parameter references that are extracted by the parameter patterns, as shown in the
following example:
<attribute>SOURCE="@@rs@@"</attribute>
<attribute>BINDING="@@col@@"</attribute>
or

282
EXTENDING DREAMWEAVER
Server behaviors
Last updated 6/15/2011
<attribute>
mmTranslatedValueDynValue="VALUE={@@rs@@.@@col@@}"
</attribute>
<display>
Description
This tag is an optional display string that should be inserted in the translation.
Parent
translation
Type
Block tag.
Required
No.
Values
The displayString value is any string comprising text and HTML. It can include parameter references that are extracted
by the parameter patterns. For example,
<display>{@@rs@@.@@col@@}</display> causes the translation to render
as
{myRecordset.myCol}.
<closeTag>
Description
This optional tag should be inserted at the end of the translated section. This tag enables certain other extensions, such
as custom Property inspectors, to find the translation.
Parent
translation
Type
Block tag.
Required
No.
Values
The tagName value is a valid tag name; it should match a translation openTag tag.
Example
If you specify the value <closeTag>MM_DYNAMIC_CONTENT</closeTag>,the dynamic data is translated to end with
the
</MM_DYNAMIC_CONTENT> tag.

283
EXTENDING DREAMWEAVER
Server behaviors
Last updated 6/15/2011
Server behavior techniques
This section covers the common and advanced techniques that create and edit server behaviors. Most of the
suggestions involve specific settings in the EDML files.
Finding server behaviors
You can find server behaviors by:
• Writing search patterns
• Using optional search patterns
Writing search patterns
To update or delete server behaviors, provide a way for Dreamweaver to find each instance in a document. It requires
a
quickSearch tag and at least one searchPattern tag, which is contained within the searchPatterns tag.
The quickSearch tag must be a string, not a regular expression, that indicates that the server behavior exists on the
page. It is not case-sensitive. It must be short and unique, and it must avoid spaces and other sections that the user can
change. The following example shows a participant that consists of the simple ASP JavaScript tag:
<% if (Recordset1.EOF) Response.Redirect("some_url_here") %>
In the following example, the quickSearch string checks for that tag:
<quickSearch>Response.Redirect</quickSearch>
For performance reasons, the quickSearch pattern is the beginning of the process of finding server behavior
instances. If this string is found in the document and the participant identifies a server behavior (in the group file,
partType="identifier" for this participant), the related server behavior files are loaded and the
findServerBehaviors() function is called. If your participant has no reliable strings for which to search (or for
debugging purposes), you can leave the
quickSearch string empty, as shown in the following example:
<quickSearch></quickSearch>
In this example, the server behavior is always loaded and can search the document.
Next, the searchPattern tag searches the document more precisely than the quickSearch tag and extracts
parameter values from the participant code. The search patterns specify where to search (the
whereToSearch
attribute) with a series of
searchPattern tags that contain specific patterns. These patterns can use simple strings or
regular expressions. The previous example code is an ASP directive. So the
whereToSearch="directive"
specification and a regular expression identify the directive and extract the parameters, as shown in the following
example:
<quickSearch>Response.Write</quickSearch>
<searchPatterns whereToSearch="directive">
<searchPattern paramNames="rs,new__url">
/if\s*\((\w+)\.EOF\)\s*Response\.Redirect\("([^\r\n]*)"\)/i
</searchPattern>
</searchPatterns>
The search string is defined as a regular expression by starting and ending with a slash (/). An i follows the slash, which
means that it is not case-sensitive. Within the regular expression, special characters such as parentheses () and periods
(.) are escaped by preceding them with a backslash (\). The two parameters
rs and new_url are extracted from the
string by using parenthetical subexpressions (the parameters must be enclosed in parentheses). In this example,
(\w+)
and
([^\r\n]*) indicate the parameters. These values correspond to the regular expression values that $1 and $2
normally returns.

284
EXTENDING DREAMWEAVER
Server behaviors
Last updated 6/15/2011
Optional search patterns
Sometimes you want to identify a participant even if some parameters are not found. The participant stores some
optional information such as a telephone number. For such an example, you could use the following ASP code:
<% //address block
LNAME = "joe";
FNAME = "smith";
PHONE = "123-4567";
%>
You could use the following search patterns:
<quickSearch>address</quickSearch>
<searchPatterns whereToSearch="directive">
<searchPattern paramNames="lname">/LNAME\s*=\s*"([^\r\n]*)"/i</searchPattern>
<searchPattern paramNames="fname">/FNAME\s*=\s*"([^\r\n]*)"/i</searchPattern>
<searchPattern paramNames="phone">/PHONE\s*=\s*"([^\r\n]*)"/i</searchPattern>
</searchPatterns>
In the previous example, the telephone number must be specified. However, you can make the telephone number
optional, by adding the
isOptional attribute, as shown in the following example:
<quickSearch>address</quickSearch>
<searchPatterns whereToSearch="directive">
<searchPattern paramNames="lname">/LNAME\s*=\s*"([^\r\n]*)"/i</searchPattern>
<searchPattern paramNames="fname">/FNAME\s*=\s*"([^\r\n]*)"/i</searchPattern>
<searchPattern paramNames="phone" isOptional="true">/PHONE\s*=\s*"([^\r\n]*)"/i¬
</searchPattern>
</searchPatterns>
Now the participant is recognized, even if the telephone number is not found.
How participants are matched
If a server behavior has more than one participant, the participants must be identified in the user document and
matched. If the user applies multiple instances of the server behavior to a document, each group of participants must
be matched accordingly. To ensure that participants are matched correctly, change or add parameters and construct
participants so they can be uniquely identified.
Matching requires some rules. Participants are matched when all parameters with the same name have the same value.
Above and below the
html tag, there can be only one instance of a participant with a given set of parameter values.
Within the
html.../html tags, Dreamwaever matches participants by their position relative to the selection or to
common nodes that are used for insertion.
Participants without parameters are automatically matched, as shown in the following example of a server behavior
with group file:
<group serverBehavior="test.htm">
<title>Test</title>
<groupParticipants>
<groupParticipant name="test_p1" partType="identifier" />
<groupParticipant name="test_p2" partType="identifier" />
</groupParticipants>
</group>
The following example inserts two simple participants above the html tag:

285
EXTENDING DREAMWEAVER
Server behaviors
Last updated 6/15/2011
<% //test_p1 %>
<% //test_p2 %>
<html>
These participants are found and matched, and Test appears once in the Server Behaviors panel. If you add the server
behavior again, nothing is added because the participants exist.
If the participants have unique parameters, multiple instances can be inserted above the html tag. For example, by
adding a name parameter to the participant, a user can enter a unique name in the Test Server Behavior dialog box. If
the user enters the name aaa, the following participants are inserted:
If you add the server behavior again with a different name, such as bbb, the document now looks like the following
example:
<% //test_p1 name="aaa" %>
<% //test_p2 name="aaa" %>
<html>
Two instances of Test are listed in the Server Behaviors panel. If the user tries to add a third instance to the page and
names it aaa, nothing is added because it exists.
Within the html tag, matching can also use position information. In the following example, you have two participants,
one that is added before the selection and another that is added after the selection:
<% if (expression) { //mySBName %>
Random HTML selection here:
<% } //end mySBName %>
These two participants are without parameters, so they are grouped. However, you can add another instance of this
server behavior elsewhere in the HTML, as shown in the following example:
<% if (expression) { //mySBName %>
Random HTML selection here:
<% } //end mySBName %>
More HTML here:
<% if (expression) { //mySBName %>
Another HTML selection here:
<% } //end mySBName %>
Now, you have two identical instances of each participant, which is allowed within the HTML. Dreamweaver matches
them by the order in which they occur in the document.
The following example shows a matching problem and how to avoid it. You can create a participant that computes the
tax on some dynamic data and displays the result at the selection.
<% total = Recordset1.Fields.Item("itemPrice").Value * 1.0825 %>
<html>
<body>
The total (with taxes) is $<%=total%>
</body>
</html>
The two participants are matched because they have no common parameters. However, if you add a second instance
of this server behavior, you must have the following code:

286
EXTENDING DREAMWEAVER
Server behaviors
Last updated 6/15/2011
<% total = Recordset1.Fields.Item("itemPrice").Value * 1.0825 %>
<% total = Recordset1.Fields.Item("salePrice").Value * 1.0825 %>
<html>
<body>
The total0(with taxes) is $<%=total%>
Sale price (with taxes) is $<%=total%>
</body>
</html>
This server behavior no longer works correctly because only one parameter is named total. To solve this problem,
make sure that a parameter with a unique value exists and that it can be used to match the participants. In the following
example, you could make the
total variable name unique using the column name:
<% itemPrice_total = Recordset1.Fields.Item("itemPrice").Value * 1.0825 %>
<% salePrice_total = Recordset1.Fields.Item("salePrice").Value * 1.0825 %>
<html>
<body>
The total0(with taxes) is $<%=itemPrice_total%>
Sale price (with taxes) is $<%=salePrice_total%>
</body>
</html>
The search patterns now uniquely identify and match the participants.
Search pattern resolution
Dreamweaver supports the following actions by using the participant searchPatterns functionality:
• File transfer dependency
• Updating the file paths for any file reference (such as those for include files)
When Dreamweaver creates server models, it builds lists of patterns by scanning all the participants for special
paramNames attributes. To find URLs to check file dependency and to fix the pathname, Dreamweaver uses each
searchPattern tag in which one of the paramNames attribute ends with _url. Multiple URLs can be specified in a
single
searchPattern tag.
For each translator searchPattern tag that has a paramNames attribute value that ends with _includeUrl,
Dreamweaver uses that
searchPattern tag to translate include file statements on the page. Dreamweaver uses a
different suffix string to identify include file URLs because not all URL references are translated. Also, only a single
URL can be translated as an include file.
In resolving a searchPatterns tag, Dreamweaver uses the following algorithm:
1 Look for the whereToSearch attribute within the searchPatterns tag.
2 If the attribute value starts with tag+, the remaining string is assumed to be the tag name (no spaces are allowed in
the tag name).
3 Look for the limitSearch attribute within the searchPattern tag.
4 If the attribute value starts with attribute+, the remaining string is assumed to be the attribute name (no spaces
are allowed in the attribute name).
If these four steps are successful, Dreamweaver assumes a tag/attribute combination. Otherwise, Dreamweaver starts
looking for
searchPattern tags with a paramName attribute that has a _url suffix and a regular expression that is
defined. (For information about regular expressions, see
“Regular expressions” on page 258.)
The following example of a searchPatterns tag has no search pattern because it combines a tag (cfinclude) with
an attribute (
template) to isolate the URL for dependency file checking, path fixing, and so forth:

287
EXTENDING DREAMWEAVER
Server behaviors
Last updated 6/15/2011
<searchPatterns whereToSearch="tag+cfinclude">
<searchPattern paramNames="include_url" limitSearch="attribute+template" />
</searchPatterns>
The tag/attribute combination (see the previous example) does not apply to translation because Dreamweaver always
translates to straight text in the JavaScript layer. File dependency checking, path fixing, and so on occurs in the C layer.
In the C layer, Dreamweaver internally splits the document into directives (straight text) and tags (parsed into an
efficient tree structure).
Updating server behaviors
You can update server behaviors by:
• Replacement update
• Precision update
Replacement update
By default, participant EDML files do not have an <updatePatterns> tag, and instances of the participant are updated
in the document by replacing them entirely. When a user edits an existing server behavior and clicks OK, any
participant that contains a parameter whose value has changed is removed. Then, the participant is reinserted with the
new value in the same location.
If the user customizes participant code in the document, the participant might not be recognized if the search patterns
look for the old code. Shorter search patterns can let the user customize the participant code in their document.
However, updating the server behavior instance can cause the replacement of the participant, which loses the custom
edits.
Precision update
In some cases, it is desirable to let users customize the participant code after it is inserted in the document. This
situation can be achieved by limiting the search patterns and providing update patterns in the EDML file. After you
add the participant to the page, the server behavior updates only specific parts of it. The following example shows a
simple participant with two parameters:
<% if (Recordset1.EOF) Response.Redirect("some_url_here") %>
This example might use the following search patterns:
<quickSearch>Response.Write</quickSearch>
<searchPatterns whereToSearch="directive">
<searchPattern paramNames="rs,new__url">
/if\s*\((\w+)\.EOF\)\s*Response\.Redirect\("([^\r\n]*)"\)/i
</searchPattern>
</searchPatterns>
The user could add another test to a particular instance of this code, as shown in the following example:
<% if (Recordset1.EOF || x > 2) Response.Redirect("some_url_here") %>
The search patterns fail because they are looking for a parenthesis after the EOF parameter. To make the search patterns
more forgiving, you can shorten them by splitting them up, as shown in the following example:

288
EXTENDING DREAMWEAVER
Server behaviors
Last updated 6/15/2011
<quickSearch>Response.Write</quickSearch>
<searchPatterns whereToSearch="directive">
<searchPattern paramNames="rs">/(\w+)\.EOF/</searchPattern>
<searchPattern paramNames="new__url">
/if\s*\([^\r\n]*\)\s*Response\.Redirect\("([^\r\n]*)"/i
</searchPattern>
</searchPatterns>
These shortened search patterns are flexible, so the user can add to the code. However, if the server behavior changes
the URL when the user clicks OK, the participant is replaced and the customizations are lost. To update more precisely,
add an
updatePatterns tag that contains a pattern for updating each parameter:
<updatePatterns>
<updatePattern paramNames="rs">/(\b)\w+(\.EOF)/\</updatePattern>
<updatePattern paramNames="new__url">
/(Response\.Redirect\(")[^\r\n]*(")/i
</updatePattern>
</updatePatterns>
In update patterns, the parentheses are reversed and are placed around the text before and after the parameter. For
search patterns, use the
textBeforeParam(param)textAfterParam parameter. For update patterns, use the
(textBeforeParam)param(textAfterParam) parameter. All the text between the two parenthetical subexpressions
is replaced with the new value for the parameter.
Deleting server behaviors
You can delete server behaviors by:
• Default deletion and dependency counts
• Using delete flags to limit participant deletion
Default deletion and dependency counts
The user can delete an instance that is selected in the Server Behaviors panel by clicking the Minus (-) button or
pressing Delete. All the participants are removed except for the ones that other server behaviors share. Specifically, if
more than one server behavior has a participant pointer to the same node, the node is not deleted.
By default, participants are deleted by removing an entire tag. If the insert location is wrapSelection, only the outer
tag is removed. For attributes, the entire attribute declaration is removed. The following example shows an attribute
participant on the
ACTION attribute of a form tag:
<form action="<% my_participant %>">
After deleting the attribute, only form remains.
Using delete flags to limit participant deletion
To limit the way that participants are deleted, add a delete tag to the EDML file. The following example shows a
participant that is an
href attribute of a link:
<a href="<%=MY_URL%>">Link Text</a>
When this attribute participant is deleted, the resulting tag is <a>Link Text</a>, which no longer appears as a link
in Dreamweaver. Deleting only the attribute value is preferred. Deletion is done by adding the following tag to the
participant EDML file:
<delete deleteType="innerOnly"/>

289
EXTENDING DREAMWEAVER
Server behaviors
Last updated 6/15/2011
Another approach is to remove the entire tag; typing <delete deleteType="tagOnly"/> deletes the attribute. The
resulting text is Link Text.
Share-in-memory JavaScript files
If several HTML files reference a particular JavaScript file, Dreamweaver loads the JavaScript into a central location
where the HTML files can share the same JavaScript source. These files contain the following line:
//SHARE-IN-MEMORY=true
If a JavaScript file has the SHARE-IN-MEMORY directive and an HTML file references it (by using the SCRIPT tag with
the
SRC attribute), Dreamweaver loads the JavaScript into a memory location where the code is implicitly included in
all HTML files thereafter.
Note: Because JavaScript files that are loaded into this central location share memory, the files cannot duplicate any
declarations. If a share-in-memory file defines a variable or function and any other JavaScript file defines the same
variable or function, a name conflict occurs. When writing new JavaScript files, be aware of these files and their naming
conventions.
290
Last updated 6/15/2011
Chapter 18: Data sources
Data source files are stored in the Configuration/DataSources/ServerModelName folder. Dreamweaver currently
supports the following server models: ASP.NET/C#, ASP.NET/VisualBasic, ASP/JavaScript, ASP/VBScript, Adobe
ColdFusion, JSP, and PHP/MySQL. Within each server model subfolder are HTML and EDML files that are associated
with the data sources for that server model.
The following table lists the files you use to create a data source:
How data sources work
Dreamweaver users can add dynamic data by using the Bindings panel. The dynamic data objects that are shown on
the Plus (+) menu are based on the server model that is specified for the page. For example, users can insert recordsets,
commands, request variables, session variables, and application variables for ASP applications. For related
information, see the function
dreamweaver.dbi.getDataSources() in the Dreamweaver API Reference.
The following steps describe the process that is involved in adding dynamic data:
1 When the user clicks the Plus (+) menu in the Bindings panel, a pop-up menu appears.
To determine the contents of the menu, Dreamweaver first looks for a DataSources.xml file in the same folder as
the data sources (for example, Configuration/DataSources/ASP_Js/DataSources.xml). The DataSources.xml file
describes the contents of the pop-up menu; it contains references to the HTML files that are placed in the pop-up
menu.
Dreamweaver checks each referenced HTML file for a title tag. If the file contains a title tag, the content of the title
tag appears in the menu. If the file does not contain a title tag, the filename is used in the menu.
After Dreamweaver finishes reading the DataSources.xml file, it searches the rest of the folder for other items that
ought to appear in the menu. It does the same if the DataSources.xml file does not exist. If Dreamweaver finds files
in the main folder that aren’t in the menu, it adds them to the menu. If subfolders contain files that aren’t in the
menu, Dreamweaver creates a submenu and adds those files to the submenu.
2 When the user selects an item from the Plus (+) menu, Dreamweaver calls the addDynamicSource() function. It
is done so that code for the data source is added to the document of the user.
Path File Description
Configuration/DataSources/ServerModelName datasourcename.htm Specifies the name of the data source and
where to find the supporting JavaScript
files.
Configuration/DataSources/ServerModelName datasourcename.edml Defines the code that Dreamweaver inserts
into the document to represent the data
source value.
Configuration/DataSources/ServerModelName datasourcename.js Contains the JavaScript functions to add,
insert, and delete the necessary code into a
document.

291
EXTENDING DREAMWEAVER
Data sources
Last updated 6/15/2011
3 Dreamweaver goes through each file in the appropriate server model folder, calling the findDynamicSources()
function in each file. For each value in the returned array, Dreamweaver calls the
generateDynamicSourceBindings() function in the same file. It is done to get a new list of all the fields in each
data source for the document of the user. Those fields are presented to the user as a tree control in the Dynamic
Data or the Dynamic Text dialog box or in the Bindings panel. The data source tree for an ASP document appears
as shown in the following example:
Recordset (Recordset1)
ColumnOneInRecordset
ColumnTwoInRecordset
Recordset (Recordset2)
ColumnOfRecordset
Request
NameOfRequestVariable
NameOfAnotherRequestVariable
Session
NameOfSessionVariable
4 If the user double-clicks a data source name in the Bindings panel, Dreamweaver calls the editDynamicSource()
function to handle editing within the tree.
5 If the user clicks the Minus (-) button, Dreamweaver gets the current node selection from the tree and passes it to
the
deleteDynamicSource() function. The function deletes the code that was added earlier with the
addDynamicSource() function. If it cannot delete the current selection, the function returns an error message.
After the
deleteDynamicSource() function returns, Dreamweaver refreshes the data source tree by calling the
findDynamicSources() and the generateDynamicSourceBindings() functions.
6 If the user selects a data source and clicks OK in the Dynamic Data or the Dynamic Text dialog box, Dreamweaver
calls the
generateDynamicDataRef() function. It does the same when the user clicks Insert or Bind in the
Bindings panel. The return value is inserted in the document at the current insertion point.
7 If the user edits a dynamic data object using the Dynamic Data, the selection in the data source tree must be
initialized to the object. Same is the case if the user edits a dynamic data object using the Dynamic Text dialog box.
To initialize the tree control, Dreamweaver goes through each file in the appropriate server model folder. For
example, the Configuration/DataSources/ASP_Js folder. Dreamweaver goes through each file calling the
implementation of the
inspectDynamicDataRef() function.
Dreamweaver calls the inspectDynamicDataRef() function to convert the dynamic data object back from the
code in the user document to an item in the tree. (This process is the reverse of what occurs when the
generateDynamicDataRef() function is called.) If the inspectDynamicDataRef() function returns an array that
contains two elements, Dreamweaver provides visual cues to the tree item that is bound to the current selection.
8 Every time the user changes the selection, Dreamweaver calls the inspectDynamicDataRef() function.
Dreamweaver does it to determine whether the new selection is dynamic text or a tag with a dynamic attribute. If
it is dynamic text, Dreamweaver displays the bindings for the current selection in the Bindings panel.
9 It is possible to change the data format for a dynamic text object or a dynamic attribute that the user has already
added to the page. To do it, use the Dynamic Data or the Dynamic Text dialog box or the Bindings panel. When
the format changes, Dreamweaver calls the
generateDynamicDataRef() function to get the string to insert into
the document of the user. Then it passes that string to the
formatDynamicDataRef() function (see
“formatDynamicDataRef()” on page 307). The string that the formatDynamicDataRef() function returns is
inserted in the document of the user.

292
EXTENDING DREAMWEAVER
Data sources
Last updated 6/15/2011
A simple data source example
This extension adds a custom data source to the Bindings panel for Adobe ColdFusion documents. Users can specify
the variable they want from the new data source.
This example creates a data source called MyDatasource, which includes a MyDatasource.js JavaScript file, a
MyDatasource_DataRef.edml file, and MyDatasource Variable command files to implement a dialog box for users to
enter the name of a specific variable. The MyDatasource example is based on the implementation of the Cookie
Variable data source and the URL Variable data source. The files for these data sources reside in the
Configuration/DataSources/ColdFusion folder.
You create this data source by creating a definition file, an EDML file, a JavaScript file, and supporting command files;
then you test the new data source.
Creating the data source definition file
The data source definition file tells Dreamweaver the name of the data source as it will appear in the Bindings Plus (+)
menu and also tells Dreamweaver where to find the supporting JavaScript files for the data source implementation.
When a user clicks on the Bindings Plus (+) menu, Dreamweaver searches the DataSources folder for the current
server model to gather all available data sources defined in the folder’s HTML (HTM) files. So, to make a new data
source available to the user, you need to create a data source definition file that simply provides the name of the data
source using the
title tag and the location of all supporting JavaScript files using the script tag.
In addition, several supporting files are necessary for implementing this data source. In general, you might not need
to use the functions in these supporting files, but they are often useful (and necessary in this example). For example,
the dwscriptsServer.js file contains the
dwscripts.stripCFOutputTags() function used in the implementation of
this data source. And, using the DataSourceClass.js file, you create an instance of the DataSource class to use as the
return value of the
findDynamicSources() function.
1 Create a new blank file.
2 Enter the following:
<HTML>
<HEAD>
<TITLE>MyDatasource</TITLE>
<SCRIPT SRC="../../Shared/Common/Scripts/dwscripts.js"></SCRIPT>
<SCRIPT SRC="../../Shared/Common/Scripts/dwscriptsServer.js"></SCRIPT>
<SCRIPT SRC="../../Shared/Common/Scripts/DataSourceClass.js"></SCRIPT>
<SCRIPT SRC="MyDatasource.js"></SCRIPT>
</HEAD>
<body></body>
</HTML>
3 Save the file as MyDatasource.htm in the Configuration/DataSources/ColdFusion folder.
Creating the EDML file
The EDML file defines the code that Dreamweaver inserts into the document to represent the data source value. (For
more information about EDML files, see
“Server behaviors” on page 246). When a user adds a particular value from a
data source to a document, Dreamweaver inserts the code that will translate into the actual value at runtime. The
participant EDML file defines the code for the document (for more information, see
“Participant EDML files” on
page 265).

293
EXTENDING DREAMWEAVER
Data sources
Last updated 6/15/2011
For the MyDatasource Variable, you want Dreamweaver to insert the ColdFusion code
<cfoutput>#MyXML.variable#</cfoutput> where variable is the value the user wants from the data source.
1 Create a new blank file.
2 Enter the following:
<participant>
<quickSearch><![CDATA[#]]></quickSearch>
<insertText location="replaceSelection"><![CDATA[<cfoutput>#MyDatasource.
@@bindingName@@#</cfoutput>]]></insertText>
<searchPatterns whereToSearch="tag+cfoutput">
<searchPattern paramNames="sourceName,bindingName"><![CDATA[/#(?:\s*\w+\s*\()?
(MyDatasource)\.(\w+)\b[^#]*#/i]]></searchPattern>
</searchPatterns>
</participant>
3 Save the file as MyDatasource_DataRef.edml in the Configuration/DataSources/ColdFusion folder.
Creating the JavaScript file that implements the data sources API functions
After you have defined the name of the data source, the name of the supporting script files, and the code for the
working Dreamweaver document, you need to specify the JavaScript functions for Dreamweaver to provide the user
with the ability to add, insert, and delete the necessary code into a document.
Based on the construction of the Cookie Variable data source, you can implement the MyXML data source, as shown
in the following example. (The
MyDatasource_Variable command used in the addDynamicSource() function is
defined in
“Creating the supporting command files for user input” on page 295.)
1 Create a new blank file.
2 Enter the following:
//************** GLOBALS VARS *****************
var MyDatasource_FILENAME = "REQ_D.gif";
var DATASOURCELEAF_FILENAME = "DSL_D.gif";
//****************** API **********************
function addDynamicSource()
{
MM.retVal = "";
MM.MyDatasourceContents = "";
dw.popupCommand("MyDatasource_Variable");
if (MM.retVal == "OK")
{
var theResponse = MM.MyDatasourceContents;
if (theResponse.length)
{
var siteURL = dw.getSiteRoot();
if (siteURL.length)
{
dwscripts.addListValueToNote(siteURL, "MyDatasource", theResponse);
}
else
{
alert(MM.MSG_DefineSite);
}
}
else

294
EXTENDING DREAMWEAVER
Data sources
Last updated 6/15/2011
{
alert(MM.MSG_DefineMyDatasource);
}
}
}
function findDynamicSources()
{
var retList = new Array();
var siteURL = dw.getSiteRoot()
if (siteURL.length)
{
var bindingsArray = dwscripts.getListValuesFromNote(siteURL, "MyDatasource");
if (bindingsArray.length > 0)
{
// Here you create an instance of the DataSource class as defined in the
// DataSourceClass.js file to store the return values.
retList.push(new DataSource("MyDatasource",
MyDatasource_FILENAME,
false,
"MyDatasource.htm"))
}
}
return retList;
}
function generateDynamicSourceBindings(sourceName)
{
var retVal = new Array();
var siteURL = dw.getSiteRoot();
// For localized object name...
if (sourceName != "MyDatasource")
{
sourceName = "MyDatasource";
}
if (siteURL.length)
{
var bindingsArray = dwscripts.getListValuesFromNote(siteURL, sourceName);
retVal = getDataSourceBindingList(bindingsArray,
DATASOURCELEAF_FILENAME,
true,
"MyDatasource.htm");
}
return retVal;
}
function generateDynamicDataRef(sourceName, bindingName, dropObject)
{

295
EXTENDING DREAMWEAVER
Data sources
Last updated 6/15/2011
var paramObj = new Object();
paramObj.bindingName = bindingName;
var retStr = extPart.getInsertString("", "MyDatasource_DataRef", paramObj);
// We need to strip the cfoutput tags if we are inserting into a CFOUTPUT tag
// or binding to the attributes of a ColdFusion tag. So, we use the
// dwscripts.canStripCfOutputTags() function from dwscriptsServer.js
if (dwscripts.canStripCfOutputTags(dropObject, true))
{
retStr = dwscripts.stripCFOutputTags(retStr, true);
}
return retStr;
}
function inspectDynamicDataRef(expression)
{
var retArray = new Array();
if(expression.length)
{
var params = extPart.findInString("MyDatasource_DataRef", expression);
if (params)
{
retArray[0] = params.sourceName;
retArray[1] = params.bindingName;
}
}
return retArray;
}
function deleteDynamicSource(sourceName, bindingName)
{
var siteURL = dw.getSiteRoot();
if (siteURL.length)
{
//For localized object name
if (sourceName != "MyDatasource")
{
sourceName = "MyDatasource";
}
dwscripts.deleteListValueFromNote(siteURL, sourceName, bindingName);
}
}
3 Save the file as MyDatasource.js in the Configuration/DataSources/ColdFusion folder.
Creating the supporting command files for user input
The addDynamicSource() function contains the command dw.popupCommand("MyDatasource_Variable"),
which opens a dialog box for the user to enter a specific variable name. However, you must create the dialog box for
MyDatasource Variable.

296
EXTENDING DREAMWEAVER
Data sources
Last updated 6/15/2011
To provide a dialog box for the user, create a set of command files: a command definition file in HTML and a
command implementation file in JavaScript (for more information about command files, see
“How commands work”
on page 131).
The command definition file tells Dreamweaver the location of the supporting implementation JavaScript files. The
definition file also tells the form for the dialog box that the user sees. The supporting JavaScript file determines the
buttons for the dialog box and how to assign the user input from the dialog box.
Create the command definition file
1 Create a new blank file.
2 Enter the following:
<!DOCTYPE HTML SYSTEM "-//Adobe//DWExtension layout-engine 10.0//dialog">
<html>
<head>
<title>MyDatasource Variable</title>
<script src="MyDatasource_Variable.js"></script>
<SCRIPT SRC="../Shared/MM/Scripts/CMN/displayHelp.js"></SCRIPT>
<SCRIPT SRC="../Shared/MM/Scripts/CMN/string.js"></SCRIPT>
<link href="../fields.css" rel="stylesheet" type="text/css">
</head>
<body>
<form>
<div ALIGN="center">
<table border="0" cellpadding="2" cellspacing="4">
<tr>
<td align="right" valign="baseline" nowrap>Name:</td>
<td valign="baseline" nowrap>
<input name="theName" type="text" class="medTField">
</td>
</tr>
</table>
</div>
</form>
</body>
</html>
3 Save the file as MyDatasource_Variable.htm in the Configuration/Commands folder.
Note: The file MyDatasource_Variable.js is the implementation file that you create in the next procedure.
Create the supporting JavaScript file
1 Create a new blank file.
2 Enter the following:
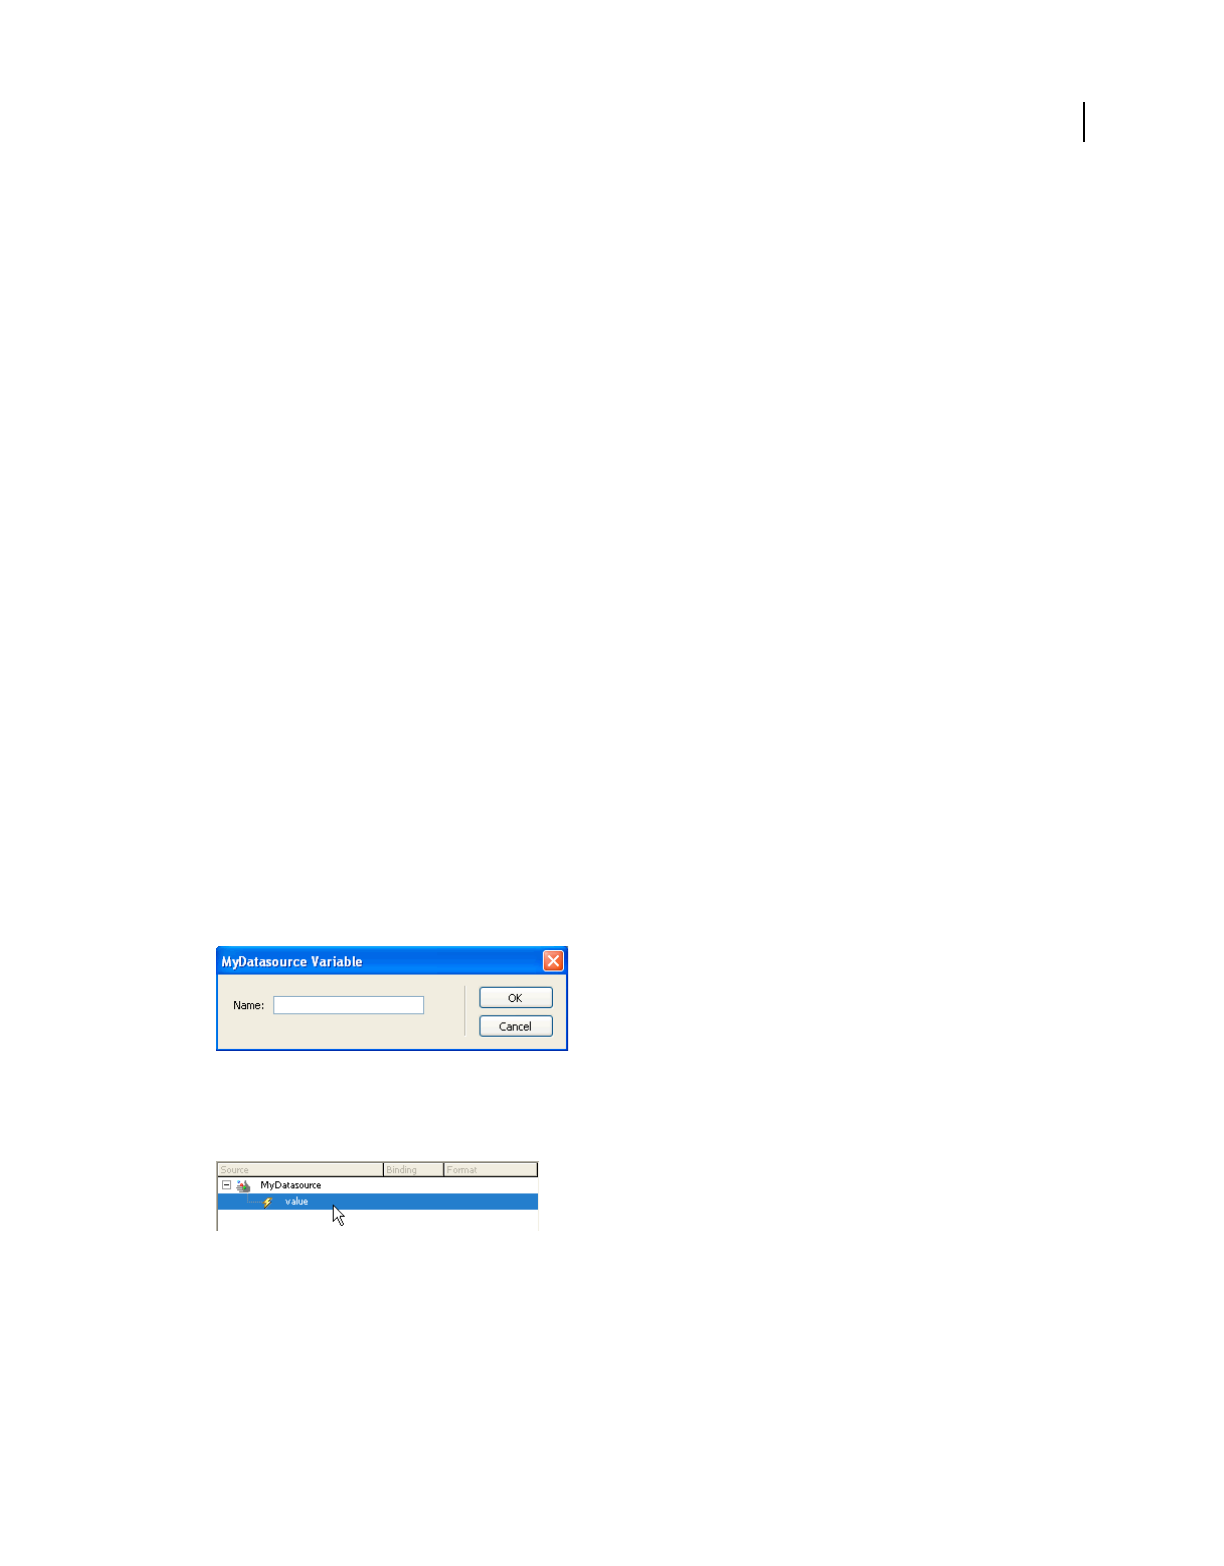
297
EXTENDING DREAMWEAVER
Data sources
Last updated 6/15/2011
//******************* API **********************
function commandButtons(){
return new Array(MM.BTN_OK,"okClicked()",MM.BTN_Cancel,"window.close()");
}
//***************** LOCAL FUNCTIONS******************
function okClicked(){
var nameObj = document.forms[0].theName;
if (nameObj.value) {
if (IsValidVarName(nameObj.value)) {
MM.MyDatasourceContents = nameObj.value;
MM.retVal = "OK";
window.close();
} else {
alert(nameObj.value + " " + MM.MSG_InvalidParamName);
}
} else {
alert(MM.MSG_NoName);
}
}
3 Save the file as MyDatasource_Variable.js in the Configuration/Commands folder.
Test the new data source
You can now open Dreamweaver (or restart it if you already have it open), and open a ColdFusion file or create a new one.
1 With the pointer in the document, click on the Bindings Plus (+) menu to see all the available data sources.
MyDatasource should appear at the bottom of the list.
2 Click the MyDatasource data source option, and the MyDatasource Variable dialog box you created appears:
3 Enter a value in the dialog box and click OK.
The Bindings panel displays the data source in a tree with the variable from the dialog box under the data source name:

298
EXTENDING DREAMWEAVER
Data sources
Last updated 6/15/2011
4 Drag the variable to your document, and Dreamweaver inserts the appropriate code from the EDML file:
The data sources API functions
The functions in the data sources API let you find, add, edit, and delete data sources and also generate and inspect
dynamic data objects.
addDynamicSource()
Availability
Dreamweaver UltraDev 1.
Description
This function adds a dynamic data source. Because there is one implementation of this function in each data source
file, Dreamweaver calls the appropriate implementation of the
addDynamicSource() function when you select a data
source from the Plus (+) menu.
For example, for recordsets or commands, Dreamweaver calls the
dw.serverBehaviorInspector.popupServerBehavior() function, which inserts a new server behavior into the
document. For request, session, and application variables, Dreamweaver displays an HTML/JavaScript dialog box to
collect the name of the variable; the behavior stores the variable name for future use.
After the addDynamicSource() function returns, Dreamweaver erases the contents of the data source tree and calls
the
findDynamicSources() and generateDynamicSourceBindings() functions to repopulate the data source tree.
Returns
Dreamweaver expects nothing.
deleteDynamicSource()
Availability
Dreamweaver UltraDev 1.
Description
Dreamweaver calls this function when a user selects a data source in the tree and clicks the Minus (-) button.

299
EXTENDING DREAMWEAVER
Data sources
Last updated 6/15/2011
For example, in Dreamweaver, if the selection is a recordset or command, the deleteDynamicSource() function calls
the
dw.serverBehaviorInspector.deleteServerBehavior() function. If the selection is a request, session, or
application variable, the function remembers that the variable was deleted and does not continue to display it. After
the
deleteDynamicSource() function returns, Dreamweaver erases the contents of the data source tree and calls the
findDynamicSources() and generateDynamicSourceBindings() functions to get a new list of all the data sources
for the user’s document.
Arguments
sourceName, bindingName
• The sourceName argument is the name of the top-level node to which the child node is associated.
• The bindingName argument is the name of the child node.
Returns
Dreamweaver expects nothing.
displayHelp()
Description
If this function is defined, a Help button appears below the OK and Cancel buttons in the dialog box. This function is
called when the user clicks the Help button.
Arguments
None.
Returns
Dreamweaver expects nothing.
Example
// The following instance of displayHelp() opens
// a file (in a browser) that explains how to use
// the extension.
function displayHelp(){
var myHelpFile = dw.getConfigurationPath() +
'/ExtensionsHelp/superDuperHelp.htm';
dw.browseDocument(myHelpFile);
}
editDynamicSource()
Availability
Dreamweaver MX.
Description
This function is called when the user double-clicks a data source name in the Bindings panel to edit the data source.
You can implement this function to handle user edits in the tree. Otherwise, the server behavior that matches the data
source is automatically invoked. The extension developer can use this function to override the default implementation
of server behaviors and provide a custom handler.

300
EXTENDING DREAMWEAVER
Data sources
Last updated 6/15/2011
Arguments
sourceName, bindingName
• The sourceName argument is the name of the top-level node to which the child node is associated.
• The bindingName argument is the name of the child node.
Returns
Dreamweaver expects a Boolean value: true if the function has handled the edit; false otherwise.
findDynamicSources()
Availability
Dreamweaver UltraDev 1.
Description
This function returns the top-level nodes from the data source tree that appears in the Dynamic Data or Dynamic Text
dialog box or in the Bindings panel. Each data source file has an implementation of the
findDynamicSources()
function. When Dreamweaver refreshes the tree, Dreamweaver reads through all the files in the DataSources folder
and calls the
findDynamicSources() function in each file.
Returns
Dreamweaver expects an array of JavaScript objects where each object can have as many as five properties, which are
described in the following list:
• The title property is the label string that appears to the right of the icon for each parent node. The title property
is always required.
• The imageFile property is the path of a file that contains the icon (a GIF image), which represents the parent node
in the tree control in the Dynamic Data or Dynamic Text dialog box or in the Bindings panel. This property is
required.
• The allowDelete property is optional. If this property is set to false, when the user clicks this node in the
Bindings panel, the Minus (-) button is disabled. If this property is set to
true, the Minus (-) button is enabled. If
the property is not defined, the default is
true.
• The dataSource property is the simple name of the file in which the findDynamicSources() function is defined.
For example, the
findDynamicSources() function in the Session.htm file, which is located in the
Configuration/DataSources/ASP_Js folder, sets the
dataSource property to session.htm. This property is
required.
• The name property is the name of the server behavior that is associated with the data source, if one exists. Some data
sources, such as recordsets, are associated with server behaviors. When you create a recordset and name it
rsAuthors, the name attribute must equal rsAuthors. The name property is always defined, but can be an empty
string (
"") if no server behavior is associated with the data source (such as a session variable).
Note: A JavaScript class that defines these properties exists in the DataSourceClass.js file, which is located in the
Configuration/Shared/Common/Scripts folder.

301
EXTENDING DREAMWEAVER
Data sources
Last updated 6/15/2011
generateDynamicDataRef()
Availability
Dreamweaver UltraDev 1.
Description
This function generates the dynamic data object for a child node.
Arguments
sourceName, bindingName
• The sourceName argument is the name of the top-level node that is associated with the child node.
• The bindingName argument is the name of the child node from which you want to generate a dynamic data object.
Returns
Dreamweaver expects a string, which can be passed to the formatDynamicDataRef() function to format it before
inserting it in a user’s document.
generateDynamicSourceBindings()
Availability
Dreamweaver UltraDev 1.
Description
This function returns the children of a top-level node.
Arguments
sourceName
• The sourceName argument is the name of the top-level node whose children you want to return.
Returns
Dreamweaver expects an array of JavaScript objects where each object can have as many as four properties, which are
described in the following list:
• The title property is the label string that appears on the right of the icon for each parent node. This property is
required.
• The allowDelete property is optional. If this property is set to the value false, when the user clicks this node in
the Bindings panel, the Minus (-) button is disabled. If this property is set to the value
true, the Minus (-) button
is enabled. If the property is not defined, the default is the value
true.
• The dataSource property is the simple name of the file in which the findDynamicSources() function is defined.
For example, the
findDynamicSources() function in the Session.htm file, which is located in the
Configuration/DataSources/ASP_Js folder, sets the
dataSource property to session.htm. This property is
required.

302
EXTENDING DREAMWEAVER
Data sources
Last updated 6/15/2011
• The name property is the name of the server behavior that is associated with the data source, if one exists. It is a
required property. Some data sources, such as recordsets, are associated with server behaviors. When you create a
recordset and name it
rsAuthors, the name property must equal rsAuthors. Other data sources, such as session
variables, do not have a corresponding server behavior. Their name property must be the empty string (
"").
Note: A JavaScript class that defines these properties exists in the DataSourceClass.js file, which is located in the
Configuration/Shared/Common/Scripts folder.
inspectDynamicDataRef()
Availability
Dreamweaver UltraDev 1.
Description
This function determines the corresponding node in the data source tree from a dynamic data object. The
inspectDynamicDataRef() function takes the string that Dreamweaver passes in and compares it to the string that
generateDynamicDataRef() returns for each node in the tree. If a match is found, the inspectDynamicDataRef()
function indicates which node in the tree matches the passed-in string. The function identifies the node by using an
array that contains two elements. The first element is the name of the parent node, and the second element is the name
of the child node. If no match is found, the
inspectDynamicDataRef() function returns an empty array.
Each implementation of the inspectDynamicDataRef() function checks only for matches of its own object type. For
example, the recordset implementation of the
inspectDynamicDataRef() function finds a match only if the passed-
in string matches a recordset node in the tree.
Arguments
string
• The string argument is the dynamic data object.
Returns
Dreamweaver expects an array of two elements (parent name and child name) for the matched node; it returns a null
value if no matches are found.

303
Last updated 6/15/2011
Chapter 19: Server formats
“Data sources” on page 290 discusses how Adobe Dreamweaver inserts dynamic data into a user document by adding
a server expression at the appropriate location. When a visitor requests the document from the web server, that server
expression is converted to a value from a database, the contents of a request variable, or some other dynamic value.
The Dreamweaver server formats let you format how this dynamic value is presented to the visitor.
How data formatting works
Dreamweaver users can format data with built-in formats. They can also create new formats that are based on built-in
format types, or create new formats that are based on custom format types.
The user can format dynamic data in several ways. To format the data before inserting it into an HTML document, use
the Format menu. It is in the Dynamic Data or the Dynamic Text dialog box or in the Bindings panel. To create a
format, select the Edit Format List command from the Format menu and select a format type from the Plus (+) menu.
The Plus (+) menu contains a list of format types. Format types are basic format categories, such as Currency,
DateTime, or AlphaCase. Format types collect all the common parameters for a category of format, letting you
streamline the work to create a format.
An example is to create a currency format. Currency formatting consists of converting a number to a string, inserting
commas and decimal points, and inserting a currency symbol, such as a dollar ($) sign. The Currency format data type
collects all the common parameters and prompts you for the required values.
The server format API discusses the API that formats the dynamic data that the functions described in “Data sources”
on page 290 return. The functions that are described in both topics work together to format dynamic data.
All format files reside in the Configuration/ServerFormats/currentServerModel folder. Each subfolder contains one
XML file and multiple HTML files.
The Formats.xml file describes all the choices in the Format menu. Dreamweaver automatically adds the Edit Format
List and None options.
The folder also contains one HTML file for each currently installed format type, which includes AlphaCase,
Currency, DateTime, Math, Number, Percent, Simple, and Trim.
Note: Currency format is not available for PHP server models.
The Formats.xml file
The Formats.xml file contains one format tag for each item in the Format menu. Each format tag contains the
following mandatory attributes:
• The file=fileName attribute is the HTML file for this format type, such as "Currency".
• The title=string attribute is the string that appears in the Format menu, such as "Currency - default".

304
EXTENDING DREAMWEAVER
Server formats
Last updated 6/15/2011
• The expression=regexp attribute is a regular expression that matches the dynamic data objects that use this
format. The expression determines what format is currently applied to a dynamic data object. For example, the
expression for the
"Currency - default" format is "<%\s*=\s*FormatCurrency\(.*, -1, -2, -2,-
2\)\s*%>|<%\s*=\s*DoCurrency\(.*, -1, -2, -2, -2\)\s*%>". The value of the expression attribute
must be unique among all
format tags in the file; it must be specific enough to guarantee that only instances of this
format match the expression.
• The visibility=[hidden | visible] attribute indicates whether the value appears in the Format menu. If the
value of the
visibility attribute is hidden, the format does not appear in the Format menu.
The format tag can contain additional, arbitrarily named attributes.
Some data formatting functions require an argument, format, which is a JavaScript object. This object is the node that
corresponds to the
format tag in the Formats.xml file. The object has a JavaScript property for each attribute of the
corresponding
format tag.
The following example shows the format tag for the "Currency - default" string:
<format file="Currency" title="Currency - default" ¬
expression="<%\s*=\s*FormatCurrency\(.*, -1, -2, -2, -2\)\s*%>|¬
<%\s*=\s*DoCurrency\(.*, -1, -2, -2, -2\)\s*%>"
NumDigitsAfterDecimal=-1 IncludeLeadingDigit=-2 ¬
UseParensForNegativeNumbers=-2 GroupDigits=-2/>
The format type for this format is Currency. The "Currency - default" string appears on the Format menu. The
expression
<%\s*=\s*FormatCurrency\(.*, -1, -2, -2,-2\)\s*%>|<%\s*=\s*DoCurrency\(.*, -1, -2, -
2, -2\)\s*%> finds occurrences of this format in the user’s document.
The NumDigitsAfterDecimal, IncludeLeadingDigit, UseParensForNegativeNumbers, and GroupDigits
parameters are for the
Currency format type and are not required. These parameters appear in the Parameters dialog
box for the
Currency format type. The Parameters dialog box appears when a user selects the Currency format type
from the Plus (+) menu of the Edit Format List dialog box. The values that are specified for these parameters define
the new format.
The Edit Format List Plus (+) menu
If you do not want a file in the ServerFormats folder to appear in the Edit Format List Plus (+) menu, add the following
statement as the first line of the HTML file:
<!-- MENU-LOCATION=NONE -->
To determine the contents of the menu, Dreamweaver first searches for a ServerFormats.xml file in the same folder as
the data formats (for example, in Configuration/ServerFormats/ASP/). The ServerFormats.xml file describes the
contents of the Edit Format List Plus (+) menu, and it contains references to the HTML files that it lists in the menu.
Dreamweaver checks each referenced HTML file for a title tag. If the file contains a title tag, the content of the title
tag appears in the menu. If the file does not contain a title tag, the filename is used in the menu.
After Dreamweaver finishes searching for the file, or if the file does not exist, Dreamweaver scans the rest of the folder
to find other items that should appear in the menu. If Dreamweaver finds files in the main folder that aren’t already in
the menu, it adds them. If subfolders contain files that aren’t already in the menu, Dreamweaver creates a submenu
and adds those files to it.

305
EXTENDING DREAMWEAVER
Server formats
Last updated 6/15/2011
Scenarios in which the data formatting functions are
called
The data formatting functions are called in the following scenarios:
• In the Dynamic Data or the Dynamic Text dialog box, the user selects a node from the data source tree and a format
from the Format menu. When the user selects the format, Dreamweaver calls the
generateDynamicDataRef()
function and passes the return value from the
generateDynamicDataRef() function to the
formatDynamicDataRef() function. The return value from the formatDynamicDataRef() function appears in
the Code setting of the dialog box. After the user clicks OK, the string of code is inserted into the user’s document.
Next, Dreamweaver calls the
applyFormat() function to insert a function declaration. For more information, see
“generateDynamicDataRef()” on page 301. A similar process occurs when the user works with the Bindings panel.
• If the user changes the format or deletes the dynamic data item, the deleteFormat() function is called. The
deleteFormat() function removes the support scripts from the document.
• When the user clicks the Plus (+) button in the Edit Format List dialog box, Dreamweaver displays a menu that
contains all the format types for the specified server model. Each format type corresponds to a file in the
Configuration/ServerFormats/currentServerModel folder.
If the user selects a format from the Plus (+) menu that requires a user-specified parameter, Dreamweaver executes
the
onload handler on the body tag and displays the Parameters dialog box, which shows the parameters for the
format type. In this dialog box, when the user selects parameters for the format and clicks OK, Dreamweaver calls
the
applyFormatDefinition() function.
If the selected format does not need to display a Parameters dialog box, Dreamweaver calls the
applyFormatDefinition() function when the user selects the format type from the Plus (+) menu.
• Later, if the user edits the format by selecting it in the Edit Format List dialog box and clicking the Edit button,
Dreamweaver calls the
inspectFormatDefinition() function before the Parameters dialog box appears, so the
form controls can be initialized to the correct values.
The server formats API functions
The server formats API consists of the following data formatting functions.
applyFormat()
Availability
Dreamweaver UltraDev 1.
Description
This function can edit a user’s document by adding a format function declaration to it. When a user selects a format
from the Format text field in the Dynamic Data or the Dynamic Text dialog box or in the Bindings panel,
Dreamweaver makes two changes to the user’s document: It adds the appropriate format function before the HTML
tag (if it’s not already there), and it changes the dynamic data object to call the appropriate format function.
Dreamweaver adds the function declaration by calling the applyFormat() JavaScript function in the data format file.
It changes the dynamic data object by calling the
formatDynamicDataRef() function.

306
EXTENDING DREAMWEAVER
Server formats
Last updated 6/15/2011
The applyFormat() function should use the DOM to add function declarations to the top of the user’s document. For
example, if the user selects Currency - Default, the function adds the
Currency function declaration.
Arguments
format
• The format argument is a JavaScript object that describes the format to apply. The JavaScript object is the node that
corresponds to the
format tag in the Formats.xml file. The object has a JavaScript property for each attribute of the
corresponding
format tag.
Returns
Dreamweaver expects nothing.
applyFormatDefinition()
Availability
Dreamweaver UltraDev 1.
Description
Commits the changes to a format that was created using the Edit Format dialog box.
Users can create, edit, or delete formats with the Edit Format List dialog box. This function is called to commit any
modifications that are made to a format. It can also set other, arbitrarily named properties on the object. Each property
is stored as an attribute of the
format tag in the Formats.xml file.
Arguments
format
• The format argument corresponds to the JavaScript format object. The function must set the expression property
of the JavaScript object to be the regular expression for the format. The function can also set other, arbitrarily
named properties of the object. Each property is stored as an attribute of the
format tag.
Returns
Dreamweaver expects the format object, if the function completes successfully. If an error occurs, the function returns
an error string. If it returns an empty string, the form is closed, but the new format is not created, which is the same as
a Cancel operation.
deleteFormat()
Availability
Dreamweaver UltraDev 1.
Description
Removes the format function declaration from the top of the user’s document.
When the user changes the format of a dynamic data object (in the Dynamic Data or the Dynamic Text dialog box or
in the Bindings panel) or deletes a formatted dynamic data object, Dreamweaver removes the function declaration
from the top of the document and also removes the function call from the dynamic data object by calling the
deleteFormat() function.

307
EXTENDING DREAMWEAVER
Server formats
Last updated 6/15/2011
Use the DOM with the deleteFormat() function to remove the function declaration from the top of the current
document.
Arguments
format
The format argument is a JavaScript object that describes the format to remove. The JavaScript object is the node that
corresponds to the
format tag in the Formats.xml file.
Returns
Dreamweaver expects nothing.
formatDynamicDataRef()
Availability
Dreamweaver UltraDev 1.
Description
Adds the format function call to the dynamic data object. When a user selects a format from the Format text box in
the Dynamic Data or the Dynamic Text dialog box or in the Bindings panel, Dreamweaver makes two changes to the
user’s document: It adds the appropriate format function before the HTML tag (if it’s not already there), and it changes
the dynamic data object to call the appropriate format function.
Dreamweaver adds the function declaration by calling the applyFormat() JavaScript function in the data format file.
It changes the dynamic data object by calling the
formatDynamicDataRef() function.
The formatDynamicDataRef() function is called when the user selects a format from the Format text box in the
Dynamic Data or the Dynamic Text dialog box or in the Bindings panel. It does not edit the user’s document.
Arguments
dynamicDataObject, format
• The dynamicDataObject argument is a string that contains the dynamic data object.
• The format argument is a JavaScript object that describes the format to apply. The JavaScript object is the node that
corresponds to the
format tag in the Formats.xml file. The object has a JavaScript property for each attribute of the
corresponding
format tag.
Returns
Dreamweaver expects the new value for the dynamic data object.
If an error occurs, the function displays an alert message under certain conditions. If the function returns an empty
string, the Format text box is set to
None.
inspectFormatDefinition()
Availability
Dreamweaver UltraDev 1.

308
EXTENDING DREAMWEAVER
Server formats
Last updated 6/15/2011
Description
Initializes form controls when a user edits a format in the Edit Format List dialog box.
Arguments
format
The format argument is a JavaScript object that describes the format to apply. The JavaScript object is the node that
corresponds to the
format tag in the Formats.xml file. The object has a JavaScript property for each attribute of the
corresponding
format tag.
Returns
Dreamweaver expects nothing.

309
Last updated 6/15/2011
Chapter 20: Components
Adobe Dreamweaver supports the creation of many of the most popular types of components. In addition,
Dreamweaver lets you extend the types of components that appear in the Components panel.
About component basics
Programmers use various strategies to encapsulate their work. You can think of encapsulation as creating an entity that
exists in a virtual black box. To use it, you need not know how it works. But, knowing what information it requires to
do its job and what information it will result in after its job is complete is a must. For example, a programmer creates
a program that gets information from an employee database. Anyone, including other programs, can then use that
program to query that database. Thus, the program is reusable.
Experience shows that well-organized programs that use encapsulation are easier to maintain, enhance, and reuse.
Different technologies offer programmers different ways to accomplish this encapsulation, and different names
describe these strategies: functions, modules, and others. Dreamweaver uses the term component for some of the more
popular and modern encapsulation strategies such as Adobe ColdFusion components (CFCs). So, when users build
web applications in Dreamweaver, the Components panel assists them in using CFCs.
Components from recent technologies (such as web services, JavaBeans, or CFCs) can describe themselves. Usually,
information about the component is embedded in the files that constitute the component. The ability of a component
to publish or share this information is called introspection. So, a program like Dreamweaver can ask a component for
a list of the functions it exposes. (Exposed functions are those functions that can be loaded from another program).
Depending on the technology in use, a component can reveal other information about itself.
Extending the Components panel
To use a component strategy that is not represented in the current Components panel, extend the logic of the
Components panel. This way, the panel can handle new kinds of components.
To add a new component to the Dreamweaver Components panel, locate the available components (in the
environment of the user). Then, request descriptions from each component (or parse them if they are written using
ASCII files).
The precise way that the location of components and how component details are retrieved varies among technologies.
Additionally, it can vary based on the server model (ASP.NET, JSP/J2EE, ColdFusion, or others). So, the JavaScript
you write to extend the Components panel depends on the component technology you want to add. The functions
described here are meant to assist you in getting information to appear in the Components panel. But, you yourself
must write much of the logic for locating components and introspecting them. It includes querying the internal
structure of the component and making its fields, methods, and properties available through Dreamweaver.
Finally, server models such as ASP.NET, JSP/J2EE, or ColdFusion tend to support some, but not all, component types.
For example, ASP.NET supports web services but not JavaBeans. Adobe ColdFusion also supports web services and
CFCs. When you add a new component type to the Components panel, it must be server-model specific. For example,
if a Dreamweaver user is working on a ColdFusion site, CF Components appear in the pop-up menu in the
Components panel.

310
EXTENDING DREAMWEAVER
Components
Last updated 6/15/2011
In some cases, writing some JavaScript code that calls certain component-related function, is a must for altering files.
Customizing the Components panel
The Dreamweaver Components panel lets users load and work with components. It lists all the available component
types that are compatible with each enabled server model. For example, CFCs can work only on an Adobe ColdFusion
page; they appear only in the Adobe ColdFusion server model within the Components panel.
Extensibility lets you add new component types to the panel. Follow several general steps when adding a new
component type to the Components panel:
1 Add the component to the list of available component types for the appropriate server models.
2 Add instructions for setting up the component in the Components panel or in a dialog box (depending on the
extension for which the steps are implemented). The instructions are also known as setup steps, and appear as
interactive numbered steps. Make sure that check marks appear next to any steps the user has completed.
3 List the components of the component type that exist either on the computer of the user or in the current site only.
4 Create a component when the user clicks the Plus (+) button in the Components panel.
In addition, you can enable the user to edit a component and delete a component.
Customizing Components panel files
The Configuration/Components folder has a subfolder for each implemented server model. Component files are
stored in the Configuration/Components/server-model/ComponentType folder. You can add other server models and
supporting server extensions (for more information, see
“Server models” on page 322 and “Server behaviors” on
page 246).
Create a custom component that can work in the Components panel
1 Create an HTML file that identifies the locations of supporting JavaScript and image files.
2 Write the JavaScript to enable the component.
3 Create or identify existing GIF image files to represent the component in the Components panel.
To make the component type appear in a tree control view, create the associated optional files and populate the tree
control.
You can set a component type to work at three levels: individual web page, set of web pages, or an entire site. Your
JavaScript code must include the logic for component persistence—for saving itself between sessions and reloading at
the start of a new session.
Add a new lightweight directory access protocol (LDAP) service component
1 Using existing component type files as a model (such as the files in the application folder
Configuration/Components/Common/WebServices), create all the required files, plus the desired optional files, to
display the new component type in the Dreamweaver Components panel, as shown in the following table:

311
EXTENDING DREAMWEAVER
Components
Last updated 6/15/2011
Note: Keep the same prefix throughout all the files that correspond to one component so that each file and its
corresponding component can be identified easily.
2 Write the JavaScript code to implement the new server component.
The extension file (HTM) defines the locations of the JavaScript code in the SCRIPT tag. These JavaScript files can
reside in the Shared folder, in the same folder as the extension file, or in the Common folder for code that applies to
multiple server models.
For example, the WebServices.htm file in the Configuration/Components/Common/WebServices/ folder contains the
line:
<SCRIPT SRC="../../Common/WebServices/WebServicesCommon.js"></SCRIPT>
For more information on the available Component API functions, see “Components panel API functions” on
page 312.
When adding a new service, you might want to use the Components panel to browse meta information so that the
information is readily available as you create the extension. Dreamweaver can browse added components and display
nodes in the component tree. The Components panel provides drag-and-drop support and keyboard support in Code view.
Properties of tree control
Use the ComponentRec property to populate a Components panel tree control, so that it appears within the
Components panel in the proper location. Every node in a tree control must have the following properties:
Filename Description Required/Optional
*.htm The extension file that identifies other supporting JavaScript and GIF files. Required
*.js The extension file that implements the Component API callback. Required
*.gif The image that appears in the Components pop-up menu. Required
*Menus.xml The repository for metadata that organizes the Components panel structure.
Although the common WebServices component does not use this file, you can
refer to the file WebServicesMenus.xml in the application folder
Components/ColdFusion/WebServices as an example.
Optional
*.gif Toolbar images, which can be enabled or disabled, as shown in the following
example:
ToolBarImageUp.gif ToolBarImageDown.gif
ToolBarImageDisabled.gif
or, tree node images.
Optional
Property name Description Required/Optional
name Name of the tree node item Required
image Icon of the tree node item. If it is not specified, a default icon is used. Optional
hasChildren Responds to clicks on the Plus (+) and Minus (-) buttons in the tree
control by loading children. You can work with a tree that is not
prepopulated.
Required
toolTipText Tooltip text of the tree node item Optional
isCodeViewDraggable Determines whether the item can be dragged and dropped into the
Code view.
Optional
isDesignViewDraggable Determines whether the item can be dragged and dropped into the
Design view.
Optional

312
EXTENDING DREAMWEAVER
Components
Last updated 6/15/2011
For example, the following WebServicesClass node has web methods as its children:
this.name = "TrafficLocatorWebService";
this.image = "Components/Common/WebServices/WebServices.gif";
this.hasChildren = true;
this.toolTipText = "TrafficLocatorWebService";
this.isCodeViewDraggable = true;
// the following allows of enabling/disabling of the button that appears
// above the Component Tree
this.allowDelete = true;
this.isDesignViewDraggable = false;
Components panel API functions
This section describes the API functions for populating the Components panel.
getComponentChildren()
Availability
Dreamweaver MX.
Description
This function returns a list of child ComponentRec objects for the active parent ComponentRec object. To load the
root-level tree items, this function needs to read its metadata from its persistent store.
Arguments
{parentComponentRec}
The parentComponentRec argument is the componentRec object of the parent. If it is omitted, Dreamweaver expects
a list of
ComponentRec objects for the root node.
Returns
An array of ComponentRec objects.
Example
See function getComponentChildren(componentRec) in the WebServices.js file in the
Configuration/Components/Common/WebServices folder.
getContextMenuId()
Availability
Dreamweaver MX.
Description
Returns the context menu ID for the component type. Every component type can have a context menu associated with
it. The Context Menu pop-up menus are defined in the ComponentNameMenus.xml file, and they work the same way
as the menu.xml file. The menu string can be static or dynamic. Keyboard shortcuts (accelerator keys) are supported.

313
EXTENDING DREAMWEAVER
Components
Last updated 6/15/2011
Arguments
None.
Returns
A string defining the context menu ID.
Example
The following example sets the Options menu for the Components panel for CFCs associated with the Adobe
ColdFusion server model.The example also defines the keyboard shortcuts for the menu:
function getContextMenuId()
{
return "DWCFCsContext";
}
The DWWebServicesContext of the menu is defined in the file in the
Configuration/Components/ColdFusion/CFCs/CFCsMenus.xml as follows:
<menubar xmlns:MMString="http://www.macromedia.com/schemes/dat/string/" name=""
id="DWCFCsContext">
<menu MMString:name="Components/ColdFusion/CFCs/CFCsMenus_xml/DWContext_CFCs/menu/name"
id="DWContext_CFCs">
<menuitem
MMString:name="Components/ColdFusion/CFCs/CFCsMenus_xml/DWContext_CFCs_createNewCFC/menuitem
/name" domRequired="false" enabled="true" command="createCFC()"
id="DWContext_CFCs_createNewCFC" />
<menuitem
MMString:name="Components/ColdFusion/CFCs/CFCsMenus_xml/DWContext_CFCs_editCode/menuitem/nam
e" domRequired="false" enabled="canGetSelectedCFC()" command="editCFC();"
id="DWContext_CFCs_editCode" />
<separator/>
<menuitem
MMString:name="Components/ColdFusion/CFCs/CFCsMenus_xml/DWContext_CFCs_getDetails/menuitem/n
ame" domRequired="false" enabled="canGetDetails()" command="getDetails()"
id="DWContext_CFCs_getDetails" />
<menuitem
MMString:name="Components/ColdFusion/CFCs/CFCsMenus_xml/DWContext_CFCs_getDescription/menuit
em/name" domRequired="false" enabled="canGetSelectedCFC()" command="getDescription()"
id="DWContext_CFCs_getDescription" />
<separator/>
<menuitem
MMString:name="Components/ASP_NET_Csharp/Connections/ConnectionsMenus_xml/DWShortcuts_Server
Component_Insert/menuitem/name" domRequired="false" enabled="insertCFCEnabled();"
command="clickedInsertCFC();" id="DWShortcuts_ServerComponent_Insert" />
</menu>
</menubar>
getCodeViewDropCode()
Availability
Dreamweaver MX.

314
EXTENDING DREAMWEAVER
Components
Last updated 6/15/2011
Description
This function gets the code that is either dragged, cut, or copied into the Code view from the Components panel.
Arguments
componentRec
• The componentRec argument is an object.
Returns
The string that contains the code for the component.
Example
The following example identifies the code for an Adobe ColdFusion Component (CFC):
function getCodeVi e wDropCode(compone nt Rec )
{
var codeToDrop="";
if (componentRec)
{
if (componentRec.objectType == "Connection")
{
v ar connPart = new Participant("d at asource_tag");
var paramObj = new Obje ct( );
paramObj.datasource = componentRec.name;
codeToDrop = con nPart.getInsertString(paramObj, "aboveHTML");}
el se if ((componentRec.objectType == "Column")| |
(componentRec.objectType == "Paramete r "))
{
c odeToDrop = componentRec.dropcode;
}
e ls e{
codeToDrop = co mponentRec.name;
}
}
return codeToDrop;
}
getSetupSteps()
Availability
Dreamweaver MX.
Description
Dreamweaver calls this function if the setupStepsCompleted() function returns zero or a positive integer. This
function controls the server-side setup instructions, which can be implemented using extensions that use a modal
dialog box and extensions that use server components.
This function returns an array of the strings for Dreamweaver to display in either the Setup Steps dialog box or the
Components panel, depending on the extension type.
Arguments
None.

315
EXTENDING DREAMWEAVER
Components
Last updated 6/15/2011
Returns
An array of n+1 strings, where n is the number of steps, as described in the following list:
• The title that appears above the list of setup steps
• For each step, the text instructions, which can include any HTML markup that is legal inside a li tag
You can include links (a tags) in the list of steps by using the following form:
<a href="#" onMouseDown="handler">Blue Underlined Text</a>
The "handler" value can be replaced by any of the following strings or any JavaScript expression, such as
"
dw.browseDocument('http://www.adobe.com')":
• An "Event:SetCurSite" handler opens a dialog box to set the current site.
• An "Event:CreateSite" handler opens a dialog box to create a new site.
• An "Event:SetDocType" handler opens a dialog box to change the document type of the user’s document.
• An "Event:CreateConnection" handler opens a dialog box to create a new database connection.
• An "Event:SetRDSPassword" handler opens a dialog box to set the Remote Development Service (RDS) user
name and password (Adobe ColdFusion only).
• An "Event:CreateCFDataSource" handler opens the Adobe ColdFusion administrator in a browser.
Example
The following example sets four steps for Adobe ColdFusion components, and provides a hypertext link in the fourth
step so the user can enter the RDS user name and password:

316
EXTENDING DREAMWEAVER
Components
Last updated 6/15/2011
function getSetupSteps()
{
var doSDK = false;
dom = dw.getDocumentDOM();
if (dom && dom.serverModel)
{
var aServerModelName = dom.serverModel.getDisplayName();
}
else
{
var aServerModelName = site.getServerDisplayNameForSite();
}
if (aServerModelName.length)
{
if(aServerModelName != "ColdFusion")
{
if(needsSDKInstalled != null)
{
doSDK = needsSDKInstalled();
}
}
}
var someSteps = new Array();
someSteps.push(MM.MSG_WebService_InstructionsTitle);
someSteps.push(MM.MSG_Dynamic_InstructionsStep1);
someSteps.push(MM.MSG_Dynamic_InstructionsStep2);
if(doSDK == true)
{
someSteps.push(MM.MSG_WebService_InstructionsStep3);
}
someSteps.push(MM.MSG_WebService_InstructionsStep4);
return someSteps;
}
setupStepsCompleted()
Availability
Dreamweaver MX.
Description
Dreamweaver calls this function before the Components tab appears. Dreamweaver then calls the getSetupSteps()
function if the
setupStepsCompleted() function returns zero or a positive integer.
Arguments
None.
Returns
An integer that represents the number of setup steps the user has completed, as described in the following list:
• A value of either zero or a positive integer indicates the number of completed steps.
• A value of -1 indicates that all the necessary steps are complete, so the instruction list does not appear.

317
EXTENDING DREAMWEAVER
Components
Last updated 6/15/2011
handleDesignViewDrop()
Availability
Dreamweaver MX.
Description
Handles the drop operation when the user drags a table or view from the Databases panel or a component from the
Components panel to the Design view.
Arguments
componentRec
• The componentRec argument is an object that contains the following properties:
• The name property is the name of the tree node item.
• The image property is an optional icon for the tree node item. If omitted, Dreamweaver MX uses a default icon.
• The hasChildren property is a Boolean value that indicates whether the tree node item is expandable: if true,
Dreamweaver MX displays the Plus (+) and Minus (-) buttons for the tree node item; if
false, the item is not
expandable.
• The toolTipText property is optional tool tip text for the tree node item.
• The isCodeViewDraggable property is a Boolean value that indicates whether the tree node item can be dragged
and dropped into the Code view.
• The isDesignViewDraggable property is a Boolean value that indicates whether the tree node item can be dragged
and dropped into the Design view.
Returns
A Boolean value that indicates whether the drop operation was successful: true if successful; false otherwise.
Example
The following example determines if the component is a table or view, and then returns the appropriate bHandled
value:
function handleDesignViewDrop(componentRec)
{
var bHandled = false;
if (componentRec)
{
if ((componentRec.objectType == "Table")||
(componentRec.objectType == "View"))
{
alert("popup Recordset Server Behavior");
bHandled = true;
}
}
return bHandled;
}

318
EXTENDING DREAMWEAVER
Components
Last updated 6/15/2011
handleDoubleClick()
Availability
Dreamweaver MX.
Description
When the user double-clicks the node in the tree, the event handler is called to allow editing. This function is optional.
The function can return a
false value, which indicates that the event handler is not defined. In this case, double-
clicking causes the default behavior, which expands or collapses the tree nodes.
Arguments
componentRec
• The componentRec argument is an object that contains the following properties:
• The name property is the name of the tree node item.
• The image property is an optional icon for the tree node item. If this icon is omitted, Dreamweaver uses a default icon.
• The hasChildren property is a Boolean value that indicates whether the tree node item is expandable: if true,
Dreamweaver displays the Plus (+) and Minus (-) buttons for the tree node item; if
false, the item is not
expandable.
• The toolTipText property is an optional tooltip text for the tree node item.
• The isCodeViewDraggable property is a Boolean value that indicates whether the tree node item can be dragged
and dropped into Code view.
• The isDesignViewDraggable property is a Boolean value that indicates whether the tree node item can be dragged
and dropped into Design view.
Returns
Nothing.
Example
In the following example, the extension has a chance to handle a double-click on the tree node item; if it returns the
value
false, the default behavior is to expand/collapse the nodes.

319
EXTENDING DREAMWEAVER
Components
Last updated 6/15/2011
function handleDoubleClick(componentRec)
{
var selectedObj = dw.serverComponentsPalette.getSelectedNode();
if(dwscripts.IS_WIN)
{
if (selectedObj && selectedObj.wsRec && selectedObj.wsRec[ProxyGeneratorNamePropName])
{
if (selectedObj.objectType == "Root")
{
editWebService();
return true;
}
else if (selectedObj.objectType == "MissingProxyGen")
{
displayMissingProxyGenMessage(componentRec);
editWebService();
return true;
}
}
}
return false;
}
toolbarControls()
Availability
Dreamweaver MX.
Description
Every component type returns a list of toolBarButtonRec objects, which represents the toolbar icons, in left-to-right
order. Each
toolBarButtonRec object contains the following properties:
Property name Description
image Path to image file
disabledImage Optional; path to disabled image searches for the toolbar button
pressedImage Optional; path to pressed image searches for the toolbar button
toolTipText Tooltip for the toolbar button
toolStyle Left/right
320
EXTENDING DREAMWEAVER
Components
Last updated 6/15/2011
Arguments
None.
Returns
An array of toolbar buttons in left-to-right order.
Example
The following example assigns properties to the toolbar buttons:
function toolbarControls()
{
var toolBarBtnArray = new Array();
dom = dw.getDocumentDOM();
var plusButton = new ToolbarControlRec();
var aServerModelName = null;
if (dom && dom.serverModel)
{
aServerModelName = dom.serverModel.getDisplayName();
}
else
{
//look in the site for potential server model
aServerModelName = site.getServerDisplayNameForSite();
}
if (aServerModelName.length)
{
if(aServerModelName == "ColdFusion")
{
plusButton.image = PLUS_BUTTON_UP;
plusButton.pressedImage = PLUS_BUTTON_DOWN;
plusButton.disabledImage = PLUS_BUTTON_UP;
plusButton.toolStyle = "left";
plusButton.toolTipText = MM.MSG_WebServicesAddToolTipText;
plusButton.enabled = "dwscripts.IS_WIN";
plusButton.command = "invokeWebService()";
}
else
{
plusButton.image = PLUSDROPBUTTONUP;
enabled JavaScript code that returns a Boolean value (true or false). The enablers are called when the following
conditions exist:
• When the dreamweaver.serverComponents.refresh() function is called
• When the selection in the tree changes
• When server model changes
command The JavaScript code to execute. The command handler can force a refresh using the dreamweaver.
serverComponents.refresh()
function.
menuId The unique menu ID for the pop-up menu button when the button is clicked. When this ID is present, it overrides
the command handler. In other words, the button can be either a button associated with a command, or a button
that has a pop-up menu associated with it, but not both at the same time.
Property name Description

321
EXTENDING DREAMWEAVER
Components
Last updated 6/15/2011
plusButton.pressedImage = PLUSDROPBUTTONDOWN;
plusButton.disabledImage = PLUSDROPBUTTONUP;
plusButton.toolStyle = "left";
plusButton.toolTipText = MM.MSG_WebServicesAddToolTipText;
plusButton.enabled = "dwscripts.IS_WIN";
plusButton.menuId = "DWWebServicesChoosersContext";
}
toolBarBtnArray.push(plusButton);
var minusButton = new ToolbarControlRec();
minusButton.image = MINUSBUTTONUP;
minusButton.pressedImage = MINUSBUTTONDOWN;
minusButton.disabledImage = MINUSBUTTONDISABLED;
minusButton.toolStyle = "left";
minusButton.toolTipText = MM.MSG_WebServicesDeleteToolTipText;
minusButton.command = "clickedDelete()";
minusButton.enabled = "(dw.serverComponentsPalette.getSelectedNode() != null &&
dw.serverComponentsPalette.getSelectedNode() &&
((dw.serverComponentsPalette.getSelectedNode().objectType=='Root') ||
(dw.serverComponentsPalette.getSelectedNode().objectType == 'Error') ||
(dw.serverComponentsPalette.getSelectedNode().objectType ==
'MissingProxyGen')))";
toolBarBtnArray.push(minusButton);
if(aServerModelName != null && aServerModelName.indexOf(".NET") >= 0)
{
var deployWServiceButton = new ToolbarControlRec();
deployWServiceButton.image = DEPLOYSUPPORTBUTTONUP;
deployWServiceButton.pressedImage = DEPLOYSUPPORTBUTTONDOWN;
deployWServiceButton.disabledImage = DEPLOYSUPPORTBUTTONUP;
deployWServiceButton.toolStyle = "right";
deployWServiceButton.toolTipText = MM.MSG_WebServicesDeployToolTipText;
deployWServiceButton.command = "site.showTestingServerBinDeployDialog()";
deployWServiceButton.enabled = true;
toolBarBtnArray.push(deployWServiceButton);
}
//add the rebuild proxy button for windows only.
//bug 45552:
if(navigator.platform.charAt(0) !="M")
{
var proxyButton = new ToolbarControlRec();
proxyButton.image = PROXYBUTTONUP;
proxyButton.pressedImage = PROXYBUTTONDOWN;
proxyButton.disabledImage = PROXYBUTTONDISABLED;
proxyButton.toolStyle = "right";
proxyButton.toolTipText = MM.MSG_WebServicesRegenToolTipText;
proxyButton.command = "reGenerateProxy()";
proxyButton.enabled = "enableRegenerateProxyButton()";
toolBarBtnArray.push(proxyButton);
}
}
return toolBarBtnArray;
}

322
Last updated 6/15/2011
Chapter 21: Server models
Server models are the technologies that run scripts on a server. When users define a new site, they can identify the
server model that they want to use at the site level and at the individual document level. This server model handles any
dynamic elements that the user adds to the document.
Server model configuration files are stored in the Configuration/ServerModels folder. Within that folder, each server
model has its own HTML file that implements a set of functions that the server model requires.
Customizing server models
You can customize some features of a server model using the functions that are available in the server model API.
Adobe Dreamweaver asks new users to identify server models when they first start Dreamweaver. For cases when the
user does not identify a server model, you can create a dynamic dialog box that prompts the user to complete the
necessary steps. This dialog box appears when the user attempts to insert a server object. For information on creating
this dialog box, see the functions
“getSetupSteps()” on page 314 and “setupStepsCompleted()” on page 316.
You might want to create a specialized server model. Adobe suggests that you create a new server model rather than
editing any of the ones that come with Dreamweaver. (For information regarding creating new document types that
are supported by your server model, see
“Extensible document types in Dreamweaver” on page 13.)
When you create a new server model, you need to include an implementation of the canRecognizeDocument()
function in your server model file. This function tells Dreamweaver the level of preference that it should give to your
server model for handling a file extension when multiple server models claim a particular file extension.
The server model API functions
This section describes the functions that configure server models for Dreamweaver.
canRecognizeDocument()
Availability
Dreamweaver MX.
Description
When opening a document (and when more than one server model claims a file extension), Dreamweaver calls this
function for each of the extension-associated server models to see whether any of the functions can identify whether
the document is its file. If more than one server model claims the file extension, Dreamweaver gives priority to the
server model that returns the highest integer.
Note: All Dreamweaver-defined server models return a value of 1, so third-party server models can override the file-
extension association.

323
EXTENDING DREAMWEAVER
Server models
Last updated 6/15/2011
Arguments
dom
The dom argument is the Adobe document object, which is returned by the dreamweaver.getDocumentDOM()
function.
Returns
Dreamweaver expects an integer that indicates the priority that you give to the server model for the file extension. This
function should return a value of
-1 if the server model does not claim the file extension; otherwise, this function
should return a value greater than zero.
Example
In the following example, if the user opens a JavaScript document for the current server model, the sample code returns
a value of
2. This value lets the current server model take precedence over the Dreamweaver default server model.
var retVal = -1;
var langRE = /@\s*language\s*=\s*(\"|\')?javascript(\"|\')?/i;
// Search for the string language="javascript"
var oHTML = dom.documentElement.outerHTML;
if (oHTML.search(langRE) > -1)
retVal = 2;
return retVal;
getFileExtensions()
Availability
Dreamweaver UltraDev 1, deprecated in Dreamweaver MX.
Description
Returns the document file extensions with which a server model can work. For example, the ASP server model
supports .asp and .htm file extensions. This function returns an array of strings, and Dreamweaver uses these strings
to populate the Default Page Extension list that is found in the App Server category in the Site Definition dialog box.
Note: The Default Page Extension list exists only in Dreamweaver 4 and earlier. For Dreamweaver MX, and later, the
Site Definition dialog box does not list file extension settings. Instead, Dreamweaver reads the Extensions.txt file and
parses the element in the mmDocumentTypes.xml file. (For more information on these two files and the
documenttype
element, see
“Extensible document types in Dreamweaver” on page 13.)
Arguments
None.
Returns
Dreamweaver expects an array of strings that represent the allowed file extensions.
getLanguageSignatures()
Availability
Dreamweaver MX.

324
EXTENDING DREAMWEAVER
Server models
Last updated 6/15/2011
Description
This function returns an object that describes the method and array signatures that the scripting language uses. The
getLanguageSignatures() function helps map generic signature mapping to language-specific mapping for the
following elements:
• The function
• Constructors
• Drop code (return values)
• Arrays
• Exceptions
• Data type mappings for primitive data types
The getLanguageSignatures() function returns a map of these signature declarations. Extension developers can use
this map to generate language-specific code blocks that Dreamweaver drops on the page (based on the appropriate
server model for the page) when the user drags and drops a Web Services method, for example.
For examples of how to write this function, see the HTML implementation files for the JSP and the ASP.NET server
models. Server model implementation files are located in the Configuration/ServerModels folder.
Arguments
None.
Returns
Dreamweaver expects an object that defines the scripting language signatures. This object should map the generic
signatures to language-specific ones.
getServerExtension()
Availability
Dreamweaver UltraDev 4, deprecated in Dreamweaver MX.
Description
This function returns the default file extension of files that use the current server model. The serverModel object is
set to the server model of the currently selected site if no user document is currently selected.
Arguments
None.
Returns
Dreamweaver expects a string that represents the supported file extensions.
getServerInfo()
Availability
Dreamweaver MX.

325
EXTENDING DREAMWEAVER
Server models
Last updated 6/15/2011
Description
This function returns a JavaScript object that can be accessed from within the JavaScript code. You can retrieve this
object by calling the
dom.serverModel.getServerInfo() JavaScript function. Furthermore, serverName,
serverLanguage, and serverVersion are special properties, which you can access through the following JavaScript
functions:
dom.serverModel.getServerName()
dom.serverModel.getServerLanguage()
dom.serverModel.getServerVersion()
Arguments
None.
Returns
Dreamweaver expects an object that contains the properties of your server model.
Example
var obj = new Object();
obj.serverName = "ASP";
obj.serverLanguage = "JavaScript";
obj.serverVersion = "2.0";
...
return obj;
getServerLanguages()
Availability
Dreamweaver UltraDev 1, deprecated in Dreamweaver MX.
Description
This function returns the supported scripting languages of a server model with an array of strings. Dreamweaver uses
these strings to populate the Default Scripting Language list that is found in the App Server category in the Site
Definition dialog box.
Note: The Default Scripting Language list exists only in Dreamweaver 4 and earlier. For Dreamweaver MX and later, the
Site Definition dialog box does not list supported scripting languages, nor does Dreamweaver use the
getServerLanguages() function. Dreamweaver does not use this function because each server model has only one
server language in Dreamweaver.
In earlier versions of Dreamweaver, a server model could support multiple scripting languages; for example, the ASP
server model supports JavaScript and VBScript.
If you want a file in the ServerFormats folder to apply only to a specific scripting language, add the following statement
so it is the first line in the HTML file:
<!-- SCRIPTING-LANGUAGE=XXX -->
In this example, XXX represents the scripting language. This statement causes the server behavior to appear in the Plus
(+) menu of the Server Behaviors panel only when the currently selected scripting language is
XXX.
Arguments
None.

326
EXTENDING DREAMWEAVER
Server models
Last updated 6/15/2011
Returns
Dreamweaver expects an array of strings that represent the supported scripting languages.
getServerModelExtDataNameUD4()
Availability
Dreamweaver MX.
Description
This function returns the server model implementation name that Dreamweaver should use when accessing the
UltraDev 4 extension data files that reside in the Configurations/ExtensionData folder.
Arguments
None.
Returns
Dreamweaver expects a string, such as "ASP/JavaScript".
getServerModelDelimiters()
Availability
Dreamweaver MX.
Description
This function returns the script delimiters that the application server uses, and it indicates whether each delimiter can
participate in merging code blocks. You can access this returned value from JavaScript by calling the
dom.serverModel.getDelimiters() function.
Arguments
None.
Returns
Dreamweaver expects an array of objects where each object contains the following three properties:
• The startPattern property is a regular expression that matches the opening script delimiter (such as <%).
• The endPattern property is a regular expression that matches the closing script delimiter (such as %>).
• The participateInMerge property is a Boolean value that specifies whether the content enclosed in the listed
delimiters should (
true) or should not (false) participate in block merging.
getServerModelDisplayName()
Availability
Dreamweaver MX.

327
EXTENDING DREAMWEAVER
Server models
Last updated 6/15/2011
Description
This function returns the name that should appear in the user interface for this server model. You can access this value
from JavaScript by calling the
dom.serverModel.getDisplayName() function.
Arguments
None.
Returns
Dreamweaver expects a string, such as "ASP JavaScript".
getServerModelFolderName()
Availability
Dreamweaver MX.
Description
This function returns the folder name to use for this server model within the Configuration folder. You can access this
value from JavaScript by calling the
dom.serverModel.getFolderName() function.
Arguments
None.
Returns
Dreamweaver expects a string, such as "ASP_JS".
getServerSupportsCharset()
Availability
Dreamweaver MX.
Description
This function returns a true value if the current server supports the specified character set. From JavaScript, you can
determine whether the server model supports a specific character set by calling the
dom.serverModel.getServerSupportsCharset() function.
Arguments
metaCharSetString
The metaCharSetString argument is a string that holds the value of the document’s "charset=" attribute.
Returns
Dreamweaver expects a Boolean value.

328
EXTENDING DREAMWEAVER
Server models
Last updated 6/15/2011
getVersionArray()
Availability
Dreamweaver UltraDev 1, deprecated in Dreamweaver MX.
Description
This function retrieves the mapping of server technologies to version numbers. This function is called by the
dom.serverModel.getServerVersion() function.
Arguments
None.
Returns
Dreamweaver expects an array of version objects, each with a version name and version value, as listed in the following
examples:
• ASP version 2.0
• ADODB version 2.1

329
Last updated 6/15/2011
Chapter 22: Data translators
Data translators translate specialized markups into code that Adobe Dreamweaver can read and display. Server-side
includes, conditional JavaScript statements, or other code such as PHP3, JSP, CFML, or ASP are examples of
specialized markups. In Dreamweaver, you can translate attributes within tags as well as entire tags or blocks of code.
All data translators—block/tag or attribute—are HTML files.
Data translation at times involves complex operations that either cannot be done with JavaScript or that can be done
more efficiently using C. It is especially true for entire tags or blocks of code. If you are familiar with C or C++, read
“C-level extensibility” on page 347 also.
The following table lists the files you use to create a data translator:
How data translators work
Dreamweaver handles all translator files the same way, regardless of whether they translate entire tags or only
attributes. At startup, Dreamweaver reads all the files in the Configuration/Translators folder and calls the
getTranslatorInfo() function to obtain information about the translator. Dreamweaver ignores any file in which
the
getTranslatorInfo() function does not exist or contains an error that causes it to be undefined.
Note: To prevent JavaScript errors from interfering with startup, errors in any translator file are reported only after all
translators are loaded. For more information on debugging translators, see
“Finding bugs in your translator” on page 335.
Dreamweaver also calls the translateMarkup() function in all applicable translator files (as specified in the
Translation preferences) whenever the user might add new content or change existing content that needs translation.
Dreamweaver calls the
translateMarkup() function when the user performs one of the following actions:
• Opens a file in Dreamweaver
• Switches back to Design view after making changes in the HTML panel or in Code view
• Changes the properties of an object in the current document
• Inserts an object (using either the Insert bar or the Insert menu)
• Refreshes the current document after making changes to it in another application
• Applies a template to the document
• Pastes or drags content into or within the Document window
• Saves changes to a dependent file
• Invokes a command, behavior, server behavior, Property inspector, or other extension that sets the innerHTML or
outerHTML property of any tag object or the data property of any comment object
• Selects File > Convert > 3.0 Browser Compatible
• Selects Modify > Convert > Convert Tables To AP Divs
Path File Description
Configuration/ThirdPartyTags/ language.xml Contains information about tags in the markup language.
Configuration/ThirdPartyTags/ language.gif Icon for tags in the language.
Configuration/Translators/ language.htm Contains JavaScript functions for the data translator.

330
EXTENDING DREAMWEAVER
Data translators
Last updated 6/15/2011
• Selects Modify > Convert > Convert AP Divs To Table
• Changes a tag or attribute in the Quick Tag Editor and presses Tab or Enter
Determining what kind of translator to use
All translators must contain the getTranslatorInfo() and translateMarkup() functions, and they must reside in
the Configuration/Translators folder. They differ, however, in the kind of code that they insert into the user’s
document and in how that code must be inspected, as described in the following list:
• To translate small pieces of server markup that determine attribute values or that conditionally add attributes to a
standard HTML tag, write an attribute translator. Standard HTML tags that contain translated attributes can be
inspected with the Property inspectors that are built into Dreamweaver. It is not necessary to write a custom
Property inspector (see
“Adding a translated attribute to a tag” on page 330).
• To translate an entire tag (for example, a server-side include (SSI)) or a block of code (for example, JavaScript,
ColdFusion, PHP, or other scripting), write a block/tag translator. The code that is generated by a block/tag
translator cannot be inspected with the Property inspectors that are built into Dreamweaver. You must write a
custom Property inspector for the translated content if you want users to be able to change the properties of the
original code (see
“Locking translated tags or blocks of code” on page 331).
Adding a translated attribute to a tag
Attribute translation relies on the Dreamweaver parser to ignore server markup. By default, Dreamweaver already
ignores the most common kinds of server markup (including ASP, CFML, and PHP); if you use server markup that
has different opening and closing markers, you must modify the third-party tag database to ensure that your translator
works properly. For more information on modifying the third-party tag database, see “Customizing Dreamweaver” in
Using Dreamweaver.
When Dreamweaver handles preserving the original server markup, the translator generates a valid attribute value that
can be viewed in the Document window. (If you use server markup only for attributes that do not have a user-visible
effect, you do not need a translator.)
The translator creates an attribute value that has a visible effect in the Document window by adding a special attribute,
mmTranslatedValue, to the tag that contains the server markup. The mmTranslatedValue attribute and its value are
not visible in the HTML panel or in Code view, nor are they saved with the document.
The mmTranslatedValue attribute must be unique within the tag. If it is likely that your translator needs to translate
more than one attribute in a single tag, you must add a routine in the translator that appends numbers to the
mmTranslatedValue attribute (for example, mmTranslatedValue1, mmTranslatedValue2, and so on).
The value of the mmTranslatedValue attribute must be a URL-encoded string that contains at least one valid
attribute-value pair. This means that
mmTranslatedValue="src=%22open.jpg%22" is a valid translation for both
src="<? if (dayType == weekday) then open.jpg else closed.jpg" ?> and <? if (dayType == weekday)
then src="open.jpg" else src="closed.jpg" ?>. As mmTranslatedValue="%22open.jpg%22" contains only
the value, not the attribute, it is not valid for either example.
Translating more than one attribute at a time
The mmTranslatedValue attribute can contain more than one valid attribute-value pair. Consider the following
untranslated code:

331
EXTENDING DREAMWEAVER
Data translators
Last updated 6/15/2011
<img <? if (dayType==weekday) then src="open.jpg" width="320" height="100" else
src="closed.jpg" width="100" height="320" ?> alt="We're open 24 hours a day from
12:01am Monday until 11:59pm Friday">
The following example shows how the translated markup might appear:
<img <? if (dayType==weekday) then src="open.jpg" width="320" height="100" else
src="closed.jpg" width="100" height="320" ?>
mmTranslatedValue="src=%22open.jpg%22 width=%22320%22 height=%22100%22"
alt="We're open 24 hours a day from 12:01am Monday until 11:59pm Friday">
The spaces between the attribute-value pairs in the mmTranslatedValue attribute are not encoded. Because
Dreamweaver looks for these spaces when it attempts to render the translated value, each attribute-value pair in the
mmTranslatedValue attribute must be encoded separately and then pieced back together to form the full
mmTranslatedValue attribute. For an example of this process, see “A simple attribute translator example” on
page 336.
Inspecting translated attributes
Translated attributes do not require locks, which makes it simple to inspect the tags that contain them.
When a server markup specifies a single attribute that is represented in a Property inspector, Dreamweaver displays it
in the Property inspector.
The markup appears irrespective of whether a translator is associated with it. The translator runs whenever the user
edits the server markup that appears in the Property inspector.
When server markup controls more than one attribute in a tag, the server markup does not appear in the Property
inspector. However, the lightning bolt icon shows that translated markup exists for the selected element.
Note: The lightning bolt icon does not appear when text or table cells, rows, or columns are selected. Translation continues
if the user edits server markup in the panel and a translator exists to handle that type of markup.
The text boxes in the Property inspector are editable; users can enter values for attributes that server markup controls.
It results in duplicate attributes. If both a translated value and a regular value are set for a particular attribute,
Dreamweaver displays the translated value in the Document window, decides whether your translator searches for
duplicate attributes and removes them.
Locking translated tags or blocks of code
In most cases, you want a translator to change the markup so that Dreamweaver can display it, but you want to save
the original markup, not the changes. For such cases, Dreamweaver provides special XML tags in which to wrap
translated content and to refer to the original code.
When you use these XML tags, the contents of the original attributes are duplicated in Code view. If the file is saved,
the original, untranslated markup is written to the file. The untranslated content is what Dreamweaver displays in
Code view.
The syntax of the XML tags is shown in the following example:

332
EXTENDING DREAMWEAVER
Data translators
Last updated 6/15/2011
<MM:BeginLock translatorClass="translatorClass" ¬
type="tagNameOrType" depFiles="dependentFilesList" ¬
orig="encodedOriginalMarkup">
Translated content
<MM:EndLock>
The values in this example have the following significance:
• The translatorClass value is the unique identifier for the translator; it is the first string in the array that the
getTranslatorInfo() function returns.
• The tagNameOrType value is a string that identifies the type of markup (or the tag name that is associated with the
markup) that is contained in the lock. The string can contain only alphanumeric, hyphen (-), or underscore (_)
characters. You can check this value in the
canInspectSelection() function of a custom Property inspector to
determine whether the Property inspector is the right one for the content. For more information, see
“Creating
Property inspectors for locked content” on page 333. Locked content cannot be inspected by the Dreamweaver
built-in Property inspectors. For example, specifying type="IMG" does not make the Image panel appear.
• The dependentFilesList value is a string that contains a comma-separated list of files on which the locked markup
depends. Files are referenced as URLs, relative to the user’s document. If the user updates one of the files named in
the dependentFilesList string, Dreamweaver automatically retranslates the content in the document that contains
the list.
• The encodedOriginalMarkup value is a string that contains the original, untranslated markup, encoded using a
small subset of URL encoding (use
%22 for ", %3C for <, %3E for >, and %25 for %). The quickest way to URL-encode
a string is to use the
escape() method. For example, if myString equals '<img src="foo.gif">',
escape(myString) returns %3Cimg%20src=%22foo.gif%22%3E.
The following example shows the locked portion of code that might be generated from the translation of the server-
side include
<!--#include virtual="/footer.html" -->:
<MM:BeginLock translatorClass="MM_SSI" type="ssi" ¬
depFiles="C:\sites\webdev\footer.html" orig="%3C!--#include ¬
virtual=%22/footer.html%22%20--%3E">
<!-- begin footer -->
<CENTER>
<HR SIZE=1 NOSHADE WIDTH=100%>
<BR>
[<A TARGET="_top" HREF="/">home</A>]
[<A TARGET="_top" HREF="/products/">products</A>]
[<A TARGET="_top" HREF="/services/">services</A>]
[<A TARGET="_top" HREF="/support/">support</A>]
[<A TARGET="_top" HREF="/company/">about us</A>]
[<A TARGET="_top" HREF="/help/">help</A>]
</CENTER>
<!-- end footer -->
<MM:EndLock>
Creating a translator that locks code inside a script tag can cause the translator to fail. For example, suppose you have
the following code:

333
EXTENDING DREAMWEAVER
Data translators
Last updated 6/15/2011
<script language="javascript">
<!--
function foo() {
alert('<bean:message key="show.message"/>');
}
// -->
</script>
Then you create a translator for the bean:messagestruts tag, the translator fails because you are creating a
MM:BeginLock section inside a MM:BeginLock section. A workaround is to create a JSP wrapper around the
bean:message tag that uses regular JSP tags like <%= My_lookup.lookup("show.message") %>. This causes your
translator to skip this code, and the translation succeeds.
Creating Property inspectors for locked content
After you create a translator, you need to create a Property inspector for the content so the user can change its
properties (for example, the file to be included or one of the conditions in a conditional statement). Inspecting
translated content is a unique problem for several reasons:
• The user might want to change the properties of the translated content, and those changes must be reflected in the
untranslated content.
• The Document Object Model (DOM) contains the translated content (that is, the lock tags and the tags they
surround are nodes in the DOM), but the
outerHTML property of the documentElement object and the
dreamweaver.getSelection() and dreamweaver.nodeToOffsets() functions act on the untranslated source.
• The tags you inspect are different before and after translation.
A Property inspector for the HAPPY tag might have a comment that looks similar to the following example:
<!-- tag:HAPPY,priority:5,selection:exact,hline,vline, attrName:xxx,¬ attrValue:yyy -->
The Property inspector for the translated HAPPY tag, however, would have a comment that looks similar to the
following example:
<!-- tag:*LOCKED*,priority:5,selection:within,hline,vline -->
The canInspectSelection() function for the untranslated HAPPY Property inspector is simple. Because the
selection type is exact, it can return a value of true without further analysis. For the translated HAPPY Property
inspector, this function is more complicated; the keyword
*LOCKED* indicates that the Property inspector is
appropriate when the selection is within a locked region, but because a document can have several locked regions,
further checks must be performed to determine whether the Property inspector matches this particular locked
region.
Another problem is inherent in inspecting translated content. When you call the dom.getSelection() function,
the values that return by default are offsets into the untranslated source. To expand the selection properly so that
the locked region (and only the locked region) is selected, use the following technique:
var currentDOM = dw.getDocumentDOM();
var offsets = currentDOM.getSelection();
var theSelection = currentDOM.offsetsToNode(offsets[0],offsets[0]+1);
Using offsets[0]+1 as the second argument ensures that you remain within the opening lock tag when you convert
the offsets to a node. If you use
offsets[1] as the second argument, you risk selecting the node above the lock.
After you make the selection (after ensuring that its nodeType is node.ELEMENT_NODE), you can inspect the type
attribute to see if the locked region matches this Property inspector, as shown in the following example:

334
EXTENDING DREAMWEAVER
Data translators
Last updated 6/15/2011
if (theSelection.nodeType == node.ELEMENT_NODE && ¬
theSelection.getAttribute('type') == 'happy'){
return true;
}else{
return false
}
To populate the text boxes in the Property inspector for the translated tag, you must parse the value of the orig
attribute. For example, if the untranslated code is
<HAPPY TIME="22"> and the Property inspector has a Time text
box, you must extract the value of the
TIME attribute from the orig string:
function inspectSelection() {
var currentDOM = dw.getDocumentDOM();
var currSelection = currentDOM.getSelection();
var theObj = currentDOM.offsetsToNode(curSelection[0],curSelection[0]+1);
if (theObj.nodeType != Node.ELEMENT_NODE) {
return;
}
// To convert the encoded characters back to their
// original values, use the unescape() method.
var origAtt = unescape(theObj.getAttribute("ORIG"));
// Convert the string to lowercase for processing
var origAttLC = origAtt.toLowerCase();
var timeStart = origAttLC.indexOf('time="');
var timeEnd = origAttLC.indexOf('"',timeStart+6);
var timeValue = origAtt.substring(timeStart+6,timeEnd);
document.layers['timelayer'].document.timeForm.timefield.value = timeValue;
}
After you parse the orig attribute to populate the boxes in the Property inspector for the translated tag, the next
step is probably to set the value of the
orig attribute if the user changes the value in any of the text boxes. You might
find restrictions against making changes in a locked region. You can avoid this problem by changing the original
markup and retranslating.
The Property inspector for translated server-side includes (the ssi_translated.js file in the Configuration/Inspectors
folder) demonstrates this technique in its
setComment() function. Rather than rewriting the orig attribute, the
Property inspector assembles a new server-side include comment. It inserts that comment into the document,
replacing the old one by rewriting the contents of the document, which generates a new
orig attribute. The
following code summarizes this technique:

335
EXTENDING DREAMWEAVER
Data translators
Last updated 6/15/2011
// Assemble the new include comment. radioStr and URL are
// variables defined earlier in the code.
newInc = "<!--#include " + radioStr + "=" + '"' + URL + '"' + " -->";
// Get the contents of the document.
var entireDocObj = dreamweaver.getDocumentDOM();
var docSrc = entireDocObj.documentElement.outerHTML;
// Store everything up to the SSI comment and everything after
// the SSI comment in the beforeSelStr and afterSelStr variables.
var beforeSelStr = docSrc.substring(0, curSelection[0] );
var afterSelStr= docSrc.substring(curSelection[1]);
// Assemble the new contents of the document.
docSrc = beforeSelStr + newInc + afterSelStr;
// Set the outerHTML of the HTML tag (represented by
// the documentElement object) to the new contents,
// and then set the selection back to the locked region
// surrounding the SSI comment.
entireDocObj.documentElement.outerHTML = docSrc;
entireDocObj.setSelection(curSelection[0], curSelection[0]+1);
Finding bugs in your translator
If the translateMarkup() function contains certain types of errors, the translator loads properly, but it fails without
an error message when you invoke it. Although failing silently prevents Dreamweaver from becoming unstable, it can
hinder development, especially when you need to find one small syntax error in multiple lines of code.
If your translator fails, one effective debugging method is to turn the translator into a command, as described in the
following steps:
1 Copy the entire contents of the translator file to a new document, and save it in the Configuration/Commands
folder inside the Dreamweaver application folder.
2 At the top of the document, between the SCRIPT tags, add the following function:
function commandButtons(){
return new Array( "OK","translateMarkup(dreamweaver.¬
getDocumentPath('document'), dreamweaver.getSiteRoot(), ¬
dreamweaver.getDocumentDOM().documentElement.outerHTML); ¬
window.close()", "Cancel", "window.close()");
}
3 At the end of the translateMarkup() function, comment out the returnwhateverTheReturnValueIs line, and
replace it with
dreamweaver.getDocumentDOM().documentElement.outerHTML =
whateverTheReturnValueIs, as shown in the following example:
// return theCode;
dreamweaver.getDocumentDOM().documentElement.outerHTML = theCode;
}
/* end of translateMarkup() */
4 In the body of the document, add the following form with no text boxes:
<body>
<form>
Hello.
</form>
</body>

336
EXTENDING DREAMWEAVER
Data translators
Last updated 6/15/2011
5 Restart Dreamweaver, and select your translator command from the Commands menu. When you click OK, the
translateMarkup() function is called, which simulates translation.
If no error message appears and translation still fails, you probably have a logic error in your code.
6 Add alert() statements in strategic spots throughout the translateMarkup() function so you can make sure
you’re getting the proper branches and so you can check the values of variables and properties at different points:
for (var i=0; i< foo.length; i++){
alert("we're at the top of foo.length array, and the value of i is " + i);
/* rest of loop */
}
7 After adding the alert() statements, select your command from the Commands menu, click Cancel, and select it
again. This process reloads the command file and incorporates your changes.
A simple attribute translator example
To better understand attribute translation, it’s helpful to look at an example. The following translator is Pound
Conditional (Poco) markup, a syntax that’s somewhat similar to ASP or PHP.
You create the attribute translator by creating a tagspec tag, an icon, and an attribute translator.
Create the tagspec tag
The first step in making this translator work properly is to create a tagspec tag for Poco markup, which prevents
Dreamweaver from parsing the untranslated Poco statements.
1 Create a new blank file.
2 Enter the following:
<tagspec tag_name="poco" start_string="<#" end_string="#>" ¬
detect_in_attribute="true" icon="poco.gif" icon_width="17" ¬
icon_height="15"></tagspec>
3 Save the file as poco.xml in the Configuration/ThirdPartyTags folder.
For an example of creating the tagspec tag, see the Tags.xml file in the Configuration/ThirdPartyTags folder.
Create the icon
Next, you create the icon for Poco tags.
1 Create an image file that is 18 x 18 pixels for the Poco tags icon.
2 Save the file as poco.gif in the Configuration/ThirdPartyTags folder.
Create the attribute translator
You create an HTML file that contains the functions necessary for the attribute translator.
1 Create a new blank file.
2 Enter the following:

337
EXTENDING DREAMWEAVER
Data translators
Last updated 6/15/2011
<html>
<head>
<title>Conditional Translator</title>
<meta http-equiv="Content-Type" content="text/html; charset=">
<script language="JavaScript">
/*************************************************************
* This translator handles the following statement syntaxes: *
* <# if (condition) then foo else bar #> *
* <# if (condition) then att="foo" else att="bar" #> *
* <# if (condition) then att1="foo" att2="jinkies" *
* att3="jeepers" else att1="bar" att2="zoinks" #> *
* *
* It does not handle statements with no else clause. *
*************************************************************/
var count = 1;
function translateMarkup(docNameStr, siteRootStr, inStr){
var count = 1;
// Counter to ensure unique mmTranslatedValues
var outStr = inStr;
// String that will be manipulated
var spacer = "";
// String to manage space between encoded attributes
var start = inStr.indexOf('<# if'); // 1st instance of Pound Conditional code
// Declared but not initalized //
var attAndValue;
// Boolean indicating whether the attribute is part of
// the conditional statement
var trueStart;
// The beginning of the true case
var falseStart;
// The beginning of the false case
var trueValue;
// The HTML that would render in the true case
var attName;
// The name of the attribute that is being
// set conditionally.
var equalSign;
// The position of the equal sign just to the
// left of the <#, if there is one
var transAtt;
// The entire translated attribute
var transValue;
// The value that must be URL-encoded
var back3FromStart;
// Three characters back from the start position
// (used to find equal sign to the left of <#
var tokens;
// An array of all the attributes set in the true case
var end;
// The end of the current conditional statement.
// As long as there's still a <# conditional that hasn't been
// translated.
while (start != -1){
back3FromStart = start-3;

338
EXTENDING DREAMWEAVER
Data translators
Last updated 6/15/2011
end = outStr.indexOf(' #>',start);
equalSign = outStr.indexOf('="<# if',back3FromStart);
attAndValue = (equalSign != -1)?false:true;
trueStart = outStr.indexOf('then', start);
falseStart = outStr.indexOf(' else', start);
trueValue = outStr.substring(trueStart+5, falseStart);
tokens = dreamweaver.getTokens(trueValue,' ');
// If attAndValue is false, find out what attribute you're
// translating by backing up from the equal sign to the
// first space. The substring between the space and the
// equal sign is the attribute.
if (!attAndValue){
for (var i=equalSign; i > 0; i--){
if (outStr.charAt(i) == " "){
attName = outStr.substring(i+1,equalSign);
break;
}
}
transValue = attName + '="' + trueValue + '"';
transAtt = ' mmTranslatedValue' + count + '="' + ¬
escape(transValue) + '"';
outStr = outStr.substring(0,end+4) + transAtt + ¬
outStr.substring(end+4);
// If attAndValue is true, and tokens is greater than
// 1, then trueValue is a series of attribute/value
// pairs, not just one. In that case, each attribute/value
// pair must be encoded separately and then added back
// together to make the translated value.
}else if (tokens.length > 1){
transAtt = ' mmTranslatedValue' + count + '="'
for (var j=0; j < tokens.length; j++){
tokens[j] = escape(tokens[j]);
if (j>0){
spacer=" ";
}
transAtt += spacer + tokens[j];
}
transAtt += '"';
outStr = outStr.substring(0,end+3) + transAtt + ¬
outStr.substring(end+3)
// If attAndValue is true and tokens is not greater
// than 1, then trueValue is a single attribute/value pair.
// This is the simplest case, where all that is necessary is
// to encode trueValue.
}else{
transValue = trueValue;
transAtt = ' mmTranslatedValue' + count + '="' + ¬
escape(transValue) + '"';
outStr = outStr.substring(0,end+3) + transAtt + ¬
outStr.substring(end+3);
}
// Increment the counter so that the next instance
// of mmTranslatedValue will have a unique name, and
// then find the next <# conditional in the code.
count++;

339
EXTENDING DREAMWEAVER
Data translators
Last updated 6/15/2011
start = outStr.indexOf('<# if',end);
}
// Return the translated string.
return outStr
}
function getTranslatorInfo(){
returnArray = new Array(7);
returnArray[0] = "Pound_Conditional"; // The translatorClass
returnArray[1] = "Pound Conditional Translator"; // The title
returnArray[2] = "2"; // The number of extensions
returnArray[3] = "html"; // The first extension
returnArray[4] = "htm"; // The second extension
returnArray[5] = "1"; // The number of expressions
returnArray[6] = "<#"; // The first expression
returnArray[7] = "byString"; //
returnArray[8] = "50"; //
return returnArray
}
</script>
</head>
<body>
</body>
</html>
3 Save the file as Poco.htm in the Configuration/Translators folder.
A simple block/tag translator example
To help understand translation, look at a translator that is written entirely in JavaScript, which does not rely on a C
library for any functionality. The following translator example would be more efficient if it were written in C, but the
JavaScript version is simpler, which makes it perfect for demonstrating how translators work.
As with most translators, this one is designed to mimic server behavior. Assume that your web server is configured to
replace the
KENT tag with a different picture of an engineer, depending on the day of the week, the time of day, and the
user’s platform. The translator does the same thing, only locally.
Create the block/tag translator
1 Create a new blank file.
2 Enter the following code:

340
EXTENDING DREAMWEAVER
Data translators
Last updated 6/15/2011
<html>
<head>
<title>Kent Tag Translator</title>
<meta http-equiv="Content-Type" content="text/html; charset=">
<script language="JavaScript">
/**********************************************************
* The getTranslatorInfo() function provides information *
* about the translator, including its class and name, *
* the types of documents that are likely to contain the *
* markup to be translated, the regular expressions that *
* a document containing the markup to be translated *
* would match (whether the translator should run on all *
* files, no files, in files with the specified *
* extensions, or in files matching the specified *
* expressions). *
**********************************************************/
function getTranslatorInfo(){
//Create a new array with 6 slots in it
returnArray = new Array(6);
returnArray[0] = "DREAMWEAVER_TEAM"; // The translatorClass
returnArray[1] = "Kent Tags"; // The title
returnArray[2] = "0"; // The number of extensions
returnArray[3] = "1"; // The number of expressions
returnArray[4] = "<kent"; // Expression
returnArray[5] = "byExpression"; // run if the file contains "<kent"
return returnArray;
}
/**************************************************************************
* The translateMarkup() function performs the actual translation. *
* In this translator, the translateMarkup() function is written *
* entirely in JavaScript (that is, it does not rely on a C library) -- *
* and it's also extremely inefficient. It's a simple example, however, *
* which is good for learning. *
***************************************************************************/
function translateMarkup(docNameStr, siteRootStr, inStr){
var outStr = ""; // The string to be returned after translation
var start = inStr.indexOf('<kent>'); // The first position of the KENT tag
// in the document.
var replCode = replaceKentTag(); // Calls the replaceKentTag() function
// to get the code that will replace KENT.
var outStr = ""; // The string to be returned after translation
//If the document does not contain any content, terminate the translation.
if ( inStr.length <= 0 ){
return "";
}
// As long as start, which is equal to the location in inStr of the
// KENT tag, is not equal to -1 (that is, as long as there is another
// KENT tag in the document)
while (start != -1){
// Copy everything up to the start of the KENT tag.
// This is very important, as translators should never change
// anything other than the markup that is to be translated.
outStr = inStr.substring(0, start);
// Replace the KENT tag with the translated HTML, wrapped in special

341
EXTENDING DREAMWEAVER
Data translators
Last updated 6/15/2011
// locking tags. For more information on the repacement operation, see
// the comments in the replaceKentTag() function.
outStr = outStr + replCode;
// Copy everything after the KENT tag.
outStr = outStr + inStr.substring(start+6);
// Use the string you just created for the next trip through
// the document. This is the most inefficient part of all.
inStr = outStr;
start = inStr.indexOf('<kent>');
}
// When there are no more KENT tags in the document, return outStr.
return outStr;
}
/**************************************************************
* The replaceKentTag() function assembles the HTML that will *
* replace the KENT tag and the special locking tags that will *
* surround the HTML. It calls the getImage() function to *
* determine the SRC of the IMG tag. *
**************************************************************/
function replaceKentTag(){
// The image to display.
var image = getImage();
// The location of the image on the local disk.
var depFiles = dreamweaver.getSiteRoot() + image;
// The IMG tag that will be inserted between the lock tags.
var imgTag = '<IMG SRC="/' + image + '" WIDTH="320" HEIGHT="240" ALT="Kent">\n';
// 1st part of the opening lock tag. The remainder of the tag is assembled
below.
var start = '<MM:BeginLock translatorClass="DREAMWEAVER_TEAM" type="kent"';
// The closing lock tag.
var end = '<MM:EndLock>';
//Assemble the lock tags and the replacement HTML.
var replCode = start + ' depFiles="' + depFiles + '"';
replCode = replCode + ' orig="%3Ckent%3E">\n';
replCode = replCode + imgTag;
replCode = replCode + end;
return replCode;
}
/******************************************************************
* The getImage() function determines which image to display *
* based on the day of the week, the time of day and the *
* user's platform. The day and time are figured based on UTC *
* time (Greenwich Mean Time) minus 8 hours, which gives *
* Pacific Standard Time (PST). No allowance is made for Daylight *
* Savings Time in this routine. *
******************************************************************/
function getImage(){
var today = new Date(); // Today's date & time.
var day = today.getUTCDay(); // Day of the week in the GMT time zone.
// 0=Sunday, 1=Monday, and so on.

342
EXTENDING DREAMWEAVER
Data translators
Last updated 6/15/2011
var hour = today.getUTCHours(); // The current hour in GMT, based on the
// 24-hour clock.
var SFhour = hour - 8; // The time in San Francisco, based on the
// 24-hour clock.
var platform = navigator.platform; // User's platform. All Windows computers
// are identified by Dreamweaver as "Win32",
// all Macs as "MacPPC".
var imageRef; // The image reference to be returned.
// If SFhour is negative, you have two adjustments to make.
// First, subtract one from the day count because it is already the wee
// hours of the next day in GMT. Second, add SFhour to 24 to
// give a valid hour in the 24-hour clock.
if (SFhour < 0){
day = day - 1;
// The day count back one would make it negative, and it's Saturday,
// so set the count to 6.
if (day < 0){
day = 6;
}
SFhour = SFhour + 24;
}
// Now determine which photo to show based on whether it's a work day or a
// weekend; what time it is; and, if it's a time and day when Kent is
// working, what platform the user is on.
//If it's not Sunday
if (day != 0){
//And it's between 10am and noon, inclusive
if (SFhour >= 10 && SFhour <= 12){
imageRef = "images/kent_tiredAndIrritated.jpg";
//Or else it's between 1pm and 3pm, inclusive
}else if (SFhour >= 13 && SFhour <= 15){
imageRef ="images/kent_hungry.jpg";
//Or else it's between 4pm and 5pm, inclusive
}else if (SFhour >= 16 && SFhour <= 17){
//If user is on Mac, show Kent working on Mac
if (platform == "MacPPC"){
imageRef = "images/kent_gettingStartedOnMac.jpg";
//If user is on Win, show Kent working on Win
}else{
imageRef = "images/kent_gettingStartedOnWin.jpg";
}
//Or else it's after 6pm but before the stroke of midnight
}else if (SFhour >= 18){
//If it's Saturday
if (day == 6){
imageRef = "images/kent_dancing.jpg";
//If it's not Saturday, check the user's platform
}else if (platform == "MacPPC"){
imageRef = "images/kent_hardAtWorkOnMac.jpg";

343
EXTENDING DREAMWEAVER
Data translators
Last updated 6/15/2011
}else{
imageRef = "images/kent_hardAtWorkOnWin.jpg";
}
}else{
imageRef = "images/kent_sleeping.jpg";
}
//If it's after midnight and before 10am, or anytime on Sunday
}else{
imageRef = "images/kent_sleeping.jpg";
}
return imageRef;
}
</script>
</head>
<body>
</body>
</html>
3 Save the file as kent.htm in the Configuration/Translators folder.
The data translator API functions
This section describes the functions used to define translators for Dreamweaver.
getTranslatorInfo()
Description
This function provides information about the translator and the files it can affect.
Arguments
None.
Returns
An array of strings. The elements of the array must appear in the following order:
1 The translatorClass string uniquely identifies the translator. This string must begin with a letter and can contain
only alphanumeric characters, hyphens (-), and underscores (_).
2 The title string describes the translator in no more than 40 characters.
3 The nExtensions string specifies the number of file extensions to follow. If nExtensions is zero, the translator can
run on any file. If nExtensions is zero, nRegExps is the next element in the array.
4 The extension string specifies a file extension (for example, "htm" or "SHTML") that works with this translator. This
string is not case-sensitive and should not contain a leading period. The array should contain the same number of
extension elements that are specified in nExtensions.
5 The nRegExps string specifies the number of regular expressions that follow. If nRegExps is zero, runDefault is the
next element in the array.

344
EXTENDING DREAMWEAVER
Data translators
Last updated 6/15/2011
6 The regExps string specifies a regular expression that you can check. The array should contain the same number of
regExps elements as are specified in nRegExps, and at least one of the regExps elements must match a piece of the
document’s source code before the translator can act on a file.
7 The runDefault string specifies when this translator executes. The following list gives the possible string values:
Note: If you set runDefault to "byExtension" but do not specify any extensions (see step 4.), the effect is the same
as setting
"allFiles". If you set runDefault to "byExpression" but do not specify any expressions (see step 6.),
the effect is the same as setting
"noFiles".
8 The priority string specifies the default priority for running this translator. The priority is a number between 0 and
100. If you do not specify a priority, the default priority is 100. The highest priority is 0, and 100 is the lowest. When
multiple translators apply to a document, this setting controls the order in which the translators are applied. The
highest priority is applied first. When multiple translators have the same priority, they are applied in alphabetical
order by
translatorClass.
Example
The following instance of the getTranslatorInfo() function gives information about a translator for server-side
includes:
function getTranslatorInfo(){
var transArray = new Array(11);
transArray[0] = "SSI";
transArray[1] = "Server-Side Includes";
transArray[2] = "4";
transArray[3] = "htm";
transArray[4] = "stm";
transArray[5] = "html";
transArray[6] = "shtml";
transArray[7] = "2";
transArray[8] = "<!--#include file";
transArray[9] = "<!--#include virtual";
transArray[10] = "byExtension";
transArray[11] = "50";
return transArray;
}
translateDOM()
Availability
Dreamweaver CS3.
String Definition
"allFiles" Sets the translator to always execute.
"noFiles" Sets the translator to never execute.
"byExtension" Sets the translator to execute for files that have one of the file extensions that are specified in the extension.
"byExpression" Sets the translator to execute if the document contains a match for one of the specified regular expressions.
"bystring" Sets the translator to execute if the document contains a match for one of the specified strings.

345
EXTENDING DREAMWEAVER
Data translators
Last updated 6/15/2011
Description
Dreamweaver performs two translation passes. The first pass goes through all the translators and calls the
translateMarkup() functions. After those functions are called, the second pass calls the translateDOM() functions.
The
dom passed in is the dom to translate. The only edits that are allowed during the second pass are those dealing with
translated attributes.
Arguments
dom, sourceStr
• The dom argument.
• The sourceStr argument is the same string passed into translateMarkup. It's provided for reference, but all
translation should be done on the dom argument, not the sourceStr argument.
Returns
Dreamweaver expects nothing.
Example
translateDOM( dom, sourceStr ); //returns nothing
The following instance of the translateDOM() function hides the tag with ID div1 in the document.
function translateDOM(dom, sourceStr){
var div1 = dom.getAttributeById("div1");
if (div1){
div1.style.display = "none";
}
}
translateMarkup()
Description
This function performs the translation.
Arguments
docName, siteRoot, docContent
• The docName argument is a string that contains the file:// URL for the document to be translated.
• The siteRoot argument is a string that contains the file:// URL for the root of the site that contains the document to
be translated. If the document is outside a site, this string might be empty.
• The docContent argument is a string that contains the contents of the document.
Returns
A string that contains the translated document or an empty string if nothing is translated.
Example
The following instance of the translateMarkup() function calls the C function translateASP(), which is contained
in a dynamic link library (DLL) (Windows) or a code library (Macintosh) called ASPTrans:

346
EXTENDING DREAMWEAVER
Data translators
Last updated 6/15/2011
function translateMarkup(docName, siteRoot, docContent){
var translatedString = "";
if (docContent.length > 0){
translatedString = ASPTrans.translateASP(docName, siteRoot, ¬
docContent);
}
return translatedString;
}
For an all-JavaScript example, see “A simple attribute translator example” on page 336 or “A simple block/tag
translator example” on page 339.
liveDataTranslateMarkup()
Availability
Dreamweaver UltraDev 1.
Description
This function translates documents when users are using the Live Data window. When the user selects the View > Live
Data command or clicks the Refresh button, Dreamweaver calls the
liveDataTranslateMarkup() function instead
of the
translateMarkup() function.
Arguments
docName, siteRoot, docContent
• The docName argument is a string that contains the file:// URL for the document to be translated.
• The siteRoot argument is a string that contains the file:// URL for the root of the site that contains the document to
be translated. If the document is outside a site, this string might be empty.
• The docContent argument is a string that contains the contents of the document.
Returns
A string that contains the translated document or an empty string if nothing is translated.
Example
The following instance of the liveDataTranslateMarkup() function calls the C function translateASP(), which
is contained in a DLL (Windows) or a code library (Macintosh) called ASPTrans:
function liveDataTranslateMarkup(docName, siteRoot, docContent){
var translatedString = "";
if (docContent.length > 0){
translatedString = ASPTrans.translateASP(docName, siteRoot, docContent);
}
return translatedString;
}

347
Last updated 6/15/2011
Chapter 23: C-level extensibility
The C-level extensibility mechanism lets you implement Adobe Dreamweaver extensibility files using a combination
of JavaScript and custom C code. You define functions using C, bundle them in a dynamic linked library (DLL) or a
shared library, save the library in the Configuration/JSExtensions folder within the Dreamweaver application folder,
and then call the functions from JavaScript using the Dreamweaver JavaScript interpreter.
For example, you might want to define a Dreamweaver object that inserts the contents of a user-specified file into the
current document. Because client-side JavaScript does not provide support file input/output (I/O), you must write a
function in C to provide this functionality.
How integrating C functions works
You can use the following HTML and JavaScript to create a simple Insert Text from File object. The objectTag()
function calls the
readContentsOfFile() C function, which is stored in a library named myLibrary.
<HTML>
<HEAD>
<SCRIPT>
function objectTag() {
fileName = document.forms[0].myFile.value;
return myLibrary.readContentsOfFile(fileName);
}
</SCRIPT>
</HEAD>
<BODY>
<FORM>
Enter the name of the file to be inserted:
<INPUT TYPE="file" NAME="myFile">
</FORM>
</BODY>
</HTML>
The readContentsOfFile() function accepts a list of arguments from the user, retrieves the filename argument,
reads the contents of the file, and returns the contents of the file. For more information about the JavaScript data
structures and functions that appear in the
readContentsOfFile() function, see “C-level extensibility and the
JavaScript interpreter” on page 349.

348
EXTENDING DREAMWEAVER
C-level extensibility
Last updated 6/15/2011
JSBool
readContentsOfFile(JSContext *cx, JSObject *obj, unsigned int ¬
argc, jsval *argv, jsval *rval)
{
char *fileName, *fileContents;
JSBool success;
unsigned int length;
/* Make sure caller passed in exactly one argument. If not,
* then tell the interpreter to abort script execution.*/
if (argc != 1){
JS_ReportError(cx, "Wrong number of arguments", 0);
return JS_FALSE;
}
/* Convert the argument to a string */
fileName = JS_ValueToString(cx, argv[0], &length);
if (fileName == NULL){
JS_ReportError(cx, "The argument must be a string", 0);
return JS_FALSE;
}
/* Use the string (the file name) to open and read a file */
fileContents = exerciseLeftToTheReader(fileName);
/* Store file contents in rval, which is the return value passed
* back to the caller */
success = JS_StringToValue(cx, fileContents, 0, *rval);
free(fileContents);
/* Return true to continue or false to abort the script */
return success;
}
To ensure that the readContentsOfFile() function executes properly and doesn’t cause a JavaScript error, you must
register the function with the JavaScript interpreter by including a
MM_Init() function in your library. When
Dreamweaver loads the library at startup, it calls the
MM_Init() function to get the following three pieces of
information:
• The JavaScript name of the function
• A pointer to the function
• The number of arguments that the function expects
The following example shows how the MM_Init() function for the library myLibrary might look:
void
MM_Init()
{
JS_DefineFunction("readContentsOfFile", readContentsOfFile, 1);
}
Your library must include exactly one instance of the following macro:
/* MM_STATE is a macro that expands to some definitions that are
* needed to interact with Dreamweaver. This macro must
* be defined exactly once in your library. */
MM_STATE

349
EXTENDING DREAMWEAVER
C-level extensibility
Last updated 6/15/2011
Note: The library can be implemented in either C or C++, but the file that contains the MM_Init() function and the
MM_STATE macro must be implemented in C. The C++ compiler garbles function names, which makes it impossible for
Dreamweaver to find the
MM_Init() function.
C-level extensibility and the JavaScript interpreter
The C code in your library must interact with the Dreamweaver JavaScript interpreter at the following different times:
• At startup, to register the library’s functions
• When the function is called, to parse the arguments that JavaScript is passing to C
• Before the function returns, to package the return value
To accomplish these tasks, the interpreter defines several data types and exposes an API. Definitions for the data types
and functions that are listed in this section appear in the mm_jsapi.h file. For your library to work properly, you must
include the mm_jsapi.h file with the following line at the top of each file in your library:
#include "mm_jsapi.h"
Including the mm_jsapi.h file includes, in turn, mm_jsapi_environment.h, which defines the MM_Environment
structure.
Data types
The JavaScript interpreter defines the following data types.
typedef struct JSContext JSContext
A pointer to this opaque data type passes to the C-level function. Some functions in the API accept this pointer as one
of their arguments.
typedef struct JSObject JSObject
A pointer to this opaque data type passes to the C-level function. This data type represents an object, which might be
an array object or some other object type.
typedef struct JSVal JSVal
An opaque data structure that can contain an integer, or a pointer to a floating-point number, string, or object. Some
functions in the API can read the values of function arguments by reading the contents of a JSVal structure, and some
can be used to write the function’s return value by writing a JSVal structure.
typedef enum { JS_FALSE = 0, JS_TRUE = 1 } JSBool
A simple data type that stores a Boolean value.
The C-level API
The C-level extensibility API consists of the following functions:

350
EXTENDING DREAMWEAVER
C-level extensibility
Last updated 6/15/2011
typedef JSBool (*JSNative)(JSContext *cx, JSObject *obj, unsigned int argc,
jsval *argv, jsval *rval)
Description
This function signature describes C-level implementations of JavaScript functions in the following situations:
• The cx pointer is a pointer to an opaque JSContext structure, which must be passed to some of the functions in
the JavaScript API. This variable holds the interpreter’s execution context.
• The obj pointer is a pointer to the object in whose context the script executes. While the script is running, the this
keyword is equal to this object.
• The argc integer is the number of arguments being passed to the function.
• The argv pointer is a pointer to an array of JSVal structures. The array is argc elements in length.
• The rval pointer is a pointer to a single JSVal structure. The function’s return value should be written to *rval.
The function returns JS_TRUE if successful; JS_FALSE otherwise. If the function returns JS_FALSE, the current script
stops executing and an error message appears.
JSBool JS_DefineFunction()
Description
This function registers a C-level function with the JavaScript interpreter in Dreamweaver. After the
JS_DefineFunction() function registers the C-level function that you specify in the call argument, you can invoke
it in a JavaScript script by referring to it with the name that you specify in the name argument. The name argument is
case-sensitive.
Typically, this function is called from the MM_Init() function, which Dreamweaver calls during startup.
Arguments
char *name, JSNativecall, unsigned int nargs
• The name argument is the name of the function as it is exposed to JavaScript.
• The call argument is a pointer to a C-level function. The function must accept the same arguments as
readContentsOfFile, and it must return a JSBool, which indicates success or failure.
• The nargs argument is the number of arguments that the function expects to receive.
Returns
A Boolean value: JS_TRUE indicates success; JS_FALSE indicates failure.
char *JS_ValueToString()
Description
This function extracts a function argument from a JSVal structure, converts it to a string if possible, and passes the
converted value back to the caller.
Note: Do not modify the returned buffer pointer. It can corrupt the data structures of the JavaScript interpreter. To
change the string, copy the characters into another buffer and create a JavaScript string.

351
EXTENDING DREAMWEAVER
C-level extensibility
Last updated 6/15/2011
Arguments
JSContext *cx, JSVal v, unsigned integer *pLength
• The *cx argument is the opaque JSContext pointer that passes to the JavaScript function.
• The v argument is the JSVal structure from which Dreamweaver extracts the string.
• The *pLength argument is a pointer to an unsigned integer. This function sets *pLength equal to the length of the
string in bytes.
Returns
A pointer that points to a null-terminated string if successful, or to a null value on failure. The calling routine must
not free this string when it finishes.
JSBool JS_ValueToInteger()
Description
This function extracts a function argument from a JSVal structure, converts it to an integer (if possible), and passes
the converted value back to the caller.
Arguments
JSContext *cx, JSVal v, long *lp
• The cx argument is the opaque JSContext pointer that passes to the JavaScript function.
• The v argument is the JSVal structure from which the integer is to be extracted.
• The lp argument is a pointer to a 4-byte integer. This function stores the converted value in *lp.
Returns
A Boolean value: JS_TRUE indicates success; JS_FALSE indicates failure.
JSBool JS_ValueToDouble()
Description
This function extracts a function argument from a JSVal structure, converts it to a double (if possible), and passes the
converted value back to the caller.
Arguments
JSContext *cx, JSVal v, double *dp
• The cx argument is the opaque JSContext pointer that passes to the JavaScript function.
• The v argument is the JSVal structure from which the double is to be extracted.
• The dp argument is a pointer to an 8-byte double. This function stores the converted value in *dp.
Returns
A Boolean value: JS_TRUE indicates success; JS_FALSE indicates failure.

352
EXTENDING DREAMWEAVER
C-level extensibility
Last updated 6/15/2011
JSBool JS_ValueToBoolean()
Description
This function extracts a function argument from a JSVal structure, converts it to a Boolean value (if possible), and
passes the converted value back to the caller.
Arguments
JSContext *cx, JSVal v, JSBool *bp
• The cx argument is the opaque JSContext pointer that passes to the JavaScript function.
• The v argument is the JSVal structure from which the Boolean value is to be extracted.
• The bp argument is a pointer to a JSBool Boolean value. This function stores the converted value in *bp.
Returns
A Boolean value: JS_TRUE indicates success; JS_FALSE indicates failure.
JSBool JS_ValueToObject()
Description
This function extracts a function argument from a JSVal structure, converts it to an object (if possible), and passes the
converted value back to the caller. If the object is an array, use
JS_GetArrayLength() and JS_GetElement() to read
its contents.
Arguments
JSContext *cx, JSVal v, JSObject **op
• The cx argument is the opaque JSContext pointer that passes to the JavaScript function.
• The v argument is the JSVal structure from which the object is to be extracted.
• The op argument is a pointer to a JSObject pointer. This function stores the converted value in *op.
Returns
A Boolean value: JS_TRUE indicates success; JS_FALSE indicates failure.
JS_ValueToUCString()
Description
This function extracts a function argument from a JSVal structure, converts it to a string if possible, and passes the
converted value back to the caller.
Note: Do not modify the returned buffer pointer. It can corrupt the data structures of the JavaScript interpreter. To
change the string, copy the characters into another buffer and create a JavaScript string.
Arguments
JSContext *cx, JSVal v, unsigned int *pLength
• The *cx argument is the opaque JSContext pointer that passes to the JavaScript function.
• The v argument is the JSVal structure from which Dreamweaver extracts the string.

353
EXTENDING DREAMWEAVER
C-level extensibility
Last updated 6/15/2011
• The *pLengthargument is a pointer to an unsigned integer. This function sets *pLength equal to the length of the
string in bytes.
Returns
A pointer that points to a null-terminated UTF-8 string if successful, or to a null value on failure. The calling routine
must not free this string when it finishes.
JSBool JS_StringToValue()
Description
This function stores a string return value in a JSVal structure. It allocates a new JavaScript string object.
Arguments
JSContext *cx, JSVal *bytes, size_t sz, JSVal*vp
• The *cx argument is the opaque JSContext pointer that passes to the JavaScript function.
• The bytes argument is the string that Dreamweaver stores in the JSVal structure. The string data is copied, so the
caller must free the string when it is not needed. If the string size is not specified (see the
sz argument), the string
must be null-terminated.
• The sz argument is the size of the string, in bytes. If sz is 0, the length of the null-terminated string is computed
automatically.
• The *vp argument is a pointer to the JSVal structure into which the contents of the string is copied.
Returns
A Boolean value: JS_TRUE indicates success; JS_FALSE indicates failure.
JSBool JS_UCStringToValue()
Description
This function stores a string return value in a JSVal structure. It allocates a new JavaScript string object.
Arguments
JSContext *cx , JSVal *bytes, size_tsz, JSVal *vp
• The *cx argument is the opaque JSContext pointer that passes to the JavaScript function.
• The *bytes argument is the string that Dreamweaver stores in the JSVal structure. The string data is copied, so the
caller must free the string when it is not needed. If the string size is not specified (see the
sz argument), the string
must be null-terminated.
• The sz argument is the size of the string, in bytes. If sz is 0, the length of the null-terminated string is computed
automatically.
• The *vp argument is a pointer to the JSVal structure into which the contents of the string is copied.
Returns
A Boolean value: JS_TRUE indicates success; JS_FALSE indicates failure

354
EXTENDING DREAMWEAVER
C-level extensibility
Last updated 6/15/2011
Note: The JS_UCStringToValue() method is like the JSBool JS_StringToValue() in every way, except that it
returns a UTF-8 string.
JSBool JS_DoubleToValue()
Description
This function stores a floating-point number return value in a JSVal structure.
Arguments
JSContext *cx, double dv, JSVal *vp
• The cx argument is the opaque JSContext pointer that passes to the JavaScript function.
• The dv argument is an 8-byte floating-point number.
• The vp argument is a pointer to the JSVal structure into which the contents of the double should be copied.
Returns
A Boolean value: JS_TRUE indicates success; JS_FALSE indicates failure.
JSVal JS_BooleanToValue()
Description
This function stores a Boolean return value in a JSVal structure.
Arguments
JSBool bv
• The bv argument is a Boolean value: JS_TRUE indicates success; JS_FALSE indicates failure.
Returns
A JSVal structure that contains the Boolean value that passes to the function as an argument.
JSVal JS_IntegerToValue()
Description
This function converts a long integer value to JSVal structure.
Arguments
lv
The lv argument is the long integer value that you want to convert to a JSVal structure.
Returns
A JSVal structure that contains the integer that was passed to the function as an argument.

355
EXTENDING DREAMWEAVER
C-level extensibility
Last updated 6/15/2011
JSVal JS_ObjectToValue()
Description
This function stores an object return value in a JSVal. Use JS_ NewArrayObject() to create an array object; use
JS_SetElement() to define its contents.
Arguments
JSObject *obj
The obj argument is a pointer to the JSObject object that you want to convert to a JSVal structure.
Returns
A JSVal structure that contains the object that you passed to the function as an argument.
char *JS_ObjectType()
Description
Given an object reference, the JS_ObjectType() function returns the class name of the object. For example, if the
object is a DOM object, the function returns "
Document". If the object is a node in the document, the function returns
"
Element". For an array object, the function returns "Array".
Note: Do not modify the returned buffer pointer or you might corrupt the data structures of the JavaScript interpreter.
Arguments
JSObject *obj
Typically, this argument is passed in and converted using the JS_ValueToObject() function.
Returns
A pointer to a null-terminated string. The caller should not free this string when it finishes.
JSObject *JS_NewArrayObject()
Description
This function creates a new object that contains an array of JSVals.
Arguments
JSContext *cx, unsigned int length, JSVal *v
• The cx argument is the opaque JSContext pointer that passes to the JavaScript function.
• The length argument is the number of elements that the array can hold.
• The v argument is an optional pointer to the JSVals to be stored in the array. If the return value is not null, v is
an array that contains length elements. If the return value is
null, the initial content of the array object is undefined
and can be set using the
JS_SetElement() function.
Returns
A pointer to a new array object or the value null upon failure.

356
EXTENDING DREAMWEAVER
C-level extensibility
Last updated 6/15/2011
long JS_GetArrayLength()
Description
Given a pointer to an array object, this function gets the number of elements in the array.
Arguments
JSContext *cx, JSObject*obj
• The cx argument is the opaque JSContext pointer that passes to the JavaScript function.
• The obj argument is a pointer to an array object.
Returns
The number of elements in the array or -1 upon failure.
JSBool JS_GetElement()
Description
This function reads a single element of an array object.
Arguments
JSContext *cx, JSObject *obj, unsigned int index, JSVal *v
• The cx argument is the opaque JSContext pointer that passes to the JavaScript function.
• The obj argument is a pointer to an array object.
• The index argument is an integer index into the array. The first element is index0, and the last element is index
(
length - 1).
• The v argument is a pointer to a jsval where the contents of the JSVal structure in the array should be copied.
Returns
A Boolean value: JS_TRUE indicates success; JS_FALSE indicates failure.
JSBool JS_SetElement()
Description
This function writes a single element of an array object.
Arguments
JSContext *cx, JSObject *obj, unsigned int index, JSVal *v
• The cx argument is the opaque JSContext pointer that passes to the JavaScript function.
• The obj argument is a pointer to an array object.
• The index argument is an integer index into the array. The first element is index0, and the last element is index
(
length - 1).
• The v argument is a pointer to a JSVal structure whose contents should be copied to the JSVal in the array.

357
EXTENDING DREAMWEAVER
C-level extensibility
Last updated 6/15/2011
Returns
A Boolean value: JS_TRUE indicates success; JS_FALSE indicates failure.
JSBool JS_ExecuteScript()
Description
This function compiles and executes a JavaScript string. If the script generates a return value, it returns in *rval.
Arguments
JSContext *cx, JSObject *obj, char *script, unsigned intsz, JSVal *rval
• The cx argument is the opaque JSContext pointer that passes to the JavaScript function.
• The obj argument is a pointer to the object in whose context the script executes. While the script is running, the
this keyword is equal to this object. Usually this is the JSObject pointer that passes to the JavaScript function.
• The script argument is a string that contains JavaScript code. If the string size is not specified (see the sz argument),
the string must be null-terminated.
• The sz argument is the size of the string, in bytes. If sz is 0, the length of the null-terminated string is computed
automatically.
• The rval argument is a pointer to a single JSVal structure. The function’s return value is stored in *rval.
Returns
A Boolean value: JS_TRUE indicates success; JS_FALSE indicates failure.
JSBool JS_ReportError()
Description
This function describes the reason for a script error. Call this function before returning the value JS_FALSE for a script
error to give the user information about why the script failed (for example, “wrong number of arguments”).
Arguments
JSContext *cx, char *error, size_t sz
• The cx argument is the opaque JSContext pointer that passes to the JavaScript function.
• The error argument is a string that contains the error message. The string is copied, so the caller should free the
string when it is not needed. If the string size is not specified (see the sz argument), the string must be null-
terminated.
• The sz argument is the size of the string, in bytes. If sz is 0, the length of the null-terminated string is computed
automatically.
Returns
A Boolean value: JS_TRUE indicates success; JS_FALSE indicates failure.

358
EXTENDING DREAMWEAVER
C-level extensibility
Last updated 6/15/2011
File access and multiuser configuration API
Adobe recommends that you always use the file access and multiuser configuration API to access the file system
through C-level extensions. For files other than Configuration files, the functions access the specified file or folder.
Dreamweaver supports multiple-user configurations for the Windows XP, Windows 2000, and Mac OS X operating
systems.
Typically, you install Dreamweaver in a restricted folder such as C:\Program Folders in Windows. As a result, only
users with administrator privileges can make changes in the Dreamweaver Configuration folder. To enable users on
multiuser operating systems to create and maintain individual configurations, Dreamweaver creates a separate
Configuration folder for each user. Whenever Dreamweaver or a JavaScript extension writes to the Dreamweaver
Configuration folder, Dreamweaver automatically writes to the user Configuration folder instead. This process lets
each user customize Dreamweaver configuration settings without disturbing the customized configurations of other
users.
Dreamweaver creates the user Configuration folder in a location where the user has full read and write access. The
location of the user Configuration folder depends on the user platform.
For Windows 2000 and Windows XP platforms:
<drive>:\Documents and Settings\<username>\Application Data\Adobe\\
Dreamweaver CS5\Configuration
Note: It is possible that in Windows XP, this folder is inside a hidden folder.
For Mac OS X platforms:
<drive>:Users:<username>:Library:Application Support:Adobe:Dreamweaver CS5:Configuration
In many cases, JavaScript extensions open files and write to the Configuration folder. JavaScript extensions can access
the file system by using DWFile or MMNotes, or by passing a URL to the
dreamweaver.getDocumentDOM() function.
When an extension accesses the file system in a Configuration folder, it generally uses the
dw.getConfigurationPath() function and adds the filename, or it gets the path by accessing the dom.URL property
of an open document and adding the filename. An extension can also get the path by accessing the
dom.URL and
stripping the filename. The
dw.getConfigurationPath() function and the dom.URL property always return a URL
in the Dreamweaver Configuration folder, even if the document is located in the user Configuration folder.
Any time a JavaScript extension opens a file in the Dreamweaver Configuration folder, Dreamweaver intercepts the
access, and checks the user Configuration folder first. If a JavaScript extension saves data to disk in the Dreamweaver
Configuration folder through DWFile or MMNotes, Dreamweaver intercepts the call. Then it redirects the call to the
user Configuration folder.
For example, in Windows 2000 or Windows XP, if the user asks for file:///C|/Program Files/Adobe/Adobe
Dreamweaver CS5/Configuration/Objects/Common/Table.htm, Dreamweaver searches for a Table.htm file in the
C:\Documents and Settings\username\adobe\Dreamweaver CS5\Configuration\Objects\Common folder and, if it
exists, uses it instead.
C-level extensions, or shared libraries, must use the file access and multiuser configuration API to read and write to
the Dreamweaver Configuration folder. Using the file access and multiuser configuration API lets Dreamweaver read
and write to the user Configuration folder. It also ensures that the file operations do not fail due to insufficient access
privileges. If the files in the Dreamweaver Configuration folder that your C-level extension accesses is created through
JavaScript with DWFile, MMNotes, or DOM manipulations, use the File Access and Multiuser Configuration API. It
is possible that these files are located in the Configuration folder of the user.

359
EXTENDING DREAMWEAVER
C-level extensibility
Last updated 6/15/2011
Note: Most JavaScript extensions need not be changed to write to the user Configuration folder. Only C shared libraries
that write to the Configuration folder must be updated to use the file access and multiuser configuration API functions.
When you delete a file from the Dreamweaver Configuration folder, Dreamweaver adds an entry to a mask file. This
entry is added to indicate which files in the Configuration folder must not appear in the user interface. A masked file
or folder does not appear to exist to Dreamweaver although it possibly exists in the folder.
For example, if you use the Trash Can icon in the Snippets panel to delete a Snippets folder called javascript and a file
called onepixelborder.csn, Dreamweaver writes a file in the user Configuration folder called mm_deleted_files.xml. It
looks like the following example:
<?xml version = "1.0" encoding="utf-8" ?>
<deleteditems>
<item name="snippets/javascript/" />
<item name="snippets/html/onepixelborder.csn" />
</deleteditems>
As Dreamweaver populates the Snippets panel, it reads all the files in the user Configuration/Snippets folder. It also
reads all the files in the Dreamweaver Configuration/Snippets folder, except the Configuration/Snippets/javascript
folder and the Configuration/Snippets/html/onepixelborder.csn file. It adds the resulting list of files to the Snippets
panel list.
If a C-level extension calls the MM_ConfigFileExists() function for the file:///c|Program Files/Adobe
/Adobe Dreamweaver CS5/Configuration/Snippets/javascript/onepixelborder.csn URL, it returns a value
of
false. Likewise, if a JavaScript extension tries to call dw.getDocumentDom(file:///c|Program
Files/Adobe/Adobe Dreamweaver CS5/Configuration/Snippets/javascript/onepixelborder.csn), it
returns a
null value.
Edit the mm_deleted_files.xml file to prevent Dreamweaver from showing files in the user interface, such as objects,
canned content in the new dialog box, and so on. You can call the
MM_DeleteConfigfile() function to add file paths
to the mm_deleted_files.xml file.
JS_Object MM_GetConfigFolderList()
Availability
Dreamweaver MX.
Description
This function gets a list of files, folders, or both for the specified folder. If you specify a configuration folder, the
function gets a list of the folders that exists in both the user Configuration folder and the Dreamweaver Configuration
folder, subject to filtering by the mm_deleted_files.xml file.
Arguments
char *fileURL, char *constraints
• The char *fileUrl argument is a pointer to a string that names the folder for which you want a list of the contents.
The string must have the format of a file:// URL. The function accepts valid wildcard characters of asterisks (*) and
question marks (?) in the file:// URL string. Use asterisks (*) to represent one or more unspecified characters, and
question marks (?) to represent a single unspecified character.
• The char *contstraints argument can be files or directories or a null value. If you specify null, the
MM_GetConfigFolderList() function returns files and folders.

360
EXTENDING DREAMWEAVER
C-level extensibility
Last updated 6/15/2011
Returns
JSObject is an array that contains the list of files or folders in either the user Configuration folder or the Dreamweaver
Configuration folder, subject to filtering by the mm_deleted_files.xml file.
Examples
JSObject *jsobj_array;
jsobj_array = MM_GetConfigFolderList("file:///¬
c|/Program Files/Adobe/Adobe Dreamweaver CS3/Configuration", "directories" );
JSBool MM_ConfigFileExists()
Availability
Dreamweaver MX.
Description
This function checks whether the specified file exists. If it is a file in a configuration folder, the function searches for
the file in the user Configuration folder or the Dreamweaver Configuration folder. The function also checks whether
the filename is listed in the mm_deleted_files.xml file. If the name is listed in this file, the function returns a
false
value.
Arguments
char *fileUrl
The char *fileUrl argument is a pointer to a string that names the desired file, which is provided in the format of a file:// URL.
Returns
A Boolean value: JS_TRUE indicates success; JS_FALSE indicates failure.
Example
char *dwConfig = "file:///c|/Program Files/Adobe/Adobe Dreamweaver CS3/
Configuration/Extensions.txt";
int fileno = 0;
if(MM_ConfigFileExists(dwConfig))
{
fileno = MM_OpenConfigFile(dwConfig, "read");
}
int MM_OpenConfigFile()
Availability
Dreamweaver MX.
Description
This function opens the file and returns an operating system file handle. You can use the operating system file handle
in calls to system file functions. You must close the file handle with a call to the system
_close function.
If the file is a configuration file, it finds the file in either the user Configuration folder or the Dreamweaver
Configuration folder. If you open the Configuration file for writing, the function creates the file in the user
Configuration folder even if it exists in the Dreamweaver Configuration folder.

361
EXTENDING DREAMWEAVER
C-level extensibility
Last updated 6/15/2011
Note: If you want to read the file before writing to it, open the file in "read" mode. When you want to write to the file,
close the read handle and open the file again in
"write" or "append" mode.
Arguments
char *fileURL, char *mode
• The char *fileURL argument is a pointer to a string that names the file that you are opening, which is provided as a
file:// URL. If it specifies a path in the Dreamweaver Configuration folder, the
MM_OpenConfigFile() function
resolves the path before opening the file.
• The char *mode argument points to a string that specifies how you want to open the file. You can specify null,
"
read", "write", or "append" mode. If you specify "write" and the file does not exist, the MM_OpenconfigFile()
function creates it. If you specify "
write", the MM_OpenConfigFile() function opens the file with an exclusive
share. If you specify "
read", the MM_OpenConfigFile() function opens the file with a non-exclusive share.
If you open the file in "write" mode, any existing data in the file is truncated before writing new data. If you open
the file in "
append" mode, any data you write is appended to the end of the file.
Returns
An integer that is the operating system file handle for this file. Returns -1 if the file cannot be found or does not exist.
Example
char *dwConfig = "file:///c|/Program Files/Adobe/Adobe Dreamweaver CS3/
Configuration/Extensions.txt";
int = fileno;
if(MM_ConfigFileExists(dwConfig))
{
fileno = MM_OpenConfigFile(dwConfig, "read");
}
JSBool MM_GetConfigFileAttributes()
Availability
Dreamweaver MX.
Description
This function finds the file and returns the attributes of the file. You can set any of the arguments except fileURL to
null if you do not need the value.
Arguments
char *fileURL, unsigned long *attrs, unsigned long *filesize, unsigned long *modtime, unsigned long *createtime
• The char *fileURL argument is a pointer to a string that names the file for which you want the attributes. You must
provide this argument as a file:// URL. If fileURL specifies a path in the Dreamweaver Configuration folder, the
MM_GetConfigFileAttributes() function resolves the path before opening the file.
• The unsigned long *attrs argument is the address of an integer that contains the returned attribute bits (see “JSBool
MM_SetConfigFileAttributes()” on page 362 for available attributes).
• The unsigned long *filesize argument is the address of an integer in which the function returns the file size in bytes.

362
EXTENDING DREAMWEAVER
C-level extensibility
Last updated 6/15/2011
• The unsigned long *modtime argument is the address of an integer in which the function returns the time that the
file was last modified. The time is given as the operating-system time value. For more information about the
operating-system time value, see
DWfile.getModificationDate() in the Dreamweaver API Reference.
• The unsigned long *createtime argument is the address of an integer in which the function returns the time that the
file was created. The time is given as the operating-system time value. For more information on the operating
system time value, see
DWfile.getCreationDate()in the Dreamweaver API Reference.
Returns
A Boolean value: JS_TRUE indicates success; JS_FALSE indicates failure. Returns JS_FALSE if the file does not exist or
an error occurs while getting the attributes.
Example
char dwConfig = "file:///c|/Program Files/Adobe/Adobe Dreamweaver CS3/
Configuration/Extensions.txt";
unsigned long attrs;
unsigned long filesize;
unsigned long modtime;
unsigned long createtime;
MM_GetConfigAttributes(dwConfig, &attrs, &filesize, &modtime, &createtime);
JSBool MM_SetConfigFileAttributes()
Availability
Dreamweaver MX.
Description
This function sets the attributes that you specify for the file, if they are different from the current attributes.
If the specified file URL is in the Dreamweaver Configuration folder, this function first copies the file to the user
Configuration folder before it sets the attributes. If the attributes are the same as the current file attributes, the file is
not copied.
Arguments
char *fileURL, unsigned long attrs
• The char *fileURL argument is a pointer to a string that names the file for which you want to set the attributes, which
is provided as a file:// URL.
• The unsigned long attrs argument specifies the attribute bits to set on the file. You can use a logical OR on the
following constants to set the attributes:
MM_FILEATTR_NORMAL
MM_FILEATTR_RDONLY
MM_FILEATTR_HIDDEN
MM_FILEATTR_SYSTEM
MM_FILEATTR_SUBDIR
Returns
A Boolean value: JS_TRUE indicates success; JS_FALSE indicates failure. Returns JS_FALSE if the file does not exist or
is marked for deletion.

363
EXTENDING DREAMWEAVER
C-level extensibility
Last updated 6/15/2011
Example
char *dwConfig = "file:///c|/Program Files/Adobe/Adobe Dreamweaver CS3/
Configuration/Extensions.txt";
unsigned long attrs;
attrs = (MM_FILEATTR_NORMAL | MM_FILEATTR_RDONLY);
int fileno = 0;
if(MM_SetConfigFileAttrs(dwConfig, attrs))
{
fileno = MM_OpenConfigFile(dwConfig);
}
JSBool MM_CreateConfigFolder()
Availability
Dreamweaver MX.
Description
This function creates a folder in the specified location.
If the fileURL argument specifies a folder within the Dreamweaver Configuration folder, the function creates the folder
in the user Configuration folder. If fileURL does not specify a folder in the Dreamweaver Configuration folder, the
function creates the specified folder, including all higher-level folders in the path, if they do not already exist.
Arguments
char *fileURL
• The char *fileURL argument is a pointer to a file:// URL string that names the configuration folder that you want
to create.
Returns
A Boolean value: JS_TRUE indicates success; JS_FALSE indicates failure.
Example
char *dwConfig = "file:///c|/Program Files/Adobe/Adobe Dreamweaver CS3
/Configuration/Extensions.txt";
MM_CreateConfigFolder(dwConfig);
JSBool MM_RemoveConfigFolder()
Availability
Dreamweaver MX.
Description
This function removes the folder and its files and subfolders. If the folder is in the Dreamweaver Configuration folder,
it marks the folder for deletion in the mm_deleted_files.xml file.
Arguments
char *fileURL
• The char *fileURL argument is a pointer to a string that names the folder to remove, which is provided as a file:// URL.

364
EXTENDING DREAMWEAVER
C-level extensibility
Last updated 6/15/2011
Returns
A Boolean value: JS_TRUE indicates success; JS_FALSE indicates failure.
Example
char *dwConfig = "file:///c|/Program Files/Adobe/Adobe Dreamweaver CS3
/Configuration/Objects";
MM_RemoveConfigFolder(dwConfig);
JSBool MM_DeleteConfigFile()
Availability
Dreamweaver MX.
Description
This function deletes the file, if it exists. If the file exists below the Dreamweaver Configuration folder, the function
marks the file for deletion in the mm_deleted_files.xml file.
If the fileURL argument does not specify a folder in the Dreamweaver Configuration folder, the function deletes the
specified file.
Arguments
char *fileURL
• The char *fileURL argument is a pointer to a string that names the configuration folder to remove, which is
provided as a file:// URL.
Returns
A Boolean value: JS_TRUE indicates success; JS_FALSE indicates failure.
Example
char dwConfig = "file:///c:|Program Files/Adobe/Adobe Dreamweaver CS3
/Configuration/Objects/insertbar.xml";
MM_DeleteConfigFile(dwConfig);
Calling a C function from JavaScript
After you understand how C-level extensibility works in Dreamweaver and its dependency on certain data types and
functions, it’s useful to know how to build a library and call a function.
The following example requires the following five files, located in the Dreamweaver-application-folder/
Tutorial_assets/Extending folder as archives for both the Macintosh and Windows platforms:
• The mm_jsapi.h header file includes definitions for the data types and functions that are described in “C-level
extensibility and the JavaScript interpreter” on page 349.
• The mm_jsapi_environment.h file defines the MM_Environment.h structure.
• The MMInfo.h file provides access to the Design Notes API.

365
EXTENDING DREAMWEAVER
C-level extensibility
Last updated 6/15/2011
• The Sample.c example file defines the computeSum() function.
• The Sample.mak make file lets you build the Sample.c source file into a DLL with Microsoft Visual C++;
Sample.mcp is the equivalent file for building a Mach-O Bundle with Metrowerks CodeWarrior and Sample.xcode
is the equivalent file for Apple Xcode. If you use another tool, you can create the makefile.
Build the DLL in Windows using VS.Net 2003
1 Use File > Open, and select Sample.mak with Files Of Type set to All Files (*.*). (VS.Net 2003 does not open MAK
files directly). You are then prompted to verify that you want to convert the project to the new format.
2 Select Build > Rebuild Solution.
When the build operation finishes, the Sample.dll file appears in the folder that contains Sample.mak (or one of its
subfolders).
Build the DLL in Windows using Microsoft Visual C++
1 In Microsoft Visual C++, select File > Open Workspace, and select Sample.mak.
2 Select Build > Rebuild All.
When the build operation finishes, the Sample.dll file appears in the folder that contains Sample.mak (or one of its
subfolders).
Build the shared library on the Macintosh using Metrowerks CodeWarrior 9 or later
1 Open Sample.mcp.
2 Build the project (Project > Make) to generate a Mach-O Bundle.
When the build operation finishes, the Sample.bundle file appears in the folder that contains Sample.mcp.
Note: The Mach-O Bundle that is generated can only be used in Dreamweaver 8 and later. Earlier versions of
Dreamweaver do not recognize it.
Build the shared library on the Macintosh using Apple Xcode 1.5 or later
1 Open Sample.xcode.
2 Build the project (Build > Build) to generate a Mach-O Bundle.
When the build operation finishes, the Sample.bundle file appears in the build folder that is next to the Sample.xcode file.
Note: The Mach-O Bundle that is generated can only be used in Dreamweaver 8 and later. Earlier versions of
Dreamweaver do not recognize it.
Call the computeSum() function from the Insert Horizontal Rule object
1 Create a folder called JSExtensions in the Configuration folder within the Dreamweaver application folder.
2 Copy Sample.dll (Windows) or Sample.bundle (Macintosh) to the JSExtensions folder.
3 In a text editor, open the HR.htm file in the Configuration/Objects/Common folder.
4 Add the line alert(Sample.computeSum(2,2)); to the objectTag() function, as shown in the following
example:

366
EXTENDING DREAMWEAVER
C-level extensibility
Last updated 6/15/2011
function objectTag() {
// Return the html tag that should be inserted
alert(Sample.computeSum(2,2));
return "<HR>";
}
5 Save the file and restart Dreamweaver.
To execute the computeSum() function, select Insert > HTML > Horizontal Rule.
A dialog box that contains the number 4 (the result of computing the sum of 2 plus 2) appears.

367
Last updated 6/15/2011
Chapter 24: The Shared folder
The Shared folder is the central repository for utility functions, classes, and images that are commonly used by all
extensions. Any extension can reference the files in the Shared folder’s subfolders, and you can add custom common
utilities to the ones already provided by Adobe Dreamweaver. The multiple user Configuration folders installed for
users on Windows XP, Windows 2000, and Mac OS X platforms also contain a Shared folder for individual
customizations. For example, when you install an extension from the Adobe exchange, you might notice that the new
extension adds contents to your user Configuration/Shared folder rather than the Dreamweaver application
Configuration/Shared folder. For more information on the Dreamweaver Configuration folders on a multiuser
computer, see
“Multiuser Configuration folders” on page 78.
The Shared folder contents
The Shared folder has subfolders that contain files shared by multiple extensions, including functions for browsing a
user’s folder system, inserting a tree control, creating editable grids, and other features.
Note: The JavaScript files in the Shared folder have comments within the code that provide details about the functions
they contain.
In addition to looking at the JavaScript files in the Shared folder, you should also search for HTML files in the
Configuration folder that include these JavaScript files so that you can investigate how they are used.
Generally, you use the functions and resources in the Common and MM folders or add resources to the Common
folder for use in new extensions. You should always look in the Shared/Common/Scripts folder first for utilities and
functions. These functions and utilities are the most current and comprise the formal interface to the Shared folder.
Use files in other folders at your own risk because they might be out of date.
Specifically, the Shared folder contains the following useful folders.
The Common folder
The Common folder has shared scripts and classes for use in third-party extensions.
File Description
CodeBehindMgr.js Contains functions for creating a code-behind document. A code-behind document lets you create
distinct pages that separate the code for user interface (UI) logic from the code for a UI design. The
methods of
JSCodeBehindMgr defined in this file can create new code-behind documents and manage
the link to design documents.
ColumnValueNodeClass.js Contains functions for mapping database columns to values. The methods of ColumnValueNode
defined in this file let you get and set various values and properties of a database column. Dreamweaver
uses this storage class when applying and inspecting edit operations objects (insert and update record
objects) and working with the SQLStatement class.
CompilerClass.js Contains functions for a base class used by CompilerASPNetCSharp and CompilerASPNVBNet but
could be extended to support other compilers.
DataSourceClass.js Contains functions that define the return structure for “findDynamicSources()” on page 300.

368
EXTENDING DREAMWEAVER
The Shared folder
Last updated 6/15/2011
The MM folder
The MM folder contains the shared scripts, images, and classes used by the extensions that come with Dreamweaver,
including the scripts for building a navigation bar, specifying preload calls, and defining the shortcut key definitions.
DBTreeControlClass.js Contains functions that build a database tree control. This class is used to create and interact with a
database tree control. To create a database tree control, such as the one in the advanced recordset server
behaviors, create a special
<select> list with type="mmdatabasetree" in your HTML file. Attach a
CBTreeControl class to the HTML control by passing the <select> list name to the class constructor.
Then use the
DBTreeControl functions to manipulate the control.
dotNetUtils.js Contains functions to facilitate working with object property inspectors, and server behaviors for
ASP.NET form controls, which are translated.
dwscripts.js Look in this main file to find useful functions for all Dreamweaver extensions. It includes functions for
working with strings, files, design notes, and so on.
dwscriptsExtData.js This file is an extension of the dwscripts.js file. This file facilitates working with server behaviors,
particularly with server behavior EDML files. Used extensively in Dreamweaver’s implementation of
server behaviors.
dwscriptsServer.js This file is an extension of the dwscripts.js file. It contains functions that are specific to server models.
Many of these functions are used when working with server behaviors.
GridControlClass.js Use this class to create and manipulate an editable grid. You add a special select list in your HTML, and
attach this class to it in JavaScript to manipulate the grid.
ImageButtonClass.js This class makes it easy to control the Pressed/Mouse-over-while-pressed/Mouse-over/Disabled-while-
pressed look of a button.
ListControlClass.js Contains functions that manage a <select> tag, also known as a list control. The methods of the
ListControl object in this file get, set, and change the value of the SELECT control.
PageSettingsASPNet.js Contains functions that set the properties of an ASP.NET document.
RadioGroupClass.js Contains functions that define and manage a radio button group. The methods of the RadioGroup
object in this file set and get values and behavior of a radio button group. You attach this class to radio
buttons in your HTML to control their behavior.
SBDatabaseCallClass.js A subclass of ServerBehavior class. This class includes functionality specific to making database calls,
for example, calling a stored procedure, using SQL to return a recordset, and so on. This is an abstract
base class, which means that it cannot be created and used on its own. To use it, you must subclass
SBDatabaseCall() and implement the placeholder functions. Dreamweaver uses this class to
implement its recordset and stored procedures server behaviors.
ServerBehaviorClass.js Contains functions that communicate information about server behaviors to Dreamweaver. You can
subclass this class as part of implementing your own server behaviors.
ServerSettingsASPNet.js Contains functions that store the properties of a ASP.NET server.
SQLStatementClass.js Contains functions that let you create and edit SQL statements, such as SELECT, INSERT, UPDATE, and
DELETE, and stored procedure statements.
tagDialogsCmn.js Contains functions that help you develop custom tag dialog boxes. The methods of the tagDialog
object defined in this file modify attributes and values for a particular tag.
TagEditClass.js Contains functions that edit tags without changing the DOM of the current page. The methods of the
TagEdit object defined in this file get and set a tag’s value, attributes, and children.
TreeControlClass.js Contains functions that manage a tree control within Dreamweaver. The methods of the TreeControl
object defined in this file get, set, and arrange values in a tree. You attach this class to a special
MM:TREECONTROL tag in your HTML to manage the tree control functionality.
XMLPropSheetClass.js Contains functions that manage the location and values of an XML property sheet.
File Description

369
EXTENDING DREAMWEAVER
The Shared folder
Last updated 6/15/2011
The Scripts subfolder
The Scripts subfolder contains the following utility functions:
The Scripts folder also contains two subfolders, Class and CMN.
The Class folder
The Class folder contains the following utility functions:
File Description
CFCutilities.js Contains utility functions related to Adobe ColdFusion components. Functions parse attributes from
within the opening tag of a given node, parse a CFC tree, get the current URL DOM, get the CFC DOM,
and more.
event.js Contains functions to register events, notify parties of events from the menus.xml file, and add event
notifiers to the menus.xml file.
FlashObjects.js Contains functions that update a color picker, check for hexadecimal color, check for an absolute link,
add an extension to a filename, generate error messages, set Flash attributes, check a link for Flash
object, and so on.
insertFireworksHTML.js Contains functions to insert Adobe Fireworks CS3 HTML code into Dreamweaver documents. Functions
check whether current document is a Fireworks document, insert Fireworks HTML at insertion point,
update a Fireworks style block to Dreamweaver, and more. Also contains related utility functions.
jumpMenuUI.js Contains functions for use with the jump menu object and jump menu behavior. Functions populate
menu options, create an option label, add an option, delete an option, and so on.
keyCodes.js Contains an array of keyboard key codes.
navBar.js Contains classes and functions for working with a navigation bar and navigation bar elements. Includes
functions to add, remove, and manipulate navigation bar elements.
NBInit.js Contains functions related to navigation bar image behaviors.
pageEncodings.js Defines various language codes.
preload.js Contains functions for adding and deleting preload-image calls to the BODY/onLoad
MM_preloadImages
handler.
RecordsetDialogClass.js Contains the static class and functions to display the recordset server behaviors UI. Functions determine
which interface, simple or advanced, to display. Also, houses functionality shared between the UI
implementations and mediates switches between the UIs.
sbUtils.js Contains shared functions for use within Adobe server behaviors. The dwscripts class in the
Configuration/Shared/Common/Scripts folder contains more general purpose utilities.
setText.js Contains functions to escape an expression string, unescape an expression string, and extract an
expression string.
sortTable.js Contains functions to initialize and sort a table as well as functions to sort an array, set the mouse pointer
to a hand icon or pointer, and check the type and version of the browser.

370
EXTENDING DREAMWEAVER
The Shared folder
Last updated 6/15/2011
The CMN folder
The CMN folder contains the following utility functions:
File Description
classCheckbox.js Helps manipulate a check box control in your HTML extension.
FileClass.js Contains a class that represents a file in the file system. The paths are represented by URLs for cross-
platform compatibility. Methods include
toString(), getName(), getSimpleName(),
getExtension(), getPath(), setPath(), isAbsolute(), getAbsolutePath(), getParent(),
getAbsoluteParent(), exists(), getAttributes(), canRead(), canWrite(), isFile(),
isFolder(), listFolder(), createFolder(), getContents(), setContents(), copyTo(),
and
remove().
GridClass.js Contains a class that manages MM:TREECONTROL.
GridControlClass.js Older version of the GridControlClass in the Common folder. See the GridControlClass.js file in the
Shared/Common/Scripts folder.
ImageButtonClass.js Older version of the ImageButtonClass in the Common folder. See the ImageButtonClass.js file in the
Shared/Common/Scripts folder.
ListControlClass.js Older version of the ListControlClass in the Common folder. See the
Shared/Common/Scripts/ListControlClass.js file.
NameValuePairClass.js Creates and manages a list of name/value pairs. Names can contain any character. Values can be blank,
but cannot be set to
null, which is the same as deleting them.
PageControlClass.js Example of a page class to be used with the TabControl class. See TabControlClass.js description.
PreferencesClass.js Contains an object and methods that contain all the preference information for a command.
RadioGroupClass.js Older version of the RadioGroupClass in the Common folder. See the RadioGroupClass.js file in the
Shared/Common/Scripts folder.
TabControlClass.js Helps build an extension that has multiple tab views, page.lastUnload().
File Description
dateID.js Contains two functions, createDateID() and decipherDateID(). Given three strings,
"
dayFormat", "dateFormat", and "timeFormat", createDateID() creates an ID for them. Given a
date array,
decipherDateID() returns an array with three items: the dayFormat, the dateFormat,
and the
timeFormat.
displayHelp.js Contains one function that displays the specified Help document.
docInfo.js Contains functions that provide information about the user’s document. Operations performed by
functions include returning an array of object references for a specified browser type and tag, returning
all instances of a specified tag name, searching for a tag that wraps the current selection, and so on.
DOM.js Contains general helper functions for working with the Dreamweaver DOM. Includes functions that get
the root node of the active document, find a tag of a given name, create a list of nodes from the specified
starting node, check whether a given tag is contained inside another tag, perform various operations on
behavior functions, and more.
enableControl.js Contains one function, SetEnabled(), which enables or disables a control based on the arguments it
receives. It is OK to enable a control that is already enabled or disable a control that is already disabled.
errmsg.js Contains logging functions for accumulating tracing output into an array of log pages that appear in a
dialog box.
file.js Contains functions pertaining to file operations. Functions let the user browse for local filename, convert
the relative path to the file URL path, return the filename for the current document, determine if a
specified document has been saved in current site and return the document-relative path, or determine
if a specified file is currently open.

371
EXTENDING DREAMWEAVER
The Shared folder
Last updated 6/15/2011
Other folders
The following list describes other folders of interest in the Shared folder:
Controls The Controls folder contains the elements used to build a server behavior. These controls include interfaces
for text and recordset menus.
Note: These controls are used by the Dreamweaver Server Behavior Builder and by many of the Dreamweaver server
behaviors, but some are useful for managing a control in your extension.
Fireworks The Fireworks folder has the supporting files for Fireworks integration.
UltraDev Dreamweaver maintains this folder primarily for backward compatibility, and it should not be used for new
extensions. Use the Dreamweaver Configuration/Shared/Common folder, where most of this functionality also exists.
See
“The Common folder” on page 367.
Using the Shared folder
Look first in the Dreamweaver Configuration/Shared/Common folder for useful extension code because this folder
contains the most current and commonly used functionality.
form.js Contains functions that add a form around a given text string if a form does not already exist in the
current document or AP element. Includes functions that determine if an object is a AP element and
determine if the insertion point is inside a form.
handler.js Contains functions that get a function for an event handler, add a function to an event handler, and
delete a function from an event handler.
helper.js Contains a handful of useful functions that replace encoding, unescape quotation marks ("), check
whether a node is inside a selection range, and checks for duplicate object names.
insertion.js Contains the insertIntoDocument() function, which inserts a text string into a document at the
insertion point. Also contains the supporting functions
getHigherBlockTag() and arrContains().
The
getHigherBlockTag() function gets the next highest blockTag, as defined in the blockTags
array, and the
arrContains() function finds a specified item in an array.
localText.js Reserved variables, not for general use. Use Startup/mminit.htm instead or use the strings from the
Dreamweaver Configuration/Strings/*.xml files.
menuItem.js Contains functions that add values to or remove values from a listed menu item.
niceName.js Contains functions that convert an array of Object references to an array of simpler names.
quickString.js Contains functions that aggregate smaller strings without doing a memory allocation each time.
string.js Contains a generic set of functions for manipulating and parsing text strings. Functions include:
extractArgs(), escQuotes(), unescQuotes(), quoteMeta(), errMsg(), badChars(),
getParam(), quote(), stripSpaces(), StripChars(), AllInRange(), reformat(), trim(),
createDisplayString(), entityNameEncode(), entityNameDecode(),
stripAccelerator(), and SprintF().
TemplateUtils.js Contains utility functions for Dreamweaver templates. Functions insert an editable region into a
document, insert a repeating region into a document, scan a document for a specified editable region,
and so on.
UI.js Contains generic functions that control the UI. These functions find a designated object in the current
document, load select list options with localized strings, return the attribute value for a selected option,
and word-wrap the text message for an alert.
File Description

372
EXTENDING DREAMWEAVER
The Shared folder
Last updated 6/15/2011
Extensions can leverage the resources in the Shared folder for their own functionality. An object, command, or other
extension can specify one of the JavaScript files in the Shared folder as a source file in a
script tag, and then use the
function in the body of the file or in another included JavaScript file. Objects and commands can even link several
JavaScript files together, and those JavaScript files can leverage Shared folder resources.
For example, open the Hypertext object file (Hyperlink.htm) in the application folder
Configuration/Objects/Common. Notice that the
head tag of the file contains the following lines:
<script language="javascript"
src="../../Shared/Common/Scripts/ListControlClass.js"></script>
<script language="javascript" src="Hyperlink.js"></script>
And, if you open the related Hyperlink.js file, you can see the following lines:
LIST_LINKS = new ListControl('linkPath');
and
LIST_TARGETS = new ListControl('linkTarget');
With the new listControl declarations, Hyperlink.js defines two new ListControl objects. The code in the
Hyperlink.htm file then attaches them to the
SELECT controls in the form, as follows:
<td align="left"> <input name="linkText" type="text" class="basicTextField" value="">
and
<td align="left" nowrap><select name="linkPath" class="basicTextField" editable="true">
Now, the Hyperlink.js script can call methods or get properties for the LIST_LINKS or LIST_TARGETS objects to
interact with the
SELECT controls in the form.
