
Documentation for JIRA Service Desk 3.1

Documentation for JIRA Service Desk 3.1
2
Created in 2016 by Atlassian. Licensed under a .Creative Commons Attribution 2.5 Australia License
Contents
JIRA Service Desk Documentation . . . . . . . . . . . . . . . . . . . . . . . . . . . . . . . . . . . . . . . . . . . . . . . . . . . . . . 4
JIRA applications overview . . . . . . . . . . . . . . . . . . . . . . . . . . . . . . . . . . . . . . . . . . . . . . . . . . . . . . . . . . 4
Permissions overview . . . . . . . . . . . . . . . . . . . . . . . . . . . . . . . . . . . . . . . . . . . . . . . . . . . . . . . . . . . 7
Installing JIRA Service Desk . . . . . . . . . . . . . . . . . . . . . . . . . . . . . . . . . . . . . . . . . . . . . . . . . . . . . . . . . 14
Getting started with JIRA Service Desk . . . . . . . . . . . . . . . . . . . . . . . . . . . . . . . . . . . . . . . . . . . . . . . . 14
Getting started for service desk admins . . . . . . . . . . . . . . . . . . . . . . . . . . . . . . . . . . . . . . . . . . . . . 16
Setting up your service desk . . . . . . . . . . . . . . . . . . . . . . . . . . . . . . . . . . . . . . . . . . . . . . . . . . . 17
Creating service desk request types . . . . . . . . . . . . . . . . . . . . . . . . . . . . . . . . . . . . . . . . . . . . . 19
Making queues for your service desk teams . . . . . . . . . . . . . . . . . . . . . . . . . . . . . . . . . . . . . . . 21
Adding service desk agents . . . . . . . . . . . . . . . . . . . . . . . . . . . . . . . . . . . . . . . . . . . . . . . . . . . . 23
Customize your service desk channels . . . . . . . . . . . . . . . . . . . . . . . . . . . . . . . . . . . . . . . . . . . 25
Bring your service desk to the next level . . . . . . . . . . . . . . . . . . . . . . . . . . . . . . . . . . . . . . . . . . 27
Introduce customers to your service desk . . . . . . . . . . . . . . . . . . . . . . . . . . . . . . . . . . . . . . . . . 28
Getting started for service desk agents . . . . . . . . . . . . . . . . . . . . . . . . . . . . . . . . . . . . . . . . . . . . . . 29
Administering service desk projects . . . . . . . . . . . . . . . . . . . . . . . . . . . . . . . . . . . . . . . . . . . . . . . . . . . 32
Automating your service desk . . . . . . . . . . . . . . . . . . . . . . . . . . . . . . . . . . . . . . . . . . . . . . . . . . . . . 32
Configuring the customer portal . . . . . . . . . . . . . . . . . . . . . . . . . . . . . . . . . . . . . . . . . . . . . . . . . . . 34
Configuring service desk notifications . . . . . . . . . . . . . . . . . . . . . . . . . . . . . . . . . . . . . . . . . . . . . . . 36
Managing access to your service desk . . . . . . . . . . . . . . . . . . . . . . . . . . . . . . . . . . . . . . . . . . . . . . 37
Receiving requests by email . . . . . . . . . . . . . . . . . . . . . . . . . . . . . . . . . . . . . . . . . . . . . . . . . . . . . . 38
Managing the email channel . . . . . . . . . . . . . . . . . . . . . . . . . . . . . . . . . . . . . . . . . . . . . . . . . . . 41
Troubleshooting issues with the email channel . . . . . . . . . . . . . . . . . . . . . . . . . . . . . . . . . . . . . 41
Setting up queues for your team . . . . . . . . . . . . . . . . . . . . . . . . . . . . . . . . . . . . . . . . . . . . . . . . . . . 46
Setting up request types . . . . . . . . . . . . . . . . . . . . . . . . . . . . . . . . . . . . . . . . . . . . . . . . . . . . . . . . . 47
Troubleshooting issues with request types . . . . . . . . . . . . . . . . . . . . . . . . . . . . . . . . . . . . . . . . 52
Workflows . . . . . . . . . . . . . . . . . . . . . . . . . . . . . . . . . . . . . . . . . . . . . . . . . . . . . . . . . . . . . . . . . . 53
Setting up service desk users . . . . . . . . . . . . . . . . . . . . . . . . . . . . . . . . . . . . . . . . . . . . . . . . . . . . . 53
Managing project role memberships . . . . . . . . . . . . . . . . . . . . . . . . . . . . . . . . . . . . . . . . . . . . . 57
Using JIRA applications with HipChat . . . . . . . . . . . . . . . . . . . . . . . . . . . . . . . . . . . . . . . . . . . . . . . 57
Default service desk project configuration . . . . . . . . . . . . . . . . . . . . . . . . . . . . . . . . . . . . . . . . . . . . 60
Working on service desk projects . . . . . . . . . . . . . . . . . . . . . . . . . . . . . . . . . . . . . . . . . . . . . . . . . . . . . 62
Using service desk queues . . . . . . . . . . . . . . . . . . . . . . . . . . . . . . . . . . . . . . . . . . . . . . . . . . . . . . . 63
Working with issues . . . . . . . . . . . . . . . . . . . . . . . . . . . . . . . . . . . . . . . . . . . . . . . . . . . . . . . . . . . . . 64
Adding request participants . . . . . . . . . . . . . . . . . . . . . . . . . . . . . . . . . . . . . . . . . . . . . . . . . . . . 64
Attaching files and screenshots to issues . . . . . . . . . . . . . . . . . . . . . . . . . . . . . . . . . . . . . . . . . 66
Creating issues and sub-tasks . . . . . . . . . . . . . . . . . . . . . . . . . . . . . . . . . . . . . . . . . . . . . . . . . . 68
Raising requests on behalf of customers . . . . . . . . . . . . . . . . . . . . . . . . . . . . . . . . . . . . . . . 70
Creating issues using the CSV importer . . . . . . . . . . . . . . . . . . . . . . . . . . . . . . . . . . . . . . . . 71
Editing and collaborating on issues . . . . . . . . . . . . . . . . . . . . . . . . . . . . . . . . . . . . . . . . . . . . . . 76
Linking issues . . . . . . . . . . . . . . . . . . . . . . . . . . . . . . . . . . . . . . . . . . . . . . . . . . . . . . . . . . . . 79
Editing multiple issues at the same time . . . . . . . . . . . . . . . . . . . . . . . . . . . . . . . . . . . . . . . . 84
Scheduling an issue . . . . . . . . . . . . . . . . . . . . . . . . . . . . . . . . . . . . . . . . . . . . . . . . . . . . . . . 89
Moving an issue . . . . . . . . . . . . . . . . . . . . . . . . . . . . . . . . . . . . . . . . . . . . . . . . . . . . . . . . . . 90
Customizing the issues in a project . . . . . . . . . . . . . . . . . . . . . . . . . . . . . . . . . . . . . . . . . . . . . . 91
Logging work on issues . . . . . . . . . . . . . . . . . . . . . . . . . . . . . . . . . . . . . . . . . . . . . . . . . . . . . . . 92
Searching for issues . . . . . . . . . . . . . . . . . . . . . . . . . . . . . . . . . . . . . . . . . . . . . . . . . . . . . . . . . . . . 95
Basic searching . . . . . . . . . . . . . . . . . . . . . . . . . . . . . . . . . . . . . . . . . . . . . . . . . . . . . . . . . . . . . 98
Quick searching . . . . . . . . . . . . . . . . . . . . . . . . . . . . . . . . . . . . . . . . . . . . . . . . . . . . . . . . . . . . . 100
Advanced searching . . . . . . . . . . . . . . . . . . . . . . . . . . . . . . . . . . . . . . . . . . . . . . . . . . . . . . . . . . 103
Advanced searching - fields reference . . . . . . . . . . . . . . . . . . . . . . . . . . . . . . . . . . . . . . . . . 109
Advanced searching - keywords reference . . . . . . . . . . . . . . . . . . . . . . . . . . . . . . . . . . . . . . 134
Advanced searching - operators reference . . . . . . . . . . . . . . . . . . . . . . . . . . . . . . . . . . . . . . 137
Advanced searching - functions reference . . . . . . . . . . . . . . . . . . . . . . . . . . . . . . . . . . . . . . 146
Search syntax for text fields . . . . . . . . . . . . . . . . . . . . . . . . . . . . . . . . . . . . . . . . . . . . . . . . . . . . 160
Saving your search as a filter . . . . . . . . . . . . . . . . . . . . . . . . . . . . . . . . . . . . . . . . . . . . . . . . . . . 165
Working with search results . . . . . . . . . . . . . . . . . . . . . . . . . . . . . . . . . . . . . . . . . . . . . . . . . . . . 169

Documentation for JIRA Service Desk 3.1
3
Created in 2016 by Atlassian. Licensed under a .Creative Commons Attribution 2.5 Australia License
Constructing cron expressions for a filter subscription . . . . . . . . . . . . . . . . . . . . . . . . . . . . . 177
Configuring dashboards . . . . . . . . . . . . . . . . . . . . . . . . . . . . . . . . . . . . . . . . . . . . . . . . . . . . . . . . . 179
Adding and customizing gadgets . . . . . . . . . . . . . . . . . . . . . . . . . . . . . . . . . . . . . . . . . . . . . . . . 181
Gadgets for JIRA applications . . . . . . . . . . . . . . . . . . . . . . . . . . . . . . . . . . . . . . . . . . . . . . . 182
Managing your user profile . . . . . . . . . . . . . . . . . . . . . . . . . . . . . . . . . . . . . . . . . . . . . . . . . . . . . . . 188
Allowing OAuth access . . . . . . . . . . . . . . . . . . . . . . . . . . . . . . . . . . . . . . . . . . . . . . . . . . . . . . . 190
Requesting add-ons . . . . . . . . . . . . . . . . . . . . . . . . . . . . . . . . . . . . . . . . . . . . . . . . . . . . . . . . . . 193
Using keyboard shortcuts . . . . . . . . . . . . . . . . . . . . . . . . . . . . . . . . . . . . . . . . . . . . . . . . . . . . . . 193
Organizing work with components . . . . . . . . . . . . . . . . . . . . . . . . . . . . . . . . . . . . . . . . . . . . . . . . . . 194
Organizing work with versions . . . . . . . . . . . . . . . . . . . . . . . . . . . . . . . . . . . . . . . . . . . . . . . . . . . . . 196
Setting up service desk reports . . . . . . . . . . . . . . . . . . . . . . . . . . . . . . . . . . . . . . . . . . . . . . . . . . . . . . . 198
Setting up SLAs . . . . . . . . . . . . . . . . . . . . . . . . . . . . . . . . . . . . . . . . . . . . . . . . . . . . . . . . . . . . . . . . . . 199
Reporting on SLAs . . . . . . . . . . . . . . . . . . . . . . . . . . . . . . . . . . . . . . . . . . . . . . . . . . . . . . . . . . . . . 205
Example: creating a basic SLA . . . . . . . . . . . . . . . . . . . . . . . . . . . . . . . . . . . . . . . . . . . . . . . . . . . . 207
Example: creating an SLA that doesn't track continuous time . . . . . . . . . . . . . . . . . . . . . . . . . . . . . 208
Example: creating an SLA with multiple cycles . . . . . . . . . . . . . . . . . . . . . . . . . . . . . . . . . . . . . . . . 209
Serving customers with a knowledge base . . . . . . . . . . . . . . . . . . . . . . . . . . . . . . . . . . . . . . . . . . . . . . 209
Using the help center . . . . . . . . . . . . . . . . . . . . . . . . . . . . . . . . . . . . . . . . . . . . . . . . . . . . . . . . . . . . . . 212
Collecting customer satisfaction (CSAT) feedback . . . . . . . . . . . . . . . . . . . . . . . . . . . . . . . . . . . . . . . . 213
JIRA Service Desk best practices . . . . . . . . . . . . . . . . . . . . . . . . . . . . . . . . . . . . . . . . . . . . . . . . . . . . . 215
Best practices for designing the customer portal . . . . . . . . . . . . . . . . . . . . . . . . . . . . . . . . . . . . . . . 216
Best practices for IT teams using JIRA Service Desk . . . . . . . . . . . . . . . . . . . . . . . . . . . . . . . . . . . 218
Getting help with JIRA Service Desk . . . . . . . . . . . . . . . . . . . . . . . . . . . . . . . . . . . . . . . . . . . . . . . . . . 221

Documentation for JIRA Service Desk 3.1
4
Created in 2016 by Atlassian. Licensed under a .Creative Commons Attribution 2.5 Australia License
JIRA Service Desk Documentation
Put the power of JIRA in the hands of your service desk team.
Check out the latest JIRA Service Desk Server release notes . here
Getting started
Installing JIRA Service Desk
Getting started guides
Setting up service desk users
Administering a service
desk
Setting up service desk reports
Setting up request types
Receiving requests by email
Serving your customers
Configuring the customer portal
Setting up service level
agreements
Integrations
Serving customers with a
knowledge base
Using JIRA applications with
HipChat
Working on a service
desk
Using service desk queues
Working with issues
Searching for issues
Latest service desk news
JIRA Service Desk Server release
notes
JIRA applications overview
The JIRA family of applications are built on the JIRA platform. JIRA Core is the default application of the JIRA
platform, and will always be present in a JIRA instance. You may also choose to include other applications in
your instance, such as JIRA Software and JIRA Service Desk. A user may require access to one, all, or any
combination of these applications. If you're a JIRA administrator, you may want to read some more information
on licensing and application access. See .Licensing and application access
Application features and project types
Each application delivers a tailored experience for its users, and has an associated project type which in turn
offers application specific features. Below is a list of the project types, and their associated application specific
features.
Application Project type Application specific feature set

Documentation for JIRA Service Desk 3.1
5
Created in 2016 by Atlassian. Licensed under a .Creative Commons Attribution 2.5 Australia License
JIRA Core
Business projects
Available to all licensed users
JIRA Software
Software projects
Integration with development tools
Agile boards
Release hub for software versions
JIRA Service
Desk
Service Desk projects
Service Level Agreements (SLAs)
A customisable web portal for customers
Permission schemes allowing customer
access
All users that can log in to a JIRA instance will be able to see all the projects in that instance (pending
permissions), but they will only be able to see the application-specific features when they have application
access. For example, a Software project is able to display information from linked development tools, such
as Bitbucket and FishEye, as well as agile boards, but this information is only viewable by a JIRA Software user.
A JIRA Core user would be able to see the Software project, but would not be able to see the Software-specific
features, like agile boards or the information from linked development tools. Likewise, a JIRA Software user
would not be able to see any JIRA Service Desk application-specific features on a Service Desk project, only a
basic view of the project and its issues.
A list of the applications, their user roles, and their project's application specific features is listed below:

Documentation for JIRA Service Desk 3.1
6
Created in 2016 by Atlassian. Licensed under a .Creative Commons Attribution 2.5 Australia License
JIRA Core JIRA Software JIRA Service Desk
JIRA-Core-user JIRA-Software-user JIRA-ServiceDesk-agent
Business
Projects
Project
level
Create
View
Issue
level
Create
View
Comment
Transition
JIRA
Gadgets
View
Software
Projects
Project
level
Create
View
Issue
level
Create
View
Comment
Transition
View
Development
Information
View
Release
information
Board
level
Create
View
JIRA
Software
gadgets
View
Service Desk
Projects
Project
level
Create
View
Issue
level
Create
View
Comment
Transition
SLA
level
Create
View
Queue
level
Create
View

Documentation for JIRA Service Desk 3.1
7
Created in 2016 by Atlassian. Licensed under a .Creative Commons Attribution 2.5 Australia License
JIRA
Service
Desk
gadgets
View
Permissions overview
This page describes the different types of permissions and access rights that can be set up in JIRA
applications.
What are permissions?
Permissions are settings within JIRA applications that control what users within those applications can see
and do. All JIRA applications allow a variety of permissions: from whether users can create new projects to
whether a user can see a specific type of comment on an issue. These permissions can differ between
applications.
Permissions are different from application access, which is controlled by groups that have access for anUse
application. For more information about setting application access, see Managing user access to JIRA
.applications
Types of permissions
There are three types of permissions in JIRA applications, and they range from the high-level to granular:
Global permissions - These apply to applications as a whole, not individual projects (for example,
whether users can see the other users in the application).
Project permissions - Organized into permission schemes, these apply to projects (e.g. who can see
the project's issues, create, edit and assign them). While project admins can assign users to a project,
they can't customize the permission schemes for a project. There are lots of project-level permissions
you can set to control what users can do within a project.
Issue security permissions - Organized into security schemes, these allow the visibility of individual
issues to be adjusted (within the bounds of the project's permissions). For example, issue security
permissions can let you set up types of issues that can only be seen by project admins or users in
specific groups.
How do permissions get assigned?
Permissions can be assigned to groups or to project roles/and or issue roles. This diagram illustrates how
permissions are assigned to users:

Documentation for JIRA Service Desk 3.1
8
Created in 2016 by Atlassian. Licensed under a .Creative Commons Attribution 2.5 Australia License
Who can set permissions?
Permission Can be set by For more info, see...
Global permission A user with the JIRA System administrator
permission
A user in a group with accessAdmin
Managing global
permissions

Documentation for JIRA Service Desk 3.1
9
Created in 2016 by Atlassian. Licensed under a .Creative Commons Attribution 2.5 Australia License
Project permission A user with the JIRA System administrator
permission
A user in a group with accessAdmin
Managing project
permissions
Issue security
permission
A user with the JIRA System administrator
permission
A user in a group with accessAdmin
A project admin
Configuring issue-level
security
JIRA Service Desk global and project permissions
JIRA Service Desk provides a standard permission scheme ( Permission scheme for JIRA Service Desk proje
) that automatically gives your service desk users the correct permissions for the project role they arect
in. For example, adding agents to your service desk will add users to the Service Desk Team role. This role
gives them access to and also allows them to work onJIRA Service Desk projects to which they're assigned
issues.
Global permissions
At installation time, JIRA Service Desk creates a global permission named JIRA Service Desk agent
. If agent based pricing is enabled for the instance, users who require access to agent views oraccess
functionality need to have this permission. The number of users who are granted this permission determines
how many agent licenses are used on the system.
Project permissions
This table shows the permission configuration for a standard service desk project permission scheme:
Project
Permissions
Users / Groups /
Project roles
Explanation
Administer
Projects
Project Role
(Administrators)
Permission to administer a project. This includes the ability to edit
project role membership, project components, project versions and
certain project details (Project Name, URL, Project Lead, Project
Description).
Browse
Projects
Service Desk
Customer -
Portal Access
Project Role
(Service Desk
Team)
Project Role
(Administrators)
Permission to browse projects, use the Issue Navigator and view
individual issues (except issues that have been restricted via issue
security). Many other permissions are dependent on this
, e.g. the 'Work On Issues' permission is only effectivepermission
for users who also have the 'Browse Projects' permission.
View
Development
Tools
Project Role
(Administrators)
View
(Read-Only)
Workflow
Project Role
(Service Desk
Team)
Project Role
(Administrators)
Permission to view the project's 'read-only' workflow when viewing
an issue. This permission provides the 'View Workflow' link against
the Status field of the .'View Issue' page

Documentation for JIRA Service Desk 3.1
10
Created in 2016 by Atlassian. Licensed under a .Creative Commons Attribution 2.5 Australia License
Issue
Permissions
Users / Groups /
Project roles
Explanation
Create
Issues
Service Desk
Customer -
Portal Access
Project Role
(Service Desk
Team)
Project Role
(Administrators)
Permission to create issues in the project. (Note that the Create
Attachments permission is required in order to create attachments.)
Includes the ability to create sub-tasks (if sub-tasks are enabled).
Edit Issues Service Desk
Customer -
Portal Access
Project Role
(Service Desk
Team)
Project Role
(Administrators)
Permission to edit issues (excluding the 'Due Date' field — see the
Schedule Issues permission). Includes the ability to convert issues
to sub-tasks and vice versa (if sub-tasks are enabled). Note that the
Delete Issue permission is required in order to delete issues. The
Edit Issue permission is usually given to any groups or project roles
who have the Create Issue permission (perhaps the only exception
to this is if you give the ability to create issues — it mayeveryone
not be appropriate to give everyone the ability to edit too). Note that
all edits are recorded in the issue change history for audit purposes.
Transition
Issues
Service Desk
Customer -
Portal Access
Project Role
(Service Desk
Team)
Project Role
(Administrators)
Permission to transition (change) the status of an issue.
Schedule
Issues
Service Desk
Customer -
Portal Access
Project Role
(Service Desk
Team)
Project Role
(Administrators)
Permission to schedule an issue — that is, to edit the 'Due Date' of
an issue. In older versions of JIRA this also controlled the
permission to view the 'Due Date' of an issue.
Move Issues Service Desk
Customer -
Portal Access
Project Role
(Service Desk
Team)
Project Role
(Administrators)
Permission to issues from one project to another, or from onemove
workflow to another workflow within the same project. Note that a
user can only move issues to a project for which they have Create
Issue permission.
Assign
Issues
Service Desk
Customer -
Portal Access
Project Role
(Service Desk
Team)
Project Role
(Administrators)
Permission to assign issues to users. Also allows autocompletion of
users in the Assign Issue drop-down. (See also Assignable User
permission below)

Documentation for JIRA Service Desk 3.1
11
Created in 2016 by Atlassian. Licensed under a .Creative Commons Attribution 2.5 Australia License
Assignable
User
Project Role
(Service Desk
Team)
Project Role
(Administrators)
Permission to be assigned issues. (Note that this does not include
the ability to assign issues; see Assign Issue permission).
Resolve
Issues
Service Desk
Customer -
Portal Access
Project Role
(Service Desk
Team)
Project Role
(Administrators)
Permission to resolve and reopen issues. This also includes the
ability to set the 'Fix For version' field for issues. Also see the Close
Issues permission.
Close Issues Service Desk
Customer -
Portal Access
Project Role
(Service Desk
Team)
Project Role
(Administrators)
Permission to close issues. (This permission is useful where, for
example, developers resolve issues and testers close them). Also
see the Resolve Issues permission.
Modify
Reporter
Service Desk
Customer -
Portal Access
Project Role
(Service Desk
Team)
Project Role
(Administrators)
Permission to modify the 'Reporter' of an issue. This allows a user to
create issues 'on behalf of' someone else. This permission should
generally only be granted to administrators.
Delete Issues Service Desk
Customer -
Portal Access
Project Role
(Service Desk
Team)
Project Role
(Administrators)
Permission to delete issues. Think carefully about which groups or
project roles you assign this permission to; usually it will only be
given to administrators. Note that deleting an issue will delete all of
its comments and attachments, even if the user does not have the
Delete Comments or Delete Attachments permissions. However, the
Delete Issues permission does not include the ability to delete
individual comments or attachments.
Link Issues Service Desk
Customer -
Portal Access
Project Role
(Service Desk
Team)
Project Role
(Administrators)
Permission to link issues together. (Only relevant if Issue Linking is
enabled).
Set Issue
Security
Service Desk
Customer -
Portal Access
Project Role
(Service Desk
Team)
Project Role
(Administrators)
Permission to set the security level on an issue to control who can
access the issue. Only relevant if issue security has been enabled.

Documentation for JIRA Service Desk 3.1
12
Created in 2016 by Atlassian. Licensed under a .Creative Commons Attribution 2.5 Australia License
Voters &
Watchers
Permissions
Users / Groups /
Project Roles
Explanation
View Voters
and
Watchers
Service Desk
Customer -
Portal Access
Project Role
(Service Desk
Team)
Project Role
(Administrators)
Permission to view the voter list and watcher list of an issue. Also,
see the Manage Watcher List permission.
Manage
Watcher List
Service Desk
Customer -
Portal Access
Project Role
(Service Desk
Team)
Project Role
(Administrators)
Permission to manage (i.e. view/add/remove users to/from) the
watcher list of an issue.
Comments
Permissions
Explanation
Add
Comments
Service Desk
Customer -
Portal Access
Project Role
(Service Desk
Team)
Project Role
(Administrators)
Permission to add comments to issues. Note that this does not
include the ability to edit or delete comments.
Edit All
Comments
Project Role
(Service Desk
Team)
Project Role
(Administrators)
Permission to edit any comments, regardless of who added them.
Edit Own
Comments
Service Desk
Customer -
Portal Access
Project Role
(Service Desk
Team)
Project Role
(Administrators)
Permission to edit comments that were added by the user.
Delete All
Comments
Project Role
(Service Desk
Team)
Project Role
(Administrators)
Permission to delete any comments, regardless of who added them.

Documentation for JIRA Service Desk 3.1
13
Created in 2016 by Atlassian. Licensed under a .Creative Commons Attribution 2.5 Australia License
Delete Own
Comments
Service Desk
Customer -
Portal Access
Project Role
(Service Desk
Team)
Project Role
(Administrators)
Permission to delete comments that were added by the user.
Attachments
Permissions
Users / Groups /
Project Roles
Explanation
Create
Attachments
Service Desk
Customer -
Portal Access
Project Role
(Service Desk
Team)
Project Role
(Administrators)
Permission to attach files to an issue. (Only relevant if attachments
are enabled). Note that this does not include the ability to delete
attachments.
Delete All
Attachments
Project Role
(Service Desk
Team)
Project Role
(Administrators)
Permission to delete any attachments, regardless of who added
them.
Delete Own
Attachments
Service Desk
Customer -
Portal Access
Project Role
(Service Desk
Team)
Project Role
(Administrators)
Permission to delete attachments that were added by the user.
Time
Tracking
Permissions
Users / Groups /
Project Roles
Explanation
Work On
Issues
Project Role
(Service Desk
Team)
Project Role
(Administrators)
Permission to log work against an issue, i.e. create a worklog entry.
(Only relevant if Time Tracking is enabled).
Edit Own
Worklogs
Project Role
(Service Desk
Team)
Project Role
(Administrators)
Permission to edit worklog entries that were added by the user.
(Only relevant if Time Tracking is enabled). Also, see the Work On
Issues permission.
Edit All
Worklogs
Project Role
(Administrators)
Permission to edit any worklog entries, regardless of who added
them. (Only relevant if Time Tracking is enabled). Also, see the
Work On Issues permission.
Delete Own
Worklogs
Project Role
(Service Desk
Team)
Project Role
(Administrators)
Permission to delete worklog entries that were added by the user.
(Only relevant if Time Tracking is enabled). Also, see the Work On
Issues permission.

Documentation for JIRA Service Desk 3.1
14
Created in 2016 by Atlassian. Licensed under a .Creative Commons Attribution 2.5 Australia License
1.
2.
3.
4.
Delete All
Worklogs
Project Role
(Administrators)
Permission to delete any worklog entries, regardless of who added
them. (Only relevant if Time Tracking is enabled). Also, see the
Work On Issues permission.
Using custom permission schemes
If you are a service desk administrator and you want to customize the standard permission scheme, make
sure that the roles have the mandatory permissions. See .Customizing JIRA Service Desk permissions
Resolving permission scheme errors
If you encounter any error messages related to your service desk's permission scheme, check out Resolving
.JIRA Service Desk permission errors
Installing JIRA Service Desk
Create a basic service desk project for teams that only need a few request types, or create an IT service desk
for teams working with change and incident management processes.
Before you get your agents and customers started on a local instance of JIRA Service Desk Server, read the JIR
for the version that you are installing or upgrading to, then follow theseA Service Desk release notes
instructions:
View the available JIRA Server applications .here
Select your JIRA Service Desk Server package.
Download the installer.
Once the installer has downloaded, run it and follow the steps.Installing JIRA applications
If you experience any problems with your installation or you have any questions, contact .Support
Getting started with JIRA Service Desk
JIRA Service Desk overview
JIRA Service Desk combines the productivity and power of the JIRA platform with an intuitive user
experience that allows service teams to focus on the customer. Throughout this tutorial, we will reference the
example of a new customer who uses JIRA Service Desk to send requests to his company's IT Team so he
can settle into his new role. Here's how the customer and a service desk agent work together to resolve a
request using JIRA Service Desk:
If you are migrating from an existing JIRA instance with the JIRA Service Desk add-on, please check out
our first.Migration Hub
Get more out of your new JIRA Service Desk instance:
Connecting JIRA Service Desk to other Atlassian products enables a host of new integration features.
Learn more below:
Using JIRA applications with Confluence — Confluence is a content creation and collaboration
platform that connects teams with the content, knowledge, and coworkers they need to get work
done, faster.
Using JIRA applications with HipChat — HipChat is hosted group chat and video chat for
companies and teams.

Documentation for JIRA Service Desk 3.1
15
Created in 2016 by Atlassian. Licensed under a .Creative Commons Attribution 2.5 Australia License
1 - Customer needs
assistance and submits a
request to JIRA Service
Desk.
2 - Service desk agent
picks up the issue.
3 - Customer and service
desk agent discuss the
problem.
4 - The customer is
satisfied and the service
desk agent resolves the
issue!

Documentation for JIRA Service Desk 3.1
16
Created in 2016 by Atlassian. Licensed under a .Creative Commons Attribution 2.5 Australia License
Request vs. issue
Your customers submit a through the customer portal or by email. TheseJIRA Service Desk request
requests become issues that your agents work on internally in the JIRA Service Desk agent view.
How customers see a in the customerrequest
portal:
How agents see an in the JIRA Service Deskissue
agent view:
JIRA Service Desk roles
There are three main roles in JIRA Service Desk: administrator, agent, and customer. This guide focuses on
the two licensed roles: administrators and agents. The administrator sets up and configures JIRA Service
Desk projects. The agent works with the preconfigured service desk projects. Service desk customers are
free and do not require a license. You can invite an unlimited number of customers to your service desk
projects.
Admin
User with administrative rights for your service desk
who can:
Access all features in JIRA Service Desk
Add and remove users to and from service
desk projects
Configure the customer portal, request types,
queues, reports and SLA metrics
Perform all tasks outlined in Admin and Agent
tutorials
Agent
User who works on and resolves customer requests
who can:
Access the internal service desk interface
View the customer portal, queues, reports
and SLA metrics of assigned service desk
projects
Add, edit and delete customer-facing and
private comments on issues
Manage knowledge base content
Ready to dive into JIRA Service Desk?
Click the admin or agent buttons below to proceed.
I am a service desk admin I am a service desk agent
Getting started for service desk admins
Welcome to JIRA Service Desk for admins! In this tutorial, we'll introduce
you to your workspace and walk you through the process of setting up a
service desk project for your team of agents and a corresponding
customer-facing site (which we call the customer portal). We'll be focusing
on basic JIRA Service Desk features and tasks to help you get up and
running quickly. By the end of this tutorial, you will have:
Set up 1 service desk project

Documentation for JIRA Service Desk 3.1
17
Created in 2016 by Atlassian. Licensed under a .Creative Commons Attribution 2.5 Australia License
1.
2.
3.
Added 3 agents
Prepared your customer portal to receive customer requests
A quick look at JIRA Service Desk:
Audience:
Service
desk
administrat
ors
Team
managers
Time: 30 minutes
Queues
As an admin, you will set up and configure queues
for your agents. Your agents will then view and work
on issues from the same tab:
Reports
Use the Reports tab to view your team's workload.
You can also set up custom reports to track your
team's progress in more detail:
Project administration
Here, you will administer request types, brand your
customer portal, link your service desk to an email
account, and manage users:
Customer portal
This link lets you navigate the customer view of your
service desk project:
Now that you are familiar with your service desk workspace, you can set up your own JIRA Service
Desksite and add your first project.
Let's go!
Setting up your service desk
Setting up
your service
desk
Creating
service desk
request types
Making

Documentation for JIRA Service Desk 3.1
18
Created in 2016 by Atlassian. Licensed under a .Creative Commons Attribution 2.5 Australia License
3.
4.
5.
6.
7.
1.
2.
3.
1.
2.
3.
4.
5.
queues for
your service
desk teams
Adding
service desk
agents
Customize
your service
desk channels
Bring your
service desk
to the next
level
Introduce
customers to
your service
desk
Let's get your service desk ready to use by setting you up with a JIRA Service Desk Cloud site. Cloud is our
hosted offering and will allow you to set up your own site without installing a thing!
Sign up for a JIRA Service Desk site
Signing up for JIRA Service Desk Cloud will provide you with a
fully-functional JIRA Service Desk site for one month.
Open in a new tab to view the signup page directly.this link
Follow the signup form steps to enter your site URL and admin
username.
Once you have completed the signup process, grab a quick coffee (or
tea, if that's your preference) — it will take a few minutes for
your JIRA Service Desk Cloud site to be created. You will receive an
email when your site is ready.
Can't use
Cloud?
If you cannot use
JIRA Service
Desk Cloud,
instructions for
installing JIRA
Service Desk
Server are
available below.
Installing
JIRA on
Windows
Installing
JIRA on
Linux
Create a project
JIRA Service Desk comes with default project templates that you can use to
suit your team's needs. Create a basic service desk project for teams that
only need a few request types, or create an IT service desk for teams
working with change and incident management processes. Let's get you set
up with a basic service desk project.
Open the link just emailed to you to log in to your new site with the
administrator credentials you selected.
Select > from the the top navigation bar ofProjects Create Project
your site.
Select "Basic Service Desk".
Name your project. In this example, we'll use the project name
"Charlie Cake Franchises". The project key should be automatically
populated, but you can change the key if you'd like. If you see options
to link another application, leave these options unchecked.
Select to create your project. Submit
If you have an existing Cloud site, to create a service desk project. If your administratorskip ahead
has set you up as a project admin for an existing project, jump to to create your request types.Step 2
Documentation for JIRA Service Desk 3.1
19
Created in 2016 by Atlassian. Licensed under a .Creative Commons Attribution 2.5 Australia License
1.
2.
3.
4.
5.
6.
7.
Nice work! You now have a service desk site with one project. You will now learn to set up request
types, which define the requests customers can submit to your team's service desk project.
Next
Creating service desk request types
Setting up
your service
desk
Creating
service desk
request types
Making
queues for
your service
desk teams
Adding
service desk
agents
Customize
your service
desk channels
Bring your
service desk
to the next
level
Introduce
customers to
your service
desk
Request types let you define and organize incoming issues so your service
desk team can more efficiently help your customers. If you're moving from
an existing help desk application, you can add your existing request
categories during this step. If you're setting up service desk request types
for the first time:
Think about how your customer would write a request (e.g. 'Need a
new monitor' vs 'Hardware Request');
Break things down into smaller chunks (e.g. 'Help with printer
configuration', 'Help with laptop problems', 'Help with software
problems'); and
Avoid specialist terminology (e.g. 'I need access to a system' vs
'Deploy SSH key').
By the end of this step, your project's request type page should look
something like this:
Requests vs.
Issues
Remember that
customers
submit trequests
o your service
desk and your
team picks up the
corresponding iss
to work onues
internally.
Create new request types
Let's go ahead and add two new request types, so you can familiarize

Documentation for JIRA Service Desk 3.1
20
Created in 2016 by Atlassian. Licensed under a .Creative Commons Attribution 2.5 Australia License
1.
2.
3.
4.
5.
6.
7.
8.
yourself with the request type configuration options.
In your new service desk project, select >Project administration Re
.quest types
In the new request type form at the top of the page, change the
request type icon and enter the following details for a new "Get wi-fi
access" request type. Note that a new request group will be created
as soon as you enter a new name in the Groups field:
Select when finished entering your request type details.Add
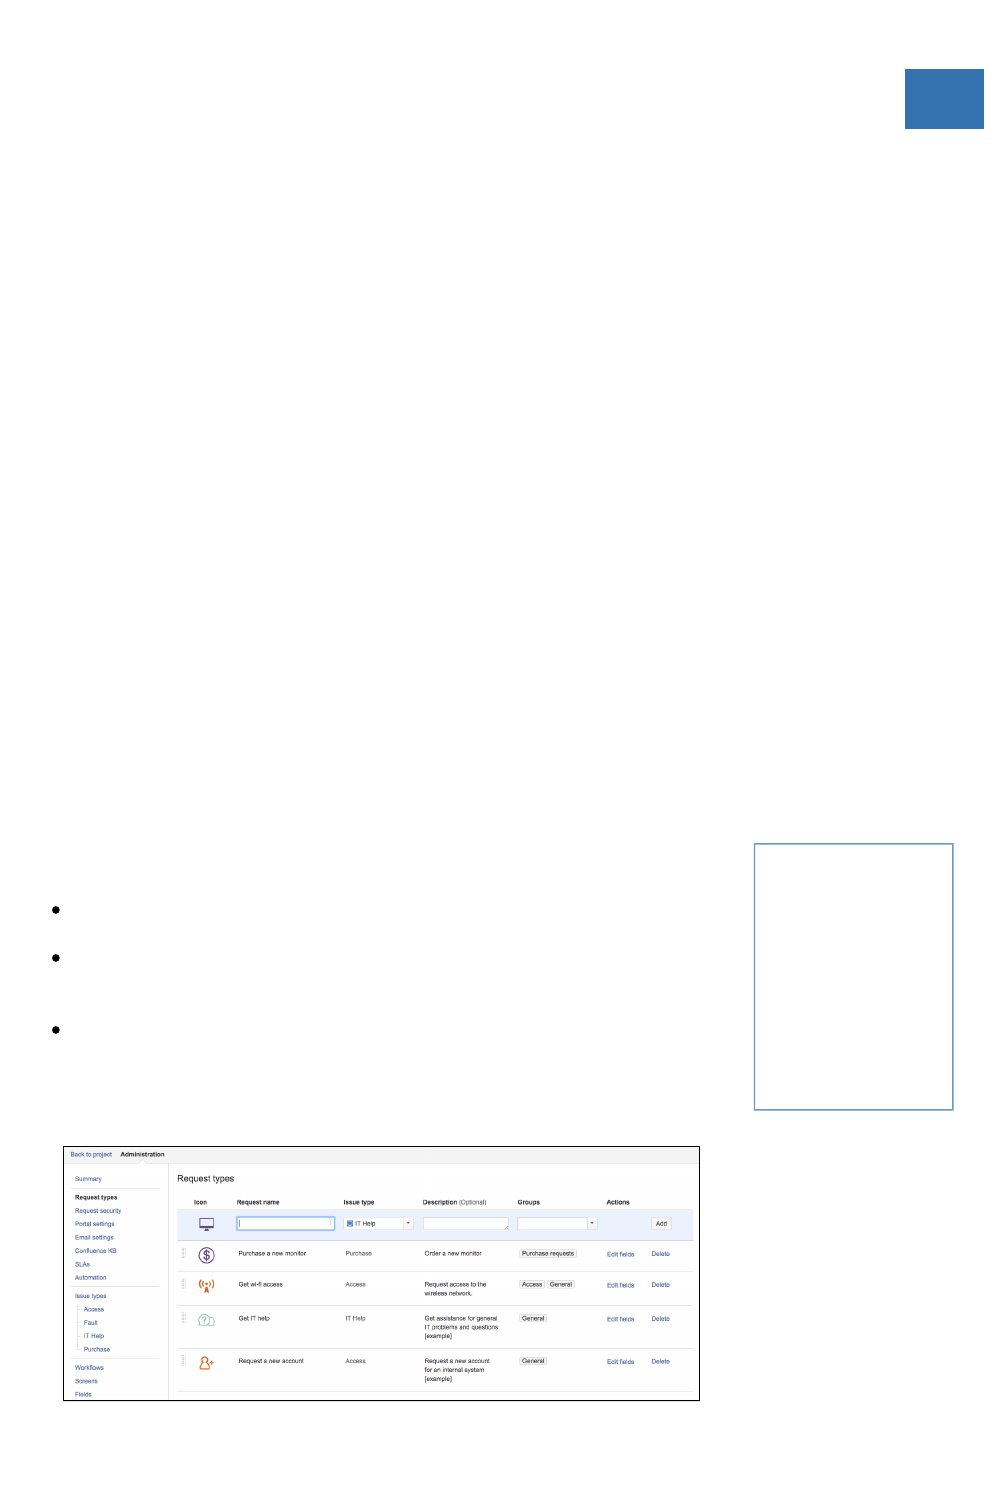
Create a second request type called "Purchase a new monitor"
with the following details:
Select when finished.Add
For the "Get wi-fi access" request type, select to changeEdit fields
which request form fields show up in the customer portal. These
simplified fields help customers understand what information they
need to provide when submitting a request.
The "Summary" field should already be displayed in the Visible fields
section. Click the "Summary" display name to rename it to "What do
you need?", and add more field help details as shown:
Select when finished. Update
Select Add a field to add the "Priority" field to the request form and
select . Apply
On the tab, you will see the default JIRAWorkflow Statuses
workflow status names displayed on the lefthand side. You can
change how these statuses appear to customers by editing the
"Status name to show customer" fields as shown:
Select to see how your changes appear inView this request form
the customer portal.

Documentation for JIRA Service Desk 3.1
21
Created in 2016 by Atlassian. Licensed under a .Creative Commons Attribution 2.5 Australia License
1.
2.
3.
4.
1.
2.
3.
4.
5.
1.
2.
3.
Organize your requests with groups
A group is simply a label you can assign to each request type. Your request
types are organized into tabs based on these group labels in the customer
portal. To edit groups:
Go back to the > screen.Project administration Request types
You should see the following groups for each request type:
Request Type Group
"Purchase a new monitor" Purchase requests
"Get wi-fi access" Access, General
"Get IT help" General
"Request a new account" General
In the Groups column, hover over and click the existing groups edit
them.
Add the Access group to the "Request a new account" request type
and select . This request type will now appear on two tabs inUpdate
the customer portal, making it easier for customers to find.
Go back to your project and open the customer portal link from your
project sidebar to see your requests organized into groups:
Create a request from the customer portal
Keep the customer portal preview open, so you can create test
requests from a customer's perspective.
Select the "Get wi-fi access" request type.
Enter "Test wi-fi request" in the open field and select Medium priority.
Click to complete your request and view view the openCreate
request in the customer portal.
Click to exit the customer view and return to your service deskClose
project.
We thinkTip:
groups are helpful
if you have seven
requestor more
types.
Excellent work! You now have four request types and a new issue in your project. Next, you will learn
how to sort these issues into queues, which will allow you to manage your team's workload.
Next
Making queues for your service desk teams
Setting up
your service
desk
Creating
service desk
request types

Documentation for JIRA Service Desk 3.1
22
Created in 2016 by Atlassian. Licensed under a .Creative Commons Attribution 2.5 Australia License
3.
4.
5.
6.
7.
1.
2.
3.
4.
5.
6.
Making
queues for
your service
desk teams
Adding
service desk
agents
Customize
your service
desk channels
Bring your
service desk
to the next
level
Introduce
customers to
your service
desk
Your teams will spend the majority of their time working out of the queues you set up. Agents do not have the
permissions to add new queues or configure existing ones; however, JIRA Service Desk queues allow you to
automatically triage and prioritize issues for them. If you want your team to focus on requests that must be
completed by next week, for example, you can set up a queue that only contains requests with a set due date
in that week.
Your site comes with preconfigured queues (e.g. "Unassigned issues"), but let's go ahead and create three
new queues for your team:
From your service desk project sidebar, select Queues.
Select New queue and name your first new queue "Access requests".
Define the issues you want to appear in this queue by selecting the following drop-down menus: Type
(select "Access"); (select "Waiting for Support"), and (select "Unresolved"): Status Resolutions
Select the following columns names that will display in this queue from the menu: "Key",More
"Summary", "Created", "Updated", "Due Date". You can reorder the columns by dragging the name
(e.g. "Key") across the column field.
Select to add this queue to your team's workspace.Create
Create two new queues with the following two search queries:
"Completed purchases" for purchase requests that have been successfully resolved.

Documentation for JIRA Service Desk 3.1
23
Created in 2016 by Atlassian. Licensed under a .Creative Commons Attribution 2.5 Australia License
6.
7.
1.
2.
3.
4.
5.
6.
7.
"Due this week" for requests that must be completed in the next week
Reorder your saved queues by clicking and dragging them to their new location.
You now have three new queues in your project! You will next learn how to add agents to your site so
you can get your teams up and running with JIRA Service Desk.
Next
Adding service desk agents
Setting up
your service
desk
Creating
service desk
request types
Making
queues for
your service
desk teams
Adding
service desk
agents
Customize
your service
desk channels
Bring your
service desk
to the next
level
Introduce
customers to
your service
desk
There are two default project roles you can assign users to in JIRA Service

Documentation for JIRA Service Desk 3.1
24
Created in 2016 by Atlassian. Licensed under a .Creative Commons Attribution 2.5 Australia License
1.
2.
3.
1.
2.
3.
4.
1.
Desk:
Service Desk Customers who create requests via email or the
customer portal
Service Desk Team who view and respond to these requests
As the user who created this project, you have been automatically added to
the Administrators project role.
Add your agents
Project administrators can only add agents with existing user accounts to
their project. If you are a project administrator, you will need to contact your
site administrator to add user accounts for new agents. Make sure you're
signed in as an administrator for this step, you can invite three new
agents to your project - Diane, Martin, and Waldo:
In your project sidebar, select . Invite team
Enter the email addresses for your new agents and select Invite 3
. Your updated agent license count is displayed: people
These agents will be automatically added to the Service Desk Team
role and assigned a JIRA Service Desk license.
Assign issues to agents
Your agents will generally work out of specific queues that have issues
automatically triaged into them. Let's test out manually assigning issues in
case you ever come across a customer request that you want a certain
agent or team to handle.
From the tab, open one of your test requests by clicking theQueues
issue summary or issue key.
Select Assign.
Enter Waldo in the Assignee field and select When WaldoAssign.
signs into JIRA Service Desk, this issue will appear in his personal
queue.
Assign another test issue to Diane.
Add your customers
You do not need to add customers to your service desk site during this
tutorial but let's check out where you would add them so you're familiar with
the needed steps:

Documentation for JIRA Service Desk 3.1
25
Created in 2016 by Atlassian. Licensed under a .Creative Commons Attribution 2.5 Australia License
1.
2.
3.
1.
2.
3.
4.
5.
6.
7.
1.
2.
From your project sidebar, select .Customers
Select in the top right corner and enter one orInvite customers
more email addresses.
When you select , invited customers will receive anSend invites
email invitation with a link to your customer portal, where they can
complete the signup process.
Public customer
signup
You can have
your customers
sign up for their
own accounts
(without an
individual email
invite) by
enabling public
.signup
You're almost done! You have now added 3 agents to your service desk project and reviewed the
process of assigning issues to these agents. You can now customize your customer portal and share
it with the rest of your team.
Next
Customize your service desk channels
Setting up
your service
desk
Creating
service desk
request types
Making
queues for
your service
desk teams
Adding
service desk
agents
Customize
your service
desk channels
Bring your
service desk
to the next
level
Introduce
customers to
your service
desk
Service desk customers can contact your team in two ways. They can log in
and create a request via the customer portal or email a request to an email
account that you have linked to your service desk project. Let's finish setting
up the customer portal and add an email account so your customers can
easily contact your team.
Customize the theme and branding of your customer portal
You can rename your customer portal and add a logo so customers can
easily associate this service desk with your team and organization when
they create requests.
In your service desk project, select > Project administration Portal
. settings
Edit your customer portal name and introduction text by typing in the

Documentation for JIRA Service Desk 3.1
26
Created in 2016 by Atlassian. Licensed under a .Creative Commons Attribution 2.5 Australia License
2.
3.
4.
5.
1.
2.
3.
4.
outlined fields:
Save any edits by selecting
.
Add a customer portal logo by selecting Use a custom logo for this
.Customer Portal
Save the sample image below and select to upload it:Choose logo
Select .Save logo
Link an email account
In addition to creating requests through the customer portal, customers can
create requests and communicate with your team by email. JIRA Service
Desk Cloud projects come with a default email address, which you can use
without having to manage an external email inbox. In this step, you'll link
your service desk project to an existing email account used by your team.
In your service desk project, select > Project administration Email
. requests
Email requests will be turned off by default, so turn them on now.
Select and fill in the requested details. If youAdd email account
use 2-step-verification for Gmail, be sure to generate an application-s
when adding your email account details. pecific password
Once you have linked an email account, look out for the test email
that will be sent to your email inbox and the corresponding request
that will be created in your service desk project.
Publicize your service desk
Now that your service desk project is ready to receive requests, you can
share the service desk email address (e.g. [email protected]) and a
direct link to the customer portal with your customers.
You can give one or both of the following URLs to your customers.
The URL to a specific service desk project customer portal Give this
URL to your customers if you've enabled public signup and want
them to signup for accounts on their own. The signup link only
appears on each individual portal.
The URL to the global portal where your customers will see all the
service desks they have access to. The URL is:
http://<computer_name_or_IP_address>:<HTTP_port_numb
er>/jira/servicedesk/customer/portals
You can choose to:
Post a link on your intranet
Add a hyperlinked button to your web portal
Email your customers and let them know about the new, easy
way to get help!
Tip:
If you use POP,
make sure the
email account
you choose for
this channel has
an sempty inbox
o you do not lose
any existing
emails.
Documentation for JIRA Service Desk 3.1
27
Created in 2016 by Atlassian. Licensed under a .Creative Commons Attribution 2.5 Australia License
1.
2.
3.
4.
5.
6.
7.
1.
2.
3.
1.
2.
3.
You've now finished setting up your service desk project! Continue on to learn more advanced tips
that will help you better track your team's progress and serve your customers.
Next
Bring your service desk to the next level
Setting up
your service
desk
Creating
service desk
request types
Making
queues for
your service
desk teams
Adding
service desk
agents
Customize
your service
desk channels
Bring your
service desk
to the next
level
Introduce
customers to
your service
desk
Now that you have your basic service desk up and running, you can learn about the following advanced
features:
Serve your customers and your team better with SLAs
Track your team's success with reports
Increase self-service with knowledge base integration
Serve your customers and your team better with SLAs
Service-level agreements (SLAs) help you communicate service agreements to your customers and keep
track of your team's performance. An SLA consists of a time metric and a corresponding goal or target. As
the administrator, you can configure each SLA metric and goal using the JIRA Service Desk SLA designer.
SLA information will appear in both the customer-facing request and the internal issue. Your agents can also
view SLA goals by going to > when they log in to your service desk project. Let's have aReports Workload
quick look at where you can create a new SLA metric.
In your service desk project, select Project administration > SLAs.
Select to create a new SLA metric for your service desk project.New Metric
For more information, check out . Setting up service level agreements (SLAS)
Track your team's success with reports
JIRA Service Desk lets you display selected SLA metrics and goals in interactive reports. Reports can be
used to help you visualize your team's performance so you can identify bottlenecks and optimize your team's
workload. Your team of agents can then view the read-only versions of your reports to see how they are
tracking towards their goals. Let's now have a quick look at the tab. Reports
From your service desk project sidebar, select to view the pre-configured reports in yourReports
project.
Select to create a new report, or simply edit one of the pre-configured reports. New Report

Documentation for JIRA Service Desk 3.1
28
Created in 2016 by Atlassian. Licensed under a .Creative Commons Attribution 2.5 Australia License
3.
1.
2.
3.
1.
2.
3.
4.
5.
6.
For more information, check out . Setting up service desk reports
Increase self-service with knowledge base integration
By connecting Confluence to your service desk project, you can help customers help themselves. Your
customers can search for solutions in the self-service customer portal before they even create a request:
Your agents can also take advantage of knowledge base integration by selecting directlyCreate KB article
from an issue and saving their customer responses as articles for future reference:
KB articles will be a good resource for new agents in your service desk project and will help prevent existing
agents from having to create the same response over again for related issues types.
In your service desk project, select > . Project administration Confluence KB
Choose "Link to a knowledge base" to select the Confluence application and space to link your service
desk project to.
Check out to learn more.Serving customers with a knowledge base
You're almost done! We'll now review the ways customers can contact your team and be informed of
updates to their requests.
Next
Introduce customers to your service desk
Setting up
your service
desk
Creating
service desk
request types
Making
queues for
your service
desk teams
Adding
service desk
agents
Customize
your service
desk channels
Bring your

Documentation for JIRA Service Desk 3.1
29
Created in 2016 by Atlassian. Licensed under a .Creative Commons Attribution 2.5 Australia License
6.
7.
1.
2.
service desk
to the next
level
Introduce
customers to
your service
desk
Now that you have set up your project in a way that serves both your agents and your customers, it's time to
show your customers how to start using JIRA Service Desk.
Create requests through the customer portal
Visit the customer portal.
Pick an option that matches what you need and fill in the details of the request:
Create requests by email
Another way of creating requests is by sending emails to a linked service desk. Ask your service team if they
are set up to receive email in their service desk project. If they do, simply email them a request directly and
keep the conversation going directly from your inbox.
Create requests in multiple service desks
To send the same request to multiple teams, you have the following options:
If all of the teams you want to contact have linked their service desk project to an email account, you
can easily create the request by sending one email message to all linked service desk email accounts.
If the teams you want to contact have not all linked their service desk project to an email account, you
will need to create the request in each service desk one by one, either through their customer portal or
sending emails.
Track and comment on requests
Use the customer portal to see all requests you have created, read comments from agents as they are
updated, and check the status of a request. You can add comments and attachments to requests on the
customer portal as well.
Another way of tracking requests is through email notifications. You receive email notifications when agents
respond to your requests and when the request has been resolved. To add comments to requests, you can
simply reply to the email notifications and your reply will be added as a comment to the request.
Congrats! You've completed the Getting started for service desk admins tutorial.
Want to learn more? Check out the home of JIRA Service Desk documentation .here

Documentation for JIRA Service Desk 3.1
30
Created in 2016 by Atlassian. Licensed under a .Creative Commons Attribution 2.5 Australia License
1.
2.
3.
Getting started for service desk agents
On this page, we will introduce you to your workspace and walk you through the process of responding to
your customers' requests.
[ ] [ ] [ ]Navigate your workspace Work on customer issues Capture knowledge
Navigate your workspace
Open JIRA Service Desk in your web browser. Take a few minutes to become familiar with the layout:
Queues
Queues display issues submitted by your customers.
These issues appear in queues configured by your
administrator.
Customer Portal
The customer portal link lets you see and interact
with your service desk from a customer's
perspective.
Customers
On the Customers tab, you can search for existing
customers in your service desk project, invite new
customers (if public signup is enabled), and see how
many issues each customers has submitted.
Reports
Reports display your team's workload and the
Service Level Agreement (SLA) goals configured by
your administrator. You can also view any
preconfigured service desk reports on this tab.
Work on customer issues
Your administrator has already set up customized queues to help organize incoming customer requests.
Please contact your administrator if you need to change a queue's configuration or add a new queue.
Open an issue
Select and choose a queue to work from (e.g. Assigned to me). Queues
Open a customer request by clicking the issue Summary or Key.
In addition to being able to edit and comment on a request, you can view a list of actions from the Mor
menu. Hover over each action to display a brief explanation:e

Documentation for JIRA Service Desk 3.1
31
Created in 2016 by Atlassian. Licensed under a .Creative Commons Attribution 2.5 Australia License
3.
1.
2.
1.
2.
1.
2.
1.
Leave a comment
Review the issue and perform the needed task (e.g. grant the customer wi-fi access). Then select Res
. By default, you'll see a pre-populated greeting in the comment field that you canpond to Customer
edit with your full response and then preview. (You can disable pre-populated commenting in your
profile.) The message you type here will appear in the notification sent to the customer.
Use the tab to write your own note or to include another colleague on the issue byInternal comment
using the "@ mention" feature (type @username) and writing your comment.
Attach a file or image
Copy and paste, or drag and drop, your attachment anywhere on the issue screen. You'll see the Add
dialogue pop up. attachments
Add a comment and select to send the attachment and comment to theShare with customer
customer, or to restrict the attachment and comment to internal users (e.g. otherAdd to issue only
agents).
Resolve an issue
Once the customer's request is completed, select .Resolve this issue
Select a resolution (e.g. Done) and add any further details for the customer or your internal team. All
participants on the issue will be notified of its resolved status.
Capture knowledge
If your administrator has linked your service desk with a Confluence space, you can capture your response
as a knowledge base article. You can then easily reference this article when responding to a similar issue in
the future. KB articles will also appear in the customer portal, directing customers to relevant information
before they even finish submitting their requests.
Click the to enter the primary problem/desired outcome (or page title) and selectCreate KB article
the page template (How-To).

Documentation for JIRA Service Desk 3.1
32
Created in 2016 by Atlassian. Licensed under a .Creative Commons Attribution 2.5 Australia License
1.
2. Fill out the How-To template and save the page in Confluence. You will see that your issue is linked to
this article for future reference.
Nice work! Want to learn more? Proceed to to learn more aboutWorking on service desk projects
what a service desk agent can do.
Administering service desk projects
Welcome to the source of truth for JIRA Service Desk administrator knowledge and power.
If you're new to JIRA Service Desk, check out this tutorial
If you're familiar with JIRA Service Desk, use the search bar below to find any needed
information
Search the topics in 'Administering service desk projects':
Automating your service desk
What is automation?

Documentation for JIRA Service Desk 3.1
33
Created in 2016 by Atlassian. Licensed under a .Creative Commons Attribution 2.5 Australia License
1.
2.
3.
4.
5.
If you find your team stuck completing repetitive tasks or missing important
request notifications, you can use automation to complete those tasks and
send those alerts. Automation consists of rules that perform actions (e.g.
alert agent) based on specific events (e.g. issue is created) and conditions
(e.g. issue is high priority).
On this page:
What is
automation
?
How to use
it
Set up a
rule
How to use it
Your service desk project comes with preset rule templates that you can use to quickly set up
automation. You can also create a custom rule (essentially a blank rule template). Here are some ways that
automation can help your team and your customers, and the preset rule templates used to do so:
What automation does Rule template used
Alert a member of your team when a customer submits an urgent request Be aware of urgent issues
Alert your team lead when a serious issue is about to breach one of your
SLAs
Keep on top of SLAs
Let your customers know when to expect a response from your team based
on the priority of their ticket
Set customer expectations
When a customer comments on a ticket, transition it to "Waiting on Support";
when your team comments, transition the ticket to "Waiting on Customer"
Transition on comment
When a customer comments on a closed ticket, re-open it so your team can
followup with more information
Re-open on customer
comment
Automatically trigger specific actions on multiple incidents, based on the
status of a linked problem
Update incident when a
linked problem is
transitioned
Automatically update issues received by email with the correct request type
based on keywords present in the request summary or description.
Triage requests sent by
email
Set up a rule
and select In your service desk project, proceed to Project administration > Automation Add your
(or if you have previously created one). first automation rule New rule
Select a preset or custom rule template from the list and then select . You'll see the ruleNext
configuration screen.
Edit the rule name and description as needed. The rule name will appear on the main automation
settings page, so changing the name will help you more easily reference what each rule does.
Fill in the WHEN, IF, THEN fields. Use for suggestions on what toTips for customizing this rule
enter in these fields.
Select to set the "Run as" user, or the user who will appear to perform the rule's action on theOptions
service desk ticket:

Documentation for JIRA Service Desk 3.1
34
Created in 2016 by Atlassian. Licensed under a .Creative Commons Attribution 2.5 Australia License
5.
6.
7.
Note that the project default user can be set on the main automation settings page. Certain rules, such
as those based on an SLA, cannot be run as the user who triggered the rule. You will simply be
unable to select this option when that's the case.
In , check "Allow this rule to be triggered by other rules". Options
This option is useful if you have a rule that results in a comment from your team (e.g. Set customer
expectations), and want that comment to trigger another rule that transitions the issue back to the
customer (e.g. Transition on comment).
Select and you're done!Save
Configuring the customer portal
Your service desk project comes with a customizable customer-facing site
called the customer portal, where your service desk customers can submit
and track requests. Customer portals for multiple service desk projects can
be accessed in the global help center.From your service desk project
sidebar, select the link at any time to check out what yourCustomer Portal
customers see when they want to contact your team:
On this page:
Setting up
request
types
Branding
your portal
Managing
access to
your portal
Viewing all
portals in
your Help
Center
If you have linked your project to a Confluence space, customers can also use this portal to search for help in
relevant knowledge base articles before filing a request.
Setting up request types
You can create and edit the request types that customers will fill out on the customer portal in Project
> : administration Request types
You must be a JIRA Service Desk Administrator or Project Administrator for this service desk project
to make the following changes.

Documentation for JIRA Service Desk 3.1
35
Created in 2016 by Atlassian. Licensed under a .Creative Commons Attribution 2.5 Australia License
1.
2.
3.
Each service desk request type (e.g. Get wi-fi access) is based on an issue type (e.g. Access. You can
organize your request types into groups (e.g. Access requests), which appear as tabs on the customer portal.
To learn more about setting up request types and organizing request types into groups, check out Setting up
.request types
Branding your portal
You can customize your customer portal to reflect your team and company's brand with the following two
steps:
In > , add a portal logo and a short description to familiarizeProject administration Portal settings
customers with your service desk:
Optionally, add an by completing the and fields. Announcement Subject Message
Follow the link (or select
> > ) to brand your customer portal header in a liveApplications JIRA Service Desk Configuration
preview mode. The header, announcement, and branding changes made here apply to all service
desk project portals and the .global help center
Managing access to your portal

Documentation for JIRA Service Desk 3.1
36
Created in 2016 by Atlassian. Licensed under a .Creative Commons Attribution 2.5 Australia License
You can open up access to your customer portal to allow new customers to create an account and submit a
request for your team. If you don't want to have an open portal, you can restrict access to:
Customers who have an existing account for any other JIRA application or service desk project
Customers who appear specifically on your service desk project's customer list
For more information about opening or restricting your portal, see .Managing access to your service desk
Viewing all portals in your Help Center
If your company uses multiple service desk projects (e.g. an IT service desk and an office administration
service desk), you can simply provide your customers with a single URL to find a list of all the customer
portals they have access to and the requests created in each one: http://<computer_name_or_IP_add
ress>:<HTTP_port_number>/jira/servicedesk/customer/portals
The URL you provide will send customers to what we call the Help Center. The Help Center displays all
customer portals generated by service desk projects in a single instance of JIRA Service Desk, as well as the
:header you previously branded
To make any changes to the header, or to update the name of your help center, proceed to
> > .Applications JIRA Service Desk Configuration
Configuring service desk notifications
When customers submit a request through the
customer portal, they receive JIRA Service Desk
notifications to keep them informed of the request's
progress. Your team of agents and any internal
users (e.g. JIRA Software developers) are updated
via the default JIRA notification scheme.
On this page:
Who receives service desk
notifications
Configuring service desk
notifications
Setting the notification email type
to HTML or plain text
Who receives service desk notifications
Your customers Your team
The customer portal integrates with , Atlassian Crowd Atlassian's single sign-on (SSO),
authentication, authorization, application provisioning, and identity management framework. For
information about integrating with third-party SSO providers, please see this .page

Documentation for JIRA Service Desk 3.1
37
Created in 2016 by Atlassian. Licensed under a .Creative Commons Attribution 2.5 Australia License
1.
2.
3.
4.
5.
1.
2.
When a customer submits a request, they
receive email notifications as the issue reporter
when:
the request is created
a comment is added to the request
another participant is added to the
request
the request is resolved with a set
resolution field
the request is reopened with a cleared
resolution field
When agents work on an issue, they receive email
notifications as part of the the project's JIRA notification
scheme.
Configuring service desk notifications
Two settings impact how notifications work for a service desk project:
The system level setting controls the customer notifications for all service desk projects.Notifications
This setting is enabled by default and can be disabled by going to
> > . Applications JIRA Service Desk Configuration
The project level controls the agent notifications for a service desk project.JIRA notification scheme
If the setting for JIRA Service Desk is enabled, agents will receive notifications asNotifications
part of the JIRA notification scheme. Customers will receive service desk notifications for all
issues they're involved with.
If the setting for JIRA Service Desk is disabled, agents will continue to receiveNotifications
notifications as part of the JIRA notification scheme; however, customers will only receive
notifications if they are working on an issue in a public project.
Setting the notification email type to HTML or plain text
As a JIRA administrator, you can set the default email type for service desk notifications. If the default type is
set to HTML, dual-encoded notifications are sent, allowing your customers to then select the HTML or plain
text view in their mail client. If your customers rely on software that requires plain text or use a plain text mail
client, you can change your default setting to plain text and apply this change to new and existing customers.
Choose
> System. Scroll down to the User Interface section and choose Default User Preferences.
Select . Edit default values
Change the to html or text and click .Default outgoing email format Update
At this point, the email format you have selected will only be applied to new service desk customers. If
you also want to override the email format chosen by existing service desk customers and agents:
Under , select . Operations Apply
Select to finish applying the email preference to all user accounts. Update
Managing access to your service desk
When you set up your service desk project, you can
open up access to allow anyone to sign up for an
account and raise a request for your team, or you
can restrict your service desk project to a specific list
of customers.
On this page:
Change your restricted access
settings
When to open your service desk
When to restrict your service desk
Change your restricted access settings
In your service desk project, go to > .Project administration Request security
Choose one of the options under "Who can raise requests". The security options you can select are

Documentation for JIRA Service Desk 3.1
38
Created in 2016 by Atlassian. Licensed under a .Creative Commons Attribution 2.5 Australia License
2.
explained in more detail below.
When to open your service desk
As an example of when to open your service desk project, an IT service desk is usually open to all the
employees in an organization, so everyone can access it and create requests. In this open service
desk scenario, customers can create an account on the customer portal or email requests to your service
desk email channel to have an account created automatically.
To open your service desk, your administrator must first enable . You can then select the firstpublic signup
option under "Who can raise requests" on the request security page.
When to restrict your service desk
If public signup is not enabled, you have the option to partially restrict your service desk to service desk
customers and JIRA application users from any type of project. This option prevents people from signing up
themselves and emailing your linked email channel without an existing account.
To partially restrict your service desk, select the second option under "Who can raise requests" on the
request security page.
In another example, for a service desk that handles contractors' leave requests, you might want to make it
only available to your contractors so that the rest of your staff do not get confused about where to put in
leave requests. Service desks like this one are restricted service desks and only customers you add to your
project's Customers list can create requests.
To restrict your service desk, select the third option under "Who can raise requests" on the request security
page.
Receiving requests by email
If your customers prefer to open and work on requests from the comfort of
their email inboxes, you can enable email requests to receive all customer
requests in JIRA Service Desk. Enabling email requests will help your team
focus on your customers, instead of having to worry about missing requests
or checking multiple inboxes.
Here's how it works:
A customer emails a request to your linked service desk account
An agent comments on the request in service desk, which sends the
customer an email notification.
The customer replies to these email notifications until the request is
resolved. All customer replies are automatically added as comments
on the corresponding issue in service desk.
On this page:
Before you
start
Adding an
email
account
Choosing
a request
type
Verifying
your linked
email
account
Preparing
customers
for email
greatness
Email
usage
notes
Before you start
Make sure you have the Administer Projects permission.
Enable or manually to your service desk project to ensure that youpublic signup add customers
receive new customer requests.
Set up a suitable with and as required visible fields. Any otherrequest type Summary Description
fields must be optional.
Know which emails from your mail client will be . processed

Documentation for JIRA Service Desk 3.1
39
Created in 2016 by Atlassian. Licensed under a .Creative Commons Attribution 2.5 Australia License
Adding an email account
Open your service desk project and proceed to Project administration > Email requests. Select Add an
. Easy enough. Choose your email service provider and enter the requested details beforeemail address
selecting . Next
Choosing a request type
When a customer emails your service desk, a corresponding request will be created with the following two
fields:
Summary (from the email subject line)
Description (from the email content)
In order to use the email channel, you therefore need to have at least one request type in your project with
the Summary and Description fields – we call these types of requests "suitable for emails". Associating email
requests with a suitable service desk request type ensures that the emails are successfully filtered into your
service desk queues. In this example, we have one suitable request type ("Get help"):
Select a suitable request type for your email channel and select .Done
Verifying your linked email account
Once you have chosen a suitable request type, JIRA Service Desk will send a test email and create a
corresponding test request in your service desk project. Head on over to the tab to find the newQueues
request:
JIRA Service Desk uses a built-in email processor to manage incoming emails in service desk
projects. It's purpose-built for service desk projects and works differently from .JIRA mail handlers
Issues created via JIRA email handlers don't show up as service desk customer requests. For this
reason, we don't recommend using a JIRA mail handler for service desk projects.
If you have two-step verification enabled for your Gmail or Yahoo! account, you will need to set up an
.application-specific password

Documentation for JIRA Service Desk 3.1
40
Created in 2016 by Atlassian. Licensed under a .Creative Commons Attribution 2.5 Australia License
1.
2.
1.
2.
New messages sent to your linked email account will now appear as service desk requests in your project.
For more information about what emails are processed by JIRA Service Desk, expand the option that applies
to you:
Emails using POP
JIRA Service Desk looks for messages in your inbox that have...
The "Deleted" flag set to false, and
Been received after your email account and service desk project have been successfully linked.
To link your email account with a service desk using POP, make sure that your email inbox is empty by
moving the existing messages to another folder, archiving them, or deleting them. Starting with an empty
inbox ensures that you do not lose emails unintentionally, as POP emails are deleted after they are
processed by JIRA Service Desk.
Emails using IMAP
JIRA Service Desk looks for messages in your inbox that have...
The "Deleted" and "Seen" flags set to false, and
Been received after your email account and service desk project have been successfully linked.
If you use IMAP, emails are marked as read (not deleted) after they are processed by JIRA Service
Desk. If you want existing messages to be pulled in by JIRA Service Desk, you can move them back to
your inbox and mark them as unread after the connection has been established.
Preparing customers for email greatness
Before sharing your linked email account with your customers, you will want to confirm whether you have an
. New customer email requests can bounce if you have a restricted serviceopen or restricted service desk
desk, and that's no fun. Expand the statement that applies to you below to make sure your customers are
ready to use your new email channel:
I have an open service desk...
Great! New customers can create requests right away by emailing your linked service desk email
account. A corresponding customer account will be created based on the new customer's email address.
Customer accounts do not count towards your service desk license.
I have a restricted service desk...
Email requests will not be processed if your customers don't have existing service desk accounts. Simply
create (or send customer invitations) before telling new customers to email yournew customer accounts
service desk.
Email usage notes

Documentation for JIRA Service Desk 3.1
41
Created in 2016 by Atlassian. Licensed under a .Creative Commons Attribution 2.5 Australia License
1.
1.
2.
3.
Note that you can only link one email account to your service desk project.If you use more than one
email address to interact with your customers, you might be able to set up forwarding rules or aliases
to receive requests in the email linked to your service desk project. You will need to configure any
forwarding rules or aliases in your email client.
If you are a JIRA Administrator, you can refer to to learn more aboutManaging the email channel
global mail settings.
If you encountered any issues during the email setup process, check out some common errors and
resolutions .here
Managing the email channel
Now that you have , youset up your email channel
can control when JIRA connects to your mail server
and filters relevant emails into your service desk
projects. You can also view logging information
directly in JIRA to check on the status of your mail
server connection.
On this page:
Managing global mail settings
Managing the email channel for
multiple service desk projects
Managing global mail settings
There are two global mail settings - email puller and email processor - that are used only by JIRA Service
Desk and do not impact any email settings you have set up for JIRA. Email puller connects to your mail
servers every minute and pulls the email data into the database. Emails with attachments larger than 25MB
will not be pulled. Email processor filters the emails (e.g. to remove auto-replies and spam) using information
stored in the database.
You can access these settings by going to
> > .System Global mail settings
Managing the email channel for multiple service desk projects
JIRA administrators can get an overview of all the service desks in the system that use the email channel
and the email accounts linked with them.
Choose
> Applications. Scroll down to the JIRA Service Desk section and choose Email settings.
From the page, you can also check the connection email processing statuses of each linkedEmail settings
email account. Note that logging information older than 6 months is deleted daily.
Choose
> Applications. Scroll down to the JIRA Service Desk section and choose Email settings.
Under , click . Actions View log
Click the or tab to view the corresponding log details.Connectivity log Processing log
Troubleshooting issues with the email channel
This page contains information about the errors you might run into when setting up the email channel for your
service desk. See the section below for more information about generating anResolving errors
application-specific password (e.g. if 2-factor authentication is enabled for your email account), resolving
email connection issues, and ensuring that customers who raise requests by email are correctly
notified.
Checking the connection
To troubleshoot email channel issues, the first thing to do is to check the connection between JIRA Service
Desk and your email account. You will see error messages that show you why the email channel does not
work for your service desk.

Documentation for JIRA Service Desk 3.1
42
Created in 2016 by Atlassian. Licensed under a .Creative Commons Attribution 2.5 Australia License
1.
2.
To check the connection:
Choose
> Applications. Scroll down to the JIRA Service Desk section and choose Email settings.
Select . Test
Resolving errors
The following table describes the common errors and provides information about how to resolve them when
available.
Symptom Description and
resolution
Setting up the email channel
Error message:
The email address you entered is currently used by another project's email channel.
Please choose another email address. Check out our troubleshooting docs for help
resolving the issue.
You can only connect
an email address to
one service desk
project in your JIRA
Service Desk Cloud
site or Server
instance. If you try to
use the same email
address to set up the
email channel in
another service desk
project, you'll receive
this error message.
You can also receive
this error message if
you are trying to use
multiple email aliases
that point to the same
email account for
multiple service desk
email channels.
To resolve this:
Choose another
email address for
the email channel
you're setting up
or for the one that
already exists.

Documentation for JIRA Service Desk 3.1
43
Created in 2016 by Atlassian. Licensed under a .Creative Commons Attribution 2.5 Australia License
Setting up a Gmail account
Error message:
Unfortunately JIRA couldn't connect to the mail server. Here is
what the mail server said: "[ALERT] Please log in via your web
browser:
http://support.google.com/mail/accounts/bin/answer.py?answer=78754
(Failure)
If you have two-factor
authentication enabled
for your Gmail
account, you'll likely
receive this error
when entering your
login details.
Alternatively, JIRA
Service Desk checks
email accounts every
minute, causing Gmail
to suspect
inappropriate usage of
this account and lock
it for security reasons.
To resolve this:
Create an
application-specific
password for JIRA
Service Desk in
your Gmail
account settings.
Details can be
found . here
Setting up a Yahoo! account
Error message:
Unfortunately JIRA couldn't connect to the mail server. Here is
what the mail server said: "[AUTHENTICATIONFAILED] (#MBR1240)
Please verify your account by going to "https://login.yahoo.com
If you have two-factor
authentication enabled
for your Yahoo!
account, you'll likely
receive this error
when entering your
login details.
To resolve this:
Create an
application-specific
password for JIRA
Service Desk in
your Yahoo!
account settings.
Details can be
found .here
Microsoft Outlook, POP3
Error message:
Unfortunately JIRA Service Desk couldn't connect to the mail
server. Here is what the mail server said: "STAT command failed:
Exceeded the login limit for a 15 minute period. Reduce the
frequency of requests to the POP3 server.
JIRA Service Desk ch
ecks email accounts
every minute. Microsof
mightt Outlook
suspect inappropriate
usage of this account
and lock it for security
reasons.
To resolve this:
Use IMAP.

Documentation for JIRA Service Desk 3.1
44
Created in 2016 by Atlassian. Licensed under a .Creative Commons Attribution 2.5 Australia License
Gmail accounts, POP3
Requests are created from archived messages.
When JIRA Service
Desk checks your
email accounts for
new messages, it polls
the . inbox folder
Gmail uses labels to
classify messages into
categories and only
has these folders: Inb
, ox Sent Mail and Bin
(or ). This Trash
means that the
archived messages
are still considered as
in the inbox folder. Wit
JIRA Serviceh POP3,
Desk is not able to
identify archived
amessages by labels
nd therefore still
brings them in as
requests.
To resolve this:
Use IMAP.

Documentation for JIRA Service Desk 3.1
45
Created in 2016 by Atlassian. Licensed under a .Creative Commons Attribution 2.5 Australia License
1.
2.
Customers send emails to create requests, but no requests are created and customers
do not receive any notifications.
This problem could be
due to one or more of
the following causes:
The connection to
the email account
failed.
You do not have
public signup
configured and the
customer does not
have a user
account in the
system.
Every customer
must have an
account before
they can create
requests in a restri
servicected
desks.
The default
request type for
the email channel
is unsuitable for
the email channel.
Learn more
A suitable request
type for the email
channel must have
the fieldSummary
and the Descriptio
field as visiblen
fields. Any other
fields must be
optional ones.
To troubleshoot the
issue and resolve it:
Check the
connection as
described
previously on this
page.
Check if user
accounts exist for
your customers. If
not, create user
accounts for your
customers. For
instructions, see S
etting up service
. Youdesk users
can also configure
.public signup

Documentation for JIRA Service Desk 3.1
46
Created in 2016 by Atlassian. Licensed under a .Creative Commons Attribution 2.5 Australia License
This message
appears on the Email
settings page and
prevents you from
turning on the email
channel.
To resolve this:
Head to Project
> administration
Request types
Add a new request
type (or choose an
existing one)
Select Edit fields
Make sure both
the Summary and
Description fields
are added and
marked as Requir
= . You caned Yes
add an additional
Attachment field
with = Required N
.o
Save the request
type and head
back to Project
> administration
Email settings
Setting up queues for your team
Make sure that your team is working on the right requests at the right time
with easily configurable service desk queues. A queue is a filtered set of
Use your project's default queues orissues that are displayed to your team.
create custom queues to save time triaging requests, and to give your
agents more visibility of the number and type of incoming customer requests
they need to work on.
On this page:
Creating
queues
Managing
queues
How your
team uses
queues
You can log in a service desk administrator to configure queues on the aptly named tab in yourQueues
service desk project:
Creating queues

Documentation for JIRA Service Desk 3.1
47
Created in 2016 by Atlassian. Licensed under a .Creative Commons Attribution 2.5 Australia License
1.
2.
3.
4.
5.
When creating a new queue, you can select the queue name, the issues that will be filtered into this queue,
and the columns that appear in the queue to make life easier for your service team. Here's how you can
create a new queue:
From your service desk project sidebar, select > . Queues New queue
Name your queue using language your team will understand (e.g. Issues due this week). Note that
you can copy this character and add it before the name of your queue to make it appear as a sub
queue:
Select which issues will show up in this queue using the dropdown options in the basic search view:
You can also use the advanced search view to enter a statement. JIRA Query Language (JQL)
Add or remove columns to control what issue information, such as the issue key and issue creation
date, is displayed in your queue.
Select . If you have existing issues in your project that fit the criteria selected in "Issues toCreate
show", these issues will now appear in your new queue.
Managing queues
You can reorder or delete queues at any time by hovering over the Queues sidebar and selecting . InManage
the Manage queues dialogue that appears, you can see the number of issues in each queue, and drag and
drop queues to reorder them.
You can edit existing queues by selecting the queue you wish to configure and selecting in theEdit queue
top right corner. You can edit the queue name, the issues shown, the columns, and column order. Note that
you will see a live preview of the updated issues that appear in this queue as you configure it.
How your team uses queues
Queues give your agents a single view of the work that needs to be done across their team. Agents can view
all of the queues in your service desk project; however, they cannot create or edit queues.
Setting up request types
JIRA Service Desk provides a set of default request types that are
configured for basic IT help desk scenarios. You can configure the default
request types or add new ones to suit the needs of your customers and
team. Request types can be organized into groups to help customers find
the request they need on the customer portal.
You must be a JIRA Service Desk Administrator or Project
Administrator to configure request types and workflow statuses.

Documentation for JIRA Service Desk 3.1
48
Created in 2016 by Atlassian. Licensed under a .Creative Commons Attribution 2.5 Australia License
On this page:
Setting up
request
types
Organizing
request
types into
groups
Customizin
g the fields
on a
request
type
Customizin
g the
workflow
statuses
for a
request
type
Hidden
fields and
unsupporte
d fields
Setting up request types
Each request type in a service desk is based on an issue type. Open > Project administration Request
to manage your project's request types:types
Note that a single issue type can be the basis for many different request types (for example, the "Purchase"
issue type serves as the basis for both the "Request new hardware" and "Request new software" requests).
Organizing request types into groups
We recommend using groups if you have seven or more request types, so you can make your request types
easier to find on the customer portal. You must have more than one group (e.g. Access requests) in order for
the groups to appear in the customer portal:

Documentation for JIRA Service Desk 3.1
49
Created in 2016 by Atlassian. Licensed under a .Creative Commons Attribution 2.5 Australia License
Administrators and Project Administrators can manage request type groups in >Project administration Req
. Simply select a request type and choose an existing group from the dropdown menu or create auest types
new one. Note that request type groups are unique to a service desk project.
Customizing the fields on a request type
The fields and descriptions that appear in a request type are based on the field configured for the issue type
(that is, the issue type the request type is based on).
When editing the request type fields, you can use the tab to change the default JIRA field names toFields
more customer friendly language. For example, the "Summary" field appears as "What do you need?" for
customers.
Tips:
You can drag and drop request types to re-arrange them on the customer portal.
As groups are displayed in alphabetical order, you can prefix group names with numbers, e.g.
to change the order in which they appear on the portal1 Access, 2 Service not working
If you assign multiple groups to a single request type, the request type will appear on multiple
tabs.

Documentation for JIRA Service Desk 3.1
50
Created in 2016 by Atlassian. Licensed under a .Creative Commons Attribution 2.5 Australia License
You can also keep fields hidden but available on the request type so that their value can be used for other
processes. For more details about how different types of fields work in JIRA Service Desk, see Hidden fields
.and unsupported fields
If the issue type doesn't have the fields you need, you must to the JIRA issue type that theadd a field
request type is based on. If the issue type uses multiple screen schemes, the new field must be available in
the create screen. See .Associating a screen with an issue operation
Customizing the workflow statuses for a request type
JIRA Service Desk uses the workflow associated with the request's issue type for the flow of the request.
You can re-map the default workflow statuses to more customer friendly statuses that will appear for
customers, and you can also map multiple statuses to a single customer status to simplify the appearance of
the workflow. Use the tab to customize the workflow that customers will see. Workflow Statuses

Documentation for JIRA Service Desk 3.1
51
Created in 2016 by Atlassian. Licensed under a .Creative Commons Attribution 2.5 Australia License
Only changes between these customer-visible 'status names' will be reflected in the Customer Portal and its
notifications (e.g. a transition between two workflow statuses can be hidden on the Portal by giving them the
same 'status name'). For more information about notifications, see .Configuring service desk notifications
If you need to change the workflow of a request, you must edit the workflow associated with the service desk
project by going to > . Project administration Workflow
Hidden fields and unsupported fields
Each request type in a service desk is based on an issue type. Every issue type has a set of allowed (and
possibly required) fields associated with it. As you set up the request type, you can choose to include fields
that are hidden on the customer portal but still provide a value to assist with your internal processes and
reporting. For example, you might want to set the value of the "Label" field as "hardware" for the "Request
new hardware" request type, and set the value as "software" for the "Request new software" request type.
Some fields used by an issue type are not supported for use in the customer portal; if you include these fields
on a request type, they will automatically be added to the section andHidden fields with preset values
you'll be required to set a value for them.
Other fields aren't supported for use in JIRA Service Desk.
These fields can be added to the request type and given a preset value, but you cannot make them visible on
the customer portal:
Assignee
Linked issues
Any fields that are defined by other JIRA applications
These types of fields can't be added to a request type and won't appear in the in the "Add a field" dialog:
Issue type
Log work
Reporter

Documentation for JIRA Service Desk 3.1
52
Created in 2016 by Atlassian. Licensed under a .Creative Commons Attribution 2.5 Australia License
Security level
Time tracking
Troubleshooting issues with request types
This page contains information about the errors and problems that you might have when setting up request
types for your service desk.
Issue Resolution
Cannot delete the request type
because it is the default request
type for the email channel.
Details...
If you see this error when
trying to delete a request
type, it means that the email
channel for your service desk
uses this request type as the
default one for all the
requests coming from emails.
When JIRA Service Desk pull
s emails from the
associated email account and
creates requests, this request
type is assigned to the
requests automatically.
JIRA administrators can change the default request type for email requests to
be another one by going to > in yourProject administration Email settings
service desk. For more information about the email channel setup, see Recei
. ving requests by email
Cannot show a hidden field or
make an optional field required
because the request type is the
default for the email channel.
Details...
When JIRA Service Desk cre
ates new requests from
emails sent to the email
account associated with your
service desk, it copies the
email subject to the Summar
y field and the email content
to the Description field. Whe
JIn more fields are required,
RA Service Desk cannot
parse emails to fill them in
with correct values.
You have the following options.
If you want to show a hidden field, make it an optional one.
Ask your JIRA administrator to change the default request type for the
email channel to use a different request type, and then modify your
request type to include more required fields. You can also create a new
request type for the email channel if no existing types are suitable. For
more information about the email channel setup, see Receiving requests
.by email
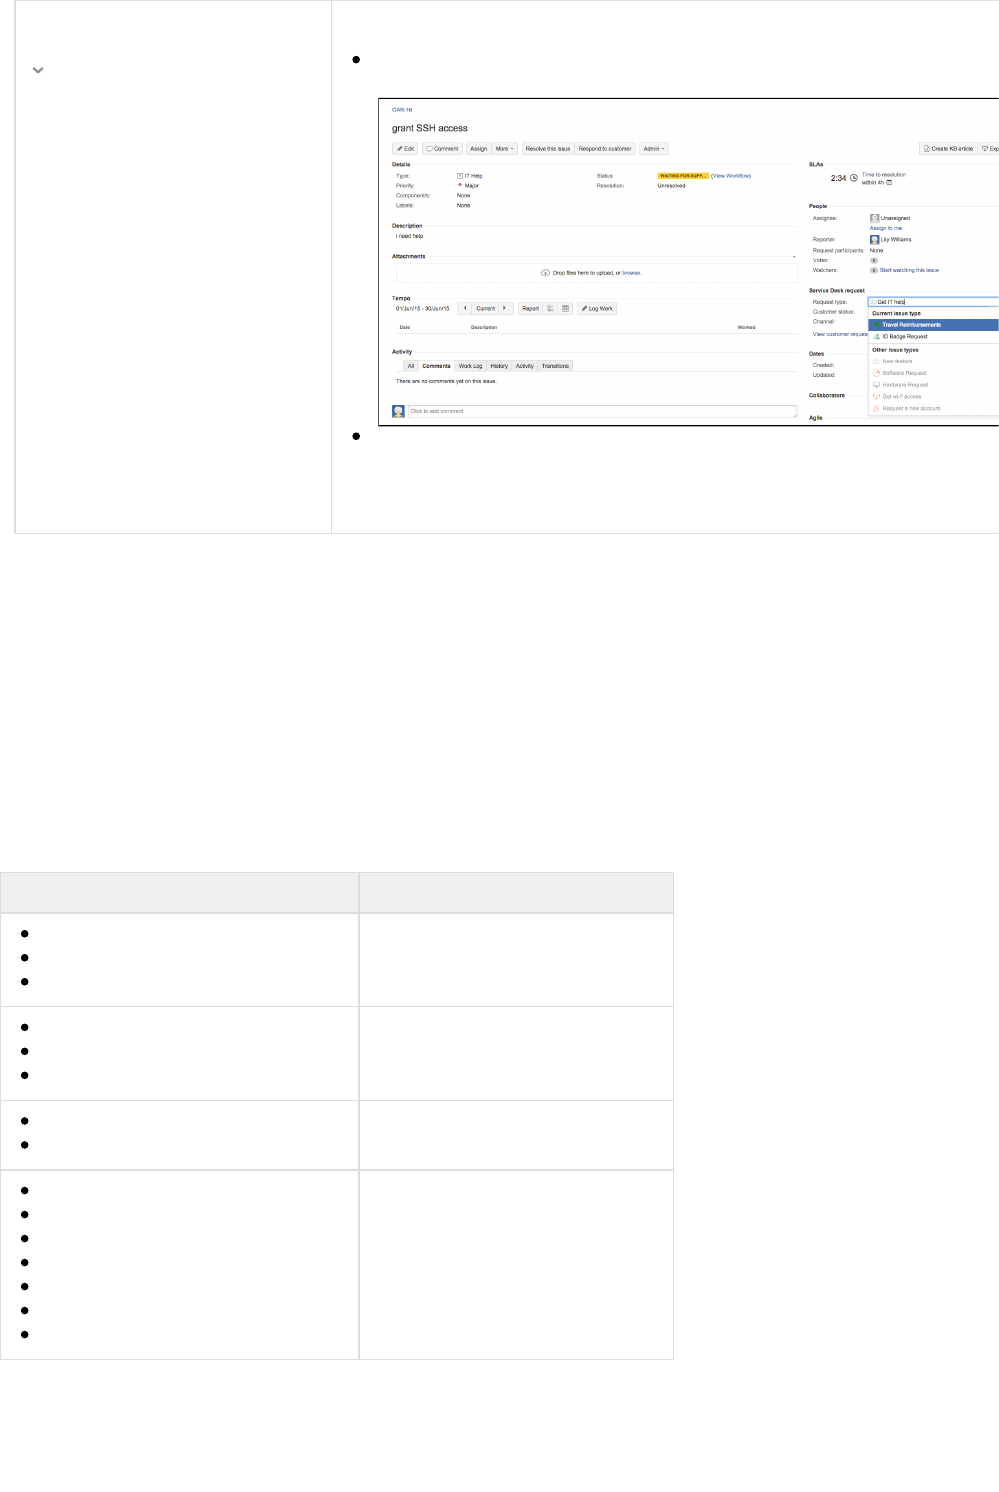
Documentation for JIRA Service Desk 3.1
53
Created in 2016 by Atlassian. Licensed under a .Creative Commons Attribution 2.5 Australia License
Request type displayed as "No
match" in agent view.
Details...
In JIRA Service Desk, the
service desk request type is
stored with the
PortalKey/RequestTypeName
value. For example, a "New
Feature" request created in
your "HelpDesk" Customer
Portal would have the
HelpDesk/NewFeature value.
When you move this request
to a new project, the
HelpDesk/NewFeature value
no longer matches the new
project's Customer Portal
name and request type
values.
You have the following options.
When you move a single issue to a new project, simply edit the service
desk request type field with the correct request type:
If you need to move a group of issues, you can search for issues with the
same issue type in your existing project and then use the Bulk Edit
wizard. In the third step, check andChange Customer Request Type
select the request type that applies to this group of issues.
Workflows
All JIRA projects contain issues that your team can view, work on, and transition through stages of work — from
creation to completion. The path that your issues take is called a workflow. Each JIRA workflow is composed of
a set of statuses and transitions that your issue moves through during its lifecycle, and typically represents work
processes within your organization.
In addition, JIRA uses workflow schemes to define the relationship between issue types and workflows.
Workflow schemes are associated with a project, and make it possible to use a different workflow for different
combinations of project and issue types.
If you need to edit or create a more advanced workflow to match how your team or organization works, you can
global permissionlog in as a JIRA Administrator with to access and create your workflow.
What you can do... Documentation
Edit existing workflows
Create new workflows
Configure existing workflows
Working with workflows
Add a workflow scheme
Configure a workflow scheme
Managing workflow schemes
Configuring workflow schemes
Import and export workflows
Activate and deactivate workflows
Managing your workflows
Adding custom events
Configuring the initial status
Working in text mode
Configuring workflow triggers
Using validators and custom fields
Using XML to create a workflow
Workflow properties
Advanced workflow configuration
Setting up service desk users
The page introduces you to service desk project roles and groups, which

Documentation for JIRA Service Desk 3.1
54
Created in 2016 by Atlassian. Licensed under a .Creative Commons Attribution 2.5 Australia License
you can use to manage service desk users and JIRA application licenses.
To set up and manage users, you must be logged in as an .administrator
When you invite agents to a service desk project, these users are
automatically added to the Service Desk Team project role, and assigned to
groups associated with a service desk license. When you invite customers
to a service desk project, these users do not consume a service desk
license, but are similarly added to the Service Desk Customers project role
and given restricted access to the customer portal.
On this page:
Overview
of project
roles
Managing
service
desk
agents
Managing
service
desk
customers
Involving
JIRA
Software
and JIRA
Core users
User
manageme
nt
documenta
tion
Overview of project roles
The following table summarizes the default service desk project roles:
Project Role Details
Administrators Users who administer a service desk project. In addition to what the Service Desk Team
can do, Administrators can:
Add agents and customers to a service desk project
Remove agents and customers from a service desk
Configure request types, request security, and the email channel
Customize the customer portal
Create and edit reports and SLAs to track progress
Connect a Confluence knowledge base
Service Desk
Team
Users who work on customer requests. Agents assigned to this project role can:
View queues, reports, SLA goals, and the customers list
Create and edit issues in the service desk project view and the customer portal
Add, edit and delete customer-facing and private comments on issues
Manage content in a connected knowledge base
Other JIRA application users can be assigned to the Service Desk Team role, but they
will have .limited project access
Service Desk
Customers
Users who create requests through the customer portal or by email. Customers can't log
in to JIRA applications and don't have access to the service desk project view used by
administrators and agents. Customers can:
Create, comment on, and track requests through the customer portal
Create and comment on requests via email
Add comments and attachment to requests
Add other participants to their own requests
Managing service desk agents

Documentation for JIRA Service Desk 3.1
55
Created in 2016 by Atlassian. Licensed under a .Creative Commons Attribution 2.5 Australia License
1.
2.
1.
2.
1.
2.
1.
2.
1.
2.
Add agents to a service desk project
Easily invite new agents from your service desk project sidebar:
Select and enter the agent's username (for existing system users) or email address (forInvite Team
new users). You'll see an updated JIRA Service Desk agent license count based on the number of
new agents.
Select . Invite
Once invited, your new agents will receive an email with a link to your service desk project and be
automatically added to the Service Desk Team project role and service-desk-users license group.
Remove agents
To remove an agent from your service desk project:
In your project, go to > . Project administration Users and roles
Hover over the user or group you'd like to remove from the Service Desk Team project role and select
.
Note that removing an agent from your project does not revoke the agent's license. To free up an agent
license, your administrator will need to proceed to
> and remove the agent's JIRA Service Desk application access. User management
Managing service desk customers
Add customers to a service desk project:
You can manually invite customers, or to allow customers to create their own serviceopen your service desk
desk accounts.
To manually invite customers:
In your service desk project, select and then select . Customers Invite customers
Enter your customer's email address or invite multiple customers. Your customers will receive their
new account details by email and will be added to the Service Desk Customer project role.
If your administrators have already enabled public signup, you can open up your service desk project to allow
new customers to create accounts on the customer portal or send requests by email, which creates an
account for them automatically. To open up your service desk:
In your service desk project, go to > . Project administration Request security
Select "Anyone can sign up for a customer account" and select .Save
Remove customers
Removing customers from your service desk project depends on your project's request security settings,
which you can check in > .Project administration Request security
If your request security settings are set to "Only people on my customers list can raise a request", you can
remove customers with these steps:
In your service desk project, go to > .Project administration Users and roles
Hover over the user or group you would like to remove from the Service Desk Customer role and
select
.
If your request security settings are set to "Anyone can sign up for a customer account", or "Only people who
have an account", your administrator will need to deactivate customer accounts by going to

Documentation for JIRA Service Desk 3.1
56
Created in 2016 by Atlassian. Licensed under a .Creative Commons Attribution 2.5 Australia License
1.
2.
3.
4.
> . User management
How restricted customer access works
The permissions assigned to customers are granted to the securitService Desk Customer - Portal Access
y type instead of the role. The securityService Desk Customers Service Desk Customer - Portal Access
type gives people access to the Customer Portal only (not JIRA). This security type checks the Service Desk
role to determine who are customers. So in summary, the security type and the role work hand inCustomers
hand to make sure that customers get the permissions they need to use the Customer Portal and cannot
access JIRA.
For example, if you want your customers to be able to create requests through your Customer Portal, grant
the permission to the security type, not the Create Issues Service Desk Customer - Portal Access Servic
role.e Desk Customers
Why does the security type have more permissions than what customers can do?
In the standard permission scheme, the security type has moreService Desk Customer - Portal Access
permissions in place than the functionality available for customers to use. For example, the security type
has the permission, but customers cannot do this on the Customer Portal. This isEdit Own Comments
because JIRA Service Desk built the functions that we think are the most commonly used by service desk
customers. We will evaluate the feature requests and expand the functions gradually. With the
permissions in place now, future functionality additions to the Customer Portal will be easier because you
will not have to modify permission schemes to make use of new functions in most cases. You can join the
discussion on new features at our issue tracker: . 965 issues
Involving JIRA Software and JIRA Core users
JIRA application users without a JIRA Service Desk license (e.g. JIRA Software developers) can assist your
team of agents on issues by working in the unlicensed view of a service desk project.
These users can:
View issues, comments and attachments
Add and delete their own attachments
Add and delete their own internal comments
Watch and vote for issues
These users cannot:
See service desk queues, reports, and customers list
Leave an external comment viewable by a service desk customer
Log work on a service desk issue
Transition a service desk issue
Be assigned to a service desk issue
As an example of how to involve other JIRA application users, Martin, an IT service desk team agent, links
an incident ticket in a service desk project to an underlying network problem ticket in a JIRA Software project.
Andrew, a JIRA Software developer on the network operations team, assigns this network issue to himself
and starts working on it. After fixing the problem, Andrew opens the linked service desk incident ticket and
leaves an internal comment asking Martin to try the network connection again. After receiving the internal
comment, Martin verifies the network connection and tells the customer that the problem is resolved.
Add JIRA Core or JIRA Software users to your service desk project
In your project, go to > .Project administration Users and roles
Select .Add users to a role
Search for the users you'd like to add and choose the Service Desk Team role.
Select . Add
JIRA Core and JIRA Software users in the Service Desk Team project roll will have restricted access to your
service desk project and will only be able to see issues with which they're involved. Adding JIRA core and
JIRA Software users to the Service Desk Team project role will not assign them to a service desk agent
license.

Documentation for JIRA Service Desk 3.1
57
Created in 2016 by Atlassian. Licensed under a .Creative Commons Attribution 2.5 Australia License
1.
2.
1.
2.
3.
4.
5.
Remove JIRA application users
In your project, go to > .Project administration Users and roles
To remove users from your service desk project only, simply hover over the user or group you wish to
remove and select
.
To remove or deactivate users, your administrator will need to proceed to
> . User management
User management documentation
Check out the following documentation to learn more about managing users and permissions:
Documentation Details
User
management
Learn more about adding and removing users, managing users with groups, and
managing access to JIRA applications.
Managing
project roles
Learn more about adding and removing project roles, and managing project role
membership.
Enabling public
signup
Open up your service desk project to allow customers without an account to sign up on
the Customer Portal and send requests by email.
Configuring
permissions
Learn how global permissions affect licensing, how project permissions are associated
with a project role, and how to customize the default service desk project permission
scheme.
Managing project role memberships
You can use project roles to easily associate users and groups with a particular project. For example, you
may want to send notifications to a specific set of users associated with your project, and by adding them all
to a project role, you can then use that project role to control who receives the notifications. You can also use
project roles to restrict how much access certain users or groups have. Unlike groups, which have the same
membership throughout your application, project roles have specific members for each project.
This page contains instructions for managing membership of existing project roles. For information on
creating and using project roles, see Managing project roles.
Viewing and editing project role members
Log in as a project administrator and open your project.
Select
> .Users and roles
You'll see all users and groups associated with each project role.
To add users or groups to a project role, select in the top right corner. Enter theAdd users to a role
users or groups and select the project role you wish to add them to.
To remove a user or group from a project role, hover over the user or group row, and select
.
Since group membership can only be edited by users with the globalJIRA Administrator
permission, project administrators may therefore prefer to assign users, rather than groups, to their
project roles.

Documentation for JIRA Service Desk 3.1
58
Created in 2016 by Atlassian. Licensed under a .Creative Commons Attribution 2.5 Australia License
1.
2.
3.
4.
5.
6.
7.
8.
9.
Using JIRA applications with HipChat
Integrating JIRA applications and gives you and your team theHipChat
following collaboration power:
Get notifications in your HipChat rooms when a customer
updates a service desk request, or a developer comments on
an issue.
Create a dedicated HipChat room from the issue you're
working on and want to discuss with your team.
Preview issues and service desk requests directly in HipChat
when someone on your team mentions them.
On this page:
Connectin
g projects
to rooms
Invite
users
Discuss
issues in
rooms
Issue
preview
Remove
OAuth
Permission
s
Connecting projects to rooms
You can link JIRA projects with one or more HipChat rooms so that when issues are updated or created,
messages are sent to the HipChat rooms that you specify.
You must be a logged in as an Administrator or a Project Administrator.
Choose
. > Projects
Select a project.
In the Project Administration menu, select .HipChat Integration
Choose a HipChat room and select .Add
Select the Issue Type, Priority, or select to enter a JIRA .Advanced JQL Query
Select the actions that will send a notification to your room (issue created, assignee changed, new
comments, and issue transitions).
Select to notify users (using HipChat notifications) when a message is sent to the room.
Changes are saved automatically, continue browsing your project to continue.
Notify Users in This Room uses HipChat notifications (playing a sound, popups, and bouncing dock icon) to
alert users of new messages sent from JIRA. This functionality is only available in the web and IOS clients.
Private rooms
Private rooms in HipChat are by invitation only. In order to in connect JIRA to a private room in HipChat you
will need to authoriize HipChat from the setup screen.HipChat Integration

Documentation for JIRA Service Desk 3.1
59
Created in 2016 by Atlassian. Licensed under a .Creative Commons Attribution 2.5 Australia License
Once you have authorized JIRA, all of the private rooms that you are a member of will be displayed in the
room selector drop-down menu. When your JIRA project and room are integrated, everyone in the private
room will be able to see the notifications that are sent to that room.
Invite users
If you have administrator permissions, you can invite users to join HipChat directly from the Integration
screen. Follow the instructions in Linking JIRA and your HipChat site above, to access the integration
screen. You must have at least one project integrated with a room to see the invite users link. Select the link
to send an email inviting users to HipChat. To invite users, you will need to confirm access to your HipChat
account to give JIRA permission to invite users.
You can remove this access by following the instructions in Removing OAuth Permissions.
Discuss issues in rooms
You can focus your discussion by creating or selecting a HipChat room to discuss an issue. When JIRA is
integrated with HipChat and you are in the issue screen, you can select to "Create a room" or "Choose a
room" in the panel. This will associate the current issue and the room and anyHipChat discussions
changes to the issue will send a notification to that room.
You can also select to have links open in your HipChat App (OSX only) when you select a link. In the issues
screen, select the cog icon in the HipChat discussion to enable opening links in the application.
Issue preview
With issue preview enabled, if you enter an issue key as part of a message, or paste a URL for the issue in
any room in HipChat, you can receive a preview of the issue. This way, the entire room can see and be on
the same page when discussing an issue, without ever having to leave the discussion.
Connectivity requirements for JIRA and/or HipChat Server customers
For this feature to work, HipChat needs to be able to talk to JIRA, which means that your JIRA instance must
be addressable and accept inbound connections via HTTPS.

Documentation for JIRA Service Desk 3.1
60
Created in 2016 by Atlassian. Licensed under a .Creative Commons Attribution 2.5 Australia License
1.
2.
3.
4.
5.
1.
2.
3.
4.
5.
6.
7.
1.
2.
3.
4.
5.
A note on JIRA permissions
If this feature is enabled for a project, a preview will be posted in HipChat for any issue key/URL for that
project. If a project contains sensitive information you don't want shared in HipChat, make sure to disable this
feature for this project.
Configuring issue previews
If you are logged in as a JIRA Administrator, you can enable or disable issue preview for all projects. A
Project Admin can also override issue preview by individually enabling or disabling this setting for each
project.
As a JIRA Administrator
Log in as a user with the global permission.JIRA Administrators
Choose
. > Applications > HipChat
Select .Advanced Settings
Select the checkbox to enable or disable the Issue Preview globally.
Select to exit.Save
As a Project Administrator
You must be a logged in as a .Project Administrator
Choose
. > Projects
Select a project.
In the Project Administration menu, select .HipChat Integration
Select .Advanced Settings
Select the checkbox to enable or disable Issue Preview for your current room.
Select to exit.Save
Remove OAuth Permissions
You can remove permissions that you have granted to allow JIRA to access HipChat. For instance, if you
have given JIRA permission to invite users on HipChat's behalf.
Select your avatar to access your profile.
Click . Profile
Select .Tools
Click .HipChat OAuth Sessions
Select .Remove Access
Default service desk project configuration
Use this page as a reference for the default configuration of your service desk projects, including custom
fields, permissions, and database tables.
Custom fields
Request types, issue types, and workflows
Project permissions
Security types
Database tables
Custom fields
If required, JIRA Service Desk will create the following custom fields:

Documentation for JIRA Service Desk 3.1
61
Created in 2016 by Atlassian. Licensed under a .Creative Commons Attribution 2.5 Australia License
Custom
field
Type Notes
Viewport
Origin
String value, storing the 'Portal' and
'Request Type' if a request was created
through the customer portal.
Issues must have this field to be a service desk
request.
Time to
resolution
An SLA field, stored in JSON format. This field stores SLA information for time until a
request's resolution is set. See Setting up SLAs
for more information.
Customer
Request
Type
String value Issues must have this field to be a service desk
request.
Request types, issue types, and workflows
The default issue types, request types, and workflows are different for each service desk project type. When
you create a new service desk project, you can view these defaults by selecting Request types, Issues types,
or Workflows from the Project administration menu.
Project permissions
At installation time, JIRA Service Desk creates a project permission called JIRA Service Desk agent access
. Users who require full access to service desk projects or functionality need to have this permission.
This page shows the permission configuration for a standard service desk project permission scheme.
To see an overview of how permissions are set up for a service desk, see . Permissions overview
If you want to customize the permission scheme, see . Customizing JIRA Service Desk permissions
If you run into permission-related problems, see .Resolving JIRA Service Desk permission errors
Security types
JIRA Service Desk introduces the security type. A security type isService Desk Customer - Portal Access
a concept that allows restriction of users to certain permissions, examples of security types include project
and groups. is a special security type that only applies toroles Service Desk Customer - Portal Access
users while they are viewing the customer portal; it was created specifically to allow customers to use the
customer portal without giving them access to the internal service desk view and your other JIRA
applications.
Database tables
When you set up JIRA Service Desk, the following tables will be created in your JIRA application database.
General JIRA Service Desk:
AO_54307E_AGENTSIGNAUTRES
AO_54307E_ASYNCUPGRADERECORD
AO_54307E_CAPABILITY
AO_54307E_CONFLUENCEKB
AO_54307E_CONFLUENCEKBENABLED
AO_54307E_CONFLUENCEKBLABELS
AO_54307E_CSATENTRIES
AO_54307E_CUSTOMGLOBALTHEME
AO_54307E_CUSTOMTHEME
AO_54307E_EMAILCHANNELSETTING
AO_54307E_EMAILSETTINGS
AO_54307E_GOAL
AO_54307E_GROUP
AO_54307E_GROUPTOREQUESTTYPE
AO_54307E_IMAGES

Documentation for JIRA Service Desk 3.1
62
Created in 2016 by Atlassian. Licensed under a .Creative Commons Attribution 2.5 Australia License
AO_54307E_METRICCONDITION
AO_54307E_PARTICIPANTSETTINGS
AO_54307E_QUEUE
AO_54307E_QUEUECOLUMN
AO_54307E_REPORT
AO_54307E_SERIES
AO_54307E_SERVICEDESK
AO_54307E_STATUSMAPPING
AO_54307E_THRESHOLD
AO_54307E_TIMEMETRIC
AO_54307E_VIEWPORT
AO_54307E_VIEWPORTFIELD
AO_54307E_VIEWPORTFIELDVALUE
AO_54307E_VIEWPORTFORM
JIRA Email Processor Plugin:
AO_2C4E5C_MAILCHANNEL
AO_2C4E5C_MAILCONNECTION
AO_2C4E5C_MAILGLOBALHANDLER
AO_2C4E5C_MAILHANDLER
AO_2C4E5C_MAILITEM
AO_2C4E5C_MAILITEMAUDIT
AO_2C4E5C_MAILITEMCHUNK
AO_2C4E5C_MAILRUNAUDIT
Automation:
AO_9B2E3B_EXEC_RULE_MSG_ITEM
AO_9B2E3B_IF_CONDITION_CONFIG
AO_9B2E3B_IF_COND_CONF_DATA
AO_9B2E3B_IF_COND_EXECUTION
AO_9B2E3B_IF_EXECUTION
AO_9B2E3B_IF_THEN
AO_9B2E3B_IF_THEN_EXECUTION
AO_9B2E3B_PROJECT_USER_CONTEXT
AO_9B2E3B_RSETREV_PROJ_CONTEXT
AO_9B2E3B_RSETREV_USER_CONTEXT
AO_9B2E3B_RULE
AO_9B2E3B_RULESET
AO_9B2E3B_RULESET_REVISION
AO_9B2E3B_RULE_EXECUTION
AO_9B2E3B_THEN_ACTION_CONFIG
AO_9B2E3B_THEN_ACT_CONF_DATA
AO_9B2E3B_THEN_ACT_EXECUTION
AO_9B2E3B_THEN_EXECUTION
AO_9B2E3B_WHEN_HANDLER_CONFIG
AO_9B2E3B_WHEN_HAND_CONF_DATA
JIRA Timed Promises Plugin:
AO_F1B27B_HISTORY_RECORD
AO_F1B27B_KEY_COMPONENT
AO_F1B27B_KEY_COMP_HISTORY
AO_F1B27B_PROMISE
AO_F1B27B_PROMISE_HISTORY
Working on service desk projects
If you are an agent working on a JIRA Service Desk project, you're in the right place!
If this is the first time you have used JIRA Service Desk, check out Getting started for
for a brief introduction to your new workspace.service desk agents

Documentation for JIRA Service Desk 3.1
63
Created in 2016 by Atlassian. Licensed under a .Creative Commons Attribution 2.5 Australia License
If you're familiar with JIRA Service Desk, use the search bar below to find any needed
information.
Search the topics in 'Working on service desk projects':
Working on issues
Working with issues
Editing and collaborating
on issues
Attaching files and
screenshots to issues
Tracking your work
Keeping on top of SLAs
Configuring dashboards
Serving your customers
Raising requests on behalf
of customers
Using service desk queues
Customer requests become issues that you can view and work on in queues. JIRA Service Desk comes with
default queues that your administrator can update to automatically triage issues for your team. As an agent,
you can see how many issues are in each queue, and switch between queues to work on the right issues at
the right time.
You can easily navigate to your service desk queues at any time by selecting from your projectQueues
sidebar:
Switching queues
When you select from your project sidebar for the first time, the secondary sidebar menu will openQueues
automatically. This sidebar displays all queues in your service desk project, as well as the number of issues
in each queue. Simply select the name of the queue you wish to work from to view its issues.
To expand the view of a single queue, you can minimize your project sidebar by selecting
and minimize your queue sidebar by selecting
in the sidebar's upper right corner. When the queue sidebar is collapsed, a Switch queue dropdown will
appear, which you can use to view a different queue or to reopen the queue sidebar:

Documentation for JIRA Service Desk 3.1
64
Created in 2016 by Atlassian. Licensed under a .Creative Commons Attribution 2.5 Australia License
Working with issues
In JIRA Service Desk, customer requests are automatically triaged into
queues, so you can easily find the issues you need to work on. If you are
ready to jump in and learn more about working on and managing customer
issues, you're in the right place.This page introduces you to the concept of
an issue. You can then learn more about creating, editing, and collaborating
issues in the Next steps section.
On this page:
What is an
issue?
Next steps
What is an issue?
Different organizations use JIRA applications to track different kinds of issues, which can represent anything
from a software bug, a project task, to a leave request form.
In JIRA Service Desk, an issue represents a customer request (i.e. a helpdesk ticket), such as "Our printer is
not working", which appears as follows in the customer portal:
As an agent, you then pick up the issue from the service desk agent view:
Next steps
Check out the following pages to reach issue ninja status:
Creating issues and sub-tasks
Attaching files and screenshots to issues
Editing and collaborating on issues
Logging work on issues
Adding request participants
Customer requests are communications between the
customer reporting an issue and the agent resolving
that issue. To aid the resolution process, both
agents and customers can add r .equest participants
Request participants are additional JIRA Service
Desk customers or other internal users who can be
included in the resolution process.

Documentation for JIRA Service Desk 3.1
65
Created in 2016 by Atlassian. Licensed under a .Creative Commons Attribution 2.5 Australia License
1.
2.
On this page:
Adding other customers
To add request participants
on an issue
To add request participants
via email
Adding internal users
About request participants
Adding other customers
Typically, you include other customers, to ask them for more information or to update them about the
issue. Request participants can add comments and attachments to a request, and receive the same
notifications from JIRA Service Desk as the reporter. Participants are able to see who else is involved in a
request both on the Customer Portal and in email notifications. This makes it possible for them to work from
their inbox. They can also add more participants, for example, other customers who may be experiencing the
same issue and would like to be notified about the resolution.
To add request participants on an issue
Navigate to an issue.
In the section of the issue, add users to the field. Note that you canPeople Request participants
only add existing customers to the service desk issue.
If customers need to add participants via the customer portal, they can do so by selecting . ServiAdd people
ce desk administrators can enable or disable this functionality by going to > Project administration Request
. security
To add request participants via email
If you are creating or responding to a request via email, add a request participant's email address to the TO
and CC fields.
Adding internal users
As an example, you can involve other agents or JIRA Software developers on an issue to analyze a bug that
a customer has reported. To involve internal users, you can mention them in a comment or add them as a
watcher. As watchers, they will be notified about the issue and can communicate any updates to you
internally.
About request participants
Request participants receive an email notifying them that they have been added. All customers, including the
reporter, will appear in the section of the request both to the customer on the customerPeople involved
portal and to internal users in JIRA Service Desk.
If is not enabled, the participant must have an existing JIRA Service Desk account topublic signup
be added to the request.

Documentation for JIRA Service Desk 3.1
66
Created in 2016 by Atlassian. Licensed under a .Creative Commons Attribution 2.5 Australia License
Attaching files and screenshots to issues
To share information with your customers, you can attach documents,
images, and screenshots to your JIRA Service Desk issues. You can also
restrict attachments to be viewed by your internal team only.
On this page:
Before you
begin
Adding
attachment
s
Sorting
and
managing
attachment
s
Accessing
ZIP file
contents
Capturing
and
attaching
screenshot
s
Before you begin
A JIRA administrator must enable specific user permissions so that you can add attachments and
screenshots into issues. The most common permissions are briefly described below. For more information,
your administrator should refer to .Configuring file attachments
JIRA administrator set permissions
You can attach files and screenshots if your JIRA administrator has file attachments enabled.
You need the permission in the appropriate projects. Create Attachments
The screenshot feature only works with Windows or Mac client. If you use another operating
system, you can attach a screenshot using the ile attachment feature. For Linux users, pleasef
see for enabling this feature.our article
If your JIRA admin has disabled thumbnails in JIRA's attachment settings, the image files will
appear as a list.
If your JIRA admin has disabled ZIP support in JIRA's , the attachments featureattachment settings
will not be available. You must download the zip file to your computer before accessing its
Note that involving people in a request does not bypass issue-level security. If issue-level security
(e.g. restricting an issue to only be viewable by the reporter) has been applied, participants may not
be able to access their requests. Service desk administrators can refer to the instructions in Configuri
to revise or delete an existing issue security scheme.ng Issue-level Security

Documentation for JIRA Service Desk 3.1
67
Created in 2016 by Atlassian. Licensed under a .Creative Commons Attribution 2.5 Australia License
individual files.
To remove attachments from an issue, you need one of the following the project permissions in
that issue's project:
Delete Own Attachments — to delete files that you have added to the issue.
Delete All Attachments — to delete files that anyone has added to the issue.
Browser capabilities
If you're using Internet Explorer versions 10+, you need to run Java version 1.7+ platform.
If you're using Google Chrome, Mozilla Firefox, or Internet Explorer 11, attaching screenshots
relies on HTML5 compatibility. Safari is not supported.
Adding attachments
You can add files and images to any issue in your service desk project. When working on an issue, simply
drag and drop a file onto the issue, or select > . You will then have the option to add aMore Attach files
comment with more information about the attachment, and then share the file and comment with your
customer or with your internal team only.
When adding or editing a comment, you can also select
to add attachments. In this case, you'll see wiki markup added to the comment field. As soon as you share
your comment, you'll see the file preview.
Acceptable file formats, characters, and sizes
File formats: GIFs, JPGs, PNGs
A valid file name cannot contain any of these characters: '\', '/','\"', '%', ':', '$',
.'?', '*'
By default, the maximum size of any one file is 10MB, although this limit can be customized by
your JIRA admin.
Sorting and managing attachments
The attachments section of the issue displays a list of options to sort, manage, and download attachments.
Select the down-arrow to the right of the attachments section to open the menu. You can reorder the
attachments according to a selected criteria. This criteria will be applied to all issues in your
project. To remove attachments from the issue, select or hover over the attachmentManage Attachments
and select
.
The selected criteria will be lost once you log out.

Documentation for JIRA Service Desk 3.1
68
Created in 2016 by Atlassian. Licensed under a .Creative Commons Attribution 2.5 Australia License
1.
2.
3.
4.
5.
1.
2.
3.
Accessing ZIP file contents
You can view the contents of a zip file (including ' ' or ' ' file name extensions) in the attachments.zip .jar
section. Click the down-arrow and select In list view, click the arrow icon in front of the zipped file'sList.
name to view and download its individual files. If a file is located within a subdirectory of the zipped file, the
path to that file is indicated in the content of the zipped file. To download the entire zip file, click Download
. Zip
Capturing and attaching screenshots
You can capture a screenshot to the system clipboard and paste it directly into an issue.
Capture a screenshot using your system keyboard shortcut.
Open the issue and click .More > Attach Screenshot
Paste the image from your clipboard into the dialog using your system keyboard shortcut.
Enter a filename.
Select Upload.
Creating issues and sub-tasks
The building blocks of any project are issues. Issues act as the packets of
work that travel through their respective workflows within their projects, until
the work is completed. An issue may also have sub-tasks that can be
assigned and tracked individually, as well as issue level security to restrict
the issue to select members of your team.
Before you begin
You need the project permission for the issue's relevantCreate Issue
project.
On this page:
Before you
begin
Creating
an issue
Cloning an
issue
Creating a
sub-task
Converting
a sub-task
to an issue
Converting
an issue to
a sub-task
Restricting
access to
an issue
Creating an issue
Click at the top of the screen to open the dialog box.Create Create Issue
Select the relevant and in the dialog box.Project Issue Type Create Issue

Documentation for JIRA Service Desk 3.1
69
Created in 2016 by Atlassian. Licensed under a .Creative Commons Attribution 2.5 Australia License
3.
a.
b.
4.
5.
1.
2.
3.
1.
2.
3.
1.
2.
3.
4.
5.
Type a for the issue and complete any appropriate fields — at least the required ones thatSummary
are marked by an asterisk.
If you want to access fields that are not shown in this dialog box, or you want to hide existing fields:
Click the button at the top right of the screen.Configure Fields
Click and select the fields you want to show or hide by selecting or clearing theCustom
relevant check boxes respectively, or click to show all fields.All
When you next create an issue, these selected fields will be displayed.
Optional: To create a series of similar issues – with the same and – select the Project Issue Type Cr
checkbox at the bottom of the dialog. Depending on your configuration and the valueseate another
you may have specified when creating previous issues, some of the fields in the new Create Issue
dialog box may be pre-populated. Make sure you check they're all correct before creating the next
issue.
When you are satisfied with the content of your issue, click the button. Create
Cloning an issue
Cloning or copying an issue lets you quickly create a duplicate of an issue within the same project. The
cloned issue is a replica of the original issue, containing most of the same details stored in the original issue
— e.g. Summary, Affects Versions, Components, etc. However, some details aren't cloned — e.g. Work Log,
Comments, Issue history, and Links to Confluence pages. Statuses and resolutions aren't cloned as well; the
statuses return to the first step of the corresponding workflow, and the resolutions are cleared. The cloned
issue can also be linked to the original issue.
Open the issue you wish to clone.
Select The screen will appear.More > Clone. Clone Issue
You can edit the clone issue's if you wish.Summary
If the issue contains links to other issue(s), you can select whether or not to include the links in
the new cloned issue.
If the issue contains sub-tasks, you can select whether or not to create the sub-tasks in the new
cloned issue.
If the issue contains attachments, you can select whether or not to include the attachments in
the new cloned issue.
Click .Create
Creating a sub-task
A sub-task can be created for an issue to either split the issue into smaller chunks, or to allow various
aspects of an issue to be assigned to different people. An issue cannot be resolved until all its sub-tasks are
completed and resolved. If you find a sub-task is holding up the resolution of an issue, you can convert the
sub-task to an issue, to allow it to be worked on independently. If you find an issue is really just a sub-task of
a bigger issue, you can also convert an issue to a sub-task.
Note: You can only create sub-tasks if your administrator has enabled sub-tasks, and has added the
sub-task issue type to the project's issue type scheme.
Navigate to the issue you would like to be the parent issue of the sub-task you are about to create.
Select . You will see the screen.More > Create Sub-Task Create sub-task
Fill in the details as needed, and then click at the bottom of the page.Create
Tip: You can customize the screen to show fields you use most often. To do this, click Create sub-task Conf
at the top right corner of the dialog, and use the and links to switch between theigure Fields All Custom
default screen and your custom settings. Your changes are saved for future use.
Converting a sub-task to an issue
Navigate to the sub-task issue you would like convert.
Select .More > Convert to Issue
In the screen, select a new issue type (i.e. a standard issue type) and clickStep 1. Select Issue Type
. Next
If the sub-task's current status is not an allowed status for the new issue type, the Step 2. Select New
screen is displayed. Select a new status and click .Status Next
In the screen, you will be prompted to enter any additional fields if they areStep 3. Update Fields

Documentation for JIRA Service Desk 3.1
70
Created in 2016 by Atlassian. Licensed under a .Creative Commons Attribution 2.5 Australia License
5.
6.
7.
1.
2.
3.
4.
5.
6.
7.
1.
2.
3.
1.
2.
3.
required. Otherwise, you will see the message 'All fields will be updated automatically'. Click .Next
The screen is displayed. If you are satisfied with the new details for the issue,Step 4. Confirmation
click .Finish
The issue will be displayed. You will see that it is no longer a sub-task, that is, there is no longer a
parent issue number displayed at the top of the screen.
Converting an issue to a sub-task
Navigate to the issue you would like to convert.
Select .More > Convert to Sub-Task
In the screen, type or select the appropriate parentStep 1. Select Parent Issue and Sub-Task Type
issue type and the new issue type (i.e. a sub-task issue type). Click .Next
If the issue's current status is not an allowed status for the new issue type, the Step 2. Select New
screen is displayed. Select a new status and click .Status Next
In the screen, you will be prompted to enter any additional fields if they areStep 3. Update Fields
required. Otherwise, you will see the message 'All fields will be updated automatically'. Click .Next
The screen is displayed. If you are satisfied with the new details for the issue,Step 4. Confirmation
click .Finish
The issue will be displayed. You will see that it is now a sub-task, that is, its parent's issue number is
now displayed at the top of the screen.
Note: You will not be able to convert an issue to a sub-task if the issue has sub-tasks of its own. You first
need to convert the issue's sub-tasks to standalone issues; you can then convert them to sub-tasks of
another issue if you wish. Sub-tasks cannot be moved directly from one issue to another — you will need to
convert them to standard issues, then to sub-tasks of their new parent issue.
Restricting access to an issue
When creating (or editing) an issue, you can restrict access to that issue to members of your team who are
part of a chosen security level. To be able to set the security level for an issue, your administrator must add
you to the appropriate issue security level, and also grant you the 'Set Issue Security' permission for the
appropriate projects.
Create/edit the relevant issue.
In the drop-down field, select the desired security level for the issue. You will only seeSecurity Level
the security levels you belong to.
Save the issue. It is now only accessible to members of the specified security level.
Users who are not members of this security level will not be able to access that issue, or see it in any
filters, queries, or statistics.
Raising requests on behalf of customers
Let's say you're helping a customer resolve an issue over the phone, and
you need to followup with additional information. You can use the Customer
Portal to quickly enter your customer's name, fill in the issue details, and
submit the service desk request.
If you don't need to create a request, but simply want to invite customers to
your service desk so they know how to get help, you can skip ahead to Invit
.e a new customer
On this page:
Raise a
customer
request
Invite a
new
customer
Raise a customer request
From your service desk project sidebar, select .Customer Portal
Select the request type that matches your customer's need.
In the Raise this request on behalf of field, enter a new customer's email address or search for an
existing customer's name:
Note that your service desk administrator must have enabled if you want to raisepublic signup
requests on behalf of new customers, or invite new customers.

Documentation for JIRA Service Desk 3.1
71
Created in 2016 by Atlassian. Licensed under a .Creative Commons Attribution 2.5 Australia License
3.
4.
1.
2.
3.
1.
2.
3.
Fill in the request details and select .Create
Your customer will be emailed a link to the new request – new customers will also receive an invitation to
finish creating a service desk account – and you will be able to continue working on the issue from your
service desk queue.
Invite a new customer
From your service desk project sidebar, select .Customers
Select and enter your customer's email address. Invite customers
Send your invitation and you're done!
Creating issues using the CSV importer
If you have the project permission and the globCreate Issue Bulk Change
al permission for the relevant projects, you can create issues in bulk using a
comma-separated value (CSV) file. CSV files are text files that represent
tabulated data, and are supported by most systems that handle tabulated
data, such as spreadsheets (MS Excel, Numbers) and databases.
The CSV importer allows you to import data from external systems that can
export their data in a tabulated format. It also allows you to create your own
CSV file to perform bulk issue creation and updates.
There are two steps to using the CSV importer, and an optional third step:
Preparing your CSV file
Running the CSV import wizard
Saving your configuration for future use
On this page:
Preparing
your CSV
file
Running
the CSV
file import
wizard
Tips for
importing
CSV data
into issue
fields
Preparing your CSV file
The JIRA Importers plugin assumes that your CSV file is based off a default Microsoft Excel-styled CSV file.
Fields are separated by commas, and any content that must be treated literally, such as commas and new
lines/'carriage returns' themselves are enclosed in quotes.
For Microsoft Excel and OpenOffice, it is not necessary to quote values in cells as these applications
handle this automatically.
CSV file requirements
In addition to being 'well-formed', CSV files have the following requirements:
Your administrator has access to more import options designed
specifically for other systems, such as Github, Fogbugz, and
Bugzilla. If you are planning on importing from an external system a
large amount of issues, administrators have access to advanced
import functionalities by following: Migrating from other issue
, including .trackers Importing data from CSV

Documentation for JIRA Service Desk 3.1
72
Created in 2016 by Atlassian. Licensed under a .Creative Commons Attribution 2.5 Australia License
Each CSV file must possess a heading row with a Summary column
The CSV file import wizard uses a CSV file's header row to determine how to map data from the
CSV file's 2nd row and beyond to fields in your project's issues.
The header row (apart from the commas separating eachshould avoid containing any punctuation
column) or the importer may not work correctly.
The header row contain a column for 'Summary' data.must
Commas (as column/field separators) cannot be omitted
For example, this is valid:
Summary, Assignee, Reporter, Issue Type, Description, Priority
"Test issue", admin, admin, 1, ,
... but this is not valid:
Summary, Assignee, Reporter, Issue Type, Description, Priority
"Test issue", admin, admin, 1
Encapsulating JIRA data structure in your CSV file
Capturing data that spans multiple lines
Use double-quote marks ( ) in your CSV file to capture data that spans multiple lines. For example, upon"
import, JIRA will treat the following as a valid CSV file with a single record:
Summary, Description, Status
"Login fails", "This is on
a new line", Open
Treating special characters literally
Use double-quote marks ( ) around a section of text to treat any special characters in that section literally."
Once this data is imported, these special characters will be stored as part of JIRA's field data. Examples of
special characters include carriage returns/enter characters (as shown in the example above), commas, etc.
To treat a double quote mark literally, you can 'escape' them with another double quote mark character.
Hence, the CSV value:
"Clicking the ""Add"" button results in a page not found error"
once imported, will be stored in JIRA as:
Clicking the "Add" button results in a page not found error
Aggregating multiple values into single issue fields
You can import multiple values into an issue field that accepts multiple values (e.g. , Fix (for) Version Affect
, , ). To do this, your CSV file must specify the same column name for eachs Version Component Labels
value you wish to aggregate into the mapped issue field. The number of column names specified must match
the maximum number of values to be aggregated into the mapped field. For example:
IssueType, Summary, FixVersion, FixVersion, FixVersion, Component, Component
bug, "First issue", v1, , , Component1,
bug, "Second issue", v2, , , Component1, Component2
bug, "Third issue", v1, v2, v3, Component1,
In the above example, the field of the second issue and the field of the third issueComponent Fix Version

Documentation for JIRA Service Desk 3.1
73
Created in 2016 by Atlassian. Licensed under a .Creative Commons Attribution 2.5 Australia License
will generate multiple values in appropriate issue fields upon import.
Be aware that only a limited number of issue fields support multiple values. The CSV importer will not
allow you to import aggregated data into issue fields that only support a single value.
Importing attachments
You can attach files to issues created from your CSV file. To do this, specify the URL of your attachment in
an 'Attachments' column within your CSV file.
Assignee, Summary, Description, Attachment, Comment
Admin, "Issue demonstrating the CSV attachment import", "Please check the
attached image below.",
"https://jira-server:8080/secure/attachment/image-name.png", "01/01/2012
10:10;Admin; This comment works"
Admin, "CSV attachment import with timestamp,author and filename", "Please check
the attached image below.", "01/01/2012
13:10;Admin;image.png;file://image-name.png", "01/01/2012 10:10;Admin; This
comment works"
URLs for attachments support the HTTP and HTTPS protocols and can be any location that your
JIRA instance be able to access. must
Importing issues into multiple projects
You can import issues from your CSV file into different projects through a CSV file import. To do this:
Your CSV file requires two additional columns whose headings should be named similarly to Project
and .Name Project Key
Ensure that every issue represented in your CSV file contains the appropriate name and key in these
columns for the projects to which they will be imported.
The project name and key data is the required for importing issues from aminimum project data
CSV file into specific projects.
IssueType, Summary, Project Name, Project Key
bug, "First issue", Sample, SAMP
bug, "Second issue", Sample, SAMP
task, "Third issue", Example, EXAM
In the example above, the first and second issues will be imported into the 'Sample' project (with project key
'SAMP') and the third issue will be imported into the 'Example' project (with project key 'EXAM') , assuming
you match the 'Project Name' and 'Project Key' fields in your CSV file to the and iProject name Project key
ssue fields, respectively during the CSV file import wizard.
Importing worklog entries
Your CSV file can contain worklog entries. For example:
Summary,Worklog
Only time spent (one hour),3600
With a date and an author,2012-02-10 12:30:10;wseliga;120
With an additional comment,Testing took me 3 days;2012-02-10
12:30:10;wseliga;259200
To track time spent, you need to use seconds.
Importing to multi select custom fields
Your CSV file can contain multiple entries for the one Multi Select Custom Field. For example:

Documentation for JIRA Service Desk 3.1
74
Created in 2016 by Atlassian. Licensed under a .Creative Commons Attribution 2.5 Australia License
1.
2.
3.
4.
5.
6.
7.
Summary,Multi Select,Multi Select,Multi Select
Sample issue,Value 1,Value 2,Value 3
This will populate the Multi Select Custom Field with multiple values.
Importing cascading choice custom fields
You can import values to a cascading choice custom field using the following syntax:
Summary, My Cascading Custom Field
Example Summary, Parent Value -> Child Value
The '->' separator allows you to import the hierarchy.
NOTE: Currently JIRA does not support importing multi-level cascading select fields via CSV (
).
- JRA-34202 Allow CSV import to support Multi-Level Cascading Select plugin fields
OPEN
Running the CSV file import wizard
Before you begin: If your JIRA installation has existing data, you should . back it up
Select to open the page. (If you do not haveIssues > Import Issues from CSV Bulk Create Setup
the option , your JIRA Admin must update the JIRA Importers plugin toImport issues from CSV
version 6.2.3 or above.)
On the page, select your .Setup CSV Source File
Leave the checkbox cleared if you do not have a configuration file,Use an existing configuration file
or if you want to create a new configuration file. Configuration files specify a mapping between column
names in your CSV file's header row and fields in your installation.
If you select this option, you will be asked to specify an .Existing Configuration File
If you do not select this option, then at the end of the CSV file import wizard, JIRA will ask you if
you want create a configuration file that you can use for subsequent CSV imports.
Click the button to proceed to the step of the CSV file import wizard. Complete theNext Settings
required fields.
If your CSV file uses a different separator character other than a comma, specify that character
in the field. If the separator is a 'Tab', this can be entered using the format ' '.CSV Delimiter /t
Click the button to proceed to the step of the CSV file import wizard. Here, you canNext Map fields
map the column headers of your CSV file to the fields in your selected project. If you want to select
specific JIRA field values to map specific CSV values to, tick the checkbox for .Map field value
You must map a CSV field to the issue's summary field. This ensures the issues createdNote:
have a summary.
Click the button to proceed to the step of the CSV file import wizard. On this step ofNext Map values
the import wizard, you can select which specific CSV field values you want to map to which specific
issue field value. For example, your issue types you may have a CSV field value of "Feature Request",
which you may want to map to the issue type field value "New Feature".
Please note:
Any fields whose checkboxes were selected in the previous step of the CSVMap field value
file import wizard will be presented on this page.
Leave a field cleared or clear any content within it if you wish to import the value 'as is'.
If you are importing a username-based CSV field (e.g. or ) and you do notReporter Assignee
select the checkbox for this field in the previous step of the CSV file importMap field value
wizard, then the importer will automatically map imported usernames from the CSV file to
(lowercase) JIRA usernames.
Regardless of whether or not you select the checkbox, JIRA willMap field value
automatically create usernames based on the data in your CSV file if they have not already
been defined in JIRA.
Click the button when you are ready to begin importing your CSV data into JIRA. TheBegin Import
importer will display updates as the import progresses, then a success message when the import is
complete.

Documentation for JIRA Service Desk 3.1
75
Created in 2016 by Atlassian. Licensed under a .Creative Commons Attribution 2.5 Australia License
7. If you're confident your import is correctly set up, click the button. Your import will beginBegin Import
and once complete you will be informed of any errors. If you'd like to check your import first, click the V
button and JIRA will validate your import and inform you of any expected errors or warnings.alidate
You can then go back and correct these before running your full import.
Note:
If you experience problems with the import (or you are curious), click the download a detailed
link to reveal detailed information about the CSV file import process.log
If you need to import another CSV file with the same (or similar) settings to what you used
through this procedure, click the link to download a CSV configurationsave the configuration
file, which you can use at the first step of the CSV file import wizard.
Congratulations, you have successfully imported your CSV data into JIRA! If you have any questions or
encounter any problems, please contact .Atlassian support
Tips for importing CSV data into issue fields
Below are some helpful tips when importing data from your CSV file into specific issue fields:
Issue Field Import Notes
Project CSV data is imported on a per-project basis. You can either specify an existing project(s)
as the target, or the importer will automatically create a new project(s) for you at time of
import.
Summary This is the only required field.
Component(s) You can import issues with multiple components by entering each component in a
separate column.
Affects
Version(s)
You can import issues with multiple 'Affects Versions' by entering each version in a
separate column.
Fix Version(s) You can import issues with multiple 'Fix Versions' by entering each version in a separate
column.
Comment
Body
You can import issues with multiple comments by entering each comment in a separate
column.
Due Date Please use the date format specified on the second step of the CSV import wizard.
Issue Type If not specified in your CSV file, imported issues will be given the default (i.e. first) Issue
Type, as specified in your JIRA instance. For more information, see Defining issue type
. field values
You can also create new values on-the-fly during the import process.
Labels You can import issues with multiple labels by entering each label in a separate column.
Priority If not specified in your CSV file, imported issues will be given the default (i.e. first) Priority
as specified in your JIRA instance. For more information, see .Defining priority field values
You can also create new values on-the-fly during the import process.
Original
Estimate
The value of this field needs to be specified as number of seconds.
Remaining
Estimate
The value of this field needs to be specified as number of seconds.
Time Spent The value of this field needs to be specified as number of seconds.

Documentation for JIRA Service Desk 3.1
76
Created in 2016 by Atlassian. Licensed under a .Creative Commons Attribution 2.5 Australia License
Users You can choose to have the importer automatically create JIRA users for any values of
the Assignee or Reporter field.
Users will be created as active accounts in JIRA. Users will need to get their
passwords emailed to them the first time they log into JIRA.
Users with no real name will get the portion of their email address (login name) before
the "@" character as their Full Name in JIRA.
If you are using External User Management, the import process will not be able to
create users; instead, the importer will give you a list of any new users that need to be
created. You will need to create the users in your external user repository before
commencing the import.
If you have a user-limited license (e.g. personal license), and the number of required
users is larger than the limit, then the import will be stopped. A page will be displayed
showing a list of users that can't be created.
If Assignee and Reporter are not mapped, then no usernames are created.
Other fields If you wish to import any other fields, you can choose to map them to specific JIRA
custom field(s). If your custom fields don't exist yet in JIRA, the importer can automatically
create them for you. If your custom field is a date field, please use the date format
specified on the second step of the CSV import wizard.
Editing and collaborating on issues
Resolve your customer requests more efficiently with these tips and tricks
for editing and collaborating on JIRA Service Desk issues.
In addition to learning about the basics of editing and commenting on an
issue, you can refer to this page for help with:
Using the wiki toolbar to make your comments and descriptions pop
Sharing issues with your team and adding request participants
Keeping track of issues with labels and issue watchers
On this page:
Attaching
files and
screenshot
s
Collaborati
ng on
issues
Editing
issue
details
Commenti
ng on
issues
Formatting
text with
wiki
markup
Tracking
issues with
labels
Watching
and voting
for issues
Attaching files and screenshots
If your administrator has enabled file attachments, you and your customers can attach files and screenshots
to issues you're working on. See for more information.Attaching files and screenshots to issues
Collaborating on issues
You can easily keep your team informed by using the
button to share an issue with other JIRA users. If your administrator has enabled anonymous access, you
can also share issues by entering the email address of a non-JIRA user.

Documentation for JIRA Service Desk 3.1
77
Created in 2016 by Atlassian. Licensed under a .Creative Commons Attribution 2.5 Australia License
If you want to invite members of your team to help you work on an issue, you can mention them by typing @
and their username in the issue description or comment. Note that the users you mention will be notified
once you save the issue description or comment.
In JIRA Service Desk, your administrator can also enable Request participants, which will appear as another
issue field. You can add other agents and customers from your service desk project to help you resolve the
original customer's request.
Editing issue details
To edit an existing issue, select to open the Edit Issue dialog box and modify the issue details. If youEdit
want to change the fields you need to edit, select > and choose the fields youConfigure Fields Custom
want to show or hide. Select to save your changes.Update
Commenting on issues
What How
Add a
comment
Simply click and select the internal (for other agents or collaborators) or external (forComment
customers) tab.
Delete a
comment
On the comment you wish to delete, select the trashcan icon located on the comment. Confirm
that you want to remove this comment from the issue by selecting when prompted.Delete
What permissions do you need?
To edit an issue, you need the project permission for the issue's relevant project. If you doEdit Issue
not have this permission, please contact your administrator.
What permissions do you need?
To add comments to an issue, i.e. to see the button, you must have both of the followingComment
project permissions for the issue's relevant project:
Browse Project permission to view the issue to be commented on
Add Comments permission to add a comment to the issue.
Note that you automatically become a watcher of the issues that you comment on. You can disable
this via the option in your profile.Preferences > Autowatch

Documentation for JIRA Service Desk 3.1
78
Created in 2016 by Atlassian. Licensed under a .Creative Commons Attribution 2.5 Australia License
Edit a
comment
Select
located on the comment, and edit the text or restrictions ( ) as needed. WhenViewable by...
you save your revised comment, you'll see ' displayed to indicate that the comment hasedited'
been edited:
You can hover over to see who edited the comment and when.'edited'
Link to a
comment
Select the icon on the comment, which will be highlighted in pale blue. Copy the linkPermlink
from the Permlink icon and paste it into your email or chat message. The link will look
something like this: http://jira.atlassian.com/browse/TST-123?focusedCommentId=94796#actio
.n_94796
Restrict
a
comment
Apply viewing restrictions to a comment by selecting the open padlock icon
(or
if restrictions already apply).
Formatting text with wiki markup
JIRA application allows you to use rich-text features, such as:Text Formatting Notation
Italic, bold, underlined text
Multiple levels of headings

Documentation for JIRA Service Desk 3.1
79
Created in 2016 by Atlassian. Licensed under a .Creative Commons Attribution 2.5 Australia License
Bullets, numbered lists, tables, and quotations
Images
Macros
When you edit an issue description, comment, or any rich-text field, you can expand the simple wiki editor
toolbar to format your text and select to see how your formatted text will appear. Note that your JIRApreview
administrator can enable, disable and configure the which allows you to use wiki markup, so your options
may vary slightly.
Tracking issues with labels
Labeling helps you categorize and search for an issue. When viewing an issue, select to addMore > Labels
or remove labels, which will appear in the Details section:
You can click a label (e.g. in the above screenshot) to jump to the Issue Navigator and see a list of alldoc
issues that have this label. You can also add the to your dashboard to quickly find issues withLabels Gadget
labels relevant to you and your team.
Watching and voting for issues
If your administrator has set up the needed notification scheme, you can select toStart watching this issue
be automatically notified of issue updates. You can also click the number of watchers on the issue to add
other JIRA users as watchers.
If your administrator has enabled the voting on issues, you can select to encourage theVote for this issue
responsible team to resolve or complete the issue.
Linking issues
Issue linking allows you to create an association between two existing
issues on either the same or different JIRA servers. For example:
An issue may another.relate to
An issue may another.duplicate
An issue may another.block
Issue linking also allows you to:
Create a new linked issue from an existing issue in a service desk or
business project.
Create an association between an issue and a Confluence page.
Link an issue to any other web page.
Your JIRA administrator can customize the types of links that you can
create.
What permissions do you need?
To view other users watching or voting for an issue, you need the and View Voters and Watchers M
project permissions.anage Watcher List

Documentation for JIRA Service Desk 3.1
80
Created in 2016 by Atlassian. Licensed under a .Creative Commons Attribution 2.5 Australia License
1.
2.
On this page:
Creating a
link to
another
issue on
the same
JIRA site
Creating a
link to an
issue on
another
JIRA site
Create a
new linked
issue from
an existing
issue in a
service
desk or
business
project
Creating a
link to a
Confluenc
e page
Creating a
link to any
web page
URL
Deleting a
link
Searching
for linked i
ssues
Issue links within an issue look like this:
Screenshot: the 'Issue Links' section within an issue
Note: Resolved issues (i.e. with a Resolution set) are displayed in strike-through font, e.g. .issues DEMO-1
Creating a link to another issue on the same JIRA site
Open the issue you wish to link to another issue in the same JIRA site.
Select to display the dialog box.More > Link Link
To create links on issues, you need to have the Link Issues permission in the project(s) to which the
issues belong.

Documentation for JIRA Service Desk 3.1
81
Created in 2016 by Atlassian. Licensed under a .Creative Commons Attribution 2.5 Australia License
2.
3.
4.
5.
6.
1.
2.
3.
Ensure that the item is selected the left of the dialog box and then choose the type of JIRA Issue at
link to be created from the drop-down list.This issue
If your JIRA system administrator has configured between yourfully reciprocal application links
JIRA site and another one, a list may appear above the list. If this is theServer drop-down This issue
case, ensure your JIRA site appears or has been selected from the list.Server
In the field, specify the issue(s) to be linked to your currently viewed/selected issue. There areIssues
two ways to do this:
Type the full issue key (e.g. ) — or to link to multiple issues, press the 'Enter' keyABC-123
between each typed issue key.
If you have previously browsed an issue, you can quickly find the issue by typing the first
few letters of the issue key (or part of the Summary), which will appear in an ' 'autocomplete
drop-down list for selection:
OR:
Click the link to use the , which allows you tosearch for an issue Find JIRA issues popup
perform either a simple or an for issues.text search advanced search
Optional: Add a to describe why you are linking these issues.Comment
Click the button at the bottom of the dialog.Link
Creating a link to an issue on another JIRA site
To create this type of link, your JIRA system administrator should have configured fully reciprocal applicati
between your JIRA site and the other JIRA site containing the issue(s) you want to link to.on links
This feature is .not available in Atlassian Cloud
Open the issue you wish to link to another issue.
Select to display the dialog box. More > Link Link
Ensure that the item is selected the left of the dialog box.JIRA Issue at
Note:
This option will not be available if your JIRA system administrator has not configured
an application link between your JIRA site and the remote JIRA site.
If, after selecting this option, you are prompted for , you may be required to log inauthorisation
to the remote JIRA site, which will allow JIRA site to access the remote JIRA site your on behalf

Documentation for JIRA Service Desk 3.1
82
Created in 2016 by Atlassian. Licensed under a .Creative Commons Attribution 2.5 Australia License
3.
4.
5.
6.
7.
8.
9.
1.
2.
3.
.of your account on the remote JIRA site
This behavior means the application links configured between your JIRA site and the remote
JIRA site use OAuth authentication.
If your JIRA site to multiple remote JIRA sites, choose the relevant JIRA site from the is connected Se
list.rver drop-down
Choose the type of link to be created from the drop-down list.This issue
Type the key of the issue on the remote JIRA site that you want to link to. Alternatively, you canIssue
search for issues on the remote JIRA site by clicking the link, which opens the search for an issue Fi
.nd JIRA issues popup
You can link to any issue on the remote JIRA site to which you have access that site.on
Select the checkbox to create the complementary link on the remote issue youCreate reciprocal link
are linking to, back to your issue. For example, if you create a link type a remote issue, theblocks to
reciprocal link generated on the remote issue will be a to your localis blocked by link type back
issue.
Optional: Add a to describe why you are linking these issues.Comment
Click the button at the bottom of the dialog.Link
Troubleshooting
If you selected the checkbox, but after clicking the button, youProblem: Create reciprocal link Link
discover that a reciprocal link from the remote issue back to your issue has not been created, then your JIRA
system administrator has most likely created only a one-way link from your JIRA site to the remote JIRA site.
Ask your JIRA system administrator to configure between yourSolution: fully reciprocal application links
JIRA site and the remote JIRA site.
If you attempted to create a reciprocal link but received the following message:Problem:
'A reciprocal link from issue 'XYZ-123' back to this issue was not created the remote JIRA serveras
' (where 'XYZ-123' is thereturned the following error: No Link Issue Permission for issue 'XYZ-123'.
issue key on the remote JIRA site),
then a reciprocal link on the remote JIRA site will not have been created, because the user account through
which you authenticated on the remote JIRA site (at step 3 above) does not have the Link Issues project
permission.
Solution:
Ask the JIRA project administrator(s) on the remote JIRA site to grant your user account the Link
Issues project permission for the relevant project(s) to which you need to create issue links.
Alternatively, if the application link between your JIRA site and the remote JIRA site use OAuth
authentication and you suspect you may have authenticated on the remote site with another user
account that does not have the Link Issues project permission, repeat the procedure above but during
the step (at step 3), on the remote site with a user account which has thisauthorisation authenticate
permission.
If you are not prompted for authentication during , try clearing your browser's cookiesauthorisation
first and repeat the procedure again.
Create a new linked issue from an existing issue in a service desk or business project
To create a linked issue:
Open the issue from which you wish to create the linked JIRA issue.
In the Issue screen, select to display the dialogMore > Create linked issue Create Linked Issue
box
: start typing The newly created linked issue contains Keyboard Shortcut '.' + Create linked issue.
the same Project, Issue Type, and Summary information stored in the original issue. It is also linked to
the service desk issue, in this case CCF-3.
To create a linked issue, you need to have Create issue and Linked Issues permissions in the
destination project(s).

Documentation for JIRA Service Desk 3.1
83
Created in 2016 by Atlassian. Licensed under a .Creative Commons Attribution 2.5 Australia License
3.
4.
5.
6.
7.
8.
9.
10.
11.
1.
2.
3.
4.
5.
Select the destination in which the new linked issue is to be created. Project
Select the correct Issue Type for the new linked issue.
In the field, specify issue(s) to be linked to your new linked issue.Linked issues
Edit the linked issue Summary.
Edit the and describe why you are linking these issues.Description
Select the checkbox to include any attachments from the original issue.Copy attachments
Select the checkbox to include any URLs from the original issue.Copy links
Click the button at the bottom of the dialog.Create
Your linked issue has now been created.
Creating a link to a Confluence page
To create this type of link, your JIRA system administrator needs to have configured an be application link
tween your JIRA site and the Confluence site containing the pages you want to link to.
Open the issue you wish to link to another issue.
Select to display the dialog box. More > Link Link
Click the option at the left of the dialog box.Confluence Page
This option is not available if your JIRA system administrator has not configured an application
link between your JIRA site and Confluence site.
If more than one application link has been configured between your JIRA site and other Confluence
sites, then choose the appropriate Confluence site from the list.Server drop-down
Specify the Confluence page to be linked to your currently viewed issue. There are two ways to do
this:
In the field, enter the URL of a page on the Confluence site you want to link to. ForPage URL
example:
http://<confluence-server>/display/ds/Welcome+to+the+Confluence+Demon
stration+Space
Click the link. The dialog box is replaced by the search for a page Link Find a Confluence
This feature is only supported in Confluence versions 4.0 or later.

Documentation for JIRA Service Desk 3.1
84
Created in 2016 by Atlassian. Licensed under a .Creative Commons Attribution 2.5 Australia License
5.
a.
b.
c.
6.
7.
1.
2.
3.
4.
5.
6.
7.
1.
2.
dialog box.page
If you are prompted for , you may be required to log in to the Confluence site,authorisation
which will allow JIRA site to access the Confluence site your on behalf of your account theon
.Confluence site
This behavior means the application links configured between your JIRA site and the remote
Confluence site use OAuth authentication.
In the first field, specify one or more search terms that appear in the page youSearch
want to link to. This field is mandatory.
Optional: In the second field, select the Confluence space to further narrowSearch
down the search.
Click the button and then the title of the page you want to link to.Search
Optional: Add a to describe why you are linking these issues.Comment
Click the button at the bottom of the dialog.Link
Troubleshooting
If links you create show on the issue or if you attempted toProblem: Confluence page Failed to load
search for a Confluence page but received the following message:
'Content on the Confluence site could not be accessed because the Confluence server's 'Remote API'
feature is disabled. The Confluence system administrator must enable this 'Remote API' feature for
'JIRA to successfully access this content.
then JIRA was unable to communicate with the Confluence server to either:
retrieve information about the link or
conduct a Confluence page search in the dialog box.Find a Confluence page
Solution:
Ask the Confluence system administrator to enable the feature, since thisRemote API (XML-RPC & SOAP)
Confluence feature is disabled by default. See in the Confluence documentation forEnabling the Remote API
details.
Creating a link to any web page URL
Open the issue you wish to link to another issue.
Select to display the dialog box. More > Link Link
Click the option at the left of the dialog box.Web Link
Specify the of the web page you want to link to.URL
Specify the that will appear in the section of the 'view issue' page and will be Link Text Issue Links h
to your URL.yperlinked
Optional: Add a to describe why you are linking these issues.Comment
Click the button at the bottom of the dialog.Link
Deleting a link
Go to an issue that contains links, and locate the section (see ).Issue Links screenshot above
Hover your mouse over the link you wish to delete, and click the ( ) icon that appears.Delete trashcan
Searching for issueslinked
You can search for issues that are linked to a particular issue. See for more information.Advanced searching
Be aware that this functionality does not extend to issues on a remote JIRA server.
Editing multiple issues at the same time
At some point, you may need to change multiple issues at the same time.
You can do this by performing a bulk operation.
There are restrictions placed on some of the bulk operations. For example, if
you select multiple issues with different workflows, you can only transition
them in groups with the same workflow, and one group at a time. The
restrictions are explained further in the relevant sections.

Documentation for JIRA Service Desk 3.1
85
Created in 2016 by Atlassian. Licensed under a .Creative Commons Attribution 2.5 Australia License
1.
2.
3.
4.
5.
6.
7.
1.
2.
3.
4.
5.
On this page:
Before you
begin
Transition
multiple
issues
Delete
multiple
issues
Move
multiple
issues
Edit
multiple
issues
Watch /
stop
watching
multiple
issues
Before you begin
Required permissions - To perform a bulk operation, you'll need the appropriate project-specific
permission and the global Bulk Change permission. For example, you would need to have both the Move
and permissions to perform the operation.Issue Bulk Change Bulk Move
Disabling Mail Notification for Bulk Operations - You can disable mail notifications for a particular bulk
operation by deselecting the checkbox in the bulk operation wizard. For this option to beSend Notification
available, you must be an administrator or of all the projects associated with yourproject administrator
selected issues.
Using the bulk change wizard - The bulk change wizard will progress you through your bulk change. To
step back at any step of the operation, select the relevant step in the menu on the left-hand side. Selecting C
will cancel the entire process.ancel
Transition multiple issues
This bulk operation allows you to transition multiple issues through a workflow at the same time. You can
only perform one transition bulk operation at a time. You will also need to provide any values required to
complete the transition. For example, to close multiple issues, you will need to provide a value for the
Resolution field, such as Done, Fixed, or Won't Fix.
How to transition multiple issues
Perform a search with the required filters to produce a list of issues.
Select .Tools > Bulk Change
Select the issues you'd like to perform the bulk operation on, and select Next.
Select , and select .Transition Issues Next
Select the available workflow action. The actions available are dependent on the issues (and their
associated workflows) that you have selected. Select .Next
Select a value for any required fields for this transition, and if available, decide whether you'd like
to send email notifications. Select .Next
Review your bulk operation, and select when you are happy with the operation.Confirm
Delete multiple issues
This bulk operation allows you to delete multiple issues at the same time.
How to delete multiple issues
Perform a search with the required filters to produce a list of issues.
Select .Tools > Bulk Change
Select the issues you'd like to perform the bulk operation on, and select .Next
Select , and select .Delete Issues Next

Documentation for JIRA Service Desk 3.1
86
Created in 2016 by Atlassian. Licensed under a .Creative Commons Attribution 2.5 Australia License
5.
6.
1.
2.
3.
4.
a.
b.
c.
d.
If available, decide whether you'd like to send email notifications. Select .Next
Review your bulk operation, and select when you are happy with the operation.Confirm
Move multiple issues
This bulk operation allows you to move multiple issues at the same time. The issues you're moving need to
be mapped to both a project and an issue type, and in doing this, you may need to also map the status and
fields of the issues. Subtasks need to be mapped, too.
How to move multiple issues
Perform a search with the required filters to produce a list of issues.
Select .Tools > Bulk Change
Select the issues you'd like to perform the bulk operation on, and select .Next
More information...
The bulk move operation can be performed on both standard issues and sub-task issues.
Standard issues can be moved to another project and issue type, whereas a sub-task can only
have its issue type changed. (Note that it is possible to convert a sub-task to an issue, and vice
versa.)
It is possible to select a sub-task and its parent to bulk move. This is so as to adherenot both
to the parent/sub-task relationship (i.e. sub-task is always located in the same project as thethe
parent issue). Any sub-tasks of selected parent issues that were also selected will be
automatically discarded from the move.
For example, you have B being a sub-task of issue A and you try to bulk move both A andissue
B simultaneously. You will see a warning message (see below) and will be prompted to select a
target project and issue type for issue A. If you select a new project for A, you will be prompted
to move the sub-task to a new issue type based on issue A's new project. If you changedon't
the project for issue A, the sub-task will not be required to be moved.
Select , and select .Move Issues Next
The bulk move operation may require additional information dependent on which issues you have
selected to move. This information is requested as follows:
Select Projects and/or Issue Types
More information...
The first step of the Bulk Move wizard is to choose which projects and issue types you
will move your issues to. The target project and issue type will determine whether extra
steps will be required to migrate statuses and fields.
Selected issues are grouped by their current project and issue type. You can either
select a new project and issue type for each one or choose to move all standard issues
to a single project and issue type.
This since they cannot be moved to a standardNote: does not apply to sub-tasks
issue type.
Select Projects and/or Issue Types for Sub-Tasks
More information...
If you are moving issues with sub-tasks to another project, you will also need to move
the sub-tasks the new project. You can also elect to change the issue types of theto
sub-tasks being moved if you need to.
Select mappings for invalid statusesstatus migration
More information...
As multiple workflows can be active simultaneously, some statuses associated with the
collection of selected issues may not be valid in the target workflow. In this case, you
should map invalid statuses to valid statuses in your new workflow.
Select values for required fields and fields with invalid values
More information...
In order to adhere to the field configuration scheme associated with the target project
and issue type, it may be necessary to update/populate required fields (e.g. thatfields
are required in the target project, but may not have been in the original project).

Documentation for JIRA Service Desk 3.1
87
Created in 2016 by Atlassian. Licensed under a .Creative Commons Attribution 2.5 Australia License
d.
2.
1.
2.
3.
4.
5.
For each field that needs to be populated, you will be prompted to supply a value. This
value will be applied to all issues that are being together.Bulk Moved
For the following fields, you can select from a list of possible values provided for you:
Component
Affects Version
Fix Version
Custom fields of type 'Version-Picker'
Note that which in the target project cannot be selected asversions have been archived
the target when performing a bulk move. If you need to move issues into an archived
version, you will need to first unarchive the version in the target project.
It is possible to retain original field values that are valid in the target destination by
checking the checkbox associated with the field. For example, some issues mayRetain
already include a valid custom field value — these values can be retained, while issues
that require an update will adopt the value specified on the screen.Field Update
Checked: the original value is retained where possible¹. The field will not be
updated with the specified new value.
Unchecked: all fields will be updated with the specified new value.
Note that the ' ' checkbox is not available for the following fields, since an explicitRetain
mapping is required:
Component
Affects Version
Fix Version
Custom fields of type 'Version-Picker'
Confirm changes to be made and complete the operation
More information...
When all move parameters — e.g. project, status mappings and field updates — havetarget
been specified for all issues, you will be presented with a confirmation screen displaying all
changes that will be made to the issues being moved. The following details are displayed as
applicable:
Issue Targets: the target project and issue type
Workflow: the target workflow and invalid status mappings
Updated Fields: new values for fields that require updating
Removed Fields: values to be removed in fields that are not valid in the target
The issues will only be moved once the button is clicked from the confirmation page. IfConfirm
the operation is exited anytime before this step, no changes will be made to the issues.
Note that steps C and D above will occur once for each different target project and issue type
combination.
Edit multiple issues
This bulk operation allows you to edit multiple issues at the same time. The bulk edit operations available
depend on the issues selected and the nature of the field/s you want to change.
How to edit multiple issues
Perform a search with the required filters to produce a list of issues.
Select .Tools > Bulk Change
Select the issues you'd like to perform the bulk operation on, and select Next.
Select , and select Edit Issues Next.
Select the bulk edit operation from the list of available operations (expand more information for a
full list of available and unavailable operations, and their conditions).
More information...
Available
Operations
Conditions

Documentation for JIRA Service Desk 3.1
88
Created in 2016 by Atlassian. Licensed under a .Creative Commons Attribution 2.5 Australia License
5.
Change
Affects
Version/s
Selected issues belong to one project, and that project has version/s
This field is not hidden in any field configurations the selected issues
belong to
Current user has 'edit issue' permission for all the selected issues
Change
Assign To
This field is not hidden in any field configurations the selected issues
belong to
Current user has 'assign issue' permission for all the selected issues
Change
Comment
This field is not hidden in any field configurations the selected issues
belong to
Current user has 'comment issue' permission for all the selected issues
Change
Component/s
Selected issues belong to one project, and that project has component/s
This field is not hidden in any field configurations the selected issues
belong to
Current user has 'edit issue' permission for all the selected issues
Change Due
Date
This field is not hidden in any field configurations the selected issues
belong to
Current user has 'edit issue' permission for all the selected issues
Current user has 'schedule issue' permission for all the selected issues
Change Fix
For Version/s
Selected issues belong to one project, and that project has version/s
This field is not hidden in any field configurations the selected issues
belong to
Current user has 'edit issue' permission for all the selected issues
Change
Issue Type
Current user has 'edit issue' permission for all the selected issues
Change
Priority
This field is not hidden in any field configurations the selected issues
belong to
Current user has 'edit issue' permission for all the selected issues
Change
Reporter
This field is not hidden in any field configurations the selected issues
belong to
Current user has 'edit issue' permission for all the selected issues
Current user has 'modify reporter' permission for all the selected issues
Change
Security
Level
This field is not hidden in any field configurations the selected issues
belong to
All the selected projects are assigned the same issue level security
scheme
Current user has 'edit issue' permission for all the selected issues
Current user has 'set issue security' permission for all the selected issues
Change
Custom
Fields
The 'Change Custom Fields' operation is available only if:
a global custom field exists OR
an issue type custom field exists and the issues are all of this specific
issue type OR
a project custom field exists and the issues are all of the same project
Edit a Closed
Issue
Your workflow must allow editing of closed issues
Change
Sprint
You need to specify the sprint ID.
This operation only affects active and future sprints, i.e.
closed/completed sprints are not included when bulk editing the Sprint
field.

Documentation for JIRA Service Desk 3.1
89
Created in 2016 by Atlassian. Licensed under a .Creative Commons Attribution 2.5 Australia License
5.
6.
7.
1.
2.
3.
4.
5.
1.
2.
3.
4.
5.
Unavailable Operations
The fields listed in this section have no operations for bulk editing. This is because there is an
alternative method or it is not logical to perform bulk edit on them.
The following system fields are unavailable for bulk editing:
Attachments
Summary
Description
Environment
Project — Please use 'Bulk Move' to move issues between projects
Resolution — Please use 'Bulk Workflow Transitions' to modify the resolution of issues
Time Tracking fields — Original Estimate, Remaining Estimate, Time Spent
The following custom field types are unavailable for bulk editing:
Import Id
Read Only Text
Select a value for any required fields for this operation, and if available, decide whether you'd like
to send email notifications. Select .Next
Review your bulk operation, and select when you are happy with the operation.Confirm
Watch / stop watching multiple issues
These bulk operations allows you to start watching or stop watching multiple issues at the same time.
How to watch multiple issues
Perform a search with the required filters to produce a list of issues.
Select .Tools > Bulk Change
Select the issues you'd like to perform the bulk operation on, and select .Next
Select , and select .Watch Issues Next
Review your bulk operation, and select when you are happy with the operation.Confirm
How to stop watching multiple issues
Perform a search with the required filters to produce a list of issues.
Select .Tools > Bulk Change
Select the issues you'd like to perform the bulk operation on, and select .Next
Select , and select .Watch Issues Next
Review your bulk operation, and select when you are happy with the operation.Confirm
Scheduling an issue
You can schedule issue due dates in JIRA Service Desk to help your agents prioritize incoming customer
requests and find overdue issues that need urgent attention. The powerful scheduling feature allows you to
perform fixed and relative date searches based on specific due dates as well as arbitrary search periods. You
can also perform advanced searches using JIRA Query Language.
Scheduling an issue
To schedule an issue, populate its date field. This can be done either when creating an issue, or at a laterDue
stage by editing the issue.
Searching by due date
You can use either or to search for issues by their Due Date.basic search advanced search
Using simple search
You can search for issues using the search form in Issue Navigator (see ). There are twoSearching for issues
To enable Issue Scheduling, at least one group or project role must be given the Schedule Issues
permission by your JIRA administrator. Only users with the Schedule Issues permission can populate
the date field.Due

Documentation for JIRA Service Desk 3.1
90
Created in 2016 by Atlassian. Licensed under a .Creative Commons Attribution 2.5 Australia License
ways to search for issues based on the date field. The first way is using fixed date values, the second isDue
using periods that are relative to the current date.
Fixed date searches
There are two text fields in the search form that allow searching based on the date field.Due
To search for all issues that are due after a certain date, enter the date in the Due After text field. For
example, to find all issues that are due after 1st June 2010, enter 1-6-2010 in the Due After field. You can
also use the Calendar popup to select a date by clicking the calendar icon to the right of the field.
To search for issues that are due before a certain date, enter the date in the Due Before text field. For
example, to find all issues that are due before 1st July 2010, enter 1-7-2010 in the Due Before field.
To search for issues that are due between two dates, populate both the Due After and the Due Before fields.
Relative period search
It is possible to perform a search that is relative to the time when it is run. For example, it is possible to do a
search for issues that are due seven days from now. To do this, enter 7d in the Due Date To text field of the
Issue Navigator. If the search is saved and run the next day, the issues that are due in seven days from the time
that the search is run will be retrieved. Thus, this search will find all issues that are due within a week every time
it is run.
The values that are entered in the Due Date From and Due Date To fields have to conform to a special syntax
(described below). However, it is also possible to use the Due Date popup by clicking the icon to the right of the
Due Date To text field to specify the search period.
Due Date Popup
Use the Due Date popup to do the following:
To search for issues that are overdue at the time of the search, select the first radio button, and click .OK
To search for issues that are overdue by more than a certain number of days, populate the text field in the
second row, and click .OK
To search for issues that are due in the next certain amount of days, and are not overdue at the time of
the search, populate the text field in the third row with the number of days, and choose from theand not
select box in the third row. Select the third radio button, and click .OK
To search for issues that are due in the next certain amount of days, and are overdue at the time of the
search, populate the text field in the third row with the number of days, and choose from the selectand
box in the third row. Select the third radio button, and click .OK
The fourth row of the popup is used for arbitrary period searches. Use the text field to specify the upperto
bound of the search, and the text field to specify the lower bound of the search. A blank text fieldfrom
means no bound. Populating the text fields in the fourth row actually has the same effect as populating
the Due Date From and Due Date To text boxes. The syntax is described below.
Relative Period Search Syntax
The Due Date From and Due Date To fields use a special syntax to denote time period bounds. The syntax uses
numbers and abbreviations that follow the numbers to represent what the numbers actually mean. The
abbreviations are "w" for weeks, "d" for days, "h" for hours, and "m" for minutes. For example, to specify 10 days
in the future, use "10d" or "1w and 3d". To specify a period bound in the past, prefix the value with the "-" sign.
For example, to specify 2 days, 4 hours, and 3 minutes ago, use "-2d 4h 3m".
Using advanced search
You can also use JIRA Query Language (JQL) to search for issues by due date — see , andAdvanced searching
particularly the documentation on the Due field.
Moving an issue
Sometimes, an issue may belong to a different project, and you may want to move this issue to another project.
You can easily do this by using the wizard.Move Issue
Before you begin:
You must have the Move Issues permission for the project that has the issue that you want to move.

Documentation for JIRA Service Desk 3.1
91
Created in 2016 by Atlassian. Licensed under a .Creative Commons Attribution 2.5 Australia License
1.
2.
3.
4.
5.
You must have the Create Issues permission for the project that you wish to move your issue to.
If you do not have either of this permissions, please contact your JIRA administrator to have these added to your
user profile.
Moving an issue
The wizard allows you to specify another project in your JIRA instance to move your selected issueMove Issue
to. As there may be significant differences in the configuration of your original project and target project, the Mov
wizard allows you to change certain attributes of the issue. These include:e Issue
Issue Type — If your issue is a custom issue type that does not exist in your target project, you must
select a new issue type. You can also choose to arbitrarily change the issue type.
Issue Status — You may have set up custom issue statuses as part of a workflow. If you have assigned
a custom status to your issue, and it does not exist in your target project, you must select a new issue
status for your issue. You cannot arbitrarily change the issue status, i.e. the option to change the issue
status will only appear if you are required to change it.
Custom Fields — If you have defined custom fields for your issue that do not exist in yourrequired
target project, you must set values for them. You will only be prompted to enter the values for required
in the target project that are missing values. If you wish to change the existing values forcustom fields
other fields on your issue, you can do this after the move is complete.
To move an issue:
View the issue that you wish to move.
Select .More > Move
The first page of the wizard is displayed. Complete the steps required.Move Issue
The confirmation page will display with all of your changes. If you wish to revise any of your changes, you
can click the appropriate step in the left-hand menu to return to that page of the wizard. Once you are
happy with your changes, click to move the issue to the target project.Move
Your issue will be moved to the target project and displayed on screen. You can now edit the issue to
make further changes, if you wish.
Moving related issues
If your issue has sub-tasks, the 'Move Issue' wizard will also move the sub-tasks to the target project.
If you are moving an epic, the 'Move Issue' wizard will not move the issues in the epic. The epic and the
issues in the epic will still be linked to each other, but the issues in the epic will remain in the original
project. You will need to move them separately.
Troubleshooting
Restricted comments appear to be removed after moving the issue. See this article: Restricted comments
.disappear after moving an issue to a new project
Customizing the issues in a project
Issues are the packets of work that need to be completed in a project. These issues are made up of issue fields,
and the issue fields contain data about the issue. This data is important, as it helps define the issue, and can
contain important information about the issue, such as a summary, a description, due dates, and when and
where the work is required. JIRA Service Desk allows you to customize the configuration and behavior of issues
You may choose to:to better suit the needs of your customers and agents.
Change a field's behavior (such as change a field's description, make a field hidden or visible, or make a
field required or optional)
Add your own values for fields that have default values assigned (e.g. Resolution and Status)
Create new 'custom' fields
Configure different renderers for (some) fields
Position fields on a screen
Choose which screen should be displayed for each issue operation (e.g. 'Create Issue', 'Edit Issue')
or workflow transition (e.g. Resolve Issue, Close Issue)
If you wish to move multiple issues between projects at the same time, please refer to the
documentation on .bulk moving issues

Documentation for JIRA Service Desk 3.1
92
Created in 2016 by Atlassian. Licensed under a .Creative Commons Attribution 2.5 Australia License
A simple example of how customizing an issue could benefit your team could be marking fields as 'Required'
when an issue is created. This would ensure you always capture the required information you need to get the
work done to resolve the issue. If you couple this with positioning the required fields at the top of the screen, and
even hiding fields you know the issue creator won't use, you'll make sure your users can see and complete the
required fields as quickly as possible.
You can make this... ...into this!
To customize your issues, you need to be a JIRA administrator. You can review more conceptual information on
in the JIRA administrator's documentation.customizing issues
Logging work on issues
In JIRA Service Desk, you use Service Level Agreements (SLAs) configured
by your administrator to help you track how well you're meeting customer
expectations (e.g. responding to a request within 4 hours). You can use the
Time Tracking feature in addition to SLAs to generate a workload report
when you're working on a customer request with other agents, or when you
need to track time spent fixing a problem that affects multiple customer
requests.
On this page:
Before you
begin
Setting a
time
estimate
for an
issue
Logging
work on an
issue
Editing a
work log
entry
Deleting a
work log
entry
Customize
d JIRA
installation
s
Here's how time tracking appears on an issue:
The Estimated field displays the amount of time originally anticipated
to resolve the issue
The Remaining field displays the amount of time currently anticipated
to resolve the issue
The Logged field displays the amount of time logged working on the
issue so far
Choosing to include sub-tasks displays the aggregated time of an

Documentation for JIRA Service Desk 3.1
93
Created in 2016 by Atlassian. Licensed under a .Creative Commons Attribution 2.5 Australia License
1.
2.
3.
1.
2.
3.
issue and all its sub-tasks
When you log time for the first time, the time spent is subtracted from
the original estimate, and the resulting value is automatically presented in
the remaining estimate. When subsequent work is logged, any time spent is
subtracted from the remaining estimate.
Before you begin
Make sure your JIRA administrator has enabled the Time .Tracking feature
Make sure you have the Work on Issues, Delete Work Logs, and Edit Work Logs project permissions.
Setting a time estimate for an issue
Teams can set a time estimate for an issue in order to calculate how long it will take to solve the issue.
Open the issue and select .Edit
Scroll down the Edit issue window to fill in the following time tracking fields:
Field Description
Original
Estimate
Amount of time you believe is required to solve the issue. If you want to change
original estimate values once they have logged work time, ask your JIRA
administrator to disable legacy mode on time tracking.
Remaining
Estimate
Amount of time you believe is required to solve the issue in its current state.
If the JIRA time tracking feature is in legacy mode, you will only see the original estimate field if work
has not been logged. Once work time has been logged, you will only see the remaining estimate field.
Select .Update
When work is first logged against the issue, the is subtracted from the , andTime Spent Original Estimate
the resulting value is automatically presented in the . When subsequent work is logged,Remaining Estimate
any is subtracted from the Time Spent Remaining Estimate.
Additionally, once work has been logged on an issue, various reports based on the time tracking information
become available.
Logging work on an issue
Once you have started to work on a specific issue, you can log your work by following these steps:
Select the issue you want to log time on.
Go to .More > Log Work
Fill in the following fields, and select : Log Work Log
Log Work
field
Description
Time
spent
The amount of time spent on the issue. This is the aggregate amount of time that has
been logged against this issue.
Note that anyone with the Browse Project permission can view time tracking information on an
issue.
Tips:
You can specify additional time units after a time value 'X', such as Xw, Xd, Xh, or Xm,
to represent weeks (w), days (d), hours (h), and minutes (m), respectively. If you type a
number without specifying a time unit (e.g. if you type '2' instead of '2h'), the default
time unit that your JIRA administrator specified will apply.
Default conversion rates are 1w = 5d and 1d = 8h.

Documentation for JIRA Service Desk 3.1
94
Created in 2016 by Atlassian. Licensed under a .Creative Commons Attribution 2.5 Australia License
3.
1.
2.
3.
Date
started
Date and time when you started this unit of work.
Remaining
estimated
Amount of time anticipated to resolve the issue after completing this unit of work. You
can adjust this value using the following options:
- Adjust the remaining estimate value by subtracting theAdjust Automatically
amount of work logged in the field from the remaining estimate currentTime Spent
value.
Leave Estimate unset - This option is displayed only if no time estimate has been
specified on the issue. You can use this option when you want to keep track of
work, but you don't necessarily have a time estimate for an issue.
- Select this option if you do not want to change theUse Existing Estimate of
issue remaining estimate value.
- You can adjust the remaining estimate value to the amount of time youSet to
specify in this field.
- Select this option to manually adjust the remaining estimate value byReduce by
subtracting the amount of time you specify in this field.
Work
description
Type a description related to the achieved work.
Comments are copied to the by default, but your JIRAWorkflow Description
administrator can change this option in the 'Copy Comment to Workflow Descriptions'
settings. If this setting is disabled:
The work log entry may be visible to anyone. If this is a concern, you need to edit
this work log entry after creating it to modify its visibility.
You have to manually copy comments to a workflow description once you have
logged work.
You can also log work while resolving or closing an issue by closing it and editing the log work fields.
Select the padlock icon to set the work logged to be viewable only by members of a particular project role or
group.
Editing a work log entry
You can permission.can edit your own work log entries if you have been granted the Edit Own Work Logs Yo
u can also edit Edit All Work Logsother people's work log entries if you have been granted the permission.
Deleting a work log entry
You can delete your own work log entries if you have been granted the Delete Own Work Logs permission
You can also delete other people's work log entries if you have been granted the Delete All Work Logs permi
ssion.
Go to the desired issue, and open the tab.Work Log
Hover over the work log entry to display the actions for the entry on the right side.
Select the entry you want to delete, and click the trash can icon. You will be prompted to choose how
the Remaining Estimate is affected by deleting the work log:
Option field Description
Auto adjust Choose this option to automatically add the time spent value to the
current remaining estimate value.
Leave existing estimate Select this option if you do not want to change the issue remaining
estimate value.
Set estimated time
remaining
Choose this option to manually set the issue's remaining estimate value
to the specified amount.

Documentation for JIRA Service Desk 3.1
95
Created in 2016 by Atlassian. Licensed under a .Creative Commons Attribution 2.5 Australia License
3.
4.
1.
2.
Increase estimated time
remaining
Select this option to increase the estimated remaining.
Click .Delete
Customized JIRA installations
JIRA applications can be customized by your JIRA administrator by adding the Log Work and Time Tracking
fields to the customized screens. This way, you can log work and specify time estimates on the same JIRA
screen when performing any JIRA operation, such as editing, creating an issue, or transitioning an issue to
another status.
If you want to work specify time estimates on the same JIRA screen:and/or
Navigate to the issue and view its details.
Perform the customized JIRA operation that allows you to log work specify time estimates on theand
same JIRA screen. For example, assuming that your JIRA administrator has added the Time
fields to the and assuming this screen also retains the default Tracking Resolve Issue Screen, Log
fields, select at the top of the issue.Work Workflow > Resolve Issue
Searching for issues
Can't find the customer issue you've been working on? This page will show
you how to search for issues in JIRA Service Desk. Any agent can search
for issues, although they will only see results from projects they have access
to.
You'll find a step-by-step guide below that will show you how to run a search
and use the search results. If you want more details on anything described
on this page, see the related topics at the bottom of the page.
On this page:
1. Define
your
search
criteria
2. Change
your view
of the
search
results
3. Working
with the
search
results
4. Save
your
search
Next steps
1. Define your search criteria
The first step in searching for issues is to define the criteria for your new search. You can define your search
criteria in three different ways: using the quick search, using the basic search, or using the advanced search.
If your JIRA administrator has configured the Log Work fields as optional, then you can
choose whether or not to log work by checking the Log Work checkbox.
If your JIRA administrator has made logging work mandatory, you will not see the Log Work
checkbox, and will instead need to log work when transitioning an issue.

Documentation for JIRA Service Desk 3.1
96
Created in 2016 by Atlassian. Licensed under a .Creative Commons Attribution 2.5 Australia License
Quick
search
The quick search is the fastest way to define search criteria. However, it is less precise than other search methods for
complex queries (e.g. ). It is most useful whenproject = JIRA AND status = Open AND priority = High
your search criteria is not complex, for example, you know the project key and some key words for an issue.
To use the quick search: Enter your search criteria in the search box in the header and press Enter.
Tip: If you know the issue key or project key, enter it before other search terms, e.g. "JRA help link is broken".
Basic
search
The basic search is more precise than the quick search, but easier to use than the advanced search. It provides a
user-friendly interface that lets you define complex queries, without needing to know how to use JQL (advanced
searching).
To use the basic search: Navigate to (in header) > , then enter your search criteria. Issues Search for issues
Tip: If the advanced search is shown instead of the basic search, click next to theBasic
icon.

Documentation for JIRA Service Desk 3.1
97
Created in 2016 by Atlassian. Licensed under a .Creative Commons Attribution 2.5 Australia License
Advanced
search
The advanced search is the most powerful of the three search methods. You can specify criteria that cannot be defined
in the other searches (e.g. clause). However, you need to know how to construct structured queries usingORDER BY
the JIRA Query Language (JQL) to use this feature.
To use the advanced search: Navigate to (in header) > , then enter your search criteria. Issues Search for issues
Tip: If the basic search is shown instead of the advanced search, click next to theAdvanced
icon.
2. Change your view of the search results
You have crafted the perfect search criteria and run the search. Your search results will be displayed in the
issue navigator. The issue navigator allows you to change how the search results are displayed. For
example, you may want to bring high priority issues to the top or hide certain fields.
Change the sort order: Click the column name.
Show/hide columns: Click and choose the desired columns.Columns
3. Working with the search results
You've got the search results displaying the way that you want. Now you can work with the actual issues in
the search results. The issue navigator lets you action individual issues, as well as the entire set of issues
returned by your search.
Individual issues:

Documentation for JIRA Service Desk 3.1
98
Created in 2016 by Atlassian. Licensed under a .Creative Commons Attribution 2.5 Australia License
1.
View the issue: Click the issue key or name.
Action individual issues: Click the cog icon next to the issue row and select an option.
All issues in the search results:
Export the search results to different formats, like Excel and XML: Click and select theExport
desired format.
Share the search results: Click , then enter the recipient's details.Share
Create an RSS feed: Click or .Export > RSS (Issues) RSS (Comments)
Bulk modify issues in search results: Click and select under .Tools all issue(s) <n> Bulk Change
4. Save your search
If you frequently run the same search, you can save the search criteria as a filter. This saves you from having
to manually redefine the search criteria every time. JIRA applications also include a number of predefined
system filters for common queries, such as 'My Open Issues', 'Reported by Me', 'Recently Viewed', and 'All
Issues'.
To save your search as a filter: On the search results page, click and enter a name for the filter.Save as
Your new filter will be shown in the left panel with your other favorite filters, filters shared with you, and the
system filters. To run a filter, just click it.
Next steps
Read the following related topics:
Quick searching
Basic searching
Advanced searching
Saving your search as a filter
Working with search results
Basic searching
The basic search provides a user-friendly interface that lets you define
complex queries, without needing to know how to use JQL (advanced
searching).
If you don't have complex search criteria, you may want to use quick
instead.search
If you are comfortable with the JIRA Query Language (JQL), you may
want to use instead. This search is more powerfuladvanced search
than than the basic search.
Screenshot: Basic search
On this page:
Basic
searching
Running a
saved
search
Troublesho
oting
Next steps
Basic searching
Choose > . Issues Search for issues
If there are existing search criteria, click the button to reset the search criteria.New filter
If the advanced search is shown instead of the basic search, click (next to the Basic
icon).
Why can't I switch between basic and advanced search?

Documentation for JIRA Service Desk 3.1
99
Created in 2016 by Atlassian. Licensed under a .Creative Commons Attribution 2.5 Australia License
1.
2.
3.
In general, a query created using basic search will be able to be translated to advanced
search, and back again. However, a query created using advanced search may not be able
to be translated to basic search, particularly if:
the query contains an OR operator (note you can have an IN operator and it will be
translated, e.g. )project in (A, B)
i.e. even though this query: is(project = JRA OR project = CONF)
equivalent to this query: , only the second(project in (JRA, CONF))
query will be translated.
the query contains a NOT operator
the query contains an EMPTY operator
the query contains any of the comparison operators: !=, IS, IS NOT, >, >=, <, <=
the query specifies a field and value that is related to a project (e.g. version,
component, custom fields) and the project is not explicitly included in the query (e.g.
, without the ). This is especially trickyfixVersion = "4.0" AND project=JRA
with custom fields since they can be configured on a Project/Issue Type basis. The
general rule of thumb is that if the query cannot be created in the basic search form,
then it will not be able to be translated from advanced search to basic search.
Enter the criteria for the search. You can search against specific fields and/or search for specific text.
If you are searching against a field and can't find the field you want, or the field is displaying
greyed out text, see the below. Troubleshooting section
If you are searching for text, you can use special characters and modifiers in your search text,
such as wildcards and logical operators. See . Performing Text Searches
The search results will automatically update in the issue navigator, unless your administrator has
disabled automatic updates of search results. If so, you will need to click the button on theUpdate
field drop-down after every change.
Running a saved search
Saved searches (also known as ) are shown in the left panel, whenfilters
using basic search. If the left panel is not showing, hover your mouse over
the left side of the screen to display it.
To run a filter, e.g. , simply click it. The search criteria forMy Open Issues
the basic search will be set, and the search results will be displayed.
Note, clicking the filter will switch you to the Recently Viewed advanced
basic search cannot represent the clause in thissearch, as the ORDER BY
filter.
Troubleshooting
Why can't I find the field I want to choose?
Some fields are only valid for a particular . For these fields, you must select theproject/issue type context
applicable project/issue type. Otherwise, the field is not available for selection.
Why are the field criteria displaying in grey text?
Some fields are only valid for a particular . If you choose a field in your search,project/issue type context
then remove all projects/issue types that reference the field, then the field is invalid. The invalid field does
not apply to your search and displays in grey text.
Why is there a red exclamation mark in my field?
Some field values are only valid for a particular . For example, you may haveproject/issue type context
configured a project to use a status in its workflow. If you select this project and status inIn QA Review
your search, then change the search to filter for a project that doesn't use , the status will beIn QA Review
invalid and ignored in the search.

Documentation for JIRA Service Desk 3.1
100
Created in 2016 by Atlassian. Licensed under a .Creative Commons Attribution 2.5 Australia License
Why don't my search results automatically update?
Your search results will always update automatically whenever any fields are changed, provided that your
administrator has not . Ask your administrator whether theydisabled automatic updates of search results
have disabled automatic updates of search results.
Next steps
Read the following related topics:
Searching for issues
Advanced searching
Saving your search as a filter
Working with search results — find out how to use the issue navigator, export your search results, bulk
modify issues, and share your search results.
Quick searching
Sometimes, you just want to be able to get to the particular issue that you
are interested in. Other times, you can't remember what the issue was, but
you remember that it was an open issue, assigned to you. Quick search can
help you in these scenarios.
Quick searching
The box is located at the top right of your screen. To use it,Quick Search
just starting typing what you are looking for.
On this page:
Quick
searching
Understan
ding quick
searching
Searching
issues
from your
browser's
search box
Next steps
Understanding quick searching
Read the following topics to learn how to get the most out of quick searching:
Jumping to an issue | | Smart querying Free-text searching
Jumping to an issue
If you type in the of an issue, you will jump straight to that issue. For example, if you type in 'ABC-107'key
(or 'abc-107'), and press the button, you will be redirected to the issue 'ABC-107'.Enter
In many cases, you do not even need to type in the full key, but just the numerical part. If you are currently
working on the 'ABC' project, and you type in '123', you will be redirected to 'ABC-123'.
Smart querying
Quick search also enables you to perform 'smart' searches with minimal typing. For example, to find all the
open bugs in the 'TEST' project, you could simply type 'test open bugs' and quick search would locate them
all for you.
Your search results will be displayed in the Issue Navigator, where you can view them in a variety of useful
formats (Excel, XML, etc).
The search terms that quick search recognizes are:
Search Term Description Examples
my
Find issues assigned to me.
my open bugs

Documentation for JIRA Service Desk 3.1
101
Created in 2016 by Atlassian. Licensed under a .Creative Commons Attribution 2.5 Australia License
r:
Find issues reported by you, another user or with no
reporter, using the prefix followed by a specificr:
reporter term, such as , a username or . me none
Note that there can be no spaces between "r:" and the
specific reporter term.
r:me — finds issues
reported by you.
— finds issuesr:samuel
reported by the user whose
username is "samuel".
— finds issues withr:none
no reporter.
<project
name>
or
<project
key>
Find issues in a particular project. test project
TST
tst
overdue
Find issues that were due before today.
overdue
created:
updated:
due:
Find issues with a particular Created, Updated, or Due
Date using the prefixes , , or ,created: updated: due:
respectively. For the date range, you can use , today to
, , a single date range (e.g. '-1w'), ormorrow yesterday
two date ranges (e.g. '-1w,1w'). Note that date ranges
cannot have spaces in them. Valid date/time
abbreviations are: 'w' (week), 'd' (day), 'h' (hour), 'm'
(minute).
created:today
created:yesterday
— findsupdated:-1w
issues updated in the last
week.
— finds issues duedue:1w
in the next week.
— finds issuesdue:-1d,1w
due from yesterday to next
week.
—created:-1w,-30m
finds issues created from one
week ago, to 30 minutes ago.
created:-1d
— findsupdated:-4h
issues created in the last
day, updated in the last 4
hours.
<priority>
Find issues with a particular Priority. blocker
major
trivial
<issue
type>
Find issues with a particular Issue Type. Note that you
can also use plurals.
bug
task
bugs
tasks
<resolution>
Find issues with a particular Resolution.
fixed
duplicate
cannot reproduce
c:
Find issues with a particular Component(s). You can
search across multiple components.
Note that there can be no spaces between "c:" and the
component name.
c:security — finds issues
with a component whose
name contains the word
"security".

Documentation for JIRA Service Desk 3.1
102
Created in 2016 by Atlassian. Licensed under a .Creative Commons Attribution 2.5 Australia License
v:
Find issues with a particular Affects Version(s). To find
all issues belonging to a 'major' version, use the wildcar
symbol . d '*'
Note that there can be no spaces between "v:" and the
version name.
v:3.0 — finds issues that
match the following versions
(for example):
3.0
3.0 eap
3.0 beta
...but will not match
against the following
versions (for example):
3.0.1
3.0.0.4
That is, it will match
against any version that
contains the string you
specify followed
immediately by a space,
but not against versions
that do not contain a
space immediately after
the string you specify.
ff:
Find issues with a particular Fix For Version(s). Same
usage as (above).v:
*
Wildcard symbol . Can be used with and .'*' v: ff: v:3.2* — finds any issue
whose version number is (for
example):
3.2
3.2-beta
3.2.1
3.2.x
Free-text searching
You can search for any word within the issue(s) you are looking for, provided the word is in one of the
following fields:
Summary
Description
Comments
You can combine free-text and keywords together, e.g. " ". You can also youmy closed test tasks
wildcards, e.g. '' ".win*8
For more information on free-text searching, see .Search syntax for text fields
Searching issues from your browser's search box
If you are using Firefox or Internet Explorer 8 (or later), you can add your JIRA as a searchinstance
engine/provider via the drop-down menu next to the browser's search box. Once you add your JIRA instance
In Mozilla-based browsers, try creating a bookmark with URL http://<your-JIRA-site>/secur
(substituting with your JIRA e/QuickSearch.jspa?searchString=%s <your-JIRA-site> inst
's URL) and keyword (such as ). Now, typing in the browser URL bar willance 'j' 'j my open bugs'
search your JIRA for your open bugs. Or simply type your search term in the Quick Searchinstance
box, then right-click on the Quick Search box (with your search term shown) and select "Add a
Keyword for this search...".

Documentation for JIRA Service Desk 3.1
103
Created in 2016 by Atlassian. Licensed under a .Creative Commons Attribution 2.5 Australia License
1.
as a search engine/provider in your browser, you can use it at any time to conduct a Quick Search for issues
in that JIRA .instance
Next steps
Read the following related topics:
Searching for issues
Advanced searching
The advanced search allows you to build structured queries using the JIRA
Query Language (JQL) to search for issues. You can specify criteria that
cannot be defined in the quick or basic searches (e.g. clause). ORDER BY
If you don't have complex search criteria, you may want to use quick
instead.search
If you are not comfortable with the JIRA Query Language (JQL), you
may want to use instead.basic search
Note, JQL is not a database query language, even though it uses SQL-like
syntax.
Screenshot: Advanced search
On this page:
Advanced
searching
Understan
ding
advanced
searching
Reference
Running a
saved
search
Next steps
Advanced searching
Navigate to (in header) > .Issues Search for issues
If there are existing search criteria, click the button to reset the search criteria.New filter
If the basic search is shown instead of the advanced search, click (next to the Advanced
icon).
Why can't I switch between basic and advanced search?
In general, a query created using basic search will be able to be translated to advanced
search, and back again. However, a query created using advanced search may not be able
to be translated to basic search, particularly if:
the query contains an OR operator (note you can have an IN operator and it will be
translated, e.g. )project in (A, B)
i.e. even though this query: is(project = JRA OR project = CONF)
equivalent to this query: , only the second(project in (JRA, CONF))
query will be translated.
the query contains a NOT operator
the query contains an EMPTY operator
the query contains any of the comparison operators: !=, IS, IS NOT, >, >=, <, <=
the query specifies a field and value that is related to a project (e.g. version,
component, custom fields) and the project is not explicitly included in the query (e.g.
, without the ). This is especially trickyfixVersion = "4.0" AND project=JRA
OpenSearch
JIRA supports this browser search feature as part of the autodiscovery part of the standOpenSearch
ard, by supplying an . This is an XML file that describes the webOpenSearch description document
interface provided by JIRA's search function. Any that support OpenSearch will beclient applications
able to add JIRA to their list of search engines.

Documentation for JIRA Service Desk 3.1
104
Created in 2016 by Atlassian. Licensed under a .Creative Commons Attribution 2.5 Australia License
1.
2.
3.
with custom fields since they can be configured on a Project/Issue Type basis. The
general rule of thumb is that if the query cannot be created in the basic search form,
then it will not be able to be translated from advanced search to basic search.
Enter your JQL query. As you type, JIRA will offer a list of "auto-complete" suggestions based on the
context of your query. Note, auto-complete suggestions only include the first 15 matches, displayed
alphabetically, so you may need to enter more text if you can't find a match.
Why aren't the auto-complete suggestions being shown?
Your administrator may have disabled the "JQL Auto-complete" feature for your JIRA
instance.
Auto-complete suggestions are not offered for function parameters.
Auto-complete suggestions are not offered for all fields. Check the reference to seefields
which fields support auto-complete.
Press Enter or click
to run your query. Your search results will display in the issue navigator.
Understanding advanced searching
Read the following topics to learn how to get the most out of advanced searching:
Constructing JQL queries | | | Setting the precedence of operators Restricted words and characters Perf
orming text searches
Constructing JQL queries
A simple query in JQL (also known as a 'clause') consists of a , followed by an , followed by onefield operator
or more or . For example:values functions
project = "TEST"
This query will find all issues in the "TEST" project. It uses the "project" , the EQUALS , and the field operator
.value "TEST"
A more complex query might look like this:
project = "TEST" AND assignee = currentuser()
This query will find all issues in the "TEST" project where the assignee is the currently logged in user. It uses
the "project" , the EQUALS , the the "AND" keyword and the "currentuser()"field operator value "TEST",
function.
For more information on fields, operators, keywords and functions, see the below.Reference section
Setting the precedence of operators
You can use parentheses in complex JQL statements to enforce the precedence of operators.
For example, if you want to find all resolved issues in the 'SysAdmin' project, as well as all issues (any status,
any project) currently assigned to the system administrator (bobsmith), you can use parentheses to enforce
the precedence of the boolean operators in your query, i.e.
(status=resolved AND project=SysAdmin) OR assignee=bobsmith
Note that if you do not use parentheses, the statement will be evaluated left-to-right.
You can also use parentheses to group clauses, so that you can apply the NOT operator to the group.
Restricted words and characters

Documentation for JIRA Service Desk 3.1
105
Created in 2016 by Atlassian. Licensed under a .Creative Commons Attribution 2.5 Australia License
Reserved characters
JQL has a list of reserved characters:
space (" ") + . , ; ? | * / % ^ $ # @ [ ]
If you wish to use these characters in queries, you need to:
surround them with quote-marks (you can use either single quote-marks ( ) or double quote-marks ( )' "
);
if you are searching a text field and the character is on the list of and, reserved characters for text
,searches
precede them with two backslashes.
For example:
version = "[example]"
summary ~ "\\[example\\]"
Reserved words
JQL also has a list of reserved words. These words need to be surrounded by quote-marks (single or double)
if you wish to use them in queries.
Show me...
"abort", "access", "add", "after", "alias", "all", "alter", "and", "any", "as", "asc", "audit", "avg", "before",
"begin", "between", "boolean", "break", "by", "byte", "catch", "cf", "char", "character", "check", "checkpoint",
"collate", "collation", "column", "commit", "connect", "continue", "count", "create", "current", "date",
"decimal", "declare", "decrement", "default", "defaults", "define", "delete", "delimiter", "desc", "difference",
"distinct", "divide", "do", "double", "drop", "else", "empty", "encoding", "end", "equals", "escape",
"exclusive", "exec", "execute", "exists", "explain", "false", "fetch", "file", "field", "first", "float", "for", "from",
"function", "go", "goto", "grant", "greater", "group", "having", "identified", "if", "immediate", "in", "increment",
"index", "initial", "inner", "inout", "input", "insert", "int", "integer", "intersect", "intersection", "into", "is",
"isempty", "isnull", "join", "last", "left", "less", "like", "limit", "lock", "long", "max", "min", "minus", "mode",
"modify", "modulo", "more", "multiply", "next", "noaudit", "not", "notin", "nowait", "null", "number", "object",
"of", "on", "option", "or", "order", "outer", "output", "power", "previous", "prior", "privileges", "public", "raise",
"raw", "remainder", "rename", "resource", "return", "returns", "revoke", "right", "row", "rowid", "rownum",
"rows", "select", "session", "set", "share", "size", "sqrt", "start", "strict", "string", "subtract", "sum",
"synonym", "table", "then", "to", "trans", "transaction", "trigger", "true", "uid", "union", "unique", "update",
"user", "validate", "values", "view", "when", "whenever", "where", "while", "with"
Note for JIRA administrators: this list is hard coded in the file.JqlStringSupportImpl.java
Performing text searches
You can use Lucene's text-searching features when performing searches on the following fields, using
the CONTAINS operator:
Summary, Description, Environment, Comments, custom fields that use the "Free Text Searcher" (i.e. custom
fields of the following built-in custom field types: Free Text Field, Text Field, Read-only Text Field).
For more information, see .Search syntax for text fields
Reference
Description Reference

Documentation for JIRA Service Desk 3.1
106
Created in 2016 by Atlassian. Licensed under a .Creative Commons Attribution 2.5 Australia License
Fields
A field in JQL is a word that represents a
JIRA field (or a custom field that has already
been defined in JIRA).
Fields reference page
Show list of fields
Affected version
Assignee
Attachments
Category
Comment
Component
Created
Creator
Custom field
Customer Request Type
Description
Due
Environment
Epic link
Filter
Fix version
Issue key
Labels
Last viewed
Level
Original estimate
Parent
Priority
Project
Remaining estimate
Reporter
Resolution
Resolved
Sprint
Status
Summary
Text
Time spent
Type
Updated
Voter
Votes
Watcher
Watchers
Work ratio

Documentation for JIRA Service Desk 3.1
107
Created in 2016 by Atlassian. Licensed under a .Creative Commons Attribution 2.5 Australia License
Operators
An operator in JQL is one or more symbols
or words that compare the value of a field on
its left with one or more values (or functions)
on its right, such that only true results are
retrieved by the clause. Some operators may
use the NOT keyword.
Operators reference page
Show list of operators
EQUALS: =
NOT EQUALS: !=
GREATER THAN: >
GREATER THAN EQUALS: >=
LESS THAN: <
LESS THAN EQUALS: <=
IN
NOT IN
CONTAINS: ~
DOES NOT CONTAIN: !~
IS
IS NOT
WAS
WAS IN
WAS NOT IN
WAS NOT
CHANGED
Keywords
A keyword in JQL is a word or phrase that
does (or is) any of the following:
joins two or more clauses together to
form a complex JQL query
alters the logic of one or more clauses
alters the logic of operators
has an explicit definition in a JQL query
performs a specific function that alters
the results of a JQL query.
Keywords reference page
Show list of keywords
AND
OR
NOT
EMPTY
NULL
ORDER BY

Documentation for JIRA Service Desk 3.1
108
Created in 2016 by Atlassian. Licensed under a .Creative Commons Attribution 2.5 Australia License
Functions
A function in JQL appears as a word followed
by parentheses, which may contain one or
more explicit values or JIRA fields.
A function performs a calculation on either
specific JIRA data or the function's content in
parentheses, such that only true results are
retrieved by the function, and then again by
the clause in which the function is used.
Functions reference page
Show list of functions
cascadeOption()
closedSprints()
componentsLeadByUser()
currentLogin()
currentUser()
earliestUnreleasedVersion()
endOfDay()
endOfMonth()
endOfWeek()
endOfYear()
issueHistory()
issuesWithRemoteLinksByGlobalId()
lastLogin()
latestReleasedVersion()
linkedIssues()
membersOf()
now()
openSprints()
projectsLeadByUser()
projectsWhereUserHasPermission()
projectsWhereUserHasRole()
releasedVersions()
standardIssueTypes()
startOfDay()
startOfMonth()
startOfWeek()
startOfYear()
subtaskIssueTypes()
unreleasedVersions()
votedIssues()
watchedIssues()
Running a saved search
Saved searches (also known as ) are shown inSaving your search as a filter
the left panel, when using advanced search. If the left panel is not showing,
hover your mouse over the left side of the screen to display it.
To run a filter, e.g. , simply click it. The JQL for theMy Open Issues
advanced search will be set, and the search results will be displayed.
Next steps
Read the following related topics:
Searching for issues

Documentation for JIRA Service Desk 3.1
109
Created in 2016 by Atlassian. Licensed under a .Creative Commons Attribution 2.5 Australia License
Basic searching
Search syntax for text fields
JQL: The most flexible way to search JIRA (on the Atlassian blog)
Saving your search as a filter
Working with search results— find out how to use the issue navigator, export your search results, bulk
modify issues, and share your search results.
Advanced searching - fields reference
This page describes information about fields that are used for advanced
searching.A field in JQL is a word that represents a JIRA field (or a custom
field that has already been defined in your JIRA applications). In a clause, a
field is followed by an , which in turn is followed by one or moreoperator
values (or ). The operator compares the value of the field with onefunctions
or more values or functions on the right, such that only true results are
retrieved by the clause.Note, it is not possible to compare two fields in JQL.
Affected version
Search for issues that are assigned to a particular affects version(s). You
can search by version name or version ID (i.e. the number that JIRA
automatically allocates to a version).Note, it is better to search by version ID
than by version name. Different projects may have versions with the same
name. It is also possible for your JIRA administrator to change the name of
a version, which could break any saved filters that rely on that name.
Version IDs, however, are unique and cannot be changed.
Syntax
affectedVersion
Field Type
VERSION
Auto-complete
Yes
Supported operators
= , != , > , >= , < , <=
IS, IS NOT, IN, NOT IN Not
e that the comparison operators
(e.g. ">") use the version order that
has been set up by your project
administrator, not a numeric or
alphabetic order.
Unsupported operators
~ , !~
WAS, WAS IN, WAS NOT, WAS
NOT IN, CHANGED
Supported functions
When used with the and IN NOT IN
operators, this field supports:
releasedVersions()
latestReleasedVersion()
unreleasedVersions()
earliestUnreleasedVersion()
List of Fields:
Affected version
Assignee
Attachments
Category
Comment
Component
Created
Creator
Custom field
Customer Request
Type
Description
Due
Environment
Epic link
Filter
Fix version
Issue key
Labels
Last viewed
Level
Original estimate
Parent
Priority
Project
Remaining estimate
Reporter
Resolution
Resolved
Sprint
Status
Summary
Text
Time spent
Type
Updated
Voter
Votes
Watcher
Watchers
Work ratio

Documentation for JIRA Service Desk 3.1
110
Created in 2016 by Atlassian. Licensed under a .Creative Commons Attribution 2.5 Australia License
Examples
Find issues with an
AffectedVersion of 3.14:
affectedVersion =
"3.14"
Note that full-stops are reserved chara
and need to be surrounded bycters
quote-marks.
Find issues with an
AffectedVersion of "Big Ted":
affectedVersion = "Big
Ted"
Find issues with an
AffectedVersion ID of 10350:
affectedVersion = 10350
^ top of page
Assignee
Search for issues that are assigned to a particular user. You can search by the user's full name, ID, or email
address.
Syntax
assignee
Field Type
USER
Auto-complete
Yes
Supported
operators
= , !=
IS, IS NOT, IN, NOT IN, WAS, WAS IN, WAS NOT, WAS NOT IN, CHANGED
Note that the comparison operators (e.g. ">") use the version order that has been set up
by your project administrator, not a numeric or alphabetic order.
Unsupported
operators
~ , !~ , > , >= , < , <=
Supported
functions
When used with the and operators, this field supports:IN NOT IN
membersOf()
When used with the and operators, this field supports:EQUALS NOT EQUALS
currentUser()
Examples
Find issues that are assigned to John Smith:
assignee = "John Smith"
or
assignee = jsmith
Find issues that are currently assigned, or were previously assigned, to John Smith:
assignee WAS "John Smith"
or
assignee WAS jsmith
Find issues that are assigned by the user with email address
assignee = "[email protected]"
Note that full-stops and "@" symbols are reserved and need to be surrounded bycharacters
quote-marks.
^ top of page

Documentation for JIRA Service Desk 3.1
111
Created in 2016 by Atlassian. Licensed under a .Creative Commons Attribution 2.5 Australia License
Attachments
Search for issues that have or do not have attachments.
Syntax
attachments
Field Type
ATTACHMENT
Auto-complete
Yes
Supported
operators
IS, IS NOT
Unsupported
operators
=, != , ~ , !~ , > , >= , < , <= IN, NOT IN, WAS, WAS IN, WAS
NOT, WAS NOT IN, CHANGED
Supported
functions
None
Examples
Search for issues that have attachments:
attachments IS NOT EMPTY
Search for issues that do not have attachments:
attachments IS EMPTY
^ top of page
Category
Search for issues that belong to projects in a particular category.
Syntax
category
Field Type
CATEGORY
Auto-complete
Yes
Supported operators
=, !=
IS, IS NOT, IN, NOT IN
Unsupported
operators
~ , !~ , > , >= , < , <= WAS, WAS IN, WAS NOT, WAS NOT IN,
CHANGED
Supported functions
None
Examples
Find issues that belong to projects in the "Alphabet Projects" Category:
category = "Alphabet Projects"
^ top of page
Comment
Search for issues that have a comment that contains particular text. can be used.JIRA text-search syntax
Syntax
comment
Field Type
TEXT
Auto-complete
No
Supported
operators
~ , !~

Documentation for JIRA Service Desk 3.1
112
Created in 2016 by Atlassian. Licensed under a .Creative Commons Attribution 2.5 Australia License
Unsupported
operators
= , != , > , >= , < , <=
IS, IS NOT, IN, NOT IN, WAS, WAS IN, WAS NOT, WAS NOT IN,
CHANGED
Supported
functions
None
Examples
Find issues where a comment contains text that matches "My PC is quite old"
(i.e. a "fuzzy" match:
comment ~ "My PC is quite old"
Find issues where a comment contains the exact phrase "My PC is quite old":
comment ~ "\"My PC is quite old\""
^ top of page
Component
Search for issues that belong to a particular component(s) of a project. You can search by component name
or component ID (i.e. the number that JIRA automatically allocates to a component).
Note, it is safer to . Different projects may havesearch by component ID than by component name
components with the same name, so searching by component name may return issues from multiple
projects. It is also possible for your JIRA administrator to change the name of a component, which could
break any saved filters that rely on that name. Component IDs, however, are unique and cannot be changed.
Syntax
component
Field Type
COMPONENT
Auto-complete
Yes
Supported operators
= , !=
IS , IS NOT , IN , NOT IN
Unsupported operators
~ , !~ , > , >= , < , <=
WAS, WAS IN, WAS NOT, WAS NOT IN, CHANGED
Supported functions
When used with the and operators, component supports:IN NOT IN
componentsLeadByUser()
Examples
Find issues in the "Comp1" or "Comp2" component:
component in (Comp1, Comp2)
Find issues in the "Comp1" and"Comp2" components:
component in (Comp1) and component in (Comp2)
or
component = Comp1 and component = Comp2
Find issues in the component with ID 20500:
component = 20500
^ top of page
Created
Search for issues that were created on, before, or after a particular date (or date range). Note that if a
time-component is not specified, midnight will be assumed. Please note that the search results will be relative
to your configured time zone (which is by default the JIRA server's time zone).
Use one of the following formats:
"yyyy/MM/dd HH:mm"
"yyyy-MM-dd HH:mm"

Documentation for JIRA Service Desk 3.1
113
Created in 2016 by Atlassian. Licensed under a .Creative Commons Attribution 2.5 Australia License
"yyyy/MM/dd"
"yyyy-MM-dd"
Or use (weeks), (days), (hours) or (minutes) to specify a date relative to the current time."w" "d" "h" "m"
The default is (minutes). Be sure to use quote-marks ( ); if you omit the quote-marks, the number you"m" "
supply will be interpreted as milliseconds after epoch (1970-1-1).
Syntax
created
Alias
createdDate
Field Type
DATE
Auto-complete
No
Supported
operators
= , != , > , >= , < , <=
IS , IS NOT , IN , NOT IN
Unsupported
operators
~ , !~
WAS, WAS IN, WAS NOT, WAS NOT IN, CHANGED
Supported
functions
When used with the , , , EQUALS NOT EQUALS GREATER THAN GREATER THAN
, or operators, this field supports:EQUALS LESS THAN LESS THAN EQUALS
currentLogin()
lastLogin()
now()
startOfDay()
startOfWeek()
startOfMonth()
startOfYear()
endOfDay()
endOfWeek()
endOfMonth()
endOfYear()
Examples
Find all issues created before 12th December 2010:
created < "2010/12/12"
Find all issues created on or before 12th December 2010:
created <= "2010/12/13"
Find all issues created on 12th December 2010 before 2:00pm:
created > "2010/12/12" and created < "2010/12/12 14:00"
Find issues created less than one day ago:
created > "-1d"
Find issues created in January 2011:
created > "2011/01/01" and created < "2011/02/01"
Find issues created on 15 January 2011:
created > "2011/01/15" and created < "2011/01/16"
^ top of page
Creator
Search for issues that were created by a particular user. You can search by the user's full name, ID, or email
address.
Syntax
creator
Field Type
USER

Documentation for JIRA Service Desk 3.1
114
Created in 2016 by Atlassian. Licensed under a .Creative Commons Attribution 2.5 Australia License
Auto-complete
Yes
Supported
operators
= , !=
IS , IS NOT , IN , NOT IN, WAS, WAS IN, WAS NOT, WAS NOT IN
Unsupported
operators
~ , !~ , > , >= , < , <=
CHANGED
Supported
functions
When used with the and operators, this field supports:IN NOT IN
membersOf()
When used with the and operators, this field supports:EQUALS NOT EQUALS
currentUser()
Examples
Search for issues that were created by Jill Jones:
creator = "Jill Jones"
or
creator = "jjones"
Search for issues that were created by the user with email address
creator = "[email protected]"
(Note that full-stops and "@" symbols are reserved , so the emailcharacters
address needs to be surrounded by quote-marks.)
^ top of page
Custom field
Only applicable if your JIRA administrator has created one or more custom fields.
Search for issues where a particular custom field has a particular value. You can search by custom
field name or custom field ID (i.e. the number that JIRA automatically allocates to an custom field).
Note, it is safer to search by custom field ID than by custom field name. It is possible for a custom field to
have the same name as a built-in JIRA system field; in which case, JIRA will search for the system field (not
your custom field). It is also possible for your JIRA administrator to change the name of a custom field, which
could break any saved filters that rely on that name. Custom field IDs, however, are unique and cannot be
changed.
Syntax
CustomFieldName
Alias
cf[CustomFieldID]
Field Type
Depends on the custom field's configuration
Note, can be used with custom fields of type 'Text'.JIRA text-search syntax
Auto-complete
Yes, for custom fields of type picker, group picker, select, checkbox and radio
button fields
Supported
operators
Different types of custom field support different operators.
Supported
operators:
number and date
fields
= , != , > , >= , < . <=
IS , IS NOT , IN , NOT IN

Documentation for JIRA Service Desk 3.1
115
Created in 2016 by Atlassian. Licensed under a .Creative Commons Attribution 2.5 Australia License
Unsupported
operators:
number and date
fields
~ , !~
WAS, WAS IN, WAS NOT, WAS NOT IN, CHANGED
Supported
operators:
picker, select,
checkbox
and radio button
fields
= , !=
IS , IS NOT , IN , NOT IN
Unsupported
operators:
picker, select,
checkbox
and radio button
fields
~ , !~ , > , >= , < . <=
WAS, WAS IN, WAS NOT, WAS NOT IN, CHANGED
Supported
operators:
text fields
~ , !~
IS , IS NOT
Unsupported
operators:
text fields
= , != , > , >= , < . <=
WAS, WAS IN, WAS NOT, WAS NOT IN, CHANGEDIN , NOT IN ,
Unsupported
operators
~ , !~ , > , >= , < , <=
WAS, WAS IN, WAS NOT, WAS NOT IN, CHANGED
Supported
functions
Different types of custom fields support different functions.
Supported
functions:
date/time fields
When used with the , , , EQUALS NOT EQUALS GREATER THAN GREATER
, THAN EQUALS
or operators, this field supports:LESS THAN LESS THAN EQUALS
currentLogin()
lastLogin()
now()
startOfDay()
startOfWeek()
startOfMonth()
startOfYear()
endOfDay()
endOfWeek()
endOfMonth()
endOfYear()
Supported
functions:
version picker
fields
Version picker fields: When used with the IN and NOT IN operators, this field
supports:
releasedVersions()
latestReleasedVersion()
unreleasedVersions()
earliestUnreleasedVersion()

Documentation for JIRA Service Desk 3.1
116
Created in 2016 by Atlassian. Licensed under a .Creative Commons Attribution 2.5 Australia License
Examples
Find issues where the value of the "Location" custom field is "New York":
location = "New York"
Find issues where the value of the custom field with ID 10003 is "New York":
cf[10003] = "New York"
Find issues where the value of the "Location" custom field is "London" or
"Milan" or "Paris":
cf[10003] in ("London", "Milan", "Paris")
Find issues where the "Location" custom field has no value:
location != empty
^ top of page
Customer Request Type
Only applicable if JIRA Service Desk is installed and licensed.
Search for Issues matching a specific Customer Request Type in a service desk project. You can search for
a Customer Request Type either by name or description as configured in the Request Type configuration
screen.
Syntax
"Customer Request Type"
Field Type
Custom field
Auto-complete
Yes
Supported
operators
= , !=
IN , NOT IN
Unsupported
operators
> , >= , < , <= ~ , !~ ,
CHANGEDIS , IS NOT, , WAS, WAS IN, WAS NOT, WAS NOT IN
Supported
functions
None
Examples
Find issues where Customer Request Type is in projectsRequest a new account
that the user has access to:
"Customer Request Type" = "Request a new account"
Find issues where the Customer Request Type is in Request a new account Simpl
, where the right operand is a selected Lucene value from theeDesk project
auto-complete suggestion list.
"Customer Request Type" = "sd/system-access"
Find issues where Customer Request Type is either or Request a new account Get
. IT Help
"Customer Request Type" IN ("Request a new account", "Get IT
Help")
^ top of page
Description
Search for issues where the description contains particular text. can be used.JIRA text-search syntax
Note that the Lucene value for Customer Request Type, is portal-key/requ
est-type-key. While the portal key cannot be changed after a service desk
portal is created, the project key can be changed. The Request Type key cannot
be changed once the Request Type is created.

Documentation for JIRA Service Desk 3.1
117
Created in 2016 by Atlassian. Licensed under a .Creative Commons Attribution 2.5 Australia License
Syntax
description
Field Type
TEXT
Auto-complete
No
Supported
operators
~ , !~
IS , IS NOT
Unsupported
operators
, > , >= , < , <= = , !=
CHANGEDIN , NOT IN, , WAS, WAS IN, WAS NOT, WAS NOT IN
Supported
functions
None
Examples
Find issues where the description contains text that matches "Please see
screenshot" (i.e. a "fuzzy" match):
description ~ "Please see screenshot"
Find issues where the description contains the exact phrase "Please see
screenshot":
description ~ "\"Please see screenshot\""
^ top of page
Due
Search for issues that were due on, before, or after a particular date (or date range). Note that the due date
relates to the only (not to the time).date
Use one of the following formats:
"yyyy/MM/dd"
"yyyy-MM-dd"
Or use (weeks) or (days) to specify a date relative to the current date. Be sure to use quote-marks ("w" "d"
)."
Syntax
due
Alias
dueDate
Field Type
DATE
Auto-complete
No
Supported
operators
, > , >= , < , <== , !=
IS , IS NOT , IN , NOT IN
Unsupported
operators
~ , !~
CHANGED , WAS, WAS IN, WAS NOT, WAS NOT IN

Documentation for JIRA Service Desk 3.1
118
Created in 2016 by Atlassian. Licensed under a .Creative Commons Attribution 2.5 Australia License
Supported
functions
When used with the EQUALS, NOT EQUALS, GREATER THAN, GREATER
, THAN EQUALS
or operators, this field supports:LESS THAN LESS THAN EQUALS
currentLogin()
lastLogin()
now()
startOfDay()
startOfWeek()
startOfMonth()
startOfYear()
endOfDay()
endOfWeek()
endOfMonth()
endOfYear()
Examples
Find all issues due before 31st December 2010:
due < "2010/12/31"
Find all issues due on or before 31st December 2010:
due <= "2011/01/01"
Find all issues due tomorrow:
due = "1d"
Find all issues due in January 2011:
due >= "2011/01/01" and due <= "2011/01/31"
Find all issues due on 15 January 2011:
due = "2011/01/15"
^ top of page
Environment
Search for issues where the environment contains particular text. can be used.JIRA text-search syntax
Syntax
environment
Field Type
TEXT
Auto-complete
No
Supported
operators
~ , !~
IS , IS NOT
Unsupported
operators
, > , >= , < , <== , !=
CHANGED , WAS, WAS IN, WAS NOT, WAS NOT ININ , NOT IN,
Supported
functions
None
Examples
Find issues where the environment contains text that matches "Third floor" (i.e.
a "fuzzy" match):
environment ~ "Third floor"
Find issues where the environment contains the exact phrase "Third floor":
environment ~ "\"Third floor\""
^ top of page
Epic link
Search for issues that belong to a particular epic. The search is based on either the epic's name, issue key,
or issue ID (i.e. the number that JIRA automatically allocates to an issue).

Documentation for JIRA Service Desk 3.1
119
Created in 2016 by Atlassian. Licensed under a .Creative Commons Attribution 2.5 Australia License
Syntax
"epic link"
Field Type
Epic Link Relationship
Auto-complete
No
Supported operators
= , !=
IS , IS NOT, IN , NOT IN
Unsupported
operators
, > , >= , < , <=~ , !~
CHANGED , WAS, WAS IN, WAS NOT, WAS NOT IN
Supported functions
When used with the or operators, supports:IN NOT IN epic link
issueHistory()
linkedIssues()
votedIssues()
watchedIssues()
Examples
Find issues that belong to epic "Jupiter", where "Jupiter has the issue key
ANERDS-31:
"epic link" = ANERDS-31
or
"epic link" = Jupiter
^ top of page
Filter
You can use a saved filter to narrow your search. You can search by filter name or filter ID (i.e. the number
that JIRA automatically allocates to a saved filter).
Note:
It is safer to search by filter ID than by filter name. It is possible for a filter name to be changed, which
could break a saved filter that invokes another filter by name. Filter IDs, however, are unique and
cannot be changed.
An unnamed link statement in your typed query will override an ORDER BY statement in the saved
filter.
You cannot run or save a filter that would cause an infinite loop (i.e. you cannot reference a saved
filter if it eventually references your current filter).
Syntax
filter
Aliases
request , savedFilter , searchRequest
Field Type
Filter
Auto-complete
Yes
Supported
operators
= , !=
IN , NOT IN
Unsupported
operators
, > , >= , < , <=~ , !~
CHANGED , WAS, WAS IN, WAS NOT, WAS NOT INIS , IS NOT,
Supported
functions
None

Documentation for JIRA Service Desk 3.1
120
Created in 2016 by Atlassian. Licensed under a .Creative Commons Attribution 2.5 Australia License
Examples
Search the results of the filter "My Saved Filter" (which has an ID of 12000) for
issues assigned to the user jsmith:
filter = "My Saved Filter" and assignee = jsmith
or
filter = 12000 and assignee = jsmith
^ top of page
Fix version
Search for issues that are assigned to a particular fix version. You can search by version name or version ID
(i.e. the number that JIRA automatically allocates to a version).
Note, it is safer to search by version ID than by version name. Different projects may have versions with the
same name, so searching by version name may return issues from multiple projects. It is also possible for
your JIRA administrator to change the name of a version, which could break any saved filters that rely on that
name. Version IDs, however, are unique and cannot be changed.
Syntax
fixVersion
Field Type
VERSION
Auto-complete
Yes
Supported
operators
, > , >= , < , <== , !=
IS , IS NOT, ,WAS, WAS IN, WAS NOT, WAS NOT ININ , NOT IN,
CHANGED
Note that the comparison operators (e.g. ">") use the version order that has
been set up by your project administrator, not a numeric or alphabetic order.
Unsupported
operators
~ , !~
Supported
functions
When used with the and operators, this field supports:IN NOT IN
releasedVersions()
latestReleasedVersion()
unreleasedVersions()
earliestUnreleasedVersion()
Examples
Find issues with a Fix Version of 3.14 or 4.2:
fixVersion in ("3.14", "4.2")
(Note that full-stops are reserved , so they need to becharacters
surrounded by quote-marks.)
Find issues with a Fix Version of "Little Ted":
fixVersion = "Little Ted"
Find issues with a Fix Version ID of 10001:
fixVersion = 10001
^ top of page
Issue key
Search for issues with a particular issue key or issue ID (i.e. the number that JIRA automatically allocates to
an issue).
Syntax
issueKey
Aliases
id , issue , key

Documentation for JIRA Service Desk 3.1
121
Created in 2016 by Atlassian. Licensed under a .Creative Commons Attribution 2.5 Australia License
Field Type
ISSUE
Auto-complete
No
Supported operators
, > , >= , < , <== , !=
IS , IS NOT, IN , NOT IN
Unsupported operators
~ , !~
, CHANGED WAS, WAS IN, WAS NOT, WAS NOT IN
Supported functions
When used with the or operators, supports:IN NOT IN issueKey
issueHistory()
linkedIssues()
votedIssues()
watchedIssues()
Examples
Find the issue with key "ABC-123":
issueKey = ABC-123
^ top of page
Labels
Search for issues tagged with a label or list of labels. You can also search for issues without any labels to
easily identify which issues need to be tagged so they show up in the relevant sprints, queues or reports.
Syntax
labels
Field Type
LABEL
Auto-complete
Yes
Supported
operators
= , !=, IS, IS NOT, IN, NOT IN
We recommend using IS or IS NOT to search for a single label, and IN or NOT IN to
search for a list of labels.
Unsupported
operators
~ , !~ , , > , >= , < , <=
WAS, WAS IN, WAS NOT, WAS NOT IN, CHANGED
Supported
functions
None
Examples
Find issues with an existing label:
labels = "x"
Find issues without a specified label, including issues without a label:
labels not in ("x") or labels is EMPTY
Last viewed
Search for issues that were last viewed on, before, or after a particular date (or date range). Note that if a
time-component is not specified, midnight will be assumed. Please note that the search results will be relative
to your configured time zone (which is by default the JIRA server's time zone).
Use one of the following formats:
"yyyy/MM/dd HH:mm"
"yyyy-MM-dd HH:mm"
"yyyy/MM/dd"
"yyyy-MM-dd"
Or use (weeks), (days), (hours) or (minutes) to specify a date relative to the current time."w" "d" "h" "m"

Documentation for JIRA Service Desk 3.1
122
Created in 2016 by Atlassian. Licensed under a .Creative Commons Attribution 2.5 Australia License
The default is (minutes). Be sure to use quote-marks ( ); if you omit the quote-marks, the number you"m" "
supply will be interpreted as milliseconds after epoch (1970-1-1).
Syntax
lastViewed
Field Type
DATE
Auto-complete
No
Supported
operators
, > , >= , < , <== , !=
IS , IS NOT, IN , NOT IN
Unsupported
operators
~ , !~
, CHANGED WAS, WAS IN, WAS NOT, WAS NOT IN
Supported
functions
When used with the , , , EQUALS NOT EQUALS GREATER THAN GREATER THAN
, or operators, this field supports:EQUALS LESS THAN LESS THAN EQUALS
currentLogin()
lastLogin()
now()
startOfDay()
startOfWeek()
startOfMonth()
startOfYear()
endOfDay()
endOfWeek()
endOfMonth()
endOfYear()
Examples
Find all issues last viewed before 12th December 2010:
lastViewed < "2010/12/12"
Find all issues last viewed on or before 12th December 2010:
lastViewed <= "2010/12/13"
Find all issues last viewed on 12th December 2010 before 2:00pm:
lastViewed > "2010/12/12" and created < "2010/12/12 14:00"
Find issues last viewed less than one day ago:
lastViewed > "-1d"
Find issues last viewed in January 2011:
lastViewed > "2011/01/01" and created < "2011/02/01"
Find issues last viewed on 15 January 2011:
lastViewed > "2011/01/15" and created < "2011/01/16"
^ top of page
Level
Only available if issue level security has been enabled by your JIRA administrator.
Search for issues with a particular security level. You can search by issue level security name or issue level
security ID (i.e. the number that JIRA automatically allocates to an issue level security).
Note, it is safer to search by security level ID than by security level name. It is possible for your JIRA
administrator to change the name of a security level, which could break any saved filter that rely on that
name. Security level IDs, however, are unique and cannot be changed.
Syntax
level
Field Type
SECURITY LEVEL
Auto-complete
Yes

Documentation for JIRA Service Desk 3.1
123
Created in 2016 by Atlassian. Licensed under a .Creative Commons Attribution 2.5 Australia License
Supported operators
= , !=
IS , IS NOT, IN , NOT IN
Unsupported operators
> , >= , < , <= , ~ , !~
, CHANGED WAS, WAS IN, WAS NOT, WAS NOT IN
Supported functions
None
Examples
Search for issues with a security level of "Really High" or "level1":
level in ("Really High", level1)
Search for issues with a ID of 123:security level
level = 123
^ top of page
Original estimate
Only available if time-tracking has been enabled by your JIRA administrator.
Search for issues where the original estimate is set to a particular value (i.e. a number, not a date or date
range). Use "w", "d", "h" and "m" to specify weeks, days, hours, or minutes.
Syntax
originalEstimate
Alias
timeOriginalEstimate
Field Type
DURATION
Auto-complete
No
Supported operators
, = , != > , >= , < , <=
IS , IS NOT, IN , NOT IN
Unsupported operators
~ , !~
, CHANGED WAS, WAS IN, WAS NOT, WAS NOT IN
Supported functions
None
Examples
Find issues with an original estimate of 1 hour:
originalEstimate = 1h
Find issues with an original estimate of more than 2 days:
originalEstimate > 2d
^ top of page
Parent
Only available if sub-tasks have been enabled by your JIRA administrator.
Search for all sub-tasks of a particular issue. You can search by issue key or by issue ID (i.e. the number that
JIRA automatically allocates to an Issue).
Syntax
parent
Field Type
ISSUE
Auto-complete
No
Supported operators
= , !=
IN , NOT IN

Documentation for JIRA Service Desk 3.1
124
Created in 2016 by Atlassian. Licensed under a .Creative Commons Attribution 2.5 Australia License
Unsupported operators
> , >= , < , <= , ~ , !~
, CHANGED WAS, WAS IN, WAS NOT, WAS NOT INIS , IS NOT,
Supported functions
None
Examples
Find issues that are sub-tasks of issue TEST-1234:
parent = TEST-1234
^ top of page
Priority
Search for issues with a particular priority. You can search by priority name or priority ID (i.e. the number that
JIRA automatically allocates to a priority).
Note, it is safer to search by priority ID than by priority name. It is possible for your JIRA administrator to
change the name of a priority, which could break any saved filter that rely on that name. Priority IDs,
however, are unique and cannot be changed.
Syntax
priority
Field Type
PRIORITY
Auto-complete
Yes
Supported
operators
= , != , > , >= , < , <=
IS , IS NOT, IN , NOT IN , WAS, WAS IN, WAS NOT, WAS NOT IN
, CHANGED
Unsupported
operators
~ , !~
Supported
functions
None
Examples
Find issues with a priority of "High":
priority = High
Find issues with a priority ID of 10000:
priority = 10000
^ top of page
Project
Search for issues that belong to a particular project. You can search by project name, by project key or by
project ID (i.e. the number that JIRA automatically allocates to a project). In the rare case where there is a
project whose project key is the same as another project's name, then the project key takes preference and
hides results from the second project.
Syntax
project
Field Type
PROJECT
Auto-complete
Yes
Supported operators
= , !=
IN , NOT INIS , IS NOT,
Unsupported operators
> , >= , < , <= , ~ , !~
, CHANGED WAS, WAS IN, WAS NOT, WAS NOT IN

Documentation for JIRA Service Desk 3.1
125
Created in 2016 by Atlassian. Licensed under a .Creative Commons Attribution 2.5 Australia License
Supported functions
When used with the and operators, supports:IN NOT IN project
projectsLeadByUser()
projectsWhereUserHasPermission()
projectsWhereUserHasRole()
Examples
Find issues that belong to the Project that has the name "ABC Project":
project = "ABC Project"
Find issues that belong to the project that has the key "ABC":
project = "ABC"
Find issues that belong to the project that has the ID "1234":
project = 1234
^ top of page
Remaining estimate
Only available if time-tracking has been enabled by your JIRA administrator.
Search for issues where the remaining estimate is set to a particular value (i.e. a number, not a date or date
range). Use "w", "d", "h" and "m" to specify weeks, days, hours, or minutes.
Syntax
remainingEstimate
Alias
timeEstimate
Field Type
DURATION
Auto-complete
No
Supported operators
= , != , > , >= , < , <=
IN , NOT INIS , IS NOT,
Unsupported operators
~ , !~
, CHANGED WAS, WAS IN, WAS NOT, WAS NOT IN
Supported functions
None
Examples
Find issues with a remaining estimate of more than 4 hours:
remainingEstimate > 4h
^ top of page
Reporter
Search for issues that were reported by a particular user. This may be the same as the creator, but can be
distinct. You can search by the user's full name, ID, or email address.
Syntax
reporter
Field Type
USER
Auto-complete
Yes
Supported
operators
= , !=
IN , NOT IN , IS , IS NOT, WAS, WAS IN, WAS NOT, WAS NOT IN ,
CHANGED
Unsupported
operators
~ , !~ , > , >= , < , <=

Documentation for JIRA Service Desk 3.1
126
Created in 2016 by Atlassian. Licensed under a .Creative Commons Attribution 2.5 Australia License
Supported
functions
When used with the IN and NOT IN operators, this field supports:
membersOf()
When used with the and operators, this field supports:EQUALS NOT EQUALS
currentUser()
Examples
Search for issues that were reported by Jill Jones:
reporter = "Jill Jones"
or
reporter = jjones
Search for issues that were reported by the user with email address "bob@myco
mpany.com":
reporter = "[email protected]"
(Note that full-stops and "@" symbols are reserved characters, so the email address needs to be
surrounded by quote-marks.)
^ top of page
Resolution
Search for issues that have a particular resolution. You can search by resolution name or resolution ID (i.e.
the number that JIRA automatically allocates to a resolution).
Note, it is safer to search by resolution ID than by resolution name. It is possible for your JIRA administrator
to change the name of a resolution, which could break any saved filter that rely on that name. Resolution IDs,
however, are unique and cannot be changed.
Syntax
resolution
Field Type
RESOLUTION
Auto-complete
Yes
Supported
operators
= , != , > , >= , < , <=
IN , NOT IN , IS , IS NOT, WAS, WAS IN, WAS NOT, WAS NOT IN
, CHANGED
Unsupported
operators
~ , !~
Supported
functions
None
Examples
Find issues with a resolution of "Cannot Reproduce" or "Won't Fix":
resolution in ("Cannot Reproduce", "Won't Fix")
Find issues with a resolution ID of 5:
resolution = 5
Find issues that do not have a resolution:
resolution = unresolved
^ top of page
Resolved
Search for issues that were resolved on, before, or after a particular date (or date range). Note that if a
time-component is not specified, midnight will be assumed. Please note that the search results will be relative
to your configured time zone (which is by default the JIRA server's time zone).
Use one of the following formats:
"yyyy/MM/dd HH:mm"

Documentation for JIRA Service Desk 3.1
127
Created in 2016 by Atlassian. Licensed under a .Creative Commons Attribution 2.5 Australia License
"yyyy-MM-dd HH:mm"
"yyyy/MM/dd"
"yyyy-MM-dd"
Or use (weeks), (days), (hours) or (minutes) to specify a date relative to the current time."w" "d" "h" "m"
The default is (minutes). Be sure to use quote-marks ( ); if you omit the quote-marks, the number you"m" "
supply will be interpreted as milliseconds after epoch (1970-1-1).
Syntax
resolved
Alias
resolutionDate
Field Type
DATE
Auto-complete
No
Supported
operators
= , != , > , >= , < , <=
IN , NOT INIS , IS NOT,
Unsupported
operators
~ , !~
WAS, WAS IN, WAS NOT, WAS NOT IN , CHANGED
Supported
functions
When used with the EQUALS, NOT EQUALS, GREATER THAN, GREATER THAN
EQUALS, LESS THAN or LESS THAN EQUALS operators, this field supports:
currentLogin()
lastLogin()
now()
startOfDay()
startOfWeek()
startOfMonth()
startOfYear()
endOfDay()
endOfWeek()
endOfMonth()
endOfYear()
Examples
Find all issues that were resolved before 31st December 2010:
resolved <= "2010/12/31"
Find all issues that were resolved before 2.00pm on 31st December 2010:
resolved < "2010/12/31 14:00"
Find all issues that were resolved on or before 31st December 2010:
resolved <= "2011/01/01"
Find issues that were resolved in January 2011:
resolved > "2011/01/01" and resolved < "2011/02/01"
Find issues that were resolved on 15 January 2011:
resolved > "2011/01/15" and resolved < "2011/01/16"
Find issues that were resolved in the last hour:
resolved > -1h
^ top of page
Sprint
Search for issues that are assigned to a particular sprint. This works for active sprints and future sprints. The
search is based on either the sprint name or the sprint ID (i.e. the number that JIRA automatically allocates to
a sprint).
If you have multiple sprints with similar (or identical) names, you can simply search by using the sprint name
— or even just part of it. The possible matches will be shown in the autocomplete drop-down, with the sprint
dates shown to help you distinguish between them. (The sprint ID will also be shown, in brackets).

Documentation for JIRA Service Desk 3.1
128
Created in 2016 by Atlassian. Licensed under a .Creative Commons Attribution 2.5 Australia License
Syntax
sprint
Field Type
NUMBER
Auto-complete
Yes
Supported operators
= , !=
IN , NOT INIS , IS NOT,
Unsupported
operators
> , >= , < , <=~ , !~ ,
WAS, WAS IN, WAS NOT, WAS NOT IN , CHANGED
Supported functions
openSprints()
closedSprints()
Examples
Find issues that belong to sprint 999:
sprint = 999
Find issues that belong to sprint "February 1":
sprint = "February 1"
Find issues that belong to either "February 1", "February 2" or "February 3":
sprint in ("February 1","February 2","February 3")
Find issues that are assigned to a sprint:
sprint is not empty
^ top of page
Status
Search for issues that have a particular status. You can search by status name or status ID (i.e. the number
that JIRA automatically allocates to a status).
Note:
It is safer to search by status ID than status name. It is possible for your JIRA administrator to change
the name of a status, which could break any saved filter that rely on that name. Status IDs, however,
are unique and cannot be changed.
The WAS, WAS NOT, WAS IN and WAS NOT IN operators can only be used with the name, not the
ID.
Syntax
status
Field Type
STATUS
Auto-complete
Yes
Supported
operators
= , !=
IN , NOT IN , IS , IS NOT, WAS, WAS IN, WAS NOT, WAS NOT IN
, CHANGED
Unsupported
operators
> , >= , < , <= ~ , !~ ,
Supported
functions
None
Examples
Find issues with a status of "Open":
status = Open
Find issues with a status ID of 1:
status = 1
Find issues that currently have, or previously had, a status of "Open":
status WAS Open

Documentation for JIRA Service Desk 3.1
129
Created in 2016 by Atlassian. Licensed under a .Creative Commons Attribution 2.5 Australia License
^ top of page
Summary
Search for issues where the summary contains particular text. can be used.JIRA text-search syntax
Syntax
summary
Field Type
TEXT
Auto-complete
No
Supported
operators
~ , !~
IS , IS NOT
Unsupported
operators
> , >= , < , <= = , != ,
IN , NOT IN , WAS, WAS IN, WAS NOT, WAS NOT IN , CHANGED
Supported
functions
None
Examples
Find issues where the summary contains text that matches "Error saving file"
(i.e. a "fuzzy" match):
summary ~ "Error saving file"
Find issues where the summary contains the exact phrase "Error saving file":
summary ~ "\"Error saving file\""
^ top of page
Text
This is a "master-field" that allows you to search all text fields, i.e.:
Summary
Description
Environment
Comments
custom fields that use the "free text searcher"; this includes custom fields of the following built-in
custom field types:
Free text field (unlimited text)
Text field (< 255 characters)
Read-only text field
Notes:
The master-field can only be used with the CONTAINS operator (" " and " "). text ~ !~
JIRA text-search syntax can be used with these fields.
Syntax
text
Field Type
TEXT
Auto-complete
No
Supported
operators
~
Unsupported
operators
> , >= , < , <= = , != , !~ ,
IN , NOT IN , IS , IS NOT , WAS, WAS IN, WAS NOT, WAS NOT IN
, CHANGED

Documentation for JIRA Service Desk 3.1
130
Created in 2016 by Atlassian. Licensed under a .Creative Commons Attribution 2.5 Australia License
Supported
functions
None
Examples
Find issues where a text field matches the word "Fred":
text ~ "Fred"
or
text ~ Fred
Find all issues where a text field contains the exact phrase "full screen":
text ~ "\"full screen\""
^ top of page
Time spent
Only available if time-tracking has been enabled by your JIRA administrator.
Search for issues where the time spent is set to a particular value (i.e. a number, not a date or date
range). Use "w", "d", "h" and "m" to specify weeks, days, hours, or minutes.
Syntax
timeSpent
Field Type
DURATION
Auto-complete
No
Supported operators
= , != , > , >= , < , <=
IN , NOT INIS , IS NOT ,
Unsupported operators
~ , !~
WAS, WAS IN, WAS NOT, WAS NOT IN , CHANGED
Supported functions
None
Examples
Find issues where the time spent is more than 5 days:
timeSpent > 5d
^ top of page
Type
Search for issues that have a particular issue type. You can search by issue type name or issue type ID (i.e.
the number that JIRA automatically allocates to an issue type).
Note, it is safer to search by type ID than type name. It is possible for your JIRA administrator to change the
name of a type, which could break any saved filter that rely on that name. Type IDs, however, are unique and
cannot be changed.
Syntax
type
Alias
issueType
Field Type
ISSUE_TYPE
Auto-complete
Yes
Supported operators
= , !=
IN , NOT INIS , IS NOT ,
Unsupported operators
> , >= , < , <=~ , !~ ,
WAS, WAS IN, WAS NOT, WAS NOT IN , CHANGED

Documentation for JIRA Service Desk 3.1
131
Created in 2016 by Atlassian. Licensed under a .Creative Commons Attribution 2.5 Australia License
Supported functions
None
Examples
Find issues with an issue type of "Bug":
type = Bug
Find issues with an issue typeof "Bug" or "Improvement":
issueType in (Bug,Improvement)
Find issues with an issue type ID of 2:
issueType = 2
^ top of page
Updated
Search for issues that were last updated on, before, or after a particular date (or date range). Note that if a
time-component is not specified, midnight will be assumed. Please note that the search results will be relative
to your configured time zone (which is by default the JIRA server's time zone).
Use one of the following formats:
"yyyy/MM/dd HH:mm"
"yyyy-MM-dd HH:mm"
"yyyy/MM/dd"
"yyyy-MM-dd"
Or use (weeks), (days), (hours) or (minutes) to specify a date relative to the current time."w" "d" "h" "m"
The default is (minutes). Be sure to use quote-marks ( ); if you omit the quote-marks, the number you"m" "
supply will be interpreted as milliseconds after epoch (1970-1-1).
Syntax
updated
Alias
updatedDate
Field Type
DATE
Auto-complete
No
Supported
operators
= , != , > , >= , < , <=
IN , NOT INIS , IS NOT ,
Unsupported
operators
~ , !~
WAS, WAS IN, WAS NOT, WAS NOT IN , CHANGED
Supported
functions
When used with the , EQUALS NOT EQUALS, GREATER THAN, GREATER
THAN EQUALS,
or operators, this field supports:LESS THAN LESS THAN EQUALS
currentLogin()
lastLogin()
now()
startOfDay()
startOfWeek()
startOfMonth()
startOfYear()
endOfDay()
endOfWeek()
endOfMonth()
endOfYear()

Documentation for JIRA Service Desk 3.1
132
Created in 2016 by Atlassian. Licensed under a .Creative Commons Attribution 2.5 Australia License
Examples
Find issues that were last updated before 12th December 2010:
updated < "2010/12/12"
Find issues that were last updated on or before 12th December 2010:
updated < "2010/12/13"
Find all issues that were last updated before 2.00pm on 31st December 2010:
updated < "2010/12/31 14:00"
Find issues that were last updated more than two weeks ago:
updated < "-2w"
Find issues that were last updated on 15 January 2011:
updated > "2011/01/15" and updated < "2011/01/16"
Find issues that were last updated in January 2011:
updated > "20011/01/01" and updated < "2011/02/01"
^ top of page
Voter
Search for issues for which a particular user has voted. You can search by the user's full name, ID, or email
address. Note that you can only find issues for which you have the "View Voters and Watchers" permission,
unless you are searching for your own votes. See also .votedIssues
Syntax
voter
Field Type
USER
Auto-complete
Yes
Supported operators
= , !=
IN , NOT INIS , IS NOT ,
Unsupported
operators
~ , !~ , > , >= , < , <=
WAS, WAS IN, WAS NOT, WAS NOT IN , CHANGED
Supported functions
When used with the and operators, this field supports:IN NOT IN
membersOf()
When used with the and operators, this field supports:EQUALS NOT EQUALS
currentUser()
Examples
Search for issues that you have voted for:
voter = currentUser()
Search for issues that the user "jsmith" has voted for:
voter = "jsmith"
Search for issues for which a member of the group "jira-administrators" has
voted:
voter in membersOf("jira-administrators")
^ top of page
Votes
Search for issues with a specified number of votes.
Syntax
votes
Field Type
NUMBER
Auto-complete
No

Documentation for JIRA Service Desk 3.1
133
Created in 2016 by Atlassian. Licensed under a .Creative Commons Attribution 2.5 Australia License
Supported operators
= , != , > , >= , < , <=
IN , NOT IN
Unsupported operators
~ , !~
WAS, WAS IN, WAS NOT, WAS NOT IN , CHANGEDIS , IS NOT ,
Supported functions
None
Examples
Find all issues that have 12 or more votes:
votes >= 12
^ top of page
Watcher
Search for issues that a particular user is watching. You can search by the user's full name, ID, or email
address. Note that you can only find issues for which you have the "View Voters and Watchers" permission,
unless you are searching for issues where you are the watcher. See also .watchedIssues
Syntax
watcher
Field Type
USER
Auto-complete
Yes
Supported
operators
= , !=
IN , NOT INIS , IS NOT ,
Unsupported
operators
~ , !~ , > , >= , < , <=
WAS, WAS IN, WAS NOT, WAS NOT IN , CHANGED
Supported functions
When used with the and operators, this field supports:IN NOT IN
membersOf()
When used with the and operators, this field supports:EQUALS NOT EQUALS
currentUser()
Examples
Search for issues that you are watching:
watcher = currentUser()
Search for issues that the user "jsmith" is watching:
watcher = "jsmith"
Search for issues that are being watched by a member of the group
"jira-administrators":
watcher in membersOf("jira-administrators")
^ top of page
Watchers
Search for issues with a specified number of watchers.
Syntax
watchers
Field Type
NUMBER
Auto-complete
No
Supported operators
= , != , > , >= , < , <=
IN , NOT IN

Documentation for JIRA Service Desk 3.1
134
Created in 2016 by Atlassian. Licensed under a .Creative Commons Attribution 2.5 Australia License
Unsupported
operators
~ , !~
WAS, WAS IN, WAS NOT, WAS NOT IN , CHANGEDIS , IS NOT ,
Supported functions
When used with the and operators, this field supports:IN NOT IN
membersOf()
When used with the and operators, this fieldEQUALS NOT EQUALS
supports:
currentUser()
Examples
Find all issues that are being watched by more than 3 people:
watchers > 3
^ top of page
Work ratio
Only available if time-tracking has been enabled by your JIRA administrator.
Search for issues where the work ratio has a particular value. Work ratio is calculated as follows: workRatio
= timeSpent / originalEstimate) x 100
Syntax
workRatio
Field Type
NUMBER
Auto-complete
No
Supported operators
= , != , > , >= , < , <=
IN , NOT INIS , IS NOT ,
Unsupported
operators
~ , !~
WAS, WAS IN, WAS NOT, WAS NOT IN , CHANGED
Supported functions
None
Examples
Find issues on which more than 75% of the original estimate has been
spent:
workRatio > 75
^ top of page
Advanced searching - keywords reference
This page describes information about keywords that are used for advanced
searching. See .Advanced searching
A keyword in JQL is a word or phrase that does (or is) any of the following:
joins two or more clauses together to form a complex JQL query
alters the logic of one or more clauses
alters the logic of operators
has an explicit definition in a JQL query
performs a specific function that alters the results of a JQL query
List of Keywords:
AND
OR
NOT
EMPTY
NULL
ORDER BY
AND
Used to combine multiple clauses, allowing you to refine your search.
Note that you can use parentheses to control the order in which clauses are executed.
Examples
Find all open issues in the "New office" project:

Documentation for JIRA Service Desk 3.1
135
Created in 2016 by Atlassian. Licensed under a .Creative Commons Attribution 2.5 Australia License
project = "New office" and status = "open"
Find all open, urgent issues that are assigned to jsmith:
status = open and priority = urgent and assignee = jsmith
Find all issues in a particular project that are not assigned to jsmith:
project = JRA and assignee != jsmith
Find all issues for a specific release which consists of different version numbers across several
projects:
project in (JRA,CONF) and fixVersion = "3.14"
Find all issues where neither the Reporter nor the Assignee is Jack, Jill or John:
reporter not in (Jack,Jill,John) and assignee not in (Jack,Jill,John)
^ top of page
OR
Used to combine multiple clauses, allowing you to expand your search.
Note that you can use parentheses to control the order in which clauses are executed.
(Note: also see , which can be a more convenient way to search for multiple values of a field.)IN
Examples
Find all issues that were created by either jsmith or jbrown:
reporter = jsmith or reporter = jbrown
Find all issues that are overdue or where no due date is set:
duedate < now() or duedate is empty
^ top of page
NOT
Used to negate individual clauses or a complex JQL query (a query made up of more than one clause) using
parentheses, allowing you to refine your search.
(Note: also see ("!="), ("!~"), and .)NOT EQUALS DOES NOT CONTAIN NOT IN IS NOT
Examples
Find all issues that are assigned to any user except jsmith:

Documentation for JIRA Service Desk 3.1
136
Created in 2016 by Atlassian. Licensed under a .Creative Commons Attribution 2.5 Australia License
not assignee = jsmith
Find all issues that were not created by either jsmith or jbrown:
not (reporter = jsmith or reporter = jbrown)
^ top of page
EMPTY
Used to search for issues where a given field does not have a value. See also .NULL
Note that EMPTY can only be used with fields that support the and operators. To see a field'sIS IS NOT
supported operators, check the individual reference.field
Examples
Find all issues without a DueDate:
duedate = empty
or
duedate is empty
^ top of page
NULL
Used to search for issues where a given field does not have a value. See also .EMPTY
Note that NULL can only be used with fields that support the and operators. To see a field'sIS IS NOT
supported operators, check the individual reference.field
Examples
Find all issues without a DueDate:
duedate = null
or
duedate is null
^ top of page
ORDER BY
Used to specify the fields by whose values the search results will be sorted.
By default, the field's own sorting order will be used. You can override this by specifying ascending order ("as
") or descending order (" ").c desc
Examples
Find all issues without a DueDate, sorted by CreationDate:

Documentation for JIRA Service Desk 3.1
137
Created in 2016 by Atlassian. Licensed under a .Creative Commons Attribution 2.5 Australia License
duedate = empty order by created
Find all issues without a DueDate, sorted by CreationDate, then by Priority (highest to lowest):
duedate = empty order by created, priority desc
Find all issues without a DueDate, sorted by CreationDate, then by Priority (lowest to highest):
duedate = empty order by created, priority asc
^ top of page
Advanced searching - operators reference
This page describes information about operators that are used for advanced
searching.
An operator in JQL is one or more symbols or words, which compares the
value of a on its left with one or more values (or ) on its right,field functions
such that only true results are retrieved by the clause. Some operators may
use the keyword.NOT
EQUALS: =
The " " operator is used to search for issues where the value of the=
specified field exactly matches the specified value. (Note: cannot be used
with text fields; see the operator instead.)CONTAINS
To find issues where the value of a specified field exactly matches vmultiple
alues, use multiple " " statements with the operator.= AND
Examples
Find all issues that were created by jsmith:
reporter = jsmith
Find all issues that were created by John Smith:
reporter = "John Smith"
^top of page
List of Operators:
EQUALS: =
NOT EQUALS: !=
GREATER THAN: >
GREATER THAN
EQUALS: >=
LESS THAN: <
LESS THAN
EQUALS: <=
IN
NOT IN
CONTAINS: ~
DOES NOT
CONTAIN: !~
IS
IS NOT
WAS
WAS IN
WAS NOT IN
WAS NOT
CHANGED
NOT EQUALS: !=
The " " operator is used to search for issues where the value of the specified field does not match the!=
specified value. (Note: cannot be used with text fields; see the (" ") operator instead.)DOES NOT MATCH !~
Note that typing is the same as typing , and that field != value NOT field = value field !=
is the same as .EMPTY field EMPTYIS_NOT
The " " operator will not match a field that has no value (i.e. a field that is empty). For example, != component
Ordering by or will list the returned issues first by , and only then byComponents Versions Project
the field's natural order (see ).JRA-31113

Documentation for JIRA Service Desk 3.1
138
Created in 2016 by Atlassian. Licensed under a .Creative Commons Attribution 2.5 Australia License
will only match issues that have a component the component is not "fred". To find issues that!= fred and
have a component other than "fred" , you would need to type: or have no component component != fred
.or component is empty
Examples
Find all issues that are assigned to any user except jsmith:
not assignee = jsmith
or:
assignee != jsmith
Find all issues that are not assigned to jsmith:
assignee != jsmith or assignee is empty
Find all issues that were reported by me but are not assigned to me:
reporter = currentUser() and assignee != currentUser()
Find all issues where the Reporter or Assignee is anyone except John Smith:
assignee != "John Smith" or reporter != "John Smith"
Find all issues that are not unassigned:
assignee is not empty
or
assignee != null
^top of page
GREATER THAN: >
The " " operator is used to search for issues where the value of the specified field is greater than the>
specified value.
Note that the " " operator can only be used with fields that support ordering (e.g. date fields and version>
fields), and cannot be used with text fields. To see a field's supported operators, check the individual field
reference.
Examples
Find all issues with more than 4 votes:
votes > 4
Find all overdue issues:

Documentation for JIRA Service Desk 3.1
139
Created in 2016 by Atlassian. Licensed under a .Creative Commons Attribution 2.5 Australia License
duedate < now() and resolution is empty
Find all issues where priority is higher than "Normal":
priority > normal
^top of page
GREATER THAN EQUALS: >=
The " " operator is used to search for issues where the value of the specified field is greater than or equal>=
to the specified value.
Note that the " " operator can only be used with fields that support ordering (e.g. date fields and version>=
fields), and cannot be used with text fields. To see a field's supported operators, check the individual field
reference.
Examples
Find all issues with 4 or more votes:
votes >= 4
Find all issues due on or after 31/12/2008:
duedate >= "2008/12/31"
Find all issues created in the last five days:
created >= "-5d"
^top of page
LESS THAN: <
The " " operator is used to search for issues where the value of the specified field is less than the specified<
value.
Note that the " " operator can only be used with fields which support ordering (e.g. date fields and version<
fields), and cannot be used with text fields. To see a field's supported operators, check the individual field
reference.
Examples
Find all issues with less than 4 votes:
votes < 4
^top of page
LESS THAN EQUALS: <=
The " " operator is used to search for issues where the value of the specified field is less than or equal to<=
than the specified value.
Note that the " " operator can only be used with fields which support ordering (e.g. date fields and version<=

Documentation for JIRA Service Desk 3.1
140
Created in 2016 by Atlassian. Licensed under a .Creative Commons Attribution 2.5 Australia License
fields), and cannot be used with text fields. To see a field's supported operators, check the individual field
reference.
Examples
Find all issues with 4 or fewer votes:
votes <= 4
Find all issues that have not been updated in the past month (30 days):
updated <= "-4w 2d"
^top of page
IN
The " " operator is used to search for issues where the value of the specified field is one of multipleIN
specified values. The values are specified as a comma-delimited list, surrounded by parentheses.
Using " " is equivalent to using multiple statements, but is shorter and more convenient. ThatIN (=)EQUALS
is, typing is the same as typing reporter IN (tom, jane, harry) reporter = "tom" reportOR
.er = "jane" reporter = "harry"OR
Examples
Find all issues that were created by either jsmith or jbrown or jjones:
reporter in (jsmith,jbrown,jjones)
Find all issues where the Reporter or Assignee is either Jack or Jill:
reporter in (Jack,Jill) or assignee in (Jack,Jill)
Find all issues in version 3.14 or version 4.2:
affectedVersion in ("3.14", "4.2")
^top of page
NOT IN
The " " operator is used to search for issues where the value of the specified field is not one ofNOT IN
multiple specified values.
Using " " is equivalent to using multiple statements, but is shorter and moreNOT IN (!=)NOT_EQUALS
convenient. That is, typing is the same as typing reporter NOT IN (tom, jane, harry) reporter
.!= "tom" reporter != "jane" reporter != "harry"AND AND
The " " operator will not match a field that has no value (i.e. a field that is empty). For example, NOT IN assi
will only match issues that have an assignee the assignee is not "jack"gnee not in (jack,jill) and
or "jill". To find issues that are assigned to someone other than "jack" or "jill" , you wouldor are unassigned
need to type: .assignee not in (jack,jill) or assignee is empty
Examples
Find all issues where the Assignee is someone other than Jack, Jill, or John:

Documentation for JIRA Service Desk 3.1
141
Created in 2016 by Atlassian. Licensed under a .Creative Commons Attribution 2.5 Australia License
assignee not in (Jack,Jill,John)
Find all issues where the Assignee is not Jack, Jill, or John:
assignee not in (Jack,Jill,John) or assignee is empty
Find all issues where the FixVersion is not 'A', 'B', 'C', or 'D':
FixVersion not in (A, B, C, D)
Find all issues where the FixVersion is not 'A', 'B', 'C', or 'D', or has not been specified:
FixVersion not in (A, B, C, D) or FixVersion is empty
^top of page
CONTAINS: ~
The " " operator is used to search for issues where the value of the specified field matches the specified~
value (either an exact match or a "fuzzy" match — see examples below). For use with text fields only, i.e.:
Summary
Description
Environment
Comments
custom fields that use the "Free Text Searcher"; this includes custom fields of the following
built-in Custom Field Types
Free Text Field (unlimited text)
Text Field (< 255 characters)
Read-only Text Field
The JQL field "text" as in searches an issue's Summary, Description, Environment,text ~ "some words"
Comments. It also searches all text custom fields. If you have many text custom fields you can improve
performance of your queries by searching on specific fields, e.g.
Summary ~ "some words" OR Description ~ "some words"
Note: when using the " " operator, the value on the right-hand side of the operator can be specified using ~ JIR
.A text-search syntax
Examples
Find all issues where the Summary contains the word "win" (or simple derivatives of that word, such
as "wins"):
summary ~ win
Find all issues where the Summary contains a wild-card match for the word "win":
summary ~ "win*"
Find all issues where the Summary contains the word "issue" and the word "collector":

Documentation for JIRA Service Desk 3.1
142
Created in 2016 by Atlassian. Licensed under a .Creative Commons Attribution 2.5 Australia License
summary ~ "issue collector"
Find all issues where the Summary contains the exact phrase "full screen" (see Search syntax for text
for details on how to escape quote-marks and other special characters):fields
summary ~ "\"full screen\""
^top of page
DOES NOT CONTAIN: !~
The " " operator is used to search for issues where the value of the specified field is not a "fuzzy" match for!~
the specified value. For use with text fields only, i.e.:
Summary
Description
Environment
Comments
custom fields that use the "Free Text Searcher"; this includes custom fields of the following
built-in Custom Field Types
Free Text Field (unlimited text)
Text Field (< 255 characters)
Read-only Text Field
The JQL field "text" as in searches an issue's Summary, Description, Environment,text ~ "some words"
Comments. It also searches all text custom fields. If you have many text custom fields you can improve
performance of your queries by searching on specific fields, e.g.
Summary ~ "some words" OR Description ~ "some words"
Note: when using the " " operator, the value on the right-hand side of the operator can be specified using !~ JI
.RA text-search syntax
Examples
Find all issues where the Summary does not contain the word "run" (or derivatives of that word, such
as "running" or "ran"):
summary !~ run
^top of page
IS
The " " operator can only be used with or . That is, it is used to search for issues where theIS EMPTY NULL
specified field has no value.
Note that not all fields are compatible with this operator; see the individual field reference for details.
Examples
Find all issues that have no Fix Version:
fixVersion is empty
or
fixVersion is null
Documentation for JIRA Service Desk 3.1
143
Created in 2016 by Atlassian. Licensed under a .Creative Commons Attribution 2.5 Australia License
^top of page
IS NOT
The " " operator can only be used with or . That is, it is used to search for issues whereIS NOT EMPTY NULL
the specified field has a value.
Note that not all fields are compatible with this operator; see the individual field reference for details.
Examples
Find all issues that have one or more votes:
votes is not empty
or
votes is not null
^top of page
WAS
The " " operator is used to find issues that currently have or previously had the specified value for theWAS
specified field.
This operator has the following optional predicates:
AFTER "date"
BEFORE "date"
BY "username"
DURING ("date1","date2")
ON "date"
This operator will match the value name (e.g. "Resolved"), which was configured in your system at the time
. This operator will also match the value ID associated with that value name too —that the field was changed
that is, it will match "4" as well as "Resolved".
(Note: This operator can be used with the Assignee, Fix Version, Priority, Reporter, Resolution,
and Status fields only.)
Examples
Find issues that currently have or previously had a status of 'In Progress':
status WAS "In Progress"
Find issues that were resolved by Joe Smith before 2nd February:
status WAS "Resolved" BY jsmith BEFORE "2011/02/02"
Find issues that were resolved by Joe Smith during 2010:
status WAS "Resolved" BY jsmith DURING ("2010/01/01","2011/01/01")
^top of page
WAS IN
The " " operator is used to find issues that currently have or previously had any of multiple specifiedWAS IN

Documentation for JIRA Service Desk 3.1
144
Created in 2016 by Atlassian. Licensed under a .Creative Commons Attribution 2.5 Australia License
values for the specified field. The values are specified as a comma-delimited list, surrounded by parentheses.
Using " " is equivalent to using multiple statements, but is shorter and more convenient. That is,WAS IN WAS
typing is the same as typing status WAS IN ('Resolved', 'Closed') status WAS "Resolved" O
. status WAS "Closed"R
This operator has the following optional predicates:
AFTER "date"
BEFORE "date"
BY "username"
DURING ("date1","date2")
ON "date"
This operator will match the value name (e.g. "Resolved"), which was configured in your system at the time
. This operator will also match the value ID associated with that value name too —that the field was changed
that is, it will match "4" as well as "Resolved".
(Note: This operator can be used with the Assignee, Fix Version, Priority, Reporter, Resolution,
and Status fields only.)
Examples
Find all issues that currently have, or previously had, a status of 'Resolved' or 'In Progress':
status WAS IN ("Resolved","In Progress")
^top of page
WAS NOT IN
The " " operator is used to search for issues where the value of the specified field has neverWAS NOT IN
been one of multiple specified values.
Using " " is equivalent to using multiple statements, but is shorter and moreWAS NOT IN WAS_NOT
convenient. That is, typing is the same as typing status WAS NOT IN ("Resolved","In Progress")
.status WAS NOT "Resolved" status WAS NOT "In Progress"AND
This operator has the following optional predicates:
AFTER "date"
BEFORE "date"
BY "username"
DURING ("date1","date2")
ON "date"
This operator will match the value name (e.g. "Resolved"), which was configured in your system at the time
. This operator will also match the value ID associated with that value name, too —that the field was changed
that is, it will match "4" as well as "Resolved".
(Note: This operator can be used with the Assignee, Fix Version, Priority, Reporter, Resolution,
and Status fields only.)
Examples
Find issues that have never had a status of 'Resolved' or 'In Progress':
status WAS NOT IN ("Resolved","In Progress")
Find issues that did not have a status of 'Resolved' or 'In Progress' before 2nd February:
status WAS NOT IN ("Resolved","In Progress") BEFORE "2011/02/02"
^top of page

Documentation for JIRA Service Desk 3.1
145
Created in 2016 by Atlassian. Licensed under a .Creative Commons Attribution 2.5 Australia License
WAS NOT
The " " operator is used to find issues that have never had the specified value for the specified field.WAS NOT
This operator has the following optional predicates:
AFTER "date"
BEFORE "date"
BY "username"
DURING ("date1","date2")
ON "date"
This operator will match the value name (e.g. "Resolved"), which was configured in your system at the time
. This operator will also match the value ID associated with that value name too —that the field was changed
that is, it will match "4" as well as "Resolved".
(Note: This operator can be used with the Assignee, Fix Version, Priority, Reporter, Resolution,
and Status fields only.)
Examples
Find issues that do not have, and have never had a status of 'In Progress':
status WAS NOT "In Progress"
Find issues that did not have a status of 'In Progress' before 2nd February:
status WAS NOT "In Progress" BEFORE "2011/02/02"
^top of page
CHANGED
The " " operator is used to find issues that have a value that had changed for the specified field.CHANGED
This operator has the following optional predicates:
AFTER "date"
BEFORE "date"
BY "username"
DURING ("date1","date2")
ON "date"
FROM "oldvalue"
TO "newvalue"
(Note: This operator can be used with the Assignee, Fix Version, Priority, Reporter, Resolution,
and Status fields only.)
Examples
Find issues whose assignee had changed:
assignee CHANGED
Find issues whose status had changed from 'In Progress' back to 'Open':
status CHANGED FROM "In Progress" TO "Open"

Documentation for JIRA Service Desk 3.1
146
Created in 2016 by Atlassian. Licensed under a .Creative Commons Attribution 2.5 Australia License
Find issues whose priority was changed by user 'freddo' after the start and before the end of the
current week.
priority CHANGED BY freddo BEFORE endOfWeek() AFTER startOfWeek()
^top of page
Advanced searching - functions reference
This page describes information about functions that are used for advanced
searching.
A function in JQL appears as a word followed by parentheses, which may
contain one or more explicit values or JIRA fields. In a clause, a function is
preceded by an , which in turn is preceded by a . A functionoperator field
performs a calculation on either specific JIRA data or the function's content
in parentheses, such that only true results are retrieved by the function, and
then again by the clause in which the function is used.
cascadeOption()
Search for issues that match the selected values of a 'cascading select'
custom field.
The parameter matches against the first tier of options in theparentOption
cascading select field. The parameter matches against thechildOption
second tier of options in the cascading select field, and is optional.
The keyword can be used to search for issues where either or both"none"
of the options have no value.
Syntax
cascadeOption(parentOption
)
cascadeOption(parentOption
,childOption)
Supported fields
Custom fields of type 'Cascading
Select'
Supported operators
IN , NOT IN
Unsupported operators
= , != , ~ , !~ , > , >= ,
< , <= IS , IS NOT, WAS ,
WAS IN , WAS NOT , WAS NOT
IN , CHANGED
List of functions:
cascadeOption()
closedSprints()
componentsLeadByU
ser()
currentLogin()
currentUser()
earliestUnreleasedVer
sion()
endOfDay()
endOfMonth()
endOfWeek()
endOfYear()
issueHistory()
issuesWithRemoteLin
ksByGlobalId()
lastLogin()
latestReleasedVersio
n()
linkedIssues()
membersOf()
now()
openSprints()
projectsLeadByUser()
projectsWhereUserHa
sPermission()
projectsWhereUserHa
sRole()
releasedVersions()
standardIssueTypes()
startOfDay()
startOfMonth()
startOfWeek()
startOfYear()
subtaskIssueTypes()
unreleasedVersions()
votedIssues()
watchedIssues()
Unless specified in the search query, note that JQL searches do not
return empty fields in results. To include empty fields (e.g.
unassigned issues) when searching for issues that are not assigned
to the current user, you would enter (assignee != currentUser() OR
assignee is EMPTY) to include unassigned issues in the list of
results.

Documentation for JIRA Service Desk 3.1
147
Created in 2016 by Atlassian. Licensed under a .Creative Commons Attribution 2.5 Australia License
Examples
Find issues where a custom
field ("Location") has the value
"USA" for the first tier and "New
York" for the second tier:
location in
cascadeOption("USA","Ne
w York")
Find issues where a custom
field ("Location") has the value
"USA" for the first tier and any
value (or no value) for the
second tier:
location in
cascadeOption( "USA" )
Find issues where a custom
field ("Location") has the value
"USA" for the first tier and no
value for the second tier:
location in
cascadeOption( "USA" ,no
ne)
Find issues where a custom
field ("Location") has no value
for the first tier and no value for
the second tier:
location in
cascadeOption(none)
Find issues where a custom
field ("Referrer") has the value
"none" for the first tier and
"none" for the second tier:
referrer in
cascadeOption( "\"none\"
" , "\"none\"" )
Find issues where a custom
field ("Referrer") has the value
"none" for the first tier and no
value for the second tier:
referrer in
cascadeOption( "\"none\"
" ,none)
^ top of page
closedSprints()
Search for issues that are assigned to a completed . Note, it is possible for an issue to belong to both aSprint
completed Sprint(s) and an incomplete Sprint(s). See also ().openSprints
Syntax
closedSprints()
Supported fields
Sprint
Supported operators
IN , NOT IN
Unsupported
operators
= , != , ~ , !~ , > , >= , < , <=
IS , IS NOT, WAS , WAS IN , WAS NOT , WAS NOT IN , CHANGED
Examples
Find all issues that are assigned to a completed sprint:
sprint in closedSprints()

Documentation for JIRA Service Desk 3.1
148
Created in 2016 by Atlassian. Licensed under a .Creative Commons Attribution 2.5 Australia License
^ top of page
componentsLeadByUser()
Find issues in components that are led by a specific user. You can optionally specify a user, or if the user is
omitted, the current user (i.e. you) will be used. Note that if you are not logged in to JIRA, a user must be
specified.
Syntax
componentsLeadByUser()
componentsLeadByUser(username)
Supported
fields
Component
Supported
operators
IN , NOT IN
Unsupported
operators
= , != , ~ , !~ , > , >= , < , <= IS , IS NOT, WAS , WAS IN ,
WAS NOT , WAS NOT IN , CHANGED
Examples
Find open issues in components that are led by you:
component in componentsLeadByUser() AND status = Open
Find open issues in components that are led by Bill:
component in componentsLeadByUser(bill) AND status = Open
^ top of page
currentLogin()
Perform searches based on the time at which the current user's session began. See also .lastLogin
Syntax
currentLogin()
Supported fields
Created, Due, Resolved, Updated, custom fields of type Date/Time
Supported operators
= , != , > , >= , < , <=
WAS* , WAS IN* , WAS NOT* , WAS NOT IN* , CHANGED*
* Only in predicate
Unsupported operators
~ , !~ IS , IS NOT , IN , NOT IN
Examples
Find issues that have been created during my current session:
created > currentLogin()
^ top of page
currentUser()
Perform searches based on the currently logged-in user. Note, this function can only be used by logged-in
users. So if you are creating a saved filter that you expect to be used by anonymous users, do not use this
function.
Syntax
currentUser()
Supported
fields
Assignee, Reporter, Voter, Watcher, custom fields of type User
Supported
operators
= , !=

Documentation for JIRA Service Desk 3.1
149
Created in 2016 by Atlassian. Licensed under a .Creative Commons Attribution 2.5 Australia License
Unsupported
operators
~ , !~ , > , >= , < , <= IS , IS NOT , IN , NOT IN , WAS , WAS IN
, WAS NOT , WAS NOT IN , CHANGED
Examples
Find issues that are assigned to me:
assignee = currentUser()
Find issues that were reported to me but are not assigned to me:
reporter = currentUser() AND (assignee != currentUser() OR
assignee is EMPTY)
^ top of page
earliestUnreleasedVersion()
Perform searches based on the earliest unreleased version (i.e. next version that is due to be released) of a
specified project. See also . Note, the "earliest" is determined by the ordering assigned tounreleasedVersions
the versions, not by actual Version Due Dates.
Syntax
earliestUnreleasedVersion(project)
Supported
fields
AffectedVersion, FixVersion, custom fields of type Version
Supported
operators
IN , NOT IN
Unsupported
operators
~ , !~ , = , != , > , >= , < , <= , IS , IS NOT WAS , WAS IN ,
WAS NOT , WAS NOT IN , CHANGED
Examples
Find issues whose FixVersion is the earliest unreleased version of the ABC project:
fixVersion = earliestUnreleasedVersion(ABC)
Find issues that relate to the earlist unreleased version of the ABC project:
affectedVersion = earliestUnreleasedVersion(ABC) or fixVersion
= earliestUnreleasedVersion(ABC)
^ top of page
endOfDay()
Perform searches based on the end of the current day. See also , , and ;endOfWeek endOfMonth endOfYear
and , , , and .startOfDay startOfWeek startOfMonth startOfYear
Syntax
endOfDay()
endOfDay("inc")
where is an optional increment of If the time unit qualifier is omitted, itinc (+/-)nn(y|M|w|d|h|m).
defaults to the natural period of the function, e.g. endOfDay("+1") is the same as endOfDay("+1d"). If the
plus/minus (+/-) sign is omitted, plus is assumed.
Supported
fields
Created, Due, Resolved, Updated, custom fields of type Date/Time
Supported
operators
= , != , > , >= , < , <=
WAS* , WAS IN* , WAS NOT* , WAS NOT IN* , CHANGED*
* Only in predicate
Unsupported
operators
~ , !~ IN , NOT INIS , IS NOT ,

Documentation for JIRA Service Desk 3.1
150
Created in 2016 by Atlassian. Licensed under a .Creative Commons Attribution 2.5 Australia License
Examples
Find issues due by the end of today:
due < endOfDay()
Find issues due by the end of tomorrow:
due < endOfDay("+1")
^ top of page
endOfMonth()
Perform searches based on the end of the current month. See also , , and ;endOfDay endOfWeek endOfYear
and , , , and .startOfDay startOfWeek startOfMonth startOfYear
Syntax
endOfMonth()
endOfMonth("inc")
where is an optional increment of If the time unit qualifier is omitted, itinc (+/-)nn(y|M|w|d|h|m).
defaults to the natural period of the function, e.g. endOfMonth("+1") is the same as endOfMonth("+1M"). If
the plus/minus (+/-) sign is omitted, plus is assumed.
Supported
fields
Created, Due, Resolved, Updated, custom fields of type Date/Time
Supported
operators
= , != , > , >= , < , <=
WAS* , WAS IN* , WAS NOT* , WAS NOT IN* , CHANGED*
* Only in predicate
Unsupported
operators
~ , !~ IN , NOT INIS , IS NOT ,
Examples
Find issues due by the end of this month:
due < endOfMonth()
Find issues due by the end of next month:
due < endOfMonth("+1")
Find issues due by the 15th of next month:
due < endOfMonth("+15d")
^ top of page
endOfWeek()
Perform searches based on the end of the current week. See also , , and ;endOfDay endOfMonth endOfYear
and , , , and .startOfDay startOfWeek startOfMonth startOfYear
For the endOfWeek() function, the result depends upon your locale. For example, in Europe, the first day of
the week is generally considered to be Monday, while in the USA, it is considered to be Sunday.
Syntax
endOfWeek()
endOfWeek("inc")
where is an optional increment of If the time unit qualifier is omitted, itinc (+/-)nn(y|M|w|d|h|m).
defaults to the natural period of the function, e.g. endOfWeek("+1") is the same as endOfWeek("+1w"). If the
plus/minus (+/-) sign is omitted, plus is assumed.
Supported
fields
Created, Due, Resolved, Updated, custom fields of type Date/Time
Supported
operators
= , != , > , >= , < , <=
WAS* , WAS IN* , WAS NOT* , WAS NOT IN* , CHANGED*
* Only in predicate

Documentation for JIRA Service Desk 3.1
151
Created in 2016 by Atlassian. Licensed under a .Creative Commons Attribution 2.5 Australia License
Unsupported
operators
~ , !~ IN , NOT INIS , IS NOT ,
Examples
Find issues due by the end of this week:
due < endOfWeek()
Find issues due by the end of next week:
due < endOfWeek("+1")
^ top of page
endOfYear()
Perform searches based on the end of the current year. See also , , and startOfDay startOfWeek startOfMonth
; and , , , and .endOfDay endOfWeek endOfMonth endOfYear
Syntax
endOfYear()
endOfYear("inc")
where is an optional increment of If the time unit qualifier is omitted, itinc (+/-)nn(y|M|w|d|h|m).
defaults to the natural period of the function, e.g. endOfYear("+1") is the same as endOfYear("+1y"). If the
plus/minus (+/-) sign is omitted, plus is assumed.
Supported
fields
Created, Due, Resolved, Updated, custom fields of type Date/Time
Supported
operators
= , != , > , >= , < , <=
WAS* , WAS IN* , WAS NOT* , WAS NOT IN* , CHANGED*
* Only in predicate
Unsupported
operators
~ , !~ IN , NOT INIS , IS NOT ,
Examples
Find issues due by the end of this year:
due < endOfYear()
Find issues due by the end of March next year:
due < endOfYear("+3M")
^ top of page
issueHistory()
Find issues that you have recently viewed, i.e. issues that are in the 'Recent Issues' section of the 'Issues'
drop-down menu.
Note:
issueHistory() returns up to 50 issues, whereas the 'Recent Issues' drop-down returns only 5.
if you are not logged in to JIRA, only issues from your current browser session will be included.
Syntax
issueHistory()
Supported
fields
Issue
Supported
operators
IN , NOT IN
Unsupported
operators
= , != , ~ , !~ , > , >= , < , <= IS , IS NOT , WAS , WAS IN ,
WAS NOT , WAS NOT IN , CHANGED

Documentation for JIRA Service Desk 3.1
152
Created in 2016 by Atlassian. Licensed under a .Creative Commons Attribution 2.5 Australia License
Examples
Find issues which I have recently viewed, that are assigned to me:
issue in issueHistory() AND assignee = currentUser()
^ top of page
issuesWithRemoteLinksByGlobalId()
Perform searches based on issues that are associated with remote links that have any of the specified global
ids.
Note:
This function accepts 1 to 100 globalIds. Specifying 0 or more than 100 globalIds will result in errors.
Syntax
issuesWithRemoteLinksByGlobalId()
Supported
fields
Issue
Supported
operators
IN , NOT IN
Unsupported
operators
= , != , ~ , !~ , > , >= , < , <= IS , IS NOT , WAS , WAS IN ,
WAS NOT , WAS NOT IN , CHANGED
Examples
Find issues that are linked to remote links that have globalId "abc":
issue in issuesWithRemoteLinksByGlobalId(abc)
Find issues that are linked to remote links that have either globalId "abc" or "def":
issue in issuesWithRemoteLinksByGlobalId(abc, def)
^ top of page
lastLogin()
Perform searches based on the time at which the current user's previous session began. See also currentLo
.gin
Syntax
lastLogin()
Supported fields
Created. Due, Resolved, Updated, custom fields of type Date/Time
Supported operators
= , != , > , >= , < , <=
WAS* , WAS IN* , WAS NOT* , WAS NOT IN* , CHANGED*
* Only in predicate
Unsupported operators
~ , !~ IS , IS NOT , IN , NOT IN
Examples
Find issues that have been created during my last session:
created > lastLogin()
^ top of page
latestReleasedVersion()
Perform searches based on the latest released version (i.e. the most recent version that has been released)
of a specified project. See also (). Note, the "latest" is determined by the ordering assignedreleasedVersions
to the versions, not by actual Version Due Dates.
Syntax
latestReleasedVersion(project)

Documentation for JIRA Service Desk 3.1
153
Created in 2016 by Atlassian. Licensed under a .Creative Commons Attribution 2.5 Australia License
Supported
fields
AffectedVersion, FixVersion, custom fields of type Version
Supported
operators
IN , NOT IN
Unsupported
operators
= , != , ~ , !~ , > , >= , < , <= IS , IS NOT , WAS , WAS IN ,
WAS NOT , WAS NOT IN , CHANGED
Examples
Find issues whose FixVersion is the latest released version of the ABC project:
fixVersion = latestReleasedVersion(ABC)
Find issues that relate to the latest released version of the ABC project:
affectedVersion = latestReleasedVersion(ABC) or fixVersion =
latestReleasedVersion(ABC)
^ top of page
linkedIssues()
Perform searches based on issues that are linked to a specified issue. You can optionally restrict the search
to links of a particular type. Note that LinkType is case-sensitive.
Syntax
linkedIssues(issueKey)
linkedIssues(issueKey,linkType)
Supported
fields
Issue
Supported
operators
IN , NOT IN
Unsupported
operators
= , != , ~ , !~ , > , >= , < , <= IS , IS NOT , WAS , WAS IN ,
WAS NOT , WAS NOT IN , CHANGED
Examples
Find issues that are linked to a particular issue:
issue in linkedIssues(ABC-123)
Find issues that are linked to a particular issue via a particular type of link:
issue in linkedIssues(ABC-123,"is duplicated by")
^ top of page
membersOf()
Perform searches based on the members of a particular group.
Syntax
membersOf(Group)
Supported
fields
Assignee, Reporter, Voter, Watcher, custom fields of type User
Supported
operators
IN , NOT IN
Unsupported
operators
= , != , ~ , !~ , > , >= , < , <= IS , IS NOT , WAS , WAS IN , WAS
NOT , WAS NOT IN , CHANGED

Documentation for JIRA Service Desk 3.1
154
Created in 2016 by Atlassian. Licensed under a .Creative Commons Attribution 2.5 Australia License
Examples
Find issues where the Assignee is a member of the group "jira-administrators":
assignee in membersOf("jira-administrators")
Search through multiple groups and a specific user:
reporter in membersOf("jira-administators") or reporter in
membersOf("jira-core-users") or reporter=jsmith
Search for a particular group, but exclude a particular member or members:
assignee in membersOf(QA) and assignee not in ("John
Smith","Jill Jones")
Exclude members of a particular group:
assignee not in membersOf(QA)
^ top of page
now()
Perform searches based on the current time.
Syntax
now()
Supported fields
Created. Due, Resolved, Updated, custom fields of type Date/Time
Supported operators
= , != , > , >= , < , <=
WAS* , WAS IN* , WAS NOT* , WAS NOT IN* , CHANGED*
* Only in predicate
Unsupported operators
~ , !~ IS , IS NOT , IN , NOT IN
Examples
Find issues that are overdue:
duedate < now() and status not in (closed, resolved)
^ top of page
openSprints()
Search for issues that are assigned to a Sprint that has not yet been completed. Note, it is possible for an
issue to belong to both a completed Sprint(s) and an incomplete Sprint(s). See also ().closedSprints
Syntax
openSprints()
Supported fields
Sprint
Supported operators
IN , NOT IN
Unsupported
operators
= , != , ~ , !~ , > , >= , < , <=
IS , IS NOT, WAS , WAS IN , WAS NOT , WAS NOT IN , CHANGED
Examples
Find all issues that are assigned to a sprint that has not yet been
completed:
sprint in openSprints()
^ top of page
projectsLeadByUser()
Find issues in projects that are led by a specific user. You can optionally specify a user, or if the user is
omitted, the current user will be used. Note that if you are not logged in to JIRA, a user must be specified.

Documentation for JIRA Service Desk 3.1
155
Created in 2016 by Atlassian. Licensed under a .Creative Commons Attribution 2.5 Australia License
Syntax
projectsLeadByUser()
projectsLeadByUser(username)
Supported fields
Project
Supported operators
IN , NOT IN
Unsupported
operators
= , != , ~ , !~ , > , >= , < , <=
IS , IS NOT, WAS , WAS IN , WAS NOT , WAS NOT IN , CHANGED
Examples
Find open issues in projects that are led by you:
project in projectsLeadByUser() AND status = Open
Find open issues in projects that are led by Bill:
project in projectsLeadByUser(bill) AND status = Open
^ top of page
projectsWhereUserHasPermission()
Find issues in projects where you have a specific permission. Note, this function operates at the project level.
This means that if a permission (e.g. "Edit Issues") is granted to the reporter of issues in a project, then you
may see some issues returned where you are not the reporter, and therefore don't have the permission
specified. Also note, this function is only available if you are logged in to JIRA.
Syntax
projectsWhereUserHasPermission(permission)
For the parameter, you can specify any of the permissions describedpermission
on .
Supported fields
Project
Supported
operators
IN , NOT IN
Unsupported
operators
= , != , ~ , !~ , > , >= , < , <=
IS , IS NOT, WAS , WAS IN , WAS NOT , WAS NOT IN , CHANGED
Examples
Find open issues in projects where you have the "Resolve Issues" permission:
project in projectsWhereUserHasPermission("Resolve Issues")
AND status = Open
^ top of page
projectsWhereUserHasRole()
Find issues in projects where you have a specific role. Note, this function is only available if you are logged in
to JIRA.
Syntax
projectsWhereUserHasRole(rolename)
Supported fields
Project
Supported
operators
IN , NOT IN
Unsupported
operators
= , != , ~ , !~ , > , >= , < , <=
IS , IS NOT, WAS , WAS IN , WAS NOT , WAS NOT IN , CHANGED

Documentation for JIRA Service Desk 3.1
156
Created in 2016 by Atlassian. Licensed under a .Creative Commons Attribution 2.5 Australia License
Examples
Find open issues in projects where you have the "Developers" role:
project in projectsWhereUserHasRole("Developers") AND
status = Open
^ top of page
releasedVersions()
Perform searches based on the released versions (i.e. versions that your JIRA administrator has released) of
a specified project. You can also search on the released versions of all projects, by omitting the paraproject
meter. See also ().latestReleasedVersion
Syntax
releasedVersions()
releasedVersions(project)
Supported
fields
AffectedVersion, FixVersion, custom fields of type Version
Supported
operators
IN , NOT IN
Unsupported
operators
~ , !~ , = , != , > , >= , < , <= , IS , IS NOT WAS , WAS IN ,
WAS NOT , WAS NOT IN , CHANGED
Examples
Find issues whose FixVersion is a released version of the ABC project:
fixVersion in releasedVersions(ABC)
Find issues that relate to released versions of the ABC project:
(affectedVersion in releasedVersions(ABC)) or (fixVersion in
releasedVersions(ABC))
^ top of page
standardIssueTypes()
Perform searches based on "standard" Issue Types, that is, search for issues that are not sub-tasks. See
also ().subtaskIssueTypes
Syntax
standardIssueTypes()
Supported
fields
Type
Supported
operators
IN , NOT IN
Unsupported
operators
~ , !~ , = , != , > , >= , < , <= , IS , IS NOT WAS , WAS IN ,
WAS NOT , WAS NOT IN , CHANGED
Examples
Find issues that are not subtasks (i.e. issues whose Issue Type is a standard issue
type, not a subtask issue type):
issuetype in standardIssueTypes()
^ top of page
startOfDay()
Perform searches based on the start of the current day. See also , , and startOfWeek startOfMonth startOfYea
; and , , , and .r endOfDay endOfWeek endOfMonth endOfYear

Documentation for JIRA Service Desk 3.1
157
Created in 2016 by Atlassian. Licensed under a .Creative Commons Attribution 2.5 Australia License
Syntax
startOfDay()
startOfDay("inc")
where is an optional increment of If the time unit qualifier is omitted, itinc (+/-)nn(y|M|w|d|h|m).
defaults to the natural period of the function, e.g. startOfDay("+1") is the same as startOfDay("+1d"). If the
plus/minus (+/-) sign is omitted, plus is assumed.
Supported
fields
Created, Due, Resolved, Updated, custom fields of type Date/Time
Supported
operators
= , != , > , >= , < , <=
WAS* , WAS IN* , WAS NOT* , WAS NOT IN* , CHANGED*
* Only in predicate
Unsupported
operators
~ , !~ IN , NOT INIS , IS NOT ,
Examples
Find new issues created since the start of today:
created > startOfDay()
Find new issues created since the start of yesterday:
created > startOfDay("-1")
Find new issues created in the last three days:
created > startOfDay("-3d")
^ top of page
startOfMonth()
Perform searches based on the start of the current month. See also , , and startOfDay startOfWeek startOfYea
; and , , , and .r endOfDay endOfWeek endOfMonth endOfYear
Syntax
startOfMonth()
startOfMonth("inc")
where is an optional increment of If the time unit qualifier is omitted, itinc (+/-)nn(y|M|w|d|h|m).
defaults to the natural period of the function, e.g. startOfMonth("+1") is the same as startOfMonth("+1M"). If
the plus/minus (+/-) sign is omitted, plus is assumed.
Supported
fields
Created, Due, Resolved, Updated, custom fields of type Date/Time
Supported
operators
= , != , > , >= , < , <=
WAS* , WAS IN* , WAS NOT* , WAS NOT IN* , CHANGED*
* Only in predicate
Unsupported
operators
~ , !~ IN , NOT INIS , IS NOT ,
Examples
Find new issues created since the start of this month:
created > startOfMonth()
Find new issues created since the start of last month:
created > startOfMonth("-1")
Find new issues created since the 15th of this month:
created > startOfMonth("+14d")
^ top of page
startOfWeek()

Documentation for JIRA Service Desk 3.1
158
Created in 2016 by Atlassian. Licensed under a .Creative Commons Attribution 2.5 Australia License
Perform searches based on the start of the current week. See also , , and startOfDay startOfMonth startOfYea
; and , , , and . For the startOfWeek() function, the resultr endOfDay endOfWeek endOfMonth endOfYear
depends upon your locale. For example, in Europe, the first day of the week is generally considered to be
Monday, while in the USA, it is considered to be Sunday.
Syntax
startOfWeek()
startOfWeek("inc")
where is an optional increment of If the time unit qualifier is omitted, itinc (+/-)nn(y|M|w|d|h|m).
defaults to the natural period of the function, e.g. startOfWeek("+1") is the same as startOfWeek("+1w"). If
the plus/minus (+/-) sign is omitted, plus is assumed.
Supported
fields
Created, Due, Resolved, Updated, custom fields of type Date/Time
Supported
operators
= , != , > , >= , < , <=
WAS* , WAS IN* , WAS NOT* , WAS NOT IN* , CHANGED*
* Only in predicate
Unsupported
operators
~ , !~ IN , NOT INIS , IS NOT ,
Examples
Find new issues since the start of this week:
created > startOfWeek()
Find new issues since the start of last week:
created > startOfWeek("-1")
^ top of page
startOfYear()
Perform searches based on the start of the current year. See also , and startOfDay startOfWeek startOfMonth
; and , , and .endOfDay endOfWeek endOfMonth endOfYear
Syntax
startOfYear()
startOfYear("inc")
where is an optional increment of If the time unit qualifier is omitted, itinc (+/-)nn(y|M|w|d|h|m).
defaults to the natural period of the function, e.g. endOfYear("+1") is the same as endOfYear("+1y"). If the
plus/minus (+/-) sign is omitted, plus is assumed.
Supported
fields
Created, Due, Resolved, Updated, custom fields of type Date/Time
Supported
operators
= , != , > , >= , < , <=
WAS* , WAS IN* , WAS NOT* , WAS NOT IN* , CHANGED*
* Only in predicate
Unsupported
operators
~ , !~ IN , NOT INIS , IS NOT ,
Examples
Find new issues since the start of this year:
created > startOfYear()
Find new issues since the start of last year:
created > startOfYear("-1")
^ top of page
subtaskIssueTypes()

Documentation for JIRA Service Desk 3.1
159
Created in 2016 by Atlassian. Licensed under a .Creative Commons Attribution 2.5 Australia License
Perform searches based on issues that are sub-tasks. See also ().standardIssueTypes
Syntax
subtaskIssueTypes()
Supported
fields
Type
Supported
operators
IN , NOT IN
Unsupported
operators
~ , !~ , = , != , > , >= , < , <= , IS , IS NOT WAS , WAS IN ,
WAS NOT , WAS NOT IN , CHANGED
Examples
Find issues that are subtasks (i.e. issues whose Issue Type is a subtask issue
type):
issuetype in subtaskIssueTypes()
^ top of page
unreleasedVersions()
Perform searches based on the unreleased versions (i.e. versions that your JIRA administrator has not yet
released) of a specified project. You can also search on the unreleased versions of all projects, by omitting
the parameter. See also ().project earliestUnreleasedVersion
Syntax
unreleasedVersions()
unreleasedVersions(project)
Supported
fields
AffectedVersion, FixVersion, custom fields of type Version
Supported
operators
IN , NOT IN
Unsupported
operators
= , != , ~ , !~ , > , >= , < , <= IS , IS NOT , WAS , WAS IN ,
WAS NOT , WAS NOT IN , CHANGED
Examples
Find issues whose FixVersion is an unreleased version of the ABC project:
fixVersion in unreleasedVersions(ABC)
Find issues that relate to unreleased versions of the ABC project:
affectedVersion in unreleasedVersions(ABC)
^ top of page
votedIssues()
Perform searches based on issues for which you have voted. Also, see the Voter field. Note, this function can
only be used by logged-in users.
Syntax
votedIssues()
Supported
fields
Issue
Supported
operators
IN , NOT IN
Unsupported
operators
= , != , ~ , !~ , > , >= , < , <= IS , IS NOT , WAS , WAS IN ,
WAS NOT , WAS NOT IN , CHANGED

Documentation for JIRA Service Desk 3.1
160
Created in 2016 by Atlassian. Licensed under a .Creative Commons Attribution 2.5 Australia License
Examples
Find issues that you have voted for:
issue in votedIssues()
^ top of page
watchedIssues()
Perform searches based on issues that you are watching. Also, see the Watcher field. Note that this function
can only be used by logged-in users.
Syntax
watchedIssues()
Supported
fields
Issue
Supported
operators
IN , NOT IN
Unsupported
operators
= , != , ~ , !~ , > , >= , < , <= IS , IS NOT , WAS , WAS IN ,
WAS NOT , WAS NOT IN , CHANGED
Examples
Find issues that you are watching:
issue in watchedIssues()
^ top of page
Search syntax for text fields
This page provides information on the syntax for searching text fields, which
can be done in the quick search, basic search, and advanced search.
Text searches can be done in the advanced search when the (~CONTAINS
) operator is used, e.g. . It can also be done in quicksummary~"windows*"
search and basic search when searching on supported fields.
Acknowledgments: JIRA uses Apache Lucene for text indexing, which
provides a rich query language. Much of the information on this page is
derived from the page of the Lucene documentation.Query Parser Syntax
On this page:
Query
terms
Term
modifiers
Boosting a
term: ^
Boolean
operators
Grouping
Escaping
special
characters:
\ or \\
Reserved
words
Word
stemming
Limitations
Next steps
Query terms
A query is broken up into and There are two types of terms: and .terms operators. Single Terms Phrases
A is a single word, such as " " or " ".Single Term test hello
A is a group of words surrounded by double quotes, such as " ".Phrase hello dolly
Multiple terms can be combined together with Boolean operators to form a more complex query (see below).
If you combine multiple terms without specifying any Boolean operators, they will be joined using AND
operators.
Note: All query terms in JIRA are not case sensitive.

Documentation for JIRA Service Desk 3.1
161
Created in 2016 by Atlassian. Licensed under a .Creative Commons Attribution 2.5 Australia License
Term modifiers
JIRA supports modifying query terms to provide a wide range of searching options.
Wildcard searches: ? and * | | Fuzzy searches: ~ Proximity searches
Wildcard searches: ? and *
JIRA supports single and multiple character wildcard searches.
To perform a single character wildcard search, use the " " symbol.?
To perform a multiple character wildcard search, use the " " symbol.*
The single character wildcard search looks for terms that match that with the single character replaced. For
example, to search for " " or " ", you can use the search:text test
te?t
Multiple character wildcard searches looks for 0 or more characters. For example, to search for , Windows Wi
, or , you can use the search:n95 WindowsNT
win*
You can also use the wildcard searches in the middle of a term. For example, to search for or Win95 Windo
, you can use the search:ws95
wi*95
Fuzzy searches: ~
JIRA supports fuzzy searches. To do a fuzzy search, use the tilde, "~", symbol at the end of a single word
term. For example, to search for a term similar in spelling to " ", use the fuzzy search:roam
roam~
This search will find terms like foam and roams.
Note: Terms found by the fuzzy search will automatically get a boost factor of 0.2.
Proximity searches
JIRA supports finding words that are within a specific distance away. To do a proximity search, use the tilde,
"~", symbol at the end of a phrase. For example, to search for " " and " " within 10 words ofatlassian jira
each other in a document, use the search:
"atlassian jira"~10
Wildcard characters need to be enclosed in quote-marks, as they are reserved characters in
advanced search. Use quotations, e.g. summary ~ "cha?k and che*"
You cannot use a * or ? symbol as the first character of a search. The feature request for this is JRA-
.6218

Documentation for JIRA Service Desk 3.1
162
Created in 2016 by Atlassian. Licensed under a .Creative Commons Attribution 2.5 Australia License
Boosting a term: ^
JIRA provides the relevance level of matching documents based on the terms found. To boost a term, use
the caret, "^", symbol with a boost factor (a number) at the end of the term you are searching. The higher the
boost factor, the more relevant the term will be.
Boosting allows you to control the relevance of a document by boosting its term. For example, if you are
searching for
atlassian jira
and you want the term " " to be more relevant, boost it using the ^ symbol along with the boostatlassian
factor next to the term. You would type:
atlassian^4 jira
This will make documents with the term atlassian appear more relevant. You can also boost Phrase Terms,
as in the example:
"atlassian jira"^4 querying
By default, the boost factor is 1. Although, the boost factor must be positive, it can be less than 1 (i.e. 0.2).
Boolean operators
Boolean operators allow terms to be combined through logic operators. JIRA supports AND, "+", OR, NOT
and "-" as Boolean operators.
OR | | | | AND Required term: + NOT Excluded term: -
OR
The OR operator is the default conjunction operator. This means that if there is no Boolean operator between
two terms, the OR operator is used. The OR operator links two terms, and finds a matching document if
either of the terms exist in a document. This is equivalent to a union using sets. The symbol can be used||
in place of the word OR.
To search for documents that contain either " " or just " ", use the query:atlassian jira confluence
"atlassian jira" || confluence
or
"atlassian jira" OR confluence
AND
The AND operator matches documents where both terms exist anywhere in the text of a single document.
This is equivalent to an intersection using sets. The symbol can be used in place of the word AND.&&
To search for documents that contain " " and " ", use the query:atlassian jira issue tracking
Boolean operators must be ALL CAPS.

Documentation for JIRA Service Desk 3.1
163
Created in 2016 by Atlassian. Licensed under a .Creative Commons Attribution 2.5 Australia License
"atlassian jira" AND "issue tracking"
Required term: +
The "+" or required operator requires that the term after the "+" symbol exists somewhere in a the field of a
single document.
To search for documents that must contain " " and may contain " ", use the query:jira atlassian
+jira atlassian
NOT
The NOT operator excludes documents that contain the term after NOT. This is equivalent to a difference
using sets. The symbol can be used in place of the word NOT.!
To search for documents that contain " " but not " ", use the query:atlassian jira japan
"atlassian jira" NOT "japan"
Note: The NOT operator cannot be used with just one term. For example, the following search will return no
results:
NOT "atlassian jira"
Excluded term: -
The " " or prohibit operator excludes documents that contain the term after the " " symbol.- -
To search for documents that contain " " but not " ", use the query:atlassian jira japan
"atlassian jira" -japan
Grouping
JIRA supports using parentheses to group clauses to form sub queries. This can be very useful if you want to
control the boolean logic for a query.
To search for and either or , use the query:bugs atlassian jira
bugs AND (atlassian OR jira)
This eliminates any confusion and makes sure that must exist, and either term or mbugs atlassian jira
ay exist.
Usage of the operator over multiple fields may return results that include the specified excludedNOT
term. This is due to the fact that the search query is executed over each field in turn, and the result
set for each field is combined to form the final result set. Hence, an issue that matches the search
query based on one field, but fails based on another field will be included in the search result set.
Do not use the grouping character '(' at the start of a search query, as this will result in an error. For

Documentation for JIRA Service Desk 3.1
164
Created in 2016 by Atlassian. Licensed under a .Creative Commons Attribution 2.5 Australia License
Escaping special characters: \ or \\
JIRA supports the ability to search issues for special characters by escaping them in your query syntax. The
current list of such characters is:
+ - & | ! ( ) { } [ ] ^ ~ * ? \ :
To escape these characters, type a backslash character ' ' before the special character (or if using advanced\
searching, type two backslashes ' ' before the special character).\\
For example, to search for in either a basic or search, use the query:(1+1) quick
\(1\+1\)
and to search for in the summary of an or JQL), use[example] advanced search (in JIRA Query Language
the query:
summary ~ "\\[example\\]"
Please note: If you are using advanced searching, see for more information about howReserved characters
these characters and others are escaped in JIRA Query Language.
Reserved words
To keep the search index size and search performance optimal in JIRA, the following English reserved words
(also known as ' ') are ignored from the search index and hence, JIRA's text search features:stop words
"a", "and", "are", "as", "at", "be", "but", "by", "for", "if", "in", "into",
"is", "it", "no", "not", "of", "on", "or", "s", "such", "t", "that", "the",
"their", "then", "there", "these", "they", "this", "to", "was", "will", "with"
Be aware that this can sometimes lead to unexpected results. For example, suppose one issue contains the
text phrase "VSX will crash" and another issue contains the phrase "VSX will not crash". A text search for
"VSX will crash" will return both of these issues. This is because the words and are part of thewill not
reserved words list.
Your JIRA administrator can make JIRA index these reserved words (so that JIRA will find issues based
on the presence of these words) by changing the to (under Indexing Language Other Administration >
).System > General Configuration
Word stemming
Since JIRA cannot search for issues containing parts of words (see ), word 'stemming' allows you tobelow
retrieve issues from a search based on the 'root' (or 'stem') forms of words instead of requiring an exact
match with specific forms of these words. The number of issues retrieved from a search based on a stemmed
word is typically larger, since any other issues containing words that are stemmed back to the same root will
also be retrieved in the search results.
For example, if you search for issues using the query term 'customize' on the Summary field, JIRA stems this
word to its root form 'custom', and will retrieve all issues whose Summary field also contains any word that
can be stemmed back to 'custom'. Hence, the following query:
summary ~ "customize"
will retrieve issues whose Summary field contains the following words:
example, will not work."(atlassian OR jira) AND bugs"

Documentation for JIRA Service Desk 3.1
165
Created in 2016 by Atlassian. Licensed under a .Creative Commons Attribution 2.5 Australia License
customized
customizing
customs
customer
etc.
Please Note:
Your JIRA administrator can disable word stemming (so that JIRA will find issues based on exact
matches with words) by changing the to (under Indexing Language Other Administration > System
).> General Configuration
Word stemming applies to JIRA fields (as well as text fields).all
When JIRA indexes its fields, any words that are 'stemmed' are stored in JIRA's search index in root
form only.
Limitations
Please note that the following limitations apply to JIRA's search:
Whole words only
JIRA cannot search for issues containing parts of words but on whole words only. The exception to this are
words which are .stemmed
This limitation can also be overcome using .fuzzy searches
Next steps
Read the following related topics:
Searching for issues
Quick searching
Basic searching
Advanced searching
Saving your search as a filter
JIRA's powerful functionality is enhanced by the ability to saveissue search
searches, called in JIRA, for later use. You can do the following withfilters
JIRA filters:
Share and email search results with your colleagues, as well as
people outside of your organization
Create lists of favorite filters
Have search results according to your preferredemailed to you
schedule
View and export the search results in various formats (RSS, Excel,
etc)
Display the search results in a report format
Display the search results in a dashboard gadget
On this page:
Saving a
search as
a filter
Running a
filter
Managing
your
existing
filters
Managing
other
user's
shared
filters
Next steps
Screenshot: Issue filter results in detail view (click to view full size image)

Documentation for JIRA Service Desk 3.1
166
Created in 2016 by Atlassian. Licensed under a .Creative Commons Attribution 2.5 Australia License
1.
2.
3.
1.
2.
3.
Saving a search as a filter
Define and run your search.
Click the link above the search results. The dialog is displayed.Save as Save Filter
Enter a name for the new filter and click . Your filter is created.Submit
Your new filter will be added to your favorite filters and shared, according to the sharing preference in your
user profile. If you haven't specified a preference, then the global default will be applied, which is 'Private'
unless changed by your JIRA administrator.
Running a filter
Choose > .Issues Search for issues
Choose any filter from the list on the left:
System filter — My Open Issues, Reported by Me, Recently Viewed, All Issues
Favorite filters (listed alphabetically)
Find filters lets you search for any filter that's been which you can then subscribe toshared,
(adding it to your ). Favorite Filters
After selecting a filter, the search results are displayed. The search criteria for the filter are also
displayed and can be changed.
Note, if you run the system filter, this will switch you to the as theRecently Viewed advanced search,
basic search cannot represent the clause in this filter.ORDER BY
Managing your existing filters
Click to manage your filters.Issues > Manage filters

Documentation for JIRA Service Desk 3.1
167
Created in 2016 by Atlassian. Licensed under a .Creative Commons Attribution 2.5 Australia License
1.
2.
3.
1.
2.
3.
4.
1.
2.
3.
4.
1.
2.
The page allows you to view and configure filters that you have created, as well as work withManage Filters
filters that other users have shared with you. See the following topics for more information:
Searching for a filter
Updating a filter
Deleting a filter
Cloning a filter
Adding a filter as a favorite
Sharing a filter
Defining a filter-specific column order
Subscribing to a filter
Searching for a filter
You can find and run any filters that you have created or that have been shared by other users.
Click the tab on the 'Manage Filters' page.Search
Enter your search criteria and click to run the search.Search
Your search results are displayed on the same page. Click the name of any issue filter to run it.
Tip: If the filter has been added as a favorite by many users, you may also be able locate it on the taPopular
b of the Manage Filters page.
Updating a filter
You can update the name, description, sharing, favorite of any filters that you have created. If you want to
edit a filter that was shared with you, either (aka copy) the shared filter, or ask your JIRA administratorclone
to .change the filter's ownership
Update the filter's details:
Click the tab on the 'Manage Filters' page.My
Locate the filter you wish to update, click the > .cog icon Edit
The page displays, where you can update the filter details as required.Edit Current Filter
Click to save your changes.Save
Update the filter's search criteria:
Click the tab on the 'Manage Filters' page.My
Locate the filter you want to update and run it.
Update the search criteria as desired, and rerun the query to ensure the update is valid. You will see
the word displayed next to your filter name.Edited
Click to overwrite the current filter with the updated search criteria. If you want discard yourSave
changes instead, click the arrow next to the save button, and select .Discard changes
Deleting a filter
Click the tab on the 'Manage Filters' page.My
Locate the filter you wish to delete, click the > .cog icon Delete
Cloning a filter

Documentation for JIRA Service Desk 3.1
168
Created in 2016 by Atlassian. Licensed under a .Creative Commons Attribution 2.5 Australia License
1.
2.
1.
2.
1.
2.
3.
4.
1.
2.
3.
1.
2.
3.
You can clone any filter – which is just a way of making a copy that you own – that was either created by you
or shared with you.
Locate the filter you wish to clone and run it.
Update the search criteria as desired. Click the arrow next to the button, and select Save Save > Save
to create a new filter from the existing filter.as
Adding a filter as a favorite
Filters that you've created or that have been shared by others can be added to your favorite filters. Favorite
filters are listed in the menu under , and in the left panel of the issue navigator. Issues > Filters
Locate the filter you wish to add as a favorite.
Click the star icon next to the filter name to add it to your favorites.
Sharing a filter
Filters that you have created can be shared with other users via user groups, projects, and project roles.
They can also be shared globally. Any filter that is shared is visible to users who have the 'JIRA
Administrators' global permission. See below.Managing other users' shared filters
Click the tab on the 'Manage Filters' page.My
Locate the filter you wish to share, click the > .cog icon Edit
Update the field by selecting the group, project, or project role that you want to share theAdd Shares
filter with, and clicking . Note that you can only share filters with groups/roles of which you are aAdd
member.
Why can't I see the filter's sharing configuration?
You need the Create Shared Object global permission to configure sharing for a filter. Contact your
JIRA administrator to obtain this permission.
Click to save your changes.Save
Tip: You can also share your filter by running it, then clicking > .Details Edit Permissions
Defining a filter-specific column order
You can add a defined column order to a saved filter, which displays the filter results according to the saved
column order. Otherwise, the results are displayed according to your personal column order (if you have set
this) or the system default.
Tip: To display your configured column order in a filter subscription, select 'HTML' for the 'Outgoing email
format' in your . If you receive text emails from JIRA, you won't be able to see your configuredUser Profile
column order.
To add a column layout to a saved filter:
Click the tab on the 'Manage Filters' page.My
Locate the filter you wish to update; click the filter's name to display the results. Be sure you are
viewing the filter in the view so that you see the columns.List
Configure the column order as desired by clicking on the column name and dragging it to the new
position. Your changes are saved and will be displayed the next time you view this filter.
To remove a filter's saved column layout:
Click the tab on the 'Manage Filters' page.My
Locate the filter you wish to update; click the filter's name to display the results. Be sure you are
viewing the filter in the view so that you see the columns.List
Click the option on the top right of the displayed columns, and select in Columns Restore Defaults
the displayed window.
Exporting column ordered issues
When the results of a saved filter are exported to Excel, the column order and choice of columns are those
that were saved with the filter. Even if a user has configured a personal column order for the results on the
screen, the is used for the Excel export. To export using your own configuration, savesaved configuration
a copy of the filter along with your configuration, and then export the results to Excel.

Documentation for JIRA Service Desk 3.1
169
Created in 2016 by Atlassian. Licensed under a .Creative Commons Attribution 2.5 Australia License
Subscribing to a filter
See .Working with search results
Managing other user's shared filters
A is a filter whose creator has shared that filter with other users. Refer to aboveshared filter Sharing a filter
for details. When a shared filter is created by a user, that user:
Initially 'owns' the shared filter.
Being the owner, can edit and modify the shared filter.
If you have the global permission, you can manage shared filters that were created byJIRA Administrators
other users. For instructions, see .Managing shared filters
Next steps
Read the following related topics:
Searching for issues
Basic searching
Advanced searching
Working with search results
Working with search results
Once you have run a search, your search results will be displayed in the
issue navigator. You may want to triage the entire list of issues or may be
looking for just one. This page will show you what you can do with your
search results, from changing what you see in the issue navigator to
modifying the issues.

Documentation for JIRA Service Desk 3.1
170
Created in 2016 by Atlassian. Licensed under a .Creative Commons Attribution 2.5 Australia License
On this page:
Changing
your view
of the
search
results
Working
with
individual
issues
Sharing
your
search
results
Displaying
your
search
results in
Confluenc
e
Displaying
your
search
results as
a chart
Exporting
your
search
results
Subscribin
g to your
search
results
Bulk
modifying
issues in
your
search
results
Next steps
The following screenshot provides an overview of the key features of the issue navigator.
Screenshot: Issue navigator (Detail view)
Documentation for JIRA Service Desk 3.1
171
Created in 2016 by Atlassian. Licensed under a .Creative Commons Attribution 2.5 Australia License
Changing your view of the search results
List view
or Detail
view
Click the
dropdown to switch between List view and Detail view for your search results.
List view: Shows your search results as a list of issues. This view is easiest to scan and
is best when you only need to know a few details about each issue.
Detail view: Shows your search results as a list of issues, with the right panel showing
the details of the currently selected issue. This view is best when you need more
information about the individual issues, or you want to quickly edit issues as you go (via
inline edit for certain fields).
Change
the sort
order
Click the column name. If you click the same column name more than once, the sort order
will switch between ascending and descending. Note:
You cannot sort by the 'Images' column nor the sub-task aggregate columns (i.e. all
columns beginning with '').
If you sort the search results for an advanced search, an 'ORDER BY' clause will be
added/updated for your JQL query to reflect the order of issues in your search results.
Columns
—
show/hide
and move
You can create different column configurations for yourself and for specific filters. To switch
between different column configurations, click and select one of the following tabs:Columns
My Defaults: This is your default column configuration for search results.
Filter: This is enabled if you are viewing the search results for a filter. It will override your
default column configuration.
System (shows if you are a JIRA administrator): This is the column configuration that
applies to all users. It will be overridden by a user's default column configuration and
filter-specific column configurations.
You can also modify any of these configurations. Make sure you have switched the desired
configuration, then do the following:
Show/hide columns: Click choose the desired columns, then click .Columns, Done
Move a column: Click the column name and drag it to the desired position.
Why can't I add a column to my column configuration?
If you cannot find a column, please make sure that you haven't run in to any of the
following restrictions:
You can only see columns for issue fields that have not been hidden and that you
have permissions to see.
It is possible to add any of the existing custom fields to the column list, as long as the
fields are visible, and you have the right permissions.
Some custom fields, even if selected, do not appear in the Issue Navigator for all
issues. For example, project-specific custom fields will be shown only if the filter has
been restricted to that project only. Issue type custom fields will only appear if the filter
has been restricted to that issue type.
Working with individual issues
You can action individual issues in your search results, directly from the issue navigator. Note that the list of
issues will remain constant even if you change an issue, so that it doesn't meet the original search
criteria. The advantage of this is that you have a constant set of search results that you can work from when
triaging issues.
View an issue
Click the key or summary of the issue.
If you are in List view, you will redirected to the issue (leaving the search results
page).
If you are in Detail view, the issue details will display in the right panel.

Documentation for JIRA Service Desk 3.1
172
Created in 2016 by Atlassian. Licensed under a .Creative Commons Attribution 2.5 Australia License
Action an
issue
To action an issue (e.g. edit it, transition it, log work on it, etc):
If you are in List view, click the cog icon and select from the options.
If you are in Detail view, select the issue and action it the issue via the details panel.
You can also select an issue and action it via keyboard shortcuts in either views.
Tip: use the and ' keys to select the previous/next issue in the issue navigator.'j' k'
Sharing your search results
Click in the issue navigator to email a link to a search result or shared filter.Share
Recipients will receive an email with a link to the search result and the content of the field (ifNote
specified). The subject of the email will state that you (using your username) shared the issue.
If you share the results of a filter, rather than an ad-hoc search, recipients will receive a link to the
filter. Note, if the recipient does not have permission to view the filter, they will receive a link to the
search results instead.
Displaying your search results in Confluence
If your JIRA applications are connected to Confluence, you can display your search results on a Confluence
page using the JIRA issues macro. For instructions, see .JIRA issues macro
Displaying your search results as a chart
Click > . Choose the desired chart from the dialog that is displayed, then click Export Charts Save to
.Dashboard
The chart will be added to your dashboard.
Exporting your search results
Excel
Click > or > .Export Excel (All fields) Export Excel (Current fields)
Excel (All fields): this will create a spreadsheet column for every issue field (excluding
comments).
Note: This will only show the custom fields that are available for all of the issues in the search
results. For example, a field that is only available for one project when your search results has
issues from multiple projects.
Excel (Current fields): this will create a spreadsheet column for the issue fields that are
currently displayed.
Note, large exports (e.g. many hundreds of issues) are not recommended. You can change the
number of issues that are exported, by changing the value of the parameter in the URL.tempMax
Word
Click > Export Word.
The export will include the Description, Comments, and all other issue data, not just the issue
fields that are currently configured in your Issue Navigator. Note, large exports (e.g. hundreds of
issues) are not recommended.
XML
Click > .Export XML
You can use the URL of the XML view in a Confluence JIRA issues macro. However, you can also
use the JQL or the URL of the issue search, which are easier to get.
To restrict which issue fields are returned in the XML export, specify the parameter in yourfield
URL. For example, to include only the and add Issue key Summary, &field=key&field=summ
to the URL. If the parameter is not specified, the XML output will include the issueary field all
fields. Otherwise, if one or more parameters are specified, the XML output will contain onlyfield
the plus your chosen field(s). See the "List of fields for field parameter" below.Issue key
List of fields for field parameter (XML exports):
Show me...

Documentation for JIRA Service Desk 3.1
173
Created in 2016 by Atlassian. Licensed under a .Creative Commons Attribution 2.5 Australia License
Value Sample XML output
title
<title>[TEST-4] This is a test</title>
link
<link>https://extranet.atlassian.com:443/jira/browse/TEST-4</link>
project (or )pid
<project id="10330" key="TST">Test</project>
description
<description>This is a detailed description of the issue.<description>
environment
<environment>Sydney network<environment>
key
<key id="22574">TEST-4</key>
summary
<summary>This is a test<summary>
type (or )issuetype
<type id="3" iconUrl="https://extranet.atlassian.com:443/jira/images/icons/task.gif">Task</type>
parent
<parent id="22620">TEST-5</parent>
priority
<priority id="4"
iconUrl="https://extranet.atlassian.com:443/jira/images/icons/priority_minor.gif">Minor<priority>
status
<status id="5"
iconUrl="https://extranet.atlassian.com:443/jira/images/icons/status_resolved.gif">Resolved</status>
resolution
<resolution id="1">Fixed</resolution>

Documentation for JIRA Service Desk 3.1
174
Created in 2016 by Atlassian. Licensed under a .Creative Commons Attribution 2.5 Australia License
labels
<labels>
<label>focus</label>
<labels>
assignee
<assignee username="jsmith">John Smith</assignee>
reporter
<assignee username="jsmith">John Smith</assignee>
security
<security id="10021">Private</security>
created
<created>Mon, 1 Sep 2008 17:30:03 -0500 (CDT)>/created>
updated
<updated>Mon, 1 Sep 2008 17:30:03 -0500 (CDT)>/updated>
resolved (or )resolutiondate
<resolved>Mon, 1 Sep 2008 17:30:03 -0500 (CDT)>/resolved>
due (or )duedate
<due>Mon, 1 Sep 2008 17:30:03 -0500 (CDT)>/due>
version (or )versions
<version>2.4.7</version>
fixfor (or )fixVersions
<fixVersion>2.6</fixVersion>
component (or )components
<component>Documentation</component>
votes
<votes>1</votes>

Documentation for JIRA Service Desk 3.1
175
Created in 2016 by Atlassian. Licensed under a .Creative Commons Attribution 2.5 Australia License
comments (or )comment
<comments>
<comment id="39270" author="jsmith" created="Tue, 24 Feb 2009 16:45:02 -0600 (CST)">this looks
familiar</comment>
<comment id="39273" author="jbrown" created="Tue, 24 Feb 2009 16:48:16 -0600 (CST)">to me
too</comment>
</comments>
attachments (or )attachment
<attachments>
<attachment id="30318" name="Issue Navigator - Atlassian JIRA-2.png" size="16161" author="yoz"
created="Mon, 9 Feb 2009 13:32:58 -0600 (CST)"/>
<attachment id="30323" name="Windows XP (with Firefox 3.0).jpg" size="5802" author="vbharara"
created="Tue, 10 Feb 2009 00:30:11 -0600 (CST)"/>
</attachments>
timeoriginalestimate
<timeoriginalestimate seconds="600">10 minutes</timeoriginalestimate>
timeestimate
<timeestimate seconds="300">5 minutes</timeestimate>
timespent
<timespent seconds="300">5 minutes</timespent>
aggregatetimeoriginalestimate
<aggregatetimeoriginalestimate seconds="36000">10 hours</aggregatetimeoriginalestimate>
aggregatetimeestimate
<aggregatetimeremainingestimate seconds="18000">5 hours</aggregatetimeremainingestimate>
aggregatetimespent
<aggregatetimespent seconds="18000">5 hours</aggregatetimespent>
timetracking
<timeoriginalestimate seconds="600">10 minutes</timeoriginalestimate>
<timeestimate seconds="300">5 minutes</timeestimate>
<timespent seconds="300">5 minutes</timespent>
<aggregatetimeoriginalestimate seconds="36000">10 hours</aggregatetimeoriginalestimate>
<aggregatetimeremainingestimate seconds="18000">5 hours</aggregatetimeremainingestimate>
<aggregatetimespent seconds="18000">5 hours</aggregatetimespent>

Documentation for JIRA Service Desk 3.1
176
Created in 2016 by Atlassian. Licensed under a .Creative Commons Attribution 2.5 Australia License
issuelinks
<issuelinks>
<issuelinktype id="10020">
<name>Duplicate</name>
<inwardlinks description="is duplicated by">
<issuelink>
<issuekey id="22477">INTSYS-1009</issuekey>
</issuelink>
</inwardlinks>
</issuelinktype>
</issuelinks>
subtasks (or )subtask
<subtasks>
<subtask id="22623">TEST-8</subtask>
</subtasks>
customfield_xxxxx
<customfields>
<customfield id="customfield_10112"
key="com.atlassian.jira.plugin.system.customfieldtypes:select">
<customfieldname>Department</customfieldname>
<customfieldvalues>
<customfieldvalue>Adminstration</customfieldvalue>
</customfieldvalues>
</customfield>
</customfields>
allcustom
<customfields>
<customfield id="customfield_10112"
key="com.atlassian.jira.plugin.system.customfieldtypes:select">
<customfieldname>Department</customfieldname>
<customfieldvalues>
<customfieldvalue>Adminstration</customfieldvalue>
</customfieldvalues>
</customfield>
<customfield id="customfield_10111"
key="com.atlassian.jira.plugin.system.customfieldtypes:select">
<customfieldname>Expenditure Type</customfieldname>
<customfieldvalues>
<customfieldvalue>Operating</customfieldvalue>
</customfieldvalues>
</customfield>
</customfields>
Subscribing to your search results
A subscription provides you with a periodic notification for all issues returned by the search. If you want to be
notified when a particular issue changes, you should watch the issue instead.

Documentation for JIRA Service Desk 3.1
177
Created in 2016 by Atlassian. Licensed under a .Creative Commons Attribution 2.5 Australia License
1.
2.
Email
Your search must be saved as a filter, if you want to create an email subscription for it. You can
create a subscription of any frequency for yourself and/or other users. Note, only the first 200
results of a filter are sent.
Run the filter that you want to subscribe to, then click (next to filter name).Details
Fill in the 'Filter Subscription form' and click .Subscribe
More information:
If you choose 'Advanced' for your , see for help on constructing CronSchedule this page
expressions.
If you want to specify a group as a recipient:
You must have the 'Manage Group Filter Subscriptions' global permission.
Be aware that the emailed filter results will be specific to each recipient. For example, if the
filter uses the function, the search results will be evaluated with thecurrentUser()
recipient as the current user. This does not apply to distribution lists (group email aliases).
Be careful about sharing a subscription with a group with many members, as it can take a
long time to generate the emails to be sent, since the search needs to be executed for
each user (as per the previous point).
RSS
Click > or > . The URL of the page that showsExport RSS (Issues) Export RSS (Comments)
can be used in your feed reader.
Tips:
You can change the number of issues that are returned, by changing the value of the tempMa
parameter in the URL.x
If you only want to receive current comments in an RSS feed, use the fieldDate Updated
when doing a search. For example, to only receive comments created in the last week, add
the Date Update field and set it to updated within the last 1 week.
You may need to log into your JIRA applications to view restricted data in your feed. If so, you
can add to the feed URL os_authType=basic
(e.g. ) to show a login dialoghttp://mycompany.com/anypage?os_authType=basic
when viewing the feed.
Bulk modifying issues in your search results
Bulk operations let you action multiple issues at once. These actions include transitioning issues, deleting
issues, moving issues, and watching/unwatching issues.
Click > Bulk Change: and follow the 'Bulk Operation' wizard.Tools all <N> issue(s)
For more information, see .Editing multiple issues at the same time
Next steps
Read the following related topics:
Searching for issues
Constructing cron expressions for a filter subscription
Constructing cron expressions for a filter subscription
This page describes how to construct a cron expression. Cron expressions can be used when creating a
subscription to a filter, as described in Working with search results.
A cron expression gives you more control over the frequency, compared to the default schedules. For example,
you could define a cron expression to notify you at 8:15 am on the second Friday of every month.
Constructing a cron expression
A cron expression is a string of fields separated by spaces. The following table displays the fields of a cron
expression, :in the order that they must be specified (from left to right)

Documentation for JIRA Service Desk 3.1
178
Created in 2016 by Atlassian. Licensed under a .Creative Commons Attribution 2.5 Australia License
Second Minute Hour Day-of-month Month Day-of-week Year
(optional)
Allowed
values
0-59 0-59 0-23 1-31 1-12 or
JAN-DEC
1-7 or
SUN-SAT
1970-2099
Allowed
special
characters
, - * / , - * / , - * / , - * / ? L W C , - * / , - * / ? L C # , - * /
Note, cron expressions are not case-sensitive.
Here is an example:
0 15 8 ? JAN MON 2014
This literally translates to 0 second, 15 minute, 8 hour, any day of the month, January, 2014.
In plain English, this represents 8:15am on every Monday during January of 2014. Note, the ? character means
"no particular value". In this example, we've set the Day-of-month to no particular value. We don't need to
specify it, as we've specified a Day-of-week value. Read more about special characters in the next section.
More examples of cron expressions are explained in the at the bottom of this page.Examples section
Special characters
Special
character
Usage
,
Specifies a list of values. For example, in the field, 'MON,WED,FRI' means 'everyDay-of-week
Monday, Wednesday, and Friday'.
-
Specifies a range of values. For example, in the field, 'MON-FRI' means 'everyDay-of-week
Monday, Tuesday, Wednesday, Thursday and Friday'.
*
Specifies all possible values. For example, in the field, '*' means 'every hour of the day'.Hour
/
Specifies increments to the given value. For example, in the field, '0/15' means 'every 15Minute
minutes during the hour, starting at minute zero'.
? Specifies no particular value. This is useful when you need to specify a value for one of the two
fields or but not the other.Day-of-month Day-of-week,
L
Specifies the last possible value; this has different meanings depending on context. In the Day-of
field, 'L' on its own means 'the last day of every week' (i.e. 'every Saturday'), or if used-week
after another value, means 'the last xxx day of the month' (e.g. 'SATL' and '7L' both mean 'the
last Saturday of the month). In the field, 'L' on its own means 'the last day of theDay-of-month
month', or 'LW' means 'the last weekday of the month'.
W Specifies the weekday (Monday-Friday) nearest the given day of the month. For example, '1W'
means 'the nearest weekday to the 1st of the month' (note that if the 1st is a Saturday, the email
will be sent on the nearest weekday i.e. on Monday 3rd). 'W' can only bewithin the same month,
used when the day-of-month is a single day, not a range or list of days.
# Specifies the nth occurrence of a given day of the week. For example, 'TUES#2' (or '3#2') means
'the second Tuesday of the month'.
Examples
0 15 8 ? * *
Every day at 8:15 pm.
0 15 8 * * ?
Every day at 8:15 am.

Documentation for JIRA Service Desk 3.1
179
Created in 2016 by Atlassian. Licensed under a .Creative Commons Attribution 2.5 Australia License
0 * 14 * * ?
Every minute starting at 2:00 pm and ending at 2:59 pm, every day.
0 0/5 14 * * ?
Every 5 minutes starting at 2:00 pm and ending at 2:55 pm, every day.
0 0/5 14,18 * *
?
Every 5 minutes starting at 2:00 pm and ending at 2:55 pm, AND every 5 minutes
starting at 6:00 pm and ending at 6:55 pm, every day.
0 0-5 14 * * ?
Every minute starting at 2:00 pm and ending at 2:05 pm, every day.
0 0/10 * * * ?
*
Every 10 minutes, forever.
0 10,44 14 ? 3
WED
2:10 pm and 2:44 pm every Wednesday in the month of March.
0 15 8 ? *
MON-FRI
8:15 am every Monday, Tuesday, Wednesday, Thursday, and Friday.
0 15 8 15 * ?
8:15 am on the 15th day of every month.
0 15 8 L * ?
8:15 am on the last day of every month.
0 15 8 LW * ?
8:15 am on the last weekday of every month.
0 15 8 ? * 6L
8:15 am on the last Friday of every month.
0 15 8 ? * 6#2
8:15 am on the second Friday of every month.
0 15 8 ? * 6#2
2007-2009
8:15 am on the second Friday of every month during the years 2007, 2008, and 2009.
Configuring dashboards
Your dashboard is the main display you see when you log in to your project.
You can create multiple dashboards for different projects, or multiple
dashboards for one big project. Each project has a default dashboard, or
you can create a personal dashboard and add gadgets to keep track of
assignments and issues you're working on. Dashboards are designed to
display gadgets that help your organize your projects, assignments, and
achievements in different charts.
You can see all dashboards by selecting the drop-down fromDashboards
your JIRA application header.
On this page:
About the
default
dashboard
Creating a
dashboard
Managing
dashboard
s and
permission
s
Sharing
and editing
your
dashboard
Adding
favorite
dashboard
s
Note on
dashboard
permission
s
Setting up
a
Wallboard

Documentation for JIRA Service Desk 3.1
180
Created in 2016 by Atlassian. Licensed under a .Creative Commons Attribution 2.5 Australia License
1.
2.
3.
4.
5.
1.
2.
1.
2.
1.
2.
About the default dashboard
The gadgets on the default dashboard can be reordered and switched between the left and right columns.
Additional gadgets can also be added, while some gadgets can be configured. The layout of the dashboard
(e.g. number of columns) can also be configured.
All changes made to the default dashboard will also change the dashboards of all users currently using the
default dashboard. However, gadgets that users do not have permissions to see will not be displayed to
them. For example, the 'Administration' gadget, although it may exist in the default dashboard configuration,
will not be visible to non-admin users.
Creating a dashboard
You can easily create and customize your own dashboard to display the information you need. Note that only
administrators can customize the default dashboard for your project.
At the top right of the Dashboard, click the menu.Tools
Select either to create a blank dashboard, or to create a copyCreate Dashboard Copy Dashboard
of the dashboard you are currently viewing.
Name and describe your dashboard.
Fill out the rest of the fields as applicable.
Click .Add
By default, sharing is set to private if you have not specified a personal preference. You can adjust this
setting in the sharing preferences in your , and change dashboard permissions at any time inuser profile
the Manage Dashboards page.
Choosing a dashboard layout
To choose a different layout for your dashboard page (e.g. three columns instead of two):
At the top right of the Dashboard, click the ' ' link. A selection of layouts will be displayed:Edit Layout
Select your preferred layout.
Managing gadgets
To get the most out of your dashboard, including adding, rearranging, removing, and configuring gadgets,
see . Adding and customizing gadgets
Managing dashboards and permissions
You can edit, delete, copy, mark favorites, and share your dashboards from the Manage Dashboards page.
Select > .Dashboards Manage Dashboards
Choose the dashboard.
Sharing and editing your dashboard
You can edit the details for your dashboard, and restrict or share with other users according to the
permissions that are set. In addition, you can see all the dashboards you've created, any public dashboards,
and any shared dashboards.
Click
> >Edit/Share Add sharing permissions.
Edit the settings.

Documentation for JIRA Service Desk 3.1
181
Created in 2016 by Atlassian. Licensed under a .Creative Commons Attribution 2.5 Australia License
1.
2.
3.
Adding favorite dashboards
If you find a dashboard you like, click the star icon next to its name to add it to your favorite dashboards list.
You can also add the default dashboard to your favorites list so it's easily available to you.
Note on dashboard permissions
JIRA administrators, as set in global permissions, can manage their users' shared dashboards in the Shared
menu. Administrators can also change the ownership of a dashboard if the creator is unable todashboards
maintain the dashboard or its gadgets. See for more information.Managing shared dashboards
Setting up a Wallboard
Turn any JIRA application dashboard into a wallboard by plugging your computer into a TV monitor. The
Wallboard is a dashboard that acts as an information radiator to provide instant visual insight intogadget
project progress and team accomplishments. With your favorite dashboard selected, click Tools > View as
. The dashboard will appear against a black background, and will rotate gadgets if the userWallboard
enables the slideshow option.
The Wallboard below shows the same gadgets and data above.Created vs. Resolved Issues
Adding and customizing gadgets
Adding a gadget to a dashboard
You can add gadgets to your own personal dashboard(s). To add a gadget to the default dashboard for your
JIRA application, you must be a JIRA admin.
Some applications allow dashboards that are shared by groups of people. If you have permission to update a
shared dashboard, the other people sharing the dashboard will see your changes, too.
Go to the dashboard by selecting the link in the header.Dashboard
On the dashboard, Click .Add Gadget
Use the gadget wizard to choose the gadgets you want to add. You can see a list of these gadgets in Gad
.gets for JIRA applications
For more information about managing dashboards, see .Configuring dashboards
Customizing how gadgets look

Documentation for JIRA Service Desk 3.1
182
Created in 2016 by Atlassian. Licensed under a .Creative Commons Attribution 2.5 Australia License
There are a few ways you can customize the view of gadgets in a dashboard:
To Do this
Expand or
collapse
gadgets
Use the
button in the gadget header.
Expand a
gadget to take
up the entire
dashboard
Use the
button in the gadget header.
Notes...
This view often provides more functionality than is available in the standard view of the
gadget. Only some gadgets provide the maximized or canvas view. The canvas view
setting is stored in a cookie, and is not saved to the dashboard server.
Rearrange
gadgets
Use the
button in the gadget header.
Customize the
gadget frames
Delete a gadget
Use the
button in the gadget header.
Custom gadgets
You need administrator privileges to add a gadget to the list of available gadgets. If you have permission to add
gadgets to and remove gadgets from the directory itself, you will see the ' ' and 'Add Gadget to Directory Remov
' buttons on the 'Add Gadget' screen. This functionality is only available for the Server version of applications; e if
you would like to add an Atlassian gadget to a directory in your Cloud site, please contact Atlassian Support.
Gadgets for JIRA applications
Gadgets let you customize the information that appears on dashboards in JIRA applications (or on your
wallboards, if you use dashboards for that purpose). This page lists all of the gadgets available for JIRA
applications and which ones they're available for.
Gadget
JIRA
Core
JIRA
Software
JIRA
Service
Desk
Use it to
Activity
Stream
See the activity in your instance: it's like a Facebook feed for your in
!stance
Sprint
Burndown
Gadget
See the burndown for a given sprint in a handy line chart.
Notes...
The vertical axis represents your configured estimation
.statistic
The gadget will only display sprints that have not been comp
.leted

Documentation for JIRA Service Desk 3.1
183
Created in 2016 by Atlassian. Licensed under a .Creative Commons Attribution 2.5 Australia License
Sprint
Health
Gadget
Seeing a summary of the issues in a sprint in a handy color-coded
bar graph.
Notes...
The colors in this gadget match the colors in your column
configuration.
The work completed is calculated based on the estimation
statistic used for your board. This is reflected by the green
part of the progress bar. For example, if you have 50 story
points in a sprint and you have 3 issues with 10 story points
that have been resolved, the 'Work complete' will be 20%
(i.e. 10 out of 50 story points).
The gadget won't reflect the progress from work logged in
the 'Remaining Estimate' and 'Time Spent' fields in JIRA.
Adding or removing an issue from a sprint, after it has
started is considered a change of scope. The percentage is
calculated using the statistic that is configured for the board.
For example, if you started a sprint with 50 story points and
add an issue with 5 story points, the Sprint Health gadget
would show a 10% scope change.
If you add/remove issues that don't have estimates, the
scope change will not be altered.
If you're using Time Tracking, Scope Change will not be
shown.
The "blocker" field counts all blockers that are in 'To Do' or
'In Progress'.
Version
Report
Track the projected release date for a version. This helps you
monitor whether the version will release on time, so you can take
action if work is falling behind.
Agile
Wallboard
Gadget
Know how you're tracking with an agile board displayed on your
wallboard (or dashboard).
Assigned to
Me
Quickly see all the unresolved issues assigned to you.
Average
Age Chart
Want to know the average age of unresolved issues? This gadget
tells you just that.
Notes...
The report is based on your choice of project or issue filter,
and your chosen units of time (i.e. hours, days, weeks,
months, quarters or years).
For the purposes of this gadget, an issue is defined as
unresolved if it has no value in the system resolution field.
The age of an issue is the difference between the current
date and the created date of the issue.
Average
Number of
Times in
Status
Displays the average number of times issues have been in a status.
Average
Time in
Status
Displays the average number of days issues have spent in status.

Documentation for JIRA Service Desk 3.1
184
Created in 2016 by Atlassian. Licensed under a .Creative Commons Attribution 2.5 Australia License
Bamboo
Charts
Checking out Bamboo plan stats in your dashboard.
Notes...
Your JIRA administrator must have configured the Bamboo
, if you want to add the Bambooplugin on your JIRA server
Charts gadget to your dashboard. If you have added multiple
Bamboo servers in JIRA there will be one Bamboo Charts
gadget available per server, e.g. 'Bamboo Charts Gadget
from ', 'Bamboo Charts Gadget from http://172.20.5.83:8085
', etc.http://172.19.6.93:8085
When you add this gadget to your JIRA dashboard, you may
see a message similar to this:
The website (container) you have placed this
gadget on is unauthorized. Please contact your
system administrator to have it approved.
To fix this problem, you will need to configure your Bamboo
site to allow JIRA to draw information from it via gadgets on
the JIRA dashboard. To do this, your JIRA administrator first
needs to define your JIRA site as an OAuth consumer in
. You will then be required to perform a once-offBamboo
authentication before your gadget will display correctly.
Bamboo
Plan
Summary
Chart
Seeing a graphical summary of a Bamboo build plan.
Notes...
Your JIRA administrator must have configured the Bamboo
, if you want to add the Bambooplugin on your JIRA server
Charts gadget to your dashboard. If you have added multiple
Bamboo servers in JIRA there will be one Bamboo Charts
gadget available per server, e.g. 'Bamboo Charts Gadget
from ', 'Bamboo Charts Gadget from http://172.20.5.83:8085
', etc.http://172.19.6.93:8085
When you add this gadget to your JIRA dashboard, you may
see a message similar to this:
The website (container) you have placed this
gadget on is unauthorized. Please contact your
system administrator to have it approved.
To fix this problem, you will need to configure your Bamboo
site to allow JIRA to draw information from it via gadgets on
the JIRA dashboard. To do this, your JIRA administrator first
needs to define your JIRA site as an OAuth consumer in
. You will then be required to perform a once-offBamboo
authentication before your gadget will display correctly.

Documentation for JIRA Service Desk 3.1
185
Created in 2016 by Atlassian. Licensed under a .Creative Commons Attribution 2.5 Australia License
Bamboo
Plans
Seeing a list of all on a particular Bamboo server and eachplans
plan's current status.
Notes...
Your JIRA administrator must have configured the Bamboo
, if you want to add the Bambooplugin on your JIRA server
Charts gadget to your dashboard. If you have added multiple
Bamboo servers in JIRA there will be one Bamboo Charts
gadget available per server, e.g. 'Bamboo Charts Gadget
from ', 'Bamboo Charts Gadget from http://172.20.5.83:8085
', etc.http://172.19.6.93:8085
When you add this gadget to your JIRA dashboard, you may
see a message similar to this:
The website (container) you have placed this
gadget on is unauthorized. Please contact your
system administrator to have it approved.
To fix this problem, you will need to configure your Bamboo
site to allow JIRA to draw information from it via gadgets on
the JIRA dashboard. To do this, your JIRA administrator first
needs to define your JIRA site as an OAuth consumer in
. You will then be required to perform a once-offBamboo
authentication before your gadget will display correctly.
Clover
Coverage
Seeing the Clover coverage of plans from a particular Bamboo
server.
Notes...
Your JIRA administrator must have configured the Bamboo
, if you want to add the Bambooplugin on your JIRA server
Charts gadget to your dashboard. If you have added multiple
Bamboo servers in JIRA there will be one Bamboo Charts
gadget available per server, e.g. 'Bamboo Charts Gadget
from ', 'Bamboo Charts Gadget from http://172.20.5.83:8085
', etc.http://172.19.6.93:8085
When you add this gadget to your JIRA dashboard, you may
see a message similar to this:
The website (container) you have placed this
gadget on is unauthorized. Please contact your
system administrator to have it approved.
To fix this problem, you will need to configure your Bamboo
site to allow JIRA to draw information from it via gadgets on
the JIRA dashboard. To do this, your JIRA administrator first
needs to define your JIRA site as an OAuth consumer in
. You will then be required to perform a once-offBamboo
authentication before your gadget will display correctly.
Created vs.
Resolved
Chart
Checking your progress by seeing the number of issues created vs
number of issues resolved over a given period of time.
Notes...
The chart is based on your choice of project or issue filter,
and the chart can either be cumulative or not.
An issue is marked as resolved in a period if it has a
resolution date in that period.
The resolution date is the last date that the fieldResolution
was set to any non-empty value.

Documentation for JIRA Service Desk 3.1
186
Created in 2016 by Atlassian. Licensed under a .Creative Commons Attribution 2.5 Australia License
Crucible
Charts
Seeing statistical summaries of your code reviews.
Notes...
Your JIRA administrator must have configured the FishEye
, if you want to add the Crucibleplugin on your JIRA server
Charts gadget to your dashboard (not applicable to JIRA
Cloud).
Days
Remaining
in Sprint
Gadget
Countdown! See how many working days you have before the
current sprint ends.
Favorite
Filters
See a list of all the issue filters that have currently been added by
you as a favorite filter.
Filter
Results
Seeing the results of a specified issue filter on the dashboard.
FishEye
Charts
Chart LOC data from a FishEye repository.
FishEye
Recent
Changesets
Get two charts about your repo in one: lines of code and commit
activity.
Notes...
Your JIRA administrator must have configured the FishEye
, if you want to add the Crucibleplugin on your JIRA server
Charts gadget to your dashboard (not applicable to JIRA
Cloud).
Introduction
Say hello to users with a configurable message on the dashboard.
Notes...
The text/html displayed in the introduction gadget is
configured by your JIRA administrator, through the JIRA
configuration page.
Issue
Statistics
See the issues returned from a specified project or saved filter
(grouped by a specified field).
Issues In
Progress
Time to work! See all issues that are currently in progress and
assigned to you.
JIRA Issues
Calendar
Generating a calendar-based view of due dates for issues and
versions
Notes...
The JIRA Calendar plugin is required for this gadget to be
available.
JIRA Road
Map
See which versions are due for release in a given period, as well as
a summary of the progress made towards completing the issues in
the versions.
Labels
Gadget
Use this gadget to see a list of all the labels used in a given project.
Pie Chart
See the issues returned from a specified project or issue filter,
grouped by a specified field.

Documentation for JIRA Service Desk 3.1
187
Created in 2016 by Atlassian. Licensed under a .Creative Commons Attribution 2.5 Australia License
Quick Links
Link to frequently-used searches and operations.
Recently
Created
Chart
See the rate at which issues are being created, as well as how
many of those created issues are resolved - all in a bar chart.
Resolution
Time
Check trends in the average time taken to resolve issues.
Notes...
The report is based on your choice of project or issue filter,
and your chosen units of time (ie. hours, days, weeks,
months, quarters or years).
The 'Resolution Time' is the difference between an issue's
Resolution Date and Created date.
If a Resolution Date is not set, the issue won't be counted in
this gadget.
The Resolution Date is the last date that the system
Resolution field was set to any non-empty value.
Text
Display your specified HTML text on the dashboard.
Notes...
This gadget is only available if your JIRA administrator has
enabled it. It is disabled by default because it is a potential
security risk, as it can contain arbitrary HTML which could
potentially make your JIRA system vulnerable to XSS
attacks.
To enable the text gadget: Choose
. The 'Find add-ons' screen shows add-ons> Add-ons
available via the . Choose Atlassian Marketplace Manage
to view the plugins currently installed on your JIRA add-ons
site. Enable the module in the Text Atlassian JIRA -
(You need to select the SystemPlugins - Gadgets Plugin
add-ons from the drop-down).
If you cannot enable the text gadget, please contact Atlassia
for assistance.n Support
Test
Sessions
View a list of test sessions.
Time Since
Chart
See a bar chart showing the number of issues for which your
chosen field (e.g. 'Created', 'Updated', 'Due', 'Resolved', or a
custom field) was set on a given date.
Notes...
'Resolved' here is the system Resolution Date field, which is
the last date that the system Resolution field was set to any
non-empty value.
The report is based on your choice of project or issue filter,
and your chosen units of time (ie. hours, days, weeks,
months, quarters or years).
Time to
First
Response
Displays the number of hours taken to respond to issues for a
project or filter.
Two
Dimensional
Filter
Statistics
See data based on a specified issue filter (For example, you could
create a filter to retrieve all open issues in a particular project. You
can then configure the gadget to display the statistical data on this
collection of issues, in a table with configurable axes.
Voted
Issues
See all the issues you've voted for.

Documentation for JIRA Service Desk 3.1
188
Created in 2016 by Atlassian. Licensed under a .Creative Commons Attribution 2.5 Australia License
Watched
Issues
Seeing all the issues you're watching.
Workload
Pie Chart
Displays the matching issues for a project or filter as a pie chart.
Managing your user profile
You can manage your JIRA settings (e.g. your password, email address, or
the format in which you would like to receive email notifications) in your user
profile. Your user profile also displays recent work in the Activity Stream,
and contains useful shortcuts to issues you have been working on or
reported.
To manage your user profile:
Choose your user name at top right of the screen, then choose Profile.
On this page:
Editing
your user
details
Changing
your avatar
Choosing
your
homepage
Managing
email
notification
s
Managing
your user
preference
s
Managing
service
desk
preference
s
Managing
your
OAuth and
login
tokens
Editing your user details
In the section on the page, click the edit icon Details Summary
at the top-right of the section to edit your display name, email address, and password. If
your JIRA administrator has configured the user directory with external password management, the Change
link will not be available. Password
Changing your avatar
Select
or your current avatar to change the image that appears next to your name in JIRA. If your administrator
has , your Gravatar (i.e. the Gravatar associated with the email address inenabled Gravatar for user avatars
your user profile) will automatically be set as your user avatar. If Gravatar has been enabled, you will not be
able to choose JIRA -specific user avatars and vice versa. using . If Gravatar has beenGravatar.com
disabled, you can choose your user avatar from the ones pre-packaged with JIRA or upload your own.
Your cropped image is resized to 48x48 pixels before it is saved as your new custom user
avatar.
A separate 16x16 pixel version of your custom user avatar will be generated for use
in comments.
Custom user avatars can only be selected by the user who uploaded them.

Documentation for JIRA Service Desk 3.1
189
Created in 2016 by Atlassian. Licensed under a .Creative Commons Attribution 2.5 Australia License
1.
2.
3.
Choosing your homepage
Your home page is the page you are presented with immediately after you log in.JIRA JIRA
You can configure the following pages as your home page:JIRA JIRA
The Dashboard
The Issue Navigator
The Rapid Board (available if you're using JIRA Software)
Click on your icon at the top right of the screen.profile
Select the appropriate home page option within the section:My HomeJIRA
Dashboard
Issue Navigator
Rapid Board (available if you're using JIRA Software)
Your page will be reloaded the home page you selected.JIRA
(Optional) To verify that your home page has been reset, log out and log back in to again.JIRA JIRA
You should be taken directly to the home page you selected in the previous step.JIRA
Managing email notifications
In the section on the page, click the icon Preferences Summary edit
at the top-right of the section to open the dialog box. You can then manage theUpdated User Preferences
following:
Change the to change tEmail Type he format (plain text or HTML) in which JIRA sends its outgoing
email notifications.
In , Choose between making JIRA send you email notifications about issue updatesMy Changes
made by either both you and other people (Notify me) or other people only (i.e. Do not notify me).
Managing your user preferences
The global defaults for most of the user preferences below can be set by your JIRA administrator; however,
you can override these default settings by changing the following:
The , or number of issues dPage Size isplayed on each Issue Navigator page
Your preferred from the drop-down list. language If you don't see your preferred language in the list,
see for more information.Translating JIRA
Your specified in your profile doesn't match the time zone of the computer you are workingtime zone
on, JIRA will ask if you want to update this selected time zone setting. All time fields in JIRA will now
be displayed in your preferred time zone.
Choose the default setting for when you create new filters and dashboards, which can beSharing
either shared with all other users (Public) or restricted.
Choose to enable or disable JIRA's keyboard shortcuts feature.
Choose between allowing JIRA to make you an autowatcher of any issue that you create or comment
on.
Managing service desk preferences
Service desk agents can enable or disable the field by editing their userPre-populated commenting
profiles. This setting can help save time by pre-filling conversation greeting text when agents comment on
customer issues. When enabled the following text appears in the comment field and in the email notification
sent to customers:

Documentation for JIRA Service Desk 3.1
190
Created in 2016 by Atlassian. Licensed under a .Creative Commons Attribution 2.5 Australia License
1.
2.
Managing your OAuth and login tokens
An OAuth access token is issued by JIRA to give gadgets access to restricted data on an external,
OAuth-compliant web application or website (also known as a "consumer"). Check out Allowing OAuth
access for recommendations on when to issue or revoke OAuth access tokens.
If you are accessing your JIRA applications in a public environment, you can clear you login tokens by
clicking the link in the Details section of your Profile.Clear all Tokens
Allowing OAuth access
About OAuth access tokens
OAuth access tokens allow you to:
Use a JIRA gadget on an external, OAuth-compliant web application
or website (also known as a 'consumer')
Grant this gadget access to JIRA data which is restricted or privy to
your JIRA user account.
Before you begin
Your JIRA administrator must establish an OAuth relationship with this
external web application or by approving it as an OAuth consumer.instance
For example, if you want to add a JIRA gadget to your Bamboo homepage
and allow this gadget to access your restricted JIRA data, then
your JIRA administrator must first approve Bamboo as an OAuth consumer.
On this page:
About
OAuth
access
tokens
Before you
begin
Issuing
OAuth
access
tokens
Revoking
OAuth
access
tokens
The JIRA gadget on the 'consumer' is granted access to your JIRA data via an 'OAuth access token', which
acts as a type of 'key'. As long as the consumer is in possession of this access token, the JIRA gadget will be
able to access JIRA data that is both publicly available and privy to your JIRA user account. You can revoke
this access token at any time from your JIRA user account, otherwise, all access tokens expire after seven
days. Once the access token is revoked or has expired, the JIRA gadget will only have access to publicly
available data on your JIRA .instance
An OAuth access token will only appear in your user profile if the following conditions have been
met:
Your JIRA Administrator has established an application link using OAuth between your JIRA instance
and the consumer. JIRA Administrators should refer to .Using AppLinks to link to other applications
You have accessed a JIRA gadget on a consumer and have allowed this gadget access to your
JIRA data. See below for details on this process.Issuing OAuth access tokens
Screenshot: Viewing your OAuth Access Tokens

Documentation for JIRA Service Desk 3.1
191
Created in 2016 by Atlassian. Licensed under a .Creative Commons Attribution 2.5 Australia License
1.
2.
3.
1.
2.
3.
Issuing OAuth access tokens
An OAuth access token is issued by JIRA to provide one of its gadgets on a consumer, access to your
JIRA data (that is, data which is restricted to your JIRA user account).
When you are using a JIRA gadget on a consumer (such as Bamboo) and this gadget requires access
to your JIRA data, you will first be prompted to log in to JIRA (if you have not already done so).
Once you have logged in to JIRA, you will be prompted with a ' ' message: Request for Access
Screenshot: Request for Access Message
At this point, JIRA is preparing to issue the JIRA gadget (on the consumer) with an OAuth access
token.
To grant the gadget access to your JIRA data, click the ' ' button. The consumerApprove Access
application will receive the OAuth access token from your JIRA . This access token is specificinstance
to this gadget and as long as the token resides with the gadget, your gadget will have access to your
JIRA data.
Revoking OAuth access tokens
You can revoke an OAuth access token to deny a JIRA gadget on a consumer access to JIRA data which is
restricted to your JIRA user account. You can only revoke OAuth access tokens that you have allowed JIRA
.to issue previously
Choose your user name at top right of the screen, then choose Profile.
Click the ' ' menu and select the ' ' menu item.Tools View OAuth Access Tokens
The ' ' page will be displayed. OAuth Access Tokens
Screenshot: Viewing your OAuth Access Tokens

Documentation for JIRA Service Desk 3.1
192
Created in 2016 by Atlassian. Licensed under a .Creative Commons Attribution 2.5 Australia License
3.
4.
5.
Your list of OAuth access tokens is presented in a tabular format, with each access token presented in
separate rows and each property of these tokens presented in a separate columns. Refer to the OAut
section below for more information about this table.h access token table details
Locate the JIRA gadget and its associated consumer application whose OAuth access token you wish
to revoke and click its 'Revoke OAuth Access Token' link in the 'Actions' column.
You may be prompted to confirm this action. If so, click the ' ' button. OK
The gadget's access token is revoked and the JIRA gadget on the consumer will only have access to
publicly available JIRA data.
OAuth access token table details
Column
name
Description
Consumer The name of the JIRA gadget that was added on the consumer.
Consumer
Description
A description of this consumer application. This information would have been obtained from
the consumer's own OAuth settings when an OAuth relationship was established between
JIRA and that consumer.
If the consumer is another Atlassian application, this information is obtained from the Con
tab's 'Description' field of the OAuth Administration settings. The application'ssumer Info
administrator can customize this Consumer Info detail.
Issued On The date on which the OAuth access token was issued to the consumer by JIRA. This would
have occurred immediately after you approved this gadget access to your JIRA data (privy to
your JIRA user account).

Documentation for JIRA Service Desk 3.1
193
Created in 2016 by Atlassian. Licensed under a .Creative Commons Attribution 2.5 Australia License
1.
2.
3.
4.
5.
6.
Expires On The date when the OAuth access token expires. This is seven days after the 'Issued On'
date. When this date is reached, the access token will be automatically removed from this
list.
Actions The functionality for .revoking the access token
Requesting add-ons
The website offers hundreds of add-ons that administrators can install to enhance andAtlassian Marketplace
extend your JIRA applications. If the add-on request feature is enabled for your instance, you can submit
requests for Marketplace add-ons directly to your administrator.
The 'Atlassian Marketplace for JIRA' page presents an integrated view of the Marketplace website from within
the JIRA user interface. The page offers the same features as the Marketplace website, such as add-on search
and category filtering, but tailors the browsing experience to JIRA application users.
This in-product view of the Marketplace gives day-to-day users of the Atlassian applications, not just
administrators, an easy way to discover the add-ons that can help them work. When you find an add-on of
interest, you can submit a request with just a few clicks.
Submitting an add-on request
From anywhere in the application, open your profile menu and choose .Atlassian Marketplace
In the Atlassian Marketplace page, use the search box to find add-ons or use the category menus to
browse or filter by add-ons by type, popularity, price or other criteria. You can see what your fellow users
have requested by choosing the filter.Most Requested
When you find an add-on that interests you, click to generate a request for your administrator.Request
Optionally, type a personal message to your administrators in the text box. This message is visible to
administrators in the details view for the add-on
When ready, click . Submit Request
Click to dismiss the 'Success!' message dialog box.Close
At this point, a notification appears in the interface your administrators use to administer add-ons. Also your
request message will appear in the add-on details view, visible from the administrator's 'Find New Add-ons'
page. From there, your administrator can purchase the add-on, try it out or dismiss requests.
Updating an add-on request
After submitting the request, you can update your message at any time. Click the button nextUpdate Request
to the listing in the 'Atlassian Marketplace' page to modify the message to your administrator.
The administrator is not notified of the update. However, your updated message will appear, as you have
modified it in the details view for the add-on immediately.
Using keyboard shortcuts
Keyboard shortcuts are a great way for you to speed up editing, navigating,
and for performing actions without having to take your fingers off the
keyboard.
Some keyboard shortcuts require additional permissions or applications, and
depend on how your JIRA administrator(s) have configured permissions for
your user account and which applications are installed.
On this page:
View
keyboard
shortcuts
Enabling
and
disabling
keyboard
shortcuts
View keyboard shortcuts
Choose
at top right of the screen, then choose .Keyboard Shortcuts
When viewing a page, press + .Shift /

Documentation for JIRA Service Desk 3.1
194
Created in 2016 by Atlassian. Licensed under a .Creative Commons Attribution 2.5 Australia License
1.
2.
The Keyboard Shortcuts dialog is displayed and shows commands for the operating system and browser that
you are using. The dialog is divided into sections for the following information:
Global shortcuts - shortcuts that can be used when you are in any part of JIRA
Navigating issues - shortcuts for navigating through issues
Issue actions - shortcuts for working with issues
App specific - any application-specific shortcuts. These shortcuts only work in the listed application.
More about the Keyboard Shortcuts dialog...
If you have other JIRA applications installed, you may have additional keyboard shortcuts available. For
example, if you have JIRA Software installed, you will see a series of additional keyboard shortcuts in the
lower-right of this dialog box (and some additional keyboard shortcuts specific to JIRA Software inGlobal
the upper-left section). However, the keyboard shortcuts in the section only function inAgile Shortcuts
JIRA Software, and not in a JIRA context.
Enabling and disabling keyboard shortcuts
Keyboard shortcuts are enabled by default. However, you can disable them on a per-user basis in
the Keyboard Shortcuts dialog box.
Ensure you are logged in and open the Keyboard Shortcuts dialog box (see ).above
At the bottom of the Keyboard Shortcuts dialog box, click or Disable Keyboard Shortcuts Enable
.Keyboard Shortcuts
You can also disable or re-enable keyboard shortcuts by editing the Preferences section of your user
profile. See for more information.Managing your user profile
Modifier keys
Some keyboard shortcuts require modifier keys to be pressed simultaneously, along with a single 'action'
key. Modifier keys may differ, depending on your combination of operating system and web browser. The
following table identifies the modifier keys for some supported web browsers and operating systems:
Web
Browser
Mac OS
X
Windows Linux/Solaris Notes
Firefox Ctrl Alt + Shift Alt + Shift In Firefox, it is possible to customize 'Modifier key
shortcuts'. Please read forMozilla's documentation
more information.
Internet
Explorer
Alt Typing a 'Modifier key shortcut' that leads to a link
requires you to press the 'Enter' to complete the
action.
Safari Ctrl +
Alt/Option
Ctrl
Chrome Ctrl +
Alt/Option
Alt + Shift Alt + Shift
Organizing work with components
Components are used to organize or group customer requests in a service
desk project. You could set up a component for systems that your teams are
responsible for (e.g. company intranet), and then set a sodefault assignee
that any customer request about that system is assigned to the agent who
manages it.
You need to have the project-specific orAdminister Projects permission
the to be able to:JIRA Administrator global permission
Add — create a new component against which issues can be aligned
Select a default assignee — choose who is automatically assigned
issues with that component assigned
Edit — change a components details

Documentation for JIRA Service Desk 3.1
195
Created in 2016 by Atlassian. Licensed under a .Creative Commons Attribution 2.5 Australia License
1.
2.
1.
2.
Delete — remove a component
Once a component has been created for a project, the 'Component' field
becomes available for your issues. If you cannot see this field on your issue,
your project may not have any components yet, or the field is hidden from
view.
On this page:
Managing
a project's
component
s
Adding a
new
component
Selecting a
default
assignee
Editing a
component
's details
Deleting a
component
Managing a project's components
The easiest way to manage a project's components is through the Components page.
Choose
> Projects, and click the name of the project.
Choose in the sidebar. The page is displayed, showing a list ofComponents Components
components and each component's details. From here, you can manage the project's components as
described below.
Adding a new component
The Add Component form is located at the top of the 'Components' screen.
Enter the for the component. Optionally, enter a and select a aName Description Component Lead
nd (see below).Default Assignee options
Selecting a default assignee
You can optionally set a for a component. This will override the project's default assignee fordefault assignee
issues in that component. If an issue has multiple components, and the default assignees of components
clash, the assignee will be set to the default assignee of the component that is first alphabetically.
Default
assignee
option
Description Notes
Project
Default
Issues matching
this component
will have the
assignee set to the
same default
assignee as the
parent project.
Project
Lead
The assignee will
be set to the
project leader.
If the project leader is not permitted to be assigned to issues in the
permission scheme, this option will be disabled and will say "Project
Lead is not allowed to be assigned issues".

Documentation for JIRA Service Desk 3.1
196
Created in 2016 by Atlassian. Licensed under a .Creative Commons Attribution 2.5 Australia License
1.
2.
3.
1.
2.
Component
Lead
The assignee will
be set to the
component leader.
If the component leader is not permitted to be assigned to issues in the
permission scheme, this option will be disabled and will say
"Component Lead is not allowed to be assigned issues". The
Component Lead option will also not be available if the component
does not have a lead assigned to the component. Instead, under this
option, it will say "Component does not have a lead".
Unassigned The assignee of
the issue will not
be set on the
creation of this
issue.
This option will only be available if "Allow unassigned issues" is
enabled in the general configuration.
Editing a component's details
On the 'Components' screen, hover over the relevant component to display the pencil icon.
Edit the component's , , and .Name Description, Lead Default Assignee
Click the button to save your changes.Update
Deleting a component
On the 'Components' screen, hover over the relevant component to display the button.Delete
You will be prompted to associate these issues with another component if you wish.
Organizing work with versions
Versions are points-in-time for a project. They help you organize your work
by giving you milestones to aim for. You can then assign the issues in your
project to a specific version, and build up the work you need to do to
complete that version.
On this page:
Managing
a project's
versions
Add a new
version
Release a
version
Archive a
version
Delete a
version
Merge
multiple
versions
Reschedul
e a version
You need to have the project-specific or the Administer Projects project permission JIRA Administrator gl
to be able to:obal permission
Add — create a new version against which issues can be aligned.
Release — mark a version as released.
Archive — hide an old version the Releases report, and in the user interface.from
Delete — remove a version. You must choose an action for any issues with that version.
Merge — combine multiple versions into one.
Reschedule — re-arrange the order of versions.
Once a version has been created for a project, the 'Affects version' and 'Fix version' fields will become
available for your issues. If you cannot see these fields on your issue, your project may not have any version
yet, or the fields are hidden from view.
Managing a project's versions

Documentation for JIRA Service Desk 3.1
197
Created in 2016 by Atlassian. Licensed under a .Creative Commons Attribution 2.5 Australia License
1.
2.
1.
2.
3.
4.
1.
2.
1.
2.
The easiest way to manage a project's versions is through the Versions page.
Choose
> Projects, and click the name of the project.
Choose in the sidebar. The page is displayed, showing a list of versions.Versions Versions
Screenshot: The 'Versions' page
Add a new version
The Add Version form is located at the top of the 'Versions' page.
Enter the name for the version. The name can be:
simple numeric, e.g. "2.1", or
complicated numeric, e.g. "2.1.3", or
a word, such as the project's internal code-name, e.g. "Memphis".
Optional details such as the version description (text not HTML), start date and release date (i.e. plthe
anned release date for a version) can be also be specified. These can be changed later if required.
Click the button. You can drag the new version to a different position by hovering over the 'drag'Add
icon
at the left of the version name.
Release a version
On the 'Versions' page, hover over the relevant version to display the cog icon, then select frRelease
om the drop-down menu.
If there are any issues set with this version as their 'Fix For' version, JIRA allows you to choose to
change the 'Fix For' version if you wish. Otherwise, the operation will complete without modifying
these issues.
Archive a version
On the 'Versions' page, hover over the relevant version to display the cog icon, then select froArchive
m the drop-down menu.
The version list indicates the version 'archived' status with a semi-transparent icon. No further changes
can be made to this version unless it is un-archived. Also it is not possible to remove any existing
archived versions from an issue's affected and fix version fields or add any new archived versions.
To revert the release of a version, simply select from the drop-down menu.Unrelease
To revert the archive of a version, simply select from the drop-down menu.Unarchive

Documentation for JIRA Service Desk 3.1
198
Created in 2016 by Atlassian. Licensed under a .Creative Commons Attribution 2.5 Australia License
1.
2.
1.
2.
3.
Delete a version
On the 'Versions' page, hover over the relevant version to display the cog icon, then select froDelete
m the drop-down menu.
This will bring you to the 'Delete Version: <Version>' confirmation page. From here, you can specify
the actions to be taken for issues associated with the version to be deleted. You can either associate
these issues with another version, or simply remove references to the version to be deleted.
Merge multiple versions
Merging multiple versions allows you to move the issues from one or more versions to another version.
On the 'Versions' page, click the link at the top right of the page.Merge
The 'Merge Versions' popup will be displayed. On this page are two select lists — both listing all
un-archived versions.
In the 'Merging From Versions' select list, choose the version(s) whose issues you wish to move. Versi
selected this list will be removed from the system. All issues associated with these versions willons on
be updated to reflect the new version selected in the 'Merge To Version' select list. It is only possible
to select one version to merge to.
Click the button. If you are shown a confirmation page, click again to complete theMerge Merge
operation.
Reschedule a version
Recheduling a version changes its place in the order of versions.
On the 'Versions' page, click the
icon for the relevant version, and drag it to its new position in the version order.
Setting up service desk reports
JIRA Service Desk provides powerful realtime reporting functionality so you
can see your team's performance metrics:
You can also create your own custom reports to query any combination of
performance data. Your team members have access to a read-only version
of the tab so they can also see the data you're tracking. To createReports
and edit reports, make sure you're logged in as an administrator.
On this page:
What
makes up
a service
desk report
Create a
new report
What makes up a service desk report
Each report consists of one or more series. A report series is composed of a predefined series (e.g. issues
created), or a time metric series (e.g. time to resolution). For each series, you need to select a label and color
to easily identify the data points in this series on your report, and define which issues should be counted with
a . When you create a service desk project for the first time, you'll see the following defaultJQL statement
reports depending on the project template you select:

Documentation for JIRA Service Desk 3.1
199
Created in 2016 by Atlassian. Licensed under a .Creative Commons Attribution 2.5 Australia License
1.
2.
3.
4.
5.
Project
template
Report
groups
Default
reports
Details
Basic
Service
Desk &
IT Service
Desk
Team Workload Shows how many requests your team is working on to help you
ensure that your team's workload is evenly distributed
SLA goals Shows how your team is tracking towards each of the SLA goals
you have set
Satisfaction Shows the average customer satisfaction rating for your team if
you have opted to collect customer feedback
Created vs
Resolved
Compares the number of issues that have been created by
customers and resolved by your team in a specified time period
Time to
resolution
Compares the length of time taken to resolve requests of varying
type or priority
SLA met vs
breached
Compares the number of requests that have met or breached a
selected SLA goal
Knowledge
base
Article usage Shows the number of times knowledge base articles were
viewed and how many customers found them helpful.
Article
effectiveness
Compares the number of customers who were self-served
through knowledge base articles to the number of customer who
created a request.
Basic
Service
Desk only
Custom Resolution
by
component
Compares the length of time taken to resolve requests for each
component (e.g. office administration) in your service desk
project
IT Service
Desk only
Incidents
reported by
priority
Compares the priority of incidents your customers have reported
Create a new report
In your service desk project sidebar, select . You will see a list of default reports for your serviceReports
desk project. In this example, we'll create a report that shows the breakdown of all high priority issues based
on the issue type:
Select New report
Choose a report name that you and your team will understand (e.g. High priority issues)
Select and fill in the following details: Add a series
= Created (to display all created issues that fit the series criteria)Series
= IT Help issuesLabel
= Color
= type = "IT Help" AND priority = Highest OR priority = HighJQL filter
Select and save your report. Add
You can add additional series to capture high priority issues of other types (e.g. type = "Fault" or type
= "Access")
Setting up SLAs
See for detailed information on how to run reports on SLA progress or status.Reporting on SLAs

Documentation for JIRA Service Desk 3.1
200
Created in 2016 by Atlassian. Licensed under a .Creative Commons Attribution 2.5 Australia License
JIRA Service Desk provides powerful built-in Service
Level Agreement (or SLA) management so you can
track your team's progress against agreements
you've set for customers. An SLA is made up of two
settings:
A time metric, which lets you define how time
will be measured for this SLA; and,
A goal for selected issues, which lets you
define a target for the time metric. Different
sets of issues can have different goals.
On this page:
Setting up SLA time metrics
Setting up SLA goals
Creating SLA Calendars
How your team sees SLAs
Managing SLA data
SLA usage notes
JIRA Service Desk comes with a few pre-configured SLA metrics to cover some of the most common IT
requirements; however you can modify or create custom SLA metrics to reflect the SLAs you use in your
business. JIRA Service Desk also provides robust reporting tools that you can use to track your team's
performance against your SLAs. Check out for tips on tracking your SLAs.Reporting on SLAs
Setting up SLA time metrics
You can think of the time metric as a stopwatch that tracks time between two points in an issue's
life-cycle. JIRA Service Desk lets you control exactly when time is tracked, letting you start, pause, and stop
based on selected issue conditions. For example:
In an SLA that guarantees issues are resolved in a certain amount of time, time starts when the issue
is created and stops when the issue is resolved. You can choose to exclude time spent waiting on a
customer by pausing the SLA on the Waiting for Customer status.
In an SLA that guarantees a fast response time from your team, time starts when the issue status is
Waiting for Support and stops when the status is Waiting for Customer. Each time the issue meets the
start condition, a new cycle of the SLA will begin.
From your service desk project sidebar, select > > to fill in theProject administration SLAs New Metric
following conditions:
Condition Description
Metric
name
This name (e.g. Time to resolution) will appear to agents in the SLA section of issues, and
should indicate what you're tracking. Note that you can't change the name of an SLA metric
after you've saved it.
Start Time starts being counted against the SLA whenever the issue has this condition (e.g. Issue
Created)
Pause on Time doesn't get counted against the SLA whenever the issue has this condition (e.g. Status:
Waiting for Customer)
Stop Time stops being counted against the SLA whenever the issue has this condition (e.g.
Resolution: Set)
Here's an example of the New Metric form:
You must be logged in as a JIRA Administrator or Project Administrator to configure SLAs.

Documentation for JIRA Service Desk 3.1
201
Created in 2016 by Atlassian. Licensed under a .Creative Commons Attribution 2.5 Australia License
Notice that you can set multiple conditions for the start, stop, and pause time. Check out Example: creating
for an in-depth look at how you can use this functionality.an SLA with multiple cycles
Setting up SLA goals
While the time conditions on an SLA specify what your team considers to be trackable time, the goal section
of the SLA metric lets you set the amount of time that's allowed for different scenarios. SLA goals can be in
hours or in time increments less than an hour. For example, an SLA that guarantees issues are resolved in a
certain amount of time could have the following goals:
Blocker issues are resolved within 24 hours and Critical issues are resolved within 36 hours
Blocker issues created by a member of the Build Engineering team are resolved within 12 hours, while
Blocker issues created by a member of the Accounting team are resolved within 36 hours.
In the New Metric or Edit Metric screen, you can fill out the following fields to define a goal:
Field Description
Issues You can enter specific issue criteria using . JIRA Query Language (JQL) Base goals on criteria
that remain relatively constant throughout an issue's lifecycle (e.g. an issue's priority rather
than its workflow status).
Goal This is where you specify the target time for the SLA you previously set. conditions When
specifying SLA goals that use a fraction of an hour, write the time as Xh Ym (e.g. 3h 30m). You
can write SLA goals as hours and minutes, but not days.
Calendar The allows you to specify working hours when time can be counted against SLAs.calendar
You can drag goals in order of importance. An issue is tracked against the first goal criteria it matches on this
list:

Documentation for JIRA Service Desk 3.1
202
Created in 2016 by Atlassian. Licensed under a .Creative Commons Attribution 2.5 Australia License
Creating SLA Calendars
By default, SLAs are measured against 24/7 working hours; however, you can use SLA Calendars to specify
your team's working hours. For example, SLA calendars let you exclude lunch breaks, holidays, or weekends
from the time that affects the SLA metrics.
Once you have saved your new SLA metric, select the button to add a calendar with your team'sCalendars
work schedule. The Sample 9-5 Calendar shown here can be edited to allow for a 1-hour lunch break that
does not count towards the SLA goal. Simply delete the 09:00-17:00 line item and replace it with two line
items (before and after lunch) for the same day:
Save your calendar and open an SLA metric to associate the calendar with one of your metric goals. Note
that SLA calendars are unique to each service desk project. See for anExample: creating a basic SLA
example of setting up an SLA that uses a 9-5 working day SLA calendar.
How your team sees SLAs
Your team members can see a read-only version of the tab so they can view how the SLA is configured.SLA
In the detail view of issues, the section lists even more detail about the SLA that the issue is beingSLA
measured against:

Documentation for JIRA Service Desk 3.1
203
Created in 2016 by Atlassian. Licensed under a .Creative Commons Attribution 2.5 Australia License
Review the following sections for more detail on what the SLA tracker conventions indicate.
Ongoing SLAs
The SLA tracker uses colors to indicate the urgency of a given SLA for an issue based on the time remaining.
SLA has greater than 1 hour remaining.
SLA has less than 1 hour remaining. If the
SLA goal is one hour, the SLA has 30
minutes remaining.
SLA has less than 30 minutes remaining. If
the SLA goal is one hour, the SLA has 15
minutes remaining.
SLA has breached the target. The amount
of time past the goal is shown as a negative
number.
SLA has been paused.
Completed SLAs
A completed SLA displays the time remaining when the SLA was completed (or the amount of time
breached) and an icon to indicate whether the SLA was completed successfully or unsuccessfully.

Documentation for JIRA Service Desk 3.1
204
Created in 2016 by Atlassian. Licensed under a .Creative Commons Attribution 2.5 Australia License
1.
2.
SLA completed successfully.
SLA completed unsuccessfully (it breached
the target)
Multiple SLA targets
If the issue meets the criteria for multiple SLAs, trackers for each SLA will appear. In addition, if the SLA has
had multiple cycles, you can hover over the symbols for more details on how the SLA was met for that
particular cycle. (For example, in an SLA that is measured based on when an issue is waiting for support,
you can see whether the SLA was met each time the issue started waiting for support.)
SLA sorting
When you view a list of issues (in a queue or elsewhere), you can sort them by their SLA resolution times.
Ongoing issues are listed first, with the shortest time remaining at the beginning of the list. Completed issues
are ranked last but aren't sorted by the remaining time.
Managing SLA data
When new SLA metric names are created, new custom fields are created in JIRA to store them. The type of
these custom fields is SLA Custom Field Type. As a JIRA administrator, you have the following options to
manage the SLA custom fields.
Allow project administrators to create SLA metric names
New metric names create new custom fields. You can restrict the creation of them to only be available for
JIRA administrators.
Choose
> . Scroll down to the section and choose .Applications JIRA Service Desk Configuration
Use the option. If the setting is disabled,Allow project administrators to create SLA custom fields
service desk administrators can only select from existing metric names when creating SLAs.

Documentation for JIRA Service Desk 3.1
205
Created in 2016 by Atlassian. Licensed under a .Creative Commons Attribution 2.5 Australia License
2.
Clean up unused custom fields
You can find out if there are SLA custom fields that are not used by any SLA metrics and clean them up with
one simple click. On the configuration page, the menu showsNumber of SLA fields currently not in use
the number of unused custom fields if any. To delete them, click the button.Clean up
SLA usage notes
Having the same user assigned to both the reporter and assignee roles may cause your SLA to work
incorrectly.
If you edit an existing SLA, JIRA Service Desk will re-index all the existing issues in the project; the
re-indexing will ensure that the SLA status on the open issues reflects any changed criteria. All the
historical SLA data for elapsed time will be recalculated to measure against the new metrics. Note that
the SLA status is only recalculated for open issues and not for resolved issues.
For example, when the goal for Blocker issues changes from 6 hours to 4 hours, all the closed issues
are still considered having met the goal as long as they were resolved in less than 6 hours. This
ensures that your reports on closed issues remain accurate for the issues' lifecycle.
If issue data changes in such a way that the goals for the issue change (for example, the priority
changes from Critical to Blocker), the time against the previous goal will be tracked against the new
goal. In other words, if the support team spent an hour on a Critical issue, when the issue is escalated
to Blocker, the hour still counts against the new goal, even if it causes the SLA to be breached.
Setting up a goal to be dependent on a different SLA is not recommended.
Reporting on SLAs
JIRA Service Desk provides robust that you can use to trackreporting tools
your team's performance against your SLAs. This page includes information
about your team's SLA goals reports and the SLA-specific JQL conditions
you can use to query the SLA data in customizable service desk reports.
On this page:
Tracking
your SLA
goals
Creating
report with
state
conditions
Creating
reports
with
duration
conditions
Common
SLA report
queries
Tracking your SLA goals
Your service desk project comes with a default report that automatically tracks how the number of issues that
are meeting your SLA goals. To access this report, simply open the Reports tab from your project sidebar

Documentation for JIRA Service Desk 3.1
206
Created in 2016 by Atlassian. Licensed under a .Creative Commons Attribution 2.5 Australia License
and select in the Team section. SLA goals
How the SLA goal success rate is calculated
#GOAL_SUCCESS_PERCENTAGE (for the last 7 days) = SUCCESSFUL / TOTAL
#SUCCESSFUL (for the last 7 days) = issues having an SLA that is completed (SLA
not running any more) AND successful (SLA is not breached) in the last 7 days
#TOTAL (for the last 7 days) = issues having an SLA that is breached (regardless
of the SLA being still running or not) OR completed (SLA is not running any more)
in the last 7 days
--------------------------------------------
#OVERALL_SUCCESS_PERCENTAGE = (SUCCESSFUL_GOAL_1 + SUCCESSFUL_GOAL_2 + ...) /
(TOTAL_GOAL_1 + TOTAL_GOAL_2 + ...)
Creating report with state conditions
State conditions are JQL functions used with operators = or != . For example:
"Time to resolution" = breached() or "Time to resolution" != breached()
Success/fail functions
Function
name
with = with !=
breached() Gives all issues whose SLA last cycle
(completed or ongoing) has breached
(target goal failed)
Gives all issues whose SLA last cycle has not
breached (for completed) or not breached yet
(for ongoing cycles)
everBreached() Gives all issues whose SLA has any
cycle (current or past) that has ever
breached.
Gives all issues whose SLA has all cycles
(past or present) successful or not breached
yet (if ongoing).
SLA state functions
This state addresses the last SLA cycle. This cycle can be completed (the stop event is reached) or ongoing
(the stop event is not reached yet). When the cycle is ongoing, the cycle can be running or paused (if pause
condition is true).
SLAs that have no cycles yet (the cycle has never been started) are not returned by these conditions.
Function
name
with = with !=
completed() Gives all issues whose SLA last cycle is
completed
Gives all issues whose SLA last cycle is not
completed
running() Gives all issues whose SLA last cycle is
ongoing and not paused
Gives all issues whose SLA last cycle is not
running (i.e. completed or paused)
paused() Gives all issues whose SLA last cycle
is ongoing and paused
Gives all issues whose SLA last cycle is not
paused (i.e. completed or running)

Documentation for JIRA Service Desk 3.1
207
Created in 2016 by Atlassian. Licensed under a .Creative Commons Attribution 2.5 Australia License
Creating reports with duration conditions
Conditions on duration are JQL functions used with operators <, <=, >, >=.
The '=' and '!=' operators are not supported.
These functions only apply to SLAs whose last cycle is ongoing (running or paused). Completed SLAs or
SLAs without cycles will not be returned.
Example:
"Time to resolution" < elapsed(2h) or "Time to resolution" < remaining("2h 30m")
There are two duration conditions:
Function
name
Description
elapsed() Gives issues whose SLA last cycle match condition on elapsed time since start event.
remaining() This function gives issues whose SLA last cycle match condition on remaining time before
SLA breaches current goal target duration.
This function is implicit, meaning that
"Time to resolution" > 5h
is the same as
"Time to resolution" > remaining(5h)
Common SLA report queries
This table lists some examples of common SLA queries; the conditions you use for your own reports will vary
depending on the way your JIRA project is set up.
To find out Query
All issues that are about to break SLAs "Time to first response" < 1h and "Time to first response" !=
breached()
Issues that have plenty of time until they
are due
"Time to first response" > 40h
Issues that have at least one breached
SLA cycle
"Time to response" = everBreached()
The order of issues based on an SLA
metric
project = SIS ORDER BY "Time to resolution"
Example: creating a basic SLA
This example looks at how you might create a very basic SLA for a service desk project with a basic
workflow:
Basic SLA configuration

Documentation for JIRA Service Desk 3.1
208
Created in 2016 by Atlassian. Licensed under a .Creative Commons Attribution 2.5 Australia License
All critical and blocker issues must be resolved within 24 hours. You provide 24/7 support for certain
customers (these issues are labeled with "24H"). You provide 9 - 5 support for all other customers, but you
don't track SLA metrics for them.
Basic issue workflow
Example: creating an SLA that doesn't track continuous time
This example looks at how you might create a more complex SLA by pausing the time counter during the
workflow:
Example SLA configuration
Support wants to complete all issues within 40 hours. Time spent waiting on the customer doesn't count
against the 40 hour goal.
Example issue workflow

Documentation for JIRA Service Desk 3.1
209
Created in 2016 by Atlassian. Licensed under a .Creative Commons Attribution 2.5 Australia License
Example: creating an SLA with multiple cycles
This example looks at how you might create a more complex SLA by starting and stopping the time counter
throughout the workflow. You might set up an SLA like this to track response times (for example, how long it
takes your team to respond each time a customer updates an issue with more information). This example
also illustrates how goals for different issue criteria can be tracked from a single SLA.
Example SLA configuration
Support wants to respond to Access issues within two hours: this includes responding within two hours when
the issue is created, as well as each time the issue is updated with more information from the customer.
All other issues have a response time goal of 24 hours.
Example issue workflow
Serving customers with a knowledge base
For further information about how SLAs with multiple start and stop conditions appear in the SLA
tracker, see .Setting up SLAs

Documentation for JIRA Service Desk 3.1
210
Created in 2016 by Atlassian. Licensed under a .Creative Commons Attribution 2.5 Australia License
JIRA Service Desk can be integrated with Confluence's knowledge base
capabilities to help customers find solutions on their own in the customer
portal or help center:
On this page:
Integrating
with
Confluenc
e
Linking a
knowledge
base
How to
suggest
articles for
specific
request
types
How
agents
create
knowledge
articles
How
customers
find
knowledge
articles
With a linked Confluence space, agents can also create knowledge articles directly from service desk issues
to help save their team time when working on similar issues and to provide customers with more self-service
knowledge articles. Note that customers do not need a Confluence license to view knowledge articles, but
service desk agents do need a Confluence license to create and edit knowledge articles.
Integrating with Confluence
Administrators can JIRA Service Desk Server with Confluence Server version 5.6 and up. They willintegrate
need to link JIRA Service Desk and Confluence with an using OAuth.application link
Linking a knowledge base
Once an administrator has integrated JIRA Service Desk with Confluence, project administrators can then
manage their project's Confluence knowledge base integration by going > Project administration Knowled
ge base:
Start by selecting a Confluence space to use as your
linked knowledge base. You must
have permission to view a space in Confluence in
order to select it as your knowledge base. If you
don't have this permission, check with your
Confluence administrator.
You can then choose to allow all active service desk
users and customers (also known as unlicensed
Confluence users) to view your linked Confluence
space. Unlicensed Confluence users cannot:
Like, comment on or edit Confluence content
See the Confluence dashboard, user profiles,
the people directory, or the space directly
Search all of Confluence
If you choose to restrict viewing of the linked
Confluence space to licensed users, you must grant

Documentation for JIRA Service Desk 3.1
211
Created in 2016 by Atlassian. Licensed under a .Creative Commons Attribution 2.5 Australia License
customers a Confluence license or open your
Confluence space to anonymous access. As a
project administrator, you'll need to contact the
administrator of your linked Confluence space to
manage which agents can create and edit
knowledge articles. Keep on reading to learn more
about the auto-search settings you can control.
How to suggest articles for specific request types
When customers select a request type from the customer portal or help center, you can select what type of
knowledge articles appear as they're filling in the request details. For example, if a customer is filling in a
hardware request, you can have knowledge articles tagged with the "hardware" label appear to offer
self-service suggestions. You can control how Confluence suggests articles for each request type in the Auto
section. You can control this in two ways:-search on request forms
Prevent Confluence from suggesting pages - Select in the column for the requestNo Search KB
type. For example, you might not want the "Get access to a system" request type to suggest pages
since users have to request access through the Customer Portal.
Limit the pages that will be suggested - In the column, enter theRestrict to articles with label
labels that must be applied to pages in order for them to appear in the suggested page list. For
example, you might want to only include pages with the label "purchasing" to appear when customers
enter a "Request new software" request.
How agents create knowledge articles
When your agents have finished working on a customer issue and want to save their solution as a knowledge
article, they can simply select from the service desk issue view: Create KB article
Agents can choose to create an article with the How-To template or Troubleshooting template. These
templates give agents content suggestions, and can help you expand your knowledge base with clearly
organized topics. The issue title and description will be automatically added to the new Confluence page as
its title and body text. If you've set up label restrictions for the request type the issue was based on, those
labels will be automatically suggested for the article. Note that images and attachments will not be
automatically copied from the service desk issue to the knowledge base article.
How customers find knowledge articles
Customers will be able to search for knowledge articles connected to service desk projects they have access
to. If you have linked a Confluence space to an (with public signup enabled), then allopen service desk
Tip:
If you add label restrictions to a request type, these labels will also appear as the default
labels for knowledge base articles for issues based on thatcreated from JIRA Service Desk
request type.
Service desk agents must have the in the Confluence space to create aAdd page permission
knowledge base article from an issue.
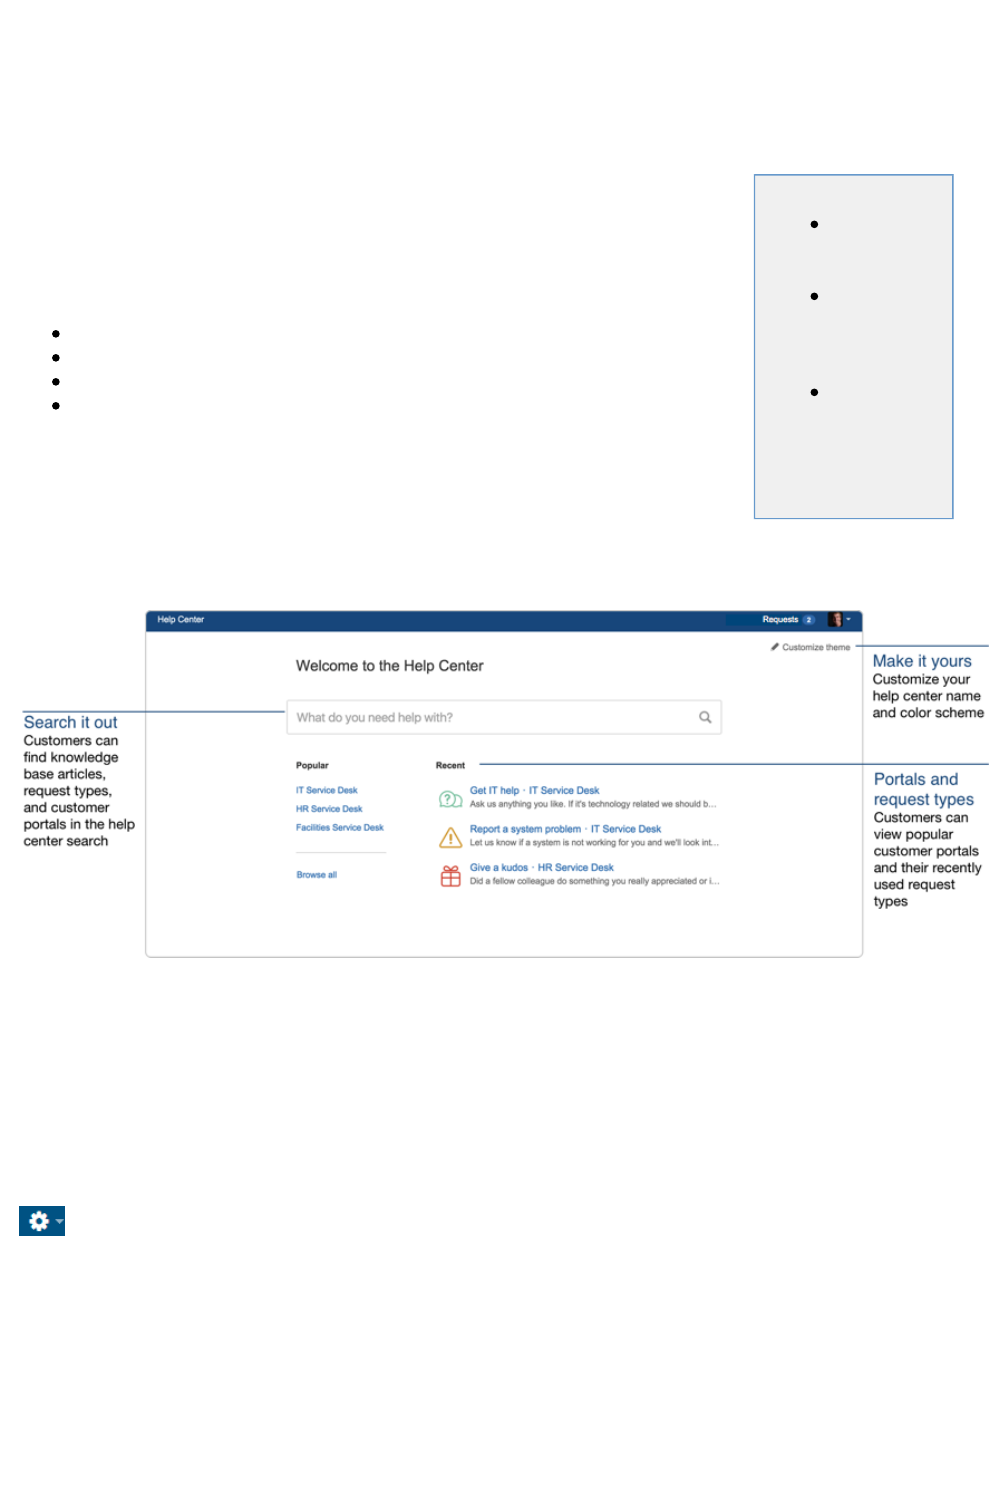
Documentation for JIRA Service Desk 3.1
212
Created in 2016 by Atlassian. Licensed under a .Creative Commons Attribution 2.5 Australia License
customers will be able to view the knowledge articles in that space. Customers can view knowledge articles
in the customer portal, the global help center, and in Confluence if they're provided with a direct link.
You can also help customers fill out a request form by suggesting knowledge articles to that type ofrelated
request.
Using the help center
You can direct customers to your help center, so they don't have to
remember whether they need to submit a request for a new laptop in the IT
Service Desk or Purchasing Service Desk. Simply searching for "new
laptop" in the help center will display the correct request type automatically.
Customers can use the help center to:
View popular service desks
Browse an individual service desk
Search for request types and knowledge base articles
See requests they have raised across all service desks
On this page:
Branding
the help
center
Sharing
the help
center with
customers
Searching
across
multiple
customer
portals
To help your customers get the most out your help center, we recommend branding your help center and inte
. Here's an quick look at the help center layout:grating your service desk projects with a knowledge base
Customers will only be able to see popular service desks and search across service desks they already have
access to. The list of popular service desks is generated automatically based on the number of requests
raised and cannot be set manually. Recent request types displayed are unique to each customer. Note that
customers who have not yet raised requests will not see any recent request types in the help center. Learn
more about managing customer access to service desk projects .here
Branding the help center
JIRA administrators can brand the global center with your company logo and color scheme. If you are logged
in as an administrator, go to
> > to customize your help center with the help of a liveApplications JIRA Service Desk Configuration
preview. Your changes will be applied to the help center and to the header of all customer portals. For more
information about managing a project-specific customer portal, check out .Configuring the customer portal
Sharing the help center with customers
You can provide your customers with the following help center URL, so they don't have to remember the URL
for each customer portal they have access to:
http://<computer_name_or_IP_address>:<HTTP_port_number>/jira/servicedesk/custome
r/portals

Documentation for JIRA Service Desk 3.1
213
Created in 2016 by Atlassian. Licensed under a .Creative Commons Attribution 2.5 Australia License
Searching across multiple customer portals
Customers can search for request types and knowledge articles across all customer portals they have
access to. Let's use the same new laptop example. When customers search for "new laptop" in the help
center, they'll find related knowledge articles and request types, as shown here:
Customers can read articles directly in the help center and provide feedback to your team by marking articles
as helpful or not helpful. If customers still need to contact your team after looking through related knowledge
articles, they can choose one of the suggested request types or browse all customer portals they have
access to.
How smart search works
The improved smart search algorithm learns from past searches and request types raised, so if customers
have previously raised hardware requests for a laptop and monitor, they can search for "laptop" or "monitor"
in the future to find the same hardware request type. Your team can also help improve search results by
updating the request type field when a customer has, for example, searched for "new laptop" and raised a
purchase order request instead of the needed hardware request.
The help center smart search has been built to be language-agnostic and can therefore learn from search
words or phrases entered in any language. As customers enter more searches and raise more requests, the
search algorithm gets smarter regardless of the language used.
Collecting customer satisfaction (CSAT) feedback
Measuring customer satisfaction can help you better understand your
customers and improve service levels.
JIRA Service Desk provides a simple, built-in mechanism to collect
customer feedback. Key features include:
Simple customer workflow to provide feedback on resolved issues
Customer satisfaction scores are visible within resolved issues and
on agent queues for resolved issues

Documentation for JIRA Service Desk 3.1
214
Created in 2016 by Atlassian. Licensed under a .Creative Commons Attribution 2.5 Australia License
1.
2.
3.
4.
5.
Single-click to view customer satisfaction report for a service desk
project
Easily create and and view custom reports and trend graphs based
on satisfaction scores.
Customer feedback data can be used to identify strengths and weaknesses
in the service quality, engage and motivate the team to improve satisfaction
scores, and provide mentoring and training where required.
On this page:
Enabling the
customer
satisfaction
feature
Viewing and
reporting on
customer
feedback
Enabling the customer satisfaction feature
This feature is enabled by default for new service desk projects; however, it must be enabled for each
existing service desk project. To enable customer satisfaction settings for an existing project:
Log in as a service desk project administrator.
Select the service desk project you wish to configure.
Select .Project administration > Satisfaction settings
Enable . Collect customer satisfaction feedback
Optionally, edit the phrase to suit your service desk environment. This phrase appears inQuestion
the resolved issue notification message that customers see.
When you enable satisfaction settings for a service desk project, resolved issue notifications will contain a
satisfaction rating scale. Customers can click the rating scale to indicate their level of satisfaction. A
confirmation page is displayed on the customer portal, where they can change the rating, and optionally
provide any additional comments that they would like to convey to the team.
Viewing and reporting on customer feedback
Customer satisfaction scores and comments are displayed in the issue view for resolved issues. Agents can
also view the satisfaction scores on their own recently resolved queues.
Service desk project administrators and agents can view the default Satisfaction report, which displays the
average customer satisfaction scores for the team.

Documentation for JIRA Service Desk 3.1
215
Created in 2016 by Atlassian. Licensed under a .Creative Commons Attribution 2.5 Australia License
A service desk project administrator can also create and view analyzing satisfactioncustom reports
trends. Agents can also view any custom satisfaction reports created for their service desk projects.
Useful examples of custom reports include:
A trend graph of the average satisfaction rating for a specific period to view changes in service levels.
Satisfaction scores based on the type of service request. This would identify issues for which the team
could provide knowledge articles.
Satisfaction scores for an individual agent compared to team scores to help identify agents who would
benefit from futher training.
JIRA Service Desk best practices
Check out the following best practice articles:

Documentation for JIRA Service Desk 3.1
216
Created in 2016 by Atlassian. Licensed under a .Creative Commons Attribution 2.5 Australia License
Best practices for designing the customer portal
Best practices for IT teams using JIRA Service Desk
Best practices for designing the customer portal
Every service desk project comes with a preconfigured customer portal that
your customers use to interact with your service team. Here are some best
practices on how to design an easy-to-use customer portal that will help
both your team and your customers work more efficiently.
On this page:
Brand your
help center
Brand your
customer
portals
Help
customers
find the
request
types they
need
Group
related
request
types
Set up a
knowledge
base
Brand your help center
Customers can use the global help center to search for request types and knowledge base articles across all
customer portals they have access to. Brand your help center by:
Uploading your company logo and your service desk can automatically generate a matching theme for
your customer portals and global Help Center header.
Naming your customer portals and global Help Center, so your customers can easily identify your
team's service desk.

Documentation for JIRA Service Desk 3.1
217
Created in 2016 by Atlassian. Licensed under a .Creative Commons Attribution 2.5 Australia License
Brand your customer portals
For each project's customer portal, you can customize the name, welcome message, and logo to let
customers know which portal to use to contact a specific team in your organization. Note that the help center
name and header appear across all your project's customer portals.
Check out to learn more.Configuring the customer portal
Help customers find the request types they need
Name request types in language that's familiar to your customers, and use keywords they'll recognize.
For example, name a request 'Access to a system' instead of 'VPN access'.
Use different icons for different request types, so customers can easily identify request types in the
customer portal.
Add contextual help (e.g. specify photo dimensions and format for the attachment field) with the Field
field.help
Use examples in your request type descriptions (e.g. 'If you need a software license such as Microsoft
Office, raise a request here').
Link to existing information that might be helpful for customers in the request type description. For
example, if you have already have a list of available Microsoft Office license numbers on your Intranet,
simply add a link to the page in the request type description and instruct customers to claim a license
from that page without needing to open a request.
See for more information on naming request types.Setting up request types
Group related request types
If you have a large number of request types, e.g. more than 7, customers will probably need to scroll
to get to some of them. In this case, consider grouping some request types together. To set up
groups, use the drop-down and type the group name:Groups

Documentation for JIRA Service Desk 3.1
218
Created in 2016 by Atlassian. Licensed under a .Creative Commons Attribution 2.5 Australia License
You can also control the order in which request type groups appear on the customer portal by adding
a number to the group name. Groups appear as tabs on the left-hand side of your customer portal:
See for more information on managing request types and groups.Setting up request types
Set up a knowledge base
After using your service desk for a while, your team will probably have accumulated a large amount of
information that can be provided to your customers so that they can solve some problems before even
opening requests. At this point, you can consider integrating Confluence's knowledge base capabilities
with JIRA Service Desk.
Connect your service desk project to a Confluence space so customers can search for relevant
knowledge base articles on the customer portal:
For information about how to achieve this, see Serving customers with a knowledge base
Best practices for IT teams using JIRA Service Desk
Overview
This best practice guide is for IT teams using JIRA Service Desk. By the end
of this guide, you will have a working service desk project for change,

Documentation for JIRA Service Desk 3.1
219
Created in 2016 by Atlassian. Licensed under a .Creative Commons Attribution 2.5 Australia License
1.
2.
3.
4.
1.
2.
3.
4.
5.
problem, and incident management, and a few test issues that will illustrate
the default service desk project workflow. Note that this guide references the
latest version of JIRA Service Desk Cloud.
Before you begin
Sign up for a JIRA Service Desk Cloud , or use an existingevaluation
JIRA Service Desk Cloud site
Log in as an administrator
On this page:
Overview
Before you
begin
Set up a
project
Set up
your
service
catalogue
Create a
group for
managers
Assign
component
leads
Edit your
workflow
Success!
Set up a project
In this step, you'll create a new IT Service Desk project.
Sign into JIRA Service Desk as an administrator.
Select > .Projects Create Project
Choose the IT Service Desk project type and select . Next
Name your project "Team Help Desk" (which will automatically fill in the project key field) and select S
.ubmit
Your new project comes with preconfigured request types, queues, workflows, and reports to help you and
your team manage incidents, problems, and changes.
Set up your service catalogue
Your new project comes prepackaged with Service Request, Change, Incident, and Problem issue types.
The Service Request, Change, and Incident issue types can be associated with request types that customers
see on the customer portal. Request types are a lightweight way to set up a service catalogue in JIRA
Service Desk. In this step, you'll view the default request types and learn how to customize the request type
fields and workflow statuses.
In your new Team Help Desk project, select > . You'll see theProject administration Request types
default request types and groups. Groups are essentially labels that let you organize the tabs and
order in which request types appear on the customer portal.
To edit the name and description of a request type, simply click the corresponding request type name
or description field and select .Update
For the "Report a system problem" request type, select . Visible fields appear on theEdit fields
request type form that customers fill out, while hidden fields are only viewable to your team. Click the
"Select a system" visible field and note that this issue field displays all components in your project.
We'll review components in the next step.
On the Fields tab, select to add the Linked Issues field and select . You will be Add a field Apply
prompted to set a preset value. Set the preset value to "Linked issue relates to", so agents and other
internal users can see all other issues marked as related to this one.
On the Workflow Statuses tab, you can rename the default workflow status name to something more
customer friendly (e.g. rename Resolved to Done). You can also select to view andview workflow
edit the workflow this request type users (in this case, the Incident workflow for Incident issue types).
We'll review more about workflows in a bit.
Create a group for managers

Documentation for JIRA Service Desk 3.1
220
Created in 2016 by Atlassian. Licensed under a .Creative Commons Attribution 2.5 Australia License
1.
2.
3.
4.
1.
2.
3.
4.
5.
6.
1.
2.
3.
4.
5.
6.
7.
> User Management > Groups, or > System > Project roles (under security)
Create a new project role: Level 2 Managers with description "Users in this role can approve or deny
change requests and request a second approval from Level 1 Managers"
Add another new project role named Level 1 Managers with description "Users in this role can
approve or deny the second approval needed on change requests"
Go back to your Team Help Desk project.
Assign component leads
In addition to the default request types and workflows, JIRA Service Desk comes with default components.
You can use components to group issues related to the same system or application, and assign component
leads so each system manager stays informed. In this step, you'll view the default components in your project
and see how an issue tagged with a component is created and managed.
In your service desk project, select > . You'll see the default listProject administration Components
of components. Simply click the component name and description to edit these fields. You can also
select a component lead (e.g. the team lead who manages a system) and a default assignee (e.g. the
team lead or project lead who will automatically be assigned to any issue tagged with that
component).
Select and open the Customer Portal link from your project sidebar. Back to project
You can now create a test request from a customer's perspective. Select the "Report a system
problem" request type.
Fill in the issue summary and description (e.g. Printers broken on level 3). Click the Select a system
field to see a list of available options and choose "Printers".
Select to finish creating your test request, and then close the customer portal to return to yourCreate
service desk project view.
From your project sidebar, select and open the test issue you just created. You'll noticeQueues
"Printers" in the issue component field. When you click the "Printers" component, you'll be taken to the
Search Issue screen which displays all issues in this project with the same component.
Edit your workflow
Now that you're a bit more familiar with how to service desk request types and components, let's look at
editing the change request workflow to require two managers to approve the request before work can start.
In your service desk project, select > (under Issue Types). You'll seeProject administration Change
the default workflow used for all change requests in this project. In this default workflow, a change
request is created and then awaits approval. If the request is approved, the request is transitioned to
in progress, and then resolved when work is completed.
Select and select . Name your new status "Awaiting Manager Approval"Edit Workflow Add status
and leave the category as To Do.
Add another status named "Approved By Manager" and leave the category as To Do.
Select , and make the transition start from the new Awaiting Manager Approval statusAdd transition
and go to the Rejected status. Name your transition "Reject by manager". Select . Add
Add a new transition from the Approved status to the Awaiting Manager Approval status, and name
this transition "Request manager approval".
Create one more new transition from the Awaiting Manager Approval status to the Approved By
Manager status, and name this transition "Approve by manager".
Drag the Start progress transition so that instead of leading from Approved to In Progress, it leads
from Approved By Manager to In Progress. Your workflow should now look something like this:

Documentation for JIRA Service Desk 3.1
221
Created in 2016 by Atlassian. Licensed under a .Creative Commons Attribution 2.5 Australia License
7.
8.
1.
2.
1.
2.
3.
Select to finalize your workflow changes. Publish
Your change request workflow now requires two approvals before work can start. Note that you can create a
, and (e.g. User is in project role) to the Reject by manager andManagers project role add a condition
Approve by manager transitions. This condition will only allow users in the Managers project role to action
these transitions. Check out for more information on adding statuses andManaging your workflows
transitions to an existing workflow.
Success!
You now have a working service desk project with a customizable service catalogue, components to better
track issues specific to systems your team managers, and a new workflow for managing change requests.
Let us know how you use JIRA Service Desk for change or incident management by creating a ticket in the
Feedback project in our . public issue collector
Getting help with JIRA Service Desk
How can we help you?
We have a number of available. You can get your problem resolved faster by using thehelp resources
appropriate resource.
I don't know how to do something
Something isn't working
I don't like the way something
works
Something else?
I don't know how to do something
Search .Atlassian Answers
Raise a .support request
Something isn't working
Check the 'JIRA Software' knowledge base at .https://confluence.atlassian.com/display/JIRAKB
Search .Atlassian Answers
Raise a .support request
If you've identified a bug but don't need further assistance, raise a . ( )bug report https://jira.atlassian.com
I don't like the way something works
Raise a . ( )suggestion https://jira.atlassian.com

Documentation for JIRA Service Desk 3.1
222
Created in 2016 by Atlassian. Licensed under a .Creative Commons Attribution 2.5 Australia License
Something else?
If you need help with something else, raise a .support request
About our help resources
Atlassian Support
Our support team handles support requests that are raised in our . You need to log in usingsupport system
your before you can raise support requests. Atlassian account
For information on our general support policies, including support availability, SLAs, bugfixes, and more, see
. Note, you'll find anything security-related at .Atlassian Support Offerings Security @ Atlassian
Atlassian Answers
Atlassian Answers is our official application forum. Atlassian staff and Atlassian users contribute questions
and answers to this site.
You may be able to find an answer immediately on Atlassian Answers, instead of having to raise a support
request. This is also your best avenue for help if:
you are using an unsupported instance or an unsupported platform,
you are trying to perform an unsupported operation, or
you are developing an add-on for JIRA Service Desk.
You can also have a look at the .most popular JIRA Service Desk answers
JIRA Service Desk knowledge base
If there are known issues with a version after it has been released, the problems will be documented as
articles in our . knowledge base
Atlassian issue tracker
Our official records our backlog of bugs, suggestions, and other changes. This is open for theissue tracker
public to see. If you log in with your Atlassian account, you will be able to create issues, comment on issues,
vote on issues, watch issues, and more.
Tip:
If you are a JIRA system administrator, you have a number of additional support tools available.
These include the ability to raise a support request from within your JIRA applications, create zip files
of key JIRA application information, and more. For details, see the dAdministering JIRA Applications
ocumentation.
Tip:
Before you create an issue, search the existing issues to see if a similar issue has already been
created.
