
SONIC FORMS FOR IMIS
Visual Antidote's Sonic Forms for iMIS lets you quickly create and publish full-featured forms on your iMIS website for
staff, member, and customer use. By generating iMIS iParts, Sonic Forms will inherit your unique website design along
with your security model and parameters. You can place Sonic Forms anywhere you want and use Sonic Forms as often as
you need in your website to achieve your goals.
Here is a list of tasks you can accomplish with Sonic Forms:
• Create a new member or customer record through a sign-up process.
• Let members view and update their information stored in any iMIS user defined table (single or multi-instance) or
Activity record.
• Let members or customers update and enter any iMIS address field from all address purposes (e.g. Home, Work,
Other)
• Add complex logic using button controls that can submit data and link to either:
o Custom landing or completion pages, or;
o Additional Sonic Forms pages in a sequence.
• Add text, layouts, symbols, graphics and other elements to your form to customize its appearance and function
using the full-featured HTML editor.
• Add advanced scripting to make your forms interactive and dynamic

TABLE OF CONTENTS
Installation .............................................................................................................................................................................. 5
Installation Requirements ................................................................................................................................................... 5
Sonic Forms Media .............................................................................................................................................................. 5
Installation and Upgrade Steps ........................................................................................................................................... 5
Merge Sonic Forms components into your iMIS environment ........................................................................................... 6
Content Type Configuration .............................................................................................................................................. 10
Quick Start ............................................................................................................................................................................. 12
Create a Sonic Form .......................................................................................................................................................... 12
Add a Sonic Form to RiSE .................................................................................................................................................. 13
Admin Panel ...................................................................................................................................................................... 17
Building Forms ...................................................................................................................................................................... 19
Using the Sonic Forms Form Manager .............................................................................................................................. 19
Form Chooser .................................................................................................................................................................... 20
Editor ................................................................................................................................................................................. 23
Form Parts ......................................................................................................................................................................... 25
Preview Panel .................................................................................................................................................................... 42
Sonic Forms – Deployment ................................................................................................................................................... 43
Using the Admin Panel ...................................................................................................................................................... 43
Select Form and Preview .................................................................................................................................................. 43
Validation Selection .......................................................................................................................................................... 43
Stored Procedure .............................................................................................................................................................. 44
Default Values ................................................................................................................................................................... 44
Form Change Logging ........................................................................................................................................................ 44
Create Account Features ................................................................................................................................................... 44
Email .................................................................................................................................................................................. 45
Validation Selection .......................................................................................................................................................... 45
Using Stored Procedures ................................................................................................................................................... 47
Create Account Features ................................................................................................................................................... 49
Advanced Topics ................................................................................................................................................................... 54
Adding Javascript to Sonic Forms ..................................................................................................................................... 54
Customizing Drop-down Lists ........................................................................................................................................... 57

Formatting Buttons with CSS ............................................................................................................................................ 59
Customizing Company Lookups ........................................................................................................................................ 60
Linking Forms with Parameters ........................................................................................................................................ 61
Regular Expressions .......................................................................................................................................................... 61
Advanced Duplicate Checking ........................................................................................................................................... 63
User Impersonation .......................................................................................................................................................... 65
Using Stored Procedures ................................................................................................................................................... 66
Sonic Forms Security ......................................................................................................................................................... 68
Designing Responsive Forms ............................................................................................................................................. 70
Resizing Text Boxes ........................................................................................................................................................... 71
Troubleshooting .................................................................................................................................................................... 73
Access to the path <Path> is denied ................................................................................................................................. 73
Error on Field: <Field_Name> ........................................................................................................................................... 73
-101 - Error Saving Data .................................................................................................................................................... 73
[30]Error Saving data on iMIS : Object reference not set to an instance of an object. .................................................... 74
Sorry - you cannot access this form on behalf of this user. .............................................................................................. 74
Uninstall Sonic Forms ............................................................................................................................................................ 75
1 - Deleting Sitemaps ........................................................................................................................................................ 75
2 - Deleting Content Types ................................................................................................................................................ 75
3 - Deleting Content Page(s) ............................................................................................................................................. 76
4 - Deleting Sonic Forms Files ........................................................................................................................................... 76
E - Dropping Database Components ................................................................................................................................. 77
Release Notes........................................................................................................................................................................ 78
Sonic Forms 3.0.1807A...................................................................................................................................................... 78
Sonic Forms 3.0.1803A...................................................................................................................................................... 79
Sonic Forms 3.0.1802A...................................................................................................................................................... 80
Sonic Forms 3.0.1712C ...................................................................................................................................................... 80
Sonic Forms 3.0.1712B ...................................................................................................................................................... 80
Sonic Forms 3.0.1712A...................................................................................................................................................... 81
Fast Forms 2.x ................................................................................................................................................................... 84
Sonic Forms 3.0.1810A...................................................................................................................................................... 87
Sonic Forms 3.0.20A .......................................................................................................................................................... 87
Sonic Forms Video Library ..................................................................................................................................................... 89

Terms and Conditions ........................................................................................................................................................... 90
Sonic Forms Document Manager .......................................................................................................................................... 91
Installation ........................................................................................................................................................................ 91
Configuration Panel .......................................................................................................................................................... 93
Sonic Forms Documents in iMIS........................................................................................................................................ 95
Sonic Forms Document Display ........................................................................................................................................ 95
Configuration Panel .......................................................................................................................................................... 96
Release Notes........................................................................................................................................................................ 99
Sonic Forms 3.0.1802A...................................................................................................................................................... 99
Sonic Forms 3.0.1712B ...................................................................................................................................................... 99

5
INSTALLATION
VISUAL ANTIDOTE OFFERS INSTALLATION ASSISTANCE. OUR STAFF CAN SET UP AND CONFIGURE SONIC FORMS
FOR YOU IF YOU NEED HELP WITH THE INSTALLATION PROCESS. CONTACT US
AT SUPPORT@VISUALANTIDOTE.COM TO ARRANGE AN INSTALLATION APPOINTMENT.
INSTALLATION REQUIREMENTS
Installing Sonic Forms requires:
• Access to your iMIS application and any optional web server(s)
• A system administration account on iMIS (normally MANAGER)\
SONIC FORMS MEDIA
The installation media for Sonic Forms includes:
• A folder with the following installation files:
o /net/va_iParts/Images
▪ Various icon and image files
o /net/va_iParts/InstallScripts
▪ SQL scripts used for configuring your iMIS environment
o /net/VA_iParts/FastForms (NOTE THAT FOR BACKWARDS COMPATIBILITY SOME SONIC FORMS
COMPONENTS HAVE "FASTFORMS" IN THEIR NAMES)
▪ SonicForms_Configurator.ascx
▪ SonicForms_Configurator.ascx.cs
▪ VA_FastForms.ascx
▪ VA_FastForms.ascx.cs
▪ VA_FastFormsPage.ascx
▪ VA_FastFormsPage.ascx.cs
▪ VA_InnerPage.ascx
▪ VA_InnerPage.ascx.cs
▪ VA_Redirector.ascx
▪ VA_Redirector.ascx.cs
• Content Record for the Sonic Forms Form Manager
• Content Type records for
o Sonic Forms Page
o VA Redirector
o Sonic Forms Document Manager (Optional Product)
o Sonic Forms Document Display (Optional Product)
INSTALLATION AND UPGRADE STEPS
Here are the key steps to install or upgrade Sonic Forms:
• (Install and Upgrade) Merge the Sonic Forms components into your target iMIS environment

6
• (Install only) Import the SONIC FORMS FORM MANAGER page and Site Map record into your RiSE system and
publish them
• (Install only) Import the SONIC FORMS content types into your RiSE environment (no publishing required)
• (Install and Upgrade) Accept the User License Agreement in order to activate Sonic Forms.
MERGE SONIC FORMS COMPONENTS INTO YOUR IMIS ENVIRONMENT
1. Login to your iMIS application or webserver
environment and ensure that the SonicForms media
is accessible from this server (download or copy as
appropriate).
2. Copy the SonicForms "net" folder from your
installation media into your iMIS installation
directory (usually /Program
Files/ASI/<YourAssociation>/) where
"<YourAssociation>" is your organization's
abbreviation. You will be prompted to merge the
Sonic Forms /net folder with the main iMIS /net
folder. This will ensure that all Sonic Forms
components are deployed to the correct location.
When you merge the /net folder provided in the
installation media with your iMIS installation this will
make Sonic Forms available for use. If you are
upgrading Sonic Forms, please overwrite all files.
3. Confirm that the files have been copied.
IMPORT THE SONIC FORMS FORM MANAGER (NEW INSTALLATIONS)
1. Login to the iMIS staff site using a System Administrator account (e.g. MANAGER).
2. From the administration menu go to RiSE --> Page Builder --> Manage Content
3. Select "Import" to import the Sonic Forms Form Manager content and site map records.
4. Select "Upload" to add this record to your RiSE system. Two records are included - a site map record and the
associated content record.
5. Once the records are imported, you will need to publish them.

7
o Under Page Builder, go to the folder @/Shared_Content/Staff and select the "Sonic Forms Form
Manager" entry and publish it
o Under Site Builder, go to the Staff site and find the Sonic Forms entry under Page Builder
(/RiSE/Page_builder/SonicForms) and publish this entry in the same way.
6. The final step is to activate Sonic Forms. Go to the new Sonic Forms entry and select the Sonic Forms menu item.
You will be asked to confirm your acceptance of the License agreement. Select this option and your installation is
complete.

8
Note, if you have installed earlier versions of Fast Forms, you may see duplicate entries in your site map and content
records. Please delete these items using RiSE to tidy up your installation.
IMPORT CONTENT TYPES (NEW INSTALLATIONS)
Similarly, you will need to create two content types for deployment of Sonic Forms onto RiSE pages or to use the VA
Redirector. To import these content types complete the following steps:
1. Login to the Staff Site (or Admin site in iMIS15) if you are not already logged in.
2. Navigate to RiSE --> Maintenance --> Content Types
3. Select "Import" to import the SONIC FORMS PAGE content records
4. When complete, you should see two content types in the "Custom" folder defined as shown below:
5. If you have installed Fast Forms previously, you may wish to remove any Fast Forms related content types.
INSTALLATION TROUBLESHOOTING
web.config Updates: In recent editions of iMIS (2016 and later) you may encounter the error message: [30]ERROR
SAVING DATA ON IMIS : OBJECT REFERENCE NOT SET TO AN INSTANCE OF AN OBJECT.

9
This requires an update to your web.config file to define the value "ImisWebServerUrl". Please see this [30]Error Saving
data on iMIS : Object reference not set to an instance of an object.
Folder Permissions: Beginning with version 3.0.20A, Sonic Forms no longer requires server access to store .config files.
Please ensure that you are updated to this release to resolve this issue.

10
CONTENT TYPE CONFIGURATION
If for any reason you are unable to import the Content Types provided with your installation media or if you wish to create them in another location, you can
create Content Records manually by selecting "New Content Type" and filling in the required fields as shown in the table below:
Sonic Forms (Page)
Sonic Forms
Document Manager
VA Redirector
CONTENT TYPE PROPERTIES
Content
Type
.ascx based
(IMIS 20.2 AND ABOVE)
.ascx based
(IMIS 20.2 AND ABOVE)
.ascx based
(IMIS 20.2 AND ABOVE)
Name of
the
Content
Type
Sonic Forms Page
Sonic Forms Document Manager
VA Redirector
Description
of the
Content
Type
Instance of a Sonic Forms page deployed
within RiSE
Sonic Forms Document Manager iPart deployed
on a RiSE page.
Redirector iPart used to control page access
and process flows by Visual Antidote.
ADVANCED PROPERTIES
URL to the
control or
page that
is used to
display
/va_iParts/FastForms/FastFormsPage.ascx
/va_iParts/FastForms/FastForms_DocMgr.ascx
/va_iParts/FastForms/VA_Redirector.ascx

11
Sonic Forms (Page)
Sonic Forms
Document Manager
VA Redirector
items of
this type at
runtime.
URL to the
control or
page that
is used to
collect the
properties
of a new
item of this
type.
/va_iParts/FastForms/FastFormsPage.ascx
(IMIS 20.2 AND ABOVE)
/va_iParts/FastForms/FastForms_DocMgr.ascx
(IMIS 20.2 AND ABOVE)
/va_iParts/FastForms/VA_Redirector.ascx
(IMIS 20.2 AND ABOVE)
URL to the
control or
page that
is used to
edit the
properties
of an
existing
item of this
type. This
is often the
same as
the
NewLink.
/va_iParts/FastForms/FastFormsPage.ascx
(IMIS 20.2 AND ABOVE)
/va_iParts/FastForms/FastForms_DocMgr.ascx
(IMIS 20.2 AND ABOVE)
/va_iParts/FastForms/VA_Redirector.ascx
(IMIS 20.2 AND ABOVE)

12
QUICK START
Follow these steps to get your first form up and running on your RiSE website:
1. Create a form using the Sonic Forms Form Manager
2. Add a Sonic Forms Page web part (iPart) to your RiSE page and publish it normally
3. Visit your new page to configure your new Sonic Form
That's it you are done!
CREATE A SONIC FORM
Let's start by creating a simple Sonic Form.
Step 1
Login to your iMIS RiSE Staff (or Admin) website. On the menu select RiSE -> Page Builder -> Sonic Forms (or your custom
installation location if chosen during installation).
Step 2
On the Form Selector select the option New Form.
Step 3
Create a new Sonic Form
1. Give your form a name and click "Save".
2. Build a page using the Editor.

13
1. Add text and instructions to guide your user.
2. Add Form Parts to your page to make it interactive.
3. Preview your page.
4. Repeat as necessary.
3. Add appropriate action Buttons to your page to submit your data.
4. Save your new Sonic Form.
Your form is now created and ready to deploy in RiSE.
ADD A SONIC FORM TO RISE
Step 1
On the iMIS menu select Rise -> Page Builder -> Manage content.
Step 2
Choose or (optional) create a website content folder for your forms.
2.1 - Click(1) on the root(@) and then on the editor bar click(2) New -> Website Content.

14
2.2 – If you are creating a new folder, choose a suitable name for your form group - in this case forms about volunteers.
Step 3
Create content.
3.1 – Click(1) on the folder that you have chosen or created and then click(2) New -> Website Content.

15
3.2 – Fill(1) a field “Title” with a name for your new page. Then click(2) on the link “Add Content”.
3.3 – By default, the content type "Sonic Forms Page" is installed in your Custom folder under ContentTypes. Select the
Sonic Forms Page item and then click OK to add it to your RiSE page.

16
3.4 – Fill the field “Name” with a suitable description of your form (e.g. Volunteer Form A):
Step 4

17
After you clicked “OK” you will now see Sonic Form Page added to your RiSE page. Click on the button “Save & Publish”.
Pro Tip: You can add additional RiSE content elements to display HTML text, IQA displays and much more to your page
provided that it does not include a "Save" or "Submit" button that will conflict with your Sonic Form.
ADMIN PANEL
Sonic Form's unique ADMIN PANEL allows you to reuse your Sonic Forms library across your entire RiSE website. The
admin panel connects your specific RiSE page with a specific Sonic Form and defines its local properties. Each Sonic Form
that you deploy must be configured in order to be visible to your community.
Step 1
Go to the webpage that you Add a Sonic Form to RiSE while logged in as a System Administrator (e.g. using the "Manager"
account). Click on the blue bar to open the Admin Panel.
Step 2
Click “Select form” to choose your Sonic Form and use the "Preview" button to see your form.
18
Step 3
After confirming that the page you are working on is displaying the right Sonic Form, click on the “Save Page” button to
save your settings.
Your form is now published and ready to go!

19
BUILDING FORMS
USING THE SONIC FORMS FORM MANAGER
Sonic Forms is built right into RiSE which means that you will find it within your RiSE framework where you can build and
maintain your Sonic Forms library. The Sonic Forms Form Manager contains multiple components:
• Form Chooser - Lets you manage your form library and your version history.
• Editor - An advanced HTML editor which gives you fine-grained control over your form's layout and features.
• Form Parts - A library of iMIS-enabled fields, controls and buttons that allow you to create dynamic content on
your form.
• Preview Panel - A preview feature which allows you to visualize your form as it will appear to your members and a
"Save" function to update your changes.

20
FORM CHOOSER
INTRODUCTION
The Form Chooser allows you to manage your Sonic Forms library from a single location within the Form Manager. The
"Choose form" dropdown list shows you all of the forms that you have created. To review or update a form in the Editor,
simply select a Sonic Form from the dropdown list.
CREATING A NEW SONIC FORM
Step 1
To create a new Sonic Form, select the “New Form” option in the "choose form" dropdown list. You will be prompted for
a Form Name which will be used to identify your form.
Step 2
After you choose the "New Form" option a “Name” field will appear that lets you name your new form.
Pro Tip: Use a suitable coding structure to group related forms together by use case (e.g. APP_NEW, APP_RETURN, etc.).
Step 3
After you fill the field name you can build your page. Click on the “Save” button to save your Sonic Form Page.
Step 4
After the form has been saved the form will be added to your drop-down menu and the version control and delete
options will become available.
DELETING A FORM
To delete a Sonic Form simply select the form and then use the "Delete this Form" option on the Form Selector
and follow the prompts. Note that once a form is deleted:
1. It cannot be restored.

21
2. Any pages where the form is currently in use will immediately stop working and show a “No form
selected" message.
To delete a form:
1. Choose the form for deletion
2. Click the delete button and confirm
FORM VERSIONS
Every time that you save a Sonic Form, a copy is automatically archived so that you can refer to it later or revert to it. This
is extremely helpful if you encounter an issue with a form and wish to return to an earlier working version or if you wish to
keep multiple versions of the same form on hand. For example, you may have the “Early Bird” version of a form and the
“Regular” version in your Sonic Forms library at the same time. When the Early Bird period expires you can simply revert
to the “Regular” version and that version will become the current version of the form.
To revert to an earlier version, simply choose the appropriate version from the dropdown list and follow the confirmation

22
steps.
Pro tip: Save your Sonic Form updates frequently to ensure that you don't lose your work when reverting to earlier
versions.
Be sure to click on "Save" to make your reverted version the current and most recent version of your form on file.
CLONING A SONIC FORM
In many cases the new form you want is a variation on an existing proven form that you have already created. To clone a
form simply do the following:
Step 1
Select the form you wish to clone from the drop down list.
Step 2
Select the “New Form” option on the menu.
Step 3
Give your cloned copy a suitable name (e.g. 2019 Application Form).

23
Step 4
Click “Save” to add your newly cloned form to the database.
EDITOR
Sonic Forms for iMIS uses the Telerik editor which is included with iMIS for form layout and design. The Telerik editor is a
highly functional HTML-based editor which is used in a variety of contexts within RiSE.
QUICK OVERVIEW
Sonic Forms for iMIS uses the Telerik editor which is included with iMIS for form layout and design. The Telerik editor is a
highly functional HTML-based editor which is used in a variety of contexts within RiSE.
EDITOR CONTROLS AND FEATURES
The Editor allows you to layout and design your form any way that you want and supports a wide variety of features
including:

24
• Styles – Standard styles such as Heading 1 and Body Text
• Fonts – Specify fonts, sizes, decoration and more
• Lists – Ordered (numbered) and unordered (bulleted) list options
• Images – Add images to your forms from the RiSE image library or upload your own images.
• Tables – Layout structured data using table formatting
and much more.
The Editor supports a “source” mode to see the underlying HTML that is being created, letting you “tweak” your form's
design and layout to meet your unique requirements. The “Preview” function is a native part of the Editor but it does not
fully preview your Sonic Form – use the Sonic Form Preview Panel to inspect your work.
Complete documentation on the Telerik editor is available from www.telerik.com.
HOW FORM PARTS APPEAR
Form Parts are added into the Editor as structured HTML with special encoding which is used by Sonic Forms to
render the form in the way you want. When you are working with the Editor, Form Parts will appear as text
blocks similar to the example shown below:
CsContact.CHAPTER.CHAPTER_LIST
Each Form Part displays its key attributes so you can validate which field or component has been placed into
your form and its key attributes. For example, the Form Part example above is a field from the CsContact
business object, is named "CHAPTER", and it uses the "CHAPTER_LIST" validation table for its lookup values.
In order to see how your final form will actually display, you need to use the Preview Panel to render your form.
The Previewer will show you how your final form will appear with each Form Part properly laid out and
configured.
TIPS AND TRICKS
Here are some handy productivity tips:
• Browsers matter – There are some known issues with iMIS 20.1 and IE11. Sometimes blank space
appears at the bottom of the form when IE11 is used. To avoid that you can switch to another browser.
• Selecting field Form Parts (for deletion or resizing):
o In IE you can click on a field Form Parts to select it.
o In Firefox you have to double click to select a field Form Parts
o In Chrome you can not select a field Form Parts directly (use HTML mode)
• Resizing Text Boxes – Once you select a field you can set it's width and height in pixels. Just type 150px
in the Width box and then hit enter. The selected field will change and you'll see it in the Editor. Setting
height for a field will make it a multi-line text area allowing users to type text having new lines in it.

25
To see if a field Form Part has been selected check the Value box at the lower part of the Editor which is
populated with the name of the Form Part when it is selected.
FORM PARTS
Form Parts are used to add dynamic content to your Sonic Form page.
There are seven major groups of Form Parts available within Sonic Forms:
• iMIS Fields - Form parts which allow you to deploy your user-defined iMIS data from both single-
instance and multi-instance tables.
• Checkboxes- Form Parts which use data from the CsContact business objects within iMIS. These fields
include both system values (e.g. "Full Name") and fields that can be updated by users.
• Address Fields - Contains all address fields (including emails and phone numbers) that relate to address
purposes defined in iMIS.
• Activity Fields - Contains all standard iMIS activity types that are available for editing. All fields are
available - even fields that are not specifically defined for an activity type.
• Sign-up - Contains specific Form Parts that must be used when creating new iMIS accounts using Sonic
Forms.
• Buttons - Allows you to add multiple buttons to your form and specify their characteristics.
• Multi-Instance Layouts - Allows you to define and configure a Multi-instance Layout as a Form Part.
• Miscellaneous - Contains other Form Parts that do not fit into the categories noted above (e.g. Captcha).
IMIS FIELDS
iMIS Fields are form parts that are taken from your iMIS user-defined tables. The list includes both single-instance and
multi-instance tables.
Depending on the Table and Field that you choose, you will see different sets of attributes that are appropriate based on

26
the field chosen.
For example, below, you can see two sections that appear to help manage a field from a multi-instance table. The field
itself is setup as a "multi-select" field in iMIS.
CHECKBOXES
"Checkbox" fields record simple “Yes” or “No” responses to questions. The form part is displayed as a checkbox.
Always include an explanatory message to define the field.
The following attributes are available on Checkbox Form Parts:
• Read Only - Set the Form Part to read only.
• Required Field - If a checkbox is marked as “Required” then it must be set to True in order for the form
to submit. This is normally used for statements such as “Click here to indicate acceptance of terms and
conditions.”
• Message - The optional message field can be used to display a more appropriate message than
"Required". For example, "Please confirm you agree with the terms and conditions."
DATE FIELDS
Date fields are used to capture date information. By default, Sonic Forms always associates a date field with a
pop-up calendar control to ensure accurate input. However, users may also enter the date directly using the
date format chosen in iMIS as the default form.
The following attributes are available on Date Form Parts:
• Read Only - Set the Form Part to read only.
• Required Field - If a Date is marked as “Required” then it must be completed in order for the form to
submit.
• Regular Expression - A regular expression can be used to specify a specific date range, month or year.
For example, a birthday must have a year greater than 1910.
• Message - The optional message field can be used to display a more appropriate message than
"Required". For example, "Please provide a graduation date."

27
DROP-DOWN LISTS
If a field is configured in iMIS as a dropdown list, it will automatically be displayed as a dropdown list and
associated with the dropdown values defined in iMIS from the General Lookup and Validation tables. Changes
to the General Lookup and Validation tables are also automatically added to dropdown lists when updated in
iMIS.
The following attributes are available on these Form Parts:
• Read Only - Set the Form Part to read only.
• Required Field - Require valid entry in the field.
• Regular Expression - Control the acceptable values for the field. For Dropdown fields this can be used to
limit the dropdown list to a subset.
• Message - The optional message field can be used to display a more appropriate message than
"Required". For example, "Please choose the option that best meets your needs."
• Features - The following features are designed to work with dropdown lists
o Allow Other - Checking this option will include an additional value of “Other" which is displayed
below the standard dropdown list values if it selected in the dropdown list. If this option is
selected by the user, a text box will be displayed to allow the user to type in their own value. This
value will be stored in iMIS but will bypass validation checks.
o Add as Text Field - This option allows you to always add the field as user-entered text. This allows
a staff user to inspect the response and properly classify it after submission.
o Save Description - Drop-down lists in iMIS have a Code or Expansion value associated with them
that is stored in the database. Using the "Save Description" option overrides this behavior and
stores the description field value instead.
o Free Text Search - For long drop-down lists this handy feature allows a user to start typing in a
value and have matching options appear.
o Sort by - The Sort By option controls how the dropdown list values are sorted. The default is to
sort by the description field in ascending order. You can also sort by the Code value (e.g. to show
a specific life cycle sequence) and use descending sorts as appropriate.
In some cases you may wish to present only a subset of your internal dropdown options on a
web form. See Customizing Drop-down Lists for ways you can update your form definition to use
a different validation list if needed to present to an external audience.

28
NUMERIC FIELDS
Numeric fields in iMIS are defined as decimals or integers depending on your requirements. Numeric fields can
be defined as Read-Only and have their attributes such as number of decimal places set. You can also
use Regular Expressions to control input by forcing a specific format or value (minimum, maximum).
Sonic Forms will detect if your numeric field is an integer or decimal and enforce correct entry.
The following attributes are available on these Form Parts:
• Read Only - Set the Form Part to read only.
• Required Field - Require valid entry in the field.
• Regular Expression - Control the acceptable values for the field. For numeric fields this can be used to
control the attributes of:
o Minimum value
o Maximum value
o Number of decimal places
o Type of rounding (e.g. .00, .25, .50, .75)
• Message - The optional message field can be used to display a more appropriate message than "Invalid
amount". For example, "Age must be between 9 and 65."
TEXT FIELDS
Text fields can be thought of as having two specific cases – text fields and text boxes. Text fields are generally
less than 50-75 characters in length and are used for specific information. Examples are Place of Birth, Spouse's
Name, Other Professional Association, etc. Regular expressions can be used to control for minimum length of
answers along with the Required option.
Larger text boxes are usually used for longer responses to open-ended questions such as “Describe your
reasons for joining”. You can include a countdown feature to show the form user how many characters they
have left for their response (optional). You can also resize text boxes (see Resizing Text Boxes).
The following attributes are available on these Form Parts:
• Read Only - Set the Form Part to read only.
• Required Field - Require valid entry in the field.
• Regular Expressions - Control the acceptable values for the field. For text fields this can be used to
enforce a naming or numbering convention, or:
o Required prefix
o Minimum length
o Disallow or require certain characters (e.g. URL must contain "http://")
• Message - The optional message field can be used to display a more appropriate message than
"Required". For example, "Please use the format xxx-yyyyyy for your licence number."
• Display Counter - For larger text fields you can optionally display a counter that will show "xx characters
left" to guide users to limit their responses appropriately to fit the available space in the database.

29
MULTI-INSTANCE FIELDS OPTIONS
All of the iMIS field types are equally available for both single-instance and multi-instance tables. A multi-instance table
can have anywhere from 0 to an unlimited number of records for each iMIS user. Multi-instance records are usually used
for data that is repetitive in nature such as work history, continuing education submissions, academic history, etc.
When adding a multi-instance record to a Sonic Form you must consider both the source and the target of the data.
Multi-instance Sources
• New – a fresh (blank) multi-instance record is loaded with appropriate defaults (checkbox is empty, numeric fields
are zero, text fields are blank, date fields are blank).
• First – the first record in the multi-instance table – normally the oldest record on file, a new record is loaded if not
found.
• Last – the last record in the table – normally the most recent record on file, a new record is loaded if not found.
• Parameter – a record matching a specific parameter value in the multi-instance table (e.g. YEAR=2013) for that
user is loaded. If that value is not found, a new record is loaded.
Multi-instance Targets
• New – a fresh (blank) multi-instance record is saved with the data captured on the form.
• First – the first record in the multi-instance table is updated by the form.
• Last – the last record in the multi-instance table is updated by the form.
• Parameter – the record matching a specific parameter value (e.g. YEAR=2015) is updated by Sonic Forms.
EXAMPLES
• A user must file an annual work history showing their employment each year. To save time, the form loads with
their most recent record: LOAD=LAST, SAVE=NEW.
• A user has four records on file, an IQA is used to display the records with an “Edit” link beside each one. The
“Edit” link goes to a Sonic Form which displays and updates the record selected by the user. LOAD=WHERE,
SAVE=WHERE.
• In 2017 a user goes to add their annual work history to their existing record. The form loads their last year's
employment history but when the form is saved it creates a new record for them. LOAD=YEAR="2016",
SAVE=NEW.
Pro Tip: When using Multi-instance fields it is very important that all of the fields have the same Source and Target
settings otherwise the form will not save properly and data may become corrupted or damaged.

30
USING THE WHERE OPTION
The "Where" option for multi-instance records provides you with both control and flexibility in how you update your data.
When a "Where" statement is added to a Form Part, Sonic Forms will evaluate the user's data to read and update the
correct record. The dropdown list includes all of the fields available in the Multi-instance record. For example:
• SEQN - the unique record number generated by iMIS
• YEAR - a field showing a four-character year code
• MENTOR - an iMIS ID for a person who is designated as a MENTOR
A Where statement can use any field in the Multi-instance table to help you identify the correct record. Where
statements must always be unique and use the Equals operator.
Simple Where Statements
A simple Where statement uses a hard-coded value to specify a record. For example,
Where YEAR = '2015'
will return the first record found where the Year is equal to 2015.
Dynamic Where Statements
When creating a Where statement, you can also specify a URL parameter by using the coding of "@ff@" which
signals to Sonic Forms to look for a URL parameter with the appropriate name. The most common use of this is to
use the SEQN number from the multi-instance record itself ot specify a single unique record.
Where SEQN=@ff@SEQN
will return the record whose sequence number matches the sequence number included in the URL.
CONTACT FIELDS
Contact Fields is the term used for the key demographic data stored in iMIS. These fields are available in every iMIS
installation and are generally used for storing personal and company information for your primary contacts.
Contact fields have special characteristics in that many of them are system fields which cannot or should not be updated
through Sonic Forms. In these cases Sonic Forms will make the fields available as Read Only fields and you will not be able
to change this option. Common examples are:
• FULL NAME - Calculated "full name" of the member.
• PAID_THRU - Paid Thru date for membership - controlled by billing.
• LAST UPDATED - Last updated date recorded by iMIS.
The following attributes are available on these Form Parts - depending on their underlying type and if they are
system fields or not - see the cross-reference below:
• Read Only - Set the Form Part to read only.
• Required Field - Require valid entry in the field.
• With Calendar - Enable the pop-up calendar display for date fields.

31
• Regular Expression - Control the acceptable values for the field. For Dropdown fields this can be used to limit the
dropdown list to a subset.
• Message - The optional message field can be used to display a more appropriate message than "REQUIRED". For
example, "PLEASE CHOOSE THE OPTION THAT BEST MEETS YOUR NEEDS."
• Show Counter - Option for text fields to show the remaining character counter.
• Features - The following features are designed to work with dropdown lists:
o Allow Other - Checking this option will include an additional value of “Other" which is displayed below the
standard dropdown list values if it is selected in the dropdown list. If this option is selected by the user, a
text box will be displayed to allow the user to type in their own value. This value will be stored in iMIS and
will bypass validation checks.
o Add as Text Field - This option allows you to always add the field as user-entered text. This allows a staff
user to inspect the response and properly classify it after submission.
o Save Description - Drop-down lists in iMIS have a Code or Expansion value associated with them that is
stored in the database. Using the "Save Description" option overrides this behaviour and stores the
description field value instead.
o Free Text Search - For long drop-down lists this handy feature allows a user to start typing in a value and
have matching options appear.
o Sort by - The Sort By option controls how the dropdown list values are sorted. The default is to sort by the
description field in ascending order. You can also sort by the Code value (e.g. to show a specific life cycle
sequence) and use DESCENDING sorts as appropriate.
CONTACT FORM PARTS REFERENCE
Field
Form Part Type
System?
Size
Birth Date
Date
BT_ID
Text
10
Category
Text
5
Chapter
Text
15
CO_ID
Text
10
Company
Text
80
ConfirmEmail
Text
100
ContactID
Text
Yes
ContactRank
Numeric (Integer)
Designation
Text
20
Email
Text
100

32
ExcludeDirectory
Checkbox
ExcludeMail
Checkbox
Fax
Text
25
First Name
Text
20
Full Name
Text
Yes
70
Functional Title
Text
50
Gender
Dropdown
1
Home Phone
Text
25
ID
Text
10
Informal
Text
20
IsInstitute
Checkbox
Yes
Join Date
Date
Last Name
Text
30
Last Update
Date
Yes
Major Key
Text
15
Member Status
Text
Yes
5
Member Status Date
Date
Yes
Member Type
Dropdown
5
Middle Name
Text
20
Paid Thru
Date
Yes
Prefix
Text
25
SIC Code
Text
10

33
Source Code
Text
Yes
Status
Text
5
Suffix
Text
10
Title
Text
80
Toll Free
Text
25
Updated By
Text
Yes
60
Website
Text
255
Work Phone
Text
25
ADDRESS FIELDS
iMIS maintains three key address sets which are named and configured through the iMIS basic configuration. These
addresses default to “Work”, “Home” and “Other” but can be renamed to suit your association's needs.
The Address Field Form Parts include an address purpose selector which allows you to display or update any one of the
three main addresses associated with the user's account. Each address field then can be deployed up to three times (one
for each purpose) on a single form.
A typical use case would be to define:
• Work Address Block (most fields mandatory))
• Home Address Block (all fields optional)
as part of a sign-up or update Sonic Form focusing on the member's address information.
ADDRESS FIELD FORM PART REFERENCE
Field
Form Part Type
System?
Size
Address1
Text
40
Address2
Text
40
Address3
Text
40
City
Text
40

34
Country
Dropdown (Text)
25
County
Dropdown (Text)
20
Email
Text
100
Fax
Text
25
Note
Text
8000
Phone
Text
25
PostalCode
Text
10
PreferredBill
Checkbox
PreferredMail
Checkbox
PreferredShip
Checkbox
StateProvince
Dropdown (Text)
15
FEATURES
Allow Other: This option inserts an option into the dropdown called "Other". If it is selected, it will add a new field for the
user that the user can fill with information.
Add as text field: The drop down will become a text field.
Free text search: The drop down will become a field and you can type and will load the values as well a dropdown.
SORT BY
Code asc: Order the drop down by Code ascent.
Code desc: Order the drop down by Code descent.
Description asc: Order the drop down by Description ascent.
Description desc: Order the drop down by Description descent.
Ready Only: To make the value a read-only field.
Required Field: When this field is checked, the field must be filled.
Regular Expression: This field is responsible to add regular expression in your field such as validation. Read more about

35
Regular Expression here.
Message: Personal message which the user sees if their regular expression is false.
Use for duplicate check: This field is used for sign-up. It enables the system to check whether this field should be
validated.
ACTIVITY FIELDS
Activity Fields are associated with Activity records in iMIS and record many different types of interactions with members,
customers and staff. Each activity record has two components:
• Basic Activity Record - the underlying database structure which controls the size, type and attributes of the field.
• Activity Definition - the user or system defined definition which defines an ALIAS for each activity record field
used by a specified Activity Type. For example, the TRANSACTION_DATE for a CALL activity would be the date and
time of the call whereas the TRANSACTION_DATE for a CEU activity would be the date and time that a course was
taken.
The following attributes are available on these Form Parts - depending on their underlying type and if they are system
fields or not - see the cross-reference below:
• Activity Type - The overall Activity Type from iMIS
• Field Name - The Alias and (Field Name) for each standard activity field. Where fields are not defined in the
Activity record with an Alias they can still be used as part of a Sonic Form.
• Load Options:
o Last - Loads the values found in the most recent Activity record as defined by the SEQN number. Loads a
blank record if there is no history.
o Blank - Loads an empty record.
o Where - Defines the criteria to select a record (e.g. YEAR="2018")
• Save Options:
o Last - Saves the values into the most recent Activity record as defined by the SEQN number. Saves a new
record if there is no history.
o New - Saves a new record with a new SEQN number.
o Where - Defines the criteria to select a record (e.g. YEAR="2018")
• Features:
o With Calendar - Enable the pop-up calendar display for date fields.
o Read Only - Set field as read-only.
o Auto Update -
o Allow Other - For dropdown lists, add an "Other" option with additional field for user-defined entries.
o Add as Text Field - This option allows you to always add the field as user-entered text. This allows a staff
user to inspect the response and properly classify it after submission.
o Save Description - Drop-down lists in iMIS have a Code or Expansion value associated with them that is
stored in the database. Using the "Save Description" option overrides this behaviour and stores the
description field value instead.
• Sort By
o Code asc - Code ascending order
o Code desc - Code descending order
o Description asc - Description ascending order (default)
o Description desc - Description descending order
• Validation Options
o Required Field - Sets the field to Required and displays the required message if it is not completed.

36
o Message - The optional message field can be used to display a more appropriate message than
"REQUIRED FIELD". For example, "PLEASE CHOOSE THE OPTION THAT BEST MEETS YOUR NEEDS."
o Minimum - For date or numeric fields set the minimum acceptable value.
o Maximum - For date or numeric fields, set the maximum acceptable value.
o Validation Table - For dropdown text fields, override the standard validation table with a custom
validation list for this form.
• Textbox Options
o Regular Expression - Control the acceptable values for the field.
o Message - Display an error message associated with the regular expression (e.g. "Please use format (555)
555-1212 for phone numbers")
o Format
o Display Counter - Option for text fields to show the remaining character counter.
ACTIVITY FORM PARTS REFERENCE
Activity Field
Type
Type
Size
Min?
Max?
Lookup?
ID
varchar(10)
Char
10
SEQN
int
Int
TRANSACTION_DATE
datetime
Date
Yes
Yes
EFFECTIVE_DATE
datetime
Date
Yes
Yes
PRODUCT_CODE
varchar(31)
Char
31
Available
OTHER_CODE
varchar(30)
Char
30
Available
DESCRIPTION
varchar(255)
Char
255
SOURCE_CODE
varchar(40)
Char
40
Available
QUANTITY
numeric(15,2)
Numeric
15,2
Yes
Yes
AMOUNT
money
Money
CATEGORY
varchar(15)
Char
15
UNITS
numeric
Int
Yes
Yes
THRU_DATE
datetime
Date
Yes
Yes
ACTION_CODES
varchar(255)
Char
255
Available
TICKLER_DATE
datetime
Date
Yes
Yes

37
NOTE
text
Text
NOTE_2
text
Text
CO_ID
varchar(10)
Char
10
UF_1
varchar(255)
Char
255
Available
UF_2
varchar(255)
Char
255
Available
UF_3
varchar(255)
Char
255
Available
UF_4
numeric(15,4)
Numeric
15,4
Yes
Yes
UF_5
numeric(15,4)
Numeric
15,4
Yes
Yes
UF_6
datetime
Date
Yes
Yes
UF_7
datetime
Date
Yes
Yes
Notes:
1. There are additional fields available on the activity record, however, they are normally reserved by iMIS and are
not exposed by Sonic Forms.
2. Lookup values for Activity fields are defined with the format ACTIVITY_TYPE/FIELD where ACTIVITY_TYPE is the
Activity Type code and the Field is the underlying field name used. For example, CALL/UF_1.
SIGN-UP
The Sonic Forms sign-up process allows you to capture all the relevant details about a prospective customer or member
and create their iMIS account. An iMIS account requires at least the following information:
• iMIS Username
• Password
• Last name
• First name
• Email
A Sonic Form which includes these Form Parts will function as a sign-up form and create a new iMIS record upon
successful submission.
When assigning an iMIS username you have two basic options:
1. Allow the user to set their username themselves.
2. Have Sonic Forms automatically assign their username to be their new iMIS ID.

38
Pro Tip: Users who are already logged into iMIS will create an error when they attempt to submit a sign-up form. Always
ensure that the “Display for Unauthenticated Users Only” option is enabled on sign-up forms before deployment.
DUPLICATE CHECKING
There are three options for Duplicate Checking Sonic Forms that are working as sign-up forms:
1. Disabled – No duplicate checks will be performed, however, a user will not be able to create a duplicate username
and will receive an error if they do so.
2. Simple Duplicate Check – This standard duplicate check validates the Email address provided to ensure that it is
not duplicated in iMIS and provides an error message if it does.
3. Advanced Duplicate Checking – This advanced check can be configured to test for multiple fields and fail if any of
them are found in the database. See Advanced Duplicate Checking for more information.
Note that Duplicate checking options are configured on the Sonic Forms Configuration Panel and are specific to each web
part where the form is deployed.
BUTTONS
Button Form Parts are action oriented buttons that allow you to drive the form submission process. Buttons can
be used to:
• Drive navigation – send the user to another page
• Submit updates to iMIS – update information in iMIS
• Invoke procedures – run a stored procedure to perform database functions
These basic button features can be combined into combinations. For example, a single button can update
iMIS, run a procedure and then send you to a new page.
Here is a summary of the options available for Sonic Form buttons:
By changing a button’s characteristics you can draw more or less attention to the button as part of your
design. For example, you may wish to change your “Delete Record” button to have a red background.
1. Button Text - the label which describes the purpose of the button. The button style and formatting will be
picked up from your RiSE template.

39
2. Mouse over text – the button will be rendered with additional “alt” text which is displayed when the
cursor is held over the button. This can provide additional information to your user about exactly what the
button will do if selected.
3. CSS Class – By default, buttons have the standard iMIS class of “ButtonText” which will pickup the default
button style defined for your iMIS website. Using this feature, you can override this class to:
o Change a button to a hyperlink
o Change the font or background colour of the button
o Change the shape or size of the button
By changing a button’s characteristics you can draw more or less attention to the button as part of your design.
For example, you may wish to change your “Delete Record” button to have a red background. For more
information on using this feature see Formatting Buttons with CSS.
4. Target URL - this is an optional value which defines where the form should send the user IF the button is
processed without error. If error message(s) are shown then Sonic Forms will leave the user on the original
page. Here are some examples of Target URLs:
o NextPage.aspx - Go to the page "NextPage.aspx" which is located in the same content folder as the
Sonic Form. No parameters are specified.
o NextPage.aspx?ID=@ff@ID&SEQN=@ff@SEQN - Go to the next page and pass the ID and SEQN
from this Sonic Form into the target page. The "@ff@" coding defines a token value to Sonic
Forms.
o http://myotherwebsite.com/folder/TargetPage.html - Go to a fully qualified URL including a full
path designation - no parameters are included.
o See Linking Forms with Parameters for more information.
5. Button Options
o Submit form with validation - This option is the standard (default) use case where all fields are
validated on the form and submitted to iMIS.
o Submit form without validation (save) - This option allows the user to submit partial information
and is ideal for a "Save my Work" button on longer forms. All fields that can be saved are accepted
and update, however, fields which do not validate are ignored.
o Do not submit data (cancel/close) – This option is normally used with a Cancel or Close button to
allow the user to back out of any changes before they are submitted.
6. Open New Window on Submit - This option will force a supported browser to open a new window upon a
successful submit. A good use case would be a button to "Review Previous Year" which would open a
different record.
7. Global Stored Procedure Options
o Run global stored procedure - Runs the global stored procedure specified on the Sonic Forms
Admin Panel.
o Do not run global stored procedure - Supresses the processing of the global stored procedure. This
is often used with the "Ignore Validation" option when clicking on "Save my Work". It is also useful
when designing forms where a user needs to leave a form temporarily (e.g. to complete a
membership application) and wishes to return before finalizing a submission.
8. Show Stored Procedure Message - This option will display a custom error or success message from either
the global, targeted stored procedure. For example, the results of a calculation could be displayed. If this is
not enabled then the general success or failure message is displayed.

40
9. Run targeted stored procedure - This option specifies a stored procedure which can be run when this
specific button is selected. For example, on a membership sign-up form a group of buttons could be setup
for different member types as follows:
o Join as Regular Member
o Join as an Executive Member
o Join as a Corporate Member
Each button in this case would run a separate procedure to set up the correct member type.
Note that when you are developing a form at least one “Submit” button is needed for testing.
MULTI-INSTANCE LAYOUTS
The Multi-Instance Form Layout is a powerful Form Part that allows you to embed a dynamic grid into your form which
allows your users to see and update multiple records in one step. Typical use cases include:
• Employment History
• Continuing Education Credits
• Annual Reviews
There are three steps:
1. Create a Multi-instance (MI) Layout - Each MI Layout has its own unique parameters and display options. Multi-instance
Layouts can be reused on multiple Sonic Forms.
2. Design your MI Layout with suitable options.
3. Deploy the MI Layout onto your form as a Form Part.
CREATING A NEW MI LAYOUT
In order to create a new MI Layout select the "New Layout" option under the Multi-instance Form Part menu.
The New Layout dialog gives you a number of options for creating your MI Layout:

41
• Layout - Name of your layout.
• Table name - List of available Multi-instance tables that you can use with this Form Part.
• Instructions - Short text block that will be displayed to the user to provide guidance on completing the
requirements for this MI Layout.
• Grid Width - Width (in pixels) of the grid on your Sonic Form Page.
• Popup Width - Width (in pixels) of the popup window that will appear when the "Edit" link is activated.
• Popup Height - Height (in pixels) of the popup window that will appear when the "Edit" link is activated.
• New Record Link - The name of the link that will appear in your grid to insert a new record (e.g. "Add another CEU
credit.")
• Stored Procedure - Name of the Stored Procedure that should be called when the save button is activated. This
stored procedure is tied to the MI Layout and is in addition to the overall stored procedure associated with the
form itself.
• Allow
o New Records - Include an "Add" link to insert new records.
o Editing - Include an edit link to permit individual records to be updated.
o Deleting - Include a Delete link to permit individual records to be deleted.
• SQL Filter - A specific SQL query that will be used to determine which records are available for display and/or
editing (e.g. STATUS='A').
• Buttons
o Save - It will save your layout.
o Delete Layout - Your MI Layout will be deleted.
MI LAYOUT DESIGN
When designing an MI layout you have two options:
GRID OPTIONS
The Grid Options control which field headings are displayed in a the MI Layout. You can control:
1. Presentation Order
2. Grid Label
3. Show or Hide the field

42
FIELD OPTIONS
Field level options control how the record appears on the Edit or View pop-up.
1. Field label (can be more expressive than the Grid label)
2. Required / Not Required
3. Editable or not
4. Viewable or not
5. Validation Table - if applicable
These attributes can be used in combination to create the user experience desired.
DEPLOYING AN MI LAYOUT
Deploying an MI layout is easy, simply select the MI layout you wish and click on "Add" to add it to the form in the location
indicated.
PRO TIP: ONCE DEFINED YOU CAN USE MI LAYOUTS IN ANY SONIC FORM. YOU CAN ALSO HAVE VARIANTS LIKE AN
EDITABLE VERSION OR A READ-ONLY VERSION AS REQUIRED.
MISCELLANEOUS
The Miscellaneous section contains Form Parts that are not defined elsewhere. Here is a list of these special
Form Parts and how they are deployed:
• CAPTCHA – This form part can be added to the page and must be successfully validated for the Submit
function to work. A Captcha-specific error message is provided automatically. Captcha blocks are most
useful on forms that are public-facing and subject to entry by spambots.
PREVIEW PANEL
The Preview Panel and Save control completes the Sonic Forms Form Manager. The “Save” function saves a new version
of the Sonic Form and immediately marks it as Published. Unlike other RiSE components, form changes are immediately
propagated to the web. The “Update Preview Only” option refreshes the Preview so you can view and evaluate your most
recent changes before clicking the “Save” button. This allows you to assess your changes before committing them.
Clicking on the Preview Panel bar displays the preview.

43
SONIC FORMS – DEPLOYMENT
USING THE ADMIN PANEL
Each time a Sonic Forms Page is added to your RiSE website you need to tell it which Sonic Form to display and what
options to use. Because each page has its own unique admin panel you can reuse your Sonic Forms in multiple locations
and quickly swap out Sonic Forms variations whenever you need to keep your site fresh and engaging.
To configure your deployment options, you use the Sonic Forms Admin Panel. It uses a page-specific configuration file to
set and retain various form parameters. To access the Admin Panel, you must be logged into your RiSE website with the
SysAdmin Role. Users with this role will see the blue bar which allows you to view and hide the configuration panel
settings.
Simply click anywhere on this bar to expose the Admin Panel.
SELECT FORM AND PREVIEW
You can select any form from your form library to deploy. Use the Preview option to confirm that you are deploying the
correct Sonic Form from your library on the page.
VALIDATION SELECTION
The following validation features are set at the page level:
• Page Title – Overrides the page title displayed in browsers.
• Message on Success – If the submit button does not take the user to another page, this global message is
displayed to indicate the outcome of the Submit process. Default message is “SUCCESSFULLY UPDATED.” If you
have button-specific messages they are appended to this message if it is used.

44
• Message on Failure – This global message is displayed to indicate the outcome of the Submit process. Default
message is “FORM NOT SAVED.” You can enter your own form-specific message here if required. If you have
button-specific messages they are appended to this message if it is used.
• Validation Summary – The Validation Summary displays a list of messages related to your form fields. For example
- LAST NAME IS REQUIRED, ZIP CODE IS REQUIRED. Normally these messages are displayed near the bottom of
a form (where a Submit button is usually deployed), however, it can also be useful to display your Validation
Summary at the at the top of the page or in both locations when designing longer forms.
• US Date Format – Forces the page to use the US date format of MM/DD/YYYY regardless of the user's Windows
settings.
• 12-Hour Format - Display time fields in AM/PM format; Otherwise 24-hour format is used.
• Additional Error Message (Top) – when enabled, this option displays system related error messages at the top of
the page. The standard location is at the bottom of the page (see Troubleshooting for more details).
STORED PROCEDURE
One of the most powerful features in Sonic Forms is its ability to invoke a stored procedure when a form is successfully
submitted. Stored procedures can be used for any kind of data update or transformation based on the information
provided by a user.
• Stored Procedure – Name of the stored procedure in your iMIS database.
• SEQN Table - (Optionally) identifies which Multi-instance Table should be the target of the Stored Procedure and
passes that table's SEQN number to the stored procedure for processing.
See Using Stored Procedures for more information.
DEFAULT VALUES
• Default Country – Default value for the country that will be used by address fields.
• State / Province - Default value for the state or province that will be used by address fields on the form.
FORM CHANGE LOGGING
By default, Sonic Forms logs all changes recorded as part of a form submission in the standard iMIS log table (Name_Log).
You can disable this feature by turning it off if changes recorded by a form are not important or needed for your
administrative requirements.
CREATE ACCOUNT FEATURES
You can optionally define the following defaults for new accounts created using Sonic Forms.
• Member Type – Any valid member type from iMIS.
• Billing Category – Any valid billing category from iMIS.
• Create Account Form - By default, Sonic Forms will create a new account and then immediately sign-in the new
user when successful. If you are using a Sonic Form to allow for 3rd party accounts to be created (e.g. a Company
Administrator creating accounts for their employees) then you can enable this option to allow a user to create
accounts without logging them in which allows them to continue to create additional accounts or perform other
activities in iMIS.

45
• Auto Assign Company - This option is used with the Create Account Form option to automatically assign a newly
created user to the same company as the person who is creating their account. For more information see
also Create Account Features.
Note that new records are always created with a status of “A” or Active. If this status code is not appropriate then a
stored procedure can be used to reset the Member Status if necessary.
DUPLICATE CHECK OPTIONS
Sonic Forms can help you to avoid duplicates when you are creating new accounts.
• Duplicate Account Message – An optional friendly message for duplicate accounts. Default message is “SORRY –
YOUR ACCOUNT IS ALREADY ON FILE - PLEASE RESET YOUR PASSWORD TO GAIN ACCESS TO YOUR
ACCOUNT.”
o Proceed Anyway Option – Option to override duplicate checks and permit a new account to be created.
Selecting this option requires that new accounts be reviewed for duplicates and merged if necessary.
o Duplicate Check –
▪ Simple - The Simple duplicate check validates only if the user's email is on file already.
▪ Advanced - The Advanced Duplicate Checking executes a stored procedure to evaluate if the user
meets your organization's policy for duplicate management. This stored procedure is called
"va_CheckForDuplicateAccount" and is automatically installed when you activate Sonic Forms.
See Advanced Duplicate Checking for more information.
EMAIL
The email notification feature allows a designated administrator be notified on form submission. Three options are
supported:
• None - do not send an email on submission.
• Notification Only - send an email which just provides a notification to the administrator.
• Notification and URL - send an email which includes a customized link to a designated page where the user's
submission can be viewed. Requires login to your iMIS website.
The following options are available:
• From: The "From" address for the email - this address must be a valid address on your SMTP server.
• To / cc / bcc - Specific email addresses to send the notification to. Multiple addresses can be added separated by
a comma.
• Subject - Subject Line for the email.
• URL - Used with the "Notification and URL" option to define the target link for review of the form submission. This
link can accept parameters if they are provided to the form via the URL. For example:
http://myassociation.org/Staff/FormReview/Form1040.aspx?ID=@ff@ID&SEQN=@ff@SEQN
The "@ff@" prefix is a token indicator which defines the field name to use as taken from the URL or the
form submission.
VALIDATION SELECTION

46
The “Validation Selection” options allow you to format the error messages generated by your form and lets you change
the title of the page and the date format.
VALIDATION SELECTION FIELDS
Page Title: This field will change the title of your page that shows in the web browser.
Message on success: Success message that the user will see after clicking the "Save" button and remaining on the same
page.
Message on failure: Error message that the user will see after clicking the "Save" button and the information could not be
read.
Validation Summary: Select where the message will be displayed - top or bottom of field.
US date format: If checked, date will appear as MM/DD /YYYY . Otherwise the format is DD/MM/YYYY.
12-hour clock: If checked, time will appear in 12-hour clock (AM/PM). Otherwise the format is 24-hour clock.
Additional Error Message(Top): if it checked, the message will show on the top of the page.
MESSAGE ON SUCCESS AND ADDITIONAL ERROR MESSAGE(TOP)

47
PAGE TITLE
USING STORED PROCEDURES
On each Sonic Forms page you can set a stored procedure to be executed on form submission. Sonic Forms will
save all the user input first and then, if successful, call the stored procedure allowing you to use the stored
procedure for post processing of any kind of data update or transformation based on the information provided
by a user.
Stored procedures that can be used with Sonic Forms must have the following parameters (although they do
not all have to be used by the procedure itself):
• ID – ID of the iMIS user who submitted the form or on whose behalf the form was submitted.
• SEQN – SEQN ID of the multi-instance record updated by the user (optional).
In order to set a stored procedure you need to open Sonic Forms Admin Panel and define the Stored Procedure
to be executed:

48
Here is an example of a simple stored procedure using only the ID parameter (@IMISID):
You can use the return value to control whether the user will be redirected to the next form (if url is attached
on the submit button). If the return value is 0 or greater than 0 Sonic Forms continues to the next page or
displays the message on success (if no url is set). If the return value is negative or the stored procedure
executes with errors the failure message will be shown and no redirect will occur. This is useful if you need to
validate user input, check if the logged in user has permissions to continue, etc.
Here is an example:

49
If you have fields from multi-instance tables on the page you can pass the sequence number of the
created/updated record to the stored procedure. In order to do this you need to put the table name in the
SEQN table field and update your stored procedure to accept two parameters: @IMISID and @SEQN. See the
example below:
1. In Sonic Forms Admin panel put name of the table in SEQN table field.
2. Make sure your stored procedure has two parameters.
CREATE ACCOUNT FEATURES
Sonic Forms allows you to create forms that will be used for adding new users to iMIS. These forms are also often called
sign-up forms.
In order for a Create Account form to function properly, you must including the following fields in your form layout.
• First Name,
• Last Name,
• Email,
• Username and
• Password.
PRO TIP: WHILE ALL OF THESE FIELDS ARE REQUIRED, YOU CAN USE JAVASCRIPT TO HIDE OR POPULATE
UNNECESSARY FIELDS TO IMPROVE YOUR USER EXPERIENCE.

50
After you have built you Create Account page, you can also configure additional options in the "Create Account" section

51
located in the Create Account Features.
• Member Type - This dropdown list allows you to set the member type for users created with this form.
• Billing Category - This dropdown allows you to choose an appropriate billing category for the member.
• Create Contact Form - If checked, this option will create a new account without signing in the user. It is used by
Company or Chapter administrators who wish to create several accounts on behalf of other individuals.
• Auto Assign Company - Used in conjunction with the Create Contact Form, this allows you to automatically assign
a new account to the same Company ID as the logged-in user.
EXAMPLE
The example below shows a Create Account form to capture a new volunteer account. The Member Type will be set to
"Volunteer" and the Billing Category would be "Not Reviewed".

52
The page will look like this:
Complete the form:

53
Click the "Save" button. The success message will appear.
The iMIS database will now have a record for your new volunteer.
54
ADVANCED TOPICS
While these features and capabilities are a standard part of Sonic Forms they require some systems experience
and knowledge to use effectively. Please contact Visual Antidote or your Authorized iMIS Solution Provider for
assistance with implementing these features if you have any concerns about how they would apply to your
installation or project.
ADDING JAVASCRIPT TO SONIC FORMS
Javascript is quickly becoming a standard for many websites and is used to improve the interactivity of your Sonic Forms.
Javascript can do things like:
• Make a field appear or disappear based on something else on a page.
• Perform immediate calculations (e.g. work out a membership fee based on options selected).
• Provide advanced validation checks based on the contents of more than one field (i.e. If field “A” is yellow then
Fruit must be “Banana” or “Mango”).
• And much more.
HOW TO ADD JAVASCRIPT TO YOUR FORM
Step 1
Access the menu Rise -> Page Builder -> Manage Content.
Step 2
Select the folder. Then select the Web Content where you want to add JavaScript. Then click on "Edit".
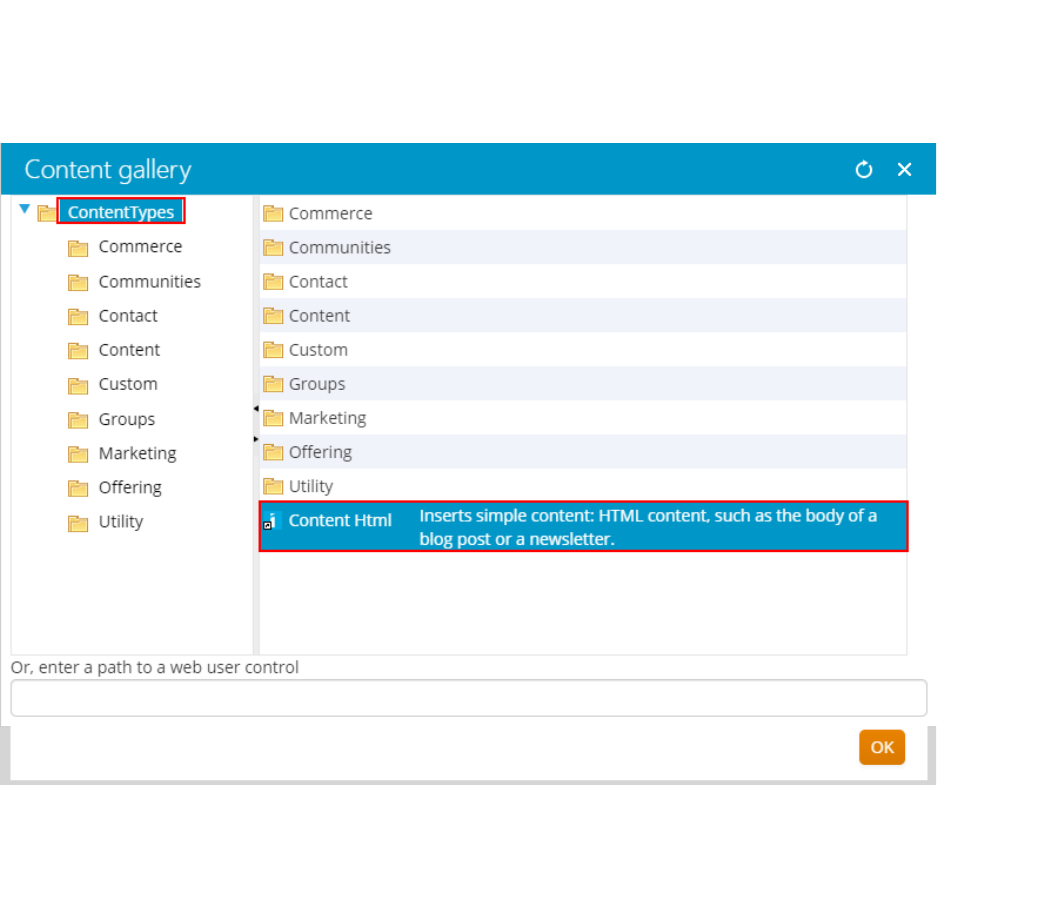
55
Step 3
Click on the link “Add content”.
Step 4
Select “Content HTML”. Make sure that you are in the Folder “Content Types”.
Step 5
In the field “Name” write(1) the name of your Form. Click(2) on the HTML Viewer. Then Write(3) your code in JavaScript.
Remember to tag <script> to open and </script> to close. When you're done, click on the “OK” button.

56
Step 6
View the content that you created. Publish your website.

57
Step 7
Test the script by accessing the page to see the message.
CUSTOMIZING DROP-DOWN LISTS
Dropdown lists are powerful tools to make sure that you get consistent data from your members and stakeholders,
however, you can often encounter situations where a dropdown list that is appropriate for one audience is inappropriate
for another.
Example: You have two kinds of applications - professional and student. For a dropdown question "How did you find out
about us?" you want to offer different choices:
For student applicants:
- Student Newspaper
- Campus Event
- Web search

58
- Word of Mouth
For professional applicants:
- Alumni newsletter
- Web search
- Networking event
- Annual Conference
- Word of Mouth
Two of these items are the same (Word of mouth, Web search) while the others are different, however, when you view
these in iMIS you want all of these values to be available.
Sonic Forms allows you to use different lookup tables *per form* to provide the right user experience. In this case we
would have three lookup tables:
FIND_US
FIND_US_STUDENT
FIND_US_PROF
The master "FIND_US" lookup table will encompass all of the codes and descriptions used on both "FIND_US_STUDENT"
and "FIND_US_PROF".
Once you have created your lookups just follow these steps to deploy them:
1. Add the field to your form as usual.
2. Switch to the HTML editor and find your field definition. You will see code similar to this:
<select va_val="required." other="True" orderby="descasc" vaatt="Char.40-0" requiredmsg="Required Field">
<option>DEMOGRAPHICS.FIND_OUR_ORG.FIND_US</option></select>
3. Simply edit the "<option>" tag to change the last value to your selected lookup.
<select va_val="required." other="True" orderby="descasc" vaatt="Char.40-0" requiredmsg="Required Field">
<option>DEMOGRAPHICS.FIND_OUR_ORG.FIND_US_STUDENT</option></select>

59
4. Save your form to enable the changes.
FORMATTING BUTTONS WITH CSS
Beginning with Sonic Forms 3.0.1807A, you can now change up the look of your buttons using CSS classes.
By default, Sonic Forms buttons take the class TextButton. Here are three common CSS classes for buttons that are
available in the Staff site template for iMIS 20.2:
• TextButton (standard format, round corners, dark blue background)
• SignInButton (plain format, full width)
• SaveAndClose (orange background, compact format)
CSS allows you to combine different classes together (classes should be chosen to avoid conflicts) to create combinations
of features. Here are five buttons that illustrate the classes noted above and how they change when they are combined:

60
and here is how these buttons are coded in Sonic Forms:
EXAMPLE: CHANGE A BUTTON TO A HYPERLINK
The following CSS code, will create a CSS entry called "buttonLink" which can be applied to a Sonic Forms button to make
it appear as a hyperlink. This CSS code should be added to the CSS used on your site template so that it is available
throughout your site as needed.
.buttonLink {
background:none!important;
border:none;
padding:0!important;
/*optional*/
font-family:arial,sans-serif; /*input has OS specific font-family*/
color:#069;
text-decoration:underline;
cursor:pointer;
}
Working with CSS requires some programming skills and experience. If you need assistance, please contact your iMIS
Solution Provider.
CUSTOMIZING COMPANY LOOKUPS
In Sonic Forms 3.x, you can now control which companies are displayed during the Create Account process.
HOW TO SELECT COMPANY DETAILS
In certain cases, you may wish to invite a user to select their Company from an approved list of company names when
creating their account. If the field
The options available to the user are controled via the view "va_Form_CompanyLookup". By default, the view looks for
company records with a status of "Active". By updating the view settings you can reduce or expand the available values to
suit your unique circumstances.
IMPORTANT CONSIDERATIONS
1. The company list is loaded as part of the form layout. If you have more than 500 companies to choose from this
may cause performance issues. Please contact Visual Antidote or your Authorized iMIS Consultant for alternative
approaches in this scenario.
2. The company field must have the "Free Text Search" option configured.

61
LINKING FORMS WITH PARAMETERS
One of the most powerful features of Sonic Forms is its ability to create complex workflows by linking multiple forms and
iParts together.
PARAMETERS IN SONIC FORMS
The key parameters used are the iMIS ID and the iMIS SEQN field used on the Activity table and multi-instance tables,
however, any field that is available to your Sonic Form can be used as a parameter if necessary. A special Sonic Forms
token value "@ff@" is used to retrieve the specified field value and add it to your URL.
EXAMPLES:
1. Pass the ID to the next form or page:
Enter the value as "?ID=@ff@ID" will display as "?ID=1243
2. Pass the ID and sequence to the next form or page:
Enter the value as "?ID=@ff@ID&SEQN=@ff@SEQN" will display as "?ID=1243&SEQN=405"
3. Pass the ID and program type (field name is "PROGRAM") to the next form or page:
Enter the value as "ID=@ff@ID&PROGRAM=@ff@PROGRAM" will display as "?ID=1243&PROGRAM=SENIOR"
USING PARAMETERS IN SONIC FORMS
Parameters settings are defined in two ways:
- The overall record is defined by the ID field. This is used to determine which Contact or Single-instance record is
retrieved.
- An individual record from a multi-instance or activity table is defined by its Sequence (SEQN) value which is an integer
starting at 1. You can specify which record is used on a form by defining the Load and Save options for the Form Part in
question.
See: Multi-Instance Fields Options and Activity Fields
REGULAR EXPRESSIONS
In Sonic Forms you can use Regular Expressions (Regex) to validate user input in text fields. A Regular Expression is a
specially coded statement which verifies if input meets certain criteria including:
- Minimum length
- Certain values or formats
- Minimum value (numeric or integer)
- Date formats and values
Regular Expressions are used in conjunction with specific error messages (e.g. "Must be more than $25.00) and allow
you to prevent form entry if your criteria are not met.
EXAMPLE

62
The example below demonstrates only permitting numbers between 50 and 99. The regular expression in this
case is: ^[5-9][0-9]$
And here is the form with a custom error message being displayed if the Regular Expression criteria is not met.
More Information
Using regular expressions you can validate numbers, names, email addresses, phone numbers, ZIP or postal
codes, etc. Here is a list of commonly used regular expressions:
Pattern
Description
^\d{5}$
5 numeric digits, such as a US ZIP code.
^(\d{5})|(\d{5}-\d{4}$
5 numeric digits, or 5 digits-dash-4 digits.
This matches a US ZIP or US ZIP+4 format.
^(\d{5})(-\d{4})?$
Same as previous, but more efficient.
Uses ? to make the -4 digits portion of the pattern optional,
rather than requiring two separate patterns to be compared
individually (via alternation).
^[+-]?\d+(\.\d+)?$
Matches any real number with optional sign.
^[+-]?\d*\.?\d*$
Same as above, but also matches empty string.
^(20|21|22|23|[01]\d)[0-5]\d$
Matches any 24-hour time value.
^[a-zA-Z0-9]*$
Alpha-numeric characters only
^[a-zA-Z]*$
Alphabetic characters only
^([ABCEGHJKLMNPRSTVXY][0-9][A-Z] [0-9][A-Z][0-
9])*$
Canadian Postal Codes

63
^([a-zA-Z0-9._%-]+@[a-zA-Z0-9.-]+\.[a-zA-
Z]{2,4})*$
Email Address
^((([0-9]{1})*[- .(]*([0-9]{3})[- .)]*[0-9]{3}[- .]*[0-
9]{4})+)*$
Phone Numbers (North American)
Here are some useful websites where you can find more regular expression examples:
http://regexlib.com
http://www.regular-expressions.info/
http://www.codeproject.com/Articles/206330/Learning-REGEX-regular-expression-in-the-most-ea
ADVANCED DUPLICATE CHECKING
Duplicate database records can cause issues both for staff and members and can be a nuisance to clean up after the fact.
To prevent accounts from being created, you can code your Create Account forms to perform either a simple or
advanced duplicate check.
The simple duplicate check only checks if the email entered is on file already exists and returns an error. The advanced
duplicate check option allows you to pass specific parameters from your Create Account form to a special duplicate
check procedure (va_CheckForDuplicateAccount) which allows you to have fine-grained control over whether or not a
contact is considered a duplicate or not.
ADMIN PANEL OPTIONS
Advanced Duplicate Checking is controled via the Sonic Forms Admin Panel.
• Duplicate Account Message - This option allows you to use a specific duplicate message rather than the default.
• Enable Proceed Anyway Option - This option allows the user the choice of bypassing the duplicate check and
creating a new account after the duplicate check returns a suspected duplicate record.
• Duplicate Check - Advanced - Choosing this option will call the stored
procedure VA_CheckForDuplicateAccount and will send all the fields that are checked with "Use for duplicate
check" to the stored procedure.
• Fields used for Duplicate Check: This area on the Admin Panel allows you to view which fields you have identified
for use with the Duplicate check using the “Use for duplicate check” option when you added the Form Part to
your page layout. These fields are passed in the order shown to the duplicate check procedure when the form is
submitted.
EXAMPLE
Here is an example of this feature in use The message is changed from default to a custom phrase, the proceed anyway
option is off, advanced duplicate checking is enabled and the Admin Panel is reporting the fields that will be passed to
the duplicate check stored procedure.

64
In this case FIRST NAME, LAST NAME and EMAIL will be passed to the Stored Procedure
called VA_CheckForDuplicateAccount. This stored procedure is called after the page is submitted, i.e. after clicking the
"Save" button.
Below is an example of the va_CheckForDuplicateAccount stored procedure with the three parameters needed. In this
case the stored procedure is checking to see if the First Name, Last name and Email exist in the table “NAME” and
all EXACT MATCHES. If they exist, it will return 101. Any positive number returned by the stored procedure is an error, if
the procedure does not detect a duplicate then it should return a negative value such as "-1".

65
If the user fails the duplicate check then the custom duplicate message is displayed by Sonic Forms and the form does
not submit.
USER IMPERSONATION
User Impersonation is an advanced technique that can be used in cases where a logged-in user may need to
inspect or update another user's record, for instance, where:
• A staff member needs to view and update a member's record.
• An adjudicator needs to review a submission made by someone else and mark it as "Approved" or
"Rejected".

66
• A staff member needs to review and process anonymous form submissions (e.g. event inquiries or
survey results).
To invoke user impersonation:
1. You must include the ID of the target user in the URL that is calling the Sonic Form. For example, if iMIS
user 1234 wants to review the record of user 5678 then user 1234 must include "?ID=5678" in their
URL. If this is not done then user 1234 will only see their own record.
2. You must include specific conditions in the special Sonic Forms stored procedure va_ff_ValidatedID to
verify if the logged in user is entitled to look at that specific record.
3. If you are looking at a multi-instance record, then you must also include the applicable SEQN number.
Pro Tip: If you are using the iMIS “On Behalf Of” feature then your UserID will appear to Sonic Forms to be the
correct user ID – no special coding is required in this case.
USING STORED PROCEDURES
One of the most powerful features of Sonic Forms is its ability to invoke a stored procedure when a form is successfully
submitted. Stored procedures can be used for any kind of data update or transformation based on the information
provided by a user. Stored Procedures used by Sonic Forms have the following parameters:
• @ID – ID of the iMIS user who submitted the form or on whose behalf the form was submitted (10 character
field). This field also accepts variants as @iMISID, @IMIS_ID, @USERID and @USER_ID
• @SEQN – SEQN ID of the multi-instance record updated by the user (integer field)
• @FORM_NAME - the name of the Sonic Form (50 character field)
• @MESSAGE - a message displayed to the user when the procedure is invoked (255 character field)
Typical examples of how a stored procedure could be used with Sonic Forms are:
1. Set a CREATED_DATE field to today's date.
2. Set a SOURCE field to “WEB”
3. Set a STATUS code to “NEW”
4. Run a billing procedure to insert new billing records for a new member.
5. Insert an Activity record to indicate that an application was received.
Here is a simple example of a stored procedure used on form submission:

67
In this case a text field is updated with the name of the Sonic Form that has been run on submission.
UNDERSTANDING RETURN CODES
Stored procedures should always end with a Return Code. The Return Code is an integer value and is normally either
positive or negative.
• A positive number return code (e.g. 1, 9 or 99) will indicate that the stored procedure was successful. The return
message will be framed in a green "success" format or the user will be transferred to another page as specified on
the button settings.
• A negative number return code (e.g. -1, -10, -57) will indicate that the stored procedure was unsuccessful. The
return message will be framed in a red "fail" format and the user will not be transferred to another page but will
see the form they are working on reloaded and ready for them to correct the issue.
If you do not include a specific return code in your stored procedure it will return a "0" as a success message. This will be
treated as a "success" condition. If a stored procedure fails for a technical reason (e.g. field missing or SQL error) then it
will return a negative error code.
GLOBAL VERSUS TARGETED MESSAGES

68
In Sonic Forms 2.x, a Global Error message was defined per form which is returned when a special message is not set in
the Stored procedure. The stored procedure message will be displayed when a button is configured to use it.
See Buttons for more details.
TARGETTING SPECIFIC RECORDS
When working with Multi-instance records, you may wish to apply a stored procedure to a specific multi-instance record.
If a multi-instance table is specified in the Admin Panel Options then Sonic Forms will pass a SEQN number to the stored
procedure. If this Multi-instance table is not selected then Sonic Forms will only pass the ID to the Stored Procedure.
This example:
sets a field called "SUBMITTED" to today's date and updates a status code on a resource library record in iMIS but does
not affect any other records in the database.
Note that while you may have more than one multi-instance table defined on a Sonic Form only one primary table can be
used with the SEQN feature as defined in the Sonic Forms Admin Panel. If the SEQN table is not defined then a value of
“0” will be passed to the Stored Procedure.
SONIC FORMS SECURITY
Sonic Forms are built into RiSE and uses RiSE security for configuring and controlling access to Sonic Forms pages.
Depending on your iMIS version, you can limit access to a page by:
• Specific iMIS Roles
• Specific iMIS users
• Specific iMIS Member Types
• Specific iMIS groups

69
In general, these options will allow you to either force a user to login or provide an "access denied" message. Sonic Forms
allows you to offer more complex and optimized workflows on top of the basic iMIS security model.
PAGE LEVEL ACCESS CONTROL
Sonic Forms users can control access to a specific page where a Sonic Form is deployed using the VA Redirector which is
included with all Sonic Form installations. See the documentation for details on the use of this tool.
FORM LEVEL ACCESS CONTROL
For more advanced applications and scenarios, Sonic Forms offers an additional level of security using a Stored Procedure
that will grant or disable access to a specific form for individual users, groups of users or based on dynamic data. A stored
procedure is invoked which checks to see if a given user is able to access a form. The Stored Procedure is called
“sp_va_ff_ValidatedID” and it takes three parameters as follows:
• @UserID – ID of the logged-in iMIS user.
• @TargetID – ID of the user whose data would be updated by the form
• @FormName – Sonic Form Name that is being accessed
The sp_va_ValidatedID procedure is called every time a form is loaded. If the stored procedure does not exist then a
default stored procedure is created by Sonic Forms. This default procedure has the following attributes:
• If the user's role is System Administrator or Content Administrator then grant access
• If the UserID = TargetID then grant access
If neither of these conditions is met then the user is denied access to the form with the following message:
Sorry - you cannot access this form on behalf of this user.
ALLOWING FORM ACCESS
The use of the @FormName parameter allows for granular control of access to forms. For example, you may have
membership forms beginning with "MEM%" that should be accessible to one group but a set of Company Administration
forms beginning with "COADMIN%" that should only be accessible to a group of users who are approved Company
Administrators.
Here are some sample use cases:
• Check the membership renewal status of the TargetID and deny access to the form if they have not paid their
dues.
• Restrict access to a program application form if a staff approval step has not been completed.
• Prevent new members with less than one year's tenure from applying for an advanced membership benefit.

70
ALLOWING SECURE THIRD-PARTY FORM ACCESS
The use of the @TargetID parameter allows for specific scenarios where an authorized user can view or update
information on behalf of another user. When a person is accessing their own information then the values of the @UserID
and @TargetID parameters will be identical, however, when an authorized third party (e.g. Chapter administrator) is
expected to complete a form for a third party, the sp_va_ff_ValidatedID procedure can be used to see if the UserID has
specific rights to view or update the TargetID's information.
For example, a student applies for a mentorship program and gives consent to share their information with a mentor. The
mentor can be allowed to view a Sonic Form providing contact information for their mentee along with their application
information. A URL such as the following would be used:
• /programs/mentorship/menteeprofile.aspx?ID=23545
where "23545" is the "TargetID" or the ID of the mentee.
When the mentor visits this page using this URL, the sp_va_ff_ValidatedID stored procedure will check to see if the
mentor has rights to view information for TargetID 23545 on a Sonic Form called "MENTEE_PROFILE". If they are
authorized then the form will display, otherwise it will not be available to that person.
HELP WITH STORED PROCEDURES
Using stored procedures is a powerful techique that allows you to transform your data and achieve your business goals. If
you are not comfortable with using SQL and creating stored procedures then you can:
• Attend an upcoming NiUG or other training seminar
• Contact your authorized iMIS solution provider for assistance
• Contact Visual Antidote for assistance
There are also extensive resources and training information available on the web to help you.
DESIGNING RESPONSIVE FORMS
Beginning with the Q4 2015 release of iMIS, a set of responsive templates are now available for use with your iMIS
website. Deploying Sonic Forms to take full advantage of bootstrap techniques is straightforward.
FORM PART FIELDS
The basic pattern for bootstrap forms is as follows:
1. A label and a Form Part are combined using a <div> tag to create a "Form Group"
2. Your label and Form Part are then inserted into the bootstrap template using the standard iMIS layout CSS.
For example, a "First Name" field would be laid out as follows in HTML:
<div class="row"> <-- DEFINES THE FORM ELEMENTS AS A ROW
<div class="col-md-12"> <-- DEFINES THAT THIS GROUP SPANS 12 COLUMNS
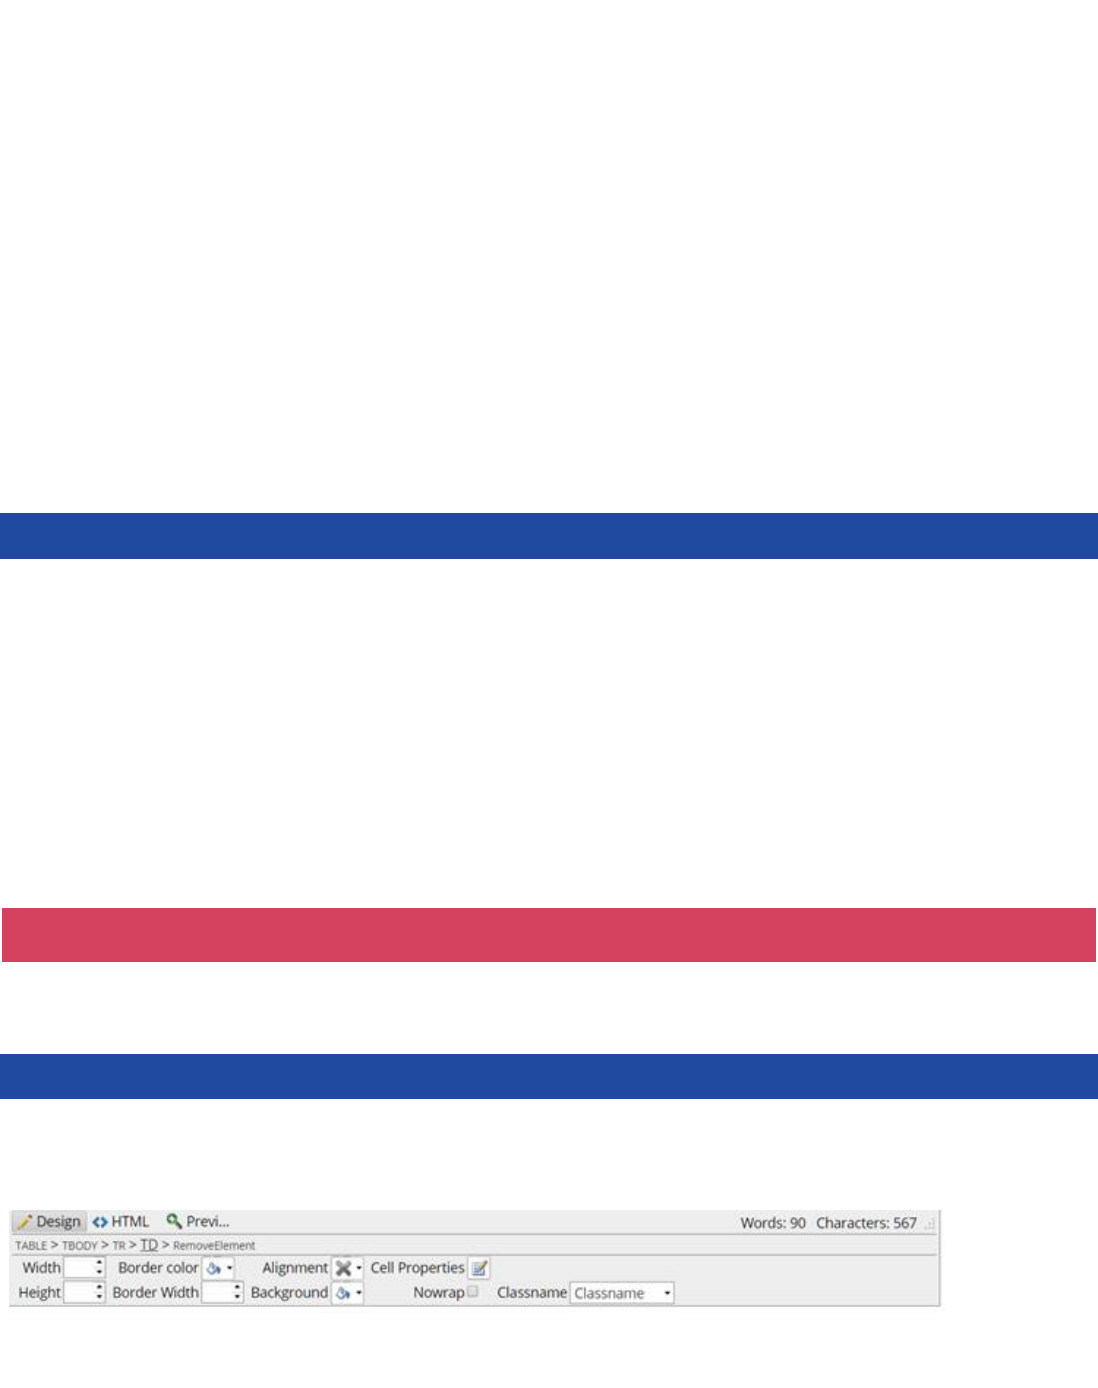
71
<div class="form-group"> <-- DEFINES THAT THIS CONTENT IS A UNIT WITHIN YOUR FORM
<label for="FirstName">First Name: </label>
<input type="text" vaatt="Char.25" ccontact="True" value="ccontact.First_Name" va_val="required."
requiredmsg="Required Field" /></div>
</div>
</div>
where
• the class "row" allows the data to be grouped together in a single row within a layout,
• the class "col-md-12" defines a twelve column layout for bootstrap and
• the class "form-group" defines that the label and the input field are a logical group - an important principle for
accessibility.
Note that you can place multiple Form parts on the same row by using different classes for each column group. For
example "col-md-4" will allow for three fields to be placed on the same line (First Name, Middle Name, Last Name).
Because they are in the same row tabbing between the fields will be intuitive.
CHECKBOX FORM PARTS
Checkboxes are a special case as the checkbox and the label need to stay together and should not fold under one another
as is the case with standard Form Parts.
<div class="row"> <-- Defines the form elements as a row
<div class="col-md-12"> <-- Defines that this group spans 12 columns
<div class="checkbox"> <-- Defines that the checkbox class is to be used
<label> <input type="button" requiredmsg="Required Field" class="VAFFButton" vaatt="CheckBox"
value="VA_PROMO.DEMO_INTEREST" va_val="required." /> Remember me </label> </div>
</div>
</div>
RESIZING TEXT BOXES
The standard size of a text box is often too small to encourage good data entry. You can increase the size of text fields
(height and width) by adding the appropriate attributes to the form.
OPTION 1 - USING THE EDITOR
To use the editor, you need to double click on the text field so that the field attribute section displays in the HTML editor.
Here is what it looks like when a text field is not selected:
and here is what it looks like when it is selected:

72
Once you see the Width and Height options for your field, you can set the width and height of the text element in pixels.
e.g. "400px". This will add a style attribute to the text field. Note that you need to click elsewhere on the form or tab away
from the field to set the attribute.
OPTION 2 - ADDING HTML TO YOUR FIELD
While the Editor works, it is a bit finicky to use and browser dependent. You can also update the HTML directly to achieve
the same results. The code in blue shows how to update a Sonic Form element with these attributes:
<input tabindex="0" vaatt="Money.2" value="MyTableName.MyFieldName" va_val="read_only."
type="text" style="width: 200px; height: 300px;" />

73
TROUBLESHOOTING
This section will help you identify and fix issues you may encounter while using Sonic Forms.
ACCESS TO THE PATH <PATH> IS DENIED
When configuring and setting up Sonic Forms for the first time or after upgrading your server, you may encounter the
error noted below:
This error occurs when Sonic Forms is trying to save its configuration information onto your server. This error is resolved
in version 3.0.20A of Sonic Forms which is available to all Sonic Forms customers through ASI.
ERROR ON FIELD: <FIELD_NAME>
When Sonic Forms attempts to render your form in RiSE it processes your form parts in sequential order from
top to bottom. If the form engine encounters a problem, it will produce a message that shows on which field
Form Part it was processing when the error was encountered. This indicates that either:
• the field noted is causing the issue, or
• a dependent or nearby field is causing the issue
Depending on your form layout and design, you can troubleshoot this kind of error by sequentially removing
fields Form Parts from your form until the form renders correctly again or restoring your form to a previously
working version. Once you have the form working, you can then add back field Form Parts to isolate the
problem.
In general, this kind of error can be caused by:
• HTML edits that have introduced coding errors into your form
• Inconsistency between your Form Parts and your iMIS database (e.g. field name changed, dropdown list
deleted, table not yet defined in a production environment, etc.)
-101 - ERROR SAVING DATA
This error is returned when the form has saved its data successfully, however, the stored procedure that is being executed
did not run successfully and returned a SQL error. This points directly to an issue with the stored procedure itself.
To resolve this problem, you should use SQL Management Studio to execute the stored procedure that you have invoked
with your Sonic Form and pass to it the same parameters (@ID, @SEQN, @FORM_NAME, @MESSAGE output) as your
form would have provided. You will then be able to see the error and correct the procedure.

74
Note that if this error occurs it means that Sonic Forms has completed all of its data updates and changes except running
the stored procedure. Any records updated or changed in a production environment will need to be assessed and the
stored procedure may need to be run against those records manually.
[30]ERROR SAVING DATA ON IMIS : OBJECT REFERENCE NOT SET TO AN
INSTANCE OF AN OBJECT.
This error message is normally encountered when installing iMIS on a new server environment. This error occurs because
of a mismatch between the server URL in the web.config file and the server settings that are available to Sonic Forms.
To correct this problem, you will need to edit your web.config file settings to adjust the following item.
<appSettings>
...
<add key="ImisWebServerUrl" value="http://visualantidote.com/imis20">
...
</appSettings>
Depending on your IIS and SSL configuration you will update the URL value shown above to be either your local server
name or your external server URL and include either http: or https: if your server is running SSL encryption full-time.
Note that this setting exists in the web.config files used in both the /net and Asi.Scheduler folders and must be updated
in both locations.
SORRY - YOU CANNOT ACCESS THIS FORM ON BEHALF OF THIS USER.
This error message is delivered by Sonic Forms itself and is not related to any iMIS security settings that you
may have on this page. Typically this means that either:
• Your URL includes an ID number that does not match your ID without an exception being granted
through the User Impersonation.
• Your URL includes a SEQN that refers to a record that does not belong to the user that is trying to access
it
In both cases, if you simply change the URL reference then you should be able to bypass the error and view the
form

75
UNINSTALL SONIC FORMS
In order to uninstall Sonic Forms you should follow these steps:
1. Deleting the Sitemap entry for Sonic Forms Form Manager
2. Deleting the Sonic Forms Content Types.
3. Deleting Content Pages or removing Sonic Forms from those pages
4. Deleting Sonic Forms Files in the va_iParts directory
5. Dropping associated Tables and Stored Procedure.
1 - DELETING SITEMAPS
1 - Go to Rise >> Site Builder >> Manage sitemaps.
2 - Choose the Staff option on the dropdown.
3 - Go to RiSE >> Page Builder >> Sonic Forms.
4 - Go to Organize >> Delete.
2 - DELETING CONTENT TYPES

76
1 - Go to RiSE >> Maintenance >> Content Types.
2 - Select the Custom Folder >> Sonic Forms Page
3 - Go to Organize >> Delete.
3 - DELETING CONTENT PAGE(S)
Note that as soon as the Sonic Forms software is removed from your server any pages previously published and working
will cease to function. Please ensure you have done a complete inventory of such pages before proceeding to the next
step.
1 - Go to RiSE >> Page Builder >> Manage Content.
2 - Select the SonicForms folder / content pages.
3 - Go to Organize >> Delete.
4 - DELETING SONIC FORMS FILES
The following step requires access to your iMIS application or webserver environment.
1 - Go to iMIS Folder. E.g. C:\Program Files (x86)\ASI\iMIS\Net.
2 - Go to va_iParts.

77
3 - Select SonicForms folder and delete it.
4 - There are a number of image files installed in the App_Themes folder that you may also wish to remove which are
documented in the Installation Requirements section.
E - DROPPING DATABASE COMPONENTS
1 - Execute those statements below in your Database.
DROP TABLE [dbo].[va_Sonicforms_V1];
DROP TABLE [dbo].[VA_SonicForms_MultiLayouts];
DROP TABLE [dbo].[VA_SonicForms_MultiOptions];
DROP PROCEDURE [dbo].[va_ff_ValidatedID];
DROP PROCEDURE [dbo].[VA_CheckForDuplicateAccount];
DROP FUNCTION [dbo].[fn_VA_Validate_IMIS_Role];

78
RELEASE NOTES
SONIC FORMS 3.0.1807A
HIGHLIGHTS
• Address Management improvements
o Preferred fields for Primary Addresses (i.e. Mailing, Billing and Shipping) are now rendered as radio
buttons instead of checkboxes.
o If a preferred address is set (e.g. Home) where an address does not exist then that address will be created
in iMIS.
• Activity record support
o Activity record Form Parts are now fully supported in this release.
• Button Form Part Improvements
o Mouseover Text - Buttons can now have optional mouseover text added to them to help document the
exact behaviour that users can expect when selecting an option on your form.
o CSS Class - Buttons can now have a specific CSS Class added to them to change the button format. This
allows you to style your buttons individually. For example, a “Delete this Record” button could be
displayed in Red instead of using a standard button style. In addition, buttons can be restyled as
hyperlinks if appropriate using simple CSS changes.
o Improved Interface - As part of the functional changes noted above the button Form Part selections have
been reorganized and regrouped for clarity and ease of use.
• Compatibility with iMIS Service Pack “K” and Higher
o New Javascript features introduced with iMIS 20.2.64.9193 and higher caused a checkbox that was
selected and marked as required to not be recognized. This has been addressed.
SONIC FORMS DOCUMENT DISPLAY
• Image Option
o A new image option has been added to Sonic Forms Document Display. This option allows you to display a
icon or other graphic beside the document hyperlink. Images must be uploaded to your standard iMIS
image folder using the RiSe Image Manager.
BUG FIXES
SONIC FORMS
• SEQN option added to “Where” clause for Activity Records
o Activity records can now be addressed by SEQN using the “Where” options. This means that these fields
can load/save inputs based on the SEQN of the activity record as well as other available fields on the
activity record. Note that the SEQN number needs to be exposed through a custom business object in
iMIS as it is not available via the standard Activity business object.
• Sign-up Fields - Confirm Email
o Fixed issue with Confirm Email field stopping page from loading any fields below the Confirm Email field
on a form.
o Enhanced error message when the Confirm Email field is used without the primary email field on a form.

79
• Improved Procedure Error Handling
o In certain cases, unusual errors returned by a form’s stored procedures would sometime be interpreted
as a “success” scenario and the form would complete processing without notifying the user of the
problem.
• Read-only field management
o Fixed issue with read-only fields either:
▪ writing no data to iMIS or
▪ storing a description instead of code or vice-versa.
• Additional Issues Resolved
o Fixed issue with transient SQL error appearing during update/install process.
o Fixed issues with Currency field not saving inputs and not accepting values in $0.00 format.
o Fixed conflict when an integer field on a Multi-Instance table was set to “Load Last” and “Save New”
when a field was Read Only where the system would store the value as 0.
SONIC FORMS DOCUMENT MANAGER
• Language Setting Change Error
o Fixed error when setting language from English to French/Spanish
• Display Refresh Issue
o Improved responsiveness of display when changing options between Download Only, Upload Only and
Manage Documents modes
SONIC FORMS 3.0.1803A
HIGHLIGHTS
• Change Log updates can now be controlled on a per-page basis. This means that you can suppress change logging
for forms where you do not want to have numerous entries added to your Change Log. The default setting is “on”
(i.e. log all changes).
• Improved handling of date and time fields
o New calendar control widget has been introduced using the iMIS standard calendar control for improved
consistency between Sonic Forms and iMIS Panel Editor displays
o New TIME fields support with setting for 12/24 hour format
o New DATETIME fields with support for 12/24 hour format as well as two date formats (dd/MM/yyyy or
MM/dd/yyyy)
• Added support for an additional variation on the “ID” field used when calling stored procedures from Sonic
Forms. “@IDnum” is now supported in addition to @idnum, @userid, @user_id, @imis_id, @imisid and @id. All
of these items are case insensitive.
• Added a Cancel button for Multi-instance layout entry forms to make it clearer to the end-user when updating
records.
• Added built-in validation checks for integer, numeric and money fields. Sonic Forms now polls iMIS to retrieve
length and decimal positions and will provide an error message if an entry does not respect iMIS parameters.
Users may need to update their iMIS settings if their forms did not respect these limits prior to this release.
BUG FIXES – SONIC FORMS
• Fixed an issue with duplicate error checking.
• Fixed issue with free text search fields (Combo box)

80
• Fixed issue with large text box fields introducing <br/> tabs when using read-only mode
SONIC FORMS 3.0.1802A
HIGHLIGHTS
• Maintenance update
BUG FIXES
• Fixed issue with integer and numeric fields (data not saving).
• Fixed issue with account creation when a company member type is selected (object reference error)
• Resolved problem with “Allow other” dropdown list option.
• Fixed problem with forms designed to create new records in a multi-instance table and leave the user on the
same page. This allowed a user to create multiple records if “save as new” was selected instead of just updating
the last entry.
• Fixed bug where blank date fields were displayed as 01/01/0001
• Fixed bug where read-only fields were not retained when creating a new record in multi-instance table
SONIC FORMS 3.0.1712C
HIGHLIGHTS
• Eliminated the use of custom CSS entries. Sonic Forms no longer requires or updates the App_Themes folder in
iMIS. The installation package no longer contains these components.
BUG FIXES
• Install and upgrade improvements have been applied to eliminate an error when the VA_ConfigParam table did
not exist from a prior installation.
• Checkboxes used with Contact and Address form would not load properly on forms. This has been addressed.
SONIC FORMS 3.0.1712B
HIGHLIGHTS
• This version introduces dynamic support for iMIS versions prior to iMIS 2017. Sonic Forms detects which version
of iMIS you have installed and dynamically adapts to the available API and capabilities of your iMIS installation.
Note that versions prior to iMIS 15.2 are not supported.
• Improved installation messaging. If Sonic Forms is installed without running the required upgrade scripting, the
following message is displayed on all Sonic Forms pages.
WE'RE SORRY, THIS FORM CANNOT BE DISPLAYED - PLEASE CONTACT YOUR SYSTEM ADMINISTRATOR AND
REPORT THE ISSUE SHOWN BELOW.

81
SONIC FORMS INSTALLATION IS INCOMPLETE. PLEASE VISIT THE SONIC FORMS FORM MANAGER PAGE IN
RISE TO COMPLETE SETUP.
SONIC FORMS 3.0.1712A
HIGHLIGHTS
• iMIS 2017 Support – This version supports new features introduced with iMIS 2017 and is strongly recommended
for all users of that release. New features include:
o New authentication method for determining the logged-in status of a user
o New Create Account method which is compatible with iMIS 2017
o Reduced use of the iBO API (currently deprecated by ASI) for data updates
• Improved Programmability – Form designers can now specify stored procedures on a per-button basis and receive
custom error messages directly from their stored procedures to allow for even more complex workflows. The
name of the Sonic Form invoking the stored procedure is now available as an optional parameter to all stored
procedures.
• Enhanced email notifications – Improved submission options for notifications on submission including more email
addresses and new options for notification email content.
• New! Activity Form Parts – You can now use SONIC FORMS to display and update Activity record information.
• New! Sonic Forms Document Display – A new complementary product for Sonic Forms Document Manager allows
for display of multiple documents for a specified user.
SONIC FORMS RELEASE NOTES
NEW FEATURES AND UPDATES
• Name Change – FAST FORMS is now SONIC FORMS. As part of this name change, SONIC FORMS will now have a
release version of 3.x.
• Integrated Help – Links are now provided to Visual Antidote documentation in both the Form Manager and Admin
Panel to help to help guide you when choosing settings and options.
• Use of va_ConfigParam Table – SONIC FORMS now uses entries in a table called “va_ConfigParam” to store
configuration options. This makes SONIC FORMS more portable between instances (development, test and
production) as well as between servers during migration or upgrade.
• New Optional Parameter for Stored Procedures – In 2.x versions, FAST FORMS passed the users’ iMIS ID (or the
ID and SEQN if a multi-instance table was specified) to an optional stored procedure for post-submission
processing. Beginning with this release, designers can now add an optional “@FORM_NAME” parameter (a 50
character field) to allow a stored procedure to react to the Form Name that is the source of the stored procedure
call. SONIC FORMS will dynamically assess what parameters that your stored procedure requires before
invocation for backwards compatibility.
• Stored Procedure Messaging – SONIC FORMS now supports custom messages which are delivered from a stored
procedure as follows:
o Success – A positive value return code (e.g. 100) will show the global MESSAGE ON SUCCESS value or a
message passed from a Stored Procedure (if specified)
o Failure – A negative value return code (e.g. -10) will show the global MESSAGE ON FAILURE value or a
message passed from a Stored Procedure (if specified)

82
Using this feature form designers can now provide very specific guidance to a form user based on how the form
submission is evaluated by the stored procedure. Some examples:
• Congratulations! You are now the 750
th
member to join us from Kansas!
A DYNAMIC CALCULATION ALLOWS US TO IDENTIFY THAT THIS PERSON IS THE 750
TH
PERSON FROM KANSAS
AND ALLOWS THAT INFORMATION TO BE REFLECTED BACK TO THE USER.
• We’re sorry, but your essay question needs to be more detailed – please try again.
IN THIS CASE, THE PROCEDURE IS ABLE TO POINT TO A SPECIFIC PROBLEM IN THE FORM SUBMISSION THAT
WAS NOT CAUGHT BY FIELD LEVEL EDITS (I.E. THE FIELD WAS COMPLETED BUT IS NOT SUFFICIENTLY
DETAILED).
Stored procedure messages are specified with the “@MESSAGE” output parameter. This
parameter can be any (reasonable) length and HTML tags are supported.
• Smart Button Options – Buttons in Sonic Forms are even more powerful. The following features have been added:
o Targeted Stored Procedure – A supplementary stored procedure can be invoked on a button click which
allows for different processes to be specified for different scenarios. Users can also opt to run the global
stored procedure with a targeted stored procedure if required.
o Show Stored Procedure Message – If a message is passed back from the specified stored procedure, the
message is appended to the overall message displayed for the global stored procedure (if applicable).
• Dual Error Message Display – SONIC FORMS will now display both the Duplicate Record error message and
any MESSAGE ON SUCCESS or MESSAGE ON FAILURE messages which are specified for a page as two distinct
error messages. In earlier releases the Duplicate Record error would suppress the global page error message.
• Enhanced Email Notifications – New Admin Panel options will allow you to:
o Specify a “From” address for emails triggered on form submission
o Specify a Subject Line
o Add cc and bcc emails to a notification email
o Embed a custom URL to allow staff one-click access to form results
• New Checkbox Default Options – Checkbox fields will now have three options on form load:
o Value from iMIS (default)
o Unchecked
o Checked
This will allow form designers to force “reconfirmation” of a checkbox or set a default value to display a preferred choice.
• Improved Admin Panel Layout – Fields have been expanded and options clarified on the Admin Panel.
• New Company Lookup View – The Company list which is displayed on sign-up forms where a Company is being
chosen is now based on a dedicated view. This allows users to define which companies should be available for
selection on forms by adding additional filters to the view (requires server access).

83
• New Activity Form Parts – Sonic Forms now offers Form Parts for Activity record fields. Standard fields which are
included in the iMIS Activity Record definition are supported. When choosing an Activity field, the user must
specify the Activity record type and then the field. The field listing displays two values:
o The field label from the Activity Record definition; and
o The underlying field name from the Activity table itself
For example, for the APPLICANT activity type, the field “DESCRIPTION” is labelled as “Committee” and is shown as
“Committee (DESCRIPTION)”.
Form designers can deploy both types of fields on their forms and update the activity record appropriately – this allows
fields without labels to store additional information.
Activity Form parts support a full range of validation options including a pop-up Calendar for date fields, regular
expressions and minimum and maximum range values.
NOTE: ACTIVITY FORM PARTS ARE BEING RELEASED AS “BETA”. IF YOU WOULD PREFER NOT TO USE THESE FORM
PARTS UNTIL THEY EXIT THE BETA TESTING PROGRAM, YOU CAN ADD A SYSTEM PARAMETER TO SUPPRESS THIS
OPTION – PLEASE CONTACT VISUAL ANTIDOTE FOR ASSISTANCE.
• New Default Values for Multi-instance Layouts – Multi-instance layouts now have an option to include a default
value for a field (text, number or integer types). There are two options:
o Specified value – a specified text or numeric value that is hard-coded as part of the form definition.
o URL Value – a specified URL value that is identified using the Sonic Forms token “@ff@”. For example, if a
page has the URL parameters ?ID=12345&YEAR=2018 then a default value can be specified for a YEAR
field as “@ff@YEAR”. The form will be loaded and display only records from 2018.

84
BUG FIXES
• Multi-Select Display, Sort by Code – For multi-select records, the “Sort by Code” option is now available.
• Multi-Instance Tables with Address Fields – An API level issue prevented pages with multi-instance table fields and
address fields from working together properly. This has now been corrected.
• Change Logging of UD Field Updates – Changes on any user-defined field are now properly logged in the iMIS
Change Log.
KNOWN ISSUES
• Time and DateTime Fields Not Supported – In this release fields that are designated as “Time” or “DateTime” in
iMIS are not supported and are not visible as field selections. This will be addressed in an upcoming release.
VA REDIRECTOR
VA REDIRECTOR IS A COMPLEMENTARY PRODUCT WHICH IS INCLUDED WITH YOUR SONIC FORMS LICENSE.
NEW FEATURES AND UPDATES
• Integrated Help – Links are now provided to Visual Antidote documentation on the Admin Panel to help to help
guide you when choosing settings and options.
SONIC FORMS DOCUMENT MANAGER
SONIC FORMS DOCUMENT MANAGER IS A SEPARATELY LICENSED PRODUCT DESIGNED TO WORK WITH SONIC
FORMS.
• Name Change – FAST FORMS DOCUMENT MANAGER is now SONIC FORMS DOCUMENT MANAGER. As part of
this name change, SONIC FORMS DOCUMENT MANAGER will now have a release version of 3.x.
• Bug Fix – The “Upload” button is now disabled when more than the maximum number of documents have already
been uploaded on the page.
• Use of va_ConfigParam Table – Document Manager now uses entries in a table called “va_ConfigParam” to store
configuration options. This makes Document Manager more portable between instances (development, test and
production) as well as between servers during migration or upgrade.
• Integrated Help – A handy link is now provided on the DOCUMENT MANAGER admin panel to link you back to
Visual Antidote’s on-line documentation to help guide you when choosing settings and options.
• New SONIC FORMS DOCUMENT DISPLAY Web Part – DOCUMENT MANAGER now has a complementary web
part (iPart) which can be used for the display of multiple documents from different sources on a single page. This
iPart is perfect for staff portals and other applications where documents from multiple sources need to be
gathered together. NOTE THAT THIS WEB PART ONLY PERMITS VIEWING AND DOWNLOADING OF EXISTING
DOCUMENTS.
FAST FORMS 2.X
SONIC FORMS 2.1.161014 - RELEASED OCTOBER 17, 2016

85
THIS RELEASE IS A MINOR UPDATE TO ADDRESS COMPATABILITY ISSUES WITH IMIS VERSION 20.2.46.5612 AND
BEYOND AND IS REQUIRED IF YOU HAVE INSTALLED THIS VERSION OF IMIS. BOTH SONIC FORMS AND THE VA
REDIRECTOR SHOULD BE INSTALLED IF YOU ARE UPDATING TO THIS RELEASE.
Backspace Error
Handling
The pop-up message for preventing the use of the browser backspace button has been removed for
improved compatability with available browsers.
Improved error
logging
Log entries now record the time as well as the date to assist with troubleshooting database
performance and related issues.
Parameter Handling
To simplify the development of IQAs that work with the VA Redirector, the utility will now pass a "0"
value if a SEQN or ID is not provided in the URL.
SONIC FORMS 2.1.160901 - RELEASED SEPTEMBER 1, 2016
THE FOLLOWING HIGHLIGHTS ARE INCLUDED IN THIS RELEASE ALONG WITH BUG FIXES AND MINOR
ENHANCEMENTS. NOTE THAT THIS RELEASE ADDRESSES A MINOR SECURITY VULNERABILITY AND IS RECOMMENDED
FOR ALL CLIENTS.
Assign Email as Username
On Create Account forms an option has been added to allow the iMIS Username to be
automatically set to the user’s email address. The option to automatically assign the user’s
iMIS ID as their username is not affected.
Enhanced Support
Features
Sonic Forms now automatically embeds version information in published forms making it easy
to verify which version you are using. In addition, the form engine will report which field was
being processed when an unrecoverable iMIS error is encountered making it easier to trace
and debug issues at the field level. The message is shown as “Error on field: <Field_Name>”.
Simplified Installation
Sonic Forms will now install standardized versions of key stored procedures used by the
software including:
• va_ff_ValidatedID – this procedure allows you to offer and manage 3
rd
party access to
form information. Parameters are @User_ID, @Target_ID and @Form_Name.
• VA_CheckForDuplicateAccount – the default procedure checks for an exact match on
First Name, Last Name and Email. You can update and extend this procedure to use
additional fields and/or less precise logic as appropriate.
A utility function called “fn_VA_Validate_iMIS_Role” is also provided that can be used in
stored procedures to validate (for example) if someone has privileged role such as “Staff” or
“SysAdmin”. NOTE THAT SONIC FORMS WILL AUTOMATICALLY CREATE THESE

86
PROCEDURES IF THEY DO NOT EXIST IN YOUR DATABASE BUT WILL NOT OVERWRITE AN
EXISTING VERSION.
Create Contact Feature
for Company
Administrators and Others
A new option is available for Create Account situations that allows a form user to create a new
record for someone else in their company. The iMIS CO_ID is automatically assigned and a
stored procedure can be used to selectively copy data from the Company record to the newly
created Contact as appropriate.
In addition, the Sonic Forms Securitystored procedure can be used to offer authorized users
the ability to edit data for contacts who work in their organization. This feature is available for
all supported versions of iMIS.
Updated Error Message
Display
Sonic Forms error messages are now displayed using the standard iMIS CSS settings for error
and success messages. Instead of red text on a white background errors are now shown inside
of a red bar. Success messages are displayed inside of a green bar.
Options Changed for
Multi-instance Fields
Multi-instance field selection options have been streamlined to the following:
• Load: “Last”, “Blank” and “Where”
• Save: “Last”, “New” and “Where”
Loading a “Blank” and loading a “New” record are functionally equivalent. The option to load
the “First” record has also been removed as it was ambiguous, however, any existing forms
using this feature will continue to work. Visual Antidote recommends the use of the “Where”
option to select the “first” record when loading a form.
iMIS ID Now Available to
Button Form Parts for
New Contacts
When creating new contact you may want to update fields on the new contact record as part
of a multi-page Sonic Form flow. With this version the parameter of “?ID=@ff@ID” will pass
the ID to a new page immediately upon creation of a new Contact in iMIS.
Dropdown Panel Display
Update
The “blue bar” for Sonic Forms configuration is now featuring an arrow icon to make its use
more obvious as well as a Trial expiry notification for customers who are using a Sonic Forms
trial version.
New Option to Submit
without Stored Procedure
Form designers now have a new option on Sonic Forms buttons to submit a form without
triggering the stored procedure. A use case example would be a “Save and Continue” button
versus a “Submit and Lock”. The Save and Continue button would not run a stored procedure
while the Submit and Lock button would complete the processing for a form. This new feature
can be used in combination with the “Ignore Validation” option to allow for the ability to
perform interim updates on long forms whenever appropriate.
Additional Contact Fields
A number of additional contact fields have been added to the Contact Fields Form Part. Where
fields are managed directly by iMIS (e.g. User ID) the fields are set as read only for display
purposes.

87
Email Notification on
Form Submittal
A new feature is available on forms to send an email to a designated contact each time a form
is submitted has been added to the system. Use cases include notifying a responsible person
to investigate or follow-up on a new contact or information request. The feature is per-
instance so each page can be configured separately.
Usability and Appearance
Improvements
Users will notice a number of usability and appearance improvements to render the Sonic
Forms Administration panel and application interface in popular browser environments.
SONIC FORMS 3.0.1810A
HIGHLIGHTS – SONIC FORMS
• Maintenance release with bug fixes
BUG FIXES
SONIC FORMS
• Improved compatibility
• Updated .net and telerik references for improved compatibility with older iMIS releases
• Fixed issue with numeric fields in multi-instance layouts
• Fixed issue with numeric fields not being saved in some cases
• Fixed issue with forms having two validation summary sections (top and bottom)
• Updated control for showing multiple validation summary elements
• Fixed issue with nullable fields not being updated
• Updated stored procedures to fix an issue with nullable fields not being updated on save
SONIC FORMS 3.0.20A
HIGHLIGHTS – SONIC FORMS
This hotfix will resolve the issues listed below that are associated with clients using iMIS 2017 (20.2.66.1148 (aka SP "W")
and higher)
• Security updates applied through Service Pack W and subsequent versions prevent updates to Sonic Form
settings. Sonic Forms will now save all settings to the iMIS database.
Installation assistance is available. Please contact ASI Technical Support if this is required.
BUG FIXES
In addition to the security update noted above, the following additional issues are resolved with this release:
• Display of "Targeted Stored Procedure" updated to reflect Javascript library changes
• Improved support for new versions of Telerik controls introduced in earlier versions of iMIS-300

88
• When a non-null character field is accidentally set to NULL (usually through data import processes), changes to
the field would not save and Sonic Forms would not provide an error message.
• When a date field is using a non-US date format, the field is saved correctly, however, when it is redisplayed as a
read-only field it can be incorrectly written back to the database.
• Required field messages can now support commas and apostrophes
• Copyright notice updated to Advanced Solutions International
• When pasting into large text fields the character limit counter provides correct feedback
Note the complementary products SONIC FORMS DOCUMENT MANAGER and SONIC FORMS DOCUMENT DISPLAY are now
licensed with Sonic Forms. These complementary products are part of this release and will be installed as part of the update.

89
SONIC FORMS VIDEO LIBRARY
Visual Antidote is pleased to make our library of training videos available to you. Please check back often as we add new
videos from time to time. If you have a suggestion for a topic, please use the Contact Us form and let us know!
INSTALLING SONIC FORMS
Introductory video showing you how to install Sonic Forms including server steps and initial configuration of your form.
Download: Installing Sonic Forms
CREATING YOUR FIRST FORM
Introductory video showing you how to lay out a series of Form Parts in the Editor and enable the form in RiSE.
Download: Creating you First Sonic Form


91
SONIC FORMS DOCUMENT MANAGER
Sonic Forms Document Manager is an add-on module which is available for Sonic Forms customers to assist
with managing documents as part of a form submission process.
Sonic Forms Document Manager is a standalone iPart which is deployed on a RiSE page. When deployed, the
iPart is a compact control letting users upload or download one or more documents or files.
By using a configuration panel available only to administrators, the iPart can be configured to:
• Allow one or more documents to be uploaded
• Enforce the minimum and maximum number of documents that can be uploaded
• Enforce the allowed formats and maximum size of the uploaded files
• Add optional previous/next buttons and update both the text on the button, and where to take users
when clicked
• Call a stored procedure in the database which you can control and write yourself
• Many other configuration options!
Example - A Simple Document Manager iPart Deployed
In the example above, the user can select which document they wish to upload. The documents are
downloadable (via hyperlinks) and they can be deleted if necessary. The user can also choose to cancel the file
they want to upload as well as submit the uploaded documents to the selected table chosen.
Clicking on the "Update Settings" button will display the configuration panel for Sonic Forms Document
Manager which controls the options for document capture and access (and is visible only to administrators
logged in to RiSE).
INSTALLATION
VISUAL ANTIDOTE OFFERS INSTALLATION ASSISTANCE. OUR STAFF CAN SET UP AND CONFIGURE
YOUR SONIC FORMS DOCUMENT MANAGER IF YOU NEED HELP WITH THE INSTALLATION PROCESS. CONTACT US
AT SUPPORT@VISUALANTIDOTE.COM TO ARRANGE AN INSTALLATION APPOINTMENT.
INSTALLATION REQUIREMENTS
Installing Sonic Forms Document Manager requires:

92
• Access to your iMIS application (and optional web server)
• A system administration account on iMIS (normally MANAGER)
SONIC FORMS DOCUMENT MANAGER MEDIA
The installation media for Sonic Forms Document Manager includes:
• Installation and release documentation in .rtf format
• A folder with the following installation files:
o /net/VA_iParts/FastForms/Images (folder)
▪ delete.gif
o /net/VA_iParts/FastForms/VA_FastForms_DocMgr.ascx
o /net/VA_iParts/FastForms/VA_FastForms_DocMgr.ascx.cs
o /net/VA_iParts/FastForms/VA_FastForms_DocMgr_InnerPage.ascx
o /net/VA_iParts/FastForms/VA_FastForms_DocMgr_InnerPage.ascx.cs
• Content Type record for Sonic Forms Document Manager iPart
INSTALLATION AND UPGRADE STEPS
New Installation and Upgrades
• Merge the Sonic Forms components into your target iMIS environment
New Installations only
• Import the Sonic Form Document Manager Content Type into your RiSE environment
Note if you prefer to configure the Sonic Forms Document Manager content type manually, the settings are
available Content Type Configuration.
MERGE SONIC FORMS DOCUMENT MANAGER COMPONENTS INTO YOUR IMIS ENVIRONMENT
1. Login to your iMIS application or webserver
environment and ensure that the Sonic Forms
Document Manager media is accessible from this
server (download or copy as appropriate).
2. Copy the Sonic Forms Document Manager "net" folder
on your installation media into your iMIS installation
directory (usually /Program
Files/ASI/<YourAssociation>/) where
"<YourAssociation>" is your organization's
abbreviation. You will be prompted to merge the
installation /net folder with the main iMIS /net folder.
This will ensure that all components are deployed
correctly.
3. When you merge the /net folder provided in the
installation media with your iMIS installation this will
make Sonic Forms Document Manager available for

93
use. If you are upgrading Sonic Forms Document Manager, please overwrite all files.
4. Confirm that the files have been copied.
IMPORT THE SONIC FORMS DOCUMENT MANAGER CONTENT TYPE
As a final step, you should import the Sonic Forms
Document Manager content type record to allow
you to deploy the iPart on your rise website (this is
not required for upgrades).
1. Login as a System Administrator (e.g.
MANAGER) on your iMIS Staff or Admin
website.
2. Navigate to RiSE --> Maintenance -->
Content Types
3. Click on Import and select the "Sonic Forms
DocMgr Content Type" record included
with your installation media.
4. Import this content type into your RiSE
installation, Sonic Forms Document
Manager will be added to your "Custom"
directory.
CONFIGURATION PANEL
Sonic Forms Document Manager is highly document-centric and has its own unique set of configuration options
which are defined below:
• Form ID - Name of the Sonic Forms with which this document manager instance is associated.
• MI Table - (Optional) Name of the Multi-Instance Table with which these documents are associated. If
this is used, you can associate a Sonic Forms document with a specific multi-instance record (e.g. a user
record for 2015).

94
• Mode - Three options are available:
o Upload only - Allows users to upload documents only.
o Download only - Allows read-only access to documents.
o Manage Documents - Allows users to add documents and delete them as needed.
• Language - Controls the display language - English, French and Spanish are available.
• Show Border - Shows a border around the document upload component (default is off).
• Upload Options
o Qty Min - A quantity of at least 1 makes the Document Manager mandatory (i.e. required).
o Qty Max - A maximum quantity can be set.
o Max Size (kB) - Per document, 1000 kB (1MB) is a recommended starting point. Pro
Tip: Sonic Forms Document Manager uploads documents directly into your iMIS database. If you
plan to upload large quantities of documents please check with your database administrator as
you may require some additional support to manage your database storage.
o Document Type(s) Permitted - A comma separated list of values which identify valid file types. A
typical setting is ".pdf,.doc,.docx,.jpg,.xml" etc.
o Set iMIS Read Only - This setting will prevent ordinary staff users from changing documents once
they are uploaded into iMIS.
o Log to iMIS Change Log - Option that will log the changes made by the user and saved in the iMIS
Change Log.
• Download Options
o Allow Download - This option allows a user to download documents when Document Manager is
in the Download or Manage Documents mode, otherwise the name of previously uploaded
documents is displayed without a hyperlink.
o Allow Deletion - This option allows a user to delete documents.
o Show Date - Option to show the file upload date beside the document.
• Date Format - The date format is a dropdown list of common international formats. Choose the one that
is suitable for your site.
• No Document Message - The default message of "No documents found." can be overridden to be more
suitable for your application.
• Command Buttons (Right)
o Enable - Select whether a button is displayed on the right hand side, which allows for document
submission. This button can optionally execute a stored procedure.
o Button Label - Name to display on the button (usually "Submit").
o Stored Procedure - Stored procedure to invoke when this button is clicked.
o Target URL - Stored procedure to invoke when this button is clicked.
o Mark Documents as Submitted - Marks documents as "Submitted" when this option is selected.
"Submitted" status equates to "Read only" on the iMIS Desktop and prevents documents from
being deleted after they are submitted. Use this option where secure capture is important.
Documents can still be edited or deleted using the iMIS Desktop by staff users.
• Command Buttons (Left)
o Enable - Select whether a button is displayed on the left hand side, which allows for cancelling
your document uploads and returning to another page. This button can execute an alternate
stored procedure (for example to cancel an application).
o Button Label - Name to display on the button (usually "Cancel").
o Stored Procedure - Stored procedure to invoke when this button is clicked.
o Target URL - Stored procedure to invoke when this button is clicked.

95
o Delete New Uploaded Documents - If selected, this option will clean up documents that have
been uploaded during the session to restore the user to a "clean slate" when this button is
selected. Documents submitted earlier are not affected.
SONIC FORMS DOCUMENTS IN IMIS
Once your documents have been uploaded, you can work with them in a number of different ways:
1. Using Sonic Forms Document Manager - Create a new instance of FFDM with the download options
included and display it in RiSE in an appropriate location. This will allow you to download and access
documents in context.
2. Using the Traditional iMIS Desktop - Using the traditional iMIS Desktop you can access uploaded
documents using Activity records. Sonic Forms documents have an activity type of "FFDOCUMENT" and
will display the Sonic Form ID associated with the document, the document name as well as other
pertinent information. Pro Tip: While Sonic Forms Document Manager can upload many document
types, only certain types can be opened directly from the iMIS desktop including PDF, DOC and XLS file
types.
3. Using Database Access Techniques - Your documents can be republished and/or exported in a variety of
ways by moving the "blob" data from within your iMIS database to other target locations. Contact your
iMIS solution provider for more details.
SONIC FORMS DOCUMENT DISPLAY
The latest addition to the Sonic Forms family allows you to display multiple documents from different sources in a single
location.
A typical use case would be a complex application where you would assemble transcripts, letters of reference as well as
an application form. Each one of these documents would be a distinct document type, however, an adjudicator needs to
review all of them at the same time.
Here is a sample of SONIC FORMS DOCUMENT DISPLAY in action. This compact iPart shows a total of 10 different
document types gathered via a complex application process.

96
CONFIGURATION PANEL
The document display configuration panel is accessible via RiSE when logged in as a System Administrator. A compact
iPart is displayed with a button "Update Settings". Click on this to open the Configuration Panel.
The Configuration Panel has a number of key settings as follows:
• Add Document - Adds a new row for a specific document
• Save - Save your settings changes

97
• Close - Close the panel and return to RiSE
• Show Border - Add a standard border around the iPart display to differentiate it from other content
• Form - Select which Sonic Form to display documents from
• Multiinstance Table - If chosen, Document Display will look for a SEQN value and only display documents from
that specific record. If left blank, all documents of that type that are associated with the user will be shown.
• ID Alias (Optional) - use this if the ID is not called "ID" in your URL
• SEQN Alias (Optional) - use this if the SEQN is not called "SEQN" in your URL
• DIV ID (Optional) - use this to wrap the document entries with a DIV tag. This tag can then be used to apply
transformations to the data.
• Date Formatting (Optional) - Display the document upload date in a variety of standard formats.
• Download? - If selected the document can be downloaded, otherwise only the name will be shown.
Using the "DIV ID" Feature
The "DIV ID" feature allows you to reformat and relocate any document that is displayed through Sonic Forms Document
Display. Here is a sample script which inserts an approrpriate heading before each group of documents in the display:
<script>
jQuery("<div class='row col-sm-12'><h5 style='text-align:left'>File Assessment</h5></div>").insertBefore("#FILEASSESS");
jQuery("<div class='row col-sm-12'><h5 style='text-align:left'>Transcripts</h5>").insertBefore("#TRANSCRIPT");
jQuery("<div class='row col-sm-12'><h5 style='text-align:left'>Proof of Education</h5>").insertBefore("#TRANSCRIPT2");
jQuery("<div class='row col-sm-12'><h5 style='text-align:left'>Job Description</h5>").insertBefore("#JOBDESC");
jQuery("<div class='row col-sm-12'><h5 style='text-align:left'>Resume</h5>").insertBefore("#RESUME");
jQuery("<div class='row col-sm-12'><h5 style='text-align:left'>Reference(s)</h5>").insertBefore("#REFERENCES");
jQuery("<div class='row col-sm-12'><h5 style='text-align:left'>Competency Report(s)</h5>").insertBefore("#COMPETENCY");
jQuery("<div class='row col-sm-12'><h5 style='text-align:left'>Proof of English Proficiency (if

98
applicable)</h5>").insertBefore("#ENGLISH");
jQuery("<div class='row col-sm-12'><h5 style='text-align:left'>Additional Documents (if
applicable)</h5>").insertBefore("#ADDITIONAL");
jQuery("<div class='row col-sm-12'><h5 style='text-align:left'>Work Permit (if
applicable)</h5>").insertBefore("#WORKPERMIT");
jQuery("<div class='row col-sm-12'><h5 style='text-align:left'>Supplementary Documents (if
applicable)</h5>").insertBefore("#SUPPLEMENTARY");
</script>

99
RELEASE NOTES
Document Manager and Document Display are add-on products that work with Sonic Forms. Note that Sonic Forms may
have incremental versions that have a higher version number than Document Manager or Document Display. All products
in the Sonic Forms family share a version number.
SONIC FORMS 3.0.1802A
SONIC FORMS DOCUMENT MANAGER
• Document Manager now supports an improved user interface under “Update Settings”.
• Multiple instances of Document Manager can now be deployed on a single RiSE page.
SONIC FORMS DOCUMENT DISPLAY
Document Display is the newest member of the Sonic Forms family. More information is available here:
Sonic Forms Document Display
• With this release, Document Display now allows for access to documents by unauthenticated users if they are
authorized via the va_ValidatedID stored procedure.
• Document Display now supports an improved user interface under "Update Settings"
SONIC FORMS 3.0.1712B
RELEASED DECEMBER 18, 2017
• Name Change – FAST FORMS DOCUMENT MANAGER is now SONIC FORMS DOCUMENT MANAGER. As part of
this name change, SONIC FORMS DOCUMENT MANAGER will now have a release version of 3.x.
• Bug Fix – The “Upload” button is now disabled when more than the maximum number of documents have already
been uploaded on the page.
• Use of va_ConfigParam Table – Document Manager now uses entries in a table called “va_ConfigParam” to store
configuration options. This makes Document Manager more portable between instances (development, test and
production) as well as between servers during migration or upgrade. Existing .config files are read and loaded into
the form for backwards compatability. New versions are then saved in the va_ConfigParam table.
FAST FORMS DOCUMENT MANAGER 2.1.161130 - RELEASED NOVEMBER 30, 2016
FAST FORMS DOCUMENT MANAGER 2.1.160901 - RELEASED SEPTEMBER 1, 2016
Unauthenticated User
Document Access
Corrected access control methods to permit documents to be accessed by unauthenticated
users where permitted through the va_ff_ValidatedID procedure
Version Number
Synchronization
Sonic Forms Document Manager now uses the same version number as Sonic Forms to reflect the
most recent release of that product.

100
Simplified
Installation
Sonic Forms Document Manager will now install a standardized version of the Sonic Forms
Security stored procedure used by Sonic Forms including the utility
function FN_VA_VALIDATE_IMIS_ROLE which is used to determine if a user has a privileged role
such as “Staff” or “SysAdmin”.
In addition, Sonic Forms Document Manager will automatically create the FFDOCUMENT Activity
Type which is used by Sonic Forms Document manager if it does not exist in your iMIS database.
NOTE THAT SONIC FORMS WILL ONLY CREATE THESE PROCEDURES OR ACTIVITY TYPES IF THEY
DO NOT EXIST IN YOUR DATABASE. IT WILL NOT OVERWRITE AN EXISTING VERSION.
