
Moritz Dining Table
Stock number: 836 33401
H74.5 W120 D120cm

103/05/2019
Thank you for purchasing the Moritz Dining Table. Please read the instructions and warnings carefully before use, to
ensure safe and satisfactory operation of this product.
At John Lewis, we are committed to making great products possible.
From our in-house Design Team, to our Buyers, we work together to bring great design to life.
Our expert Product Technologists work collaboratively with our buyers and suppliers to ensure the legality, safety
and quality of the product we sell.
We are are all committed to designing and developing products to the highest industry standards.
We hope you are happy with your product and welcome any feedback or comments you may have.
The John Lewis Team
30 minutes

203/05/2019
03456 049 049

303/05/2019
Your table
Ref Description Dimensions Qty
To p 120cm x 120cm x 2cm 1
Base 74cm x 73cm x 60cm 1
1
2
1
2

403/05/2019
Ref Description Dimensions Qty
Allen bolt M6 X 10mm 5
Ref Description Dimensions Qty
Small allen key #4 1
Large allen key #5 1
Fixtures and ttings
A
B
C

503/05/2019
Product assembly
Moritz Dining Table
836 33401
Step 1
Parts, fittings and tools
2 C
Step 2
Parts, fittings and tools
1 2
LOOSEN BY 1 X TURN
ONLY!
2
C
1
2
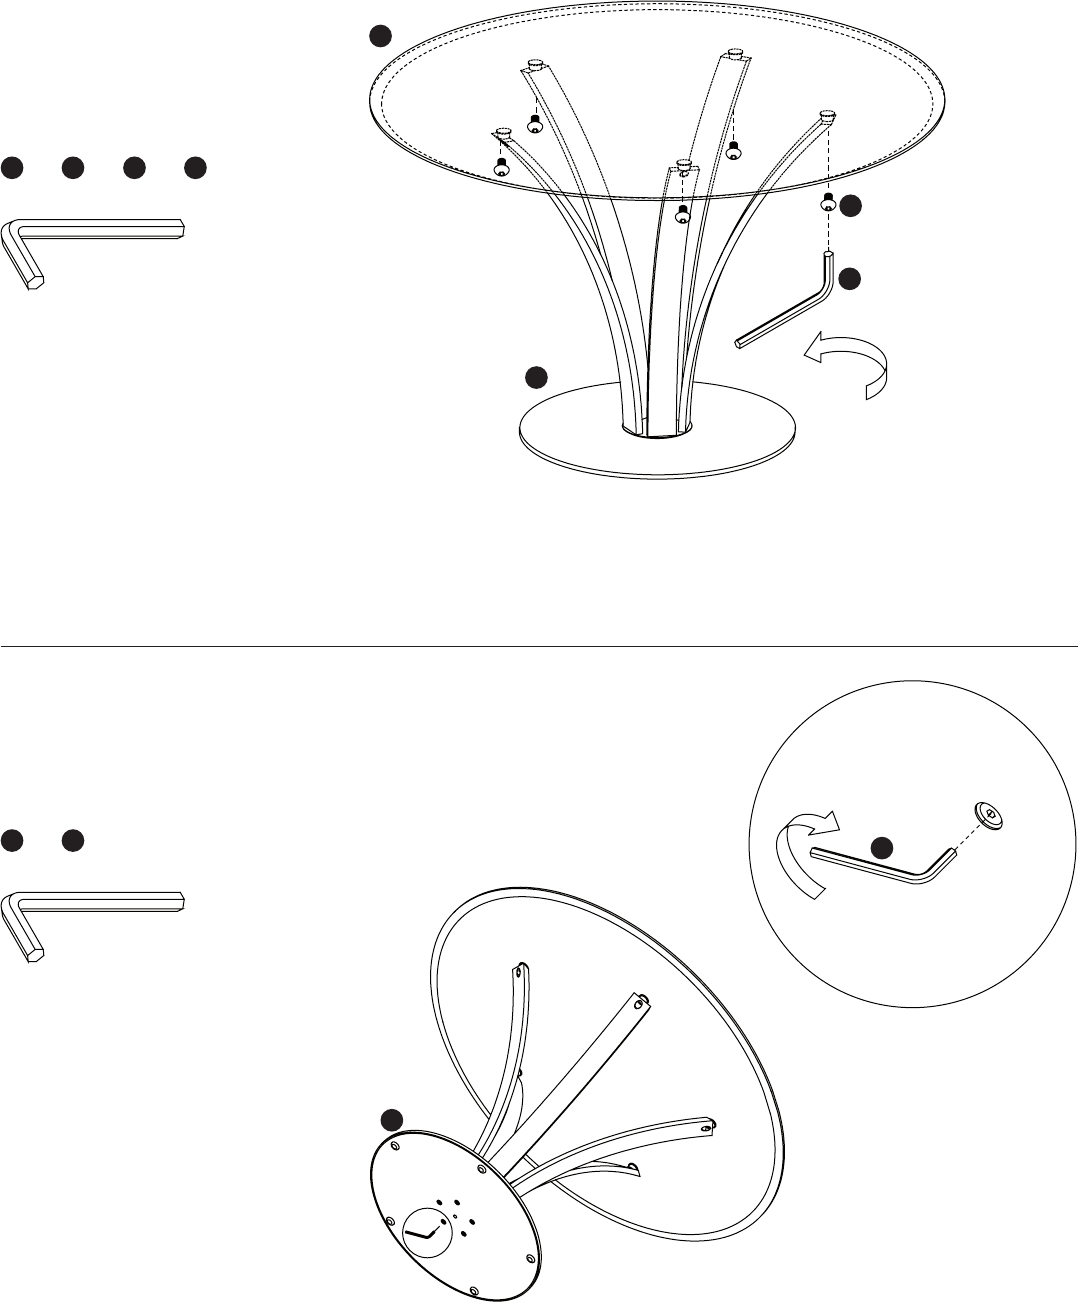
Please note, the base is very heavy and needs to be unpacked as near to it’s final location as possible. Very
carefully remove the base and stem unit from the packaging. To avoid scratches and possible damage carry out all
steps on a clean, soft surface such as a rug or large cloth. Do not remove the protective film on the base until Step
6. Carefully turn the base upside down, and use the allen key to gently loosen each of the 5 screws by 1 turn only
(turn in anticlockwise direction). This important step is to prepare for fixing the glass top in Step Two.
With at least two people, turn the base over so that it is upright. Whilst 2 people hold the glass top, the third
person should help guide the bosses on the glass top into the cups at the top of the metal stems one by one until
all are located. Take care not to scratch the glass at this stage.
603/05/2019
Product assembly
Moritz Dining Table
836 33401
Step 3
Parts, fittings and tools
1 2 A B
Step 4
Parts, fittings and tools
2 C
Tighten fully!
1
2
A
B
2
C
Once the glass top is in the correct location, take the 5 x screws (A) and insert them into the holes. Very carefully
(to avoid cross-threading) tighten the screws using the allen key.
With 2 people, carefully tip the table carefully to one side taking care not to bump or damage the edge of the glass,
so that the third person can access the base plate and screws. Ensure that the glass top is protected from the
floor to avoid any damage to the glass. Using the allen key, firmly re-tighten each of the 5 screws (turn in clockwise
direction).

703/05/2019
Product assembly
Moritz Dining Table
836 33401
Step 5
Parts, fittings and tools
Step 6
Parts, fittings and tools
With 2 people carefully turn the table back into the upright position. The stainless steel base is protected with a
plastic protective film. To remove, gently peel film away from the base by hand. Do not use any sharp im-
plements to cut from the base as this will damage the surface. Once the plastic is fully unstuck from the base, you
may find that you have a ring of loose plastic film left around the stem. If necessary, cut through one side of the film
with scissors to remove from around the stem. TAKE CARE not to touch any part of the metal on the table
with the sharp blades as this will cause permanent damage.
Adjust the levellers on the underside of the base in order to level the table.
803/05/2019
Care guide
How to care for your glass and metal furniture
For glass elements use glass cleaner or soapy water for cleaning, do not use anything abrasive as this may damage
the surface of the product. Note: Glass can scratch in normal use therefore please protect surfaces from
scratches and marks by using mats and coasters.
Protect the metal elements from spillage, sunlight and heat. A slightly damp cloth is the best cleaning agent for the
material. Dry and polish with a non abrasive soft cloth.
Do not use any abrasive cleaner or harsh detergent on the metal elements as this can damage the surface. Avoid
spilling or dropping crumbs of food with a high fat content on the surface as this can permanently mark the metal.
Safety instructions
Never drag furniture when moving it, always lift it.
Periodically check all fixings to unsure none have come loose and retighten when necessary.
Please take care when handling or moving the furniture as careless handling may cause damage or injury.
Furniture can be dangerous if incorrectly installed. Assembly should be carried out by a competant person. No
liability will be accepted for damage or injury caused by incorrectly installed or assembled furniture.
It is recommended that before moving heavy objects to a new location they are completely dis-assembled to avoid
personal injury or damage to the furniture. Please be careful to retain all fittings when doing this.
Glass furniture warning
Do not place very hot or very cold items glass surface(s) unless adequately thick table mats are used to prevent
such items from coming into contact with the glass.
Do not sit or stand upon glass surface(s)
Do not use the glass as a chopping surface. Do not strike the glass with hard or pointed items.
Tempered glass is designed to break into very small fragments for customer safety. On very rare occasions including
when not in direct use, glass can break for the following reasons:-Surface damage and scratches (protect the surface
with mats during use). Please take extra care to ensure no heavy or sharp objects impact this product. -Extremes
of temperature. Avoid areas where the item can become very hot and cold.
Retain these instructions for future reference.
John Lewis Partnership
171 Victoria Street
London SW1E 5NN
johnlewis.com
Y
our feedback is very important to us and we would love to hear your comments on your new furniture.
Please visit our website to leave a review. Thank you.
