
Follett School Solutions ©2019
Genrecation Best Practices

1
Follett School Solutions ©2019
Contents
Overview of Genrecation ...........................................................................................................4
What is genrecation? ............................................................................................................4
About this guides ....................................................................................................................4
Getting help ............................................................................................................................4
What does a “typical” genrecation project entail?...............................................................4
What do I need to include in my plan?...................................................................................5
Prepare and plan for the collection ........................................................................................5
Plan and prepare the physical library space..........................................................................9
Plan and prepare the work of ipping the collection..............................................................9
Planning Your Library Space .....................................................................................................11
Genre-organized shelf planning ...........................................................................................11
Shelf-space calculations ......................................................................................................11
Indicating genre on the shelves ............................................................................................13
Library signage .....................................................................................................................13
Using the Genre Collection Report ...........................................................................................14
Elements of the report ..........................................................................................................14
How to use the Genre Collection Report..............................................................................16
Adding Genre Data to Destiny ...................................................................................................17
Genre Planning Checklist ..........................................................................................................22
Popular Fiction Genres, Titles and Authors...............................................................................25
Adventure ..............................................................................................................................25
Animal Stories .......................................................................................................................25
Classics .................................................................................................................................25
Dystopian. .............................................................................................................................25
Fantasy .................................................................................................................................. 26
Graphic Novel .......................................................................................................................26
Historical Fiction ...................................................................................................................26
Horror/Scary Stories. ............................................................................................................26

2
Follett School Solutions ©2019
Humor ...................................................................................................................................27
Mystery .................................................................................................................................27
Mythology .............................................................................................................................27
Poetry ....................................................................................................................................27
Realistic Fiction ..................................................................................................................... 28
Romance ...............................................................................................................................28
Science Fiction .....................................................................................................................28
Sports Fiction ........................................................................................................................ 28
Popular Nonction Genres, Titles and Authors..........................................................................29
All About Me (Elementary) ....................................................................................................29
Ancient World (Secondary) ...................................................................................................29
Animals .................................................................................................................................29
Around the World (Elementary) ............................................................................................. 29
Biography ..............................................................................................................................29
Business & Finance (Secondary) ..........................................................................................30
Careers & College (Secondary) ............................................................................................30
Conservation & Environment (Secondary)............................................................................30
Cooking & Food ....................................................................................................................30
Criminal Justice & Law (Secondary) ..................................................................................... 30
Curiosities & Wonders (Secondary) ......................................................................................30
DIY .........................................................................................................................................30
Dinosaurs (Elementary) .........................................................................................................31
Drama (Secondary). ..............................................................................................................31
Earth Science (Secondary) ...................................................................................................31
Economics (Secondary) ........................................................................................................31
Fashion (Secondary) .............................................................................................................31
Folklore (Elementary). ...........................................................................................................31
Fun Facts (Elementary) .........................................................................................................31
Games & Puzzles or Games & Gaming................................................................................32
Government & Civics ............................................................................................................32
Graphic Novels .....................................................................................................................32
Health & Wellness .................................................................................................................32
Holidays & Traditions (Elementary)........................................................................................32

3
Follett School Solutions ©2019
Life Science (Secondary) .........................................................................................................32
Literature ................................................................................................................................33
Military .................................................................................................................................... 33
Music (Secondary) ..................................................................................................................33
My State (Elementary) .............................................................................................................33
Mythology (Secondary) ............................................................................................................ 33
Money & Business (Elementary) ...............................................................................................33
Native Americans (Elementary) ................................................................................................33
Our Earth (Elementary) ............................................................................................................34
Personal Growth (Secondary) ..................................................................................................34
Philosophy (Secondary) ...........................................................................................................34
Physical Science (Secondary) ..................................................................................................34
Psychology (Secondary) ..........................................................................................................34
Poetry ..................................................................................................................................... 34
Religions. ................................................................................................................................35
Social Issues ........................................................................................................................... 35
Space .....................................................................................................................................35
Sports ....................................................................................................................................35
STEM .....................................................................................................................................35
Supernatural (Secondary) ........................................................................................................35
The Arts (Elementary) ..............................................................................................................36
Transportation .........................................................................................................................36
True Crime (Secondary) ...........................................................................................................36
U.S. History ............................................................................................................................36
When I Grow Up (Elementary) ..................................................................................................36
World History ..........................................................................................................................37
World Languages ....................................................................................................................37
Questions and Answers ................................................................................................................38

4
Follett School Solutions ©2019
Overview of Genrecation
What is genrecation?
Genrecation is organizing a library by subject and genre, more like a bookstore, to enable students to nd
materials more easily and improve circulation.
The genres the library chooses can align with district suggestions or can support each school and its
curriculum uniquely.
About this guide
This guide is a starting point for anyone planning to reorganize their library collection by genre. The goal is
that you will come away with knowledge of the high-level planning involved, as well as helpful information
and tips.
This guide consists of six sections:
• Overview of Do-It-Yourself Genrecation
• Planning Your Library Space
• Using the Genre Collection Report
• Adding Genre Data to Destiny
• DIY Genrecation Checklist
• Popular Genres, Titles and Authors
This guide is aimed at the Do-It-Yourself (DIY) genrecation scenario – where you plan to work on your own
to organize your library collection by genre. The information provided is not intended to be all-inclusive, as
each library has different goals to consider. Use this guide to help lay the groundwork for dening a plan for
your library.
Getting help
Follett School Solutions (FSS) can help. Our services include:
• On-site project management of the service
• Project planning and assistance with genre mapping
• Stafng, resources and materials needed to perform the work
• Population of genre information into Follett Destiny
®
Library Manager
• Post-genrecation collection analysis using TitleWave
®
Follett’s services are customized to meet each library’s unique needs. For more information and to get a price
quote, contact your Follett School Solutions sales representative. If you don’t know who your representative
is, click the “Find Your Follett Team” link in the “Contact Us” block on the Follett School Solutions website
(www.follettlearning.com).
What does a “typical” genrecation project entail?
The word “typical” is emphasized because it’s important to know that genrecation projects will differ from
library to library. While there can be some commonality in approach, the decisions made are unique to the
individual collections and curriculum goals of each school/library. Here is a high-level list of what’s typically
involved:
• Plan!
Having a plan is critical to success. Plan the work, then work the plan. Be ready to be rmly exible when
something unexpected comes up. Count on something unexpected to happen – it likely will.

5
Follett School Solutions ©2019
• Prepare!
Organize everything. Make guiding decisions up front, and adjust your details when a situation
requires it. Prepare and organize everything, from dening genres to planning materials needed to
considering patron service interruptions.
• Execute!
This is where you work your plan. As you begin doing the work, new details not identied when planning
will surface. Sometimes, this means adjusting your plan. Be exible in adjusting.
The remainder of this section dives a little deeper with information Follett School Solutions has gained in our
experience ipping libraries to a genre organization. The details are still high-level and provided for you to
consider in planning your DIY genrecation project. This guide is not a template you can follow, but it will help
you determine what to consider as you move forward. Your plan will reect your library and your situation.
What do I need to include in my plan?
Dene the purpose of genrefying
Ask yourself “Why do I want to genrefy my library?” This can be the most important question of the project.
Here are some common reasons why libraries ip their collections to genre organization:
• To better tie the collection to and support the school curriculum
• To bring greater visibility to high-interest titles
• To help students and staff members more easily nd reading materials they seek
• To expose students and staff to a more diverse selection of authors and reading
• To make students more independent library users, which saves staff time
• To motivate students to read more
• To increase circulation and support of school curriculum, which can help secure additional funding
Prepare and plan for the collection
Decide what to genrefy
Most libraries choose to begin to genrefy their collection with ction rst. Genre organization can later
be expanded to include nonction and/or picture books. This decision is often guided by the size of the
collection and the stafng/timeframe needed to complete the work.
Identify which genres to use
Genres can be unique to an individual school library or a school district. District guidelines usually maintain an
overall structure but give individual libraries some exibility to meet their unique needs.
Some questions to ask:
• Which genres best support the curriculum?
• What do my students/staff want to nd in the collection?
• Are there sections of the collection that are underused and need more exposure?
• Do I use a predened list of genres as a starting point?
• Are there district guidelines we should create or that I need to follow?
Weed!
Starting with a clean house is critical. Flipping a collection to be organized by genre is a lot of work. You don’t
want to spend time or money processing books that are severely out-of-date and no longer useful. A good
weeding will give you an accurate view of your collection and will help you improve your collection going
forward. Weeding can be done well in advance of starting the actual genre ip project.
But where to begin? Follett can help with a TitleWise
®
Collection Analysis. The TitleWise Collection Analysis
report will show strengths and weaknesses in your collection, including copyright information. The analysis is
a great way to start reviewing your collection for content that no longer provides value.

6
Follett School Solutions ©2019
Follett worked with librarians from around the country to determine which genres are most commonly used at
various grade levels. Use this as a reference when dening the genres you want to use. You may choose to
use some or all the genres listed.
Elementary Fiction
• Adventure
• Animal Stories (Tales)
• Classics
• Fantasy
• Graphic Novels
• Historical Fiction
• Humor
• Mystery
• Realistic Fiction
• Scary Stories
• Science Fiction
• Sports Fiction
Secondary Fiction
• Adventure
• Classics
• Dystopian
• Fantasy
• Graphic Novels
• Historical Fiction
• Horror
• Humor
• Mystery
• Quick Reads
• Realistic Fiction
• Romance
• Science Fiction
• Sports Fiction
• Story Collections
• Supernatural
• Thriller

7
Follett School Solutions ©2019
Elementary Nonction
• All About Me
• Animals
• Around the World
• Biography
• Cooking & Food
• Dinosaurs
• DIY
• Folklore
• Fun Facts
• Games & Puzzles
• Government & Civics
• Holidays & Traditions
• Language
• Literature
• Military
• Money & Business
• My State
• Native Americans
• Our Earth
• Poetry
• Religion
• Social Issues
• Space
• Sports
• STEM
• Supernatural
• Technology
• The Arts
• Transportation
• U.S. History
• When I Grow Up
• World History
Secondary Nonction
• Ancient World
• Animals
• Art
• Biography
• Business & Finance
• Careers & College
• Conservation & Environment
• Cooking & Food
• Criminal Justice & Law
• Cultural Studies
• Curiosities
• DIY
• Drama
• Earth Science
• Economics
• Fashion
• Games & Gaming
• Geography
• Government & Civics
• Graphic Novels
• Health & Wellness
• Life Sciences
• Literature
• Military
• Music
• Mythology
• Personal Growth
• Philosophy
• Physical Science
• Poetry
• Psychology
• Religion
• Social Issues
• Space
• Sports
• STEM
• Supernatural
• Transportation
• True Crime
• U.S. History
• World History
• World Language

8
Follett School Solutions ©2019
Map the collection to your genres
After you have dened the genres you will use, map all the books in your collection into the correct genre.
Genre mapping the collection is one of the most challenging and time-consuming activities of the project.
But it is a critical part of a smooth and successful genre ip project.
Genre mapping involves looking at every copy of every title you are genrefying and deciding what genre
it belongs in. This occurs at the copy level, because you might choose to map some titles that you have
multiple copies of into more than one genre.
You will nd yourself challenged with the choice between genres for some titles. Sometimes, referring to your
driving purposes can help you decide which genre to select. The weakness or strength of some sections of
your collection can also inuence this decision.
Decide how to indicate the genre on the shelves
Students and staff need to be able to nd what they are looking for. It is important to clearly identify the
genres on the physical materials. Common approaches include the use of genre labels, colored labeled
genres and genre call number prexes. See the Planning Your Library Space section for more details.
Modify your Titlewave account
After you’ve decided what portion of your library you want to genrefy, what genres you want to use in your
library and how you want to indicate genre in your collection, update your Titlewave account to reect
your genres.
After your genres have been set up in your Titlewave account, your collection will begin to update to
your selected genres with a few simple keystrokes. Contact a Titlewave School Support Specialist or
call 888.511.5114 x45051 for help.
Follett will also provide a free resource called the Genre Collection Report to help assign genres to your
collection. Created using data submitted for TitleWise analysis, this report is a spreadsheet listing all the
copies in your collection. For most libraries, the collection can be genre-assigned using only this spreadsheet.
To request a Genre Collection Report, contact a Titlewave School Support Specialist or call 888.511.5114
x45051 for help.
Decide how to identify genres in your library automation system
The capabilities of the automation system you use will inuence how you present genre information to
students and staff. Since organizing libraries by genre is becoming more popular, new features are being
developed to better support genre-organized collections. It is important that the genre information is visible
to students/staff on the search results screen. Consult your library automation system vendor for their
recommendations on displaying genre information in their system.

9
Follett School Solutions ©2019
Plan and prepare the physical library space
It is important to plan how you will arrange the new genre sections in your library. Ask yourself these
questions:
• How do my existing trafc patterns in the library inuence my genre locations?
• Do I need to create new trafc patterns?
• How does reorganizing my collection by genre affect my shelf space?
• With your collection reorganized, what kind of signage do you need to help students and staff nd what
they’re looking for?
Plan and prepare the work of ipping the collection
The work of ipping the collection into genres is often described as the scariest part of the project. You are
removing every book from its current shelf location and moving it to a new location within its target genre.
The following are considerations to include in your plan:
Time and timing:
• Is there a deadline for having the project completed? What drives this deadline?
• What hours can work be performed?
• Will books be in circulation during the project? How will books in circulation be handled?
• Can the library be shut down? If so, for how long?
Workspace:
• What space is available to work in? What space is needed?
• How close is the work space to the books?
• What is needed in the work space (tables, chairs, network access, air conditioning/heat, lighting)?
Stafng:
• Who will perform the work (volunteers, student helpers, paid workers/temp workers, other librarians in
the district)?
• What level of commitment is required? How is that commitment maintained through the duration of
the work?
• Who has decision authority for resolving issues or answering questions?
Tools: Book carts, computers, bookends, boxes
Supplies: Genre labels, color labels/protectors, sticky notes, markers, pens, tape, shelf markers,
new signage
Choose an approach
There are two general approaches to perform the work of ipping the collection to genre: you can do it
gradually over a period of time or you can do it all at once. For either choice, please see our Genre Planning
Checklist to help you organize and execute your library ip.
The “work over time” approach
This approach requires fewer resources than the all-at-once approach and is typically inuenced by funding
and available stafng. There are many articles, blogs and videos on the internet from others who have
genreed a library. Following is a general sequence of activity to use as a starting reference.
Follett strongly encourages you to research how others have done this and build an approach that works best
for you and your library. Unless indicated otherwise, each step can be completed as an independent activity
leading up to the work of reorganizing the collection into genres.

10
Follett School Solutions ©2019
The “all at once” approach
It is possible to label and reorganize into genres all at once. This requires more planning and coordination. The
benet is less disruption to providing library services overall. This is the general approach Follett uses when
delivering genre-related services on-site with a project team.
There is a lot of activity happening at the same time. Following is a general sequence of activity to use as a
starting point. Follett strongly encourages you to research how others have done this and build an approach
that works best for you and your library.
Regardless of which approach you choose:
1. Start with the largest genre you have. Clear the estimated number of shelves you calculated for that
genre. Using boxes or available surface areas, sort the copies being removed into their indicated genres
as shelves are cleared.
2. After the shelves for that genre are cleared, continue to work through the collection pulling all copies in
that target genre.
3. Route the copies for the target genre to a workstation, applying whatever means needed to indicate the
genre on the copies. Do not mix genres at a workstation.
4. After the genre is indicated, the copies can be shelved in their new genre location.
5. As you complete one genre, move on to the next largest genre and repeat the process. Continue this
until all books in the collection reect their target genre and the copies are organized on the shelves
by their genre. If you have books still in circulation, process them into their new genre location as they
are returned.

11
Follett School Solutions ©2019
Planning Your Library Space
It is important to consider how you will arrange the physical collection in your library. As with other aspects
of this process, Follett recommends your decisions about your library space be driven by your genrecation
objectives. Following are some questions about your library space that can help you with your planning.
• What are the existing trafc patterns in the library?
Think about your trafc paths through the collection. How do they inuence where you will locate
your genres?
• Do you want to change existing trafc patterns or create new trafc patterns?
The location of popular genres can inuence trafc patterns in the library. Think about what genres you want
to promote, which genres are in regular demand and if you want to change the ow in your library.
• How does reorganizing my collection by genre affect my shelf space?
Where you locate the genres and how much shelf space they require is an important part of planning.
Adjusting the collection on the shelves is very time-consuming. As you shelve the collection, you want to
avoid having to shift the collection on shelves as much as possible. Follett has devised a way to estimate
where your genre sections will t on your shelves. The result is only an estimate, but it can help minimize
the amount of shifting.
This section of the guide includes information on the following:
• Genre-organized shelf planning
• Shelf-space calculations
• Indicating genre on the shelves
• Library signage
Genre-organized shelf planning
Here are some useful tips about shelf planning:
• Use sticky notes to label shelves with genres as a visual aid in planning the layout of the collection by
genre. Sticky notes can easily be repositioned as your layout plan is dened.
• Measure your shelves. Standard library shelves measure 46 inches wide. Most libraries have some
shelves of varied lengths. Measure and document how many shelves of each length you have and where
they are located.
• Consider how much open space you want to have on your shelves. A common target is to plan to ll
your shelves 75% full. This allows insertion of new materials in the future without the need to adjust
your collection to make room. Some libraries do not have enough space to accomplish this. For those
situations, identify a realistic target for your library that you will use in your planning.
• Different genres require different amounts of shelf space. Science Fiction genre books are generally
thicker than Graphic Novels and thus have a higher “inches per book” requirement for space use. This is
very important to consider while planning your genre locations in your library.
Shelf-space calculations
Collecting some information about your collection is critical to estimating the locations of genres in your
library. The information is aided by using the sticky notes to visualize which shelves will house which genres.
The following details the steps to perform some simple calculations to accomplish this.

12
Follett School Solutions ©2019
Step 1: Determine how full you want your shelves to be. A 46-inch shelf that is 75% full uses 35 inches
of space for books. Where shelves differ in width or where you do not have space for 75% shelf use, use the
information for your situation to determine how much book space you have on your shelves. Noting where
any off-sized shelves will be helpful in later steps. Noting the size on sticky notes can help with this activity.
Step 2: Determine the average “inches per book” for each of your genres. To determine this, collect
a good-sized representative sample of titles from each genre. Position them as they would be on a shelf,
between bookends and measure how many inches of space they use. Divide the number of inches by the
number of books and you get the average “inches per book” for that genre. Note this number for use in
future steps.
To aid this process, Follett has collected data on how many inches of space a book consumes, on average,
within several common genres in library collections. This data reects measurements from multiple libraries
for the indicated genre. We provide this data as a reference to assist in your calculations.
Step 3: Determine how many copies exist in each genre. Calculate the number of inches of shelf space
required for that genre by multiplying the number of copies by the average “inches per book” value for
that genre.
The Follett Genre Collection Report can help estimate how much shelf space a genre will require. The
Genre Collection Report is mentioned in our “Basic Steps for a DIY Genrecation Project” document. It is
a spreadsheet tool used to map the copies of your collection into your target genres. Through this tool you
can sort the list by genre and calculate how many copies are in that genre. Using the number of copies in the
genre and the average “inches per book” value for the genre, you can calculate an estimated amount of shelf
space a genre will require. Further calculations based on your shelf sizes help estimate how many shelves the
genre requires.
The following is an example of estimating the required shelf space for a genre:
• The library shelves are 34 inches wide.
• The desire is to have shelves 75% full. A 34-inch shelf, 75% full, has 25.5 inches of space for books.
• The Genre Collection Report indicates the Fantasy genre includes 1,559 books. Sample book
measurements indicate an average thickness of 1.090 inches per book.
Calculations:
Number of books in genre X Inches per book = Inches required for books in genre.
1,559 X 1.090 = 1,700 inches of books.
Inches per book ÷ Available book space per shelf = Number of shelves to hold the genre.
1,700 ÷ 25.5 = 67. It will take approximately 67 shelves to hold the Fantasy books.

13
Follett School Solutions ©2019
Step 4: Using the shelf estimate you just calculated, write the genre name on sticky notes and apply to
the shelves for that genre. Repeat this step for each genre until all genres are reected on your shelves. This
lets you visualize your library organized by genres and adjust as you need. Moving the sticky notes around is
much easier than adjusting shelves of books later. Follett has found it generally easier to work from the largest
genre to the smallest when doing this. Having the sticky notes on the shelves can also help with coordinating
workers to shelve the books correctly.
Follett School Solutions is here to help. Call your Sales Representative or a School Support Specialist with
any questions.
Indicating genre on the shelves
Students and staff need to be able to nd what they are looking for. It is important to clearly identify the
genres on the physical materials. Common approaches include the use of genre labels, color association
with genres and genre call number prexes.
Genre labels and color labels:
Each genre has an identifying label design that is applied on or near the spine to indicate which genre
that copy is in. Some libraries choose to create their own labels and design. There are many options for
labeling books: Follett Genre labels, Demco Genre labels and colored label protectors. Please check
follettlearning.com to explore all options.
Genre call number prexes:
This approach indicates the genre or a genre code as a prex in your copy call number. Note that this can
increase the physical work required to genrefy, since you must add the prex values to your automation
system data, print new spine labels and apply these labels to the collection.
Library signage
With your collection reorganized, students and staff need signage to nd the materials they are looking for.
Signage is important!
What kind of signage do I need? Common needs include poster/wall signs, genre section signs, and
individual shelf signs. If you are using genre codes, such as a call number prex, consider providing a
reference table by your workstations.

14
Follett School Solutions ©2019
Using the Genre Collection Report
The Genre Collection Report is a valuable tool from Follett that aids in the planning, genre mapping and work
execution of a library genrecation project. We recommend that you have your account set up with your
desired genres rst, as this will enable us to recommend genres for you to use at the title level.
Elements of the report
The lines
Each line in the spreadsheet reects a copy that is in the MARC le submitted to Titlewave for analysis.
Where there is more than one copy of a title, there is a line for each copy. Each line will have a unique
barcode and possibly call number if any copies have differing call numbers.

15
Follett School Solutions ©2019
The columns
Each column has an identied purpose (see table). All data comes from the MARC records submitted to
Titlewave for analysis.
Column
Heading
Description Source
of Data
# Original sort order number; added by Follett for this spreadsheet --
CALLNUM Copy Call Number
Customer’s
MARC
BARCODE Barcode Number
Customer’s
MARC
BUCKET
In the TitleWise analysis setup, classications and buckets are set up per call number
prex grouping. This eld reects those selections. When nonction is included, the
bucket will reect the Dewey section for the title.
MARC/
Titlewave
TITLE Title reects the data in the MARC record
Customer’s
MARC
AUTHOR Author reects the data in the MARC record
Customer’s
MARC
MATCHED
Matched means the MARC title matched a title in Titlewave. Titles that are matched can
display data in the remaining column headings.
MARC/
Titlewave
FOLLETT
NUM
Follett’s product number for the title Titlewave
BISAC
The Book Industry Standards and Communications Category provided by the publisher
for the title
Titlewave
SUBJECTS Library of Congress Subject Headings for the title Titlewave
FOLLETT
TAGS
Follett applied tags reecting genres, subjects and themes Titlewave
PRIMARY
GENRE
Primary Follett Genre of the title applied by Follett Titlewave
SECONDARY
GENRE
Secondary Follett Genre of the title applied by Follett Titlewave
CUSTOMER
CHOICE
Blank or the Customer’s Genre. If you have a Genre Prole that is mapped to Follett
Genres, the system can populate the customer’s genre.
Titlewave
THICKNESS Thickness of title in millimeters. This information can help when planning shelving space. Titlewave
PUBYEAR Publication Year Titlewave
INTEREST
LEVEL
Follett Interest Level Range Titlewave
LOW AGE
LEVEL
Follett Low Age Level Titlewave
HIGH AGE
LEVEL
Follett High Age Level Titlewave
ATOS
READING
LEVEL
ATOS
®
(Advantage -TASA Open Standard) Book Level – Accelerated Reader data is
provided by Renaissance Learning
Titlewave
RC READING
LEVEL
Reading Counts Reading Level – data provided by Houghton Mifin Harcourt Titlewave

16
Follett School Solutions ©2019
How to use the Genre Collection Report
One of the more challenging tasks when organizing a library by genre is dening which genre the title
belongs in. The Genre Collection Report lets you see information about a title that is helpful in making this
determination.
A large portion of a collection can be genre-mapped from the Genre Collection Report, without pulling
individual titles from the shelves to review. However, there will be titles that require getting the book in hand,
looking it over and reading about the story to decide.
To use the Genre Collection Report:
1. Always save a backup copy of your Genre Collection Report spreadsheet. Doing so will prevent the loss
of a large amount of work due to an error.
2. For each line, review the information provided and compare them with the genres you have identied
you will use in your library. The information in the BISACS, SUBJECTS and CCSSTAGS columns will
reect the themes of each title. Type the destination “genre” into the cell for that line in Column L.
3. For the titles where you’re unable to determine a genre without looking at the book, you can highlight
the line and place text in column L to indicate the need to pull the book for review. Doing this makes it
easy to sort the list by genre, then Call Number, and combine all the books to pull together, providing
a list to work from. In the example chart provided on page 14, the yellow highlight and text “**Book in
Hand” is used to indicate one of these titles.
Note: Should you encounter a title or line you are unsure about, ag it as one needing hands-on review.
There are many ways to ag these lines, including shading the line with a color ll, making it easy to nd
later. The Call Number in the line makes it easier to retrieve that title from the shelves later. Continue this
process until all lines in the Genre Collection Report have been mapped to a genre.
4. The Genre Collection Report is provided as a spreadsheet to take advantage of the ltering and sorting
capabilities available. How you use the Genre Collection Report from this point can vary based on your
approach to reorganizing the collection into genres.
• Filter the list for titles that failed to match the Follett Database. Now you can easily nd those titles
on the shelves and determine which genre they map to.
• Sort the list by Genre. Now you can count how many copies there are in each genre. This
information can help you understand the size of each genre, plan shelf usage and plan the genre
layout of your library.
• Sort the list by Call Number. The list can be used to go through your shelves and apply your genre
identiers on the individual titles before reorganizing the collection into genres.
• Sort the list by Genre rst, with a sub-sort of Call Number. The list can be used to shelve the copies
within their genre, and then organized by Call Number within the genre.
• Print individual pages of the list to assign tasks to workers or volunteers. The pages can help with
organizing the work and tracking what has been completed.
The exibility of being able to organize the Genre Collection Report information many ways makes it a
valuable aid in a genrecation project.

17
Follett School Solutions ©2019
Adding Genre Data to Destiny
This section provides instructions for populating genre data into the MARC records of Destiny.
Note: Before proceeding with these steps, all work of mapping your materials into their genres – including
the shelving of the collection into their genre groups – should be completed. This is necessary to ensure
accuracy.
The changes you make in your data are based on the materials on the shelf. There may be more than one
way to accomplish some of the steps described. Also, steps presented are the easiest to describe using
equipment most commonly available to all Destiny customers.
Create barcode list les
The rst step in adding genre data to your Destiny records is to create a list of barcodes that are contained
in each genre. This is accomplished by placing a laptop on a rolling cart and using a scanner to scan all
the barcodes on the books in the genre into a text le. Follett recommends creating a separate le for each
genre and do all the scanning of a genre on one laptop. You can scan multiple genres at the same time using
multiple laptops and barcode scanners.
Equipment needed:
• Microsoft Windows
®
laptop computer with barcode scanner attached
• Rolling cart (such as an AV cart)
• USB ash drive (optional, if the laptop has internal storage)
1. Determine which genre will be scanned. Place the laptop on the movable cart and proceed to that area.
Optional: Insert the USB ash drive into the computer.
2. Click the Windows Start icon in the lower-left corner of the Windows interface.
3. Click All Programs > Accessories and select Notepad. The Notepad application opens.
4. In Notepad, click File > Save As. You will be prompted for the location you want to save the le. You
can save it to the Desktop or, if using a USB ash drive, save the le to that location. For the lename,
use the name of the genre you will be scanning. Click Save.
5. Click on the blank page in the Notepad application. The cursor should be at the top leftmost position.
Begin scanning barcodes on the materials in that genre. The scanner should automatically insert a
carriage return after the scan, so you end up with a list of barcodes numbers. Duplicate scans are not
a problem, so if you are not sure you scanned a barcode, scanning it again causes no harm. If you are
interrupted while scanning, save the le and turn a book sideways where you left off so you can easily
resume scanning.
6. After you have scanned a shelf of books, save the le. This is done by clicking File > Save in the
Notepad application. Pressing Ctrl + S on the keyboard at the same time will also save the le.
7. After you have scanned all the books in the genre, save the le again. You are now ready to scan the
next genre. It’s important to follow the next steps so you do not overwrite the le you just completed.
8. Open a new le in the Notepad application. This is done by clicking File > New. A blank page will open
in Notepad. As before, click File > Save As, and choose the same location for this le to be saved. Be
sure to use the next genre you are scanning as the lename.
9. Repeat these steps for each genre until all materials in all genres have been scanned into the le named
for the genre.
10. After all genres have been scanned, collect the Notepad text les onto a single USB drive. You should
have one le for each genre in your collection. Each le should contain all barcode scans for the
materials in that genre.

18
Follett School Solutions ©2019
Create Copy Categories in Destiny
Next, we will populate your genres into the Copy Category eld of your copy records in Destiny. Doing
this groups your copies by the genre, including searching, producing bibliographies and reading lists, and
promoting materials. Copy Categories can also be used to create historical collection statistics reports. We
will also use the categories we add here to add your genres as Sublocations in Destiny. Sublocations display
the Genre name on the search results displays in Destiny.
1. Log in to Destiny as a user that has Library Administrator or higher access rights.
2. Click the Catalog tab > Library Search option. Then click the Copy Categories sub-tab.
3. You will see the Add Copy Category display with the cursor in the Add Copy Category eld. Type your
rst genre name. Immediately below the genre name you just typed, deselect the checkbox that says
Restricted. Click Save.
4. Repeat these steps for each of your genres until all genres have a Copy Category created for them.
Assign Copy Categories to your copies in Destiny
Next, use the text les of scanned barcodes to assign the Copy Category genre to the copies in that genre.
In your computer, insert the USB ash drive containing all the scanned text les to allow it to initialize. After it
has initialized, conrm you can browse to and see the les on the ash drive.
1. Log in to Destiny as a user that has Library Administrator or higher access rights.
2. Click the Catalog tab > Library Search option. Click the Copy Categories sub-tab to the right half of
the display.
3. Find your rst genre in the Library Copy Categories listing. Click the Plus sign to the right of
that genre name. This opens the Add to “[Genre Name]” Copy Category display.
4. In the Select by drop-down, select Barcode List.
5. In the Select a barcode le eld, click Choose File. Use this pop-up to browse to the genre text le
that aligns with the genre category name you are creating. Following these instructions, this location
would be the USB ash drive you inserted into the computer at the beginning of this process. In this
pop-up, select the barcode scan le that matches the “[Genre Name]” Copy Category you are
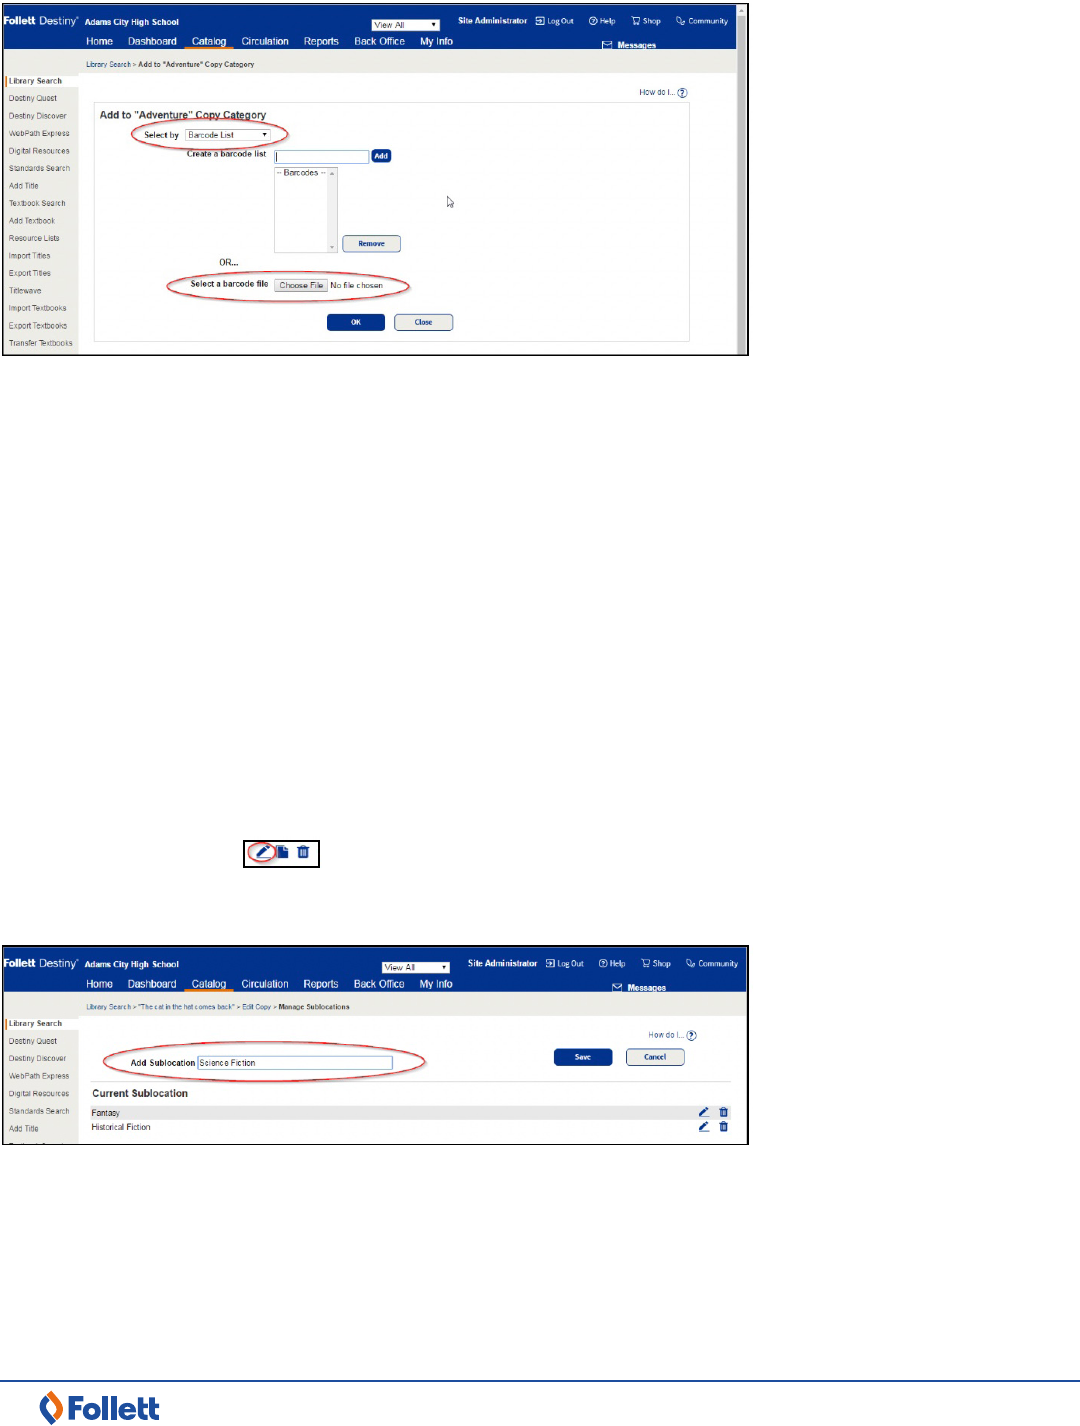
19
Follett School Solutions ©2019
working with. Be sure the barcode le and the genre name are the same genre. Click Open. The full path to
the le appears in the Select a barcode le eld.
6. Click OK. A box indicates the number of copies added to this category. These copies now have this
genre category assigned to them.
7. Repeat these steps for the remaining genres, ensuring you select the correct barcode le that matches
each genre until all genres are completed.
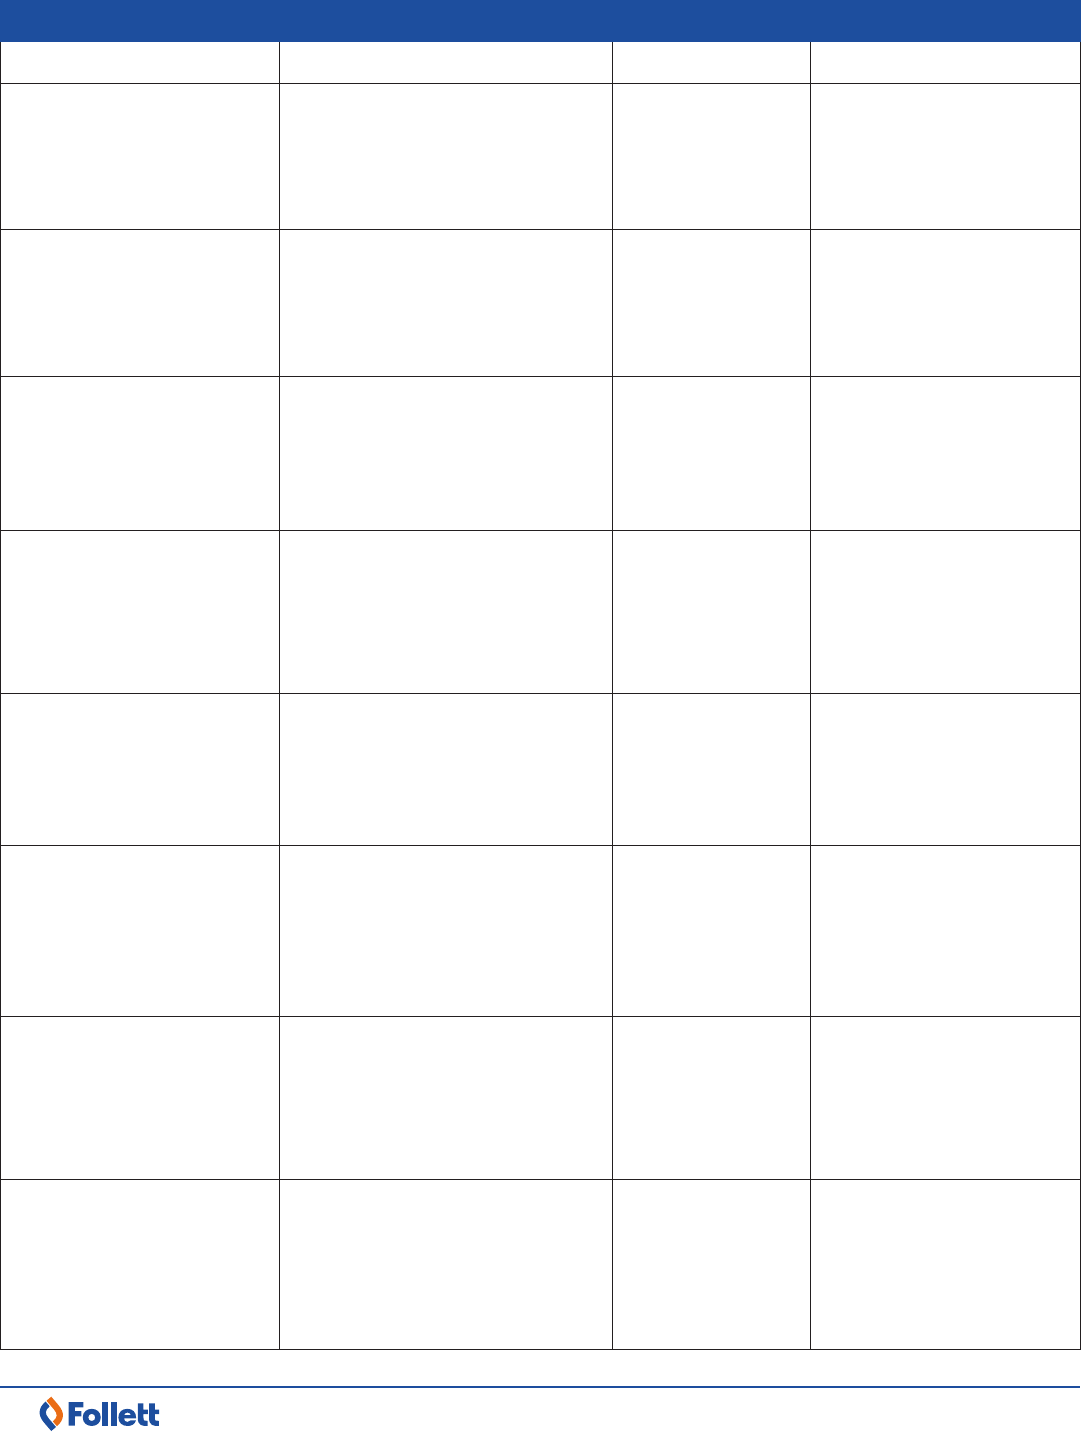
Add Genre Sublocation Values to Destiny
With the genre categories created, you can now use Destiny features to create genre sublocations on the
copies so the genre name appears in search results. First, you must create all the genre sublocation names in
Destiny.
1. Log in to Destiny as a user that has Library Administrator or higher access rights.
2. Click the Catalog tab > Library Search option.
3. Search for a copy:
a. Click the Basic sub-tab to search for the copy by its Title.
b. Click the Barcode sub-tab to search for the copy by its Barcode Number.
c. Enter or scan in the Barcode Number.
4. Click the Edit icon to edit the copy.
5. In the Sublocation eld, click the Other button.
6. In the Add Sublocation eld, type the name of your rst genre. Click Save.
7.
Repeat Steps 5-6 until you have added all your genre names as Sublocations. The Copy Edit page
appears.
8. In the Sublocation eld, click the Sublocation drop-down and select the correct genre for this copy.
9. Click Save Copy.

20
Follett School Solutions ©2019
Globally update Sublocations based on genre category
Now that the genre names are entered as Sublocation values, you can use Destiny’s global update
capabilities to quickly populate the correct genre Sublocation value on the copies based on the genre
categories created earlier.
1. Log in to Destiny as a user that has Library Administrator or higher access rights.
2. Click the Catalog tab > Update Copies option.
3. Click the Global Update sub-tab.
4. In the With elds:
a. Select Category from the rst drop-down. Once you make this selection, the second eld becomes
a drop-down.
b. Select your rst genre category name from the second drop-down.
5. In the Make elds:
a. Select Sublocation from the rst drop-down. Once you make this selection, the second eld
becomes a drop-down.
b. Select the same genre name as you selected in step 4b from the second drop-down.
6. Verify that the genre values selected in both second drop-downs match. Click Update Copies.
You will see a warning that the process cannot be reversed. If you want to proceed, click Yes.
7. The Job Manager page lists the job as Global Update Copies. The status will indicate Pending.
Click the Refresh List link near the top center of the display. When the job status shows Completed,
you can click the View link to see the results of the job.
8. A report appears, indicating the number of copies that were updated and if any of the copies to be
updated were skipped. Use this report to verify that all the copies were updated. If any were skipped,
the details about which record was skipped and the reason appear below the Summary information.
You may need to resolve any issues and assign a genre Copy Category and/or Sublocation to a single
copy. The next section explains how to do this.

21
Follett School Solutions ©2019
Assign a genre Copy Category and Sublocation to a single copy
You may need to assign a genre Copy Category and/or Sublocation to a single copy in your collection.
1. Log in to Destiny as a user that has Library Administrator or higher access rights.
2. Click the Catalog tab > Library Search option.
3. Search for the copy you want to add the genre information to.
a. Click the Basic sub-tab to search for the copy by its Title.
b. Click the Barcode sub-tab to search for the copy by its Barcode Number.
4. Click the Edit icon to edit the copy.
To add a genre Copy Category:
1. In the Copy Categories section, click Update. Find the genre name you want to assign to this copy in
the list. Toward the right of the display, select the Assigned checkbox aligned with that genre name.
2. Click OK. That genre name now appears in the Copy Categories section.
To add a genre Sublocation:
1. Find the Sublocation drop-down toward the bottom of the display. Click the drop-down eld.
2. Select the desired genre name you want to assign to this copy.
3. Click Save Copy.
If the desired genre name is not in the list of values in the Sublocation drop-down, click Other.
1. In the Sublocation eld, click Other.
2. In the Add Sublocation eld, type the name of the genre you want to add. Click Save.
3. The genre name appears in the Sublocation drop-down.
4. Click Save Copy.
22
Follett School Solutions ©2019
Genre Planning Checklist
Task Person(s) responsible Date completed Notes
Dene the goals or
accomplishments that drive
why you are reorganizing the
collection by genre.
Speak with other librarians to
determine best practices and
problem areas.
Dene what in the collection
you will reorganize by genre.
Dene what genre groupings
you will use. Consider any
unique needs you want
to address.
Dene how you will identify
the genres on the materials
and shelves.
Dene the organization
and location of the genre
groupings in the library.
Dene the plan and process
you will use to manage and
perform the physical work of
reorganizing the collection.
Consider if you can
benet from any of the
Follett Managed
Genrecation Services.
Plan

23
Follett School Solutions ©2019
Task Person(s) responsible Date completed Notes
Use goals/accomplishments
to guide decision-making
throughout your preparation.
Weed the collection
(can be done up to a year
in advance).
After weeding, submit
your data to Titlewave
and request the Genre
Collection Report.
Use the Genre Collection
Report to map your
collection into your
dened genres.
Obtain labels, color
protectors, signage or other
materials used to identify the
genres on the shelves.
Temporarily label library
shelves to reect where
the genres will be after the
collection is reorganized.
Adjust as needed.
Create instructions to guide
volunteers/workers in the
tasks to be performed.
Obtain commitments from
volunteers/workers to
perform the work.
Organize the physical work
space to support volunteers/
workers in completing
the work.
Obtain any equipment and
supplies needed to perform
the work.
Schedule the work.
Prepare

24
Follett School Solutions ©2019
Task Person(s) responsible Date completed Notes
Document (at least in
outline form) all the
aspects of your plan.
Use your plan, decisions
and tools like the Genre
Collection Report to aid in
organizing the work as
it progresses.
Frequently spot-check the
work results. Make sure the
workers are completing the
work correctly. Coach and
train as needed.
Once the collection is
reorganized by genres,
populate the genre data
into Destiny.
Put your signage in place so
students and staff can nd
what they are looking for.
Celebrate and promote the
changes and benets with
your library patrons and
school staff.
Track the library activity,
looking for changes resulting
from the new organization of
the collection.
Execute

25
Follett School Solutions ©2019
Popular Fiction Genres, Titles and Authors
This section is a guide for individuals organizing a library collection by genre groupings. The genres reected
are examples of popular genres used in the grade levels indicated. Reviewing these characteristics can help
in deciding into which genre a title best maps. Genre selection can be very subjective and for some books
there may be more than one genre to consider for a title. The specics of your collection and curriculum can
equally inuence your decisions.
For each genre, there is:
• A brief description of titles that likely map into this genre
• The common characteristics found in titles that likely map into this genre
• Examples of popular titles/authors that are often found in the genre
Adventure
Common characteristics:
• Epic journeys or quests
• Action/danger/violence
• Survivals
Example titles/authors:
• Nim’s Island by Wendy Orr
• The Call of the Wild by Jack London
• If We Survive by Andrew Klavan
Animal Stories
Common characteristics:
• Often stories where the animals can talk or wear clothes
• Often stories about a person’s relationship or adventures with an animal
Example titles/authors:
• Clifford the Big Red Dog series
• Curious George series
Classics
Common characteristics:
• Published frequently, including internationally
• Frequently used texts in the classroom
• Frequently adapted
Example titles/authors:
• Johnny Tremain by Esther Forbes
• The Adventures of Huckleberry Finn by Mark Twain
• Charlotte’s Web by E.B. White
Dystopian
Common characteristics:
• Often takes place after an apocalyptic event in the future
• Obstacles include attacking aliens, robots, zombies, etc. and/or survival in an apocalyptic wasteland,
including disease outbreaks or totalitarian governments
• The protagonists’ goals are usually to help themselves and others survive or overthrow the antagonists
Example titles/authors:
• Empty World by John Christopher
• Divergent series by Veronica Roth

26
Follett School Solutions ©2019
Fantasy
Common characteristics:
• Epic quests
• Good versus evil
• Imaginary worlds and imaginary creatures
• Magic
• Human characters that interact with nonhuman characters
• Books featuring a monster from mythology, such as a minotaur or harpies, as a main plot element
without any mention or reliance on their birth mythology
Example titles/authors:
• The Harry Potter series by J.K. Rowling
• Where the Mountain Meets the Moon by Grace Lin
• The Fellowship of the Ring by J.R.R. Tolkien
Graphic Novel
Common characteristics:
• Can be one story or a story collection focusing on a particular characters or settings
• Can feature multiple authors and illustrators
• Often feature superheroes
• Original work or collection of previously published stories from comic magazine issues
Example titles/authors:
• The Unbeatable Squirrel Girl series
• Captain America series
• Bleach series by Tite Kubo
Historical Fiction
Common characteristics:
• Set in the past
• Fictional characters in a real setting
• Notable historical gures as characters
• Historical events used as plot elements
Example titles/authors:
• Sarah, Plain and Tall by Patricia MacLachlan
• Bud, Not Buddy by Christopher Paul Curtis
• The Glory Field by Walter Dean Myers
Horror/Scary Stories
Common characteristics:
• Death/the afterlife
• Suspense
• Unexpected incidents/surprise
• Dark and evil forces
• May have characters that are zombies, vampires, ghosts, werewolves, monsters, etc.
Example titles/authors:
• Coraline by Neil Gaiman
• The Goosebumps series by R.L. Stine
• The Graveyard Book by Neil Gaiman
• Miss Peregrine’s Home for Peculiar Children by Ransom Riggs

27
Follett School Solutions ©2019
Humor
Common characteristics:
• Humor may be blatant or subtle
• Outrageous situations and characters
• Parodies of existing books or other media
• Contains frequent jokes
Example titles/authors:
• Captain Underpants series by Dav Pilkey
• Diary of a Wimpy Kid series by Jeff Kinney
• Middle School series by James Patterson
Mystery
Common characteristics:
• Missing persons/objects
• Clues/evidence
• Crime/murder
• Detectives/investigators/amateur detectives
• Suspects
Example titles/authors:
• 39 Clues series by Rick Riordan
• Flush by Carl Hiaasen
• Paper Towns by John Green
Mythology
Common characteristics:
• Includes gods, heroes, monsters and other elements from mythology of any culture
• May feature stories taking place during the time of early mythology or contemporary characters dealing
with characters and elements from mythology
Example titles/authors:
• Percy Jackson series by Rick Riordan
• Hunters of Chaos series by Crystal Velasquez
• Hit the Road, Helen! by Kate McMullan
Poetry
Common characteristics: picture books that rhyme or juvenile one-story poems or retellings of famous poems
Example titles/authors:
• Martin Rising: Requiem for a King by Andrea Davis Pinkney
• Out of Wonder: Poems Celebrating Poets by Kwame Alexander
• The Firey Letters by Margarita Engle

28
Follett School Solutions ©2019
Realistic Fiction
Common characteristics:
• Believable situations featuring ctional characters
• Tackles issues that reect contemporary life
Example titles/authors:
• Because of Winn-Dixie by Kate DiCamillo
• Wonder by R.J. Palacio
• The Fault in Our Stars by John Green
Romance
Common characteristics:
• Emotionally satisfying and/or optimistic conclusion
• Love triangles
• Forbidden love
Example titles/authors:
• A Very Large Expanse of Sea by Tahereh Ma
• Everything, Everything by Nicola Yoon
Science Fiction
Common characteristics:
• Alien life, robots, machines
• Space exploration
• Imagined science/technology concepts
• Set in outer space, a fabricated world or different planets/universes
Example titles/authors:
• The Wild Robot Escapes by Peter Brown
• Leviathan by Scott Westerfeld
• Scythe by Neal Shusterman
Sports Fiction
Common characteristics:
• Main character participates in the sport
• Often has the main character faced with a moral issue related to the sport
• Antagonists play or are involved with the sport
Example titles/authors:
• Jake Maddox JV series
• Football Genius by Tim Green
• Booked by Kwame Alexander

29
Follett School Solutions ©2019
Popular Nonction Genres, Titles and Authors
This section is a guide for individuals organizing a library collection by genre groupings. The genres reected
are examples of popular genres used in the grade levels indicated.
Reviewing these characteristics can help in deciding into which genre a title best maps. Genre selection can
be very subjective and for some books there may be more than one genre to consider for a title. The specics
of your collection and curriculum can equally inuence your decisions.
For each genre, there is:
• A brief description of titles that likely map into this genre
• Examples of popular titles/authors that are often found in the genre
All About Me (Elementary)
This genre includes: human body, emotions, character development, mindfulness, life skills, coping, safety,
health, family, friendship and safety.
Example titles/authors:
• Not So Different: What You Really Want to Ask About Having a Disability by Shane Burcaw
• The Color Monster by Anna Llenas
• Germs: Fact or Fiction by Lesa Cline-Ransome
Ancient World (Secondary)
This genre includes: Ancient Egypt, Greece, Rome, Asia, Africa and Americas.
Example titles/authors:
• Ancient Chinese Culture by Paula Morrow
• Ancient America’s Lost Colonies by Frank Joseph
Animals
This genre includes: all animals.
Example titles/authors:
• Giant Squid by Candace Fleming
• Diving Bell Spiders by Meg Gaertner
• Misunderstood: Why the Humble Rat May Be Your Best Pet Ever by Rachel Toor
Around the World (Elementary)
This genre includes: geography, customs, country books, regions, landforms and cultures around the world.
Example titles/authors:
• Schools Around the World by Eleanor O’Connell
• This Is How We Do It: One Day in the Lives of Seven Kids from Around the World by Matt Lamothe
Biography
This genre includes: biographies, collective biographies, autobiographies and memoirs.
Example titles/authors:
• Dreamers by Yuyi Morales
• It’s Trevor Noah: Born a Crime by Trevor Noah
• Obsessed: A Memoir of My Life with OCD by Allison Britz

30
Follett School Solutions ©2019
Business & Finance (Secondary)
This genre includes: business enterprises and personal nance.
Example titles/authors:
• Amazon by Shannon Baker Moore
• Earning Information for Teens by Keith Jones and Angela L. Williams
Careers & College (Secondary)
This genre includes: careers and occupations, college guides and nancial aid.
Example titles/authors:
• Biologists in Action by Anne Rooney
• Colleges that Pay You Back by Robert Franek
Conservation & Environment (Secondary)
This genre includes: environmental conservation and protection, environmental science and
natural resources.
Example titles/authors:
• Global Warming by Erin L. McCoy
• Trashing the Planet: Examining Our Global Garbage by Stuart Kallen
Cooking & Food
This genre includes: science of food and cookbooks.
Example titles/authors:
• Grow! Raise! Catch! How We Get Our Food by Shelley Rotner
• Food Fight! A Mouthwatering History of Who Ate What and Why Through the Ages by Tanya Steel
• Chocolate: Sweet Science & Dark Secrets of the World’s Favorite Treat by Kay Frydenborg
Criminal Justice & Law (Secondary)
This genre includes: criminal investigations and the prison system.
Example titles/authors:
• Law & Justice by Charlie Ogden
• Crime (Changing Perspectives) by The New York Times Editorial
Curiosities & Wonders (Secondary)
This genre includes: fact books, trivia, miscellanea, almanacs and world records.
Example titles/authors:
• Knowledge Encyclopedia: The World as You’ve Never Seen It Before by DK
• 1,342 QI Facts to Leave You Flabbergasted (Quite Interesting) by John Lloyd, John Mitchinson,
James Harkin and Anne Miller
DIY
This genre includes: crafts, hobbies, construction, gardening and sewing.
Example titles/authors:
• Make This! Building, Thinking, and Tinkering Projects for the Amazing Maker in You by Ella Schwartz
• YouTube Channel by Virginia Loh-Hagan
• Fizz Boom Bath! Learn to Make Your Own Bath Bombs, Body Scrubs, and More! by Isabel Bercaw

31
Follett School Solutions ©2019
Dinosaurs (Elementary)
This genre includes: prehistoric animals and dinosaurs.
Example titles/authors:
• Where on Earth? Dinosaurs and Other Prehistoric Life: The Amazing History of Earth’s Most Incredible
Animals by DK
• Titanosaur: Discovering the World’s Largest Dinosaur by Diego Pol
Drama (Secondary)
This genre includes: American/multicultural drama, plays and anthologies.
Example titles/authors:
• Communicate! Memorable Lines by Dona Herweck Rice
• The Best Women’s Stage Monologues by Lawrence Harbison
Earth Science (Secondary)
This genre includes: rocks and minerals, atmosphere, water and geology.
Example titles/authors:
• Earth’s Atmosphere by Melissa Raé Shofner
• A Visual Guide to Volcanoes and Earthquakes by Diana Malizia
Economics (Secondary)
This genre includes: business, economics, international economics, money and monetary policy.
Example titles/authors:
• Fair Trade & Global Economy by Charlie Ogden
• How Money Works: The Facts Visually Explained by Beverly Blair Harzog
Fashion (Secondary)
This genre includes: fashion and accessories, style, clothing and dress.
Example titles/authors:
• Killer Style: How Fashion Has Injured, Maimed, & Murdered Through History by Serah-Marie McMahon
and Allison Matthews David
• Aimee Song: World of Style by Aimee Song
Folklore (Elementary)
This genre includes: fairytales, fables, tall tales, myths and folktales.
Example titles/authors:
• Celtic Gods, Heroes, and Mythology by June Smalls
• Cinderella by Stephanie Stansbie
Fun Facts (Elementary)
This genre includes: browsable reference and books on a variety of topics.
Example titles/authors:
• Weird but True! USA by National Geographic Kids
• National Geographic Little Kids First Big Book of Why (National Geographic Little Kids First Big Books)
by Amy Shields

32
Follett School Solutions ©2019
Games & Puzzles or Games & Gaming
This genre includes: games and activities, board games and video games.
Example titles/authors:
• I Spy Extreme Challenger by Jean Marzollo and Walter Wick
• Minecon by Josh Gregory
• Video Games and Culture by Carolyn Williams-Noren
Government & Civics
This genre includes: civics, elections, branches of government and citizenship.
Example titles/authors:
• What Is Citizenship? by Jessica Pegis
• Activism & Volunteering by John Wood
• Interpreting the Bill of Rights by Avery Elizabeth Hurt
Graphic Novels
This genre includes: comics, graphic novels, manga and superheroes.
Example titles/authors:
• The Unbeatable Squirrel Girl by Ryan North
• Hey, Kiddo by Jarrett Krosoczka
Health & Wellness
This genre includes: diet and nutrition, health and tness, exercise, diseases, illness and Injuries, depression
and mental illness.
Example titles/authors:
• Deadly Viruses by Erin McCoy
• Health Tech: The Apps and Gadgets Redening Wellness by New York Times Company
Holidays & Traditions (Elementary)
This genre includes: holidays, festivals and birthdays.
Example titles/authors:
• Every Month Is a New Year: Celebrations Around the World by Marilyn Singer
• Chinese New Year by Rachel Koestler-Grack
Life Science (Secondary)
This genre includes: biology, neuroscience, genetics, anatomy and physiology, plants, animals, zoology
and botany.
Example titles/authors:
• What Do You Know About Life Cycles? by Anna Claybourne
• DNA, RNA, and the Inheritance of Traits (Heredity and Genetics) by Don Rauf

33
Follett School Solutions ©2019
Literature
This genre includes: American/multicultural literature, essays, rhetoric, composition and creative writing,
literary criticism, parts of speech and alphabets.
Example titles/authors:
• Twenty-Odd Ducks: Why Every Punctuation Mark Counts! by Lynne Truss
• A Velocity of Being: Letters to a Young Reader by Maria Popova and Claudia Bedrick
• The Handy Literature Answer Book by Daniel Burt and Deborah Felder
Military
This genre includes: military history, military science, vehicles, weapons, aviation and warfare.
Example titles/authors:
• Sergeant Reckless: The True Story of the Little Horse Who Became a Hero by Patricia McCormick
• Going After Sparky!: Pararescue Jumpers Bring Vietnam War Pilot Home by John Perritano
• Animals Go to War: From Dogs to Dolphins by Connie Goldsmith
Music (Secondary)
This genre includes: classical, history and criticism and popular music.
Example titles/authors:
• Country Music: A Uniquely American Sound by Tamra B. Orr
• Story of African American Music by Andrew Pina
My State (Elementary)
This genre includes: books of specic interest to only one state.
Example titles/authors:
• Our California by Pam Muñoz Ryan
• People of Texas by Mary Dodson Wade
Mythology (Secondary)
This genre includes: myths, ancient world, fables, folklore, legends and gods.
Example titles/authors:
• Gods and Heroes: Mythology Around the World by Korwin Briggs
• Bulnch’s Medieval Mythology by Thomas Bulnch
Money & Business (Elementary)
This genre includes: economics, business, currency, nancial literacy, products, brands and companies.
Example titles/authors:
• If You Made a Million by David M. Schwartz
• Pocket Change: Pitching in for a Better World by Michelle Mulder
Native Americans (Elementary)
This genre includes: tribes and historical events.
Example titles/authors:
• Comanche by Katie Lajiness
• Apache by Valerie Bodden

34
Follett School Solutions ©2019
Our Earth (Elementary)
This genre includes: environment, conservation, plants, trees, seasons, biomes, ecosystems, oceans,
weather, rock, soil, earth science, natural resources and natural disasters.
Example titles/authors:
• Otis and Will Discover the Deep by Barb Rosenstock
• Hurricanes by Seymour Simon
Personal Growth (Secondary)
This genre includes: emotions, feelings, inspirational and personal growth, happiness, life skills,
responsibility, self-condence, self-esteem and self-reliance.
Example titles/authors:
• Getting Out and Getting Along: The Shy Guide to Friends and Relationships (Shy Guides) by
Karen Latchana Kenney
• Positively Teen by Nicola Morgan
• Girl Mogul: How to Create Success in All Areas of Your Life by Tiffany Pham
Philosophy (Secondary)
This genre includes: ways of thinking about the world, the universe and basic questions about the nature of
human thought.
Example titles/authors:
• Children’s Book of Philosophy: An Introduction to the World’s Great Thinkers and Their Big Ideas by DK
• Knowledge and Education by Tim Cooke
Physical Science (Secondary)
This genre includes: antimatter, chemistry, elements, energy, geology, matter, mechanical, organic chemistry,
periodic table and physics.
Example titles/authors:
• Astrophysics for Young People in a Hurry by Neil deGrasse Tyson
• Antimatter Explained by Richard Gaughan
Psychology (Secondary)
This genre includes: adolescence, family and relationships, human behavior, anxieties, phobias and PTSD.
Example titles/authors:
• Sleep, Dreams, and Your Brain (What Goes on Inside Your Brain?) by Robert Snedden
• Clocking In: The Psychology of Work (The Psychology of Everyday Life) by Rudy Nydegger
• Siblings: The Ultimate Teen Guide by Olivia Ghafoerkhan
• Life Sucks by Michael Bennett
Poetry
This genre includes: poetry and how to read and write poetry.
Example titles/authors:
• Out of Wonder by Kwame Alexander
• All the World by Liz Garton Scanlon
• What Is Poetry? The Essential Guide to Reading & Writing Poems by Michael Rosen

35
Follett School Solutions ©2019
Religions
This genre includes: world religions and Bible stories.
Example titles/authors:
• Noah’s Ark by Jerry Pinkney
• Bible Characters Visual Encyclopedia by DK
• Understanding the Nonreligious by Cynthia Kennedy Henzel
Social Issues
This genre includes: current issues, immigration, bullying, prejudice and racism, social activists, refugees
and family violence.
Example titles/authors:
• Where Will I Live? by Rosemary McCarney,
• Black Lives Matter by Duchess Harris
• Immigration Nation by Judy Dodge Cummings
• Gun Violence by Natalie Hyde
Space
This genre includes: space science, aeronautics, asteroids, astronomy and outer space exploration.
Example titles/authors:
• To the Moon! by Jeffrey Kluger and Ruby Shamir
• What’s Inside a Black Hole? by Tom Jackson
• Asteroids, Meteors, Meteorites, and Comets (Universe and Our Place in It) by Nicholas Faulkner
and Erik Gregersen
Sports
This genre includes: sports teams, how to play and history of the sport.
Example titles/authors:
• We Are the Ship: The Story of Negro League Baseball by Kadir Nelson
• The NBA Playoffs by Matt Doeden
• Athletes, Ethics, and Morality (Opposing Viewpoints) by Martin Gitlin
STEM
This genre includes: articial intelligence, computers and technology, engineering, inventions, robotics,
science, experiments, energy and electricity.
Example titles/authors:
• Energy Island: How One Community Harnessed the Wind and Changed Their World by Allan Drummond
• Animal-Inspired Robots by Robin Koontz
• How 3D Printing Will Impact Society by Cecilia Pinto McCarthy
Supernatural (Secondary)
This genre includes: ghosts, paranormal, angels, demons, witchcraft, human interaction with spirits,
debunked theories and exposed hoaxes.
Example titles/authors:
• Unexplained: Aliens and UFOs by Theo Baker
• Unexplained: Freaky Phenomena by Grace Ramsey
• Embedded with the Paranormal Paramilitary: Riding with Mediums, Spirit Seekers, and Ghost Hunters
by John B. Kachuba

36
Follett School Solutions ©2019
The Arts (Elementary)
This genre includes: ne arts, dance, theater, music, reader’s theater, movies and TV.
Example titles/authors:
• Ada’s Violin: The Story of the Recycled Orchestra of Paraguay by Susan Hood
• A Child’s Introduction to Art: The World’s Greatest Paintings and Sculptures by Heather Alexander
Transportation
This genre includes: automobile racing, aviation, cars, trucks, railroads, trains, ships, shipbuilding
and automobiles.
Example titles/authors:
• Locomotive by Brian Floca
• British Supercars by Paul Mason
• Convertibles: Sun, Wind & Speed by Michael Benson
True Crime (Secondary)
This genre includes: computer crimes, gangs, organized crime, criminal investigation, forensics, DNA
analysis and ngerprinting.
Example titles/authors:
• Top Secret Science in Cybercrime and Espionage by Ellen Rodger
• Clues in Corpses: A Closer Look at Body Farms (Crime Scene Investigations) by Sophie Washburne
U.S. History
This genre includes: U.S. history spanning from America in precolonial times to the 21st century.
Example titles/authors:
• Separate Is Never Equal: Sylvia Mendez and Her Family’s Fight for Desegregation by Duncan Tonatiuh
• George Washington’s Secret Six: The Spy Ring That Saved the American Revolution by Brian Kilmeade
and Don Yaeger
• Desegregation in Little Rock: Executive Order 10730 by Bethany Bryan
When I Grow Up (Elementary)
This genre includes: careers and community helpers.
Example titles/authors:
• Look I’m a Scientist by DK
• State Troopers by Meish Goldish
• Doctors in My Community by Bridget Heos

37
Follett School Solutions ©2019
World History
This genre includes: historical events and movements that impact the world. It examines history from a
global perspective, including exploration and discovery.
Example titles/authors:
• Hands Around the World: Protecting Egypt’s Treasured Books by Susan L. Roth
and Karen Leggett Abourya
• Piracy: From the High Seas to the Digital Age by Jennifer Lombardo
• The History of Russia from 1801 to Present by Rosina Beckman
World Languages
This genre includes: world languages, sign language and how to learn another language.
Example titles/authors:
• My First Book of Chinese Words by Faye-Lynn Wu
• Passport to the World: Your A to Z Guided Language Tour by Craig Froman
• Babel: Around the World in Twenty Languages by Gaston Dorren

38
Follett School Solutions ©2019
Questions and Answers
As you begin thinking and planning about how to categorize your collection, here are some questions and
answers you might nd helpful.
Our library has a lot of series titles. Our students like to read through the series of popular titles. How
do I make it easy for them to nd series titles when organized by genre?
Look at your challenge and ask, “What is the simplest solution that addresses the need?” At Follett, we have
arranged series titles in order within the main genre. Consider the advantages and disadvantages of that
approach against your driving purposes. An alternate approach is to create a series genre section located
directly next to the main genre. For example, a library with a “Science Fiction” genre section would dene a
“Science Fiction Series” genre section right next to it. If a driving purpose is to make it easier for students to
nd the materials they want, consider an approach that best supports that goal.
Our library has a lot of foreign language materials. How do I organize foreign language material
in genres?
In a manner similar to the previous series situation, consider your driving purposes and what organization of
your foreign language titles best accomplishes what you want. Follett has used similar approaches for foreign
language materials as we have for series.
Our library serves students in Grades K-5. Our younger students like picture books.
Our older students like chapter books. How do we organize the collection to meet both
their needs?
We at Follett have seen picture books as their own genre section, separating them from chapter books, and
we have seen picture books in the genre sections with the chapter books. If you have a particularly large
picture book collection and choose to make them their own genre section, consider how to organize them
within the genre section so students can nd what they’re looking for.
