
1
Cat® S42
User Manual

2
PLEASE READ BEFORE FIRST USE SAFETY PRECAUTIONS
• Please read this manual and the recommended safety precautions carefully to ensure the correct use of this
device.
• If used in salt water, rinse the device afterwards, including the audio jack and the USB connector, to avoid
salt corrosion.
• Despite its rugged nature; avoid hitting, throwing, crushing, puncturing or bending the device.
• Do not switch on the device in a circumstance when it is prohibited to use devices, or when it may cause
interference or danger.
• Never use your device while driving.
• Always follow any device use rules in hospitals and health care facilities, and switch off near medical
apparatus.
• Switch off the device or activate aeroplane mode when in an aircraft, as it may cause interference to the
vessel’s control equipment.
• Switch off your device near high-precision electronic devices as it may affect their performance.
• Do not attempt to disassemble your device or its accessories; only qualified personnel should service or
repair it, if needed.
• Do not place the device or its accessories in containers with a strong electromagnetic field.
• Do not place magnetic storage media near the device. Radiation from the device may erase the information
stored on it.
• Do not use the device in an environment with flammable gas, such as a gas station, or put the device in a
high temperature place.
• Keep the device and its accessories away from young children. Do not allow children to use the device
without guidance.
• Only use approved chargers to avoid the risk of explosion.
• Observe any laws or regulations on the use of wireless devices, respecting others’ privacy and legal rights.
• For medical implant patients (heart, joints, etc), keep the device 15cm away from the implant and positioned
on the opposite side of the implant.
• Strictly follow the relevant instructions of this manual while using the USB cable, otherwise your device or PC
may be damaged.
• The full text of the safety instruction is available at the following internet address:
https://www.catphones.com/support/

3
LEGAL NOTICE
© 2020 Caterpillar. All Rights Reserved.
CAT, CATERPILLAR, LET’S DO THE WORK, their respective logos, "Caterpillar Yellow", the "Power Edge" and Cat
“Modern Hex” trade dress as well as corporate and product identity used herein, are trademarks of Caterpillar
and may not be used without permission.
Bullitt Mobile Ltd. is a licensee of Caterpillar Inc.
Bullitt Mobile Ltd.’s and third-party trademarks are the property of their respective owners.
No part of this document may be reproduced or transmitted in any form or by any means without prior
written consent of Caterpillar Inc.
The product described in this manual may include copyrighted software and possible licensors. Customers
shall not in any manner reproduce, distribute, modify, decompile, disassemble, decrypt, extract, reverse
engineer, lease, assign, or sublicence the said software or hardware, unless such restrictions are prohibited by
applicable laws or such actions are approved by respective copyright holders under licences.
The contents of this manual are provided “as is”. Except as required by applicable laws, no warranties of any
kind, either express or implied, including but not limited to the implied warranties of merchantability and
fitness for a particular purpose, are made in relation to the accuracy, reliability or contents of this manual.
To the maximum extent permitted by applicable law, in no case shall the manufacturer be liable for any
special, incidental, indirect, or consequential damages, or lost profits, business, revenue, data, goodwill or
anticipated savings.
The Bluetooth® word mark and logos are registered trademarks owned by the Bluetooth SIG, Inc. and any use
of such marks by Bullitt Group Ltd is under licence. All other third-party trademarks and trade names are those
of their respective owners.
Google, Android, Google Play and other marks are trademarks of Google LLC.
NOTICE
Some features of the product and its accessories described herein rely on the software installed, capacities and
settings of local network, and may not be activated or may be limited by local network operators or network
service providers. Therefore, the descriptions in this manual may not exactly match the purchased product or
its accessories.
The manufacturer reserves the right to change or modify any information or specifications contained in this
manual without prior notice or obligation.

4
The manufacturer is not responsible for the legitimacy and quality of any products that you upload or
download through this device including text, pictures, music, movies, and non-built-in software with copyright
protection. Any consequences arising from the installation or usage of the preceding products on this device is
accountable to you.
IMPORT AND EXPORT REGULATIONS
Customers shall comply with all applicable export or import laws and regulations. Customers must obtain all
necessary governmental permits and licences to export, re-export or import the product mentioned in this
manual including the software and technical data.
5
CONTENTS
WELCOME TO THE CAT® S42 ....................................................................................................................... 7
RUGGED CREDENTIALS ............................................................................................................................... 7
WHAT’S IN THE BOX ................................................................................................................................... 8
KEY FUNCTIONS ......................................................................................................................................... 9
GETTING STARTED...................................................................................................................................... 9
INSTALLING SIM CARD(S) AND MEMORY CARD .................................................................................................. 9
CHARGING THE BATTERY .......................................................................................................................... 10
IMPORTANT INFORMATION REGARDING FUTURE USE OF THE BATTERY .................................................... 10
POWERING YOUR DEVICE ON/OFF ............................................................................................................ 10
TOUCHSCREEN ......................................................................................................................................... 11
HOME SCREEN ......................................................................................................................................... 11
LOCKING AND UNLOCKING THE SCREEN .................................................................................................... 11
LOCKING THE SCREEN ........................................................................................................................................11
UNLOCKING THE PHONE ....................................................................................................................................11
DISPLAY ................................................................................................................................................... 12
DISPLAY LAYOUT ................................................................................................................................................12
NOTIFICATIONS AND STATUS INFORMATION ...................................................................................................12
NOTIFICATION PANEL ............................................................................................................................... 13
SHORTCUT ICONS ..................................................................................................................................... 13
WIDGETS ................................................................................................................................................. 14
FOLDERS .................................................................................................................................................. 14
WALLPAPERS ........................................................................................................................................... 14
TRANSFERRING MEDIA TO AND FROM YOUR DEVICE ................................................................................ 14
USING FLIGHT MODE ................................................................................................................................ 15
MAKING A PHONE CALL............................................................................................................................ 15
CONTACTS ............................................................................................................................................... 16
USING THE ON-SCREEN KEYBOARD ........................................................................................................... 18
DISPLAYING THE KEYBOARD PANEL ..................................................................................................................18
USING THE LANDSCAPE KEYBOARD ...................................................................................................................18
CUSTOMISING YOUR KEYBOARD SETTINGS ......................................................................................................18
WI-FI®...................................................................................................................................................... 18
SMS AND MMS ........................................................................................................................................ 18
BLUETOOTH® ........................................................................................................................................... 20
TAKING PHOTOS AND RECORDING VIDEOS ............................................................................................... 21
ENJOYING MUSIC .................................................................................................................................... 23
LISTENING TO FM RADIO .......................................................................................................................... 23
USING GOOGLE SERVICES ......................................................................................................................... 24
6
USING GOOGLE PLAY STORE ..................................................................................................................... 25
SYNCHRONISING INFORMATION............................................................................................................... 26
USING OTHER APPS .................................................................................................................................. 27
MANAGING THE DEVICE ........................................................................................................................... 29
SETTING THE DATE AND TIME ...........................................................................................................................29
PERSONALISING THE DISPLAY ................................................................................................................... 29
SETTING YOUR RINGTONE ........................................................................................................................ 30
SETTING PHONE SERVICES ........................................................................................................................ 31
USING NFC ............................................................................................................................................... 31
PROTECTING THE DEVICE.......................................................................................................................... 31
MANAGING APPS ..................................................................................................................................... 32
RESETTING THE DEVICE ............................................................................................................................ 32
APPENDIX ................................................................................................................................................ 33
VIEWING THE E-LABEL .......................................................................................................................................33
PREVENTION OF HEARING LOSS ........................................................................................................................33
EMERGENCY CALL ..............................................................................................................................................34
CE SAR COMPLIANCE .........................................................................................................................................34
FCC REGULATION ...............................................................................................................................................35
RF EXPOSURE INFORMATION (SAR) ..................................................................................................................36
DISPOSAL AND RECYCLING INFORMATION .......................................................................................................37
REDUCTION OF HAZARDOUS SUBSTANCES .......................................................................................................37
EU REGULATORY CONFORMANCE .....................................................................................................................38
EU COMPLIANCE STATEMENT ...........................................................................................................................38
UKCA REGULATORY CONFORMANCE…………………………………………………………………………………………………………. 38
SPECTRUM AND POWER TABLE .........................................................................................................................38
UKCA REGULATORY CONFORMANCE…………………………………………………………………………………………………………..39
UKCA COMPLIANCE STATEMENT…………………………………………………………………………………………………………………39
CAT® S42 SPECIFICATION ...................................................................................................................................39

7
WELCOME TO THE CAT® S42
The Cat S42 is a remarkable workhorse.
Whether you’re in the police force, or a first responder keeping us safe...
Or you work in a hospital and hygiene is your priority...
Or you’re a construction worker and you need a phone that’s tough enough to survive a building site, day after
day...
The Cat S42 is robust and reliable.
It's not just tough on the outside, it's sleek and sophisticated on the inside too.
This latest addition to the Cat phones portfolio includes notable upgrades. Faster connectivity, a better
camera, and more memory.
We designed the Cat S42 for dependability in extreme situations. With extended battery life, and a big bright
screen you can read in full sunlight and that works with gloves on, and of course it’s drop-proof.
And you can scrub it with hot water and soap. Useful in these times of essential hygiene vigilance.
Giving the protection and reliability you can expect from our Cat rugged credentials.
RUGGED CREDENTIALS
DROPPING YOUR DEVICE:
• Do: Use your device up to a height of 1.5 metres – it’s drop proof within this height range.
• Don’t: Throw it with force, or drop from above the 1.5 metre range – it’s durable, but not indestructible.
WATERPROOFING:
• Do: Use your device in damp and wet conditions. Ensure all components and covers are properly closed
before using in water. The device can withstand a depth of 1.5 metres, for up to 35 minutes.
• Don’t: Attempt to use it for longer than 35 minutes in 1.5 metres depth or beyond a 1.5 metre depth.
DUSTPROOF AND SCRATCHPROOF:
• Do: Use your device in dirty, dusty environments. The Cat® S42 is certified IP68, an industry standard
measure for durability.
EXTREME TEMPERATURES:
• Do: Use your device within the operational temperature range of -25º C to + 55º C. It can also handle
extreme changes in temperature: shifting between cold and hot, or vice versa very quickly.
• Don’t: Use it outside the range of 0º C to + 45º C without the use of protective gloves.

8
WHAT’S IN THE BOX
• Device
• Quick start guide
• Warranty
• USB power cable
• Factory-fitted screen protector (already on device)
Note:
Your device comes with a factory-fitted screen protector. Please ensure that the screen protector remains in
place. Removal of the screen protector may mean that any subsequent damage requiring repairs will be
considered to be ‘Out of Warranty’.
Please visit https://www.catphones.com/screen-protectors should you require a replacement screen
protector.
1. Earpiece
7. Programmable Key
2. Headset Jack
8. Speaker
3. Volume Up/Down Keys
9. USB Port
4. Power button
10. Microphone
5. Flash
11. SIM/SD door
6. Rear Camera
12. Front Camera

9
KEY FUNCTIONS
VOLUME UP/DOWN KEY
• Volume – press the Volume Up key to increase, or the Volume Down key to decrease the volume of the call,
ringtone, media or alarm
• Screenshot – press Power and Volume Down keys simultaneously (Screenshots are saved in the photo
album)
• Camera app – press Volume Up or Down key to take photo.
GETTING STARTED
INSTALLING SIM CARD(S) AND MEMORY CARD
1. Place your device on a flat, clean surface with the display facing upwards.
2. Use your fingertip to pull out the SIM/SD door and the SIM/SD tray.
3. Place the SIM card in the SIM 1/ SIM 2 tray with gold pins of the SIM card (facing down).
4. If you would like to use a microSD card, place this on the microSD tray with gold pins of the memory card
also facing down.
5. Carefully insert the tray back into the SIM card slot and reposition the door.
NOTE
• Push the SIM/SD door back in until it is fixed securely.
Some devices take two SIM cards.
When two SIM cards are inserted, both SIM card slots can support 4G/3G service.

10
CHARGING THE BATTERY
The S42 battery cannot be removed from the device. To charge it:
1. Connect the USB power cable to the charging power adapter.
Only use Cat® phone approved chargers and cables. Unapproved equipment may cause damage to the device
or the battery and it will void the warranty.
2. Battery indicator changes from red to green when charging is completed.
IMPORTANT INFORMATION REGARDING FUTURE USE OF THE
BATTERY
When the battery power level is low, the device displays a prompt. When the battery power is almost
exhausted, your device will power off automatically. The time required to charge the battery depends on its
age and the environmental temperature.
If the battery is completely exhausted, your device may not power on immediately after charging starts. Allow
the battery to charge for a few minutes before attempting to turn it on. The on-screen charge animation may
not be displayed during this period.
POWERING YOUR DEVICE ON/OFF
POWER ON
• Press and hold the Power Key to turn on your phone.
The first time you turn on your phone, you will see a Welcome Screen. Select your preferred language and tap
START to continue the set-up.
• Press and hold to open the power off options (Power off/ Restart/ Screenshot) when the device is on.
• Press to lock or wake the screen when the device is idle.
• Press twice to open the Camera app when the device is locked.
NOTE:
• A Wi-Fi or Data connection is required to access data and services.
• If personal identification number (PIN) protection is enabled on your SIM Card, you will be asked to enter
your PIN before the Welcome Screen.

11
• A Google™ account is required to use some of the Google services on your device. You will be asked to sign in
with your existing Google account, or set up a new account later.
POWER OFF
1. Press and hold the Power Key to open the Power Off options menu.
2. Tap Power off.
TOUCHSCREEN
TOUCHSCREEN ACTIONS
• Tap: Use your finger to select an item, confirm a selection or start an app on the screen.
• Tap and hold: Tap an item with your finger and continue to press until the screen responds (e.g. to open the
options menu for the active screen, tap the screen and hold until the menu appears).
• Swipe: Move your finger across the screen either vertically or horizontally (e.g. swipe left or right to switch
between pictures).
• Drag: To move an item, tap and hold it with your fingertip then drag it to any part of the screen.
HOME SCREEN
The Home Screen is the starting point for accessing your device’s features. It displays app icons, widgets,
shortcuts and more.
You can customise your Home Screen with different wallpapers and adjust it to display your preferred items.
LOCKING AND UNLOCKING THE SCREEN
LOCKING THE SCREEN
1. If your device is turned on, press the Power Key to lock the screen. You can still receive messages and calls if
the screen is locked.
2. If the device is left undisturbed for a certain period, the screen will lock automatically. You can adjust the
length of this in the setting menu.
UNLOCKING THE PHONE
• Press the Power key to wake up the screen. Swipe up to unlock the screen. Enter pattern or PIN code if pre-
set.
12
DISPLAY
DISPLAY LAYOUT
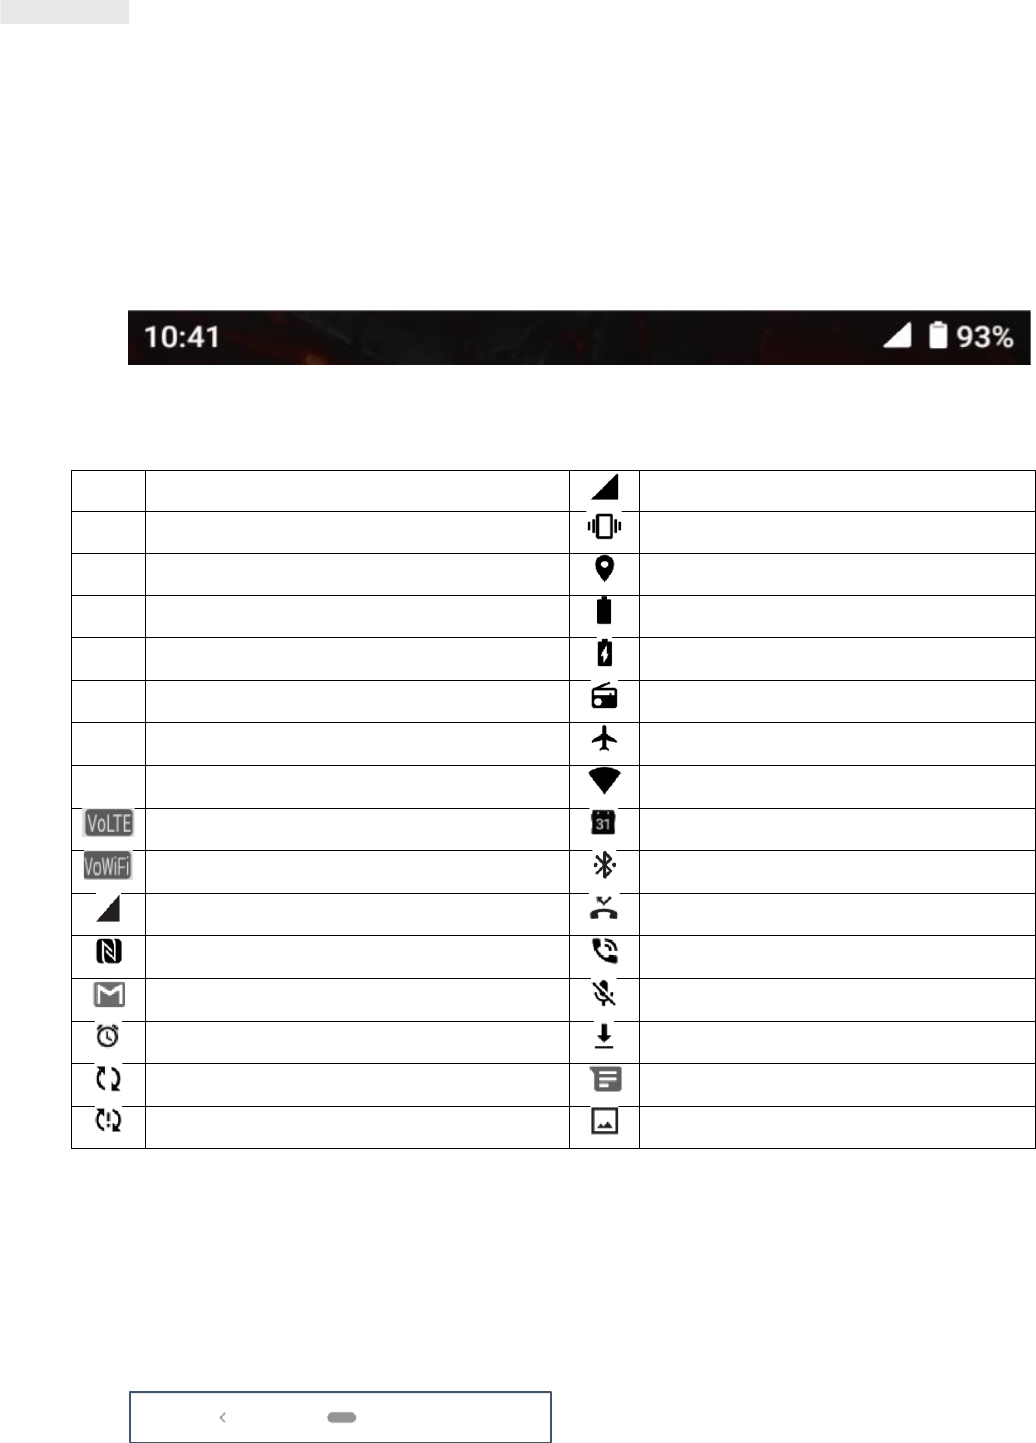
NOTIFICATIONS AND STATUS INFORMATION
The Status Bar appears at the top of every screen. This displays notification icons, such as missed calls or
received messages (on the left) and phone status icons, such as battery status (on the right), along with the
current time.
STATUS ICONS
NOTIFICATIONS ICONS
4G
Connected to 4G mobile network
Cellular signal
LTE
Connected to LTE mobile network
Vibrate mode
3G
Connected to 3G mobile network
Location service is being used
G
Connected to GPRS mobile network
Battery is full
E
Connected to EDGE mobile network
Battery is charging
H
Connected to HSDPA mobile network
FM radio is turned on
H+
Connected to HSPA+ mobile network
Airplane mode
R
Roaming
Connected to a Wi-Fi network
VoLTE
Upcoming event
VoWiFi
Connected to a Bluetooth device
Mobile network signal strength
Missed call
NFC enabled
Speakerphone is activated
New email message
Phone microphone is muted
Alarm is set
Downloading data
Data is syncing
New text message
Problem with sign-in or sync
A Screenshot is captured
NAVIGATION BAR
The navigation bar is located at the bottom of the screen. While the device is in full screen mode, please swipe
up from the bottom of the device to make the navigation bar appears.
• If you would like to access recently used apps, please swipe up from the bar.

13
The bar contains two main soft buttons:
Back Button
• Tap to return to the previous screen.
Home Button
• Tap to return to the home screen
• Tap and hold to activate Google assistant
NOTIFICATION PANEL
You will get a notification when you receive a new message, miss a call, or have an upcoming event. Open the
notification panel to see alarms, wireless network operators or to view a message, reminder or event
notification.
OPENING THE NOTIFICATION PANEL
1. When a new icon appears, swipe down the notification panel and then drag down to open the notification
panel.
2. Tap a notification to open the related app.
CLOSING THE NOTIFICATION PANEL
1. To close the notification panel, slide the bottom of the panel upwards.
2. To close a notification (without viewing), hold the notification and drag it to the left/right of the screen.
NOTE:
• Notifications preferences can be changed in Settings > Apps & notifications.
SHORTCUT ICONS
ADDING A NEW HOME SCREEN ITEM
1. From the Home Screen, swipe up.
2. To add an item to your Home Screen, drag its icon to your chosen position.
MOVING A HOME SCREEN ITEM
1. Tap and hold an app icon on the Home Screen until it moves.
2. Without lifting your finger, drag the icon to the chosen position on the screen, then release it.
NOTE:
•There must be enough space for an icon to fit on the Home Screen panel.
REMOVING A HOME SCREEN ITEM
1. Tap and hold an app icon on the Home Screen until it moves.
2. Without lifting your finger, drag the icon to Remove, then release.

14
WIDGETS
A widget lets you preview, or use an app. You can place widgets on your Home Screen as icons or preview
windows. Several widgets are already installed on your phone, while more can be downloaded from Google
Play.
ADDING A WIDGET
1. Tap and hold the Home Screen.
2. Tap the Widgets option to see what is available.
3. Drag your chosen widget to the Home Screen.
REMOVING A WIDGET
1. Tap and hold the widget icon on the Home Screen until it moves.
2. Without lifting your finger, drag the icon to Remove at the top of the screen, then release.
FOLDERS
CREATING A FOLDER
You can group certain apps on your Home Screen by dragging an icon or shortcut and releasing it on top of
another. This will create a new folder that you can add to as you choose.
RENAMING A FOLDER
1. Tap a folder to open it.
2. Enter a new folder name in the title bar.
3. Then touch the screen anywhere outside of the folder.
WALLPAPERS
CHANGING YOUR WALLPAPER
1. Tap and hold the Home Screen.
1. Tap Wallpapers.
2. Scroll through the available options.
3. Tap Set Wallpaper on chosen image – then choose whether to set it as Lock Screen wallpaper, Home
Screen wallpaper or both.
TRANSFERRING MEDIA TO AND FROM YOUR DEVICE
Transfer your favourite music and pictures between your device and PC in Media Device MTP mode.
1. Connect your device to your PC with the USB power cable.
2. Open the notification panel and the USB connection options. Tap Charging this device via USB to access
more options.

15
3. Tap File transfer to share files to/from your PC.
4. Your device should be displayed as a removable device displaying the phone’s internal storage. If a memory
card is inserted, microSD card will also be visible. Copy the chosen files to your device.
Your device will be displayed as a removable device, showing the phone’s internal storage. If a memory card is
inserted, the microSD card details will also be visible.
NOTE:
• If you are using a MAC, the drivers must be downloaded from: http://www.android.com/filetransfer/
USING FLIGHT MODE
Some locations may require you to switch off data connections. Instead of turning off your device, you can set
it to Flight Mode.
1. From the Home Screen, swipe down the notification panel and tap to switch on Flight mode.
NOTE:
• You can also access Flight Mode from the Setting menu.
MAKING A PHONE CALL
There are multiple ways to place a call. You can either:
1. Dial a number into the keypad.
2. Select a number from your contacts list.
3. Select a number from a web page or document that contains a phone number.
NOTE:
• When you’re on a call, you can either answer incoming calls or send them to your voicemail. You can also set
up conference calls with several participants.
• When you’re on a call, press the Home button to return to the Home Screen and use other functions. To
return to the calling screen, drag the notification bar down and tap Current call.
MAKING A PHONE CALL WITH THE KEYPAD
1. From the Home Screen, tap . Then tap to show the keypad.
2. Tap the numeric keys to dial the phone number.
3. After you enter the number, or select the contact, tap .
Tip: Your device supports the SmartDial function. As you type a number into the keypad, it automatically
searches your contacts and lists options for ones that match the number. You can close the keypad to view
more possible matches.
MAKING A PHONE CALL FROM CONTACTS

16
1. Swipe up from the Home Screen > Contacts to display the contact list. From the keypad, tap the tab to
see the contact list.
2. Select a contact.
3. Tap the phone number to call the contact.
MAKING A PHONE CALL FROM THE CALL LOG
1. Swipe up from the Home Screen > Phone to see a list of latest calls. If you cannot find the desired
contact, tap > Call history to display all call history.
2. Select a contact from the list and tap to make a call.
ANSWERING AND REJECTING A PHONE CALL
When you receive a phone call, the incoming call screen will show the caller ID, and any additional caller
information that you have entered in Contacts.
• To answer a call, tap ANSWER.
• To reject the call, tap DECLINE.
• To reject the call and send a message directly to the caller, tap the call notification banner and then tap .
Select one of the available template message options or tap Write your own to compose a personal message.
ENDING A PHONE CALL
During a phone call, press Hang up to hang up.
CONTACTS
The Contacts app lets you save and manage information about your contacts.
OPENING THE CONTACTS APP
When you set up the device, Contacts will display a message outlining how to start adding contacts. To open
the app, do one of the following:
• Swipe up from the Home Screen and then tap Contacts .
• All of your contacts are displayed alphabetically in a scrolling list. Tap on them to see more details.
COPYING CONTACTS
You can copy your contacts from the SIM card or saved in internal storage or a memory card.
1. In the contacts list, tap > Settings > Import.
2. Do one of the following:

17
• To import contacts from the SIM card:
Tap SIM card. Select the contact(s) and tap IMPORT to import the selected contact(s).
• To import contacts from the internal storage or memory card:
Tap .vcf file. Select the location where to import the contacts and tap the *.vcf file to import the contacts.
BACK UP CONTACTS
You can copy contacts to internal storage.
1. In the contacts list, tap > Settings > Export.
2. Select the location where to save the contacts and tap SAVE.
ADD A NEW CONTACT
1. In the contacts list, tap to add a new contact.
2. Enter the contact’s name, and then add any detailed information such as phone number or address.
3. Tap Save to store the contact information.
ADDING A NEW CONTACT TO YOUR FAVOURITES
1. Tap the contact you want to add to Favourites.
2. Tap at the top right corner.
SEARCHING FOR A CONTACT
1. In the contacts list, tap Search contacts to search for a contact.
2. Enter the name of the contact for which you are searching. As you type, contacts with matching names
appear below the search box.
EDITING A CONTACT
You can always make changes to the information you have stored for a contact.
1. In the contacts list, tap the contact you want to edit.
2. Tap Edit contact.
3. Make the desired changes to the contact information, then tap Save. To cancel any changes press X.
DELETING A CONTACT
1. In the contacts list, tap the contact you want to delete.
2. Tap > Delete.

18
3. Tap Delete again to confirm.
USING THE ON-SCREEN KEYBOARD
DISPLAYING THE KEYBOARD PANEL
Some apps open the keyboard automatically. In others, tap a text field to open the keyboard. Press the Back
button to hide the keyboard.
USING THE LANDSCAPE KEYBOARD
If you find it difficult to use the keyboard in portrait orientation, simply turn the device sideways. The screen
will now display the keyboard in landscape orientation, providing you with a wider keyboard layout.
CUSTOMISING YOUR KEYBOARD SETTINGS
1. Swipe up from the Home Screen > Settings > System > Languages & input.
2. Do any of the following:
• Tap Virtual keyboard to configure the Google keyboard and Google voice typing settings.
• Tap Physical keyboard to configure the external keyboard settings.
• Tap Advanced to access the input assistance related settings.
WI-FI®
Access to wireless access points (hotspots) is required to use Wi-Fi on your device.
TURNING ON WI-FI AND CONNECTING TO A WIRELESS NETWORK
1. Swipe up from the Home Screen > Settings > Network & Internet.
2. Tap Wi-Fi and slide the Wi-Fi switch to the right .
3. Choose a Wi-Fi network to connect to from the list.
4. If you select an open network, the device will connect automatically. If you select a network that is secured,
you must enter a password and tap Connect.
NOTE:
• You will not have to re-enter the password for a secured network if you have connected to it before, unless
the device has been reset to its default settings, or if the Wi-Fi password has been changed.
• Obstacles blocking the Wi-Fi signal will reduce its strength.
Tip: On the Wi-Fi settings screen, tap + Add network to add an invisible Wi-Fi network.
SMS AND MMS
OPENING MESSAGING
To open the app, do one of the following:

19
• Tap on the Home Screen.
• Swipe up from the Home Screen > Messages .
CREATING AND SENDING A TEXT MESSAGE
You can create a new text message or open an ongoing message thread.
1. Tap Start Chat to start a new text message or tap an existing message thread to open it.
2. Enter a phone number or contact name into the To field. When you type, the SmartDial will attempt to
match it with the device’s contacts. Either tap a suggested recipient or continue to type. If you want to open
an existing message thread, simply tap it.
3. Tap the text box to compose your message. If you press the Back button while composing a message, it
will save as a draft in the message list. Tap the message to resume.
4. When your message is ready to send, tap .
NOTE:
• As you view and send additional messages, a message thread is created.
CREATING AND SENDING A MULTIMEDIA MESSAGE
1. On the messaging screen, tap Start Chat.
2. Enter a phone number or contact name into the To field, or scroll down the contact list to find the contact
you wish to message. Tap to start a group conversation.
3. Tap the text box to compose a message.
4. Tap again and select the type of media file. Select the file to attach.
5. Your device is now in multimedia mode. Once you’re done, tap .
OPENING AND REPLYING TO A MESSAGE
1. In the message list, tap a text or multimedia message thread to open it.
2. Tap the text box to compose a message.
3. When ready, tap .
CUSTOMISING THE MESSAGE SETTINGS
In the message list, tap > Settings to customise your message settings. Choose from:
Default SMS app: Specify the default SMS app (Messages is default)

20
BLUETOOTH®
Your Cat® S42 device has Bluetooth. It can create a wireless connection with other Bluetooth devices, so you
can share files with your friends, talk hands-free with a Bluetooth headset, or even transfer photos from your
device to a PC.
If you are using Bluetooth, remember to stay within 10 metres of the Bluetooth device you want to connect to.
Be aware that obstacles like walls or other electronic equipment may interfere with the Bluetooth connection.
TURNING ON BLUETOOTH
1. Swipe up from the Home Screen > Settings > Connected devices.
2. Tap Connection preference > Bluetooth and slide the switch to the right to enable the function.
When Bluetooth is turned on, the Bluetooth icon appears in the notification bar.
PAIRING AND CONNECTING A BLUETOOTH DEVICE
Bluetooth lets you do the following:
• Use a hands-free Bluetooth device.
• Use a mono or stereo Bluetooth headset.
• Control what plays through the Bluetooth headset remotely.
Before you use Bluetooth, you need to pair your device with another Bluetooth device as follows:
1. Ensure that the Bluetooth function on your device is enabled.
2. Tap + Pair new device. Your device will then search for Bluetooth devices in range.
3. Tap the device you want to pair with.
4. Follow the on-screen instructions to complete the connection.
NOTE:
• Once a partnership has been created, you will no longer have to enter a password if you connect to that
Bluetooth device again.
SENDING FILES VIA BLUETOOTH
With Bluetooth, you can share pictures, videos, or music files with family and friends. To send files via
Bluetooth:
1. Tap the file you want to send.
2. Tap > Bluetooth, then select a paired device.
DISCONNECTING OR UNPAIRING A BLUETOOTH DEVICE
1. Swipe up from the Home Screen > Settings > Connected devices.

21
2. Tap Previously connected devices.
3. Tap and then tap FORGET to confirm the disconnection.
TAKING PHOTOS AND RECORDING VIDEOS
You can use your Cat® S42 to shoot and share pictures and videos.
OPENING YOUR CAMERA AND TAKING A PHOTO
To open the camera app, do the following:
• Tap on the Home Screen.
• By default, the app opens in Camera mode. If not, tap Photo at bottom of the screen.
• To switch between front and rear camera, tap .
• Compose your photo within the photo capture screen.
• Tap the screen to focus on a specific area.
• Pinch to zoom in/out of the subject.
• Tap to change the camera settings; set a self-timer, adjust the anti-flicker or adjust the image
properties.
• Tap to take your photo.
• you can also take photos by pressing the Volume up/down keys.
VIEWING PHOTOS
To view your photos, do one of the following:
• When in the Camera app, tap the thumbnail of the latest captured photo in the bottom left corner to access
the gallery app.
NOTE:
• To go back to Camera view, press the camera icon in the top left corner or swipe to the right until the
capture screen appears again.
• Swipe up from the Home Screen > Photos to view all photos and videos.
EDIT AND SHARE PHOTOS
As you browse through your photos, the following options are available:
• Share: Tap to share your photos through various apps available on your device.
• Edit: Tap to edit your photos with a range of options available.

22
• Details: Tap to see the details of the photos.
• Delete: Tap to delete the photos you don’t want.
SHOOTING A VIDEO
1. Tap on the Home Screen.
• By default, the app opens in Camera mode.
2. Swipe to the right to switch to Video mode.
• To switch between front and rear camera, tap .
3. Tap to start recording.
4. While recording, do one of the following:
• Pinch to zoom in/out on the subject.
• Tap to pause the recording. Tap again to resume.
• Tap to take a photo.
5. Tap to stop shooting.
VIEWING YOUR VIDEOS
To view a video after recording, tap the thumbnail of the latest captured video in the bottom right hand corner
to access the gallery app.
USING PHOTOS
The Photos app automatically searches for pictures and videos saved to your device or memory card. Select
the album/folder and play as a slideshow, or select items to share with other apps.
OPENING PHOTOS
Swipe up from the Home Screen > Photos to open the application. The Photos app categorises your
pictures and videos by storage location and stores these files in folders. Tap a folder to view the pictures or
videos inside.
VIEWING A PHOTO
1. In Photos, tap a folder to view the photos inside.
2. Tap the picture to view it in full-screen mode, then swipe left or right to view the previous or next picture.

23
3. To zoom in on the image, pinch two fingers apart from each other at the location of the screen where you
want to zoom in. In zoom mode, swipe your finger up or down and left or right.
Tip: The picture viewer supports rotation function. Tap the after you rotated the device, the picture will
adjust itself to the rotation.
CROPPING A PICTURE IN PHOTOS
1. When viewing a picture, tap .
2. Tap and use the cropping tool to select the portion of the picture to crop.
• Drag from the inside of the cropping tool to move it.
• Drag an edge or a corner of the cropping tool to resize the image.
3. Tap Done > Save copy to save the cropped picture.
• To discard the changes, press the Back button and tap DISCARD.
ENJOYING MUSIC
Music files can be transferred from a PC onto your Cat® S42 so you can listen to music wherever you are.
COPYING MUSIC TO YOUR DEVICE
1. Connect your device to a computer with the USB cable and select File Transfer on the device.
2. On the PC, navigate to the USB drive and open it.
3. Create a folder in the root directory of your device or in the SD card (for example, Music).
4. Copy your music from the PC to the new folder.
5. To safely remove your device from the PC, wait until the music has finished copying, then eject the drive as
required by your PC’s operating system. Disconnect the USB cable.
OPENING YouTube Music and PLAYING MUSIC
• Swipe up from the Home Screen, then tap YT Music
• Tap Library, then tap Device Files to add songs into your playlist, or:
• Tap the Search button on the right top corner to search your songs online.
LISTENING TO FM RADIO
You can listen to FM radio stations in the FM Radio app.
Firstly, connect the headset to the audio jack before opening the app. Then tap > FM Radio to launch the
app.

24
CHOOSE FROM THE FOLLOWING OPTIONS:
• To manually tune a frequency, tap < or >.
• To scan the radio stations automatically, tap > Search, and select your preferred channel from the list.
• To add the current radio station to your favourites list, tap
• To turn off the radio, tap .
USING GOOGLE SERVICES
You must sign in to a Google account to use Gmail, Google Calendar, and to download and use other Google
apps.
CREATING A GOOGLE ACCOUNT
If you chose not to create a Google account during set up, it’s easy to create one:
1. Swipe up from the Home Screen > Settings .
2. Tap Accounts > Add account.
3. Tap Google , then follow the on-screen instructions.
USING GMAIL
During set-up, you may have configured your device to an existing Gmail account. The first time you open the
Gmail app on your phone, your Inbox will contain the messages from this account.
OPENING GMAIL
Swipe up from the Home Screen > Gmail .
SWITCHING BETWEEN ACCOUNTS
Tap the account selection box in the top right of the screen, then tap the account you want to view.
CREATING AND SENDING AN EMAIL
1. On the Inbox screen, tap ( ).
2. Enter the message recipient’s email address in the To field.
• To send the email to several recipients, separate the email addresses with spaces.
• To Cc or Bcc other recipients, tap V to display the Cc/Bcc fields.
3. Enter the email subject and compose your message.

25
• If you want to add a picture attachment, tap > Attach file, to select a file.
4. To send, tap .
REPLYING OR FORWARDING EMAIL
1. Select the email on the Inbox screen.
2. Tap to reply, or tap to select Reply all or Forward.
CUSTOMISING YOUR GMAIL SETTINGS
3. On the Gmail home screen, tap > Settings.
4. Choose General settings, or an email account.
5. Tap an option and change the necessary settings.
USING GOOGLE PLAY STORE
Download and install apps and games on Play Store.
OPENING GOOGLE PLAY STORE
Swipe up from the Home Screen > Play Store .
SEARCHING FOR APPS
To find apps on the Play Store home screen, you can:
• List apps by category: Tap a category and scroll through.
• Use Search: Enter search keywords in the field.
• To view your installed apps, tap > My apps & games.
INSTALLING AN APP
1. Swipe up from the Home Screen > Play Store .
2. Tap a category, and then tap the item you want to download for added information.
3. To install the item, tap Install.
NOTE:
You can check the progress of a download in the notification panel.
UNINSTALLING AN APP

26
1. On the Play Store home screen, tap > My apps & games.
2. Select tab INSTALLED.
3. Choose the app you want to uninstall and tap Uninstall.
4. Tap OK to remove the app from your device.
NOTE:
Apps can also be managed by going to the main phone Settings > Apps & notifications. They can also be
uninstalled directly from the App drawer by holding your finger on the app and dragging it up to Uninstall.
SYNCHRONISING INFORMATION
Some apps (for example, Gmail and Calendar) on your Cat® S42 provide access to the same information that
you can add, view and edit on other devices. If you add, change or delete information in any of these apps on
other devices, the updated information will also appear on your device.
This is made possible through over-the-air data synchronisation. The process occurs in the background and
does not interfere with your device. When your device is synchronising, a data synchronisation icon will be
shown in the notification bar.
MANAGING YOUR ACCOUNTS
You can synchronise contacts, email and other information on your device with multiple Google accounts or
other accounts, depending on the apps you have installed.
For example, adding a personal Google account means your personal email, contacts, and calendar entries are
always available. You can also add a work account, so your work-related emails, contacts and calendar entries
are kept separate.
ADDING AN ACCOUNT
1. Swipe up from the Home Screen > Settings.
2. Tap Accounts. The screen will show your current synchronisation settings and a list of your current accounts
being used in related applications.
NOTE:
• In some cases, account details may need to be obtained from your network administrator support. For
example, you may need to know the account’s domain or server address.
3. Tap + Add account.
4. Tap the account type to add.
5. Follow the on-screen instructions to enter the required and optional information about your account. Most
accounts require a username and password, but the details depend on the kind of account and the
configuration of the service to which you are connecting to.
6. When you are finished, your account will be added to the list in the Accounts settings screen.
REMOVING AN ACCOUNT

27
An account and all information associated with it can be removed from your device, including email, contacts,
settings, etc. Some accounts, however, cannot be removed, such as the first account you signed into on your
device. If you attempt to remove certain accounts, be aware that all personal information associated with it
will be deleted.
1. On the Accounts settings screen, tap the account to delete.
2. Tap REMOVE ACCOUNT, then again when prompted to confirm.
CUSTOMISING YOUR ACCOUNT SYNCHRONISATION
Background data use and synchronisation options can be configured for all the applications on your device.
You can also configure the kind of data synchronised for each account. Some applications, such as Contacts
and Gmail, can synchronise data from multiple applications.
Synchronising is two-directional for some accounts and changes made to the information on your device are
made to the copy of that information on the web. Some accounts support only one-way synchronisation and
the information on your device is read-only.
CHANGING AN ACCOUNT’S SYNCHRONISATION SETTINGS
1. On the Accounts settings screen, tap the account.
2. Tap Account sync. The data and synchronisation screen will open, displaying a list of information that the
account can synchronise.
3. Enable the items you want to sync by:
• Sliding the respective data switch to the right .
• To disable automatic sync, slide the respective data switch to the left .
USING OTHER APPS
USING THE CALENDAR
Use Calendar to create and manage events, meetings and appointments. Depending on your synchronisation
settings, the calendar on the device stays in synchronisation with the calendar on your other devices.
OPENING THE CALENDAR
Swipe up from the Home Screen > Calendar to open the app. Tap to display the various view and settings
options.
CREATING AN EVENT
1. On any calendar view, tap > Event, to start adding an event.
2. Enter the event title, location, or the contacts.
• If there is a time frame for the event, tap the beginning and end date, and times.

28
• If it is a special occasion such as a birthday or a day-long event, slide the All-day switch to the right .
3. Set the time of your event reminder, invite people, set a colour and add any notes or attachments.
4. Once all information is entered and settings are complete, tap Save.
SETTING AN EVENT REMINDER
1. On any calendar view, tap an event to view its details.
2. Tap to start editing the event.
3. Tap Add notification to set the reminder for the event.
4. Tap Save to save it.
USING THE ALARM
You can set a new alarm or modify an existing alarm.
OPENING THE ALARM
Swipe up from the Home Screen > Clock > to use your device alarm.
ADDING AN ALARM
1. On the alarm list screen, tap to add an alarm.
2. To set your alarm, do the following:
• Set the hour and minutes by navigating around the dial, tap OK.
• To set repeat mode, tap the Repeat check box. Tap one or more options.
• To set the ringtone, tap , then select an option.
• If you want your device to vibrate when the alarm sounds, tap the Vibrate check box.
• To add an alarm label, tap Label. Enter the label, then tap OK.
NOTE:
• By default, the alarm is automatically activated.
CALCULATOR
Your Cat® S42 is equipped with a calculator that has both a standard and advanced mode.
OPENING THE CALCULATOR
1. Swipe up from the Home Screen > Calculator to open the app.
2. Swipe left or rotate the device to horizontal to access the Advanced calculator mode.

29
MANAGING THE DEVICE
To configure your device, swipe up from the Home Screen > Settings.
SETTING THE DATE AND TIME
When you first turn on your device, there is an option to update the time and date automatically, using the
time provided by your network.
NOTE:
You cannot set the date, time and time zone manually if using the automatic option.
If you wish to set the date and time settings manually, do the following:
1 On the Settings screen, tap System > Date & time.
2. Tap Automatic date & time and select Off. Slide the Automatic time zone switches to the left to disable
the functions.
3. Tap Set date, then select the desired date and tap OK.
4. Tap Set time. On the set time screen, tap the hour or minute field and move the pointer up or down to set
the time. Tap OK when the configuration is complete.
5. Tap Select time zone, and then select the desired time zone from the list.
6. Enable or disable the Use 24-hour format function to switch between 24-hour and 12-hour formats.
CONFIGURING THE PROGRAMMABLE KEY
1. You can assign the Programmable key to perform various functions, in some circumstances while the screen
is locked.
2. On the Settings screen, tap Programmable key.
3. Select the button pressing method. Then select an available function to assign to the key.
4. Tap OK.
PERSONALISING THE DISPLAY
ADJUSTING THE SCREEN BRIGHTNESS
1. On the Settings screen, tap Display > Brightness level.
2. Drag the slider left to make the screen darker, or right to make it brighter.
3. Lift your finger off the slider to save your settings automatically.
Tip: Slide the Adaptive Brightness switch to the right to enable the device to automatically adjust the
brightness of the screen depending on the light level around you.
AUTO-ROTATE SCREEN

30
To enable the display to rotate when you turn your device between landscape and portrait, tap Advanced and
slide the Auto-rotate switch to the right .
ADJUSTING THE IDLE TIME BEFORE THE SCREEN TURNS OFF
If your device is idle for a period of time, the screen will turn off to save battery power. To set a longer or
shorter idle time:
1. On the Settings screen, tap Display > Advanced > Sleep.
2. Select the duration you want the screen to be illuminated for before it turns off.
NOTE:
When your device is asleep, press Power to wake the screen.
SETTING YOUR RINGTONE
TURNING ON SILENT MODE
• Press the Volume key until the volume control panel appears on the screen. Then tap the first icon to select
.
• All sounds except media and alarms will be silenced.
ADJUSTING THE RINGTONE VOLUME
You can adjust the ringtone volume from the Home Screen, or from any app (except during a call or when
playing music or videos). Press the Volume up/down key to adjust the ringtone volume to your chosen level.
You can also adjust the ringtone volume on the Settings screen.
1. On the Settings screen, tap Sound.
2. In Ring volume, drag the slider to adjust the volume level.
CHANGING THE RINGTONE
1. On the Settings screen, tap Sound.
2. Tap Phone ringtone.
3. Select the ringtone you want to use. A preview plays when selected.
4. Tap OK.
SETTING THE DEVICE TO VIBRATE FOR INCOMING CALLS
On the Settings screen, tap Sound > Advance. Then slide the Also vibrate for calls switch to the right .

31
SETTING PHONE SERVICES
TURNING ON DATA ROAMING
1. On the Settings screen, tap Network & Internet > Mobile network.
2. Slide the Roaming switch to the right .
NOTE:
• Remember that accessing data services while roaming may incur considerable additional charges. Check with
your network service provider about data roaming fees.
DISABLE DATA SERVICE
1. On the Settings screen, tap Network & Internet > Mobile network.
2. Slide the Mobile data switch to the left .
USING NFC
NFC allows the exchange of data between two NFC-enabled devices, when both devices are either touching or
no more than a few centimetres apart.
ACTIVATING THE NFC FUNCTION
1. On the Settings screen, tap Connected devices.
2. Slide the NFC switch to the right .
3. The Android™ Beam function will also be enabled automatically.
BEAMING CONTENT VIA NFC
1. Enable the NFC and Android Beam functions.
2. Open the content to be shared (you can share web content, YouTube videos, contacts and much more)
3. Place the devices back-to-back, when prompted Tap to beam, tap your screen.
PROTECTING THE DEVICE
ENABLE YOUR SIM CARD PIN
1. On the Settings screen, tap Security & location > Advanced >SIM card lock.
2. Slide the Lock SIM card switch to the right.
3. Enter the SIM card PIN, then tap OK. To change the SIM card PIN at any time, tap Change SIM PIN.
NOTE:
You can dial emergency numbers any time from your device.

32
PROTECTING THE DEVICE WITH A SCREEN LOCK
To keep the data on your Cat® S42 more secure you can use a screen lock method.
1. On the Settings screen, tap Security & location > Screen lock.
2. Select the one of the available options.
• Swipe: Swipe the lock icon up to unlock the screen.
• Pattern: Trace the correct unlock pattern to unlock the screen.
• PIN: Enter a PIN number to unlock the screen.
• Password: Enter a password to unlock the screen.
3. Follow the on-screen instructions to complete the set-up of your chosen screen lock method.
MANAGING APPS
VIEWING AN INSTALLED APP
1. On the Settings screen, tap Apps & notifications.
2. In the apps list, do any of the following:
• Tap an app to view its details directly.
• Tap Notifications to configure the notification settings.
• Tap Advanced > App permissions to adjust what information the app can access.
• Tap Advanced > Default apps to set, or clear default apps.
• Tap Advanced > Emergency alerts to change your emergency alert settings.
• Tap Advanced > Special app access to configure which apps can access special features listed here.
RESETTING THE DEVICE
BACKING UP PERSONAL SETTINGS
Your personal settings can be backed up to Google servers with a Google account. If you replace your device,
the backed-up settings will be transferred onto a new device the first time it is signed into from a Google
account.
1. On the Settings screen, tap System > Backup.
2. Slide the Back up to Google Drive switch to the right .
RESTORING FACTORY DATA
If you restore the factory data, your device will reset to the settings that were configured at the factory. All of
your personal data from the internal device storage, including account information, the system and application
settings, and any downloaded applications will be erased.

33
Resetting your device does not erase any system software updates that have been downloaded or any files on
a microSD card, such as music or photos.
1. On the Settings screen, tap System > Advanced > Reset options > Erase all data (factory reset).
2. When prompted, tap RESET PHONE, and then tap ERASE EVERYTHING. The device will reset to the original
factory settings, and then restart.
APPENDIX
OPERATING TEMPERATURE
• Keep the ambient temperature between 0°C and 40°C while the device is being charged. Keep the ambient
temperature between -25°C to 55°C for using the device powered by a battery. Please wear protective gloves
while using it outside the range of 0ºC to + 45ºC.
CHARGER OUTPUT
• Output rating of charger 5V/1.55A
VIEWING THE E-LABEL
To view the regulatory information on your device, do the following:
1. From the Home Screen, tap > Settings.
2. On the Settings screen, tap About phone > Regulatory information.
PREVENTION OF HEARING LOSS
To prevent possible hearing damage, do not listen at high volume levels for long periods.
HEARING AID COMPATIBILITY (HAC)
REGULATIONS FOR WIRELESS DEVICES US VARIANT ONLY
WHAT IS HEARING AID COMPATIBILITY?
The Federal Communications Commission has implemented rules and a rating system designed to enable
people who wear hearing aids to more effectively use these wireless telecommunications devices. The
standard for compatibility of digital wireless phones with hearing aids is set forth in American National
Standard Institute (ANSI) standard C63.19. There are two sets of ANSI standards with ratings from one to four
(four being the best rating): an “M” rating for reduced interference making it easier to hear conversations on
the phone when using the hearing aid microphone, and a “T” rating that enables the phone to be used with
hearing aids operating in the telecoil mode thus reducing unwanted background noise.
This device has been tested and rated for use with hearing aids, with some of the wireless technologies that it
uses. However, there may be newer wireless technologies used in the device that have not been tested yet for
use with hearing aids. It is important to try the different features on your device thoroughly and in different
34
locations whilst using a hearing aid or cochlear implant to determine if there is any interfering noise. Consult
your service provider or the device manufacturer for information on hearing aid compatibility. If you have any
questions about return or exchange policies, consult your service provider or phone retailer.
• The U.S. Federal Communications Commission (FCC) has established requirements for digital wireless mobile
devices to be compatible with hearing aids and other hearing assistive devices.
• The wireless telephone industry has developed a rating system to assist hearing device users, reviewing the
compatibility of mobile devices with hearing devices.
• The ratings are not guaranteed. Results will vary depending on the user’s hearing device and hearing loss. If a
user’s hearing devices happens to be vulnerable to interference, the user may not be able to use a rated
phone device successfully. Testing the mobile device with a hearing device is the best way to evaluate if it is
suitable for a user’s personal needs.
• The FCC has adopted HAC rules for digital wireless phones. These rules require certain devices to be tested
and rated under the American National Standard Institute (ANSI) C63.19-2011 hearing aid compatibility
standards. The ANSI standard for hearing aid compatibility contains two types of ratings:
• M-Ratings: Phones rated M3 or M4 meet FCC requirements and are likely to generate less interference to
hearing devices than mobile devices that are not labelled. M4 is the better/higher of the two ratings.
• T-Ratings: Phones rated T3 or T4 meet FCC requirements and are likely to work better with a hearing device’s
telecoil (“T Switch” or “Telephone Switch”) than unrated phones. T4 is the better/ higher of the two ratings.
(Note not all hearing devices have telecoils in them.) The tested M-Rating and T-Rating for this device (FCC ID:
ZL5S42), M3 and T4.
EMERGENCY CALL
This device can be used for emergency calls in the service area. The connection, however, cannot be
guaranteed in all conditions. The device should not be relied on solely for essential communications.
CE SAR COMPLIANCE
This device meets the EU requirements (1999/519/EC) on the limitation of exposure of the general public to
electromagnetic fields by way of health protection.
The limits are part of extensive recommendations for the protection of the general public. These
recommendations have been developed and checked by independent scientific organizations through regular
and thorough evaluations of scientific studies. The unit of measurement for the European Council’s
recommended limit for mobile devices is the “Specific Absorption Rate” (SAR), and the SAR limit is 2.0 W/ kg
averaged over 10 gram of tissue. It meets the requirements of the International Commission on Non-Ionizing
Radiation Protection (ICNIRP).
For body worn operation, this device has been tested and meets the ICNIRP exposure guidelines and the
European Standard EN 62209-2, for use with dedicated accessories. Use of other accessories which contain
metals may not ensure compliance with ICNIRP exposure guidelines.
SAR is measured with the device at a separation of 5 mm to the body, while transmitting at the highest
certified output power level in all of the device’s frequency bands.
The highest reported SAR values under the CE regulatory for the phone are listed below:
Head SAR: 0.947W/kg, Body SAR: 1.206W/kg, Limbs SAR: 2.029W/kg

35
To reduce exposure to RF energy, use a hands-free accessory or other, similar options to keep this device away
from your head and body. The device must be carried 5mm from the body to ensure exposure levels remain at
or below the as-tested levels. Choose the belt clips, holsters, or other similar body-worn accessories which do
not contain metallic components to support operation in this manner. Cases with metal parts may change the
RF performance of the device, including its compliance with RF exposure guidelines in a manner that has not
been tested or certified. Thus, use of such accessories should be avoided.
FCC REGULATION
This mobile phone complies with part 15 of the FCC Rules. Operation is subject to the following two
conditions:
(1) This device may not cause harmful interference, and (2) this device must accept any interference
received, including interference that may cause undesired operation.
This mobile phone has been tested and found to comply with the limits for a Class B digital device, pursuant to
Part 15 of the FCC Rules. These limits are designed to provide reasonable protection against harmful
interference in a residential installation. This equipment generates, uses and can radiated radio frequency
energy and, if not installed and used in accordance with the instructions, may cause harmful interference to
radio communications.
However, there is no guarantee that interference will not occur in a particular installation If this equipment
does cause harmful interference to radio or television reception, which can be determined by turning the
equipment off and on, the user is encouraged to try to correct the interference by one or more of the
following measures:
-Reorient or relocate the receiving antenna.
-Increase the separation between the equipment and receiver.
-Connect the equipment into an outlet on a circuit different from that to which the receiver is connected.
-Consult the dealer or an experienced radio/TV technician for help.
FCC NOTE:
Caution: Changes or modifications not expressly approved by the party responsible for compliance could void
the user‘s authority to operate the equipment.
IC Notice
This device complies with Industry Canada license-exempt RSS standard(s). Operation is subject to the
following two conditions:
(1) this device may not cause interference, and
To reduce the level of exposure to radiation, please do the following:
• Use the mobile phone in good reception conditions to reduce the amount of radiation received
(in particular in underground car parks and on train or car journeys).
• Use a hand free kit
• For pregnant women, please keep the device away from the stomach
• Use the device away from genital parts
36
(2) this device must accept any interference, including interference that may cause undesired operation of the
device.
Le présent appareil est conforme aux CNR d'Industrie Canada applicables aux appareils radio exempts de
licence. L'exploitation est autorisée aux deux conditions suivantes:
(1) l'appareil ne doit pas produire de brouillage, et
(2) l'utilisateur de l'appareil doit accepter tout brouillage radioélectrique subi, même si le brouillage est
susceptible d'en
CAN ICES-3 (B)/NMB-3(B)
This Class B digital apparatus complies with Canadian ICES-003.
Cet appareil numérique de la classe B est conforme à la norme NMB-003 du Canada.
IC: 11151A-S42
IC Radiation Exposure Statement
This EUT is compliance with SAR for general population/uncontrolled exposure limits in IC RSS-102 and had
been tested in accordance with the measurement methods and procedures specified in IEEE 1528 and IEC
62209. This equipment should be installed and operated with minimum distance 10 cm between the radiator
and your body. This device and its antenna(s) must not be co-located or operating in conjunction with any
other antenna or transmitter.
Cet appareil est conforme aux limites d'exposition DAS incontrôlée pour la population générale de la norme
CNR-102 d'Industrie Canada et a été testé en conformité avec les méthodes de mesure et procédures
spécifiées dans IEEE 1528 et IEC 62209. Cet appareil doit être installé et utilisé avec une distance minimale de
10 cm entre l’émetteur et votre corps. Cet appareil et sa ou ses antennes ne doivent pas être co-localisés ou
fonctionner en conjonction avec tout autre antenne ou transmetteur.
Operations in the band 5.15-5.25GHz are restricted to indoor use only.
RF EXPOSURE INFORMATION (SAR)
This mobile phone is designed and manufactured not to exceed the emission limits for exposure to radio
frequency (RF) energy set by the Federal Communications Commission of the United States.
During SAR testing, this device was set to transmit at its highest certified power level in all tested frequency
bands, and placed in positions that simulate RF exposure in usage against the head with no separation, and
near the body with the separation of 10 mm. Although the SAR is determined at the highest certified power
level, the actual SAR level of the device while operating can be well below the maximum value. This is because
the phone is designed to operate at multiple power levels so as to use only the power required to reach the
network. In general, the closer you are to a wireless base station antenna, the lower the power output.
The exposure standard for wireless devices employing a unit of measurement is known as the Specific
Absorption Rate, or SAR.
The SAR limit set by the FCC is 1.6 W/kg.

37
This mobile phone is complied with SAR for general population /uncontrolled exposure limits in ANSI/IEEE
C95.1-1992 and had been tested in accordance with the measurement methods and procedures specified in
IEEE1528. The FCC has granted an Equipment Authorization for this model phone with all reported SAR levels
evaluated as in compliance with the FCC RF exposure guidelines. SAR information on this model phone is on
file with the FCC and can be found under the Display Grant section of www.fcc.gov/oet/ea/fccid after
searching on FCC ID: ZL5S42E(EU SKU), ZL5S42(US SKU).
The highest reported SAR values under the FCC regulatory for the phone are listed below:
EU SKU (FCC ID: ZL5S42E):Head SAR: 1.11 W/kg, Body SAR: 1.09 W/kg, Wireless Router SAR: 1.09 W/kg
US SKU (FCC ID: ZL5S42):Head SAR: 1.07 W/kg, Body SAR: 1.06 W/kg, Wireless Router SAR: 1.10 W/kg
While there may be differences between the SAR levels of various phones and at various positions, they all
meet the government requirements.
SAR compliance for body-worn operation is based on a separation distance of 10 mm between the unit and
the human body. Carry this device at least 10 mm away from your body to ensure RF exposure level compliant
or lower to the reported level. To support body-worn operation, choose the belt clips or holsters, which do not
contain metallic components, to maintain a separation of 10 mm between this device and your body.
RF exposure compliance with any body-worn accessory, which contains metal, was not tested and certified,
and as such body-worn accessories should be avoided.
DISPOSAL AND RECYCLING INFORMATION
This symbol on the device (and any included batteries) indicates that they should not be disposed of as normal
household garbage. Do not dispose of the device or batteries as unsorted municipal waste. The device
(and any batteries) should be handed over to a certified collection point for recycling or proper
disposal at the end of their life.
For more detailed information about the recycling of the device or batteries, contact your local city office, the
household waste disposal service, or the retail store where you purchased this device.
The disposal of the device is subject to the Waste from Electrical and Electronic Equipment (WEEE) directive of
the European Union. The reason for separating WEEE and batteries from other waste is to minimize the
potential environmental impacts on human health from any of the hazardous substances that may be present.
REDUCTION OF HAZARDOUS SUBSTANCES
This device is compliant with the EU Registration, Evaluation, Authorization and Restriction of Chemicals
(REACH) Regulation (EU Regulation (EC) No 1907/2006 (REACH) of the European Parliament and of the Council)
and the EU Restriction of Hazardous Substances (RoHS).
Directive (Directive 2011/65/EU (RoHS) and its amendment directive (EU) 2015/863 of the European
Parliament and of the Council). It is recommended to visit the Web site regularly for up-to-date information.

38
EU REGULATORY CONFORMANCE
Hereby, the manufacturer declares that this device is compliant with the essential requirements and other
relevant provisions of
Directive 2014/53/EU. For the declaration of conformity, visit the website:
https://www.catphones.com/download/Certification
Authorised Representative:
Authorised Representative Service
77 Camden Street Lower
Dublin D02 XE80
Ireland
EU COMPLIANCE STATEMENT
This device is restricted to indoor use only when operating in the 5150 to 5350 MHz frequency range.
Restrictions in: Belgium (BE), Bulgaria (BG), Czech Republic (CZ), Denmark (DK), Germany (DE), Estonia (EE),
Ireland (IE), Greece (EL), Spain (ES), France (FR), Croatia (HR), Italy (IT), Cyprus (CY), Latvia (LV), Lithuania (LT),
Luxembourg (LU), Hungary (HU), Malta (MT), Netherlands (NL), Austria (AT), Poland (PL), Portugal (PT),
Romania (RO), Slovenia (SI), Slovakia (SK), Finland (FI), Sweden (SE), North Ireland ( UK(NI) ), Switzerland (CH),
Norway (NO), Iceland (IS), Liechtenstein (LI) and Turkey (TR).
EU: SPECTRUM AND POWER TABLE
Bands
Conducted Power(dB)
GSM 900
33.20
GSM 1800/1900
30.20
WCDMA B1
24.00
WCDMA B5
24.00
WCDMA B8
24.00
FDD-LTE B1
24.00
FDD-LTE B3
24.00
FDD-LTE B5
24.00
FDD-LTE B7
24.00
FDD-LTE B8
24.00
FDD-LTE B20
24.00
FDD-LTE B28
24.00
WiFi: 2400 - 2483.5 MHz
17.90
WiFi: 5150 - 5250 MHz
17.16
WiFi: 5250 - 5350 MHz
17.36
WiFi: 5470 - 5725 MHz
17.12
WiFi: 5745 - 5825 MHz
13.89
Bluetooth: 2400 - 2483.5 MHz
9.30
NFC: 13.56 MHz
-14.76 dBuA/m
NOTE:
Observe the national local regulations in the location where the device is to be used. This device may be
restricted for use in some or all member states of the European Union (EU).
Some bands may not be available in all countries or all areas. Please contact the local carrier for more details.
Maximum radio-frequency power transmitted in the frequency bands in which the radio equipment operates:
The maximum power for all bands is less than the highest limit value specified in the related Harmonised
Standard.
The frequency bands and transmitting power nominal limits applicable to this radio equipment are as follows:

39
UKCA REGULATORY CONFORMANCE
Hereby, Bullitt Mobile Ltd. declares that the radio equipment with this declaration and bearing the UKCA Mark
is in compliance with UK Radio Equipment Regulations 2017. The full text of the UK declaration of conformity
is available at the following internet address: https://www.catphones.com/download/Certification
UKCA COMPLIANCE STATEMENT
Restriction in the UK: 5150 to 5350 MHz indoor-use only
CAT® S42 SPECIFICATION
Operation System
Android 10
Processor
MediaTek MT6761D Quad Core
Memory
• Internal Memory: 32GB eMMC / 3GB LPDDR4X SDRAM
• External Memory: SDXC, Class 10/Ultra high speed/up to 256GB
Cellular Network
Rest of the World Variant A:
LTE: 1/ 2/ 3/ 4/ 5/ 7/ 8/ 20/ 28/
WCDMA: 1/ 2/ 4/ 5/ 8
GSM; 850/ 900/ 1800/ 1900
US and Canada Variant B Only:
LTE: 1/ 2/ 3/ 4/ 5/ 7/12/13/14/ 25/ 26/ 41/ 66/ 71
WCDMA: 1/ 2/ 4/ 5/ 8
GSM: 850/ 900/ 1800/ 1900
Display
Size 5.5” HD+ with wet finger & glove support,
Camera
• Rear Camera: 13MP Dual cell PDAF single LED flash
• Front Camera: 5MP
Sensor
• Ambient Light
• Accelerometer
• Compass
• Proximity
Connectivity
• Audio jack: 3.5mm
• Bluetooth: 5.0
• USB: USB 2.0
• WiFi 802.11 a/b/g/n/ac
• GPS, aGPS, GLONASS, Gaileo, EGNOS, SBAS, Beidou
• FM Radio with RDS
• NFC
• SIM type: Nano SIM
Battery
4200mAH
Others
Ingress Protection: IP68
Drop: 1.5m
Waterproof: 1.5m for up to 35mins
Programmable Key with PTT mode
Dimensions
161.3 x 77.20 x 12.70mm
Weights
220g
* Design and specifications are subject to change without prior notice.

40
© 2020 Caterpillar. All Rights Reserved. CAT, CATERPILLAR, LET’S DO THE WORK, their respective logos,
"Caterpillar Yellow", the "Power Edge" and Cat “Modern Hex” trade dress as well as corporate and
product identity used herein, are trademarks of Caterpillar and may not be used without permission.
www.cat.com / www.caterpillar.com
Bullitt Mobile Ltd. is a licensee of Caterpillar Inc.
Bullitt Mobile Ltd.’s and third-party trademarks are the property of their respective owners.
S42_User_Manual_EN_V6
