
smarttech.com/kb/171185
Trademark notice
SMARTNotebook, SMART Document Camera, SMARTInk, SMARTBoard, SMARTResponse, SMARTExchange, smarttech, the SMART logo and all SMART
taglines are trademarks or registered trademarks of SMARTTechnologiesULC in the U.S. and/or other countries. Windows, PowerPoint and Internet Explorer
are either registered trademarks or trademarks of Microsoft Corporation in the U.S. and/or other countries. Mac, OSX and QuickTime are trademarks of Apple
Inc., registered in the U.S. and other countries. Adobe, Reader and Flash are either registered trademarks or trademarks of Adobe Systems Incorporated in the
U.S. and/or other countries. GeoGebra is a registered trademark of GeoGebra Inc. All other third-party product and company names may be trademarks of their
respective owners.
Copyright notice
© 2017SMARTTechnologiesULC. All rights reserved. No part of this publication may be reproduced, transmitted, transcribed, stored in a retrieval system or
translated into any language in any form by any means without the prior written consent of SMARTTechnologiesULC. Information in this manual is subject to change
without notice and does not represent a commitment on the part of SMART.
This product and/or use thereof covered by one or more of the following U.S. patents.
www.smarttech.com/patents
09/2017

i smarttech.com/kb/171185
Contents
Chapter 1: Welcome 1
What’s new in SMARTNotebook 17.1 2
Getting started 4
SMART lab tutorial 11
Undoing and redoing actions 21
Chapter 2: Creating and working with files and pages 23
Creating files 23
Opening files 24
Displaying pages in a file 24
Creating pages 26
Cloning pages 26
Renaming, rearranging and grouping pages 27
Deleting pages 29
Saving files 29
Printing files 30
Exporting files 32
Attaching files to e-mail messages 36
Chapter 3: Creating basic objects 37
Writing, drawing and erasing digital ink 37
Creating shapes and lines 40
Creating and working with text 44
Creating and working with tables 50
Chapter 4: Working with objects 61
Selecting objects 62
Changing object properties 64
Positioning objects 67
Aligning objects 67
Rearranging stacked objects 69
Cutting, copying and pasting objects 70
Cropping images with a mask 70
Cloning objects 72
Resizing objects 72
Flipping objects 75
Grouping objects 75
Grouping objects automatically 77

CONTENTS
ii smarttech.com/kb/171185
Deleting objects 77
Chapter 5: Inserting and sharing content 79
Using the SMARTNotebook 17.1 Gallery 80
Using the SMARTExchange website 85
Using the Notebook Math Equation Editor 87
Inserting content from GeoGebra 89
Inserting equations with the math equation tool 90
Using SMART Notebook Document Writer - Print to Board 92
Using Share 95
Inserting content from other sources 97
Chapter 6: Creating lesson activities 99
Creating basic lesson activities 99
Using advanced object features 103
Chapter 7: Using SMART lab 113
Overview 114
Adding game elements and device enabled contributions to SMARTlab activities 115
Creating and adding a Flip Out activity 115
Creating and adding a Super Sort activity 117
Creating and adding a Match ‘Em Up! activity 118
Creating and adding a Fill In the Blanks activity 119
Creating and adding a Label Reveal activity 121
Creating and adding a Rank Order activity 122
Creating and adding a Speedup activity 123
Creating and adding a Shout It Out! activity 125
Adding device enabled student text contributions to Shout It Out! activities 129
Adding student image contributions 132
Removing students from an activity 135
Adding a game element to your activity 135
Using Monster Quiz 137
Using the Hand out activity 139
Using SMART response 2 140
Chapter 8: Presenting lesson activities 147
Preparing to present 148
Using presentation tools 151
Using the Text Pen 159
Clearing and resetting pages 161
Using the Screen Capture toolbar 164
Using the Magnifier 165
Using the Screen Shade tool 167
Using the Spotlight tool 168

CONTENTS
iii smarttech.com/kb/171185
Chapter 9: Installing and using add-ons 171
Installing add-ons 171
Using add-ons 171
Identifying missing add-ons 172
Disabling and removing add-ons 172
Chapter 10: Configuring SMARTNotebook software 175
Customizing the toolbar 175
Changing the default program for .notebook files 177
Setting gesture preferences 178
Setting image optimization preferences 179
Setting default background color preferences 181
Setting table cell padding preferences 181
Chapter 11: Troubleshooting SMARTNotebook software 183
Adobe Flash Player issues 184
Connection issues 184
Digital ink issues 185
File issues 185
Gesture issues 186
Installation issues 187
Missing lesson content issues 187
Object issues 188
Subscription and product key issues 190
Toolbar and window issues 190
Contacting SMART reseller/support for further assistance 192

Chapter 1
1 smarttech.com/kb/171185
Chapter 1: Welcome
What’s new in SMARTNotebook 17.1 2
What’s new in SMART Notebook 17.1 2
What’s new in SMART Notebook 17.1 3
Getting started 4
Starting SMARTNotebook software for the first time 5
Account sign in 5
Limited mode 6
The Welcome screen 6
Navigating the interface 6
Menu 6
Toolbar 7
Page Sorter 8
Gallery tab 9
Attachments tab 10
Properties tab 10
Add-ons tab 11
Page area 11
SMART lab tutorial 11
Use Speedup to add a competitive gaming element to your next grammar lesson 12
Setting up the SMART lab activity 12
Student participation 13
Results 14
Use student mobile devices and Shout It Out! for a class-wide brainstorming session 15
The activity-based lesson 16
Setting up the Shout It Out! activity 16
Student participation 16
Results 17
Create an exit ticket using SMART response 2 17
The activity-based lesson 17
Setting up the SMART lab activity 17
Student participation 18
Results 19
Pace your lesson and reduce information overload using Label Reveal 19
Setting up the SMART lab activity 19

CHAPTER 1
WELCOME
2 smarttech.com/kb/171185
Student participation 20
Results 21
Undoing and redoing actions 21
This chapter introduces you to SMARTNotebook® collaborative learning software and shows you
how to get started.
What’s new in SMARTNotebook 17.1
What’s new in SMART Notebook 17.1
SMARTNotebook 17.1 software includes one new feature.
Feature Description
SMART Notebook
Document Writer - Print to
Board
The new Print to Board feature in SMART Notebook Document
Writer allows you to convert any Windows application document
into a SMART Notebook file. Each page of your document will
convert to an individual SMART Notebook page.
Selecting the Print to SMART Notebook Document Writer print
function will enable you to:
l
Convert content into a printable Notebook file
l
Share your Notebook file to the Notebook Player app for
SMART Board interactive displays with iQ technology
l
Upload your Notebook file and share through a link
NOTE
SMART Notebook Document Writer - Print to Board is only
available for Windows operating systems.

CHAPTER 1
WELCOME
3 smarttech.com/kb/171185
What’s new in SMART Notebook 17.1
SMARTNotebook 17.1 software includes a number of new features.
Feature Description
The Welcome
screen
The new Welcome screen gives you timely information, links to new
Notebook features and content, file sharing, the latest subscription
information, and upgrade offers. You can also access your recent SMART
lab activities.
Improved sign in
process
SMART Notebook 17.1 software now allows you to sign in with your
Google™ or Microsoft account. (Sign in is required to create and play most
SMART lab activities.) If you sign in with one of these accounts, you and
your students will not have to sign in each time you want to use SMART
response 2 or other activities that require account sign in. Learn more at
Account Sign In and Limited mode.
Images in SMART
lab Super Sort
SMART lab Super Sort now supports the use of images as sorting items so
that teachers can choose the best content for their students.
Timer in
SMARTlab
Monster Quiz
You can now assign a time limit to questions by toggling the new Time limit
button in the Review Content dialog box and setting the number of seconds
allowed for each answer.

CHAPTER 1
WELCOME
4 smarttech.com/kb/171185
Feature Description
SMART response 2
file conversion
response 2 file conversion now allows you to choose between question
groupings:
l
Convert all Response assessment pages into one new response 2
assessment
l
Convert each SMART Response assessment question into a separate
new single question response 2 activity inserted on a new page in
front of it. You will see two pages for every SMARTResponse page in
the original SMART Response file.
Learn more at Creating assessments with SMART response 2.
Improvements to
SMART response 2
teacher-paced
assessments
l
Teachers now have greater flexibility when using SMART response 2
as a formative assessment tool. In scenarios where teachers prefer to
review the questions prior to students responding to the questions,
there is now a Show Questions toggle which displays the questions
rather than the default class progress bar.
l
Teachers can mark up questions with Ink to highlight parts of a
question while reviewing it with the class
l
Teachers can get real-time results of class responses even before an
assessment has ended
New Share to
Board and share to
Board by link
The new Share to Board feature allows you to share Notebook files from
Notebook to SMART Board interactive displays with iQ technology. Learn
more at Using Share.
If the files you want to share are large, you can also share them by link to a
SMART Board interactive displays with iQ technology. Learn more at Using
Share.
Getting started
With SMARTNotebook software, you can create .notebook files that include graphics, text, tables,
lines, shapes, animations and more. Present your file and keep your class’s attention as you move
and interact with these objects. When your class provides comments and suggestions, write their
input on the page using digital ink. You can open .notebook files in SMARTNotebook software on
a Windows®, Mac or Linux® computer. You can also export your file in a variety of formats, including
HTML and PDF.
IMPORTANT
Access to the premium features of Notebook 17.1 requires an activated product key.

CHAPTER 1
WELCOME
5 smarttech.com/kb/171185
Starting SMARTNotebook software for the first time
When you start SMARTNotebook software the first time, the Welcome screen opens. Select New
Features on the Welcome screen to learn more about the software and its new features.
Select the Don’t show this again check box if you don’t want the Welcome screen to appear each
time you open SMARTNotebook software. You can access the Welcome screen anytime from
SMART Notebook software Menu > Help.
In Notebook, select File > New to create a new, blank file. See creating-and-working-with-files-and-
pages.htm for more information.
Account sign in
SMART Notebook 17.1 software now allows you to sign in with your Google™ or Microsoft account.
(Sign in is required to create and play most SMART lab activities.) After you sign in with one of
these accounts, you and your students won’t have to sign in each time you want to use SMART
response 2 or other activities that require sign in.
With one-time sign in, you can:
l Have your students connect to your SMART lab and response 2 activities with one persistent
code (students won’t have to reconnect every time).
l Share lessons with your peers using an online link
l Share your lessons on SMART Boards with iQ technology
l Access limited features of Notebook after the trial period has ended
NOTE
If you skip the sign in, you might not be able to use the activity that’s prompting you to sign in.
You will be prompted to sign in:
l When using the SMART lab Creation Wizard for the first time
l When using the SMART response 2, Shout It Out! and Monster Quiz activities
l When using the Hand out activity
When you start the software subsequent times, a new blank file opens automatically. To open
the tutorial, select Help > Tutorial.
Learn more about Account sign-in.

CHAPTER 1
WELCOME
6 smarttech.com/kb/171185
Limited mode
After the trial period, Notebook opens in limited mode unless you have activated it. Limited mode
allows a user to access limited features of SMARTNotebook software outside a trial or purchased
subscription.
When in limited mode, a watermark appears on the screen if you are not using a SMARTBoard.
Learn more at SMART Notebook Features.
The Welcome screen
The Welcome screen gives you timely information, links to new Notebook features and content,
file sharing, the latest subscription information, and upgrade offers. You can also access your
recent Notebook files.
Navigating the interface
The SMARTNotebook software interface consists of the these components:
l Menu
l Toolbar
l Tabs (Page Sorter, Gallery, Attachments, Properties, and Add-ons)
l Page area
Menu
The menu contains the commands for managing files and objects.

CHAPTER 1
WELCOME
7 smarttech.com/kb/171185
Toolbar
From the toolbar, you can select and use a variety of commands. The toolbar buttons are
organized in panels.
Panel Description
Actions The Actions panel includes buttons for browsing and making changes to
.notebook files:
Add-ons If you install SMARTNotebook add-ons, an add-on panel appears to the right
of the Actions panel:
Tools The Tools panel includes buttons for creating and working with basic objects
on pages:

CHAPTER 1
WELCOME
8 smarttech.com/kb/171185
Panel Description
Contextual When you select a button in the Tools panel, additional buttons appear. For
example, if you select Pens , the following additional buttons appear:
Press the Pen Types button to select a pen type and then press one of the
line type buttons to write or draw digital ink in that line type. You can
customize a selected line type using the options in the Properties tab and
then save your customizations for future use (see Changing object properties
on page64).
Use the three property selectors beside the line type buttons to set the color,
thickness, style and transparency of digital ink.
If you click other buttons in the Tools panel, similar sets of additional buttons
appear.
NOTE
The commands in the toolbar are also accessible from the menu.
You can add, remove and change the position of buttons on the toolbar by pressing Customize the
toolbar (see Customizing the toolbar on page175).
By default, the toolbar appears at the top of the SMARTNotebook software window. You can
move it to the bottom by pressing Move toolbar to top/bottom of window . This is useful in
situations where you or your students can’t reach the toolbar when it’s at the top of the window.
Page Sorter
The Page Sorter displays all the pages in the open file as thumbnails and automatically updates
these thumbnails as you change the contents of the pages.
Using the Page Sorter, you can:
l Cut or copy and paste pages
l Display pages
l Create pages
l Clone pages
CHAPTER 1
WELCOME
9 smarttech.com/kb/171185
l Clear pages
l Delete pages
l Rename pages
l Rearrange pages
l Move objects from one page to another
l Group pages
To open the Page Sorter, press Page Sorter .
You can move the Page Sorter from one side of the SMARTNotebook software window to the
other by pressing Move Sidebar .
You can resize the Page Sorter by dragging its border left or right. You can also hide the Page
Sorter when you aren’t using it by selecting the Auto-hide option. To display the Page Sorter when
it’s hidden, press Page Sorter .
NOTE
For Windows operating systems: if you reduce the Page Sorter to its minimum size, the auto-hide
option turns on automatically.
Gallery tab
The Gallery tab contains clip art, backgrounds, multimedia content, files and pages that you can
use in your lessons. The Gallery tab also provides access to other online resources. For more
information, see Inserting content from the Gallery on page80.
You can also add your own and other teachers’ content to the Gallery tab.
To open the Gallery tab, press Gallery .
You can move the Gallery tab from one side of the SMARTNotebook software window to the
other by pressing Move Sidebar .
You can resize the Gallery tab by dragging its border left or right. You can also hide the Gallery tab
when you aren’t using it by selecting the Auto-hide option. To display the Gallery tab when it’s
hidden, press Gallery .

CHAPTER 1
WELCOME
10 smarttech.com/kb/171185
NOTE
For Windows operating systems: if you reduce the Gallery tab to its minimum size, the auto-hide
option turns on automatically.
Attachments tab
The Attachments tab displays the files and web pages attached to the current file.
To open the Attachments tab, press Attachments .
You can move the Attachments tab from one side of the SMARTNotebook software window to the
other by pressing Move Sidebar .
You can resize the Attachments tab by dragging its border left or right. You can also hide the
Attachments tab when you aren’t using it by selecting the Auto-hide check box. (To display the
Attachments tab when it’s hidden, press Attachments .)
NOTE
For Windows operating systems: if you reduce the Attachments tab to its minimum size, the auto-
hide feature turns on automatically.
Properties tab
The Properties tab enables you to format objects on a page, including digital ink, shapes, lines, text
and tables. Depending on the object you select, you can change:
l The color, thickness and style of lines
l The transparency and fill effects of objects
l The font type, size and style of text
l The animation of objects
The Properties tab displays only the options available for the object you select. For more
information about displaying and setting object properties in the Properties tab, see Changing
object properties on page64.
To open the Properties tab, press Properties .
You can move the Properties tab from one side of the SMARTNotebook software window to the
other by pressing Move Sidebar .

CHAPTER 1
WELCOME
11 smarttech.com/kb/171185
You can resize the Properties tab by dragging its border left or right. You can also hide the
Properties tab when you aren’t using it by selecting the Auto-hide option. To display the
Properties tab when it’s hidden, press Properties .
NOTE
For Windows operating systems: if you reduce the Properties tab to its minimum size, the auto-
hide option turns on automatically.
Add-ons tab
The Add-ons tab enables you to work with SMARTNotebook software add-ons.
To open the Add-ons tab, press Add-ons .
You can move the Add-ons tab from one side of the SMARTNotebook software window to the
other by pressing Move Sidebar .
You can resize the Add-ons tab by dragging its border left or right. You can also hide the Add-ons
tab when you aren’t using it by selecting the Auto-hide option. To display the Add-ons tab when
it’s hidden, press Add-ons .
NOTE
For Windows operating systems: if you reduce the Add-ons tab to its minimum size, the auto-hide
option turns on automatically.
Page area
The page area displays the contents of a selected page in a file. This is the area of the page where
you create and work with objects.
SMART lab tutorial
Create interactive learning experiences in less than five minutes that will engage and amaze your
students. SMARTlab and SMART response 2 feature a game-based learning environment, real-
time student collaboration tools and a suite of formative assessment tools.
Save hours of lesson planning time while providing a rich classroom experience for your students.

CHAPTER 1
WELCOME
12 smarttech.com/kb/171185
These examples demonstrate basic concepts you can use with SMART lab to achieve specific
learning objectives. For detailed procedures, refer to the appropriate links in each example.
1. Use Speedup to add a competitive gaming element to your next grammar lesson
2. Use student mobile devices and Shout It Out! for a class-wide brainstorming session
3. Create an exit ticket using the response 2 formative assessment tool
4. Pace your lesson and reduce information overload using Label Reveal
Use Speedup to add a competitive gaming element to your next
grammar lesson
Let’s say you have planned an English grammar lesson to help students learn about parts of
speech. You would like to create an activity that will help your students distinguish nouns, verbs,
adjectives and adverbs. To create student input and enthusiasm, you will have students participate
by playing the Speedup racing activity on the SMART Board in your classroom.
Whatever the subject, grade or skill level, SMART Notebook activities help ensure that your
content is teacher-defined and pedagogically sound. SMART Notebook software gives you eye-
catching activities your students will love.
See Adding a Speedup activity for more information.
Setting up the SMART lab activity
You’ve completed the lesson in-class and want to quickly evaluate student understanding. Open

CHAPTER 1
WELCOME
13 smarttech.com/kb/171185
SMARTlab from your Notebook 17 software. From the SMART lab Select an Activity Creation
Wizard, select Speedup from the list of activities and enter a few questions and answers on nouns,
verbs, adjectives and adverbs, or use a previously saved list. See Adding a Speedup activity for
additional information.
You can easily manage SMARTlab content to match your activity requirements. See Managing
SMART lab content.
Student participation
Have students form small groups so that they can collaborate during the game. SMART lab quickly
builds the activity. You can give a few words of direction, press Start and the game begins.
Students choose race avatars, speed around the track and give answers at predetermined
locations.

CHAPTER 1
WELCOME
14 smarttech.com/kb/171185
Students get excited about the race and quickly learn to collaborate for correct answers. At the
end of the race, the groups are shown their race times, the number of questions they correctly
answered and their position by player avatar.
Results
Review the quiz answers with the class using the avatars for each group. After the race, press
Review to see the questions, their possible answers and the players’ avatars. Press Show Answer
to see the answer to each question. Invaluable learning can also occur by discussing the incorrect
answers contextually.

CHAPTER 1
WELCOME
15 smarttech.com/kb/171185
If you wish, give students additional work in class. While they’re working on that, you can use the
time to quickly build another activity that improves upon previous learning.
Use student mobile devices and Shout It Out! for a class-wide
brainstorming session
Shout It Out! is a mobile device enabled activity where students can use their own device or
school supplied devices to contribute to peer or teacher-curated discussion. The teacher can
select between categorized arrangements, where students contribute to teacher created
categories, or random arrangements, where student contributions are placed randomly. The
contributions can then be moved freely on the SMARTBoard activity page and arranged in groups
if desired. See Adding a Shout It Out! activity for additional information.

CHAPTER 1
WELCOME
16 smarttech.com/kb/171185
The activity-based lesson
In Notebook 17 software, open SMART lab and select Shout It Out! from the list of activities. Then
select Randomized or Categories based on the type of contributions you require and the type of
dialog you want to encourage. Select the maximum number of contributions students can make
and whether you want contributor names to appear on the SMART Board. You determine how
many text answers students contribute per activity session. Students may contribute up to 50
images per activity session. Game components can also be used with Shout It Out! activities.
SMART lab quickly builds the activity and you can begin.
Setting up the Shout It Out! activity
If you select Randomized student contribution placements, you will be prompted to choose either
Text or Images as acceptable student contributions. If you selected Categories for student
contribution placements, at least two categories are required for the activity.
For Categories student contribution placements, give names to the categories that will contain
student contributed content. In the Contributions section, choose from Text or Images contribution
types.
Student participation
Let’s say you want to gather class comments in support of or against a current political candidate’s
policy statements. You can hide contributor names to encourage greater participation for this
activity. Toggle the Student names switch to Show or Hide as required. If students are discussing
their answers before they contribute, you can also manage the number of contributions per device.
CHAPTER 1
WELCOME
17 smarttech.com/kb/171185
Instruct students instructions to go to classlab.com on their devices, enter the activity number and
prepare to answer the questions. The activity and activity number appears on the SMART Board
and the teacher manages the start time.
You will find that contributions begin to appear very quickly, stimulating even more contributions,
peer collaboration and discussion.
To pause the activity for additional discussion or classroom management, press Pause
contributions. An Activity Pause notification appears on each device. When you wish to continue,
press Resume and students can make contributions again. When the activity is complete, press
End. An Activity has ended notification appears on each device.
Results
Use the results of the class or small group submissions as a springboard for deeper discussion.
Students quickly see that diverging opinions can be valuable and that peers can have insights that
they might not have had themselves.
Create an exit ticket using SMART response 2
An “exit ticket” is a good way for students to review and apply what they learned in the lesson.
There are many approaches you can use. This example shows how you can use SMARTresponse
2 to quickly create an “exit ticket.”
See Using SMART response 2 for more information on the SMART response 2 version
assessments platform.
The activity-based lesson
In this example, the teacher will have students answer a multiple choice quiz using
SMARTresponse 2. The teacher will use the quiz as a class “exit ticket” that tracks student
understanding prior to leaving the class. Students will answer the answers on their own mobile
devices or those supplied by the school.
Setting up the SMART lab activity
Open SMART response 2 from Notebook 17 software and quickly enter a few questions without
entering the multiple choice answers. Just get the questions in quickly; they can be edited
afterward.
After you’ve entered all the questions, select Edit to edit the questions, then press Next. You can
review your content and questions in the Review Content dialog box.
Press Finish. SMART response 2 builds the activity in a few seconds. Tell students to go to
classlab.com on their devices, enter the activity number if required and prepare to answer the
questions. The activity and activity number appears on the SMART Board. The teacher manages
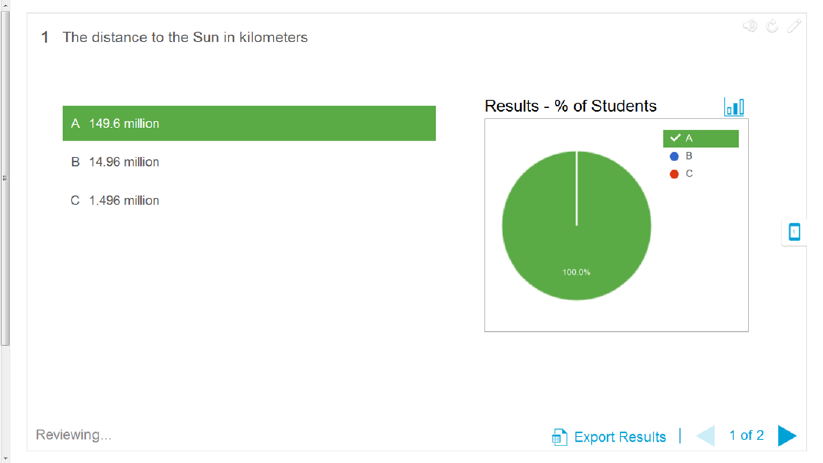
the start time. Here’s an example of the quiz questions:

CHAPTER 1
WELCOME
18 smarttech.com/kb/171185
Student participation
When the activity is ready, press Start Activity. Students can begin taking the quiz on their
devices. See Using a mobile device to access SMART response 2. You can pause the quiz if
required. The live Results animation indicates the percentage of questions the class has answered.
When all students have submitted their answers, pause or end the activity. If you end the activity,
all students will receive notification on their devices, and the quiz results will appear on the SMART
Board.
CHAPTER 1
WELCOME
19 smarttech.com/kb/171185
Results
After students submit their answers and the results are in, the results assessment begins. Each
question is shown, and you can select a bar or pie chart to indicate the number of students who
answered the question.
The results dialog box gives both teacher and class an opportunity to review the questions and
check for student understanding. The teacher can assess student understanding immediately and
make adjustments to the lesson if necessary.
Pace your lesson and reduce information overload using Label Reveal
Label Reveal helps students identify all the parts of the whole, and helps you test knowledge and
lesson plan progression. You add an image, click inside the image and add as many labels that you
need, and begin!
In this example, you want to measure student understanding of terms used in the human cell lesson
your class completed yesterday. You will use the Label Reveal activity to pace your lesson plan
and test understanding, and SMART response 2 for the assessment. You can have individual
students participate with peer support as the activity progresses, or use small teams of students so
that team members support each other to find answers.
See Adding a Label Reveal activity for more information on setting up Label Reveal.
Setting up the SMART lab activity
Complete the Label Reveal activity out of the class if time is available. Open the SMARTlab Label
Reveal activity. Next, drag and drop an image you wish to use into the box on the Add Content
page or browse to the image by selecting Browse for an image

CHAPTER 1
WELCOME
20 smarttech.com/kb/171185
. The image appears in the activity.
Now drag and drop as many labels on the image as you need. A Label dialog box appears in which
you can add or edit a label for the image and add a description of up to 150 characters. You can
also change the image or pointer style from this page.
When you have finished adding labels, press Finish. SMART lab builds the activity in seconds and
now you’re ready to use the activity in class: use the gaming components to add excitement to the
various reveals, discuss the image and reveal the labels.
Student participation
In the classroom, open the Label Reveal activity. If you’ve decided to use the timers or buzzers,
have two or three small student groups come to the SMART Board and identify the parts of the cell.
After each identification is made, students can press the buzzer to indicate they’ve made their
choice, and they can see how much time their identifications took. Students will enjoy trying to out-
do each other to complete the activity quickly.
As an alternative, you can have individual students come to the SMART Board to reveal labels, and
you can get the whole class to assist by calling out clues if the student needs help.
When the Label Reveal activity is complete, use the SMART response 2 assessments platform to
evaluate student knowledge.
In SMART response 2, use images of different cells that also have the same general cell parts.
Student understanding will reflect the earlier discussion, which was just reinforced by the Label
Reveal activity.
When you’re ready, press Start Activity and students can begin taking the quiz. You can pause the
quiz if required.

CHAPTER 1
WELCOME
21 smarttech.com/kb/171185
Results
Use SMARTresponse 2 to assess student understanding. The live Results animation indicates the
percentage of questions the class has answered. Use the quiz results to determine whether
additional classroom or individual instruction is required.
Undoing and redoing actions
When you make changes to a file, you can reverse the effects of your previous actions and
commands.
NOTE
If two people are using your interactive product, pressing Undo and Redo affects the actions of
both users.
To reverse the effect of the last action
Press Undo .
NOTE
You can undo an unlimited number of actions.
To reinstate the last action reversed with the Undo command
Press Redo .

Chapter 2
23 smarttech.com/kb/171185
Chapter 2: Creating and working with files and
pages
Creating files 23
Opening files 24
Displaying pages in a file 24
Creating pages 26
Cloning pages 26
Renaming, rearranging and grouping pages 27
Deleting pages 29
Saving files 29
Printing files 30
Exporting files 32
Attaching files to e-mail messages 36
In SMARTNotebook software, you can create or open SMARTNotebook software (.notebook)
files. After creating or opening a .notebook file, you can save it, print it and complete other
common tasks.
A .notebook file is composed of a series of pages, each with its own objects and properties.
A thumbnail of each page appears in the Page Sorter. Using either the Page Sorter or menu
commands, you can display an existing page, create a blank page, create a clone of an existing
page or delete an existing page.
Creating files
When you start SMARTNotebook software for the first time, the Welcome screen opens
automatically. When you start the software subsequent times, a new .notebook file opens
automatically. However, you can create a new file at any time.

CHAPTER 2
CREATING AND WORKING WITH FILES AND PAGES
24 smarttech.com/kb/171185
To create a file
Select File > New.
If you’re working on a file with unsaved changes, a dialog box appears and prompts you to
save the current file. Press Yes to save your changes, and then follow the on-screen
instructions.
Opening files
SMARTNotebook 17 software opens and saves your files in .notebook format, which is also the
default file format for SMARTNotebook 9.5 to 16 software.
The method by which you open a file is the same for all versions of SMARTNotebook software.
To open a file
1.
Press Open File .
The Open dialog box appears.
2. Browse to and select the file.
3. Press Open.
TIP
You can open a recently opened file by selecting the File menu, and then selecting the file
name (Windows operating systems) or File > Open Recent (OS X operating systems).
Displaying pages in a file
You can display any page in the file using the Page Sorter. You can display the next or previous
page in the file using buttons or gestures.
To display a page
1.
If the Page Sorter isn’t visible, press Page Sorter .
2. Press the thumbnail of the page you want to display.

CHAPTER 2
CREATING AND WORKING WITH FILES AND PAGES
25 smarttech.com/kb/171185
To display the next page in a file
Press Next Page .
OR
Swipe your finger across the page from right to left.
A message appears, displaying the current page’s number.
To display the previous page in a file
Press Previous Page .
OR
Swipe your finger across the page from left to right.
A message appears, displaying the current page’s number.

CHAPTER 2
CREATING AND WORKING WITH FILES AND PAGES
26 smarttech.com/kb/171185
Creating pages
You can add a blank page to the open file using the Add Page button or the Page Sorter.
To insert a page using the Add Page button
Press Add Page .
The new page appears after the current page.
To insert a page using the Page Sorter
1.
If the Page Sorter isn’t visible, press Page Sorter .
2. Select the thumbnail of the page you want the new page to appear after.
3. Press the thumbnail’s menu arrow, and then select Insert Blank Page.
The new page appears after the selected page.
Cloning pages
As an alternative to creating a blank page, you can create a duplicate (or “clone”) of an existing
page.
NOTE
You can clone a page only if it contains content.
To clone a page
1.
If the Page Sorter isn’t visible, press Page Sorter .
2. Select the thumbnail of the page you want to clone.
3. Press the thumbnail’s menu arrow, and then select Clone Page.
The cloned page appears immediately after the current page.
NOTE
You can repeat this process as many times as you want.

CHAPTER 2
CREATING AND WORKING WITH FILES AND PAGES
27 smarttech.com/kb/171185
Renaming, rearranging and grouping pages
When you create a page, SMARTNotebook software automatically names the page with the date
and time of its creation. You can also rearrange and group pages.
To rename a page
1.
If the Page Sorter isn’t visible, press Page Sorter .
2. Double-click the page’s name.
3. Type a new name for the page.
4. Press elsewhere.
To rearrange pages
1.
If the Page Sorter isn’t visible, press Page Sorter .
2. Press the thumbnail of the page you want to move in the file.
A blue border appears around the thumbnail.
3. Drag the thumbnail to its new position in the Page Sorter.
A blue line indicates the page’s new position.
4. Release the thumbnail.
To create a group (Windows)
1.
If the Page Sorter isn’t visible, press Page Sorter .
By default, all the pages in a Notebook file are already part of a group titled Group 1. You can
rename Group 1 by typing a new name.
2. To add a second group, press the first group’s menu arrow, and then select Add New Group.
A second group, with a new, blank page, appears below the first.
3. Type a name for the second group.

CHAPTER 2
CREATING AND WORKING WITH FILES AND PAGES
28 smarttech.com/kb/171185
NOTE (MAC)
If you’re using SMART Notebook software on a Mac computer the procedure is slightly different.
Instead of choosing Add New Group from the default group’s menu arrow, select Edit Page
Groups. This action displays current groups in the page area, where you can create, rename,
move, or delete them.
The next four procedures are also affected by this difference. On a Mac, you select the Edit
Page Groups function to display groups in the page area for editing rather than editing them
directly in the Page Sorter.
To move pages within or between groups (Windows)
Drag a page’s thumbnail to a new position within the group or into a different group.
To move a group (Windows)
Drag the group’s title bar to the group’s new position.
NOTES
l You can also rearrange groups by pressing a group’s menu arrow, and then selecting Move
Up or Move Down.
l SMARTNotebook software numbers pages sequentially across a file. If you change the
order of groups, SMARTNotebook software renumbers the pages in the groups
accordingly.
To delete a group and keep its pages (Windows)
Move the pages in a group to different groups. When a group contains no pages, SMART
Notebook software deletes it automatically.
To delete a group and all pages in the group (Windows)
Press the group’s menu arrow and select Delete Group.

CHAPTER 2
CREATING AND WORKING WITH FILES AND PAGES
29 smarttech.com/kb/171185
Deleting pages
You can delete a page from the current file using the Delete Page button or the Page Sorter.
TIP
As an alternative to deleting a page, you can clear all of its objects (see Clearing pages on
page161).
To delete a page using the Delete Page button
1. If you haven’t done so already, display the page you want to delete.
2.
Select Delete Page .
To delete a page using the Page Sorter
1.
If the Page Sorter isn’t visible, press Page Sorter .
2. Select the thumbnail of the page you want to delete.
3. Press the thumbnail’s menu arrow, and then select Delete Page.
Saving files
SMARTNotebook 17 software opens and saves your files in .notebook format, which is also the
default file format for SMARTNotebook 9.5 to 16 software.
To save a new file
1.
Press Save .
The Save As dialog box appears.
2. Browse to where you want to save the new file.
3. Type a name for the file in the File name box.
4. Press Save.
To save an existing file
Press Save .

CHAPTER 2
CREATING AND WORKING WITH FILES AND PAGES
30 smarttech.com/kb/171185
To save an existing file with a new name or location
1. Select File > Save As.
The Save As dialog box appears.
2. Browse to where you want to save the new file.
3. Type a name for the file in the File name ox.
4. Press Save.
To save files automatically (Windows)
1. Select File > Timed Saves.
The Timed Save Wizard appears.
2. Select Every time I move to a different page to save your file automatically every time you
select a different page.
OR
Select 1 minute, 5 minutes, 15 minutes or 30 minutes to save your file automatically after a
specified period of time.
3. Press Next.
4. Select Notebook Document.
5. Press Next.
The Save As dialog box appears.
6. Browse to where you want to save the new file.
7. Type a name for the file in the File name box. SMARTNotebook software automatically saves
the file with the .notebook file extension.
8. Press Save.
Printing files
You can print all pages or select pages in a .notebook file. You can print the pages as thumbnails,
handouts or full pages.
To print a file when using Windows operating systems
1. Select File > Print.
The Print dialog box appears.

CHAPTER 2
CREATING AND WORKING WITH FILES AND PAGES
31 smarttech.com/kb/171185
2. Press Thumbnails, Handouts or Full Page.
3. Optionally, type header text in the Header box, footer text in the Footer box and the current
date in the Date box.
4. Optionally, select the Show page numbers check box to show a page number on each page.
5. If you pressed Thumbnails or Handouts in step 2, select a thumbnail size in the Thumbnail
size drop-down list and, optionally, select the Page borders check box to show a border
around each thumbnail and the Thumbnail titles check box to show titles under each
thumbnail.
6. Select All to include all pages.
OR
Select Pages to include select pages, and then type the page numbers in the box. Separate
individual page numbers with commas and separate page ranges with a hyphen (for example,
1,2,4-7).
7. Press the Printer Setup tab.
8. Specify other print settings, including the printer name and the number of copies.
9. Press Print.
To print a file when using OS X operating systems
1. Select File > Print.
A dialog box appears.
2. Press Thumbnails, Handouts or Full Page.
3. Optionally, type header text in the Header box, footer text in the Footer box and the current
date in the Date box.
4. Optionally, select the Show page borders check box to show a border around each printed
page.
5. Optionally, select the Show page numbers check box to show a page number on each page.
6. If you pressed Thumbnails or Handouts in step 2, select a thumbnail size in the Thumbnail
Size drop-down list and, optionally, select the Show Thumbnail titles check box to show titles
under each thumbnail.
7. Press Continue.
A dialog box appears.
8. If all print settings aren’t visible, press the disclosure triangle beside the Printer drop-down list.

CHAPTER 2
CREATING AND WORKING WITH FILES AND PAGES
32 smarttech.com/kb/171185
9. Select All to include all pages.
OR
Select From to include select pages, and then type the page range.
10. Select other print settings, including the printer name and the number of copies.
11. Press Print.
Exporting files
You can export your .notebook files to the following formats:
l Web pages
l Picture formats
o
BMP
o
GIF (Windows operating systems)
o
JPEG
o
PNG
o
TIFF (OS X operating systems)
l PowerPoint® (Windows operating systems)
l PDF
l Interactive Whiteboard Common File Format (CFF)
NOTES
For OSX operating systems, note the following:
l SMARTNotebook software doesn’t include attachments when you export files as picture
files (Windows operating systems) .To include attachments, you must export your file as
either web pages or PDF (Adobe® Reader® 8.0 or later).
l SMARTNotebook software doesn’t include links when you export files as web pages,
picture files or PDF. SMARTNotebook software doesn’t include attachments when you
export files as picture files or PDF. To include attachments, you must export your file as web
pages.
l SMARTNotebook software doesn’t export files that you attach to your .notebook file as
shortcuts. If you want to include an attachment, attach a copy of the file.

CHAPTER 2
CREATING AND WORKING WITH FILES AND PAGES
33 smarttech.com/kb/171185
l SMARTNotebook software doesn’t export files that you attach to your .notebook file as
aliases. If you want to include an attachment, attach a copy of the file.
l SMARTNotebook software doesn’t export some gradient, pattern and image effects.
These effects might appear as a solid fill or appear incorrectly in the exported file.
To export a file as web pages
1. Select File > Export As > Web Page.
A dialog box appears.
2. Browse to where you want to export the file.
3. Type a name for the file in the File name box.
4. Type a name for the file in the Save As box.
5. Press Save.
To export a file as a picture file
1. Select File > Export As > Image Files.
A dialog box appears.
2. Select a folder where you want to export the files.
3. Select a picture format in the Image Type drop-down list.
4. Select a picture size in the Size drop-down list.
5. Select a picture format in the Image Format drop-down list.
6. Select a picture size in the Image Size drop-down list.
7. Type a name for the files in the Save As box.
8. Press OK.
9. Press Save.
To export a file as a PowerPoint file
1. Select File > Export As > PowerPoint.
The Save As dialog box appears.
2. Browse to where you want to export the file.
3. Type a name for the file in the File name box.

CHAPTER 2
CREATING AND WORKING WITH FILES AND PAGES
34 smarttech.com/kb/171185
4. Select PowerPoint 2007 Files (*.pptx) or PowerPoint Files (*.ppt) in the Save at type
drop-down list.
5. Press Save.
To import a PowerPoint file
1. Select File > Import.
The Open dialog box appears.
2. Select All PowerPoint Files (*.ppt;*.pptx) in the Files of type drop-down list.
3. Browse to and select the PowerPoint file you want to import.
4. Press Open.
SMARTNotebook software adds the contents of the PowerPoint file to a .notebook file.
To export a file as a PDF file
1. Select File > Export As > PDF.
The Export PDF dialog box appears.
2. Press Thumbnails, Handouts or Full Page.
3. Optionally, type header text in the Header box, footer text in the Footer box and the current
date in the Date box.
4. Optionally, select the Show page numbers check box to show a page number on each page.
5. If you pressed Thumbnails or Handouts in step 2, select a thumbnail size in the Thumbnail
size drop-down list and, optionally, select the Page borders check box to show a border
around each thumbnail and the Thumbnail titles check box to show titles under each
thumbnail.
6. Select All to include all pages.
OR
Select Pages to include select pages, and then type the page numbers in the box. Separate
individual page numbers with commas and separate page ranges with a hyphen (for example,
1,2,4-7).
7. Press Save.
The Save as PDF File dialog box appears.
8. Browse to where you want to export the file.

CHAPTER 2
CREATING AND WORKING WITH FILES AND PAGES
35 smarttech.com/kb/171185
9. Type a name for the file in the File name box.
10. Press Save.
To export a file as a PDF file
1. Select File > Export As > PDF.
A dialog box appears.
2. Press Thumbnails, Handouts or Full Page.
3. Optionally, type header text in the Header box, footer text in the Footer box and the current
date in the Date box.
4. Optionally, select the Show page borders check box to show a border around each printed
page.
5. Optionally, select the Show page numbers check box to show a page number on each page.
6. If you pressed Thumbnails or Handouts in step 2, select a thumbnail size in the Thumbnail
Size drop-down list and, optionally, select the Show Thumbnail titles check box to show titles
under each thumbnail.
7. Press Continue.
The Save dialog box appears.
8. Browse to where you want to export the file.
9. Type a name for the file in the Save As box.
10. Press Save.
To export a file as a CFF file
1. Select File > Export As > CFF.
A dialog box appears.
2. Browse to where you want to export the file.
3. Type a name for the file in the File name box.
4. Type a name for the file in the Save As box.
5. Press Save.
To import a CFF file
1. Select File > Import.
The Open dialog box appears.

CHAPTER 2
CREATING AND WORKING WITH FILES AND PAGES
36 smarttech.com/kb/171185
2. Select All Common File Format Files (*.iwb) in the Files of type drop-down list.
3. Select File > Import > All Common File Format Files (.IWB).
A dialog box appears.
4. Browse to and select the file you want to import.
5. Press Open.
The file opens.
Attaching files to e-mail messages
You can send your file to others by attaching the file, or a PDF version of the file, to an e-mail
message.
NOTE
Attaching files to email messages can only be performed with Windows operating systems.
To attach a file to an e-mail message
Select File > Send To > Mail Recipient.
Your default e-mail program starts, creates a new message and attaches the current file to the
message.
If you haven’t saved the file, SMARTNotebook software saves it as a temporary file called
untitled.notebook and your e-mail program attaches this temporary file to the e-mail
message.
To attach a file to an e-mail message as a PDF
Select File > Send To > Mail Recipient (as PDF).
Your default e-mail program starts, creates a new message and attaches a PDF of the current
file to the message.
If you haven’t saved the file, SMARTNotebook software saves the PDF file as a temporary file
called untitled.pdf and your e-mail program attaches the temporary file to the e-mail
message.

Chapter 3
37 smarttech.com/kb/171185
Chapter 3: Creating basic objects
Writing, drawing and erasing digital ink 37
Writing, drawing and erasing digital ink 38
Erasing digital ink 40
Creating shapes and lines 40
Creating shapes with the Shapes tool 41
Creating shapes with the Polygons tool 42
Creating shapes with the Shape Recognition Pen tool 43
Creating straight lines and arcs 44
Creating and working with text 44
Typing text 45
Formatting text 45
Resizing text objects 47
Cutting, copying and pasting text objects 48
Inserting mathematical symbols 48
Checking the spelling of text 49
Creating and working with tables 50
Creating tables 50
Selecting tables, columns, rows or cells 52
Adding or removing columns, rows or cells 53
Resizing tables, columns or rows 54
Adding objects to tables 55
Moving tables 56
Changing a table’s properties 57
Splitting or merging table cells 59
Deleting tables and the contents of tables 60
Objects are the building blocks of content in your .notebook files. An object is simply an item on a
page that you create or import and then work with.
Writing, drawing and erasing digital ink
Digital ink is freehand text or objects that you create using your interactive display’s pen or pens, or
the SMARTNotebook software Pens tool. Writing or drawing digital ink enables you to quickly add
content to your SMARTNotebook software files, either when creating the files or when presenting

CHAPTER 3
CREATING BASIC OBJECTS
38 smarttech.com/kb/171185
the files to students.
After you create digital ink, you can erase it.
Writing, drawing and erasing digital ink
The easiest way to write or draw digital ink is to use your interactive display’s pen or pens.
You can also create freehand objects using the Pens tool. The Pens tool enables you to write or
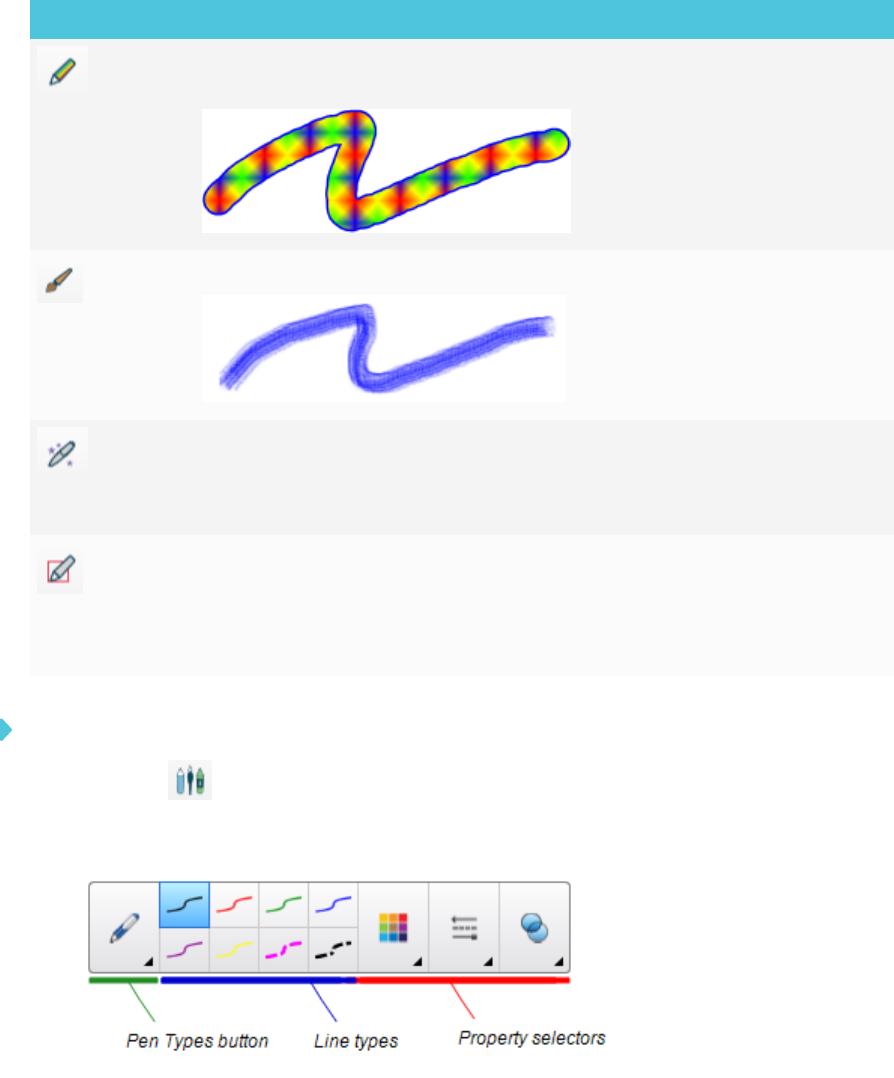
draw digital ink using the following pen types:
Pen type Purpose and example Notes
Standard
Write or draw digital ink in a variety of
colors and line styles.
The Standard pen can be used
for most writing applications.
Calligraphic
Write or draw digital ink, like you do with
the Standard pen type, but with lines of
varying thickness.
The Calligraphic pen type is
useful for teaching students
handwriting.
Crayon
Write or draw crayon-like digital ink. The Crayon pen type is intended
for artistic work, such as painting
and coloring pictures, rather than
writing.
Highlighter
Highlight text and other objects. Use the Highlighter pen to add
emphasis to text.
Text
Write notes that automatically convert to
editable text.
You can edit your text as you
work without touching a
keyboard.
CHAPTER 3
CREATING BASIC OBJECTS
39 smarttech.com/kb/171185
Pen type Purpose and example Notes
Creative
Add colorful elements to your
presentations.
You can create custom Creative
pen styles (see Creating custom
Creative pen styles on
page104).
Paint Brush
Write or draw paint-like digital ink.
The Paint Brush pen type is
intended for artistic work, such as
painting and coloring pictures,
rather than writing.
Magic
Write or draw digital ink that fades after a
few seconds.
You can also use the Magic Pen
to open a magnification window
or a spotlight window (see Using
the Magic Pen on page153).
Shape
Recognition
Draw a variety of shapes with digital ink. You can draw circles, ovals,
squares, rectangles, triangles
and arcs (see Creating shapes
with the Shape Recognition Pen
tool on page43).
To write or draw digital ink
1.
Press Pens .
The Pens tool buttons appear.
2. Press Pen Types, and then select a pen type.
3. Select a line type.

CHAPTER 3
CREATING BASIC OBJECTS
40 smarttech.com/kb/171185
4. Optionally, customize the line type using the property selectors.
NOTE
You can also customize the line type using the Properties tab (see Changing object
properties on page64).
5. Write or draw digital ink on the page.
TIPS
o
Don’t rest your elbow or the palm of your hand on your interactive product’s surface
while you write or draw.
o
If you write or draw multiple lines, SMARTNotebook software automatically combines
the lines into a single object. For example, if you write the letters of a word,
SMARTNotebook software combines the individual letters, enabling you to interact
with the whole word. If you want to write words on the same line but don’t want them
combined, leave a large gap between them, use different pens, or briefly put the pen
in the pen tray before writing another word (interactive whiteboards only).
o
If you want to write diagonally, write in a straight line, and then rotate it.
o
If you want to write in small letters, write large letters, and then reduce their size.
o
You can fill areas that you’ve enclosed with digital ink.
Erasing digital ink
You can erase digital ink from your interactive display using the eraser or the erasing gesture. If
you’re erasing digital ink from a .notebook file page, you can also erase objects using the Eraser
tool.
NOTE
Although you can erase digital ink, you’re unable to erase other types of objects, including
shapes, lines, text and pictures. To remove these types of objects, you must delete them.
To erase digital ink
1.
Press Eraser , and then select an eraser type.
2. Erase the digital ink.
Creating shapes and lines
In addition to creating freehand shapes and lines by drawing digital ink, you can create shapes and

CHAPTER 3
CREATING BASIC OBJECTS
41 smarttech.com/kb/171185
lines using the tools in SMARTNotebook software.
NOTE
To remove a shape or line from a page, you must delete it. The Eraser tool doesn’t remove
shapes.
Creating shapes with the Shapes tool
You can use the Shapes tool to create a variety of shapes, including perfect circles, perfect
squares, perfect triangles, other geometric shapes, hearts, check marks and Xs.
You can add a shape to your page, and then edit its properties. Alternatively, you can customize a
shape’s outline color, fill color and line thickness, and then add it to your page.
To create a shape
1.
Press Shapes .
The Shapes tool buttons appear.
2. Select a shape on the toolbar.
OR
Press and then select a shape.
3. Optionally, customize the shape using the property selectors.
NOTE
You can also customize the shape using the Properties tab (see Changing object properties
on page64).

CHAPTER 3
CREATING BASIC OBJECTS
42 smarttech.com/kb/171185
4. Create a shape by pressing where you want to place the shape and dragging until the shape
is the size you want.
TIPS
o
You can create perfect circles, squares, triangles and other shapes by holding down
SHIFT as you draw the shape.
o
You can select a shape while the Shapes tool is active without having to switch to
the Select tool . Press the shape once, and a selection rectangle appears around the
shape.
Creating shapes with the Polygons tool
In addition to creating shapes using the Shapes tool, you can create regular polygons with 3 to 15
sides using the Regular Polygons tool.
To create a shape with the Regular Polygons tool
1.
Press Regular Polygons .
The Regular Polygons tool buttons appear.
2. Select a shape on the toolbar.
OR
Press and then select a shape.
NOTE
The number in the shape indicates its number of sides.

CHAPTER 3
CREATING BASIC OBJECTS
43 smarttech.com/kb/171185
3. Optionally, customize the shape using the property selectors.
NOTE
You can also customize the shape using the Properties tab.
4. Create a shape by pressing where you want to place the shape and dragging until the shape
is the size you want.
Creating shapes with the Shape Recognition Pen tool
You can use the Shape Recognition Pen tool to draw circles, ovals, squares, rectangles, triangles
and arcs.
To draw a shape
1.
Press Pens .
The Pens tool buttons appear.
2. Press Pen Types, and then select Shape Recognition Pen.
3. Draw a shape on the page.
If SMARTNotebook software recognizes your drawing as a circle, oval, square, rectangle,
triangle or arc, it adds this shape to the page.

CHAPTER 3
CREATING BASIC OBJECTS
44 smarttech.com/kb/171185
Creating straight lines and arcs
You can use the Lines tool to draw straight lines and arcs.
You can add a line to your page, and then edit its properties. Alternatively, you can customize the
line, and then add it to your page.
To create a straight line or arc
1.
Press Lines .
The Lines tool buttons appear.
2. Select a line or arc type.
3. Optionally, customize the line or arc type using the property selectors.
NOTE
You can also customize the line or arc type using the Properties tab (see Changing object
properties on page64).
4. Create a line by pressing where you want the line to start and dragging to where you want the
line to end.
Creating and working with text
You can create text in SMARTNotebook software by doing any of the following:
l Typing the text using a keyboard connected to your computer
l Typing the text using the on-screen keybarod
l Writing the text and then converting it to typed text using the software’s handwriting
recognition feature
After creating text, you can edit it, check its spelling and change its properties, including font style,
size and color.

CHAPTER 3
CREATING BASIC OBJECTS
45 smarttech.com/kb/171185
Typing text
You can type new text or edit existing text.
To type new text
1.
If a keyboard isn’t accessible, press and hold SMART Board Tools in the notification area
(Windows operating systems) or the Dock (OSX operating system software), and then select
Keyboard.
2.
Press Text Properties , and then select an available font style.
3. Optionally, customize the font style (see Formatting text below).
4. Press where you want the text to start.
5. Type your text.
6. When you’re done, press outside the text object.
To edit existing text
1. Double-click the text object.
2. Edit the text.
3. When you’re done, press outside the text object.
Formatting text
If you want to format all text in a text object, select the text object.
OR
If you want to format specific text in a text object, double-click the text object, and then select the
text.
You can format text using the buttons in the toolbar or the options in the Properties tab or the
Format menu.
NOTE
If the Properties tab isn’t visible, press Properties , and then press Text Style.

CHAPTER 3
CREATING BASIC OBJECTS
46 smarttech.com/kb/171185
The following table presents the formatting changes that you can make using the above tools:
Change Toolbar Properties
tab
Format
menu
Character, paragraph or object level
Change the font face Yes Yes No
Change the font size
TIP
To select a font size that doesn’t appear in the
drop-down list (including font sizes with decimal
values such as 20.5), type the font size in the Font
Size box on the toolbar.
Yes Yes No
Change the color Yes Yes No
Bold, italicize or underline text Yes Yes
Yes
Strike out text Yes
1
Yes Yes
Superscript or subscript text Yes
2
Yes Yes
Paragraph or object level
Change justification (left, right or center) Yes Yes Yes
Change indentation Yes
3
Yes Yes
Create a bulleted or numbered list Yes
4
Yes Yes
Insert a drop cap
TIP
To insert a drop cap at the beginning of a
paragraph, press Drop Cap in the Properties
tab under Text Style.
OR
Select Format > Paragraph > Drop Cap.
No Yes Yes
1
Under More Text Options
2
Under More Text Options
3
Under More Text Options
4
Under More Text Options

CHAPTER 3
CREATING BASIC OBJECTS
47 smarttech.com/kb/171185
Change Toolbar Properties
tab
Format
menu
Change line spacing
TIP
To add spacing between paragraphs, select the
Add space after paragraphs check box in the
Properties tab or select Format > Paragraph >
Line Spacing > Add space after paragraphs.
No Yes Yes
Change language direction (left-to-right or right-to-
left)
NOTE
Select Format > Paragraph > Direction > Left to
Right for languages that read left to right (for
example, English and French).
OR
Select Format > Paragraph > Direction > Right to
Left for languages that read right to left (for
example, Arabic and Hebrew).
No No Yes
Object level
Change text direction (horizontal or vertical) Yes
5
Yes Yes
Change transparency Yes Yes No
Resizing text objects
When you resize a text object, the text in the object changes size.
If you want to resize the text object without changing the size of the text in the object, complete
the following procedure.
To resize a text object
1. Double-click the text object.
2. Press one of the two white circles on either side of text object, and then drag the circle to
increase or reduce the text object’s size.
5
Under More Text Options

CHAPTER 3
CREATING BASIC OBJECTS
48 smarttech.com/kb/171185
Cutting, copying and pasting text objects
You can cut, copy and paste text objects like any other objects. You can also cut and paste text in a
text object.
To cut and paste text to another location on the same page
1. Double-click the text object.
2. Select the text you want to cut.
3. Drag the selected text to another location on the same page.
To cut and paste text to another page
1.
If the Page Sorter tab isn’t visible, press Page Sorter .
2. Double-click the text object.
3. Select the text you want to copy.
4. Drag the selected text to the other page’s icon in the Page Sorter tab.
Inserting mathematical symbols
You can insert a variety of mathematical and scientific symbols into a page.
NOTE
The mathematical symbols are characters only. They don’t perform mathematical operations.
To insert a mathematical symbol
1. Type text on a page.
2.
Press More Text Options and then select Insert Symbol .
A dialog box appears.
3. Press a category.
A list of symbols appears.
4. Press the symbol you want to add to the text.
5. Press Insert.
The symbol appears in the text object.

CHAPTER 3
CREATING BASIC OBJECTS
49 smarttech.com/kb/171185
Checking the spelling of text
As you type text, SMARTNotebook software checks the spelling. If you spell a word incorrectly,
SMARTNotebook software underlines the word red. You can then right-click the word and select
the correct spelling from a list of options.
If you prefer, you can disable this feature and check the spelling using the SpellingCheck dialog
box.
To disable automatic spell checking
1.
Press Text .
2.
Press More Text Options , and then select Check Spelling .
To manually check spelling of a text object
1. Select the text object.
2. Press the object’s menu arrow, and then select Check Spelling.
If SMARTNotebook software finds a misspelled word, the Spelling Check dialog box appears
For OSX, the Spelling and Grammar dialog box appears. This dialog box displays the
misspelled word and suggests alternatives.
3. For each misspelled word, do one of the following:
o
To keep the word’s current spelling for this instance, press Ignore Once.
o
To keep the word’s current spelling for all instances in the file, press Ignore All.
o
To keep the word’s current spelling for all instances in the file and add the spelling to the
dictionary, press Add to Dictionary.
o
To change the word’s spelling for this instance, select the correct word in the
Suggestions list, and then press Change.
o
To change the word’s spelling for all instances in the file, select the correct word in the
Suggestions list, and then press Change All.
NOTE
If you pressed a button by mistake, press Undo to undo the resulting change.
After you complete this step for each misspelled word, a dialog box appears asking whether
you want to check the spelling in the rest of the file.

CHAPTER 3
CREATING BASIC OBJECTS
50 smarttech.com/kb/171185
4. Press Yes to check the remainder of the file.
OR
Press No to close the Spelling Check dialog box without checking the rest of the file.
Creating and working with tables
You can create tables in SMARTNotebook software or paste them from other programs. After you
create a table, you can insert objects into the table’s cells.
If you want to customize a table, you can select a table, column, row, cell or selection of cells, and
then do any of the following:
l Move the table
l Change line type, fill and text properties
l Resize the table, a column or a row
l Insert or remove columns, rows or cells
l Split or merge cells
l Delete the table
Creating tables
To insert a table using the Table button
1.
Press Table .
A grid appears.

CHAPTER 3
CREATING BASIC OBJECTS
51 smarttech.com/kb/171185
2. Move the pointer over the grid to select the number of columns and rows that you want in the
table.
NOTE
The cells of the grid correspond to the cells of your table.
TIP
The grid displays eight rows and eight columns by default. You can add rows by moving the
pointer past the bottom row. Similarly, you can add columns by moving the pointer past the
right row.
If you’re using a mouse, click and hold the left mouse button while moving the pointer.
3. Press the screen or click your mouse.
The table appears on the page.
To insert a table using the Insert Table dialog box
1. Select Insert > Table.
The Insert Table dialog box appears.
2. Type the number of rows and columns in the boxes.
3. Optionally, select Make cells square to make the table cells square.
4. Optionally, select Remember dimensions for new tables to use the current table dimensions
for all future tables that you create in SMARTNotebook software.
5. Press OK.
The table appears on the page.

CHAPTER 3
CREATING BASIC OBJECTS
52 smarttech.com/kb/171185
To draw a table
1.
Press Pens .
The Pens tool buttons appear.
2. Press Pen Types, and then select Pen or Calligraphic Pen.
3. Select a line type.
4. Draw a table on the screen.
TIP
Make the lines of the table as straight as possible and connect the corners.
5.
Press Select .
6. Select your drawing.
7. Press the menu arrow, and then select Recognize Table.
If SMARTNotebook software recognizes your drawing as a table, it removes your drawing
and adds a table to the page.
Selecting tables, columns, rows or cells
You can select a table, column, row, cell or selection of cells. After you select a table or part of a
table, you can do the following:
l Move the table
l Change the table’s or cells’ properties
l Resize the table, columns or rows
l Add or remove columns, rows or cells
l Split or merge cells
l Delete the table

CHAPTER 3
CREATING BASIC OBJECTS
53 smarttech.com/kb/171185
To select a table
1.
Press Select .
2. Press outside, but near to, a corner of the table, and then drag to the opposite corner.
NOTE
Don’t start dragging from inside the table. If you do, you select a table cell instead of the
table.
To select a column
1.
Press Select .
2. Press inside the column’s top cell, and then drag to the bottom cell.
To select a row
1.
Press Select .
2. Press inside the row’s leftmost cell, and then drag to the rightmost cell.
To select a cell
1.
Press Select .
2. Press inside the cell.
To select multiple cells
1.
Press Select .
2. Press inside the top and leftmost cell, and then drag to the bottom and rightmost cell.
NOTE
If you select multiple cells and drag them to a different position on the page, you create a
new table consisting of the selected cells and their contents.
Adding or removing columns, rows or cells
If you want to customize a table, you can add columns or rows.

CHAPTER 3
CREATING BASIC OBJECTS
54 smarttech.com/kb/171185
To add a column
1. Select a column.
2. Press the column’s menu arrow, and then select Insert Column.
A new column appears to the right of the current column.
To remove a column
1. Select the column.
2. Press the column’s menu arrow, and then select Delete Column.
To add a row
1. Select a row.
2. Press the row’s menu arrow, and then select Insert Row.
A new row appears below the current row.
To remove a row
1. Select the row.
2. Press the row’s menu arrow, and then select Delete Row.
To remove a cell
1. Select the cell.
2. Press the cell’s menu arrow, and then select Delete Cells.
NOTE
o
Removing a cell deletes the contents of the cell.
o
You’re unable to remove a cell if it provides the only connection between two halves
of a table.
Resizing tables, columns or rows
If you want to customize a table, you can resize the table, a column or a row.

CHAPTER 3
CREATING BASIC OBJECTS
55 smarttech.com/kb/171185
To resize a table
1. Select the table.
2. Press the table’s resize handle (the gray circle), and then drag it to increase or reduce the size
of the table.
To resize a column
1.
Press Select .
2. Press the vertical border to the right of the column.
A resize pointer appears.
3. Drag the vertical border to resize the column.
To resize a row
1.
Press Select .
2. Press the horizontal border below the row.
A resize pointer appears.
3. Drag the horizontal border to resize the row.
To resize all cells in a table
1. Select the table.
2. Press the table’s menu arrow, and then select Adjust size.
3. Select one of the following options:
o
Make same height to make all cells in the table the same height.
o
Make same width to make all cells in the table the same width.
o
Make same size to make all cells in the table the same height and width.
o
Make cells square to make all cells in the table square.
Adding objects to tables
After you insert a table on a page, you can insert objects into the table’s cells.

CHAPTER 3
CREATING BASIC OBJECTS
56 smarttech.com/kb/171185
NOTE
You can add only one object to each cell. If you want to add multiple objects to a cell, do one of
the following:
l Group the objects before adding them to the table (see Grouping objects on page75).
l Select all of the objects at once, and then add them to the table as described in the
following procedure. SMARTNotebook software automatically groups the objects in the
table cell.
To add an object to a table
1. Select the object.
2. Drag the object to the table cell.
NOTE
You’re unable to move an object if it’s locked in place.
The object appears in the table cell.
NOTE
If you add a text object to a table, the cell resizes to fit to the text object. If you add other
object types to the table, the object resizes to fit the cell.
To remove an object from a table
1. Select the object.
2. Drag the object out of the table.
Moving tables
After you create a table, you can move it on the page.
To move a table
Select the table, and then drag it to a different position on the page.
OR
Select all of the table’s cells, and then drag the cells to a different position on the page.

CHAPTER 3
CREATING BASIC OBJECTS
57 smarttech.com/kb/171185
Changing a table’s properties
You can use the Properties tab to change the table’s properties, including its transparency, cell
color and line color.
To change a table’s fill
1. S elect a table, column, row, cell or selection of cells.
2. Press the table’s, column’s, row’s or cell’s menu arrow, and then select Properties.
3. Press Fill Effects.

CHAPTER 3
CREATING BASIC OBJECTS
58 smarttech.com/kb/171185
4. Select a fill style:
Fill style Procedure
None (transparent) Select No fill.
Solid color
a.
Select Solid fill.
b.
Do one of the following:
o
Select one of the 40 colors in the palette.
o
Press More, and then select a color in the dialog box.
o
Press the eyedropper , and then select a color on the
screen.
Gradient of two
colors
a.
Select Gradient fill.
b.
For each color, do one of the following:
o
Select one of the 40 colors in the palette.
o
Press More, and then select a color in the dialog box.
o
Press the eyedropper , and then select a color on the
screen.
c.
Select an option in the Style drop-down list.
Pattern
a.
Select Pattern fill.
b.
Select a pattern.
c.
Press Foreground color, select a color in the dialog box, and
then press OK.
d.
Press Background color, select a color in the dialog box, and
then press OK.
Picture
a.
Select Image fill.
b.
Press Browse.
A dialog box appears.
c.
Browse to and select the picture you want to use as a
background, and then press Open.
NOTE
If you insert a large picture, a dialog box may appear and
prompt you to either reduce the picture’s file size or retain the
picture’s file size. For more information, see Setting image
optimization preferences on page179.
d.
Select Keep image size to keep the picture’s size, regardless of
whether the picture is larger or smaller than the object.
OR
Select Scale image to fit to resize the picture to fit the object.

CHAPTER 3
CREATING BASIC OBJECTS
59 smarttech.com/kb/171185
5. Optionally, drag the Object transparency slider to the right to make the table transparent.
To change a table’s line style
1. Select a table.
NOTE
You can only change the line style of an entire table, not individual cells, columns or rows.
2. Press the table’s, column’s, row’s or cell’s menu arrow, and then select Properties.
3. Press Line Style.
4. Change the table’s line style.
To change a table’s text style
1. Select a table, column, row, cell or selection of cells.
2. Press the table’s, column’s, row’s or cell’s menu arrow, and then select Properties.
3. Press Text Style.
4. Change the table’s text style (see Formatting text on page45).
Splitting or merging table cells
You can add tables to your page and insert objects into the table’s cells. If you want to customize a
table, you can split or merge cells.
To split a cell
1. Select the cell.
2. Press the cell’s menu arrow, and then select Split.
3. Select an option to split the cell into multiple rows and/or columns.
NOTE
If you split a cell that contains content, the content appears in the upper-left cell after the
split.

CHAPTER 3
CREATING BASIC OBJECTS
60 smarttech.com/kb/171185
To merge cells
1. Select the cells.
2. Press the cells’ menu arrow, and then select Merge Cells.
NOTE
If you merge cells that contain content, the merged cell contains the contents of the top-left
cell. If the top-left cell is empty, the merged cell contains the contents of the next available
non-empty cell, moving from left to right, top to bottom.
Deleting tables and the contents of tables
You can delete the contents of a table or the table itself.
NOTE
You can delete all objects on a page, including tables, by clearing the page (see Clearing pages
on page161).
To delete the contents of a table
1. Select the cells containing the content you want to delete.
2.
Press Delete .
To delete a table
1. Select the table.
2. Press the table’s menu arrow, and then select Delete.

Chapter 4
61 smarttech.com/kb/171185
Chapter 4: Working with objects
Selecting objects 62
Changing object properties 64
Changing the fill 64
Filling digital ink drawings 66
Changing other properties 66
Saving tool settings 67
Positioning objects 67
Aligning objects 67
Rearranging stacked objects 69
Cutting, copying and pasting objects 70
Cropping images with a mask 70
Cloning objects 72
Resizing objects 72
Flipping objects 75
Grouping objects 75
Grouping objects automatically 77
Deleting objects 77
After creating an object, you can select it and work with it as described in this chapter.
NOTE
The tasks described in this chapter are for all objects, not just basic objects.

CHAPTER 4
WORKING WITH OBJECTS
62 smarttech.com/kb/171185
Selecting objects
Before you can work with an object, you must select it. You can select an individual object, multiple
objects or all objects on a page. When you select an object, a selection rectangle appears around
it.
The gray circle in the object’s lower-right corner is a resize handle.
The green circle above the object is a rotation handle.
The downward arrow in the object’s upper-right corner is a menu arrow. Press the menu arrow to
display a menu of commands.
NOTE
Pressing an object’s menu arrow gives you access to the same menu as right-clicking the object.

CHAPTER 4
WORKING WITH OBJECTS
63 smarttech.com/kb/171185
To select an object
1.
Press Select .
2. Press the object you want to select.
A selection rectangle appears around the object.
NOTE
If you press an object and a lock symbol appears instead of the menu arrow, the object is
locked. Depending on the type of lock, you might have to unlock the object before you can
manipulate it.
To select multiple objects
1.
Press Select .
2. Press the interactive screen and drag until a rectangle surrounds the objects you want to
select.
OR
Hold down CTRL (Windows operating systems) or the COMMAND (⌘ ) key (OSX operating
system software), and then press the objects you want to select.
A selection rectangle appears around the selected objects.
NOTE
If you draw a rectangle around multiple objects and some of the objects are locked, you
select only the unlocked objects.
To select all objects on a page
Select Edit > Select All.
A selection rectangle appears around all objects on the page.
NOTE
If some of the objects are locked, you select only the unlocked objects.
To select all locked objects on the page
Select Edit > Select All Locked Notes.
A selection rectangle appears around all locked objects on the page.

CHAPTER 4
WORKING WITH OBJECTS
64 smarttech.com/kb/171185
Changing object properties
You can change an object’s properties. The properties you can change depend on the object you
select. You can also select several objects and change their properties at the same time.
Changing the fill
You can change an object’s fill by selecting the object and then setting the fill in the Properties tab
or by clicking Fill , setting the fill, and then selecting the object.
To change an object’s fill by first selecting the object
1. Select the object.
2.
If the Properties tab isn’t visible, press Properties .
3. Press Fill Effects.
4. Select a fill style:
Fill style Procedure
None (transparent) Select No fill.
Solid color
a.
Select Solid fill.
b.
Do one of the following:
o
Select one of the 40 colors in the palette.
o
Press More, and then select a color in the dialog box.
o
Press the eyedropper , and then select a color on the
screen.
Gradient of two
colors
a.
Select Gradient fill.
b.
For each color, do one of the following:
o
Select one of the 40 colors in the palette.
o
Press More, and then select a color in the dialog box.
o
Press the eyedropper , and then select a color on the
screen.
c.
Select an option in the Style drop-down list.

CHAPTER 4
WORKING WITH OBJECTS
65 smarttech.com/kb/171185
Fill style Procedure
Pattern
a.
Select Pattern fill.
b.
Select a pattern.
c.
Press Foreground color, select a color in the dialog box, and
then press OK.
d.
Press Background color, select a color in the dialog box, and
then press OK.
Picture
a.
Select Image fill.
b.
Press Browse.
A dialog box appears.
c.
Browse to and select the picture you want to use as a
background, and then press Open.
NOTE
If you insert a large picture, a dialog box may appear and
prompt you to either reduce the picture’s file size or retain the
picture’s file size. For more information, see Setting image
optimization preferences on page179.
d.
Select Keep image size to keep the picture’s size, regardless of
whether the picture is larger or smaller than the object.
OR
Select Scale image to fit to resize the picture to fit the object.
5. Optionally, drag the Object transparency slider to the right to make the object transparent.
TIP
You can also change an object’s properties using the property selectors on the toolbar.
To change an object’s fill by first pressing the Fill button
1.
Press Fill , and then select a color.
2. Select the object.
3. Repeat step 2 for each object you want to apply the fill to.

CHAPTER 4
WORKING WITH OBJECTS
66 smarttech.com/kb/171185
Filling digital ink drawings
In addition to filling shapes, regular polygons and irregular polygons, you can fill areas enclosed by
digital ink using the Fill button.
NOTES
l To fill an area, you must enclose it with a single digital ink path.
l You’re unable to fill an enclosed area if that area is part of a group (see Grouping objects on
page75).
l When you fill an enclosed area, the fill becomes a separate object, which you can move
away from the original enclosed area. You can fill the enclosed area and move the resulting
fill object multiple times.
Changing other properties
In addition to fill, you can change objects’ line style and text style.
To change an object’s line style
1. Select the object.
2.
If the Properties tab isn’t visible, press Properties .

CHAPTER 4
WORKING WITH OBJECTS
67 smarttech.com/kb/171185
3. Press Line Style.
4. Change the object’s line style.
To change an object’s text style
1. Select the object.
2.
If the Properties tab isn’t visible, press Properties .
3. Press Text Style.
4. Change the object’s text style (see Formatting text on page45).
Saving tool settings
When you select a tool in the toolbar, you can change its default settings using the Properties tab
and then save your changes by clicking Save Tool Properties.
When you save your changes to a tool’s default settings, the tool’s button displays those changes:
To restore the default settings, see Customizing the toolbar on page175.
Positioning objects
You can change the position of an object by moving it to another area of the existing page or to
another page. You can also align objects and change the order of stacked objects.
Aligning objects
You can use the Alignment Tools add-on to align and distribute objects on a page. You can align
selected objects on the bottom, left, right, top, vertically or horizontally. You can also align stacked
objects vertically or horizontally.
If you want, you can display guidelines on a page to assist you in manually aligning objects with
other objects, as well as the page’s vertical and horizontal centers. You can also set objects to
align automatically with these guidelines when you move the objects on a page.

CHAPTER 4
WORKING WITH OBJECTS
68 smarttech.com/kb/171185
To align objects on a page
1. Select the objects you want to align.
2.
Press Add-ons on the toolbar to display the Alignment Tools buttons.
3. Press an alignment button:
Button
Name
Select this button to:
Align bottom
Align selected objects along their bottom edge.
Align left
Align selected objects along their left edge.
Align middle X
Align selected objects vertically through the middle of the
objects.
Align middle Y
Align selected objects horizontally through the middle of the
objects.
Align right Align selected objects along their right edge.
Align top Align selected objects along their top edge.
Stack
horizontally
Align selected stacked objects horizontally.
Stack vertically Align selected stacked objects vertically.
To display guidelines
1. Select View > Alignment.
A dialog box appears.
2. Select check boxes to specify which guidelines you want to display:
Check box Select this check box to:
Show guides for
active objects
Display a guideline when you move an object into alignment with
another object.
Show vertical page
center guide
Display a guideline when you move an object into alignment with the
page’s vertical center.
Show horizontal
page center guide
Display a guideline when you move an object into alignment with the
page’s horizontal center.
Snap objects to
guides
Automatically align objects to guidelines when you move the
objects on a page.

CHAPTER 4
WORKING WITH OBJECTS
69 smarttech.com/kb/171185
3. If you want to change the color of the guidelines, press the colored bar to the left of Guide
color, and then select a color.
4. Press OK.
Rearranging stacked objects
If objects overlap on a page, you can rearrange the order of the stack (that is, you can control
which objects appear in front of others).
NOTE
You’re unable to move an object in the stack if it’s locked in place.
To move an object to the front of the stack
1. Select the object.
2. Press the object’s menu arrow, and then select Order > Bring to Front.
To move an object to the back of the stack
1. Select the object.
2. Press the object’s menu arrow, and then select Order > Send to Back.
To move an object one place forward in the stack
1. Select the object.
2. Press the object’s menu arrow, and then select Order > Bring Forward.
To move an object one place backward in the stack
1. Select the object.
2. Select the object’s menu arrow, and then select Order > Send Backward.

CHAPTER 4
WORKING WITH OBJECTS
70 smarttech.com/kb/171185
Cutting, copying and pasting objects
You can cut, copy and paste objects—including text, pictures, straight lines, arcs and shapes—in a
.notebook file.
TIPS
l You can paste text from other programs into SMARTNotebook software and cut text from
SMARTNotebook software and paste it into other programs.
l You can create an exact copy of an object by cloning it.
To cut and paste an object
1. Select the object.
2. Press the object’s menu arrow, and then select Cut.
TIP
Alternatively, you can press Cut if you added this button to the toolbar.
3. If you want to paste the object onto a different page, display that page.
4.
Press Paste .
To copy and paste an object
1. Select the object.
2. Press the object’s menu arrow, and then select Copy.
TIP
Alternatively, you can press Copy if you added this button to the toolbar (see
Customizing the toolbar on page175).
3. If you want to paste the item onto a different page, display that page.
4.
Press Paste .
Cropping images with a mask
You can use a mask to crop images. The mask hides the section of the image you crop out instead
of deleting it. This enables you to edit the mask if you want to crop a different section of the image.
You can also unmask the image to restore the original image.

CHAPTER 4
WORKING WITH OBJECTS
71 smarttech.com/kb/171185
NOTE
You can crop raster images only. For example, you can crop raster pictures you insert from the
Gallery or from your computer. You’re unable to crop other types of objects.
To crop an image with a mask
1. Select the image.
2. Press the image’s menu arrow, and then select Mask.
A cropping mask appears on the image. Cropped out sections of the image are shaded gray.
3. Drag the image until the section of the image you want to keep appears in the cropping mask.
4. Optionally, press one of the cropping mask’s eight resize handles (the white circles), and then
drag it to increase or reduce the cropping mask’s size.
5. Press anywhere outside of the image to crop it.
To edit the mask
1. Select the image.
2. Press the image’s menu arrow, and then select Edit Mask.
A cropping mask appears on the image. Cropped out sections of the image are shaded gray.
3. Drag the image until the section of the image you want to keep appears in the cropping mask.
4. Optionally, press one of the cropping mask’s eight resize handles (the white circles), and then
drag it to increase or reduce the cropping mask’s size.
5. Press anywhere outside of the image to crop it.

CHAPTER 4
WORKING WITH OBJECTS
72 smarttech.com/kb/171185
To restore the image
1. Select the image.
2. Press the image’s menu arrow, and then select Unmask.
The original image is restored.
Cloning objects
You can create a duplicate of an object by using the Clone command, or you can create multiple
copies of an object using the Infinite Cloner command.
NOTE
You can also copy and paste objects, including text, images, straight lines, arcs and shapes (see
Cutting, copying and pasting objects on page70).
To clone an object
1. Select the object.
2. Press the object’s menu arrow, and then select Clone.
A duplicate object appears on the page.
To clone an object using the Infinite Cloner
1. Select the object.
2. Press the object’s menu arrow, and then select Infinite Cloner.
3. Select the object again.
An infinity symbol appears instead of the object’s menu arrow.
4. Drag the object to another position on the page.
5. Repeat step 4 as many times as you want.
6. When you finish cloning the object, select the original object.
7. Press the infinity symbol, and then clear the selection of Infinite Cloner.
Resizing objects
You can resize objects on a page by using the resize handle or the scale gesture (if your interactive

CHAPTER 4
WORKING WITH OBJECTS
73 smarttech.com/kb/171185
product supports multitouch gestures).
NOTE
You’re unable to resize an object if it’s locked in place.
To resize an object using the resize handle
1. Select the object.
2. Press the object’s resize handle (the gray circle), and then drag it to increase or reduce the
object’s size.
NOTE
To keep the shape’s original height-to-width ratio, hold down SHIFT while you drag the
resize handle (Windows operating system only).
To resize multiple objects using the resize handle
1. Group the objects (see Grouping objects on page75), and then select the group.
A selection rectangle appears around the group.
2. Press the resize handle in the lower-right corner of the selection rectangle.
3. Drag the resize handle to increase or reduce the size of the objects.
To resize or scale an object from its center using gestures
1. Select the object.
2. Using one finger on each hand, press the screen at opposite ends of the object.

CHAPTER 4
WORKING WITH OBJECTS
74 smarttech.com/kb/171185
3. Drag your fingers in opposite directions to increase the object’s size.
OR
Drag your fingers toward each other to decrease the object’s size.
To resize an object from its corner or side using gestures
1. Select the object.
2. Using one finger on each hand, press the screen at the corner or side you want to resize the
object from.
3. Drag your fingers in opposite directions to increase the object’s size.
OR
Drag your fingers toward each other to decrease the object’s size.
To resize multiple objects using gestures
1. Select the objects.
2. Using one finger on each hand, press the screen at opposite ends of one of the objects.

CHAPTER 4
WORKING WITH OBJECTS
75 smarttech.com/kb/171185
3. Drag your fingers in opposite directions to increase the objects’ size.
OR
Drag your fingers toward each other to decrease the objects’ size.
NOTE
The objects resize from their centers regardless of where you press the screen.
Flipping objects
You can flip an object on a page.
NOTE
You’re unable to flip an object if it’s locked in place.
To flip an object
1. Select the object.
2. Press the object’s menu arrow, and then select Flip > Up/Down or Flip > Left/Right.
To flip multiple objects
1. Select the objects.
2. Press the menu arrow on any one of the selected objects, and then select Flip > Up/Down or
Flip > Left/Right.
Grouping objects
You can create a group of objects, which lets you interact with all grouped items at the same time.
After you create a group, you can select, move, rotate or resize the group as if it were an individual
object. However, if you want to interact with an individual object in a group, you must ungroup the
objects first.

CHAPTER 4
WORKING WITH OBJECTS
76 smarttech.com/kb/171185
You can group and ungroup objects manually using the menu or the shake gesture.
NOTES
l You’re unable to use the shake gesture with a mouse.
l The shake gesture works only when you initially contact your interactive product’s surface.
To group objects using the menu
1. Select the objects.
2. Press the menu arrow of any one of the selected objects, and then select Group > Group.
To ungroup objects using the menu
1. Select the group.
2. Press the group’s menu arrow, and then select Group > Ungroup.
To group objects with the shake gesture
Quickly shake your finger over the objects three times.
To ungroup objects with the shake gesture
Quickly shake your finger over the group three times.

CHAPTER 4
WORKING WITH OBJECTS
77 smarttech.com/kb/171185
Grouping objects automatically
If you write or draw multiple lines, SMARTNotebook software automatically combines the lines
into a single object. For example, if you write the letters of a word, SMARTNotebook software
combines the individual letters, enabling you to interact with the whole word. If you want to write
words on the same line but don’t want them combined, leave a large gap between them, use
different pens, or briefly put the pen in the pen tray before writing another word (interactive
whiteboards only).
If SMARTNotebook software combined lines that you want to manipulate individually, ungroup the
lines as described above.
Deleting objects
Although you can erase digital ink, you’re unable to erase some types of objects, including text,
shapes, straight lines, arcs and pictures. To remove these types of objects from a page, you must
delete them.
NOTE
You’re unable to delete an object if it’s locked in place. To delete a locked object from a page,
you must unlock it.
To delete an object
1. Select the object.
2. Press the object’s menu arrow, and then select Delete.

Chapter 5
79 smarttech.com/kb/171185
Chapter 5: Inserting and sharing content
Using the SMARTNotebook 17.1 Gallery 80
Inserting content from the Gallery 80
Adding content to the Gallery 82
Organizing content in the Gallery 83
Sharing content with other teachers 84
Using the SMARTExchange website 85
Inserting content from the SMARTExchange website 85
Sharing content using the SMARTExchange website 86
Using the Notebook Math Equation Editor 87
To open the Math Equation Editor 87
Using the Math Equation Editor with GeoGebra 88
Inserting content from GeoGebra 89
Inserting equations with the math equation tool 90
Using SMART Notebook Document Writer - Print to Board 92
Using Print to Board in SMART Notebook Document Writer 92
Using Print to SMART Notebook 93
Using Share to the Notebook Player app 93
Using Create link to this document 94
Using Share 95
To use Share 95
Share using a link 97
Inserting content from other sources 97
Inserting pictures 98
Inserting multimedia files 98
Importing PowerPoint files (Windows) 98
You can insert pictures, multimedia files and other content into your .notebook files from a variety
of sources. These sources include the Gallery, the SMARTExchange® website and the Internet.
After inserting your content, you can organize it using the Gallery and share it with other teachers
using the Gallery or the SMARTExchange website.

CHAPTER 5
INSERTING AND SHARING CONTENT
80 smarttech.com/kb/171185
Using the SMARTNotebook 17.1 Gallery
Use the Gallery tab in the SMARTNotebook software user interface to browse or search for lesson
activities and content. You can then add that content to your .notebook files.
You can organize your content using the Gallery and share it with other teachers.
Inserting content from the Gallery
The Gallery contains Lesson Activity Examples, which includes Activity Builder examples (see
Creating a matching lesson activity on page99), interactive techniques and 3D models to aid you
in creating lesson activities.
When your system administrator installs SMARTNotebook software, he or she can install the
following additional items:
l Gallery Essentials is a collection of thousands of pictures, multimedia objects and more,
organized into subject-specific categories.
l Lesson Activity Toolkit is a collection of customizable tools and templates that you can use to
create professional-looking and interactive lessons. The toolkit helps you create engaging
content like word games, quizzes and sorting activities.
IMPORTANT
SMART Notebook 17.1 does not play Adobe Flash content. However, some of your Flash content
may be accessible through your web browser. You will see a notification when you attempt to
open Flash content in Notebook 17.1 for both Windows and OS X operating systems. See
Knowledge Base article 171128 for more information.
The Gallery is divided into two sections. The top section of the Gallery is the category list. When
you select a category or subcategory in the list, its contents appear in the bottom section of the
Gallery.
TIP
You can change the size of the category list and content list by pressing the boundary between
them, and then dragging it up or down.

CHAPTER 5
INSERTING AND SHARING CONTENT
81 smarttech.com/kb/171185
You can browse the category list to view the contents of each category. Thumbnails in the
categories provide preview images of the content.
l In Pictures, pictures appear as thumbnails.
l In Interactive and Multimedia, video objects appear as a single frame from the videos, sound
objects appear with a speaker icon in the lower-left corner.
l Adobe Flash content is not supported for Windows or OS X operating systems. However,
some of your Flash content may be accessible through your web browser. You will see a
notification when you attempt to open Flash content in Notebook 17 for OS X operating
systems.
l In 3D Objects, 3D models appear as thumbnails.
l In Notebook Files and Pages, files appear as binders and pages appear with a folded upper-
right corner.
l In Backgrounds and Themes, backgrounds appear as pages with a folded lower-right corner
and themes appear as thumbnails.
You can search for a Gallery item using the keyword search.
After browsing or searching for a Gallery item, you can add it to your .notebook file.
To browse the Gallery
1.
If the Gallery isn’t visible, press Gallery .
2. Press a category’s plus sign to view its subcategories (for Windows operating systems) or
press a category’s disclosure triangle to view its subcategories (for OS X operating systems).
NOTE
You can close a category by pressing the category’s minus sign (Windows operating
systems). For OS X operating systems. you can close a category by pressing the category’s
disclosure triangle a second time.
3. Select a category or subcategory to display its contents.
To search the Gallery
1.
If the Gallery isn’t visible, press Gallery .
2.
Type a keyword into the Type search terms here box, and then press Search .
The Gallery displays all content containing the keyword.

CHAPTER 5
INSERTING AND SHARING CONTENT
82 smarttech.com/kb/171185
To add a Gallery item to your .notebook file
1.
If the Gallery isn’t visible, press Gallery .
2. Browse or search for the Gallery item you want to add.
3. Double-click the Gallery item’s thumbnail.
o
If you add a background, it replaces the page’s existing background.
o
If you add a page from a .notebook file, SMARTNotebook software inserts it before the
current page.
o
If you add a .notebook file, SMARTNotebook software inserts the file’s pages before the
current page.
Adding content to the Gallery
You can add SMARTNotebook software objects and pages as well as supported files to the My
Content category in the Gallery.
To add an object to the Gallery
1.
If the Gallery isn’t visible, press Gallery .
2. Select the object that you want to add to the Gallery.
3. Drag the object from the page to the Gallery’s My Content category or one of its
subcategories.
NOTES
o
You’re unable to drag an object if it’s locked in place.
o
If you want to change a Gallery item’s name, select the item, press its menu arrow, and
then select Rename.
To add a page to the Gallery
1. Create and modify objects on the page until the page appears exactly as you want it to.
2. Select File > Export Page as Gallery Item The Save Page as Gallery Item dialog box appears.
3. Browse to the folder where you want to save the page.
4. Type a name for the page in the File name box (Windows operating systems) or in the Save
As box (OS X operating systems).
5. Press Save.

CHAPTER 5
INSERTING AND SHARING CONTENT
83 smarttech.com/kb/171185
6.
If the Gallery isn’t visible, press Gallery .
7. Select My Content (or one of its subcategories) in the Gallery’s category list, press its menu
arrow, and then select Add to My Content.
The Add to My Content dialog box appears (Windows operating systems) or the Open dialog
box appears (OS X operating systems).
8. Browse to and select the item that you saved in step 5.
9. Press Open.
To add a supported file to the Gallery
1.
If the Gallery isn’t visible, press Gallery .
2. Select My Content (or one of its subcategories) in the Gallery’s category list, press its menu
arrow, and then select Add to My Content.
The Add to My Content dialog box appears (Windows operating systems) or the Open dialog
box appears (OS X operating systems).
3. Browse to and select the item you want to add to the Gallery.
4. Press Open.
NOTE
By default, SMARTNotebook software names the new Gallery item based on the original
file name. If you want to change the item’s name, select the Gallery item’s thumbnail, press
its menu arrow, and then select Rename.
Organizing content in the Gallery
As you add objects, pages and supported files to the My Content category in the Gallery, you may
want to reorganize the category’s structure. You can create subcategories and move Gallery items
between subcategories.
To create a subcategory
1.
If the Gallery isn’t visible, press Gallery .
2. Select My Content (or one of its subcategories) in the Gallery’s category list, press its menu
arrow, and then select New Folder.
A new subcategory appears.
3. Type a name for the new subcategory, and then press ENTER (or RETURN).

CHAPTER 5
INSERTING AND SHARING CONTENT
84 smarttech.com/kb/171185
To rename a subcategory
1.
If the Gallery isn’t visible, press Gallery .
2. Select My Content in the Gallery’s category list, and then browse to the subcategory that you
want to rename.
3. Select the subcategory, press its menu arrow, and then select Rename.
4. Type a new name for the subcategory, and then press ENTER (or RETURN).
To move a Gallery item to a different subcategory
1.
If the Gallery isn’t visible, press Gallery .
2. Browse to the category that contains the Gallery item you want to move.
The Gallery displays the contents of the category.
3. Drag the item to another subcategory.
Sharing content with other teachers
Importing and exporting collection files is an ideal way to share custom categories with other
teachers and to use categories that other teachers have created. You can use collection files to
add items to the My Content category in the Gallery. After you import a collection file, all of its
items appear in the Gallery as a new subcategory.
To import a collection file from another teacher
1.
If the Gallery isn’t visible, press Gallery .
2. Select My Content (or one of its subcategories) in the Gallery’s category list, press its menu
arrow, and then select Add to My Content.
The Add to My Content dialog box appears (Windows operating systems) or the Open dialog
box appears (OS X operating systems).
3. Browse to the folder that contains the collection file you want to import.
NOTE
A collection file has a .gallery extension.
4. Select the collection file, and then press Open.
The collection appears as a new subcategory.

CHAPTER 5
INSERTING AND SHARING CONTENT
85 smarttech.com/kb/171185
To export a collection file to share with other teachers
1. Select the category that contains the items you want to save in a collection.
NOTE
SMARTNotebook software exports the selected category but doesn’t export any of its
subcategories. See Knowledge Base article 171128 for more information.
2. Press the category’s menu arrow, and then select Export as Collection File.
The Save As dialog box appears (Windows operating systems) or The Save dialog box
appears (OS X operating systems).
3. Browse to the folder where you want to save the collection file.
4. Type a name for the file in the File name box (Windows operating systems) or in the Save As
box (OS X operating systems).
5. Press Save.
Using the SMARTExchange website
The SMARTExchange website (exchange.smarttech.com) includes thousands of lesson plans,
question sets, widgets and other content that you can download and then open in
SMARTNotebook software.
Inserting content from the SMARTExchange website
To insert content from the SMARTExchange website
1.
Press Gallery .
The Gallery window opens.
2. Press SMART Exchange.
The SMART Exchange window opens below the Gallery window.
3. Press the exchange.smarttech.com link. The SMARTExchange website opens in your web
browser.

CHAPTER 5
INSERTING AND SHARING CONTENT
86 smarttech.com/kb/171185
4. If you’re new to the SMARTExchange website, press Join for free, and then follow the on-
screen instructions to create an account.
OR
If you have an account, press Sign In, and then follow the on-screen instructions to log on to
the SMARTExchange website with your account.
5. Search or browse for content, and then download it to your computer.
6. Import content into the Gallery.
NOTES
l You can also share your lesson plans with other teachers through the SMARTExchange
website.
Sharing content using the SMARTExchange website
Use the SMARTExchange website to share .notebook files with teachers from around the world.
To share a .notebook file on the SMARTExchange website
1. Open the .notebook file you want to share.
2.
Press Gallery and select SMART Exchange from the Gallery content list.
A dialog box appears below the list with a link to exchange.smarttech.com.
3. Click exchange.smarttech.com.
Your browser will open at the SMART Exchange website.
4. If you’re new to the SMARTExchange website, press Join for free!, and then follow the on-
screen instructions to create an account.
OR
If you have an account, select Sign In, then type your e-mail address in the Email Address box
and your password in the Password box, and then press Sign In.
TIPS
o
If you forgot your password, click Forgot your password, and then follow the on-
screen instructions to reset it.
o
If you don’t want to log on to the SMARTExchange website each time you share
content, select the Keep me signed in check box.

CHAPTER 5
INSERTING AND SHARING CONTENT
87 smarttech.com/kb/171185
5. Enter the following information:
Control Instructions
Enter resource details Type a title for the .notebook file.
Description Type a description of the .notebook file.
Subject(s) Select the subjects that the .notebook file is applicable to.
Grade(s) Select the grades that the .notebook file is applicable to.
Search terms Type words or phrases that other SMARTExchange users will
likely enter to search for the .notebook file. Separate the words
or phrases with commas.
6. Read the sharing agreement.
7. If you accept the sharing agreement, press Agree and Submit.
Using the Notebook Math Equation Editor
Use the math equation editor to easily add equations to your SMARTNotebook pages. You can
also use the equation editor with GeoGebra.
To open the Math Equation Editor
1.
In the menu bar, press the Add-ons button , then press Insert Equation .
The Math Equation Editor opens.

CHAPTER 5
INSERTING AND SHARING CONTENT
88 smarttech.com/kb/171185
2. Enter the numbers you require and use the Math Equation Editor to add operation symbols.
For example, to enter , type “a,” then select the symbol from the equation editor.
The cursor will move to superscript position after the “a.” Then type “2.”
3. When your equation is complete, press Insert Equation.
The equation is inserted into the Notebook page.
Using the Math Equation Editor with GeoGebra
You can add equations to GeoGebra using the Math Equation Editor.
1. To open GeoGebra press Add-Ons and then press GeoGebra.
2. Select Insert GeoGebra Widget.
The GeoGebra worksheet appears on the current page.
3. Open the Math Equation Editor and write the equation you wish to graph, like y = x
2
+ 3.
4. When the equation is complete, press Insert Equation.
The equation is inserted into the Notebook page.

CHAPTER 5
INSERTING AND SHARING CONTENT
89 smarttech.com/kb/171185
5. Drag the equation onto the GeoGebra worksheet.
The equation will appear in the input area of the worksheet. It will also be graphed on the
worksheet page.
Inserting content from GeoGebra
GeoGebra is interactive mathematics software for all levels of education. When you insert the
GeoGebra widget in SMARTNotebook software, you can explore geometry, algebra, tables,
graphing, statistics and calculus with your students.
You can also search for worksheets from GeoGebraTube using the keyword search. After
searching for a worksheet, you can add it to your .notebook file. GeoGebraTube
(geogebratube.org) contains thousands of worksheets created and shared by other teachers.
NOTE
For more information on how to use GeoGebra software, go to the GeoGebra Wiki
(wiki.geogebra.org).
To access the GeoGebra widget
Press Add-ons , and then press GeoGebra.
To insert the GeoGebra widget
1.
If the GeoGebra widget isn’t visible, press Add-ons , and then press GeoGebra.
2. Select Insert GeoGebra Widget.

CHAPTER 5
INSERTING AND SHARING CONTENT
90 smarttech.com/kb/171185
To search GeoGebraTube
1.
If the GeoGebra widget isn’t visible, press Add-ons , and then press GeoGebra.
2. Type a keyword into the Search in Free Materials box, and then press Search.
The GeoGebra widget displays thumbnail images of worksheets containing the keyword.
To add a GeoGebraTube worksheet to your .notebook file
1.
If the GeoGebra widget isn’t visible, press Add-ons , and then press GeoGebra.
2. Search for the GeoGebraTube worksheet you want to add.
3. Press the worksheet’s thumbnail, and then select Insert GeoGebra Widget.
The worksheet appears on the current page.
Inserting equations with the math equation tool
You can use the SMARTNotebook math equation tool to insert a handwritten equation to a page in
a more readable format. The math equation tool recognizes your handwriting and automatically
converts it to a typeset format. You can also add the recognized equation to a GeoGebra
worksheet if the equation is in a supported graph format.
To insert an equation to the page
1.
Press Add-ons , and then select Insert Equation .
The math equation tool appears.
2. Select a pen tool and color (see page38).

CHAPTER 5
INSERTING AND SHARING CONTENT
91 smarttech.com/kb/171185
3. Write a math equation on the graph paper section of the editor.
The handwritten equation converts to a typed equation, which appears below the graph
paper section. Accept and Reject icons appear beside the recognized equation.
4.
Press to accept the recognized equation.
The typed equation appears on the page.
OR
Press to reject the recognized equation and close the math equation tool.
To edit the recognized equation
1.
Press Select , and then press the recognized equation on the page twice.
The handwritten equation appears on the math equation tool.
2. Edit the handwritten equation with the Eraser tool and a pen tool.
The edited equation is recognized and appears below the graph paper section. Accept and
reject icons appear beside the recognized equation.
3.
Press to accept the recognized equation.
The equation updates with your edits.
OR
Press to reject the recognized equation and close the math equation tool.
The equation doesn’t update.

CHAPTER 5
INSERTING AND SHARING CONTENT
92 smarttech.com/kb/171185
To add the recognized equation to a GeoGebra worksheet
1. Insert a GeoGebra worksheet on the page (see Inserting content from GeoGebra on
page89).
2. Drag the equation from the page to the GeoGebra widget.
The equation is automatically graphed in the worksheet.
Using SMART Notebook Document Writer - Print
to Board
The new Print to Board feature in SMART Notebook Document Writer allows you to convert any
Windows application document into a SMART Notebook file that you can print and share.
Using Print to Board in SMART Notebook Document Writer
To use Print to Board
1. Open the Windows application document.
2. From the main menu, select File.
3. Select Print.
The Print dialog box opens.
4. From the Printer: drop down menu, select SMART Notebook Document Writer.

CHAPTER 5
INSERTING AND SHARING CONTENT
93 smarttech.com/kb/171185
5. Click Print.
The SMART Notebook Document Writer printer dialog box appears.
Using Print to SMART Notebook
To convert content to a SMART Notebook file
1. From the SMART Notebook Document Writer dialog box, select Print to SMART Notebook.
2. The document will open in a SMART Notebook file.
3. View, print, or annotate in the SMART Notebook file.
4. From the main menu select File > Save to save the Notebook file.
Using Share to the Notebook Player app
To share content using Share to the Notebook Player app
1. From the SMART Notebook Document Writer dialog box, select Share to the Notebook
Player app.

CHAPTER 5
INSERTING AND SHARING CONTENT
94 smarttech.com/kb/171185
The Share dialog box appears.
See how to use SMART Notebook Player on your SMART Board with iQ for further instructions.
Using Create link to this document
To create and share a link using Create a link to this document.
1. From the SMART Notebook Document Writer dialog box, select Create a link to this
document.
The Share dialog box with the copied link appears.

CHAPTER 5
INSERTING AND SHARING CONTENT
95 smarttech.com/kb/171185
NOTE
Once the Share dialog box appears, as shown above. The share link in the text box will
automatically be copied to your clipboard.
2. Right-click and select Paste to paste the link and share with others.
3.
Select the button to close the Share dialog box.
Using Share
Use Notebook’s Share feature to share Notebook files and Notebook file links to your SMART
Board.
NOTE
If you are required to sign in, sign in options will open in a separate browser.
To use Share
1. Open SMART Notebook.

CHAPTER 5
INSERTING AND SHARING CONTENT
96 smarttech.com/kb/171185
2. From the SMART Notebook menu, select Share.
The Share dialog box opens.
3. Press Share with a SMART Board.
4. Enter the code of the SMARTBoard to which you wish to connect or select the code from the
drop-down menu.
5. Press Share Now.
The Lessons library opens.
6. Select the file in the library you wish to share. The file will be available on the board you
previously selected.
NOTE
Use SMART Notebook Player on the display to open, view and interact with downloaded or
assigned SMART Notebook content. Player makes it easy to present files and play SMART lab
activities on SMART Boards with iQ technology.
See Using SMART Notebook Player on your SMART Board 6000 with iQ for more information.

CHAPTER 5
INSERTING AND SHARING CONTENT
97 smarttech.com/kb/171185
Share using a link
You can also share a file by sending a link to the file to a SMART Board with iQ technology. This is
very useful for sharing large files.
1. From the Share dialog box, press Share using a link.
The Share link dialog box opens.
2. Paste the link into an email and then send the email to those with whom you want to share the
file.
The recipients click the link they received by email to begin the file download.
3.
Press to close the dialog box.
Inserting content from other sources
If you or other teachers have created content outside of SMARTNotebook software, you can
include this content in your .notebook files.

CHAPTER 5
INSERTING AND SHARING CONTENT
98 smarttech.com/kb/171185
Specifically, you can do the following:
l Cut, copy, and paste content from other programs
l Import content from other programs such as YouTube™ using the SMARTNotebookYouTube
add-on
l Import content into a .notebook file from a variety of sources, including PowerPoint files
Inserting pictures
You can insert pictures into pages from files, a scanner or a SMART Document Camera. Simply
drag and drop a picture file into a Notebook page. Also see Using your SMART Document Camera.
NOTE
You can also insert pictures from the Gallery tab. For more information, see Inserting content
from the Gallery on page80.
Inserting multimedia files
You can insert multimedia files, including video files and sound files, into pages. Simply drag and
drop your files into a Notebook page. Also see Adding sounds to objects.
Importing PowerPoint files (Windows)
1. Select File > Import.
The Open dialog box appears.
2. Select All PowerPoint Files (*.ppt;*.pptx) in the Files of type drop-down list.
3. Browse to and select the PowerPoint file you want to import.
4. Press Open.
SMARTNotebook software adds the contents of the PowerPoint file to a .notebook file.

Chapter 6
99 smarttech.com/kb/171185
Chapter 6: Creating lesson activities
Creating basic lesson activities 99
Creating a matching lesson activity 99
Creating a hide-and-show lesson activity 101
Using advanced object features 103
Creating custom Creative pen styles 104
Adding links to objects 106
Adding sounds to objects 108
Animating objects 109
Locking objects 109
Using SMARTNotebook software, you can not only present information to students but also
engage them in interactive lesson activities.
You can create lesson activities by inserting objects such as shapes, pictures and tables, and using
features such as the Activity Builder and scaling gesture.
This chapter documents the advanced features you can use to create lesson activities and shows
you how to create a set of example lesson activities. You can use these example lesson activities
or develop your own. You can also use resources available to you in the Gallery and
SMARTExchange website.
Creating basic lesson activities
The Activity Builder enables you to create matching activities, sorting activities, labeling activities,
games and more using your own content.
Creating a matching lesson activity
Using the Activity Builder, you define one object on the page as an activity object. You then define
which objects on the page will be accepted and which will be rejected when you drag the objects
over the activity object.
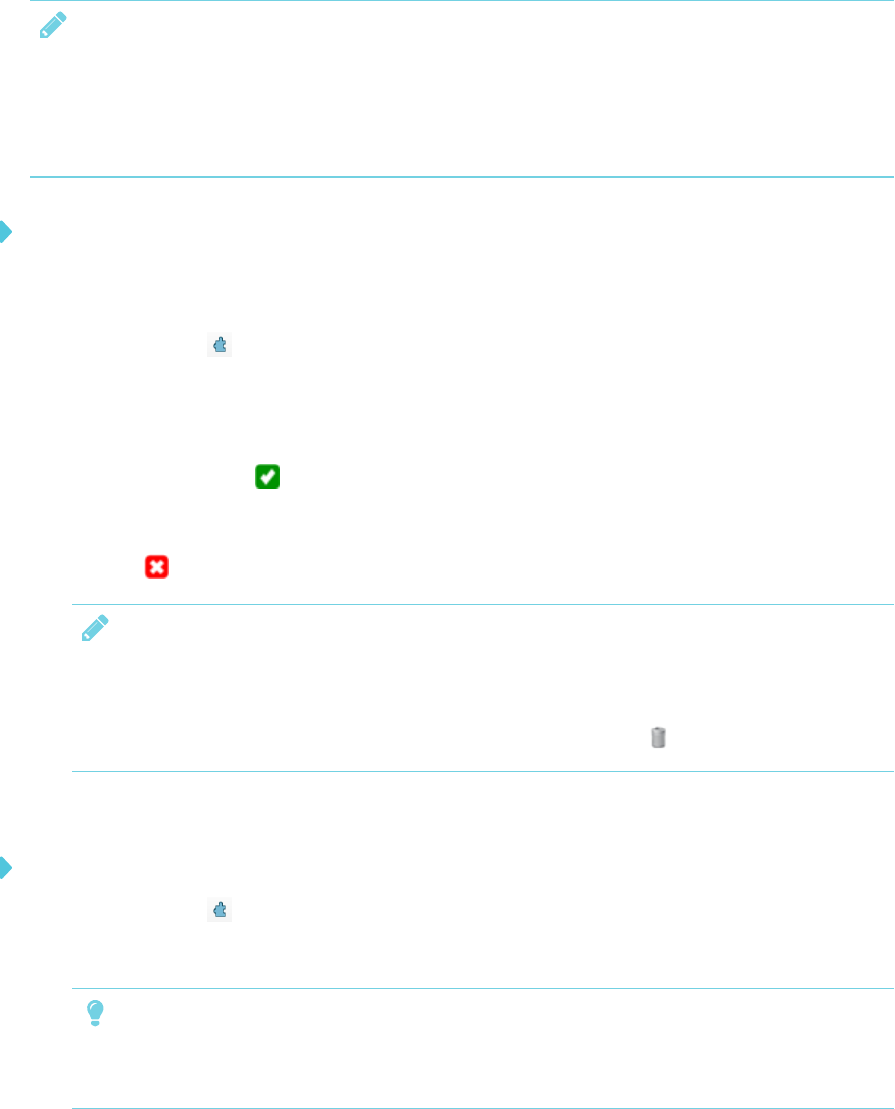
CHAPTER 6
CREATING LESSON ACTIVITIES
100 smarttech.com/kb/171185
NOTE
You’ll complete the following tasks when creating matching lesson activities:
l Using the Activity Builder
l Adding sounds to objects (see Adding sounds to objects on page108)
To create a matching lesson activity
1. Create the object you want to use as the activity object and the objects you want to accept or
reject when dragged to the activity object.
2.
Press Add-ons , and then press Activity Builder.
3. Select the object you want to use as the activity object, and then press Edit.
4. Drag the objects you want to accept to the Accept these objects list.
A green check mark appears beside objects you select to accept.
5. Drag the objects you want to reject to the Reject these objects list.
A red X appears beside objects you select to reject.
NOTES
o
To quickly select any remaining objects on the page to accept or reject, press Add All
Remaining in the appropriate list.
o
To remove an object from a list, drag it to the trash can icon .
6. Press Done.
To change a matching lesson activity’s settings
1.
Press Add-ons , and then press Activity Builder.
2. Select the activity object, and then press Edit.
TIP
If you don’t know which object on the page is the activity object, click Identify. Blue
diagonal lines appear for three seconds over any activity objects on the page.
3. Press Settings.
4. Select the desired animation for accepted objects in the first Animation drop-down list.

CHAPTER 6
CREATING LESSON ACTIVITIES
101 smarttech.com/kb/171185
5. Optionally, select the Also play the object’s sound check box to play sounds attached to
accepted objects when they’re dragged over the activity object (see Adding sounds to
objects on page108).
6. Select the desired animation for rejected objects in the first Animation drop-down list.
7. Optionally, select the Also play the object’s sound check box to play sounds attached to
rejected objects when they’re dragged over the activity object (see Adding sounds to
objects on page108).
8. Press Done.
To present a matching lesson activity
1. Drag the objects (or have students drag the objects) to the activity object.
o
If the object is accepted, the accepted object animation plays (fade out by default).
o
If the object is rejected, the rejected object animation plays (bounce back by default).
2.
Press Add-ons , press Activity Builder, and then press Reset All when you’re done.
To remove a matching lesson activity
1.
Press Add-ons , and then press Activity Builder.
2. Select the activity object, and then press Clear Properties
Creating a hide-and-show lesson activity
NOTE
You’ll complete the following tasks when creating hide-and-show lesson activities:
l Moving objects
l Locking objects
l Resizing objects using the scaling gesture
You can hide an object and then reveal it using several techniques:
l Add a Screen Shade to a page. During the presentation, gradually remove the shade to reveal
the underlying text and graphics when you’re ready to discuss them (see Using the Screen
Shade on page151).

CHAPTER 6
CREATING LESSON ACTIVITIES
102 smarttech.com/kb/171185
l Cover the object with digital ink and then erase the digital ink (see Writing, drawing and
erasing digital ink on page37).
l Cover the object with another object and then change the order of the objects in the stack.
l Use the object animation feature (see Animating objects on page109).
Alternatively, you can hide an object behind a locked object and then use the scaling gesture to
enlarge and show the hidden object if you’re using a SMART interactive product that supports
multitouch gestures.
To create a hide-and-show lesson activity
1. Create or insert the object you want to hide.
2. Create or insert the object you want to lock.
CHAPTER 6
CREATING LESSON ACTIVITIES
103 smarttech.com/kb/171185
3. Move the object you want to lock so that it covers the object you want to hide.
4. Select the object you want to lock, press its menu arrow, and then select Locking > Lock in
Place.
5. Use the scaling gesture to enlarge and show the hidden object while keeping the locked
object in place (see Resizing objects on page72).
Using advanced object features
Using SMARTNotebook software, you can not only present information to students but also
engage them in interactive lesson activities.
You can create lesson activities by inserting objects such as shapes, pictures and tables, and using
features such as the Activity Builder and scaling gesture.

CHAPTER 6
CREATING LESSON ACTIVITIES
104 smarttech.com/kb/171185
Creating custom Creative pen styles
SMARTNotebook software includes eight Creative pen styles (see Writing, drawing and erasing
digital ink on page38). In addition to these styles, you can create your own styles using pictures or
objects on the currently selected page.
To create a custom Creative pen using a picture
1.
Press Pens .
The Pens tool buttons appear.
2. Press Pen Types, and then select Creative Pen.
3. Select a line type.
4.
If the Properties tab isn’t visible, press Properties .
5. Press Line Style.
6. Select Use a custom stamp image.
7. Click Browse.
The Insert Image File dialog box appears.
8. Browse to and select the picture you want to use for the Creative pen style.
9. Press Open.

CHAPTER 6
CREATING LESSON ACTIVITIES
105 smarttech.com/kb/171185
10. Write or draw digital ink on the page.
TIP
o
To resume using the default line type, select Use the default pattern.
o
If you want to save your custom Creative pen style for future use, press Save Tool
Properties. You can later reset the Creative pen style (see Customizing the toolbar on
page175).
To create a custom Creative pen using an object
1.
Press Pens .
The Pens tool buttons appear.
2. Press Pen Types, and then select Creative Pen.
3.
If the Properties tab isn’t visible, press Properties .
4. Press Line Style.
5. Select Use a custom stamp image.
6. Press Select object, and then select an object on the page.
7. Write or draw digital ink on the page.
TIP
o
To resume using the default line type, select Use the default pattern.
o
If you want to save your custom Creative pen style for future use, press Save Tool
Properties. You can later reset the Creative pen style (see Customizing the toolbar on
page175).
CHAPTER 6
CREATING LESSON ACTIVITIES
106 smarttech.com/kb/171185
Adding links to objects
You can link any object on a page to a web page, another page in the file, a file on your computer
or an attachment. An attachment is a copy of a file, a shortcut to a file or a link to a web page that
you add to the Attachments tab.
NOTE
You can display animated link indicators around all links on a page (see Displaying links on
page150).
To add a link to a web page
1. Select the object.
2. Press the object’s menu arrow, and then select Link.
The Insert Link dialog box appears.
3. Press Web Page, and then type the web address in the Address box.
4. If you want to open the link by pressing an icon, select Corner icon.
OR
If you want to open the link by pressing anywhere in the object, select Object.
5. Press OK.
If you selected Corner icon, the icon appears in the lower-left corner of the object.
To add a link to another page in the file
1. Select the object.
2. Press the object’s menu arrow, and then select Link.
The Insert Link dialog box appears.
3. Press Page in this File, and then select an option in the Select a page area.
4. If you want to open the link by pressing an icon, select Corner icon.
OR
If you want to open the link by pressing anywhere in the object, select Object.
5. Press OK.
If you selected Corner icon, the icon appears in the lower-left corner of the object.

CHAPTER 6
CREATING LESSON ACTIVITIES
107 smarttech.com/kb/171185
To add a link to a file on your computer
1. Select the object.
2. Press the object’s menu arrow, and then select Link.
The Insert Link dialog box appears.
3. Press File on this Computer, and then type the file’s location and name in the File box.
4. If you want to attach a copy of the file, select Copy of file.
OR
If you want to insert a shortcut to the file, select Shortcut to file.
5. If you want to open the link by pressing an icon, select Corner icon.
OR
If you want to open the link by pressing anywhere in the object, select Object.
6. Press OK.
If you selected Corner icon, the icon appears in the lower-left corner of the object.
To add a link to an attachment
1. Select the object.
2. Press the object’s menu arrow, and then select Link.
The Insert Link dialog box appears.
3. Press Current Attachments, and then select the attachment in the list.
4. If you want to open the link by pressing an icon, select Corner icon.
OR
If you want to open the link by pressing anywhere in the object, select Object.
5. Press OK.
If you selected Corner icon, the icon appears in the lower-left corner of the object.
To remove a link
1. Select the object.
2. Press the object’s menu arrow, and then select Link.
The Insert Link dialog box appears.
3. Press Remove Link.

CHAPTER 6
CREATING LESSON ACTIVITIES
108 smarttech.com/kb/171185
Adding sounds to objects
You can add a sound to any object (except AdobeFlash Player compatible files and widgets) by
attaching a sound file or recording a sound using a computer microphone. You can play the sound
during the lesson by pressing an icon in the corner of the object or the object itself.
NOTE
SMARTNotebook software supports the MP3 audio format.
To add a sound file to an object
1. Select the object.
2. Press the object’s menu arrow, and then select Sound.
A dialog box appears.
3. Press Browse (for Windows operating systems). The Insert File dialog box appears. For OS X
operating systems, press Choose File. The Open dialog box appears.
4. Browse to and select the sound file, and then press Open.
5. Select Corner Icon if you want to play the sound file when you press an icon in the object’s
lower-left corner.
OR
Select Object if you want to play the sound file when you press anywhere on the object.
6. Press Attach Sound.
To add a recorded sound to an object
1. Connect a microphone to your computer and turn it on.
2. Select the object.
3. Press the object’s menu arrow, and then select Sound.
A dialog box appears.
4. Click Start Recording.

CHAPTER 6
CREATING LESSON ACTIVITIES
109 smarttech.com/kb/171185
5. Record the sound using the microphone.
IMPORTANT
SMARTNotebook software stops recording after one minute. Therefore, ensure the sound
is no more than one minute long.
6. Click Stop Recording.
7. Type a name for the sound in the Recording name box.
8. Optionally, click Preview Recording to hear the sound before adding it to the object.
9. Select Corner Icon if you want to play the sound file when you press an icon in the object’s
lower-left corner.
OR
Select Object if you want to play the sound file when you press anywhere on the object.
10. Press Attach Recording.
To remove a sound from an object
1. Select the object.
2. Press the object’s menu arrow, and then select Sound.
A dialog box appears.
3. Press Remove Sound.
Animating objects
You can animate an object to fly onto a page from the side, spin, fade in, shrink and more. You can
set the animation to start when you open a page or when you press the object.
To animate an object
1. Select the object.
2.
If the Properties tab isn’t visible, press Properties .
3. Press Object Animation.
4. Select options in the Type, Direction, Speed, Occurs and Repeats drop-down lists.
Locking objects
You can lock an object to prevent its modification, movement or rotation. Alternatively, you can
lock an object but limit its movement either vertically or horizontally, or allow more movement and

CHAPTER 6
CREATING LESSON ACTIVITIES
110 smarttech.com/kb/171185
rotation.
You can remove this lock at any time.
To lock an object
1. Select the object.
2. Press the object’s menu arrow, and then select Lock > Lock in Place.
You’re unable to move, rotate or modify the object until you unlock it.
NOTE
If you press a locked object, a lock icon appears instead of a menu arrow.
To lock an object but allow its movement
1.
Select the object.
2. Press the object’s menu arrow, and then select Lock > Allow Move.
You can move the object but you’re unable to rotate or modify it until you unlock it.
NOTE
If you press a locked object, a lock icon appears instead of a menu arrow.
To lock an object but allow its movement vertically
1. Select the object.
2. Press the object’s menu arrow, and then select Lock > Allow Vertical Move.
You can move the object vertically but you’re unable to rotate or modify it until you unlock it.
NOTE
If you press a locked object, a lock icon appears instead of a menu arrow.

CHAPTER 6
CREATING LESSON ACTIVITIES
111 smarttech.com/kb/171185
To lock an object but allow its movement horizontally
1. Select the object.
2. Press the object’s menu arrow, and then select Lock > Allow Horizontal Move.
You can move the object horizontally but you’re unable to rotate or modify it until you unlock
it.
NOTE
If you press a locked object, a lock icon appears instead of a menu arrow.
To lock an object but allow its movement and rotation
1. Select the object.
2. Press the object’s menu arrow, and then select Lock > Allow Move and Rotate.
You can move and rotate the object but you’re unable to modify it until you unlock it.
NOTE
If you press a locked object, a lock icon appears instead of a menu arrow.
To unlock an object
1. Select the object.
2.
Press the object’s lock icon , and then select Unlock.

Chapter 7
113 smarttech.com/kb/171185
Chapter 7: Using SMART lab
Overview 114
Browser, device, operating system and network recommendations 114
Website access requirements 115
Adding game elements and device enabled contributions to SMARTlab activities 115
Creating and adding a Flip Out activity 115
Creating and adding a Super Sort activity 117
Creating and adding a Match ‘Em Up! activity 118
Creating and adding a Fill In the Blanks activity 119
Creating and adding a Label Reveal activity 121
Creating and adding a Rank Order activity 122
Creating and adding a Speedup activity 123
Creating and adding a Shout It Out! activity 125
Shout It Out! User validation 127
Web browser, device operating system recommendations and network
recommendations 128
Website access requirements 129
Adding device enabled student text contributions to Shout It Out! activities 129
Adding student image contributions 132
Removing students from an activity 135
Adding a game element to your activity 135
Timer 136
Randomizer 136
Buzzer 137
Using Monster Quiz 137
Using the Hand out activity 139
Creating a Hand out activity 140
Using SMART response 2 140
Creating assessments with SMART response 2 140
Using a mobile device to access SMART response 2 144

CHAPTER 7
USING SMART LAB
114 smarttech.com/kb/171185
Overview
Use SMART lab to enhance your lessons by creating and adding interactive activities. These
activities help students memorize concepts and facts, identify objects, learn vocabulary
definitions, and more.
NOTES
l Account Sign In is required to create and play some SMART lab activities, and
SMARTNotebook 17 software allows you to sign in with your Google™ or Microsoft account.
If you sign in with one of these accounts, you will not have to sign in each time you want to
use SMART response 2, Shout It Out! or Monster Quiz. For more information see Account
Sign In.
l Students can be removed from an activity with the SMARTlab Remove Students feature.
Browser, device, operating system and network recommendations
NOTE
Students may check their website access at http://classlab.com/connection/check.html.
Web browser
recommendations
l
Google Chrome™ 33 or above
l
Firefox® 38 or above
l
Microsoft Internet Explorer® 11
l
Microsoft Edge
Device operating
system
recommendations
l
Windows® 7 or later operating system
l
iOS 8 or later operating system software
l
Android™ 4.2 or later operating system
l
The current release of the Chrome OS™ operating system
IMPORTANT
Mobile device-enabled activities are not currently supported on the
first generation iPad or Samsung Galaxy Tab 3.

CHAPTER 7
USING SMART LAB
115 smarttech.com/kb/171185
Network
recommendations
SMART lab activities on classlab.com are designed to keep network
requirements as low as possible while still supporting rich collaboration. The
network recommendation for Shout It Out! alone is 0.3 Mbps per device. A
school that regularly uses other Web 2.0 tools should have enough network
capacity to run SMART lab activities on classlab.com. If SMART lab activities
on classlab.com are used in conjunction with other online resources, such as
streaming media, greater network capacity could be required, depending
on the other resources being used.
Website access requirements
To ensure that all student-side SMART lab activities works correctly, add the following URLs to
your network’s white list.
l https://www.classlab.com
l http://id.smarttech-prod.com
l https://content.smarttech-prod.com
l https://metric.smarttech-prod.com
l https://google.com
l http://google-analytics.com
l https://www.gstatic.com (used by Google to load reCAPTCHA)
l https://*.firebaseio.com
l https://*.cloudfront.com
l https://entitlement.smarttech-prod.com
Adding game elements and device enabled
contributions to SMARTlab activities
Teachers and students can add game elements and device enabled contributions to most
SMARTlab activities. For more information, see To add a game element to an activity and To add
device enabled student contributions to an activity.
Creating and adding a Flip Out activity
Flip Out flashcards teach one to one correspondence, memory and vocabulary. When you create a
Flip Out flip card activity, you can use as many cards as you like and choose from different themes,
such as Space, Jungle or Monsters.

CHAPTER 7
USING SMART LAB
116 smarttech.com/kb/171185
TIP
l
Use the Sound button to turn activity sound on or off.
l
Use the Activity Restart button to restart the current activity. This button is located at
the top right of the open SMART lab activity page.
l
Use the Activity Edit button to open the Add Activity dialog box. This button is located
at the top right of the open SMART lab activity page.
To add a Flip Out flip card activity
1.
Open SMART lab by pressing the toolbar icon in the SMART Notebook toolbar.
The Select an Activity Creation Wizard opens.
2. Scroll to locate the Flip Out activity and press the activity icon.
3.
Enter text or tap the image icon to add an image in both the Facing Up and Facing Down
fields.
Create as many cards as you need. If you create more than 12 cards, the additional cards will
be located in the middle of the SMART Notebook desktop, along with the Discard pile. Card
placement is random.
TIP
To use an image in your Flip card activity, click the image icon in the Add Content
dialog box. Select the image from the appropriate Windows Explorer (Windows operating
systems) or Finder (OS X operating systems) folder by clicking Open. The image appears in
the Card back or Card face list and also on the flip cards.
4. Press Next.
The Select a Theme dialog box opens.
5. Select a theme, then press Finish.
SMART lab builds the activity, and it will be ready for use after a few moments.

CHAPTER 7
USING SMART LAB
117 smarttech.com/kb/171185
6.
To add a buzzer, timer or randomizer game element to the activity, press .
See Adding a game component to an activity for more information.
Students can also use their devices to contribute to the Super Sort activity. For more
information, see To add device enabled student contributions to an activity.
7. Have students flip cards over to reveal what’s on the other side. For example, the back of a
card may be named “run,” while the face of the card is named “verb.” After the card has been
flipped and the content discussed, you can drag the card to the discard pile.
Creating and adding a Super Sort activity
Super Sort teaches classification and grouping. In a Super Sort activity, students sort items into two
categories. An item disappears if a student sorts it correctly, and the item is sent back to be
resorted if it’s sorted incorrectly. Add optional game components to make the activity even more
engaging.
To ensure the best possible user experience with Super Sort, see Device and network
requirements for more information.
To add a Super Sort sorting activity
1.
To open SMART lab, press the toolbar icon in the SMART Notebook toolbar.
The Select an Activity Creation Wizard opens.
2. Scroll to locate the Super Sort activity and press the activity icon.
The Super Sort Add Content dialog box opens.
3. In Required Category Name fields, type the name you want to use for each category.
4.
Enter text or tap the image icon to add an image to each category. You may enter up to
10 pairs.
5. In Enter text or add image, type category content, select an image or press the Manage
Content icon to add category content from a previously saved list.
6. Press Next.
The Select a Theme dialog box opens.
7. Select a Super Sort theme. The selected activity is highlighted with a blue box.

CHAPTER 7
USING SMART LAB
118 smarttech.com/kb/171185
8. Press Finish.
SMART lab builds the activity, and it will be ready for use after a few moments.
9.
To add a buzzer, timer or randomizer game element to the activity, press .
The Game element selector opens.
10. Select a game element if desired. The game element will appear in the activity. See Adding a
Game Component to an Activity for more information.
Have students work individually or in teams to sort the content into the correct categories.
Students can also use their devices to contribute to the Super Sort activity. For more
information, see To add device enabled student contributions to an activity.
Creating and adding a Match ‘Em Up! activity
Match ‘Em Up! is a matching activity that emphasizes memory and one to one correspondence
between items. Add game elements to make the activity even more engaging.
To add a Match ‘Em Up! activity
1.
Open SMART lab by pressing the SMART lab toolbar icon in the SMART Notebook
toolbar.
The Select an Activity Creation Wizard opens.
2. Scroll to locate the Match ‘Em Up activity and press the icon.
The Match ‘Em Up Add Content dialog box opens.
3. In Optional Category Name fields, type the name you want to use for each category pair.
4.
Enter text or tap the image icon to add an image to each category. You may enter up to
10 pairs.
5. In the Check Answers section, select Instantly to indicate immediately whether the answers
are correct.
OR
6. Select When Prompted to check answers at a pace you choose. As answers are entered into
the activity, a Check Matches button appears in the activity. Press the button when you want
to check an answer.
If the answer is correct, a appears beside it. If the answer is incorrect, a appears beside it.

CHAPTER 7
USING SMART LAB
119 smarttech.com/kb/171185
7. Press Next.
The Match ‘Em Up! Select a Theme dialog box opens.
8. Select a theme, then press Finish.
SMART lab builds the activity, and it will be ready for use after a few moments.
9.
To add a buzzer, timer or randomizer game element to the activity, press .
The Game element selector opens.
10. Select a game element if desired. The game element will appear in the activity. See Adding a
Game Component to an Activity for more information.
Students can also use their devices to contribute to the Super Sort activity. For more
information, see To add device enabled student contributions to an activity.
Have students work individually or in teams to match up the content to the correct categories.
TIP
To use an image in your activity, click the image file folder icon in either content list.
Browse to and select the image, then press Open. The image appears in the content list.
Although you can create as many items as you like, only the first 10 are used in your activity.
Create at least two matches to continue.
Creating and adding a Fill In the Blanks activity
Fill In the Blanks is a fun activity where students drag words or numbers into blanks. Write a
sentence with up to ten blank spaces, then let students drag the words around the board to fill in
the missing information that belongs in those blanks.
To add a Fill In the Blanks activity
1.
Open SMART lab by pressing the SMART lab toolbar icon in the SMART Notebook
toolbar.
The Select an Activity Creation Wizard opens.
2. Scroll to locate the Fill In the Blanks activity and press the activity icon.
The Fill in the Blanks Add Content window opens.

CHAPTER 7
USING SMART LAB
120 smarttech.com/kb/171185
3. In the Edit text area, enter the desired text. You can use up to 300 characters for your content.
The character counter indicates how many characters you have left. You will define the blanks
in the next step.
4. In the Check Answers section, select Instantly to indicate immediately whether the answers
are correct.
OR
Select When Prompted to check answers at a pace you choose. As answers are entered into
the activity, a Check Matches button appears in the activity. Press the button when you want
to check an answer.
OR
Select Don’t check. Answers will not be checked.
5. Press Define Blanks.
The Define Blanks dialog box opens with your text.
6. Define the blanks by clicking a word. Use the sizing handles to make a blank bigger or smaller.
To remove a blank, click it again.
7. Press Next.
The Fill in the Blanks Select a Theme dialog box opens.
8. Select a theme and press Finish.
SMART lab builds the activity, and it will be ready for use after a few moments. The sentence
and word blanks appear.
9.
To add a buzzer, timer or randomizer game element to the activity, press .
The Game element selector opens.
10. Select a game element if desired. The game element will appear in the activity. See Adding a
Game Component to an Activity for more information.
Have students work individually or in teams to drag the correct words or numbers into the
appropriate blanks.
Students can also use their devices to contribute to the Super Sort activity. For more
information, see To add device enabled student contributions to an activity.
11. Press the Check answers button that appears when the activity is complete.
If an answer is correct, a appears beside it. If an answer is incorrect, a appears beside it.

CHAPTER 7
USING SMART LAB
121 smarttech.com/kb/171185
Creating and adding a Label Reveal activity
The Label Reveal activity is a great way for students to develop deeper understanding of systems
and their components. Label Reveal emphasizes memory and deduction.
To add a label reveal activity
1.
Open SMART lab by pressing the SMART lab icon in the SMART Notebook toolbar.
The Select an Activity Creation Wizard opens.
2. Scroll to the Label Reveal activity and press the activity icon.
The Label Reveal Add Content dialog box opens.
3. Drag an image from your desktop into the square box in the activity dialog box.
OR
Press the icon to browse to and select an image saved on your computer.
The image appears in the Label Reveal Add Content dialog box.
4. Click within the image to add labels.
The Label window and Label edit tool open.
5. Move the label to the part of the image you wish to label.
Press Change Style to change the type and color of the label arrows.
6. Enter a brief description on the label. Press the down arrow below the label to enter an
extended note of up to 150 characters.
Press Done to close the Note window.
7. Add as many labels as required, and then press Finish.
SMART lab builds the activity, and it will be ready for use after a few moments. Each label
appears as a question mark icon until it is clicked. The label name will then be revealed.
For more information see Setting up the SMART lab activity.

CHAPTER 7
USING SMART LAB
122 smarttech.com/kb/171185
8.
To add a buzzer, timer or randomizer game element to the activity, press .
The Game element selector opens.
9. Select a game element. The game element appears in the activity. See Adding a Game
Component to an Activity for more information.
Students can also use their devices to contribute to the Super Sort activity. For more
information, see To add device enabled student contributions to an activity.
10. Ask students to identify and reveal component labels as they are discussed.
Creating and adding a Rank Order activity
In the Rank Order activity, students arrange items in ranked order and learn about comparison,
deduction, sequencing and arrangement. Try arranging whole numbers from smallest to largest,
steps in a scientific procedure or other items in order of preference.
To add a Rank Order activity
1.
Open SMART lab by pressing the SMART lab icon in the SMART Notebook toolbar.
The Select an Activity Creation Wizard opens.
2. Scroll to the Rank Order activity and press the activity icon.
The Rank Order Add Content dialog box opens.
3.
Enter text or tap the image icon to add an image. You can add up to ten items.
4.
Press to reverse the order of the text items.
5. In the Check Answers section, select Instantly to indicate immediately whether the answers
are correct.
OR
Select When Prompted to check answers at a pace you choose. As you add answers to the
activity, a Check Matches button appears in the activity. Press the button when you want to
check an answer.
OR
Select Don’t check. Answers will not be checked.
6. In the Ranking Labels section, enter the terms you would like to use to indicate the order,
such as First and Last.

CHAPTER 7
USING SMART LAB
123 smarttech.com/kb/171185
7. Press Next.
The Rank Order Select a Theme dialog box opens.
8. Select a theme and press Finish.
SMART lab builds the activity, and it will be ready for use after a few moments.
9.
To add a buzzer, timer or randomizer game element to the activity, press .
The Game element selector opens.
10. Select a game element if desired. The game element will appear in the activity. See Adding a
Game Component to an Activity for more information.
Students can also use their devices to contribute to the Super Sort activity. For more
information, see To add device enabled student contributions to an activity.
Although you can create as many items as you like, only the first 10 appear in the activity.
TIP
To use an image in your activity, return to the Rank Order Add Content dialog box and click
the file folder icon in the content list. Browse to and select the image, then press Open. The
image appears in the content list. Create at least two items to continue.
11. Have students drag and drop the items in the correct order from top to bottom. When the
items are sorted correctly, they gently move to indicate completion.
TIPS
l A green check mark or a red X will appear beside each ordering answer to indicate
correct or incorrect. The order may be changed until all answers are correct.
l If you selected Check answers right away, answers are checked as they are given. Correct
answers are accepted, and incorrect answers are rejected.
l If you selected Check answers after students have finished, the answers are checked after
students answer all the questions, giving you time for discussion.
Creating and adding a Speedup activity
Speedup is a racing quiz with multiple choice and true or false questions. Students will love to
compete to see who answers questions the fastest using the Speedup activity. Speedup
encourages competition and quick thinking.

CHAPTER 7
USING SMART LAB
124 smarttech.com/kb/171185
To add a Speedup activity
1.
Open SMART lab by pressing the toolbar icon in the SMART Notebook toolbar.
The Select an Activity Creation Wizard opens.
2. Scroll to locate the Speedup activity and press the Speedup activity icon.
The Add Content dialog box opens.
3. Select between Multiple Choice and True or False as the type of quiz you would like to build.
Multiple Choice format
4. For Multiple Choice format, enter a question. You may use up to 150 characters for your
question.
5. Enter at least two answers to the question you entered in step 4, and press the button beside
the correct answer. A indicates the answer.
6. Press Add Question to continue adding questions and answers.
7. After you have finished adding questions and answers, press Next.
The Review Content dialog box opens. You may edit your questions and answers and set a
time limit to answer each question.
Click the questions or answers to edit them.
If you would like to assign a time limit for the question to be answered, toggle the Time limit
button and set the number of seconds allowed for answering each question.
8. Press Finish.
SMART lab builds the activity, and it will be ready for use after a few moments.
True or False format
9. For True or False format, enter a question. You may use up to 150 characters for your
question.
10.
Press the button beside True or False to indicate the correct answer to the question. A
indicates the answer.
11. Press Add Question to continue adding questions and answers.

CHAPTER 7
USING SMART LAB
125 smarttech.com/kb/171185
12. After you have finished adding questions and answers, press Next.
The Review Content dialog box opens. You may edit your questions and answers and set a
time limit to answer each question.
Click the questions or answers to edit them.
If you would like to assign a time limit for the question to be answered, toggle the Time limit
button and set the number of seconds allowed for answering each question.
13. Press Finish.
SMART lab builds the activity, and it will be ready for use after a few moments.
NOTE
Game components cannot be added to the Speedup activity.
To play a Speedup activity
1. When the activity opens, press Start
2. Select the number of racers from one to four. A maximum of four racers can race, but
additional students can participate.
3.
Select a racer avatar and press the check mark to lock in your choice. You have 15
seconds to select a racer avatar. If no avatars are chosen, avatars will automatically be
selected and the race will begin.
4. When the race starts, rapidly press the Racer control arrow for a Turbo boost to increase
speed .
5. At various points around the race track, the questions will be asked. Racers select the letter
that corresponds to the correct answer on their racer controls.
6. When the race is complete, the winner’s racer avatar is displayed in the results window, and
time results will be shown in seconds for each racer avatar. Press Review answers to see all
answers. Press Show Players to see each racer’s avatar.
Creating and adding a Shout It Out! activity
Students use the Shout It Out! to quickly create and contribute text and images to SMART lab
content-creation activities using their own device web browsers, and teachers can easily curate
the content. Use it as a brainstorming activity for generating ideas.

CHAPTER 7
USING SMART LAB
126 smarttech.com/kb/171185
To ensure the best possible user experience with Shout It Out!, see Device and network
requirements for more information.
IMPORTANT
If you are using a trial version of SMARTNotebook software, you might receive a reCaptcha
notification. Validate the trial version to use Shout It Out!. For more information, see Shout It Out!
user validation for more information.
To add a Shout It Out! activity
1.
Open SMART lab by pressing the SMART lab toolbar icon in the SMART Notebook
toolbar.
The Select an Activity Creation Wizard opens.
2. Scroll to locate the Shout It Out! activity and press the activity icon.
The Shout It Out! Add Content page opens. Select the contribution format you would like to
use. You can choose from either Randomized or Categories placements.
If you selected Categories placements, at least two categories are required for the activity.
Give names to the categories that will contain student contributed content.
3. In the Contributions section, select either Text or Images as the type of contribution students
will make; then enter the maximum number of contributions allowed per device.
4. In the Student Names section, select whether you would like to Show or Hide student names.
5. Click Finish.
SMART lab builds the activity, and it will be ready for use after a few moments. To start the
activity and allow your students to make contributions, see Adding Student Text Contributions
and Adding Student Image Contributions.
6.
To add a buzzer, timer or randomizer game element to the activity, press .
The Game element selector opens.
7. Select a game element if desired. The game element will appear in the activity. See Adding a
Game Component to an Activity for more information.
To start a Shout It Out! Activity using student devices
1. After you have created a Shout It Out! activity, confirm that the Contributions and Student
Namessettings are correct.

CHAPTER 7
USING SMART LAB
127 smarttech.com/kb/171185
2. Press Finish.
The SMART lab Student Contribution Activity dialog box appears. It includes the classlab.com
URL that students will enter into their device browsers, and the generated activity ID number
students will enter on the classlab.com website.
The activity icon turns blue to indicate that an activity is currently in progress.
For more information, see To add device enabled student contributions to an activity.
3. Direct students to classlab.com and have them enter the activity IDnumber and their names.
Students are connected to the activity.
Student contributions will appear in the SMART Notebook SMART lab page.
NOTE
To delete a contribution, drag it to the Recycle bin at the top left of the SMART lab activity page.
After a contribution is deleted, it cannot be retrieved.
Shout It Out! User validation
If you are using a trial version of SMART Notebook collaborative learning software, you might
receive a reCaptcha notification when you open Shout It Out! in SMART lab for the first time.
If you receive this notification, you must first validate the trial version before Shout It Out! features
will work. After you have registered as a trial user, you will no longer receive reCaptcha
notifications.

CHAPTER 7
USING SMART LAB
128 smarttech.com/kb/171185
To validate as a trial user
1. If you receive a reCaptcha notification In the SMART lab Student Contribution Activity dialog
box, select the I’m not a robot check box.
An image questionnaire appears.
2. Complete the questionnaire and press Verify.
If you answer the questionnaire correctly, a green check mark will appear in the I’m not a
robot check box.
3. Press Start Activity to begin adding the Shout It Out! activity.
Web browser, device operating system recommendations and network
recommendations
NOTE
When using SMART lab activities on classlab.com, students may check their website access at
http://classlab.com/connection/check.html.
Web browser
recommendations
l
Google Chrome 33 or above
l
Firefox 38 or above
l
Internet Explorer11
l
Edge

CHAPTER 7
USING SMART LAB
129 smarttech.com/kb/171185
Device operating
system
recommendations
l
Windows 7 operating system or above
l
iOS 8 operating system or above
l
Android 4.4.2 operating system or above
Network
recommendations
SMART lab activities on classlab.com are designed to keep network
requirements as low as possible while still supporting rich collaboration. The
network recommendation for Shout It Out! alone is 0.3 Mbps per device. A
school that regularly uses other Web 2.0 tools should have enough network
capacity to run SMART lab activities on classlab.com. If SMART lab activities
on classlab.com are used in conjunction with other online resources, such as
streaming media, greater network capacity could be required, depending
on the other resources being used.
Website access requirements
To ensure that Shout It Out! works correctly, add the following URLs to your network’s white list.
l https://www.classlab.com
l http://id.smarttech.com
l https://content.smarttech-prod.com
l https://metric.smarttech-prod.com
l https://google.com
l http://google-analytics.com
l https://www.gstatic.com (used by Google to load reCAPTCHA)
l https://*.firebaseio.com
l https://*.cloudfront.com
Adding device enabled student text contributions
to Shout It Out! activities
Students will enjoy adding their contributions to your SMART lab activities. Students can add text
or images, depending on activity requirements. Have other students position comments into
categories or use the contributions to begin discussions.
After a student has signed in to the activity using the SMART lab Student Contribution Activity
dialog box on their computer or mobile device browser, the Activity response window opens.
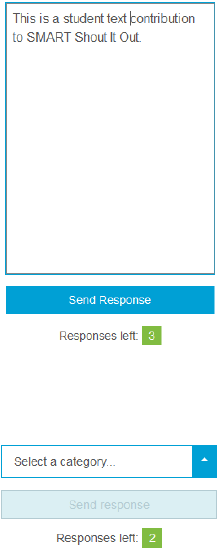
CHAPTER 7
USING SMART LAB
130 smarttech.com/kb/171185
1. Students enter their contribution in the text window. A student may enter up to 150 characters
into the window including spaces, and can contribute the number of times specified by the
teacher.
If you previously selected Categorized placements, the text window includes a category
menu.
After making their contributions, students select the category to which they wish to contribute
from the Select a category drop-down menu.

CHAPTER 7
USING SMART LAB
131 smarttech.com/kb/171185
2. Students press Send Response to send their contributions to the SMART Notebook SMART
lab activity page.
The student contribution appears on the SMART Notebook SMART lab activity page. See
Adding Student Text Contributions and Adding Student Image Contributions for more
information.
In Categorized view, click the to minimize the activity ID window to view contributions that
appear in the window on the right of the activity page. Click to reopen the window.
TIP
You can move a student contribution from one category to another by pressing the student
contribution and dragging it to the other category.

CHAPTER 7
USING SMART LAB
132 smarttech.com/kb/171185
Adding student image contributions
1. After a student has signed in to the activity using the SMART lab Student Contribution Activity
dialog box, the Activity response window opens.
2. The student presses Select an image.
The device file explorer opens.
3. The student selects the image and presses Open.
As with the text contribution, the image contribution appears on the SMART Notebook SMART
lab page.
To enlarge the image contribution, the teacher can press the image on the SMART Notebook
page, and the image will enlarge.
To return the image to its normal size, press outside the enlarged image, or press the X in the
top right corner of the enlarged image.
IMPORTANT
A student may contribute 50 images per activity. If the student exceeds this amount, a
warning appears, and additional image contributions by that student do not appear for the
current activity.
NOTE
To delete a contribution, drag it to the Recycle bin at the top left of the SMART lab activity
page. After a contribution is deleted, it cannot be retrieved.

CHAPTER 7
USING SMART LAB
133 smarttech.com/kb/171185
4. To leave the activity, students can press the application exit symbol on their device browsers
.
To add device enabled student contributions to the activity
1.
To add a student device enabled activity using classlab.com, press or .
The device enabled activity dialog box opens.
2. Press Start for Students
The Activity running dialog box opens.

CHAPTER 7
USING SMART LAB
134 smarttech.com/kb/171185
3. Have students go to classlab.com on their devices.
The classlab.com activity dialog box opens.
4. Students enter the activity code and press Enter.
Students will be prompted to enter their names and press Join the Activity.
The activity dialog box opens.
Students make their selections and press Send response when complete.
For more information on using classlab.com, see Adding student text contributions and
Adding student image contributions.

CHAPTER 7
USING SMART LAB
135 smarttech.com/kb/171185
Removing students from an activity
You can remove students from a Shout It Out! activity and end the activity.
1. At the bottom of the activity panel, press Remove Students.
The Remove Students confirmation dialog box will appear.
2. Press Remove Students. The activity will end and all students will be removed from the
activity and the Remove Student button will be disabled.
Adding a game element to your activity
You can make your SMART lab activity more interesting and engaging for your students by adding
game elements. Three game elements are available.

CHAPTER 7
USING SMART LAB
136 smarttech.com/kb/171185
To add a game element to an activity
1.
To add a buzzer, timer or randomizer game element to the activity, press .
The Game element selector opens.
2. Select a game element. The game element appears in the activity, along with a Settings
button.
3. Press the Settings button to change available features of the game element.
Timer
Use the timer to track how long it takes students to complete an activity. In the Timer dialog box
you can choose from 15 second, 30 second, or one minute count down from or count up to times,
or you can set a custom time in minutes and seconds.
Randomizer
Use the Randomizer to randomly select the students or the activity’s content. You can randomize
flip card backs, numbers, or student lists. In the Randomizer dialog box, you can randomize Flip
card backs or numbers from 1 to 30. You can also randomize selected student names by adding
them to the Student List box or by adding student names from a student list you have already
saved. Each item can only be chosen once.
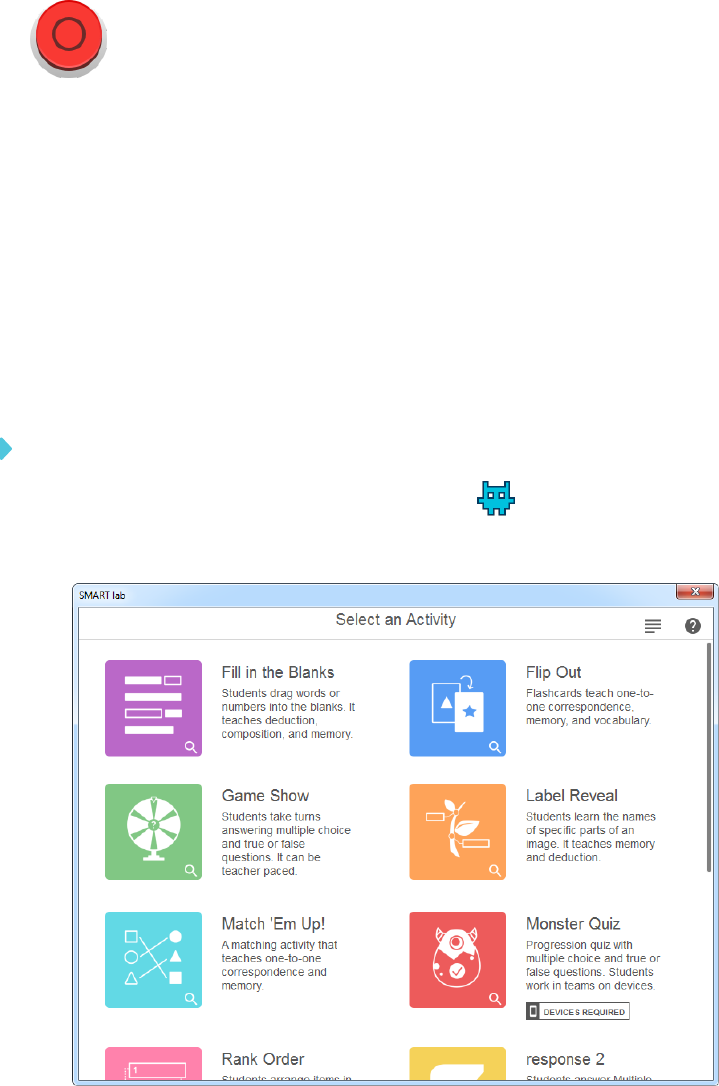
CHAPTER 7
USING SMART LAB
137 smarttech.com/kb/171185
Buzzer
Students can compete to see who gets to go next. You can select and use up to four buzzers from
the Buzzer dialog box using the game element’s Settings.
Using Monster Quiz
Monster Quiz is a mobile device-enabled progression quiz with multiple choice and true and false
questions. Students learn through teamwork and competition. Using their mobile enabled devices,
students help their team grow lovable monster characters by correctly answering questions you
have prepared.
To use Monster Quiz
1.
Open SMART lab by pressing the toolbar icon in the SMART Notebook toolbar.
The Select an Activity Creation Wizard opens.
2. Scroll to Monster Quiz and press the activity icon.
The Monster Quiz Add Content dialog box opens.

CHAPTER 7
USING SMART LAB
138 smarttech.com/kb/171185
3. Select Multiple Choice or True or False as the type of quiz to build.
4. For Multiple Choice format, enter a question. You may use up to 150 characters for your
question.
5. Enter at least two answers to the question you entered in step 4, and press the button beside
the correct answer. A indicates the correct answer.
6. Press Add Question to begin adding questions and answers to the activity. You can also add
questions from a previously saved list or save new questions to a list. For more information
about adding content, see Using Monster Quiz on the previous page.
Only the first ten questions are added to the activity.
7. After adding questions, press Next.
The Review Content dialog box opens.
8. Select the Time Limit Per Question toggle to assign the number of seconds allowed for
answering each question.
9. Press Finish. SMART lab builds the activity, and it will be ready for use after a few moments.
The Add game components dialog box opens along with a reminder dialog that gaming
components are not available for the Monster Quiz activity.
10.
Press the red activity icon .
11. The classlab.com Student Contribution Activity dialog appears. It includes the URL that
students will enter into their browsers and the generated activity ID number students will enter
on the SMART Notebook lesson activity builder website. Direct students to visit classlab.com
on their mobile device browsers. The activity icon turns blue to indicate that an activity is
currently in progress.

CHAPTER 7
USING SMART LAB
139 smarttech.com/kb/171185
12. Students enter the Activity code ID and their name in the dialog box that appears on their
mobile devices.
13. Have students press Join the activity on their devices.
14. Press Start the Activity on the Monster Quiz activity window.
Students receive a confirmation that they are now in the game.
15. The teacher presses Set teams and enters the number of participating teams.
SMART lab assigns participants to the teams and builds the activity, and it will be ready for use
after a few moments. To start the activity and allow your students to make contributions, see
Using Monster Quiz on page137.
16. Press Start Quiz.
The quiz begins.
Students answer the quiz on their mobile devices. As correct answers are given, the monsters
hatch, and the game concludes when all monsters have hatched.
17. Press Review to review students’ answers. You can review the team scoreboards and class
reviews.
Using the Hand out activity
As a teacher, you can create a Hand out activity with almost any SMART lab activity. Use the Hand
out activity to send a SMART activity to students so that they can participate in the lesson on their
mobile devices in real time.

CHAPTER 7
USING SMART LAB
140 smarttech.com/kb/171185
Creating a Hand out activity
To create a Hand out activity
1. Select from any SMART lab activity including Super Sort, Rank Order, Flip Out, Fill in the
Blanks, Match ‘Em Up and Label Reveal activities.
2. Set up your activity as you would normally, but when your set up is complete, you will now see
the activity icon .
3.
Press the activity icon to begin the activity. The icon turns blue to indicate that an activity
is currently in progress.
The Ready to start activity dialog box opens, indicating the classlab.com activity ID.
4. Direct students to classlab.com using their mobile device browsers.
5. Press Start for Students. Students will see the classlab.com website.
6. Direct students to enter the Activity ID and their names and then tap Join the activity on their
individual devices.
7. The Hand out activity appears on students’ mobile devices. When all students have
completed the activity, press End on the Ready to start activity dialog box. Students receive
a notification on their devices that the activity has ended.
Using SMART response 2
Creating assessments with SMART response 2
Available within SMARTNotebook software, response 2 is a highly intuitive and simplified

CHAPTER 7
USING SMART LAB
141 smarttech.com/kb/171185
assessments tool, making it easier, quicker and more natural to create actionable question sets.
Focusing on formative assessments, the new tool supports the need for educators to effectively
assess students in order to guide learning. Students access the assessments tool by navigating to
classlab.com on their mobile devices.
NOTE
To begin using the response 2 assessments tool, open it from Notebook by pressing the
response 2 icon . The response 2 setup dialog box opens. You can then begin to create and
save question sets. Each question requires at least two answers. Keep questions under 150
characters for optimal performance.
IMPORTANT
1. Previous versions of SMART Response files will be converted so that they open in SMART
response 2. A dialog box appears when you attempt to open a file from a previous version
of SMART Response:
2. Press Convert to convert the old SMARTResponse questions. Each set of consecutive
questions will be grouped into a new SMARTresponse 2 activity.
3. If you don’t want to group consecutive questions, select the Don’t group consecutive
questions check box.
If you select the Don’t group consecutive questions check box, each SMART Response
page in the file will get a new single-question response 2 activity inserted on a new page in
front of it. You will see two pages for every SMARTResponse page in the original SMART
Response file.
4. Press Convert to confirm the file conversion.
5. The converted Notebook file opens.
A banner appears indicating that the file has been converted. Select Learn More on the
banner for additional information.

CHAPTER 7
USING SMART LAB
142 smarttech.com/kb/171185
The conversion process does not capture certain pieces of information from SMART Response:
pictures, annotations and cross references are not preserved;
l Untranslated Yes/No and True/False labels will show as text questions A) True and B) False. If
the file has been translated, the options will still be Yes/No and True/False.
l Superscript and subscript will be formatted but no other text formatting will be converted
l Number character references will not be maintained
l Math question types will not be supported
l Empty question titles will show the following default text: Incomplete question. Edit activity
to complete
To create a SMART response 2 question set
1.
Open response 2 from Notebook by pressing the response 2 icon .
The response 2 Add Content dialog box opens.
2. From the Add Content dialog box, select the type of quiz you want to create. You can create
multiple choice, true or false, multiple answer, poll/opinion or short answer questions.
The quiz question set you choose determines the answer format. For example, a multiple
choice quiz will give four potential answers from A through D, while a true or false quiz will
give only True and False answers for you to complete.
3. Select the correct answer for each question.
4. To add another question to your quiz, press Add Question.
5.
Press Save to save the quiz. You can use it later for other lessons.
6. When completed, press Next.
OR
Press Previous to go back to the previous page and edit your questions or add more
questions.
7. Press Finish.
After a few moments the activity will load and will be ready to use.

CHAPTER 7
USING SMART LAB
143 smarttech.com/kb/171185
To create a SMART response 2 question set from a previously saved file
1. From the Notebook menu, press Add Page. A new Notebook page opens.
2.
Open response 2 from Notebook by pressing the response 2 icon . The response 2 Add
Content dialog box opens.
You can also select response 2 from the SMARTlab Creation Wizard.
3.
Tap Load to load a previously saved file.
The Load Content selection dialog box opens.
4. Select the file to load, then press Load.
The question set loads and appears in the Review Content dialog box. While in the Review
Content dialog box, you can also delete questions from your quiz.
To delete a question, press .
5. Select Finish.
After a few moments the activity will load and will be ready to use.
To add questions to a question set
1. In the response 2 Add Content dialog box, press Add Question. The Questions dialog box
opens.
2. Add questions as required.
Press Save to save your question set. You can then use it later.
3. Press Next.
The question set loads and appears in the Review Content dialog box.
OR
Press Previous to go back to the previous page and edit you questions.
4. Press Finish.
After a few moments the activity will load and will be ready to use.

CHAPTER 7
USING SMART LAB
144 smarttech.com/kb/171185
To add images to a SMART response 2 question set
1.
Press the Add Image icon .
An Open dialog box appears.
2. Select the image to add to the list and press Open.
The image appears in the Add Content dialog box. You can also drag an image into the
dotted blue box.
3. After all answers have been entered, press Add Question to add another question to the set.
4. Press Done. The Add Content dialog box opens. Edit, remove or add questions as needed.
See Chapter 7: Using SMART lab on page113 for more information about managing content.
5. Press Finish. After a few moments the question set will be built and will be ready to use.
Students will see the activity and activity identification number on the SMARTBoard.
6. Press Start for Students. Students can now use their mobile devices to access the response
2 activity.
Using a mobile device to access SMART response 2
Once the activity is running, it can be accessed on a mobile device if the device meets the
necessary browser and connectivity requirements.
The student uses the browser on the mobile device to browse to classlab.com.
1. When in the classlab.com website, the student enters the activity identification number.
The Activity instructions dialog box opens.
2. Press OK. The first quiz question opens.
3. Select the answer to the quiz question and then press the arrow key to advance to the next
question.

CHAPTER 7
USING SMART LAB
145 smarttech.com/kb/171185
4. when all questions have been answered press the arrow key once more to advance to the
submit questions page. On this page you can get information about the quiz or sign out of the
quiz
5. Press Submit All Answers.
6. A confirmation pages opens.
7. Press Submit. The teacher will review results with class.
To review results on the device
1. When the teacher presses review, the student gets instant feedback on the device for each
question. Tapping a question on the final review pages takes the user to that question to see
what selections are available
The percentage correct is indicated at the bottom of the device screen.


Chapter 8
147 smarttech.com/kb/171185
Chapter 8: Presenting lesson activities
Preparing to present 148
Setting the page display 148
Zooming in and out 148
Panning a page 149
Displaying links 150
Moving windows between screens 150
Using presentation tools 151
Using the Screen Shade 151
Using cell shades 152
Using the Magic Pen 153
Using the Text Pen 153
Using SMART Blocks 153
Using measurement tools 155
Using Concept Mapping 155
Setting measurement tool preferences 157
Using the Text Pen 159
Writing editable text 159
Editing with the Text pen 160
Clearing and resetting pages 161
Clearing pages 161
Resetting pages 163
Using the Screen Capture toolbar 164
Using the Magnifier 165
Using the Magnifier tool 165
Using the Screen Shade tool 167
Using the Spotlight tool 168
After creating lesson activities in SMARTNotebook software, you can present the lesson activities
to students using your interactive product and the presentation features of the software.
In addition to presenting lesson activities to students, you can facilitate collaboration in your
classroom using SMARTNotebook software and your interactive product. Specifically, you can
enable two people to use your SMARTBoard D600 series or 800 series interactive whiteboard at
the same time.

CHAPTER 8
PRESENTING LESSON ACTIVITIES
148 smarttech.com/kb/171185
Preparing to present
When you have completed your .notebook files and are ready to present them to students, save
the files on a CD, DVD or USB drive. This enables you to access and display the files by inserting
the CD, DVD or USB drive into the computer connected to the interactive product. Alternatively,
make the files accessible on your local area network, and then browse to them on the interactive
product.
Next, prepare for presenting by doing the following:
l Set the page display
l Display any links in the file
l If you have multiple interactive products in your classroom, move windows to the appropriate
screens
l If you’re presenting video or sound files, adjust the volume
Setting the page display
SMARTNotebook software includes the following views:
l Full Screen view expands the page area to fill the interactive screen by hiding the title bar,
toolbar, taskbar and sidebar.
l Transparent Background view enables you to see the desktop and windows behind the
SMARTNotebook software window and continue to interact with the open, transparent page.
l Dual Page view displays two pages side-by-side.
Zooming in and out
You can zoom in and out using the View Screens button or multitouch gestures (if your interactive
product supports multitouch gestures).
To zoom in and out using the view menu
1.
Press View Screens .
2. Select a magnification level between 50% and 300%.
OR
Select Entire Page to make the entire page fit your display.
OR
Select Page Width to set the page’s width to the same width as your display.

CHAPTER 8
PRESENTING LESSON ACTIVITIES
149 smarttech.com/kb/171185
To zoom in and out using the view menu
Drag your fingers in opposite directions to zoom in.
OR
Drag your fingers toward each other to zoom out.
A message appears, displaying the current zoom level.
Panning a page
If your interactive product supports the pan gesture, you can pan a page when zoomed in.
To pan a page
1. Using two fingers on the same hand, press and hold the screen.
2. Keeping your fingers on the screen, move up, down, left or right.

CHAPTER 8
PRESENTING LESSON ACTIVITIES
150 smarttech.com/kb/171185
3. When you reach the area you want to view, release your fingers.
Displaying links
You can attach a copy of a file, a shortcut to a file, a link to a web page or a sound file to any object
on a page (see Using advanced object features on page103). You can display an animated
indicator around each object that has a link.
To display links when a page opens
Select View > Show All Links When Page Opens.
Each time you open a page, an animated indicator appears around each object that has a link.
Depending on how you define the links, each indicator surrounds either the entire object or an
icon in the object’s lower-left corner. The indicators disappear automatically after several
seconds.
NOTE
Clear the selection of View > Show All Links When Page Opens to stop displaying links
when you open a page.
To display links on the current page
Select View > Show All Links.
An animated indicator appears around each object that has a link. Depending on how you
define the links, each indicator surrounds either the entire object or an icon in the object’s
lower-left corner. The indicators disappear automatically after several seconds.
Moving windows between screens
You can operate multiple interactive products from the same computer. You can split the computer
display over two or more screens, or you can display some programs on one screen and other
programs on another. For more information, see Connecting multiple interactive whiteboards to
one computer (smarttech.com/kb/000315).

CHAPTER 8
PRESENTING LESSON ACTIVITIES
151 smarttech.com/kb/171185
If you connect multiple interactive products to one computer, you can move windows from one
screen to another.
To move a window from one screen to another
1. If you haven’t done so already, display the window.
NOTE
You can move a window only if it’s neither maximized nor minimized.
2. Press and hold the window on the first screen with your finger.
3. Press the second screen with a finger on your other hand.
4. Lift your finger from the first screen.
The window disappears from the first screen and appears on the second screen.
Using presentation tools
While presenting lesson activities to students, you can use the following tools:
l Screen Shade
l Cell shades
l Magic Pen
l Text Pen (to write editable ink)
l Standard pen type (to create fading objects)
l SMART Blocks
l Concept Mapping
l Measurement tools
o
Ruler
o
Protractor
o
Geodreieck protractor
o
Compass
Using the Screen Shade
If you want to cover information and reveal it slowly during a presentation, you can add a Screen
Shade to a page. You can also change the color of your screen shade to enhance your

CHAPTER 8
PRESENTING LESSON ACTIVITIES
152 smarttech.com/kb/171185
presentation.
If you add a Screen Shade to a page and save the file, the Screen Shade appears over the page
the next time you open the file.
To add a Screen Shade to a page
1.
Press Show/Hide Screen Shade .
A Screen Shade appears over the entire page.
2. Press the screen shade to automatically change it to a different color.
To reveal part of the page
Drag one of the Screen Shade’s resize handles (the small circles at the edges of the Screen
Shade).
To remove the Screen Shade from a page
Press Show/Hide Screen Shade .
OR
Press Close in the upper-right corner of the Screen Shade.
Using cell shades
You can add a cell shade to a table cell. This enables you to reveal the information in the cells
during a presentation.
NOTES
l You must remove the cell shade if you want to change the cell’s properties; insert columns
or rows; remove columns, rows or cells; or split or merge cells.
l You can also add a screen shade to cover an entire page (see Using the Screen Shade on
the previous page).
To add a cell shade
1. Select the cell.
2. Press the cell’s menu arrow, and then select Add Cell Shade.

CHAPTER 8
PRESENTING LESSON ACTIVITIES
153 smarttech.com/kb/171185
To show and hide the contents of a cell
1. Press the cell shade.
The cell shade disappears, showing the contents of the cell.
2.
Press in the top-left corner of the cell.
The cell shade appears, hiding the contents of the cell.
To remove a cell shade
1. Select the cell.
2. Press the cell’s menu arrow, and then select Remove Cell Shade.
Using the Magic Pen
The Magic Pen enables you to do the following:
l Create an object that slowly fades. Select the Magic pen from the Tools panel and write or
draw with it. The digital ink disappears after about 10 seconds. See Writing, drawing and
erasing digital ink for more information.
l Open a magnification window. Learn more at Using the Magnifier tool.
l Open a spotlight window. Learn more at Using the Spotlight Tool.
Using the Text Pen
The Text Pen enables you to do the following:
l Write notes that automatically convert into editable text
l Edit the text as you work without touching a keyboard
See Using the Text Pen Using the Text Pen for complete information.
Using SMART Blocks
SMART Blocks is an add-on that enables you to perform math activities with your class by writing
numbers on the page, and then connecting them to a SMART Block. You can choose from seven
different equation types to work with. You can learn how to use SMART Blocks through the pop-up
guide.

CHAPTER 8
PRESENTING LESSON ACTIVITIES
154 smarttech.com/kb/171185
IMPORTANT
SMART Blocks will perform the computation inside the blocks. Do not ink inside the blocks. See
the examples below.
The following SMART Block activities are available:
SMART Block Function Example
Addition blocks accept up to two inputs.
The output is the sum of the inputs.
Subtraction blocks accept up to two
inputs. The output is the difference of the
inputs.
Multiplication blocks accept up to two
inputs. The output is the product of the
inputs.
Division blocks accept up to two inputs.
The output is the quotient of the inputs.
Power blocks accept up to two inputs. The
output is the first input to the power of the
second input.
Square root blocks accept one input. The
output is the square root of the input.
Unknown blocks accept two inputs. The
output is a random operation applied to
the inputs.

CHAPTER 8
PRESENTING LESSON ACTIVITIES
155 smarttech.com/kb/171185
To access SMART Blocks
Press Add-ons , and then select SMART Blocks.
To access the SMART Blocks pop-up guide
1.
Press Add-ons , and then select SMART Blocks.
2. Press Learn More.
Using measurement tools
Using the SMARTNotebook software measurement tools, you can insert a ruler, protractor,
Geodreieck protractor or compass into a page.
Using Concept Mapping
Use Concept Mapping to quickly create concept maps that encourage dynamic participation from
students. You can use ink gestures along with traditional interactions to build concept maps.
To begin using Concept Mapping, open it from the toolbar. A root node appears automatically.
You then use additional nodes to create the concept map.
To create a root node
1.
Press Start a new concept map in the Add-ons menu.
A root node opens.
2.
Double press within the root node to edit the text. Press Properties or Text to open the
Text menu, where you can select text size, font and color.
To create additional nodes
1. Press the + button in the root node. A new node appears with a line connecting it to the root
node.

CHAPTER 8
PRESENTING LESSON ACTIVITIES
156 smarttech.com/kb/171185
2. Double press within the node to edit the text.
To use an image as a node
1. Open Concept Mapping and drag or paste an image, Ink or text to the Notebook page.
2. Use a Notebook pen to draw a circle around the image.
3. The image appears within a new node. Move the node to wherever you like on the Notebook
page.

CHAPTER 8
PRESENTING LESSON ACTIVITIES
157 smarttech.com/kb/171185
4. Now use the pen to draw a regular ink line from the new node to another node. The line turns
into a segment and joins the two nodes.
TIPS
o
Use the Undo and Redo buttons to undo or redo your Concept Mapping work.
o
If you delete a root node, all other nodes are also deleted.
o
You can re-size the node by pressing the re-size handle and moving it to make the
node larger or smaller.
Setting measurement tool preferences
By default, the ruler, protractor and Geodreieck protractor in SMARTNotebook software are blue
and display best with light-colored backgrounds.

CHAPTER 8
PRESENTING LESSON ACTIVITIES
158 smarttech.com/kb/171185
You can change these measurement tools’ color to yellow if you want to use them with dark-
colored backgrounds.
NOTE
Completing the following procedure affects the appearance of measurement tools in .notebook
files when viewed on your copy of SMARTNotebook software only. If you open the same
.notebook files on another copy of SMARTNotebook software, the measurement tools could
display in a different color.
To change the measurement tools’ color (Windows operating systems)
1. Select Edit > Preferences.
The SMART Notebook Preferences dialog box appears.
To change the measurement tools’ color (OS X operating systems)
1. Select Notebook > Preferences.
A dialog box appears.
2. Press Defaults.
3. Select Blue tint (recommended for light backgrounds) in the Measurement tool color
drop-down list to set the measurement tools’ color to blue.
OR
Select Yellow tint (recommended for dark backgrounds) in the Measurement tool color
drop-down list to set the measurement tools’ color to yellow.
4. Press OK.

CHAPTER 8
PRESENTING LESSON ACTIVITIES
159 smarttech.com/kb/171185
Using the Text Pen
You can apply mark-ups and make revisions to editable text using the Text Pen. You can delete
unwanted text by drawing a strike-through line through the text. You can use different color ink to
highlight different parts of your text. You can also apply other mark-ups to insert spaces, to insert
text and to replace text with new text.
The Text Pen enables you to do the following:
l Write notes that automatically convert into editable text
l Edit the text as you work without touching a keyboard
Writing editable text
You can write notes that automatically convert to editable text using the Text Pen.
To write editable text
1.
Press Pens .
The Pens tool buttons appear.
2. Press Pen Types then select Text Pen.
3. Select a line type.
4. Write digital ink notes on the page.
Your handwriting converts to typed text. Accept and Reject icons appear beside the typed
text.

CHAPTER 8
PRESENTING LESSON ACTIVITIES
160 smarttech.com/kb/171185
5.
Press to accept the typed text
OR
Press to restore your handwritten notes.
Editing with the Text pen
Examples of available mark-ups are defined in the following table:
Edit Instruction Example
Delete text Draw a strike-through line through the
text.
Insert space Draw a vertical line in the text.
Insert text
1.
Draw a caret ^ symbol where you
want to inserttext.
2.
Write the new text in the text box
that appears.
TIP
Press a line type or press Color
to select a new color for the
inserted text.
Words that most resemble what
you’ve written display underneath
your handwriting.
3.
Select a word to insert it as typed
text. You can also press to
automatically select the word that
appears as bold text.
OR
Press to cancel insert text.

CHAPTER 8
PRESENTING LESSON ACTIVITIES
161 smarttech.com/kb/171185
Edit Instruction Example
Replace text
1.
Draw a circle around the text you
want to replace.
2.
Write the replacement text in the
box that appears.
Words that most resemble what
you’ve written display underneath
your handwriting.
3.
Select a word to replace the typed
text or press to automatically
select the word that appears as
bold text.
OR
Press to cancel replace text.
Change text
color
1.
Press one of the line types or press
Color to select a new color for
the typed text.
2.
Draw a circle around the typed text
you want to change.
3.
Press to automatically accept
the new color selection.
OR
Press to cancel the new color
selection.
Change text
color of a word
with a gesture
1.
Press one of the line types or press
Color to select a new color for
the typed word.
2.
Draw a horizontal line through the
word and return to the start of your
line in a back and forth gesture.
The word automatically changes to
the new color selection.
Clearing and resetting pages
After presenting a lesson activity to students, you can clear or reset the pages in your .notebook
files to use the files again for future lesson activities.
Clearing pages
You can erase digital ink and delete individual objects from a page. You can also clear all objects

CHAPTER 8
PRESENTING LESSON ACTIVITIES
162 smarttech.com/kb/171185
or all digital ink objects from a page simultaneously.
NOTE
You’re unable to clear objects locked in place or infinitely cloned objects (see Cloning objects
on page72). To clear all objects from a page, you must unlock all locked objects and clear the
selection of Infinite Cloner on any infinitely cloned objects.
To clear all objects from the page
1. If you haven’t done so already, display the page you want to clear.
2. Select Edit > Clear Page.
NOTES
o
This option is disabled if there are no objects on the page or if the objects are locked
or infinitely cloned.
o
You can also select this option by doing one of the following:
o
Right-click (Windows operating system) or Control-click (OS X operating system).
o
Pressing the page’s menu arrow in the Page Sorter
o
Pressing the page’s menu arrow while editing page groups (see To create a
group (Windows) on page27)
o
Pressing Clear Page if it’s included on the toolbar (see Customizing the
toolbar on page175)
o
You can clear all objects from multiple pages at the same time. Select the pages’
thumbnails in the Page Sorter, press the menu arrow, and then select ClearPage.

CHAPTER 8
PRESENTING LESSON ACTIVITIES
163 smarttech.com/kb/171185
To clear all digital ink objects from the page
1. If you haven’t done so already, display the page you want to clear.
2. Select Edit > Clear Ink from Page.
NOTES
o
This option is disabled if there is no digital ink on the page or if the digital ink is locked
or infinitely cloned.
o
You can also select this option by doing one of the following:
o
Right-click (Windows operating system) or Control-click (OS X operating system).
o
Pressing the page’s menu arrow in the Page Sorter
o
Pressing the page’s menu arrow while editing page groups (see To create a
group (Windows) on page27)
o
Pressing Clear Ink if it’s included on the toolbar (see Customizing the toolbar
on page175)
o
You can clear all digital ink objects from multiple pages at the same time. Select the
pages’ thumbnails in the Page Sorter, press the menu arrow, and then select ClearInk
from Page.
Resetting pages
If you make changes to a page (without saving those changes), you can reset the page to the state
it was in before you made the changes.
NOTE
Resetting a page doesn’t reset any AdobeFlash Player compatible files running on the page.

CHAPTER 8
PRESENTING LESSON ACTIVITIES
164 smarttech.com/kb/171185
To reset a page
1. If you haven’t done so already, display the page you want to reset.
2. Select Edit > Reset Page.
A dialog box appears, prompting you to confirm the reset.
NOTES
o
This option is disabled if you haven’t made changes to the page since last saving the
file.
o
You can also select this option by doing one of the following:
o
Right-click (Windows operating system) or Control-click (OS X operating system).
o
Pressing the page’s menu arrow in the Page Sorter
o
Pressing the page’s menu arrow while editing page groups (see To create a
group (Windows) on page27)
o
Pressing Reset Page if it’s included on the toolbar (see Customizing the toolbar
on page175)
o
You can reset multiple pages at the same time. Select the pages’ thumbnails in the
Page Sorter, press the menu arrow, and then select ResetPage.
3. Press Reset Page.
Using the Screen Capture toolbar
The Screen Capture toolbar enables you to take a screen capture of a rectangular area, a freehand
area, a window or the entire screen.
To take a screen capture
1.
Press the SMARTBoard icon in the notification area (Windows operating systems) or Mac
menu bar (macOS operating system software), and then select Screen Capture Toolbar.
NOTE
If your computer isn’t currently connected to a SMART interactive product, the
SMARTBoard icon includes an X in its lower-right corner .

CHAPTER 8
PRESENTING LESSON ACTIVITIES
165 smarttech.com/kb/171185
2. Press one of the following buttons:
Capture a rectangular area.
Capture a window.
Capture an entire screen.
Capture a freehand area.
3. Select the area, window or screen you want to capture.
The Capture window opens. This window displays a thumbnail of the screen capture and a
button for the last action you selected.
4. Press the last action’s button.
OR
PressDo something else and select a different action.
To close the Screen Capture toolbar
PressClose (Windows operating systems) or Close (macOS operating system software)
in the Screen Capture toolbar.
Using the Magnifier
Use the Magnifier tool so that your audience can see all the details on the display.
Using the Magnifier tool
To start the Magnifier tool
1. In Notebook, select the Magic Pen and draw a square or rectangular shape around the area to
be magnified.

CHAPTER 8
PRESENTING LESSON ACTIVITIES
166 smarttech.com/kb/171185
The Magnifier tool appears.
2. Position the mouse pointer over the magnifier and perform a left-click.
3. While holding down the left-click, move the magnifier tool to any area of the display to
magnify content details.
Use the slider below the magnifier tool to magnify details to an even greater degree.
You can also use your finger to position the magnifier when using a SMART board.
To close the Magnifier tool
Press Close in the Magnifier tool’s upper right corner.

CHAPTER 8
PRESENTING LESSON ACTIVITIES
167 smarttech.com/kb/171185
Using the Screen Shade tool
You can use a screen shade to cover a screen and reveal its content slowly:
To cover a screen
1.
Press the SMARTBoard icon in the notification area (Windows operating systems) or Mac
menu bar (macOS operating system software), and then select Screen Shade.
NOTE
If your computer isn’t currently connected to a SMART interactive product, the
SMARTBoard icon includes an X in its lower-right corner .
2. If your computer is connected to more than one display, select the display on which you want
the screen shade to appear.
3. Press one side of the screen shade and drag it to cover and uncover the display’s screen.
TIPS
o
Press the screen shade to change its color.
o
Double-click the screen shade to resume covering the entire screen.
To remove the screen shade
PressClose in the screen shade’s upper-right corner.
CHAPTER 8
PRESENTING LESSON ACTIVITIES
168 smarttech.com/kb/171185
Using the Spotlight tool
You can use the Spotlight tool during a presentation to draw attention to an area of a screen:
NOTE
When the Spotlight tool is open, you can write on and interact with screen elements in the
spotlight area only.
You can also use the Magic Pen to open the Spotlight tool.
To start the Spotlight tool
1.
Press the SMARTBoard icon in the notification area (Windows operating systems) or Mac
menu bar (macOS operating system software), and then select Spotlight.
NOTE
If your computer isn’t currently connected to a SMART interactive product, the
SMARTBoard icon includes an X in its lower-right corner .
2. If your computer is connected to more than one display, select the display on which you want
the spotlight to appear.
3. Optionally, position and drag the mouse pointer over the edge of the Spotlight tool to
increase or decrease the size of the Spotlight area.
To close the Spotlight tool
PressClose in the spotlight’s upper-right corner.

CHAPTER 8
PRESENTING LESSON ACTIVITIES
169 smarttech.com/kb/171185
To use the Magic Pen to open the Spotlight tool
1. In Notebook, select the Magic Pen and draw a circular shape around the area to be
spotlighted. See
The Spotlight tool appears.
2. Position and drag the mouse pointer over the edge of the Spotlight tool to increase or
decrease the size of the Spotlight area.
To close the Spotlight tool
Press Close in the Spotlight tool’s upper right corner.

Chapter 9
171 smarttech.com/kb/171185
Chapter 9: Installing and using add-ons
Installing add-ons 171
Using add-ons 171
Identifying missing add-ons 172
Disabling and removing add-ons 172
You can search for, browse and install SMARTNotebook software add-ons from the
SMARTExchange website.
Installing add-ons
To install an add-on
1. On the Notebook menu, select Add-ons > Manage Add-ons.
The Add-on Manager appears.
2. Select one of the add-ons in the left panel, and press Done.
Using add-ons
After installing an add-on, you can use the features of that add-on like any other features in
SMARTNotebook software.
IMPORTANT
The SMARTkapp add-on only supports SMART kapp 42 and SMART kapp 84 models.
To view an add-on
1.
Press Add-ons to open the list of add-ons.
2. Press the add-on’s icon to open the add-on.

CHAPTER 9
INSTALLING AND USING ADD-ONS
172 smarttech.com/kb/171185
3.
Press to return to the list of add-ons.
To view an add-on’s version and other information
1. Select Add-ons > Manage Add-ons on the software toolbar
OR
Press on the add-on title bar.
The Add-on Manager appears.
2. Press the add-on’s name.
3. Press About.
Identifying missing add-ons
If you open a page in a .notebook file that requires an add-on that isn’t installed or is disabled on
your computer, a message appears at the top of the page. Press the message to open the Add-on
Manager. The Add-on Manager identifies which add-on is required. You can then install or enable
that add-on.
Disabling and removing add-ons
In some situations, you might want to disable or remove a previously installed add-on.
If you choose to disable an add-on, the add-on no longer appears in SMARTNotebook software
but is still installed on your computer. You can subsequently enable the add-on.
If you choose to remove an add-on, the add-on no longer appears in SMARTNotebook software
and is removed from your computer.
To disable an add-on
1. Select Add-ons > Manage Add-ons.
The Add-on Manager appears.
2. Press the add-on’s name.

CHAPTER 9
INSTALLING AND USING ADD-ONS
173 smarttech.com/kb/171185
3. Press Disable.
TIP
To enable the add-on again, press Enable.
To remove an add-on
1. On the Notebook menu, select Add-ons > Manage Add-ons.
The Add-on Manager appears.
2. Double press the name of the add-on.
3. Press Remove.
NOTE
o
You can only remove an add-on that you have installed after you installed
SMARTNotebook software.

Chapter 10
175 smarttech.com/kb/171185
Chapter 10: Configuring SMARTNotebook
software
Customizing the toolbar 175
Changing the default program for .notebook files 177
Setting gesture preferences 178
Setting image optimization preferences 179
Manually reducing the size of large pictures 180
Exporting optimized files 180
Setting default background color preferences 181
Setting table cell padding preferences 181
This chapter explains how to configure SMARTNotebook software.
Customizing the toolbar
The SMARTNotebook software toolbar enables you to select and use a variety of commands and
tools. You can customize the toolbar so that it includes the tools you use most frequently.
After adding or removing toolbar buttons, you can restore the default set of toolbar buttons. You
can also restore the tools’ default settings if you customized and saved the settings using the
Properties tab.
To add or remove toolbar buttons
1.
Click Customize the toolbar .
OR
Right-click the toolbar.
The Customize Toolbar dialog box appears.

CHAPTER 10
CONFIGURING SMARTNOTEBOOK SOFTWARE
176 smarttech.com/kb/171185
2. Press Actions or Tools.
3. Do the following:
o
To add a button to the toolbar, press its icon in the dialog box, and then drag it to the
toolbar.
o
To remove a button from the toolbar, press its icon in the toolbar, and then drag it away
from the toolbar.
o
To rearrange the buttons, press an icon in the toolbar, and then drag it to a new position
in the toolbar.
NOTES
o
You can only add, remove and rearrange buttons in the panel of the toolbar you
selected in step 2. For example, if you pressed Actions in step 2, you can only add,
remove and rearrange buttons in the Actions panel.
o
To span a button across rows, drag and hold it between two columns of buttons.
If you’re using a smaller screen resolution, only span one or two buttons across rows to
prevent issues when the toolbar is wider than the SMARTNotebook software window.
4. Press Done.
To restore the default set of toolbar buttons
1.
Click Customize the toolbar .
OR
Right-click the toolbar.

CHAPTER 10
CONFIGURING SMARTNOTEBOOK SOFTWARE
177 smarttech.com/kb/171185
A dialog box appears.
2. Press Restore Default Toolbar.
To restore the tools’ default settings
1.
Click Customize the toolbar .
OR
Right-click the toolbar.
A dialog box appears.
2. Press Restore Default Tool Properties.
Changing the default program for .notebook files
If you install a SMART program other than SMARTNotebook software that can open .notebook
files, you can set that program to be the default for .notebook files. If you want, you can change the
default program back to SMARTNotebook software later.
To change the default program when you open a file
1. Open a .notebook file using SMARTNotebook software (see Opening files on page24).
A message appears asking whether you want to change the default program for .notebook
files to SMARTNotebook software.
2. Press Yes.
To change the default program using the Preferences dialog box
1. Select Edit > Preferences.
The SMARTNotebook Preferences dialog box appears.
2. Press General.
3. Press Make Default.
4. If you want a message to appear when you open a .notebook file and your default program
isn’t SMARTNotebook software, select Tell me if SMARTNotebook software isn’t the default
program for .notebook files.
5. Press OK.

CHAPTER 10
CONFIGURING SMARTNOTEBOOK SOFTWARE
178 smarttech.com/kb/171185
Setting gesture preferences
You can interact with objects in SMARTNotebook software using gestures, including the shake
gesture and the press-and-hold gesture.
Gesture Name Purpose
Shake gesture Group two or more objects.
Press-and-hold gesture Perform a right-click (Windows
operating system) or Control-
click (OS X operating system).
The shake and press-and-hold gestures are enabled by default. However, you can choose to
disable them if you find that you or your students frequently invoke the gestures by accident.
To disable the shake gesture
1. Select Edit > Preferences (for Windows operating systems). The SMART Notebook
Preferences dialog box appears. For OS X operating systems, select Notebook >
Preferences. A dialog box appears.
2. Press General.
3. Clear the Use the shake gesture to group and ungroup objects check box.
4. Press OK.

CHAPTER 10
CONFIGURING SMARTNOTEBOOK SOFTWARE
179 smarttech.com/kb/171185
To disable the press-and-hold gesture
1. Select Edit > Preferences (for Windows operating systems). The SMART Notebook
Preferences dialog box appears. For OS X operating systems, select Notebook >
Preferences. A dialog box appears.
2. Press General.
3. Clear the Press and hold to perform a right-click check box.
4. Press OK.
Setting image optimization preferences
If your .notebook files contain large pictures (pictures over 1 MB in file size), your files could open
and run slowly. You can reduce the pictures’ file size without noticeably reducing their quality. As a
result, your .notebook files’ overall file sizes will be smaller and the files will open and run more
quickly.
To set image optimization preferences
1. Select Edit > Preferences (for Windows operating systems). The SMART Notebook
Preferences dialog box appears. For OS X operating systems, select Notebook >
Preferences. A dialog box appears.
2. Press Defaults.
3. Select one of the following options in the Image optimization drop-down list:
o
Ask every time I insert a large image to have the option of reducing or not reducing large
pictures’ file sizes when you insert them.
o
Never change the resolution of inserted images to never reduce large pictures’ file sizes
when you insert them.
o
Always change image resolution to optimize file size to always reduce large pictures’ file
sizes when you insert them.
4. Press OK.

CHAPTER 10
CONFIGURING SMARTNOTEBOOK SOFTWARE
180 smarttech.com/kb/171185
Manually reducing the size of large pictures
If you selected Ask every time I insert a large image in the Image Optimization drop-down list, you
can manually reduce the size of large pictures when you insert those pictures in your file or
afterwards.
To reduce the size of a large picture when inserting it in a file
1. Insert the picture as described in Inserting pictures on page98.
After you press Open, the Image Optimization dialog box appears.
2. Press Optimize to reduce the picture’s file size.
OR
Press Keep Resolution to not reduce the picture’s file size.
NOTES
o
When you insert a BMP file, SMARTNotebook software internally converts the file to
PNG format. This conversion reduces the size of the file. As a result, you might not
need to export an optimized version of the .notebook file (see Exporting optimized
files below) even if the BMP file is over 1 MB in size.
o
SMARTNotebook software automatically reduces the file size of pictures over 5 MB or
5 megapixels regardless of which option you choose.
To reduce the size of a large picture after inserting it in a file
1. Select the picture.
2. Press the picture’s menu arrow, and then select Image Optimization.
The Image Optimization dialog box appears.
3. Click Optimize.
Exporting optimized files
If you have existing files that contain large pictures or if you chose Never change the resolution of
inserted images in the Image Optimization drop-down list, you can export optimized versions of
your files that contain reduced pictures. This is particularly useful when you need to present a
.notebook file on an older or less powerful computer.

CHAPTER 10
CONFIGURING SMARTNOTEBOOK SOFTWARE
181 smarttech.com/kb/171185
To export an optimized file
1. Select File > Export As > Optimized SMART Notebook File for . A dialog box appears.
2. Browse to where you want to save the new file.
3. For Windows operating systems, type a name for the file in the File name box. For OS X
operating systems, type a name for the file in the Save As box.
4. Press Save.
Setting default background color preferences
By default, new pages added to your file have a default white background color. You can change
the default background color.
NOTE
This setting only affects new pages, and will be overridden by any applied Themes.
To change the default background color
1. Select Edit > Preferences (for Windows operating systems). The SMART Notebook
Preferences dialog box appears. For OS X operating systems, select Notebook >
Preferences. A dialog box appears.
2. Press Defaults.
3. Select Change Color, and then select a color.
4. Press OK.
Setting table cell padding preferences
SMARTNotebook 11 software adds cell padding to tables.

CHAPTER 10
CONFIGURING SMARTNOTEBOOK SOFTWARE
182 smarttech.com/kb/171185
Complete the following procedure to remove cell padding from tables. This is particularly useful if
you created tables prior to upgrading to SMARTNotebook 11 software and intended the tables’
contents to display without cell padding.
NOTE
Completing the following procedure affects the appearance of tables in .notebook files when
viewed on your copy of SMARTNotebook software only. If you open the same .notebook files
on another copy of SMARTNotebook software, the tables display with cell padding (assuming
the procedure hasn’t been completed on that copy of SMARTNotebook software).
To remove cell padding from tables
1. Select Edit > Preferences (for Windows operating systems). The SMART Notebook
Preferences dialog box appears. For OS X operating systems, select Notebook >
Preferences. A dialog box appears.
2. Press Defaults.
3. Clear the Add cell padding to table cells check box.
4. Press OK.
5. Close and restart SMARTNotebook software.
New and existing tables in your .notebook files display without cell padding.

Chapter 11
183 smarttech.com/kb/171185
Chapter 11: Troubleshooting SMARTNotebook
software
Adobe Flash Player issues 184
Connection issues 184
Digital ink issues 185
File issues 185
Gesture issues 186
Installation issues 187
Missing lesson content issues 187
Object issues 188
Subscription and product key issues 190
Toolbar and window issues 190
Contacting SMART reseller/support for further assistance 192
This chapter explains how to troubleshoot issues with SMARTNotebook software.

CHAPTER 11
TROUBLESHOOTING SMARTNOTEBOOK SOFTWARE
184 smarttech.com/kb/171185
Adobe Flash Player issues
Issue Solutions
Videos or animated objects
won’t play in your SMART
Notebook lesson because
Adobe Flash Player won’t
load.
What’s happening
Adobe is discontinuing Flash Player and will remove all support for
it in 2020. HTML5 is replacing Adobe Flash Player as the preferred
online platform for multimedia content, so everyone who creates
online content, including SMART Technologies, is switching to
HTML5 for creating and playing multimedia files, such as videos
and animations.
What SMART is doing
To promote the use of files that will work once Adobe Flash Player
is discontinued, we removed support for the player in SMART
Notebook 17. See a list of the Adobe Flash Player objects that
SMART Notebook software no longer supports.
We’ve already replaced the most popular Adobe Flash Player
activities in the SMART Notebook Gallery with HTML5 activities.
See a list of the Adobe Flash Player activities that SMART
Notebook software converts.
What you can do
To prepare for Adobe Flash Player’s discontinuation, delete
unsupported, Flash based objects and activities from your SMART
Notebook lessons and create new ones using the tools available in
SMART Notebook 17.
If you really need to play a Flash based file from an old lesson, you
can attempt to open it in an Adobe Flash enabled web browser.
Connection issues
Issue Solutions
You have a network
connection issue.
Several components of SMARTNotebook software
(activation, maestro, lab, response 2) require an active Internet
connection and access to URLs that may be blocked by a
network firewall or other filters. See Device and Network
Requirements for a list of URLs that must be whitelisted.

CHAPTER 11
TROUBLESHOOTING SMARTNOTEBOOK SOFTWARE
185 smarttech.com/kb/171185
Digital ink issues
Issue Solutions
On Windows computers,
SMARTNotebook software
doesn’t recognize
handwriting in your
language.
Install the appropriate language pack.
You want your handwriting
to appear more smooth and
natural in SMARTNotebook
software.
Use the Calligraphic pen type rather than the Standard pen
type (see Writing, drawing and erasing digital ink on page38).
You’re having trouble
writing smoothly in
SMARTNotebook software
on the Windows 7
operating system.
Turn off the Single Finger Panning feature. See
smarttech.com/kb/147470.
When you write with a pen,
SMARTNotebook software
on the Windows 7
operating system interprets
your action as a mouse
click.
Turn off the Flicks feature. See smarttech.com/kb/144274.
File issues
Issue Solutions
Your file contains large
pictures and runs slowly
when you open it in
SMARTNotebook
software.
Export an optimized version of the file (see Setting image
optimization preferences on page179).

CHAPTER 11
TROUBLESHOOTING SMARTNOTEBOOK SOFTWARE
186 smarttech.com/kb/171185
Issue Solutions
You receive a file or
feature-specific error.
l
Restart the computer and attempt to view the
SMARTNotebook file again.
l
Try to create a new file with the problematic content (for
example, add a new instance of a photo that may not have
appeared) to determine if the issue is widespread.
l
Try a different user account or a different computer and
access the SMARTNotebook file to see if the issue is specific
to the file or the user account.
The SMARTNotebook file
is corrupt and can’t be
opened with
SMARTNotebook
software.
If you are unable to open a file with SMARTNotebook
software, further information is available at this support page.
Gesture issues
Issue Solutions
The multitouch gestures
aren’t working in
SMARTNotebook
software.
Ensure that your interactive product supports multitouch
gestures and that multitouch gestures are enabled.

CHAPTER 11
TROUBLESHOOTING SMARTNOTEBOOK SOFTWARE
187 smarttech.com/kb/171185
Installation issues
Issue Solutions
You have received an
installation error.
Troubleshooting procedures for installation errors vary according
to operating system, the specific error message, and the
environment and specifications of the computer. Here are some
general tips and tricks you can try if you run into an error message
during installation. See this SMART Community topic for additional
information.
l
Windows:
a.
Run Windows updates and apply any updates.
b.
Restart the computer.
c.
Run Scan to repair any problematic system files. See this
support document for more information.
d.
Run the installation again.
l
Mac computers:
a.
Run macOS or OS X updates and apply any updates.
b.
Restart the computer.
c.
Repair disk permissions (if applicable). See this Apple
support site document for more information.
d.
Run the installation again.
Missing lesson content issues
Issue Solutions
You create a SMART
Notebook lesson at home,
but quizzes or questions are
missing when you or a
colleague present it from a
different computer.
NOTE
If you’re using a computer other than the one on which you
created the lesson, you can open your lesson, but you must sign
in to your SMART Notebook account before you can access all
the features in SMART lab and SMART response 2.
l
Select Account from the SMART Notebook menu to sign in
and access the missing content.

CHAPTER 11
TROUBLESHOOTING SMARTNOTEBOOK SOFTWARE
188 smarttech.com/kb/171185
Object issues
Issue Solutions
When you create a
.notebook file on one
computer and then open it
on another computer, the
objects in the file appear
differently.
There are several possible causes. The following are the most
common:
o
You used a font that’s installed on one computer but not
on the other.
o
The two computers have different operating systems.
o
The two computers have different versions of
SMARTNotebook software.
You want to move, resize or
otherwise change an
object, but when you do so,
you also move, resize or
otherwise change other
objects.
l
The objects are grouped. Any changes you make to one
object affect the other objects.
l
Select the objects, and then select Format > Group >
Ungroup to ungroup them. You can then move, resize or
otherwise change the individual objects.
l
For more information, see Positioning objects on page67.
You want to move, resize or
otherwise change an object
but can’t. A lock icon
appears instead of a menu
arrow when you select the
object.
The object is locked, which prevents you from making
changes to it. To unlock the object, select it, press its lock icon
, and then select Unlock.

CHAPTER 11
TROUBLESHOOTING SMARTNOTEBOOK SOFTWARE
189 smarttech.com/kb/171185
Issue Solutions
One object on a page
covers another:
You want to change this so
that the second object
covers the first:
l
As you create objects, newer objects cover older objects
automatically if the objects are in the same position on the
page.
l
You can change the order of objects. For more information,
see Rearranging stacked objects on page69.
When you fill an object with
a picture that is larger than
the object, the picture is cut
off:
Conversely, when you fill an
object with a picture that is
smaller than the object, the
picture is tiled:
l
When filling an object with a picture, select Scale image to fit
to resize the picture to fit the object:
l
For more information, see Changing object properties on
page64.

CHAPTER 11
TROUBLESHOOTING SMARTNOTEBOOK SOFTWARE
190 smarttech.com/kb/171185
Subscription and product key issues
Issue Solutions
You want to obtain a
SMARTNotebook product
key.
l
The product key is provided through the SMART Software
Portal. The SMART Software Portal log on is given to the
contacts provided when SMART Notebook software was
purchased. Contact your technical administrator to obtain your
SMARTNotebook product key.
l
If you are the technical administrator, you should have
received an email with your sign in credentials. Sign in to the
SMART Software Portal to view all SMART software product
keys available to your organization.
You need to renew your
SMARTLearning Suite
subscription
l
Contact your SMART authorized reseller to renew your
SMARTLearning Suite subscription.
You want to determine the
version of
SMARTNotebook software
to which your subscription
entitles you.
l
Generally, you’re entitled to download and install any version
of SMARTNotebook software that is released during your
active subscription period.
l
On the SMARTNotebook download page you can enter the
SMARTLearning Suite product key to determine the most
current version to which you will be entitled.
You want to know how
SMART Learning Suite
software will behave if your
subscription expires.
l
When your SMARTLearning Suite subscription expires, you
can continue to use SMARTNotebook software. However,
several premium features will be available only in read-only
mode.
l
Visit the SMARTLearning Suite subscription features page for
more information.
Toolbar and window issues
Issue Solutions
When using
SMARTNotebook software
on an interactive product,
you or your students can’t
reach the toolbar.
Press Move toolbar to top/bottom of window to move the
toolbar from the top of the window to the bottom.
TIP
If you have a height-adjustable wall mount, you can also
adjust the height of the interactive whiteboard or display so
that students can reach it.

CHAPTER 11
TROUBLESHOOTING SMARTNOTEBOOK SOFTWARE
191 smarttech.com/kb/171185
Issue Solutions
Toolbar buttons described
in this documentation don’t
appear on the toolbar.
l
If a down arrow appears on the right side of the toolbar,
press it to display additional toolbar buttons.
l
If the desired button you’re looking for doesn’t appear when
you click the down arrow , you or another user might have
removed the button (see Customizing the toolbar on
page175).
l
Don’t span more than a few buttons across rows to prevent the
toolbar from being wider than the SMARTNotebook software
window.
You want to change the
defaults on the
SMARTNotebook toolbar,
like pen thickness or
default text font.
See Changing the default font in SMARTNotebook software
There isn’t enough room on
your interactive product to
display the contents of a
page.
l
Press View Screens , and then select Full Screen to display
the page in Full Screen mode.
l
Select the Auto-hide check box to hide the tabs when not in
use.
The Page Sorter, Gallery,
Attachments, Properties
and other tabs disappear
whenever you press
outside of the tabs.
Press one of the tab’s icons to display it, and then clear the
Auto-hide check box.
Two users are creating or
manipulating objects in
SMARTNotebook software
on a SMARTBoard 800
series interactive
whiteboard. One user is
using his or her finger. The
other user is using a pen
from the pen tray.
When the user using the
pen presses a button in the
toolbar, the selected tool or
option changes for the user
using his or her finger
instead.
The user using the pen must press buttons in the toolbar with
the pen, not with a finger.

CHAPTER 11
TROUBLESHOOTING SMARTNOTEBOOK SOFTWARE
192 smarttech.com/kb/171185
Contacting SMART reseller/support for further
assistance
Issue Solutions
You need to contact
SMART reseller/support for
further assistance.
1.
Gather screen shots, videos, sample files and steps required
to reproduce the issue.
2.
Determine the scope of the issue. Are only certain user
profiles affected? How many computers are affected? How
widespread is the issue?
3.
Gather SMARTNotebook and system logs.
o
Windows: Open SMARTNotebook software and select
Help > Generate Diagnostic Data.
o
macOS: Open SMARTNotebook software and select
Notebook > Generate Diagnostic Data.
