
User Guide
July 24, 2024
2024.1
Copyright © 2013, 2024, Oracle and/or its affiliates.
This software and related documentation are provided under a license agreement containing restrictions
on use and disclosure and are protected by intellectual property laws. Except as expressly permitted
in your license agreement or allowed by law, you may not use, copy, reproduce, translate, broadcast,
modify, license, transmit, distribute, exhibit, perform, publish, or display any part, in any form, or by any
means. Reverse engineering, disassembly, or decompilation of this software, unless required by law for
interoperability, is prohibited.
The information contained herein is subject to change without notice and is not warranted to be error-
free. If you find any errors, please report them to us in writing.
If this is software or related documentation that is delivered to the U.S. Government or anyone licensing it
on behalf of the U.S. Government, then the following notice is applicable:
U.S. GOVERNMENT END USERS: Oracle programs (including any operating system, integrated software,
any programs embedded, installed or activated on delivered hardware, and modifications of such
programs) and Oracle computer documentation or other Oracle data delivered to or accessed by
U.S. Government end users are "commercial computer software" or "commercial computer software
documentation" pursuant to the applicable Federal Acquisition Regulation and agency-specific
supplemental regulations. As such, the use, reproduction, duplication, release, display, disclosure,
modification, preparation of derivative works, and/or adaptation of i) Oracle programs (including any
operating system, integrated software, any programs embedded, installed or activated on delivered
hardware, and modifications of such programs), ii) Oracle computer documentation and/or iii) other
Oracle data, is subject to the rights and limitations specified in the license contained in the applicable
contract. The terms governing the U.S. Government's use of Oracle cloud services are defined by the
applicable contract for such services. No other rights are granted to the U.S. Government.
This software or hardware is developed for general use in a variety of information management
applications. It is not developed or intended for use in any inherently dangerous applications, including
applications that may create a risk of personal injury. If you use this software or hardware in dangerous
applications, then you shall be responsible to take all appropriate fail-safe, backup, redundancy, and other
measures to ensure its safe use. Oracle Corporation and its affiliates disclaim any liability for any damages
caused by use of this software or hardware in dangerous applications.
Oracle and Java are registered trademarks of Oracle and/or its affiliates. Other names may be trademarks
of their respective owners.
Intel and Intel Inside are trademarks or registered trademarks of Intel Corporation. All SPARC trademarks
are used under license and are trademarks or registered trademarks of SPARC International, Inc. AMD,
Epyc, and the AMD logo are trademarks or registered trademarks of Advanced Micro Devices. UNIX is a
registered trademark of The Open Group.
This software or hardware and documentation may provide access to or information about content,
products, and services from third parties. Oracle Corporation and its affiliates are not responsible for and
expressly disclaim all warranties of any kind with respect to third-party content, products, and services
unless otherwise set forth in an applicable agreement between you and Oracle. Oracle Corporation and
its affiliates will not be responsible for any loss, costs, or damages incurred due to your access to or use
of third-party content, products, or services, except as set forth in an applicable agreement between you
and Oracle.
If this document is in public or private pre-General Availability status:
This documentation is in pre-General Availability status and is intended for demonstration and preliminary
use only. It may not be specific to the hardware on which you are using the software. Oracle Corporation
and its affiliates are not responsible for and expressly disclaim all warranties of any kind with respect to
this documentation and will not be responsible for any loss, costs, or damages incurred due to the use of
this documentation.
If this document is in private pre-General Availability status:
The information contained in this document is for informational sharing purposes only and should be
considered in your capacity as a customer advisory board member or pursuant to your pre-General
Availability trial agreement only. It is not a commitment to deliver any material, code, or functionality, and
should not be relied upon in making purchasing decisions. The development, release, timing, and pricing
of any features or functionality described in this document may change and remains at the sole discretion
of Oracle.
This document in any form, software or printed matter, contains proprietary information that is the
exclusive property of Oracle. Your access to and use of this confidential material is subject to the terms
and conditions of your Oracle Master Agreement, Oracle License and Services Agreement, Oracle
PartnerNetwork Agreement, Oracle distribution agreement, or other license agreement which has
been executed by you and Oracle and with which you agree to comply. This document and information
contained herein may not be disclosed, copied, reproduced, or distributed to anyone outside Oracle
without prior written consent of Oracle. This document is not part of your license agreement nor can it be
incorporated into any contractual agreement with Oracle or its subsidiaries or affiliates.
Documentation Accessibility
For information about Oracle's commitment to accessibility, visit the Oracle Accessibility Program website
at http://www.oracle.com/pls/topic/lookup?ctx=acc&id=docacc
Access to Oracle Support
Oracle customers that have purchased support have access to electronic support through My Oracle
Support. For information, visit http://www.oracle.com/pls/topic/lookup?ctx=acc&id=info or visit http://
www.oracle.com/pls/topic/lookup?ctx=acc&id=trsif you are hearing impaired.
Sample Code
Oracle may provide sample code in SuiteAnswers, the Help Center, User Guides, or elsewhere through
help links. All such sample code is provided "as is” and “as available”, for use only with an authorized
NetSuite Service account, and is made available as a SuiteCloud Technology subject to the SuiteCloud
Terms of Service at www.netsuite.com/tos, where the term “Service” shall mean the OpenAir Service.
Oracle may modify or remove sample code at any time without notice.
No Excessive Use of the Service
As the Service is a multi-tenant service offering on shared databases, Customer may not use the Service
in excess of limits or thresholds that Oracle considers commercially reasonable for the Service. If Oracle
reasonably concludes that a Customer’s use is excessive and/or will cause immediate or ongoing
performance issues for one or more of Oracle’s other customers, Oracle may slow down or throttle
Customer’s excess use until such time that Customer’s use stays within reasonable limits. If Customer’s
particular usage pattern requires a higher limit or threshold, then the Customer should procure a
subscription to the Service that accommodates a higher limit and/or threshold that more effectively aligns
with the Customer’s actual usage pattern.
Table of Contents
OpenAir Overview ................................................................................................................... 1
Signing In to OpenAir .............................................................................................................. 9
Signing In Using Your OpenAir Sign-In Details ....................................................................... 10
Password Expiration ....................................................................................................... 11
Changing your OpenAir Password .................................................................................... 12
Setting Up Security Questions ......................................................................................... 13
Resetting Your OpenAir Password .................................................................................... 13
Signing In Using Two-Factor Authentication (2FA) ................................................................... 14
Set Up Two-Factor Authentication (2FA) ............................................................................. 16
Reset Your Two-Factor Authentication (2FA) Settings ........................................................... 18
Trusted Devices ............................................................................................................. 19
Two-Factor Authentication FAQ ........................................................................................ 20
Troubleshoot Authenticator Apps ..................................................................................... 23
Signing In to OpenAir Using Single Sign-On (SSO) .................................................................. 24
Navigating OpenAir ................................................................................................................ 26
Using the Main Navigation Menu ......................................................................................... 28
User Center ...................................................................................................................... 31
Create Button ................................................................................................................... 33
Utility Buttons ................................................................................................................... 34
Shortcuts ..................................................................................................................... 35
Contextual Tips ............................................................................................................. 39
Resource Comparison .................................................................................................... 40
Product Updates ........................................................................................................... 41
Canvas and Screen Header ................................................................................................. 42
Administration Settings Screen Navigation ............................................................................. 43
Working with Lists and Records ............................................................................................... 44
List Views ......................................................................................................................... 44
List View Toolbar ........................................................................................................... 46
Navigating the List View ................................................................................................. 46
List View Column Headers .............................................................................................. 47
Bulk Actions .................................................................................................................. 49
Selecting List View Columns ............................................................................................ 51
Sorting the List View Data ............................................................................................... 52
Filtering Options ............................................................................................................ 54
Download Your List View Data ......................................................................................... 62
Other List Options ......................................................................................................... 62
Saving and Using Custom List View Configurations ............................................................. 63
List View Contextual Tips ................................................................................................ 66
List View Data ............................................................................................................... 67
List Views — Previous UI Version Layout ............................................................................... 73
Records ........................................................................................................................... 76
Record Header .............................................................................................................. 77
Forms .......................................................................................................................... 79
Grids ........................................................................................................................... 83
Working with the Project Center View ....................................................................................... 85
Project Center Toolbar ....................................................................................................... 88
Viewing Hours, Time Costs, or Time Charges in the Project Center ......................................... 89
Date Navigation in the Project Center ............................................................................... 91
Project Center Column Options ....................................................................................... 92
Project Center Display Options ........................................................................................ 93
Managing Project Plans in the Project Center ........................................................................ 97
Managing Resource Bookings in the Project Center .............................................................. 101
Adding Resource Bookings to Your Project Plan ................................................................ 102
Searching for Resources in the Project Center .................................................................. 104
Modifying Resource Bookings in the Project Center ........................................................... 107
Creating a Booking and Distributing Hours Over a Multiple Week Period ............................... 108
Copying, Cutting and Pasting Booking Row Cells ............................................................... 109
Copying Booking Row Cells Using the Fill Handle .............................................................. 111
Copying Bookings with Projects ..................................................................................... 112
Deleting a Booking Row in the Project Center .................................................................. 113
Project Schedule Calculation in the Project Center ................................................................ 113
Basing Project Schedule Calculation on Bookings for a Project ............................................ 114
Working with Dashboards and Calendars ................................................................................ 116
Home / Dashboard ........................................................................................................... 116
Calendars ....................................................................................................................... 119
Working with Reports ........................................................................................................... 122
Reports .......................................................................................................................... 122
Report Management and Editor ......................................................................................... 122
Searching Reports in the Report Management Interface .................................................... 123
Creating and Editing Reports in the Report Editor ............................................................. 125
Configuring OpenAir to Run and Deliver a Report Automatically .............................................. 129
Personal Settings ................................................................................................................. 130
Authorized Applications .................................................................................................... 147
Authorizing Applications to Access OpenAir on Your Behalf ................................................ 147
References .......................................................................................................................... 151
Global Icons .................................................................................................................... 151
List View Icons ................................................................................................................ 152
Record Icons ................................................................................................................... 154

OpenAir Overview 1
OpenAir Overview
Welcome to OpenAir.
This guide includes information about the OpenAir user interface and describes how to use its features.
Note: With effect from June 2022, all OpenAir accounts will be using the new generation user
interface, previously introduced as the Redesigned OpenAir User Experience optional feature. The
new responsive design optimizes screen real estate and adapts well to tablets and smaller screen
resolutions.
See Feature Changes in the Redesigned User Experience for a summary of features released to date.
The User Guide includes the following chapters:
■
OpenAir Overview — This overview includes a brief introduction to OpenAir Modules (see OpenAir
Modules). If you were using the previous UI until recently, you can refer to the list of feature changes
introduce with the upgrade to the redesigned user experience and other optional features available
with upgrade (see Feature Changes in the Redesigned User Experience and Optional Features).
■
Signing In to OpenAir — Describes how to access OpenAir, change your password, or reset your
password.
■
Navigating OpenAir — Describes how to navigate OpenAir, including the Create, Tips, User Center, and
other navigation options available from all pages in OpenAir.
■
Working with Lists and Records — Describes how to navigate and use the functionality of:
□
Redesigned list views — See List Views.
□
List views using the previous UI layout and functionality — See List Views — Previous UI Version
Layout.
Note: Not all list views use the redesigned list view layout and functionality. For
information about list views using the redesigned list view layout and functionality, see
Feature Changes in the Redesigned User Experience.
□
Records — See Records.
■
Working with the Project Center View — Describes how to work with the Project Center view. The
Project Center optional feature aims to provide you with the tools to manage key project activities
from a single screen.
■
Working with Dashboards and Calendars — Gives a general introduction to the Home module,
including dashboards and calendars..
■
Working with Reports — Gives a general introduction to the Reports module, including the Report
Management and Editor optional feature and user interface.
■
References — Provides reference material, including descriptions for most icons used on the OpenAir
user interface.
OpenAir Modules
The OpenAir system contains various applications, also referred to as modules. These applications are
designed around specific functional areas, as described in the table below.
User Guide

OpenAir Modules 2
Note: The way these applications operate in your environment is dependent on the business
needs of your company. You may not have access to all these applications or all the functionality
within these applications. Access is controlled by role permissions and other settings managed by
your account administrator.
Icon Description
Home Application — A home base application providing you critical information such as messages
and reminders of pending approvals. It can also contain wizards, which help you quickly update data
throughout the system, quick access to saved reports, which can be displayed in graphical forms such as
pie charts and line graphs.
Opportunities Application — This application enables you to manage prospective new business for your
company with existing customers as well as with new customers and prospects. You are able to create
Deals, Estimates, Proposals, To dos, and Events within the application.
Projects Application — This is one of the primary components within OpenAir. This is where management
of your projects takes place. The application is flexible and provides several features to address your
business needs.
Resources Application — This application enables you to schedule resources to projects. It also provides
a vehicle to store the skill sets, education, industry experience, job roles and location of employees in the
OpenAir database. You can then search the database to find the right resource.
Invoices Application — This application handles financial transactions such as customer charges and
invoices in OpenAir. Primarily focused on invoicing your customers, the Invoices application manages the
results of running the billing rules you can set up for projects in the Projects application.
Timesheets Application — This application is where employees record their time against customer or
internal projects.
Expenses Application — This application is where employees enter expense reports against projects for
a specific date or period of time. It can also handle authorizations for employee spending on company
expenses.
Purchases Application — This application provides the ability to create a process flow from a purchase
request to fulfillment and receipt, and lets you track purchases made within your company.
Reports Application — This application lets you create and run a wide variety of reports based on your
business configuration. OpenAir provides a robust and flexible reporting environment.
Workspaces Application — This application provides an area where you can store documents and share
them with others. It acts as an administrative library within OpenAir.
Administration Application — This is where account administrators manage the many configuration
options within OpenAir.
User Guide

Feature Changes in the Redesigned User Experience 3
User Center — This is where you set up your user preferences. You can also view your profile and access
OpenAir Help and Support features from the User Center.
Feature Changes in the Redesigned User
Experience
The following table summarizes the feature changes introduced with the UI upgrade to the redesigned
user experience, as well as the list views that benefit from the redesigned list view layout and functionality,
and the records and pages that benefit from the redesigned header layout and functionality. Other
features retain the design and functionality of the previous user interface.
Other optional features work particularly well with the new user interface and let you take full advantage
of its capabilities — see Optional Features.
Features Redesigned List Views Redesigned Screen and
Record Headers
■
Navigation:
□
Navigation bar
□
In-module screen navigation
□
Create, Tips and Resource
compare view buttons
□
User center
■
List Views:
□
Fixed position for Run an
action / Bulk actions and
Modify columns
□
Column lock
□
Improved pagination
□
Redesigned toolbar
□
To approve tab
□
Bulk actions
□
Sorting options
□
Advanced filters
□
Rows per page list options
□
Column totals
□
Multicurrency monetary totals
□
Column filters
□
Preset column filters when
opening list view from
QuickView or Bookings Chart
□
List view smart rendering
■
Record Header:
□
Title and subtitle
□
In-record navigation
□
Record information panel
■
Screen Header:
■
Projects module
□
Alerts
□
Bookings
□
Issues
□
Projects
□
Projects > [Select a project] > Issues
□
Projects > [Select a project] > Financials
> Billing > Rules
□
Projects > [Select a project] > Financials
> Billing > Transactions
□
Projects > [Select a project] > Financials
> Recognition > Rules
□
Projects > [Select a project] > Financials
> Recognition > Transactions
□
Project budgets
□
Tasks
■
Resources module
□
Alerts
□
Bookings
□
Resources
□
Resource Demand Requests (RDR)
□
Resource Request Queues (RRQ)
■
Timesheets module
□
Alerts
□
Leave accrual > All transactions
□
Schedule requests
□
Time entries
□
Timesheets
■
Expenses module
■
Record Headers:
□
Bookings
□
Customers
□
Employees
□
Expense reports
□
Filter sets
□
Guests
□
Invoices
□
Projects
□
Purchase orders
□
Purchase requests
□
Resource profile
approvals
□
Resources
□
Resource requests
□
Schedule requests
□
Timesheets
□
Workspaces
□
Workspace Discussions
□
Workspace Documents
■
Other Screen Headers:
■
Administration > Global
Settings
■
Administration >
Application Settings
User Guide

Feature Changes in the Redesigned User Experience 4
□
Title and subtitle
□
Tab navigation
□
Alerts
□
Authorizations
□
Expense reports
□
Expense reports > [Select an expense
report] > Receipts
□
Receipts
■
Invoices module
□
Invoices
□
Retainers
□
Slips
■
Purchases module
□
Fulfillments
□
Fulfillments outstanding / Fulfilled POs
□
Purchase items
□
Purchase orders
□
Purchase orders > [Select a purchase
order] > Purchase items
□
Purchase requests
□
Purchase requests > [Select a purchase
request] > Request items
□
Request items
■
Reports module
□
Saved Reports
■
Workspaces module
□
Alerts
□
Discussions
□
Documents
□
Workspaces
□
Workspaces > [Select a workspace] >
Discussions
□
Workspaces > [Select a workspace] >
Documents
□
Workspaces > [Select a workspace] >
Links
User Guide

Feature Changes in the Redesigned User Experience 5
■
Administration module
□
Application settings > [Select an
application] > Approval processes
□
Application settings > [Select an
application] > Notifications
□
Application settings > Expenses >
Expense items
□
Application settings > Expenses >
Vendors
□
Application settings > Invoices >
Agreements
□
Application settings > Invoices >
Charge stages
□
Application settings > Invoices >
Customer POs
□
Application settings > Invoices >
Invoice layouts
□
Application settings > Invoices >
Services
□
Application settings > Projects >
Assignment groups
□
Application settings > Projects >
Budget activities
□
Application settings > Projects >
Budget categories
□
Application settings > Projects > Issue
categories
□
Application settings > Projects > Issue
stages
□
Application settings > Projects >
Project locations
□
Application settings > Projects >
Project stages
□
Application settings > Projects >
Service [1–5] lines
□
Application settings > Projects >
Severities
□
Application settings > Projects >
Sources
□
Application settings > Projects >
Statuses
□
Application settings > Projects > Task
types
□
Application settings > Purchases >
Accounts payable locations
□
Application settings > Purchases >
Carriers
□
Application settings > Purchases >
F.O.B. locations
□
Application settings > Purchases >
Manufacturers
User Guide

Feature Changes in the Redesigned User Experience 6
□
Application settings > Purchases >
Products
□
Application settings > Purchases
>Purchasers
□
Application settings > Purchases >
Receiving locations
□
Application settings > Purchases >
Shipping terms
□
Application settings > Resources >
Attribute sets
□
Application settings > Resources >
Booking types
□
Application settings > Resources >
Generics
□
Application settings > Purchases >
Vendors
□
Application settings > Resources >
Skill/Education/Location/Job role/
Industry/Custom profile NN
□
Application settings > Timesheets >
Leave accrual rules
□
Application settings > Timesheets >
Payroll types
□
Application settings > Timesheets >
Services
□
Application settings > Timesheets >
Time types
□
Application settings > Workspaces >
Document categories
□
Global settings > Custom Fields
□
Global settings > Customers >
Contacts
□
Global settings > Customers >
Customer locations
□
Global settings > Customers >
Customers
□
Global settings > Display > Email
templates
□
Global settings > Jobs, rates > Cost
centers
□
Global settings > Jobs, rates > Job
codes
□
Global settings > Jobs, rates > Rate
cards
□
Global settings > Organization >
Accounting Periods
□
Global settings > Organization >
Current Periods
□
Global settings > Organization >
Departments
□
Global settings > Organization >
Hierarchies
User Guide

Feature Changes in the Redesigned User Experience 7
□
Global settings > Organization >
Projects
□
Global settings > Organization > Saved
List Views
□
Global settings > Organization > Work
schedules
□
Global settings > Reports > Custom
calculations
□
Global settings > Reports > Custom
time ranges
□
Global settings > Reports > Enabled
Features
□
Global settings > Users > Employee
locations
□
Global settings > Users >Employees
□
Global settings > Users > Filter sets
□
Global settings > Users > Filter sets >
[Select a filter set] > Access Control
□
Global settings > Users > Guests
□
Global settings > Users > Guest roles
□
Global settings > Users > Roles
Optional Features
The following optional features work particularly well with the redesigned OpenAir user experience and
let you take full advantages of its capabilities. Contact your account administrators to check whether these
features are enabled in your OpenAir configuration.
■
Inline-editing in list views — This feature lets you edit items data directly from the list view, without
having to open the item form. This is currently available only in the project tasks list view and in the
project center (if the Project Center feature is enabled). See Inline-Editing in List Views.
■
Project Center (Requires the Inline-Editing in List Views feature) — This feature lets you create and
modify your project plan, create new phases and tasks directly from the new list view and drag-and-
drop tasks and phases to reorder them, and create and manage resource bookings to your project
and tasks from within the same outline view. See Working with the Project Center View.
■
Redesigned Administration module (enabled by default) — This feature lets account administrators
and users with the relevant access rights use the main navigation to go to administration global
settings sections and use tabs in the global settings screen header to navigate between screens. See
Administration Settings Screen Navigation.
■
Redesigned Advanced Filters — This feature changes the user interface for advanced filters on
redesigned list views. The redesigned advanced filters panel is compact and lists filter conditions
horizontally instead of vertically. It lets you select and apply saved filters directly from the list view
toolbar instead of the flyout panel. The new design brings better usability and takes less of your
canvas space. See Redesigned Advanced Filters (Optional Feature).
■
Consolidated user profile — This feature lets you review information about you and other resources
at a glance, including skills and experience. You can access your resource profile from the user center
when this feature is enabled.
■
Customized user avatars — This feature lets you or your account administrator upload a profile
picture. In the new UI, this picture displays in the User Center, when this feature is enabled.
■
Save list view configuration — This feature lets you save list view configurations for future use. You
can use the enhanced list view controls and options the new UI offers to create custom configurations
User Guide

Feature Changes in the Redesigned User Experience 8
to suit your every need and switch between these configurations at any time. See Saving and Using
Custom List View Configurations.
The following usability enhancements are also available as optional features for the redesigned OpenAir
redesigned experience list views:
■
Wrap text in list view cells — This feature wraps long text over multiple lines in list view cells instead
of showing truncated text on a single line. See Display Options for Long Text Cells in List Views.
User Guide
Signing In to OpenAir 9
Signing In to OpenAir
To access OpenAir, go to the OpenAir sign-in page and enter your sign-in details. Use the following web
address: https://auth.openair.com/login.
Note: To access an OpenAir sandbox account, go to https://auth.sandbox.openair.com/login.
The sign-in page includes two tabs. Clicking either tab changes the URL in your browser address bar
without reloading the page.
■
Password – Use the Password tab if you sign in using your OpenAir sign-in details. See Signing In
Using Your OpenAir Sign-In Details.
You may be required to provide a second factor when signing in using your OpenAir sign-in
details to add more security to your company's OpenAir account. See Signing In Using Two-Factor
Authentication (2FA).
■
Single Sign-On – Use the Single Sign-On tab if you sign in to OpenAir by entering your username
and password on your company single sign-on page. See Signing In to OpenAir Using Single Sign-On
(SSO).
Note: Depending on the single sign-on solution used in your company, you may need to
enter your SSO details on your company SSO page first, then select the application you want to
access. In this case, refer to your internal documentation for instructions.
If you are not sure which tab or sign-in method you need to use, see your company's internal
documentation or the instructions provided by your account administrator.
The sign-in page includes the following links.
■
Forgot your password and ID? – Click this link to get a reminder of your OpenAir user ID and the hint
you set up for your password.
■
Reset your password or unlock your user account – Depending on your company's account
configuration, you can click this link to regain access to your OpenAir account after answering a
security challenge.
■
View the OpenAir system status – Click this link to check the availability of OpenAir at any time.
■
Go to the visitor home page – Click this link to go to the OpenAir product information website
(https://www.openair.com/).
The right panel includes announcements. OpenAir include important service announcements on the
OpenAir sign-in page from time to time. Review this panel regularly for information about planned service
disruptions (during new release upgrades, for example) and other information.
User Guide

Signing In Using Your OpenAir Sign-In Details 10
Note: The OpenAir Mobile app on Android or iOS devices uses a version of this sign-in page
adapted for smaller displays. This light version does not include the announcement panel.
Your browser remembers which version of the sign-in page you last used to sign in to OpenAir.
You can change the sign-in page version by changing or appending the following query parameter
at the end of the URL in the address bar of your browser:
■
https://auth.openair.com/login?ui=light – light version adapted for smaller displays.
■
https://auth.openair.com/login?ui=default – full version.
Signing In Using Your OpenAir Sign-In Details
You need the following information to sign in to OpenAir:
■
Your Company ID — This is the unique identifier for your company’s OpenAir account.
■
Your User ID — This is your unique identifier as a user of your company’s OpenAir account.
■
Your Password — This is the secret combination of characters that you have created.
The combination of your Company ID, User ID and Password may be referred to as your OpenAir sign-
in details or user credentials in the OpenAir documentation.
Passwords are valid for a limited period. See Password Expiration.
User Guide

Signing In Using Your OpenAir Sign-In Details 11
You will need to change your password periodically, before or when it expires. You may also need to
change your password the first time you sign in to OpenAir. See Changing your OpenAir Password.
Depending on your company's account configuration, you may be required to set up security questions
and answers. This gives you the ability to reset your password and regain access in case you are locked
out of OpenAir without the assistance of an account administrator. See Setting Up Security Questions and
Resetting Your OpenAir Password.
To sign in using your OpenAir sign-in details:
1.
Go to the OpenAir sign-in page — https://auth.openair.com/login.
Note: To access an OpenAir sandbox account, go to https://auth.sandbox.openair.com/
login.
2.
Enter your Company ID, User ID, and Password.
Tip: You can get a reminder to your email address if you forgot your User Id or Password.
See ID and Password Reminder.
3.
Click Log in.
The OpenAir user interface appears.
You may need to set up two-factor authentication (2FA) or enter a verification code next time you
sign in if required by your company before the OpenAir UI appears. See Signing In Using Two-
Factor Authentication (2FA).
Important: You have a limited number of sign-in attempts, after which you will be locked
out of your company's OpenAir account.
ID and Password Reminder
In case you forget your sign-in details, you can get a reminder of your user ID and the hint you set up for
your password.
To get a reminder of your sign-in details:
1.
Click the link Forgot your password or ID?.
2.
Enter your email address associated with your OpenAir user account.
An email is sent to your email address with a reminder of your user ID and the hint you set up for
your password.
Password Expiration
Passwords are valid for a limited period. Your password validity period depends on your company's
account configuration.
After your password expires, the password form appears automatically if you try to sign in to OpenAir.
You must change your password before you can access OpenAir. You can change your password at any
time before it expires — see Changing your OpenAir Password.
You will receive a password expiration notification email 14 days before the password expires, and 3 days
before the password expires, unless you change your password before. The notification email includes
the date your password will expire and instructions for changing your OpenAir password.
User Guide

Signing In Using Your OpenAir Sign-In Details 12
Changing your OpenAir Password
You may need to change your OpenAir password the first time you sign in to OpenAir or when your
password expires. You can also change your password at any time.
Note: If you are signing in using two-factor authentication (2FA), you will need to enter a
verification code next time you sign in. All your trusted devices are removed automatically with
every change of password. See Signing In Using Two-Factor Authentication (2FA).
To change your password in OpenAir:
1.
Enter your single sign-on details. If your identity is verified successfully using SSO, you will be
redirected to OpenAir.
2.
In OpenAir, go to the User Center and click Password.
3.
Enter your Current Password.
4.
Enter your new password in the Change Password field.
5.
Enter your new password again in the Confirm New Password field.
6.
Click Save.
A message appears confirming that your password was changed
It is important to choose a password that cannot be compromised. Your password must meet minimum
requirements. The following minimum requirements apply to all OpenAir accounts by default. However, a
stricter password policy may be enforced for your company's account.
■
The password must be at least characters 8 in length.
■
The password must not be the same as your User ID.
■
The password must contain at least one alpha and one numeric character.
■
The password must contain at least three of these four character types: uppercase, lowercase,
numeric, special characters (" !"#$%&'()*+,-./:;<=>?@[\]^_`{|}~").
■
Your new password must not be the same as one of your last two previous passwords.
Tip: Create a password that is easy to remember and hard to guess.
User Guide

Signing In Using Your OpenAir Sign-In Details 13
Setting Up Security Questions
Depending on your company's account configuration, you may need to set up security questions when
you sign in to OpenAir for the first time. You may also be prompted to set up security questions when you
change your password, if the Security Questions feature was enabled for you OpenAir account recently.
Security questions are used to verify your identity if you are unable to access OpenAir. After you set up
security questions in OpenAir, you can reset your password and regain access to OpenAir by answering a
security challenge.
You can select your three security questions from the dropdown list and write your answers in the text
field next to each question.
To set up your security questions:
1.
sign in to OpenAir. If you have not already set up security questions and the feature is enabled for
your OpenAir account, the Password form appears.
2.
Scroll down to the Security Questions section.
3.
For each question, select a question and enter your answers in the text field.
4.
Click Save.
You can change your security questions and answers at any time.
To change your security questions:
1.
In OpenAir, go to the User Center and click Password.
The Password page appears.
2.
Scroll down to the Security Questions section.
For each question, select a question and enter your answers in the text field.
3.
Click Save.
Note: When setting up or changing your security questions, consider the following rules:
■
You must answer all three questions.
■
Your answers should be unique for each question.
Resetting Your OpenAir Password
Depending on your company's OpenAir account configuration, you can reset your password and regain
access in case you are locked out of OpenAir without the assistance of an account administrator. If this
User Guide

Signing In Using Your OpenAir Sign-In Details 14
option is available for your company's OpenAir account, you will need to answer a security challenge to
verify your identity and regain access to OpenAir.
To reset your password and unlock your access to OpenAir :
1.
On the OpenAir sign-in page, click Reset your password or unlock your user account.
2.
Enter your Company ID, User ID and E-mail address.
3.
Click Submit.
If the details entered are valid, the security challenge form appears.
4.
Answer all three questions and click Submit. If you answer the questions correctly, you will receive
an email with a temporary password.
5.
Sign in to OpenAir using the temporary password.
The password form appears. You will regain access to OpenAir after you change your password.
See Changing your OpenAir Password.
Note: If you are signing in using two-factor authentication (2FA), you need to enter a
verification code before the password form appears. All your trusted devices are removed
automatically with every change of password.
To find the verification code, open the authenticator app on your phone and locate your
company's OpenAir account. In the authenticator app accounts list, OpenAir uses the account-
specific domain for your company's OpenAir account (typically <company-id>.app.openair.com
for a production account) and your user ID to identify the account and user set up to work with
the authenticator app.
Signing In Using Two-Factor Authentication (2FA)
Requiring a second factor for authentication is a method of improving security. Your account
administrator can require you to use two-factor authentication (2FA) to sign in to your company's OpenAir
account.
OpenAir sends you an email notification if an account administrator enrolls you to sign in to your
company's OpenAir account using 2FA. The next time you sign in to OpenAir, you will be asked to set up
2FA. See Set Up Two-Factor Authentication (2FA).
After you set up 2FA, you will be asked to enter a verification code when you sign in.
Important: If you change your phone, change your authenticator app, or lose your phone,
reset (clear) your 2FA settings in OpenAir to access your company's OpenAir account. After you
reset 2FA, you will be asked to set up 2FA again on the next sign in. See Reset Your Two-Factor
Authentication (2FA) Settings.
If you share or lose one of your trusted devices, you must remove all your trusted devices to
protect your OpenAir account from unauthorized access. See Trusted Devices.
To sign in to OpenAir using 2FA:
User Guide

Signing In Using Two-Factor Authentication (2FA) 15
1.
Go to the OpenAir sign-in page — https://auth.openair.com/login.
2.
Enter your Company ID, User ID and Password.
3.
Click Log in.
The Help us to verify your identity page appears.
4.
Enter the verification code on the OpenAir 2FA verification page.
To find the verification code, open the authenticator app on your phone and locate your company's
OpenAir account. In the authenticator app accounts list, OpenAir uses the account-specific domain
for your company's OpenAir account (typically <company-id>.app.openair.com for a production
account) and your user ID to identify the account and user set up to work with the authenticator
app.
5.
(Optional) Check the Trust this device for the next <number> days box to add the device to your
list of trusted devices. This will let you sign in to OpenAir on that device without being asked to
enter a verification code every time.
Note: Your company’s OpenAir account may not allow you to add trusted devices. Your
account administrator controls whether the Trusted Devices feature is available and how
long devices can be trusted.
6.
Click Next.
The OpenAir UI appears.
User Guide

Signing In Using Two-Factor Authentication (2FA) 16
Important: If your verification code is refused several times, follow the instructions to
Troubleshoot Authenticator Apps before you try again. Using an incorrect validation code
during 2FA setup or identity verification counts as a failed sign-in attempt. You have a limited
number of sign-in attempts, after which you will be locked out of your company's OpenAir
account.
Learn more
■
Why do I need 2FA? How does 2FA add more security to OpenAir?
■
What is my authenticator app?
■
The code from my authenticator app isn’t right. What's wrong?
■
There's not enough time to enter the verification code before it changes. What do I do?
■
Can I transfer the 2FA setup from my old phone to a new one?
■
Can I switch authenticator apps?
■
Troubleshoot Authenticator Apps
Set Up Two-Factor Authentication (2FA)
If you are required to set up two-factor authentication (2FA), onscreen instructions guide you through the
2FA setup process after you enter your company ID, user ID and password on the OpenAir sign-in page,
and click Sign In.
Note: You can set up 2FA from the sign-in form that you use when signing in to the OpenAir
UI, when connecting the OpenAir Mobile app to OpenAir, or when authorizing an API integration
application to access OpenAir on your behalf.
To set up 2FA:
1.
Click Set up 2FA.
The 2FA setup step 1/3 page appears.
Note: At different steps through the setup process, you can click Skip to OpenAir to
dismiss the 2FA setup. You can skip the 2FA setup up to a limited number of times or days.
After that, you are required to complete the setup to access OpenAir.
2.
Install Oracle Mobile Authenticator on your phone. You can download the app from the App Store
(iOS) or from Google Play (Android).
Note: You can use any app that complies with the OATH TOTP standard, if you have
already one installed on your phone.
After you have installed the authenticator app, click Next.
The 2FA setup step 2/3 page appears. It includes a QR code and a link to Try a setup key instead.
User Guide

Signing In Using Two-Factor Authentication (2FA) 17
3.
Using the authenticator app on your phone, scan the QR code, or enter a setup key manually.
The authenticator app generates a verification code.
4.
Enter the verification code on the OpenAir 2FA setup step 2/3 page, and click Next. Verification
codes generated by an authenticator app expire approximately every 30 seconds. Enter a new
code if the initial code you receive expires.
Important: If your verification code is refused several times, follow the instructions
to Troubleshoot Authenticator Apps before you try again. Using an incorrect validation
code during 2FA setup or identity verification counts as a failed sign-in attempt. You have
a limited number of sign-in attempts, after which you will be locked out of your company's
OpenAir account.
5.
Click Next.
The 2FA setup finished page appears.
6.
Click Enter OpenAir to access the OpenAir UI.
The OpenAir UI appears. The 2FA setup is completed.
User Guide

Signing In Using Two-Factor Authentication (2FA) 18
Note: You need to click Enter OpenAir to complete the setup. The 2FA setup finished
page will appear on the next sign-in otherwise.
OpenAir sends an email notification to your email address when you complete your 2FA
setup.
Learn more
■
Why do I need 2FA? How does 2FA add more security to OpenAir?
■
Can I skip the 2FA setup?
■
What do I need to know about authenticator apps?
■
What authenticator app can I use for 2FA?
■
I can’t scan the QR code as required in the 2FA setup, what should I do?
■
The QR code and the setup key don't work. What's wrong?
■
The code from my authenticator app isn’t right. What's wrong?
■
There's not enough time to enter the verification code before it changes. What do I do?
■
Troubleshoot Authenticator Apps
Reset Your Two-Factor Authentication (2FA) Settings
To avoid disrupting your access to your company's OpenAir account, you need to reset (clear) your two-
factor authentication (2FA) settings if you:
■
Change your authenticator app.
■
Change your phone.
■
Lose your phone.
When you reset your 2FA settings, you remove your existing 2FA setup information from OpenAir. After
you reset 2FA, you will be asked to set up 2FA again on the next sign in.
You can reset your 2FA settings in OpenAir.
Note: If you are not able to sign in to OpenAir to reset your 2FA settings, contact your account
administrator for assistance.
To reset your 2FA settings:
1.
In OpenAir, go to User Center > Two-factor authentication.
User Guide

Signing In Using Two-Factor Authentication (2FA) 19
2.
Click Reset two-factor authentication.
A window appears asking you to enter a verification code.
3.
Enter the verification code.
To find the verification code, open the authenticator app on your phone and locate your company's
OpenAir account. In the authenticator app accounts list, OpenAir uses the account-specific domain
for your company's OpenAir account (typically <company-id>.app.openair.com for a production
account) and your user ID to identify the account and user set up to work with the authenticator
app.
4.
Click Reset.
A confirmation message appears. You will be asked to set up 2FA again next time you sign in to
your company's OpenAir account.
Note: OpenAir sends an email notification to your email address when you reset your 2FA
settings or an account administrator resets your 2FA settings.
Learn more
■
Can I transfer the 2FA setup from my old phone to a new one?
■
Can I switch authenticator apps?
■
Where do I reset my 2FA?
■
I can't reset my 2FA, what should I do?
Trusted Devices
If your company’s OpenAir account allows you to add trusted devices, you can ask OpenAir to trust a
device for several days when you sign in. This will let you sign in to OpenAir on that same device without
being asked to enter a verification code every time. See Signing In Using Two-Factor Authentication (2FA).
User Guide

Signing In Using Two-Factor Authentication (2FA) 20
To protect your company's OpenAir account from unauthorized access, you need to remove all your
trusted devices if you share or lose one of your trusted devices.
You can view the number of current trusted devices or remove your trusted devices in OpenAir.
Note: If you are not able to sign in to OpenAir to remove your trusted devices, contact your
account administrator for assistance.
To view the number of current trusted devices or remove your trusted devices:
1.
In OpenAir, go to User Center > Two-factor authentication.
2.
Click Remove trusted devices.
A window appears asking you to enter a verification code.
3.
Enter the verification code.
To find the verification code, open the authenticator app on your phone and locate your company's
OpenAir account. In the authenticator app accounts list, OpenAir uses the account-specific domain
for your company's OpenAir account (typically <company-id>.app.openair.com for a production
account) and your user ID to identify the account and user set up to work with the authenticator
app.
4.
Click Remove.
A confirmation message appears. You will be asked to enter a verification code next time you sign
in to your company's OpenAir account.
Two-Factor Authentication FAQ
Review the following frequently asked questions and answers about two-factor authentication (2FA).
User Guide

Signing In Using Two-Factor Authentication (2FA) 21
■
Why do I need 2FA? How does 2FA add more security to OpenAir?
■
Can I skip the 2FA setup?
■
What do I need to know about authenticator apps?
■
What authenticator app can I use for 2FA?
■
I can’t scan the QR code as required in the 2FA setup, what should I do?
■
The QR code and the setup key don't work. What's wrong?
■
The code from my authenticator app isn’t right. What's wrong?
■
There's not enough time to enter the verification code before it changes. What do I do?
■
Can I transfer the 2FA setup from my old phone to a new one?
■
What is my authenticator app?
■
Can I switch authenticator apps?
■
Where do I reset my 2FA?
■
I can't reset my 2FA, what should I do?
■
What is a trusted device?
Why do I need 2FA? How does 2FA add more security to
OpenAir?
Two-factor authentication (2FA) adds an extra verification step when you sign in to OpenAir. This extra
step prevents your account from unauthorized access, even when your password gets compromised.
2FA codes from your authenticator app are complicated to intercept, which makes 2FA a reliable form of
authentication.
Can I skip the 2FA setup?
If your company requires you to sign in using 2FA, you can skip two-factor authentication (2FA) setup up
to the number of times and number of days set by your account administrator. You will be asked to set up
2FA next time you attempt to sign in. After that, you won't be able to sign in to your company's OpenAir
account until you complete the 2FA setup. See Set Up Two-Factor Authentication (2FA).
What do I need to know about authenticator apps?
An authenticator app generates the verification code (the second factor) that you need for signing in to
OpenAir. It provides a code even when you’re not connected to a network.
What authenticator app can I use for 2FA?
You can use any authenticator app that complies with the OATH TOTP standard.
■
OATH stands for the Initiative for Open Authentication.
■
TOTP stands for time-based one-time password.
Oracle Mobile Authenticator is one example of OATH TOTP-compliant app.
You can use a term like OATH TOTP to search for other compliant authenticator apps.
User Guide

Signing In Using Two-Factor Authentication (2FA) 22
I can’t scan the QR code as required in the 2FA setup, what
should I do?
To scan the QR code, you may first need to select Scan a QR code or Add Account in the app.
For more information, see the help for your app.
■
If you've reset 2FA in OpenAir, you can use the same authenticator app to set up 2FA again.
■
If your app won’t scan the QR code or accept a manually entered key, delete the OpenAir account from
your app, and try scanning the QR code again.
The QR code and the setup key don't work. What's wrong?
Your authenticator app may not be OATH TOTP-compliant. Try installing a different authenticator app.
Oracle Mobile Authenticator is OATH TOTP-compliant.
For more information, see the help for your app.
■
If you've reset 2FA in OpenAir, you can use the same authenticator app to set up 2FA again.
■
If your app won’t scan the QR code or accept a manually entered key, delete the OpenAir account from
your app, and try scanning the QR code again.
The code from my authenticator app isn’t right. What's wrong?
There are a few possible reasons for OpenAir not accepting the code from your authenticator app.
■
Verify that you've entered the code exactly as it appears in your authenticator app.
■
If you have more than one account listed in your authenticator app, be sure you're entering the code
associated with your OpenAir account.
■
The time on your phone needs to be accurate. Directions for different versions of phone software vary.
See Troubleshoot Authenticator Apps.
There's not enough time to enter the verification code before
it changes. What do I do?
You can enter either the current or the previous verification code generated by the authenticator app.
This gives you some additional time to enter the verification code even after it changes.
Can I transfer the 2FA setup from my old phone to a new one?
It depends on an authenticator app you use.
What is my authenticator app?
You may have used Oracle Mobile Authenticator to set up two-factor authentication (2FA) for OpenAir.
You may also have used another app that complies with the OATH TOTP standard.
If you lost your mobile phone or you can’t access your authenticator app, contact the person in your
company who manages OpenAir to reset 2FA. If you reset 2FA, you will be asked to set up 2FA again next
time you sign in.
User Guide

Signing In Using Two-Factor Authentication (2FA) 23
Can I switch authenticator apps?
Yes, the process is the same as when you need to reset your 2FA. See Reset Your Two-Factor
Authentication (2FA) Settings.
Where do I reset my 2FA?
After you sign in to OpenAir, go to the user center (your avatar menu in the upper right corner), and click
Two-factor authentication.
This page lets you reset 2FA. See Reset Your Two-Factor Authentication (2FA) Settings.
I can't reset my 2FA, what should I do?
If you can't generate a 2FA verification code, you need to contact your account administrator to help you
reset 2FA.
What is a trusted device?
If your company’s OpenAir account allows you to add trusted devices, you can ask OpenAir to trust a
device for several days when you sign in. This will let you sign in to OpenAir on that device without being
asked to enter a verification code every time.
Each trusted device is removed automatically several days after you add it to your trusted devices,
depending on your company’s OpenAir account configuration.
You or the person in your company who manages OpenAir can remove all your trusted devices at any
time to protect your OpenAir account from unauthorized access, in case you share or lose one of your
trusted devices, for example.
Troubleshoot Authenticator Apps
Occasionally, OpenAir will not accept verification codes generated by your authenticator app. You may get
an error message that the code is expired. If your phone (and perhaps your app) are not synchronized to
the proper time source, your verification codes will not work.
Important: If your verification code is refused several times, use the following steps to
troubleshoot your authenticator app before you try again. Using an incorrect validation code
during 2FA setup or identity verification counts as a failed sign-in attempt. You have a limited
number of sign-in attempts, after which you will be locked out of your company's OpenAir
account.
Use the following steps to verify your phone and authenticator app settings.
To synchronize time on your phone and your authenticator app:
1.
On your phone, go to the settings screen and locate the settings for date and time.
■
On iOS devices, go to Settings > General > Date & Time. Verify that the switch for the setting Set
Automatically is on.
■
On Android devices, go to Settings > System > Date & Time. Verify that the switch for the
settings Automatic date & time and Automatic time zone is on.
User Guide

Signing In Using Two-Factor Authentication (2FA) 24
Note: The navigation path to the date and time settings, and the exact name of the
settings varies depending on the type and the version of the operating system software on
your phone (iOS or Android). Older software versions on some phones might have a sync
time to server setting. Clear the box if the sync time to server setting is checked. Verify that
the time on your phone is synchronized to network time.
2.
Some authenticator apps have an internal time synchronization setting. If the time is not correctly
synchronized, the verification codes will not work. Refer to the vendor documentation for your
authenticator app for steps to correct the time in the app.
In the Google Authenticator app for Android devices, for example, this setting is called Time
correction for codes. Refer to Common issues with 2–Step Verification (External link to Google
Support site) for troubleshooting steps.
3.
If synchronizing time does not help you, try resetting 2FA. See Reset Your Two-Factor
Authentication (2FA) Settings.
Signing In to OpenAir Using Single Sign-On (SSO)
Your company may use a single sign-on (SSO) page to manage your access to OpenAir and other
applications.
Depending on the single sign-on solution used in your company, you may need to:
■
Enter your SSO details on your company SSO page first, then launch OpenAir from the single sign-
on portal without needing to use the OpenAir sign-in page. In this case, refer to your internal
documentation for instructions.
■
Start the sign-in process from the OpenAir sign-in page. In this case, use the following steps.
If you are not sure which tab or sign-in method you need to use, see your company's internal
documentation or the instructions provided by your account administrator.
To sign in to OpenAir using SSO:
1.
Go to the OpenAir sign-in page.
2.
Click the Single Sign-On tab.
Note: Clicking the Password or Single Sign-On changes the URL in your browser address
bar without reloading the page.
■
https://auth.openair.com/login for the Password tab.
■
https://auth.openair.com/login_sso for the Single Sign-On tab.
If you use single sign-on when you sign in:
■
The Single Sign-On tab is active the next time you go to https://auth.openair.com/login
and the URL in your browser address bar changes to https://auth.openair.com/login_sso,
unless you clear your browser cache history.
■
If your OpenAir session times out, you are redirected to the sign-in page with the Single
Sign-On tab active (https://auth.openair.com/login_sso)
3.
Enter your Company ID.
User Guide

Signing In to OpenAir Using Single Sign-On (SSO) 25
4.
Click Log in.
Your company single sign-on page appears.
5.
Enter your single sign-on details. If your identity is verified successfully using SSO, you will be
redirected to OpenAir.
User Guide

Navigating OpenAir 26
Navigating OpenAir
This section introduces you to common UI elements and tools in the redesigned OpenAir user
experience.
The following features are always available regardless of the screen you are working in. Some of these
features are context-sensitive and adapt according to the application you are using or the screen you are
viewing.
1 Main navigation menu — The navigation bar on the left lists the applications you have access to. Click one of
the application icons to display a flyout in-module navigation menu listing the various views and tools available
within that application. See Using the Main Navigation Menu.
2 User Center — Click on your initials or profile picture to display a flyout menu and access all user preference and
support features. See User Center.
3 Create button — Click the Create button to add a new record. See Create Button.
4 Utility buttons — See Utility Buttons.
■
Click the Shortcuts button to add shortcuts, edit shortcuts, or click shortcuts to go to your favorite pages in
and outside OpenAir. See Shortcuts.
■
Click the Tips button to show a menu of quick links and contextual tips. See Contextual Tips.
■
Click the Resource Comparison button if your role gives you access to this feature. See Resource
Comparison
■
Click the Product Updates button to show a panel with new release highlights and other product updates.
See Product Updates.
5 Canvas — Your business data displays in the canvas area. See Canvas and Screen Header.
6 Screen header — The screen-specific header indicates the screen or the record you are currently viewing. For
some screens, the screen header also includes a screen-specific navigation menu and an information panel. See
Canvas and Screen Header.
7 Company pictogram — Your company pictogram displays in the top left corner. The optimal pictogram size is
50 x 50 pixels. Larger logos are scaled down to fit within this dedicated space.
User Guide

Navigating OpenAir 27
User Guide

Using the Main Navigation Menu 28
Note: If you were using OpenAir with the previous user interface , the redesigned user
experience brings the following changes:
■
The main navigation menu on the top bar in the previous UI is now vertical and located on the
left of your browser window.
■
The administration global settings overview screen listing all global settings screens is now
replaced with overview screens for each global settings sections (Organization, Display, Users,
Account, Jobs, Rates, Reports, Customers, Custom Fields).
■
The utility buttons (Tips and Resource Comparison buttons) have moved from the left (under
the Create button) to the top bar next to the User Center.
■
Collapsing/expanding the horizontal top bar or the vertical main navigation bar is not an option
in the current version of the new UI.
■
With the new UI you have direct access to the required screen or tab and two steps closer from
loading the relevant data:
□
You no longer need to load the default or the last visited screen for the selected application.
□
You no longer need to expand the dropdown list in the in-module navigation menu to
access the required tab.
Using the Main Navigation Menu
The main navigation menu on the left of your browser window lists all the applications or modules you
have access to. OpenAir’s main modules appear as icons with a black background, while special modules
such as Reports, Workspaces, and Administration are shown with a dark gray background. The application
currently being used is highlighted with a green line on the left of the application icon.
1 Click one of the module icons to display a navigation sub-menu for that module. The in-module screen
navigation menu includes the views and tools you have access to in the module grouped by functionality. If the
sub-menu includes the screen you are currently viewing, that screen title is highlighted with a green line on the
left.
2 If different views and tools are available for a particular functionality, that functionality is listed in bold type with a
small caret next to the functionality header. Click the header to expand/collapse the list of available views and
tools. Notice the caret points up if the list of views and tools is expanded, an down if it is collapsed.
3 Click any of the available options listed in a normal-weight font to go to that page. For example to view a list of
approved time off requests, click the Timesheets icon then click Approved under Time off requests in the
Timesheets in-module screen navigation menu.
User Guide

Using the Main Navigation Menu 29
Tip: Hold the Shift key on your keyboard and click one of the options in the in-module screen
navigation menu to open that view/tool in a new browser window. Hole the Ctrl key and click the
required option to open the view/tool in a new browser tab.
4 Click the collapse icon or click anywhere outside the in-module screen navigation menu to close it.
Depending on your screen size and resolution:
5 There may not be sufficient space to display all the available applications in the main navigation menu. Click on
the More icon at the bottom of the main navigation menu to display a flyout navigation menu listing all the
modules you have access to. Notice the green line under the application you are currently using.
6 Click one of the module icons to display a navigation menu for that module. The in-module screen navigation
menu lists the functionality screens you have direct access to in the module.
User Guide

Using the Main Navigation Menu 30
7 There may not be sufficient space to display all the available screen and tab options for a module (Projects, for
example). Use the scroll bar to scroll up and down the in-module screen navigation menu.
User Guide

Using the Main Navigation Menu 31
User Center
A material avatar with your initials or your profile picture displays on the top right corner.
Click the avatar to view the User Center menu. The flyout menu shows your name and role at the top.
User Guide

User Center 32
Depending on your user and role privileges, you can access the following user settings, preferences and
filters from the User Center menu.
■
Text size — Select the text size used in the screens.
■
Change Filter set — If you have multiple filters sets available, you will have the option to change your
current filter set. Click Change Filter set to display the list of available filter sets and select the filter
set you want to use. If your primary filter set gives you access to large amounts of information, you can
change the filter set to limit the amount of records on lists to speed up loading times and improve the
performance of list views.
Note: This option is only available if you have more than one filter set assigned to your user
account.
■
My profile — Click My profile to display your resource profile.
Note: This option is only available if the Consolidated Resource Profile optional feature is
enabled for your OpenAir account and if your role privileges enable you to view your resource
profile. You also need appropriate role privileges to be able to edit your resource profile or
change your profile picture.
■
Personal settings — Click Personal settings to display and configure your personal settings and
optional features. See Personal Settings
■
Password — Click Password to display a form where you can change your password, set a password
hint and, depending on your account configuration, your security questions. See Changing your
OpenAir Password and Setting Up Security Questions.
■
Help Center — Click Help Center to open the OpenAir Help Center in a new browser tab.
User Guide

User Center 33
Note: This option is only available if your role privileges enable you to view the OpenAir Help
Center.
■
Support — Click Support to display the support page from where you can access SuiteAnswers and
the User Forum or view release notes and user guides.
Note: This option is only available if your user privileges enable you to view the Support page.
■
Mobile apps — Click Download Android app or Download iOS app to open the OpenAir Mobile app
page in the Google Play Store (Android devices) or the App Store (iOS devices).
Note: These options are only available if your user privileges enable you to use the OpenAir
Mobile app and can be disabled for all users across your OpenAir account.
■
Proxies — Click Proxies to enable other users to proxy in for you and perform tasks on your behalf.
■
Log in as ... — Click Log in as ... to display the list of users you can proxy in as, then click one user to
open a new instance in a new browser tab and perform tasks on behalf of a colleague.
Note: This option is only available if you are configured as an authorized proxy for at least
one other user.
■
Log out — Click Log out to sign out of OpenAir and end your OpenAir session.
Create Button
The Create button is located on the upper left corner between your company logo and the main
navigation menu.
Click the Create button to display a context-specific Create New menu listing the create actions available
within the context of the screen you are currently viewing, the module you are using and throughout the
application.
Note: The Create New menu only lists those items you are able to create according to your role
and access privileges
Click the item you want to create to display the new item form and create a new record.
1 Type the first characters of the item you want to create in the search box. The Create New menu items list
is filtered as you type and only includes the items containing the string you have typed. Matching strings are
highlighted in bold in the filtered create action list.
2 Screen specific create actions are listed on a white background. These are all the create actions available for
the current screen.
3 Module specific create actions are listed on a gray background if screen- or record-specific create actions are
also available. These are all the create actions available for the current module.
4 The global create list includes all the create actions available in OpenAir.
5 Click on the collapse icon or click anywhere outside the Create New menu to close it.
User Guide

Create Button 34
Utility Buttons
Utility buttons are located on the upper right corner, immediately to the left of the User Center. Your role
and other access privileges determine the utility buttons you can see. They can include, from right to left:
■
Shortcuts – Click the Shortcuts button to add shortcuts, edit shortcuts, or click shortcuts to go to
your favorite pages in and outside OpenAir.
■
Contextual Tips – Click the Tips button to show a menu of quick links and contextual tips.
■
Resource Comparison – Click the Resource Comparison button if your role gives you access to this
feature.
User Guide

Utility Buttons 35
■
Product Updates – Click the Product Updates button to show a panel with new release highlights
and other product updates.
Shortcuts
Note: This button is only available if the Navigation Shortcuts feature is enabled for your
company's OpenAir account. When enabled, you can hide the shortcuts utility panel and
functionality in your personal settings. See Optional Features.
Click the shortcuts utility button to view the shortcuts menu and go to your favorite pages in and
outside OpenAir from anywhere in OpenAir.
If the Navigation Shortcuts is enabled in your company's OpenAir account, you can:
■
Access the shortcuts menu from any page in OpenAir. To do so, click the shortcut utility button. The
utility button shows a yellow color star if a shortcut already exists for the current page.
■
Add shortcuts to any pages in OpenAir including new record forms, specific tabs on specific records,
report properties and report runs. See Adding a Shortcut to a Page in OpenAir.
■
Add shortcut to any external URLs. See Adding a shortcut to an external URL.
■
Go to your favorite pages in and outside of OpenAir.
Tip: Point to a shortcut to see the full shortcut name and URL.
■
Edit or delete your shortcuts. See Managing your shortcuts.
Note: By default, you can have a maximum of 50 shortcuts in your shortcuts menu. Account
administrators can reduce this maximum value.
To enable the Navigation Shortcuts feature go to Administration > Global Settings > Account > Optional
features and check the Enable shortcuts box. You can also reduce the maximum number of shortcuts
user can save. See the help topic Optional Features.
User Guide

Utility Buttons 36
Adding a Shortcut to a Page in OpenAir
Use the following steps to add a shortcut to any page in OpenAir.
To add a shortcut to a page in OpenAir:
1.
Go to the page you want to add a shortcut for.
2.
Click the shortcut utility button .
3.
Click Add shortcut.
The Add shortcut window appears.
User Guide

Utility Buttons 37
4.
Select This page.
Note: You cannot have more than one shortcut for the same OpenAir page. You cannot
select This page if a shortcut already exists for the page you are currently on.
5.
Edit the default Shortcut name, if required. The name can be up to 128 characters long.
6.
Check the Open in a new tab box if you want the page to open in a new browser tab when clicking
the shortcut.
7.
Click Save.
Adding a shortcut to an external URL
Use the following steps to add a shortcut to any external URL.
To add a shortcut to an external URL:
1.
Copy the URL for the page you want to add a shortcut for.
2.
Click the shortcut utility button from anywhere in OpenAir.
3.
Click Add shortcut.
The Add shortcut window appears.
User Guide

Utility Buttons 38
4.
Select External URL.
5.
Enter a Shortcut name. The name can be up to 128 characters long.
6.
Paste the URL in the Shortcut URL box.
Note: External URLs always open in new browser tab.
7.
Click Save.
Managing your shortcuts
Use the following steps to edit or delete your existing shortcuts.
To manage your shortcuts:
1.
Go to the shortcut menu from the shortcut utility button .
2.
Click Edit.
The Edit shortcuts panel appears in place of the shortcuts menu.
User Guide

Utility Buttons 39
3.
Do any of the following:
■ □
Click the edit icon to change the shortcut name or shortcut URL.
The Edit shortcut window appears. It is similar to the Add shortcut window. See Adding a
Shortcut to a Page in OpenAir and Adding a shortcut to an external URL.
□
Click the delete icon to delete the shortcut.
4.
Click Save to save your changes, or Cancel to discard your changes.
Contextual Tips
Click the Tips button to display contextual tips and information related to the screen you are currently
viewing or module you are in. It also contains quick access links to context-specific special actions
available to your role.
User Guide

Utility Buttons 40
Note: The redesigned OpenAir user experience adds new levels of contextual tips to bring
contextual tips closer to their context. For example, contextual tips are available at the column and
the cell level on redesigned list views. See List View Contextual Tips.
Resource Comparison
Note: This button is only available if you have access to the Resources module and the
appropriate role privileges to use the Resource Comparison feature.
Click the Resource Comparison button to show a list of resources currently selected for comparison.
Click the remove icon to remove a resource from the list. Click Compare View to open the Resource
Compare View.
User Guide

Utility Buttons 41
Product Updates
Note: This button is only available if the Product Updates Panel feature is enabled for your
OpenAir account and if your role privileges enable you to view the OpenAir Help Center.
Click the Product Updates button to show a panel with new release highlights and other product
updates. The Product Updates utility button is highlighted after each release to indicate that there are
new product updates available. Click Read More to view the full release notes in the OpenAir Help Center.
User Guide

Utility Buttons 42
Canvas and Screen Header
The canvas shows your business data organized into various visual layouts. Depending on the context
and purpose, information is organized into Forms, Lists, Charts or Grids/Worksheets for a “Big Picture”
perspective and convenient access to data.
The screen header identifies the screen or data you are currently viewing. For some data items, such
as Projects, Timesheets or Expense Envelopes, the screen header also features an in-record navigation
menu to give deeper and more precise control over the data configuration.
The content of the canvas and screen header and the content format vary depending on the screen type.
For more information, see the following topics:
■
List Views — List Views present bulk data in a linear way, providing a variety of helpful tools for
productive work.
■
Records — Records may include data presented in different ways. In some cases, you may be able to
access forms, grids, list views as well as other views and tools within a record. An in-record navigation
located in the screen header for these records, or record header, enables you to navigate the record
data.
User Guide

Canvas and Screen Header 43
■
Administration Settings Screen Navigation — Administrators control global and application settings in
the Administration module. The administration global settings screen header lets you move between
the different settings forms and list views.
Administration Settings Screen Navigation
Administration global and application settings have a screen header with tab navigation and overview
screens for each settings section or each OpenAir module.
To go to any administration settings screen from any other screen in OpenAir:
1.
Click Administration in the Main Navigation menu. The in-module screen navigation submenu
appears.
2.
Click the relevant section under Global Settings. The section overview screen appears.
3.
Click the screen required.
To move between global settings screens or application settings screens:
1.
Click the relevant section heading in the screen header.
A submenu appears. The submenu includes a second level if screens include subtabs.
2.
Click the screen or subtab required.
User Guide

Working with Lists and Records 44
Working with Lists and Records
All the information you work with in OpenAir is organized and stored in records. These records are
accessible from list views that include all records of a specified type. You can customize these list view to
display selected fields.
List Views
You can use list views to access individual records or to work with multiple records at one time.
To access list views, click a module icon in the main navigation menu and select a relevant view from the
in-module screen navigation flyout menu. See Navigating OpenAir.
Some list views are also accessible as part of a specific record. See Records.
List views available within a record, or in-record list views, offer the same features as list views available
from the in-module screen navigation menu.
This section describes the common features for redesigned list views in the redesigned OpenAir user
experience. Some of these features let you customize the list view to your requirements. Any changes
you make before navigating away from a list view, signing out of OpenAir or closing the browser, will be
remembered the next time you go to that list view. You may also save different configurations for your
list views and switch between any saved configurations rapidly. See Saving and Using Custom List View
Configurations
Note: Not all list views use the redesigned list view layout and functionality.
For a list of list views using the redesigned layout and functionality, see Feature Changes in the
Redesigned User Experience.
For information about list views using the previous UI layout and functionality, see List Views —
Previous UI Version Layout.
1 Screen header — The screen header indicates the screen or the record you are currently viewing. If the list view
is part of a record, the screen header also includes an in-record navigation menu. See Record Header.
2 List view toolbar — The toolbar lets you switch between different tabs and gives you access to options and
tools. See List View Toolbar and Navigating the List View.
3 Column headers — You can access additional tools and controls in the column headers. See List View Column
Headers.
4 List view data — From the list data, you can use optional features to access more information or edit data
directly from the list view. See List View Data.
5 Column totals — The totals for the current page are displayed in bold at the bottom of the numeric columns
and the totals for the whole data across all list view pages are displayed underneath the page totals. The total
number of rows in the page and in across all list view pages are displayed at the bottom of the first non-numeric
column. You can enable or disable column totals using a toggle on the more options panel. See Other List
Options.
6 Page navigation — Use the page navigation bar to go to the item you need quickly. See Navigating the List View.
User Guide

List Views 45
Changes Introduced With Redesigned List Views
If you were using OpenAir with the previous user interface, the redesigned user experience brings the
following functionality changes:
■
The new list view toolbar includes a Bulk actions panel, a List view configurations panel, a Data
panel grouping the columns, sort and advanced filters tools, a Download function and Other list
options.
■
For items with an approval process enabled, the Submitted > Waiting for my approval sub-tab in the
previous UI has moved to a new To Approve tab for items awaiting your approval.
■
The Bulk actions button has moved from the column headers in the previous UI to the toolbar in the
new UI and it now indicates the number of selected rows.
■
The Advanced filter has moved from the top of the canvas in the previous UI to a button in the
toolbar in the new UI. The advanced filter panel displays under the toolbar when clicking the button.
■
Access the Download function directly from the toolbar in the new UI instead of the List options
dropdown in the previous UI .
■
The List options cog wheel toolbar icon and dropdown options in the previous UI have been replaced
by a new icon and a different set of list options in the new UI, including the number of rows per page
setting and the column totals switch.
■
Column Filters dropdowns include a search box in the new UI.
■
The Clear column filters has moved from the Tips menu in the previous UI to the list options
dropdown in the new UI.
■
Improved list view sorting feature — You can now control the sort order of your list data from both
the column headers and the toolbar with up to three sorting levels.
■
Improved column locking feature — Change your locked column in one click.
■
Improved page navigation.
■
Shortcut keys — ‘B’ for B ulk actions, ‘L’ for Saved L ist view configurations, ‘C’ for C olumns , ‘O’ for S o
rt and ‘F’ for Advanced F ilters.
User Guide

List Views 46
■
If the Inline-Editing in List Views optional feature is enabled for your account, you can edit project tasks
and bookings from within the project tasks list view and from the project center.
Some but not all list view settings are ported from the previous UI to the new UI or inversely. For example,
any column filters set for your list views are maintained. However, column sizes set in one UI version are
not maintained in the other UI.
List View Toolbar
The list view toolbar includes 5 sections giving you quick access to different list view tabs and tools. You
can also press a shortcut key to access certain tools.
1 Tab/View navigation — Click one of the tabs or views to go to a different list view tab or to a different view
accessible from the list view. See Navigating the List View.
2 Bulk actions — Use the bulk action utility to make changes to any number of selected items in one go. Shortcut
key: . See Bulk Actions.
3 List view configurations — Save your list view configuration for later use, load one of your saved configurations
and share them with colleagues. Shortcut key: . See Saving and Using Custom List View Configurations.
4 Data — Control what data is included in your list view and how it is displayed. The tools in the data panel
grouping include:
Columns — Select the columns you want to display and set the column order. Shortcut key: . See Selecting
List View Columns.
Sort — Sort your list data by column using up to three sorting levels in ascending or descending order.
Shortcut key: . See Sorting the List View Data.
Advanced Filters — Apply advanced filters to restrict the number of list view entries according to set criteria.
Shortcut key: . See Filtering Options.
5 Download — Download your list view data as a CSV, HTML or PDF file and import/read your data in your
spreadsheet, word processing or PDF tools. See Download Your List View Data.
More options — Control the number of rows per page, enable column totals or clear filters. See Other List
Options.
Navigating the List View
List views offer tab/view navigation and page navigation.
■
Tab/View navigation — Click one of the tabs or views in the list view tool bar to go to a different list
view tab or to a different view accessible from the list view.
□
The available options depend on the particular list view you are viewing. For example, in the
Projects list view, each tab represents a project Stage.
User Guide

List Views 47
For items with an approval status, such as bookings, timesheets or expenses, each list view tab
represent a status — Open, Submitted, To approve, Approved, Rejected, Archived, and All. For
some list views, such as the bookings list view, the navigation panel also includes other views and
tools accessible from the list view. For example, in the bookings list, the tab/view navigation panel
may also include links to the Advanced Booking Worksheet, Booking Chart and Resource Booking
Planner, depending on the features enabled on your OpenAir account.
□
If there is not sufficient space to display all the available tab options, click the More header with a
small caret next to it to display a continuation menu.
■
Page navigation — Click the navigation arrows to go to the first , previous , next or last
page or click on the page number and type the page number you want to go to and press the Enter to
go straight to that page.
List View Column Headers
You can access several tools and display options directly from the column headers bar:
1 Column width — By default, column widths are calculated to provide an optimum fit between the list view
content and the available canvas space.
To change the width of a column:
1.
Point to the column border.
2.
When the mouse pointer changes to a resize cursor , drag the column border to the required width.
User Guide

List Views 48
Note: Consider the following:
■
Full use of the available canvas space takes precedence over custom column width. If you change the
width of a column, the width of other columns may also change to ensure the list view occupies the
full canvas width. You may not be able to reduce a column width below a certain limit.
■
If you set custom column widths manually and navigate away from the list view, these custom column
widths will continue to apply the next time you go to the list view.
■
Custom column widths are saved as part of your custom list view configuration. See Saving and Using
Custom List View Configurations.
2 Column category — Column headers are displayed on a dark blue color background unless the field or column
falls under a field grouping or column category. If the column falls under a field grouping or column category, the
column header is split vertically with the column title at the bottom displayed on a green color background and
the column category at the top displayed on a lighter green color background. If two or more adjacent columns
fall under the same category, the column category shows as one merged cell across those columns.
3 Column options — The available option icons are hidden unless one of the options is enabled for the column.
Point to the column header to display the available option icons, which may include the sort ascending, sort
descending and column lock icons. If one of the column option is enabled, the available option icons continue to
display when you move the pointer away from the column header.
4 Column lock — Click the column lock icon to lock the list to that column. Everything to the left of the locked
column will stay in view when you scroll horizontally. Notice the green locked column icon next to the title of
the locked column and the green column border running through the entire list.
Click the locked icon to unlock the column or click the lock icon for another column to change the locked
column.
5 Sort — Point to the column title to display the option icons for the column and click the sort ascending icon
or sort descending icon next to the column title to sort your list data using up to three sorting levels in
ascending or descending order. See Sorting the List View Data.
6 Column tips — The column options include an information icon if contextual tips are available for the column.
Click the information icon to view contextual tips relevant to the column. See List View Contextual Tips.
7 Column filters — Use column filters to restrict the number of list view entries. See Filtering Options.
8 Check the box in the Bulk actions column header to select all items on the page or click the clear all icon to
clear all selected items in the list. See Bulk Actions
8 Expand All / Collapse All — The workspace documents list view lets you expand and collapse all folders in the
document tree by clicking the expand all icon and collapse all icon in the Name column header.
User Guide

List Views 49
Bulk Actions
The Bulk Actions feature allows you to make changes to any number of selected items at the same time.
Note: Account administrators can control who can access bulk actions for expenses, timesheets,
employees, projects, bookings, charges, billing transactions, and recognition transactions list
views by role permission. Go to Administration > Employees > Roles > [Select a role] and check the
Disallow the use of bulk actions in <record type> list views box to disable bulk actions for that
role and list view.
If bulk actions are available for the list view and enabled for your role:
■
The bulk actions column is always the first column on the left and shows a box for each row in the list.
■
The list view toolbar includes the bulk actions panel.
Otherwise, the bulk actions column and toolbar panel are not available.
To use bulk actions:
1 Check the box next to the items you want to select. Selected rows are shown with a light gray color background
and a green checked box in the bulk actions column.
2
The bulk actions panel in the list view toolbar is highlighted in green whenever items are selected and indicates
the number of selected rows across the entire list.
3
Check the box in the column headers to select all items on the page or click the clear all icon to clear all
selected items in the list.
4
Click Bulk Actions in the toolbar or press on your keyboard to open the Actions dialog.
5
Select the actions as required and press OK. The available actions depend on the items and on your role
permissions.
User Guide

List Views 50
The following list views feature a redesigned Bulk actions dialog:
■
Reports > Saved Reports
■
Resources > Profile approval > To approve
■
Workspaces > Documents
■
Workspaces > [Select a workspace] > Documents
User Guide

List Views 51
Selecting List View Columns
Click the Columns icon in the list view panel or press on your keyboard to display the List view
columns flyout panel. Select the columns you want to include in the active list view and specify the
column order. Click Apply to validate your changes and return to your list view. Any column preferences
applied to a list view continue to apply the next time you go to the same list view until you change them or
switch to a different list view configuration.
1 Type any characters from a column title in the search box. The lists of available and selected list view columns
are filtered as you type and only includes the column titles containing the string you have typed. Matching strings
are highlighted in bold in the filtered column list.
2 Click a Column title to include the column in the list view or click Select all to include all available columns.
3
Click the remove icon next to a selected column title to remove it from the list view or click Clear all to remove
all selected columns.
4
Some columns, for example Bulk actions or Actions, are required and set to display as the first columns on the
left. You cannot remove them from the list view nor change their position. These columns are displayed with a
gray color background.
5
Some columns are required but can be reordered. For example, you cannot remove the Project column from
a Project list view but you can change its position. These columns do not have the remove icon next to the
column title.
6
Click a column to select it then drag the selected column to change its position.
User Guide

List Views 52
Tip: You can save these column preferences as part of a custom list view configuration. See
Saving and Using Custom List View Configurations.
Sorting the List View Data
You can sort your data using the Order by panel accessible from the list view tool bar or the sort options
available in the column headers. Both methods work together.
This feature supports ascending and descending sort options and multi-level sorting up to three levels.
Any sort order applied to a list view continues to apply the next time you go to the same list view until you
change it or switch to a different list view configuration.
1 Click the sort icon in the list view toolbar or press on your keyboard. The Order by panel displays. Click
Add New Field and select up to three fields to sort by.
2
The fields are displayed in the Order by panel. Click one of the icons next to the field name to select between an
ascending sort order or a descending sort order .
User Guide

List Views 53
Drag the fields up or down to determine the order of your sorting levels.
The sorting levels are color-coded — green for the primary, yellow for the secondary, and orange for
the tertiary sort field. In the pictured example below, the list data is sorted by Start date in descending order,
then by Project owner in descending order, and finally by Customer in descending order.
Click the remove icon next to a field name to clear that sorting level and stop using that field to order your list.
Click Apply to validate your changes and return to the list view.
3
Notice the sort icon is displayed in green color with a dot to indicate that sorting options have been set for the
list view.
4
Notice the column headers also indicate the sort order and sorting levels with icons similar to those in the Order
by flyout panel.
5
You can also sort your data directly from the column headers. Point to the column title to display the option icons
for the column. Click the Sort Ascending or Sort Descending icons. The icons show in green, yellow or
orange color if the sort option is enabled for that column.
You can set up to three sorting levels. The first sort icon you click will make that column the primary sort field. The
second and third sort icons you click will make these columns the secondary and tertiary sort fields, respectively.
When you have set all three sorting levels, the sort icons no longer display for the remaining columns. Click an
active sort icon to clear that sort level if you want to sort your data by another column.
User Guide

List Views 54
Tip: You can save the sort order settings as part of a custom list view configuration. See Saving
and Using Custom List View Configurations.
Important: Sorting is disabled if the list view contains more than a threshold number of rows.
The threshold depends on the configuration of your OpenAir account.
■
A message appears at the top of the list view column headers if the number of rows exceeds
the threshold: “Sorting is disabled for list views containing more than <threshold> rows. To
reduce the number of rows and restore full functionality, use advanced filters. See Advanced
Filters.
■
You can still use the Order by panel and the sort ascending or descending buttons. However,
any changes will have no effect on the order your list view data is displayed if the number of
rows exceeds the threshold.
Filtering Options
You can limit the data displayed in the list view based on criteria you specify. There are two features you
can use to achieve this:
■
Column Filters — Searchable dropdown options accessible directly from the column headers bar let
you limit your data by matching fields to specific values or range of values.
■
Advanced Filters — Flexible filtering options accessible from the list view toolbar let you refine your list
view to show exactly the data you need.
Column Filters
Column filters are dropdown boxes located in the column headers bar. Click the dropdown box to display
a searchable list of value options. Select the desired options to set the column filter.
Depending on the column, the value options will be listed in one of the following formats:
■
Distinct values: All (default), List of distinct values. Non-unique values only appear one time.
■
Alphabetical: All (default), First alphabetical and numerical character [A-Z, 0-9].
■
Date: All (default), List of redefined date ranges.
The feature includes the following characteristics. Column filters are:
■
Searchable — Type any number of characters in the dropdown search box to display only the options
containing your search string. The list of available value options is filtered as you type. Matching
strings are highlighted in bold in the filtered options list.
User Guide
List Views 55
Note: Distinct value column filter dropdowns show up to 50 options initially.
To show distinct value options that are not included in the initial list, type at least three
characters in the search box. The list of distinct value options is filtered as you type with
matching terms highlighted in bold. Filtering as you type only filters through the 50 distinct
values loaded initially. To search for all matching values, click Search All.
The dropdown will show a list of up to 1000 distinct values containing your search term. If there
are more than 1000 matching values in the database, only the first 1000 values are returned
as search results and a message appears above the search results. Refine your search as
necessary until there are less than 1000 matching values, then type additional characters to
filter the search results.
If there are less than 50 distinct values in the column filter dropdown, no search is required.
All possible options may already be listed if other filters are already used to refine the list view
data. For example, if you are using column filters on the project or resource columns, to refine
the list view data, there may be less than 50 distinct value options for the tasks column filter, in
which case the dropdown shows all options, and a search is not required.
■
Easily identifiable — When a column filter is applied, the column filter dropdown box is highlighted
with a green color background and shows the selected filter option. Multiple column filters — You can
apply multiple column filters to the list view.
■
Remembered — Any column filters applied to a list view continue to apply the next time you go to the
same list view.
Note: If you were using OpenAir with the previous user interface, applied column filters are
not affected by the change to a different version of the user interface. Any column filters you
applied to the list view before the change to the new UI will be maintained if you are using the
new UI the next time you go to this list view.
■
Easily cleared — To clear all column filters applied to the list view, click the List options icon and
click Clear column filters from the List options dropdown panel.
User Guide

List Views 56
Tip: You can save any combination of column filters as part of a custom list view configuration.
See Saving and Using Custom List View Configurations.
Opening a List View from QuickViews and Other Screens — Preset
Column Filters
You can go to specific list views by clicking links available in a QuickView window, in other screens such as
the Booking chart or the Assignments chart, or in some of the portlets, such as the My Status portlet, on
the Home and Dashboard screens. When you click a link in a QuickView or Booking chart which refers to
a list view, the list view opens with predefined column filters already applied. The column filters are set to
list context-specific data in them list view.
For example:
■
QuickViews give you access to additional information, actions and quick navigation options for certain
items in any list views — See QuickViews. The QuickView for a Project will include quick navigation links
to Time entries, Receipts, Charges and Invoices list views. Clicking one of these links opens a list view
showing only the Time entries, Receipts, Charges and Invoices for that specific Project. The column
filters for the Project and Customer columns will be preset when the List view displays.
■
The Booking chart lets you see booking data in a visual chart and gives you an overview of bookings
for one or more employees. Clicking on a bar in the chart opens the Bookings list view listing only the
bookings for the selected Resource, or all bookings, for a specific period of time. The column filters for
the Resource, Start date and End date columns will be preset when the List view displays.
User Guide

List Views 57
Note: Review the following guidelines:
■
Filtered columns will be automatically added to the list view if not present in the active or
remembered list view configuration.
■
Date Column filters are preset to custom date ranges matching a period of time in the Booking
chart. These custom date ranges are temporary and will not be available in the dropdown
options after you have cleared or changed the value for that column filter.
■
Opening a List view using a quick navigation link in a QuickView or in the Booking chart
overrides the remembered list view configuration. The Column filters will continue to apply the
next time you go to that List view unless you clear or change the values set for those column
filters.
■
Column filters are not currently preset when opening to a list view by clicking a quick navigation
link in the Assignment chart.
Advanced Filters
Advanced filters are accessible from the list view toolbar and let you refine your list view using filter
conditions to show exactly the data you need.
Tip: Use advanced filters to reduce your list view data and only include the data directly
relevant to your task. This will help your list views load faster and in some cases may restore full
functionality to your list views. See List View Data.
Click the Filter icon in the list view tool bar or press on your keyboard to show or hide the advanced
filters panel under the list view toolbar. If an advanced filter is currently applied to your list view, the Filter
icon is displayed in green color .
Currently, two versions of the advanced filters user interface are available. Both have similar functionality
but different layouts.
User Guide

List Views 58
■
Default Advanced Filters UI — The default advanced filters user interface lists filter conditions vertically
(one filter condition per line). For complex filters. You select and apply a filter from the flyout panel and
not from the toolbar.
■
Redesigned Advanced Filters (Optional Feature) — The Redesigned Advanced Filters optional feature
changes the user interface for advanced filters on redesigned list views. The redesigned advanced
filters panel is compact and lists filter conditions horizontally instead of vertically. It lets you select and
apply saved filters directly from the list view toolbar instead of the flyout panel. The new layout brings
better usability and takes less of your canvas space.
Default Advanced Filters UI
The default advanced filters user interface lists filter conditions vertically (one filter condition per line). For
complex filters. You select and apply a filter from the flyout panel and not from the toolbar.
1 Click the dropdown to select one of your saved Advanced Filters or create a new one. Click Edit to modify the filter
settings, View to display the filter criteria or Hide to display only the filter name.
Select All from the dropdown to disable any Advanced filter currently applied to your list.
2
Give your advanced filters a descriptive name so you can re-use them in future. After you have set or modified
the filter condition, click Save to validate your changes and return to your list view.
3 Click Add row to add a new filter condition.
4
Click the dropdown box further left in the filter condition row to select a field.
5
Click the middle dropdown box to select a comparison operator from the available options.
6
Depending on the chosen field and comparison operator, define a value or a range of values by either typing,
selecting a value or range from predefined dropdown options, or setting a custom value.
7
Click the Delete row icon next to a row to delete that criterion.
8
Click the dropdown field and select Match all if the results must match all specified filter conditions (AND logical
operator) or select Match any if the results must meet at least one of the specified filter conditions (OR logical
operator).
Note: The default logical operator for list view advanced filters is Match all. Whenever possible, set
advanced filters to match all specified filter conditions for optimum list view performance.
9
Click Delete to delete the saved advanced filter. The deleted advanced filter will no longer be available for
selection.
User Guide

List Views 59
Redesigned Advanced Filters (Optional Feature)
The Redesigned Advanced Filters optional feature changes the user interface for advanced filters
on redesigned list views. The redesigned advanced filters panel is compact and lists filter conditions
horizontally instead of vertically. It lets you select and apply saved filters directly from the list view toolbar
instead of the flyout panel. The new layout brings better usability and takes less of your canvas space.
1.
Click the caret icon and select an option to save, save as, rename or delete the filter.
2.
The filter selector in the list view toolbar shows the name of the filter that is currently applied to
your list view, or All if no filters are applied.
The filter selector includes a search bar. To search for a specific filter, type a few characters of the
filter names in the search bar. The dropdown list is refined as you type to show only the saved
filters with names list matching your search string.
■
The default name for new filters is "Unsaved filter".
■
A red asterisk next to the filter name indicates there are unsaved changes.
■
Click the filter name to select and apply one of your saved filter, or to clear advanced filters
and show All data. To search for a specific filter, type a few characters of the filter names in the
search bar. The dropdown list is refined as you type to show only the saved filters with names
list matching your search string.
3.
The logical operator is shown in light blue color background. Click the logical operator to change
it. Select Match all if the results must match all specified filter conditions (AND logical operator) or
select Match any if the results must meet at least one of the specified filter conditions (OR logical
operator).
User Guide

List Views 60
Note: The default logical operator for list view advanced filters is Match all. Whenever
possible, set advanced filters to match all specified filter conditions for optimum list view
performance.
4.
Each filter condition shows the field name, the comparison operator and the value in a simple
sentence structure. If multiple values are selected, the filter conditions shows a number
indicating the number of values selected instead of the value.
Click a filter condition to modify it, or click the clear icon to remove a filter condition.
Note: The filter panel shows a maximum of three rows of filter conditions when you first
open it. A + <n> button indicates there are <n> more additional filter conditions defined for
this filter. Click + <n> to expand the filter panel and show all filter conditions.
To add a new filter condition:
a.
Click the add icon in the advanced filter panel.
b.
Enter a field name. A list of matching available field names appears and is updated as you
type, with exact and closest match at the top of the list. Select the relevant field.
c.
Select a comparison operator.
d.
(Optional) Select one or more values, or a range from predefined dropdown options, or
enter a custom value, depending on the field type and comparison operator.
User Guide

List Views 61
Note: Review the following guidelines:
■
You must add at least one filter condition before you can save the filter.
■
It is not necessary to select or enter a value for each filter condition you define. The
filter condition will be ignored if the value is not specified. This may be helpful if you
want to configure saved filter templates, which you can then can adapt by selecting
relevant values for each filter condition.
■
The customer dropdown list in the Redesigned Advanced Filters feature shows
additional customers information in addition to the customer Name, depending on
your OpenAir account configuration. See Administrator Guide.
■
The resource or employee dropdown list in the Redesigned Advanced Filters feature
lets you search and select both active and inactive employees as values in your filter
conditions depending on your account configuration. See Administrator Guide.
5.
Click Apply to preview the advanced filter results before saving the changes you made to the
filter. The list view shows the items matching all filter conditions in the filter panel including any
unsaved changes you made to the filter conditions. You can then click the caret next to Apply, and
click Save to save the changes you made to the filter.
Alternatively, click the caret next to Apply, then click Save and Apply to save the changes you
made to the filter before viewing the advanced filter results.
6.
Click Clear to clear all filter conditions.
User Guide

List Views 62
Download Your List View Data
Click the Download icon in the List view toolbar to download your list view data. You can export your
list view data in one of the following file formats:
■
CSV — CSV is a widely supported format for tabular data import. Use this option if you want to import
the list view data into a spreadsheet or a Business Intelligence (BI) tool, for example.
■
HTML — Use this option to import the list view data as formatted and editable text into a word
processing tool, for example.
■
PDF — Use this option to view the list view data in a PDF tool or to distribute the list view data.
Note: The downloaded list view data uses all redesigned list view configuration options,
including multiple sorting levels.
Other List Options
Click the More options icon in the List view toolbar to access the following options:
1 Set the number of rows per page. 1000 rows per page is the maximum allowed so as not to compromise
performance when displaying large list view data.
If you change the number of rows per page, OpenAir reloads the list view at the relevant page. After you change
the option, the new page contains the first row which was displayed in the old page before you changed the
number of rows per page option.
Note: If the number of rows per page is set to 100 or higher, OpenAir renders your list view data
progressively as you scroll. See Rendering Rows of Data as You Scroll.
2
Column totals for all numeric columns, including monetary values. Click the Column totals toggle to turn the
feature on/off.
3
When Column totals are enabled, the totals for the current page are displayed in bold type at the bottom of the
numeric columns and the totals for the whole data across all list view pages are displayed underneath the page
totals.
The total number of rows in the page and across all list view pages are displayed at the bottom of the first non-
numeric column.
If multicurrency is enabled for your account and the list view column contains monetary values in two or more
currencies, click Currency subtotals to view subtotals for all currencies included in the list view data. See
Multicurrency Monetary Column Totals.
4
Click Clear column filters to reset all column filters applied to your list view.
Click Clear advanced filters to reset all advanced filters applied to your list view.
User Guide

List Views 63
Click Clear all filters to reset all column filters and advanced filters applied to your list view.
Multicurrency Monetary Column Totals
You can view monetary subtotals for each currency if multicurrency is enabled for your account and the
list view column contains monetary values in two or more currencies. Currency subtotals are available
both for the page and for the entire list view.
■
To view the currency subtotals for the page you are currently viewing, click the Currency subtotals
link in bold type at the bottom of the monetary column.
■
To view the currency subtotals for the whole data across all list view pages, click the Currency
subtotals link in smaller and normal weight type underneath.
The column totals row shows the total monetary value in place of the Currency subtotals link if all
monetary values on the current page or across all pages are in the same currency.
Saving and Using Custom List View Configurations
The Save List View Configurations optional feature lets you save custom configurations for your list views,
load any configurations saved previously and, if your role permits, share these configurations with other
users.
Several features enable you to customize the active list view and adapt it to your specific needs. After you
have customized the list view, you can save the custom configuration settings for future use.
User Guide

List Views 64
You may want to use different configurations for the same list view for different duties. This feature lets
you switch between several configurations saved for the same list view.
You can save custom configurations for any existing list view. However, each saved configuration is
associated with the specific list view it was created for. It cannot be applied to other list views. For
example, list view configurations for Expenses list views cannot be applied to Timesheets list views.
Account administrators and users with the relevant role permissions can create public list view
configurations, which other users can apply, or default list view configurations for new employees.
The name of the List view configuration currently applied to your list view is displayed in the List view
toolbar. When you go to a list view for the first time, the List View configuration panel in the list view
toolbar displays either the name of the default list view configuration, if one was set by your account
administrator, or “Untitled”, if it is the system default.
Tip: If you are using the “Untitled” system default configuration or a default configuration set by
an account administrator and you want to retain these changes, make sure you save the list view
configuration.
Account administrators may set or change a default configuration at any time. Unsaved changes
will be lost and the new default configuration will automatically apply to your list view if:
■
You were using the system default “Untitled” configuration.
■
You were using a default configuration set by an account administrator, and that configuration
is no longer available as a public list view configuration.
The list view configuration saves the following list view properties:
■
Selected columns and column order — See Selecting List View Columns.
■
Sorting options including the columns your list view data is ordered by, the sorting levels and the
sorting order for each column — See Sorting the List View Data.
■
Column filters — see Column Filters.
■
List display options such as custom column widths (see List View Column Headers) and number of
rows per page (see Other List Options).
Note: The following list view properties are not saved as part of the list view configuration:
■
Column lock and column totals settings.
■
Advanced filters — Note however that you can save advanced filters separately. See Advanced
Filters.
1 The toolbar panel shows the name of the configuration currently applied to the List view
Click the name of the active list view configuration in the toolbar or press on your keyboard to display the List
view configuration flyout menu. A red asterisk displays next to the List view configuration name if there are
any unsaved changes.
User Guide

List Views 65
2
If there are any unsaved changes, the Save menu option is available. Click Save to overwrite the previously saved
configuration with the modified one.
Click Discard changes to return to the last saved version of the list view configuration. A confirmation dialog
displays. Click OK to confirm. This action cannot be undone.
3
Click Save as ... to create a new list view configuration based on the active configuration and save any changes
made to a new configuration instead of the active configuration. The New list view settings window displays. Enter
a descriptive name for the new configuration in the List view name field, an optional up to 500 characters long
Description and click Save. The new configuration name displays in the toolbar panel.
You can edit the name and description of the saved configuration at any time. Click Edit properties to modify the
configuration properties.
4
If your role permissions allow you to do so, you may check either or both the Make this view public and Set this
list view as default for new users boxes.
5
You can delete the configuration if it is no longer required. After you click Delete, a confirmation dialog displays.
Click OK to confirm.
6
Click the My saved list views or Public list views menu options to display a list of all configurations you
have created or all created and shared by others for this list view. Click a configuration name to apply that
configuration to the list view.
7
You can set the configuration you use most frequently as favorites for easier access. Point to one of the
configurations in My saved list views or Public list views. A star icon displays next to the configuration
name. Click the icon to mark this configuration as a favorite. Favorite configurations display at the bottom of the
List view configurations menu under a Favorites section with a red star icon next to their name. To remove a
configuration from your favorites, click the red star icon next to its name.
8
Click Manage saved list views to display a dedicated screen listing. From that screen you can delete
configurations one at a time or in bulk. You can also apply a configuration to a list view by clicking the Apply to
list view link in the Actions column.
User Guide

List Views 66
List View Contextual Tips
Contextual tips specific to the list view you are currently viewing are available at three levels:
■
List view contextual tips — Click the Tips button to display contextual tips and information
related to the list view you are currently viewing or to the OpenAir module the list view is part of. See
Contextual Tips.
■
Column contextual tips — The column options in the column headers include an information icon
if contextual tips are available for the column. Click the information icon to view contextual tips
relevant to the column. See List View Column Headers.
User Guide

List Views 67
■
Cell contextual tips — List view cells include an information icon if contextual tips are available. Click
the information icon in the top right corner of the cell to view contextual tips relevant to that field
or record. See List View Data.
List View Data
List view data is presented in a tabular form according to the Column configuration, Sorting, Filtering and
other List options you have specified. List views let you have an overview of a specific set of data and let
you select and go to the particular item you want to work on.
From the list view you can:
1
Go to one of the listed records — Click the name of the record to display the record screen.
2
Monitor the progress of your projects at a glance.
3
Some list views include a Bulk actions column. The Bulk actions column is always the first column on the left,
when present, and cannot be moved. Select records and run bulk actions on the selected records. See Bulk
Actions
4
Some list views include an Actions column. The Actions column is always the first or second column on the left,
when present, and cannot be moved. Depending on the list view, the following actions may be available:
■
Add New — Click the add new icon to crate a new record.
■
Delete — Click the delete icon to delete the record, document or report.
■
Download — Click the download icon to save the workspace document or the report on your computer.
■
Duplicate — Click the duplicate icon to create a copy of the record.
■
Edit — Click the edit icon to open the record form.
■
File — click the file icon to place the report in a folder or remove it from its current folder.
User Guide

List Views 68
■
Publish — click the publish icon to publish the report to the OpenAir OData service.
■
Replace — Click the replace icon to replace a workspace document
■
Run — Click the run icon to run the report.
■
Schedule — click the schedule icon to run or publish the report automatically according to a specific
schedule.
■
Share — Click the share icon to share the report with other employees.
■
View — Click the view icon to show a non-editable view of the record.
■
View Document — Click the view document icon to view a workspace document.
■
More actions — Click the more icon to display additional action options.
5
Cell tips — List view cells include an information icon if contextual tips are available. Click the information icon
in the top right corner of the cell to view contextual tips relevant to that field or record. See List View Contextual
Tips.
6
Expand / Collapse — The workspace documents and saved reports list views let you expand and collapse folders
by clicking the expand icon and collapse icon next to the folder name.
Tip: List views with fewer rows load faster. To reduce the number of row, use advanced filters.
A tip appears at the top of the list view column headers if the list view contains more than 500 rows:
Some list view features, such as Sorting the List View Data, are disabled if the list view contains more than
a threshold number of rows. The threshold depends on the configuration of your OpenAir account. A
message appears at the top of the list view column headers if the number of rows exceeds that threshold:
Tip: Reduce the number of rows using advanced filters to load list views faster or restore full
functionality. See Advanced Filters.
Some of the list view features depend on your account configuration:
■
The following optional features change some of the list view behavior and functionality:
□
Rendering Rows of Data as You Scroll
User Guide

List Views 69
□
Display Options for Long Text Cells in List Views
■
The following optional features extend the capabilities of the list view data beyond an overview and
navigation tool:
□
QuickViews
□
Inline-Editing in List Views
□
Project Center — See Working with the Project Center View
Note: To check whether these features are enabled in your OpenAir configuration, contact your
account administrators.
Rendering Rows of Data as You Scroll
OpenAir renders rows of data as you scroll the list view if the number of rows per page is set to 100 or
higher. If this is the case, OpenAir only prepares for display the rows that will be visible on your screen
as well as extra rows of data up and down the list. Additional rows will be rendered progressively as you
scroll up and down. This reduces the demands on your browser and let your list views load faster.
Note: You can only search the rendered rows using the browser “Find in page” feature (Ctrl +F).
You cannot search through all 100 or 1000 rows in a page using Ctrl + F.
Display Options for Long Text Cells in List Views
Depending on your account configurations, list views display long text cells differently. Account
administrators can select to wrap long text and text area field values on multiple lines in list view cells or
display it in truncated form on a single line.
■
Single line (Default) — By default, redesigned list views display text and text area field values on a
single line by default. Line feeds are removed to show more information. List views are more compact.
If the entire text does not fit the cell, only part of the text is displayed with ellipses to indicate the text
is truncated. To view the full text, point to the cell or click Read more inside the cell (for longer text
content).
■
Wrap text — If the Wrap Text in List View Cells feature is enabled for your account, OpenAir wraps
long text and text area field values on multiple lines in list view cells. List views are less compact. For
longer text content, only part of the text is displayed with ellipses to indicate the text is truncated. To
view the full text, click Read more inside the cell.
User Guide

List Views 70
Longer text area cell content is truncated whether the wrap text option is enabled or disabled. To view
the full text, click Read more. The full text appears in a popup box. Click the close icon , press the Esc
key or click outside the box to close the popup box and return to the list view.
Note: These display options do not apply to the description column in the following list views.
The entire cell content is always shown and line feeds are supported.
■
Projects > [Select a Project] > Financials > Billing > Rules
■
Projects > [Select a Project] > Financials > Recognition > Rules
QuickViews
QuickViews give you access to additional information, actions and quick navigation options for certain
items in any list views. Quickviews are available for the following items:
■
Bookings
■
Employees
■
Projects
■
Tasks
When QuickViews are enabled for a particular item, the item is underlined with a dotted line. Point to the
item to view the QuickView panel with context-specific details including:
■
General information about the item.
■
Specific Details such as the Employee’s Skills, for example.
■
Action links such as a New booking Create action or Add to Resource Comparison, for example.
■
Quick navigation links to specific forms, screens and list views, filtered where appropriate to show only
the relevant data.
User Guide

List Views 71
Note: Account administrators can enable QuickViews for each item separately and set the
default delay between the time you point to the item name and the time the QuickView panel
appears at the account level.
■
To enable QuickViews, go to Administration > Global Settings > Account > Optional Features,
and check the Enable QuickView for <record type>.
■
To set the default QuickView delay, go to Administration > Global Settings > Display > Interface:
Display, and enter the QuickView popup activation delay in seconds under Display options.
You can change the QuickView delay or disable QuickViews. To do so, go to User Center > Personal
settings, and:
■
To set the QuickView delay, enter the QuickView popup activation delay in seconds under
Display options.
■
To disable QuickViews, check the Disable QuickViews box under Display options.
Inline-Editing in List Views
The Inline-Editing in List Views optional feature lets you edit records from within the list view.
This feature is currently available for the following views only:
■
Administration > Global Settings > Organization > Projects
■
Projects > Projects
User Guide

List Views 72
Note: Standard fields for projects supporting inline-editing include Project, Customer, Project
owner, Project stage, Transactional budget (hours), Project location, Cost center, Active, Notes,
Is a portfolio project, Start date, Invoice layout, Authorizations approver, Project budgets
approver, PO approver, Purchase request approver, Bookings approver, Revenue containers
approver, Timesheets approver, Invoice approver, Expense reports approver, Project approver
1, Project approver 2, and Project approver 3.
Custom field types supporting inline-editing include Checkbox, Date, Dropdown, Pick list, Text,
and Text area.
■
Projects > Tasks
■
Projects > Projects > [Select a project] > Project Center
■
Reports > Saved Reports
Note: Currently, the only field for reports supporting inline-editing is Name.
Note: Contact your account administrators to check whether the Inline-Editing in List Views
feature is enabled in your OpenAir configuration.
If the Inline-Editing feature is enabled and available for the list view you are working with, a label on top of
the column headers indicates this is an editable list view.
■
Double-click any editable cell to edit the field value straight from the list view, without having to leave
the list view or open a record form.
Note: Inline-editing is available for all fields except Multiple Selection and File Attachment
fields. Multiline text area fields are supported as of October 12, 2019.
Tip: Press Shift + Enter on your keyboard to insert a line break in a text area field. Drag the
bottom right corner to resize the box
■
Press the Tab key or Shift+Tab to go to the editable cell immediately to the right or immediately to the
left, respectively. If you are editing the last editable cell to the right, press the Tab key to go to the first
editable cell in the same row. If you are editing the first editable cell to the left, press Shift + Tab to go
to the last editable cell in the same row.
■
Click a different row to save the changes made, or press the Enter key to save the change, close the
edit mode and move to the cell immediately below. An on-screen message confirms the record was
saved or notifies you in case of error in the same way as when you click Save on the Task form.
■
Form permissions and form rules are respected. If you are not able to modify a particular record or
field on the record form, you will not be able to modify that record or field in the list view.
■
Any form scripts associated with the record form will be triggered when editing a record directly from
the list view.
User Guide

List Views 73
List Views — Previous UI Version Layout
Note: This help topic describes how to work with list views that do not use the redesigned list
view layout and functionality.
For a list of list views using the redesigned list view layout and functionality, see Feature Changes
in the Redesigned User Experience.
For information about the redesigned layout and functionality, see List Views.
Some of the list views available in OpenAir do not currently use the redesigned list view layout and
functionality. This help topic provides information about list views in the previous version of the OpenAir
UI for reference.
1.
Screen-specific navigation
2.
Run bulk actions
3.
Row Header colors
4.
List Options combine visual display settings, content configuration and data export options.
Selected rows, sorted and filtered columns are clearly highlighted in bright and positive colors.
See List Options and Density.
User Guide

List Views — Previous UI Version Layout 74
Note: The icon is used for Run bulk actions and the Cog icon is used for List
options.
5.
“Active” check mark — Identify your active items at a glance. See Active Tick.
6.
Progress bar — The progress bar gives a visual indication of progress status at a glance. See
Progress Bar
7.
Pagination — See Pagination.
List Options
The List options button pulls together the previous List Menu and Rows per page features and has been
moved to a more prominent position.
Density
List Views
User Guide

List Views — Previous UI Version Layout 75
Select comfortable or compact from the List Options menu to control the density of the data displayed in
list views. In compact mode the margins are trimmed and headings wrap to make more data visible.
Timesheets
Timesheet grid density is set from User Center > Personal Settings > Display Options > Data Density >
Control the data density displayed in timesheet grid with selected mode.
Active Tick
The Active tick provides a clear positive indication of an active item.
User Guide

List Views — Previous UI Version Layout 76
Progress Bar
The Progress bar combines a quick visual indication of completed status together with the numerical
value.
Pagination
The Pagination control is provided in the List Views — Previous UI Version Layout to allow you to quickly
move to the item you need regardless of the size of the list.
From the control you can clearly see your position in the list and move through the pages. Hover your
mouse over the control and click to jump to a specific page.
Records
Through records, you keep track of all the information from your OpenAir account. You can have records
of your employees, customers, projects , tasks, timesheets, receipts, expense reports, charges, invoices
and so on. Different views and tools are available for some record types. These views may include
information about records of different types which relate directly to the record you are viewing . For
example, the information associated with an Expense Report record will typically comprise several Receipt
records, Similarly, a Project record will include all Task and Issue records associated with that project.
Other views may offer a functionality associated with that type of record.
1 The record header gives information about the record you are currently viewing and, where applicable, lets you
navigate the different views and tools available for that record type. See Record Header.
Note: Not all record types use the redesigned header layout and functionality currently. For
information about record types and pages using the redesigned header layout and functionality see
Feature Changes in the Redesigned User Experience.
2 The canvas shows information about the record you are viewing. Record information may be displayed in
different formats depending on the type of information you are viewing. The main three formats are forms, list
views and grids.
■
Entity forms let you view and modify information about the record you are viewing. See Forms.
User Guide

Records 77
■
In-record list views provide information about items associated with the record you are viewing and let you
navigate to these item records. For more information about list views, see List Views.
Note: Not all in-record list views use the redesigned list view layout and functionality currently.
For information about list views using the redesigned list view layout and functionality see Feature
Changes in the Redesigned User Experience.
■
Grids let you view and enter information about multiple items over and across a date range on the same
page. See Grids.
Record Header
The record header displays in the screen-specific header section of the top bar when you are viewing a
record. Depending on the record you are viewing it may include the following features:
1 The record title and sub-title remind which record you are viewing. For example if you are viewing a Project
record, the title and sub-title will be the Project name and the Customer name, respectively.
2 The in-record navigation menu lets you navigate between the different views and tools available for the type of
record you are viewing, when applicable. See In-Record Navigation.
3 Click the back arrow in the top left corner to go to the list view for items of the same type as the record you
are currently viewing.
Note: This button does not take you back to the list view you were viewing before navigating to the
record. For example, if you navigated to a Project record using a quick navigation link in a QuickView
within the Bookings list view, clicking the back arrow will take you to the Projects list view and not the
Bookings list view.
4 A record information panel gives you access to information about your record at a glance and lets navigate
quickly to related assets. See Record Information Panel.
Note: The redesigned record header is currently available only for the following record
types: Bookings, Customers, Envelopes/Expense reports, Guests, Invoices, Projects, Resources,
Timesheets, Users/Employees. See Feature Changes in the Redesigned User Experience.
Screen headers adjust to smaller screens to ensure that title, tab navigation, record information and utility
icons are either visible or accessible.
User Guide

Records 78
In-Record Navigation
The in-record navigation menu lets you navigate between the different views and tools available for the
type of record you are viewing. The in-record navigation menu is fully responsive and adapts well when
viewing the record on tablets or small screens. If there is not sufficient space to display all menu options
in the in-record navigation panel, click More to display a vertical continuation menu.
Record Information Panel
The record information panel includes more information about the record you are viewing and quick
navigation links to related assets. For example:
■
If you are viewing a project record, the information panel shows the project progress bar and project
status and includes quick navigation links to any assets associated with the project. Such assets may
include a project status summary report , a workspace , or the project status news feed . To
view the asset, click the corresponding icon. You can also click the Project status tag to view the
project status news feed.
■
If you are viewing a resource request record, the information panel shows the request progress bar
and the Finalize request button.
User Guide

Records 79
Forms
Forms let you view and modify the main information on each record.
Forms have a two-column layout, collapsible sections, and input fields.
■
The form navigation panel let you navigate between form sections. This is particularly useful for
complex records with long forms, such as Projects. The form section you are currently viewing is
highlighted automatically as you scroll the form. See Form Navigation.
■
Form signposting helps you keep your bearings when navigating complex forms — See Form
Signposting.
■
Action buttons are color-coded in the application. Green color buttons generally indicate saving
changes you made. Blue color buttons perform in-page functions but do not save information. Cancel
and Delete buttons are shown with a transparent background.
■
Task progress bars or sliders show a visual representation of the current progress.
Note: If enabled in your account, the slider lets you set the progress.
■
On-screen error messages help you locate and correct input errors — See On-Screen Error Messages.
■
In-form notifications help you find and resolve data entry issues — See In-Form Notifications.
■
In-form overlay popups r(recommended) or popup windows are used for additional data entry — See
In-Form Popups.
Form Navigation
Form navigation is a Forms control that allows you to quickly navigate around large forms.
User Guide
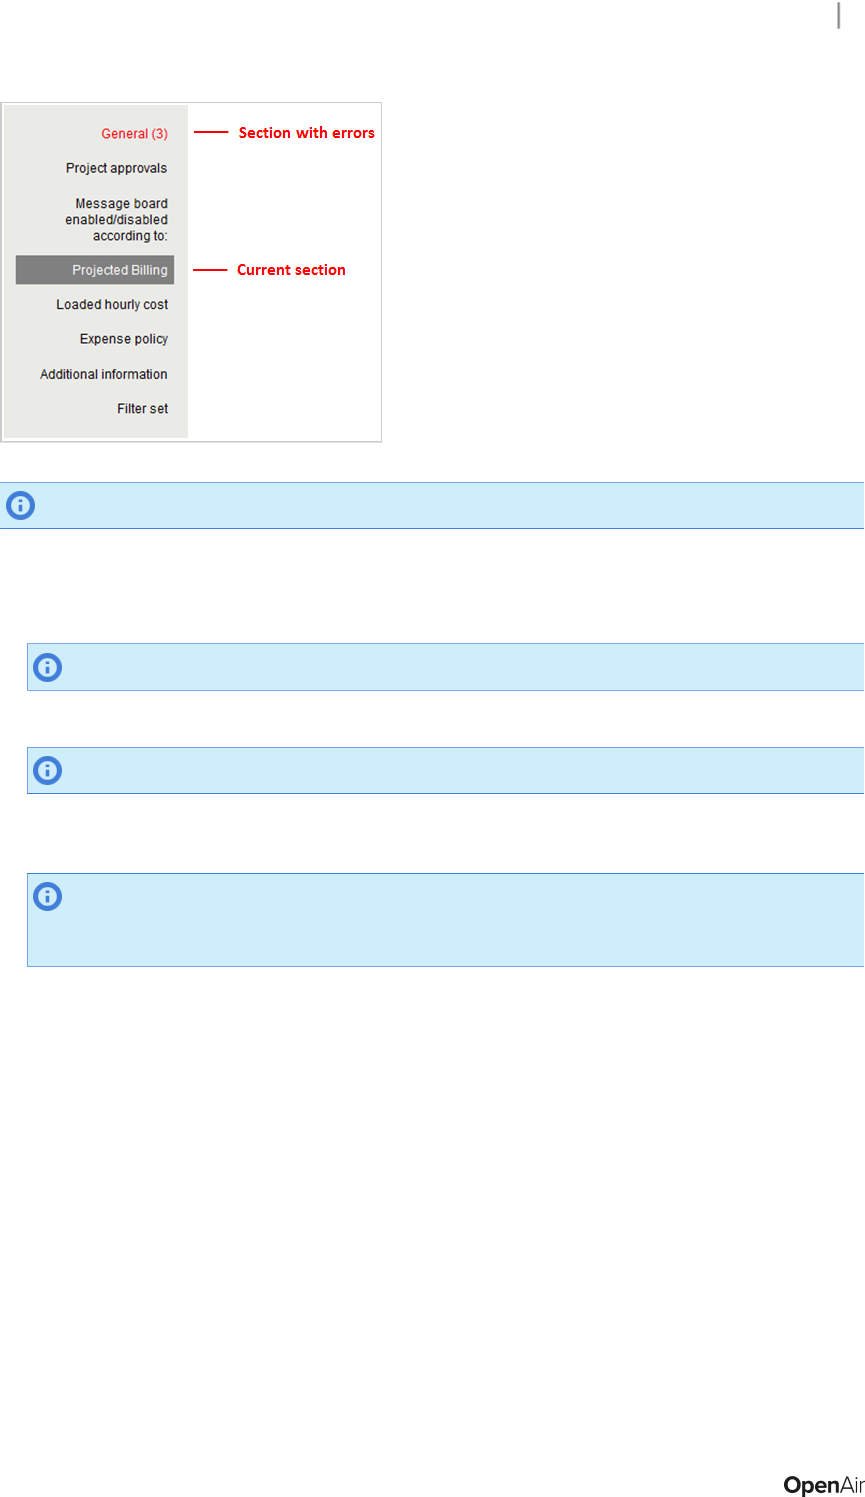
Records 80
Note: Form Navigation does not display if the form only includes a General section.
Form navigation features:
■
Section list — The bar displays the list of sections the form is divided into.
Note: Clicking on a section will take you directly to the relevant part of the form.
■
Section indicator — The section you are currently viewing is highlighted in gray.
Note: As you scroll through a form the Section indicator changes instantly.
■
Section errors — If you attempt to save an incomplete form red text is used to indicate sections with
errors together with a count of the number of errors.
Note: One missing field will be reported as more than one error if it breaks more than one
rule. For example, not selecting a customer can generate the ‘Required field' and ‘Please select
a customer' errors.
Form Signposting
Form signposting uses info tips and color highlighting to help you to keep your bearings when navigating
complex forms.
User Guide

Records 81
The orange box in the above screenshot shows an info tip. An info tip is displayed when you hover your
mouse over a control. This allows you to positively confirm the selection.
The blue boxes show the use of color to highlight the selections that have been made. This color coding
makes it easier for you to verify that the correct settings have been made.
Note: For this release, form signposting has only been applied to the ‘Modify the form
permissions’ screens.
On-Screen Error Messages
The Form Navigation control and on-screen error messages help to you quickly located and correct errors
messages.
User Guide

Records 82
If problems are encountered, the form will automatically take you to the first error. The Form Navigation
control shows you the number of errors in each section. The on-screen error messages explain how to
correct the errors.
In-Form Notifications
In-Form notifications provide clear feedback on user actions without the need for popup windows. They
are particularly valuable for correcting data input errors. Errors are reported in a list with clickable links
and instructions. Click on the links to be taken directly to the source of the error.
Note: For this release, in-form notifications are only available for the timesheet grid.
In-Form Popups
In-form popups have all the advantages of conventional popup windows, but appear as part of the form.
This allows you to block popup windows and still use all the OpenAir functionality.
User Guide

Records 83
The option is enabled from Personal Settings > Display Options.
Grids
Timesheet grid
Timesheet grid features:
User Guide

Records 84
■
Pin — Click the pin icon to fix the calendar display on the right. After you pin the calendar, You can
scroll vertically the information columns on the left without losing the calendar on the right.
■
Week browse — Click to view the Previous week or Next week.
■
Delete row — Click the Delete icon and confirm the deletion to remove a row from the grid.
■
Duplicate row — Click the Duplicate icon to add a duplicate immediately below.
■
New row — An empty row is always available at the bottom of the timesheet. When you start to fill out
the empty row, a new empty row is added automatically.
■
Time entry information — Click the Notes icon to add information for a time entry. A green color
Notes icon indicates that there is additional information for the time entry
■
Resizing timesheet columns — When this feature is enabled, drag the column edge to resize the
column. OpenAir remembers the column size.
Classic grid
Dynamic grid
User Guide

Working with the Project Center View 85
Working with the Project Center View
Note: The following optional features must be enabled to use the project center: Inline-Editing in
List Views and Project Center.
You must have the “View Project Center” role permission to access the project center.
Contact your account administrators to check whether these features are enabled in your OpenAir
configuration and to check your role permissions.
The Project Center optional feature aims to provide you with the tools to manage key project activities
from a single screen.
The Project Center lets you:
■
Create and modify your project plans — See Managing Project Plans in the Project Center.
■
Create and manage resource bookings from within the project center — See Managing Resource
Bookings in the Project Center.
■
Track hours worked in past periods and view the planned resource costs and time charges — Viewing
Hours, Time Costs, or Time Charges in the Project Center
Account administrators control who can access the project center by role permission.
Account administrators control project center options for all OpenAir account users, including whether
the project center show project sequence information only or project sequence information and resource
booking information. See the help topic Project Center Options.
To access the project center for a specific project, go to Projects > Projects > [Select a project] > Project
Center.
The project center view looks similar to a list view and supports several list view features including inline-
editing. A label above the column headers indicates whether the project center view is editable or read-
only, depending on the access control settings for the project you are viewing and your permissions. For
more information about inline-editing, see Inline-Editing in List Views.
Note: Depending on your role, you may not be able to edit all information in the project center
view even if the view itself is editable.
Form permissions and form rules are applied. Form scripts associated with the booking form will
be triggered when updating a booking record directly from the project center.
The project center includes the following components:
1 Toolbar — The project center toolbar includes the column selection and download tools available for list views
throughout OpenAir as well as functionality specific to the project center view. See Project Center Toolbar.
User Guide

Working with the Project Center View 86
2
Project outline — The project outline occupies only the left section of the canvas and shows your project
sequence and, depending on the project center options configured for your account, resources booked to your
project.
■
You can create and modify your project plans.
■
You can add phases, tasks and milestones to your project and modify the project sequence.
■
You can view, enter or update information about the phases, tasks and milestones in your project using inline-
editing.
■
You can set task and phase dependencies.
■
You can choose the columns shown in the project outline. The first time you visit the project center, the
project outline includes the following columns: Actions, Task, Start, Finish, Hours — Booked. Only the Actions
and Task columns are required, all others are optional. You can include columns corresponding to standard
and custom fields for task records (phases, tasks and milestones) and booking records. You can save the
configuration in the same way as for list views. See Selecting List View Columns and Saving and Using Custom
List View Configurations.
■
Add resource bookings at the task level or at the project level. You can change the resources booked directly
from the project center view. (Available only if project center options are set to show resource booking
information)
■
View, enter, or update resource booking information using inline-editing. (Available only if project center
options are set to show resource booking information)
■
Add built-in and custom fields for the booking entity as columns to the project outline.
Relationship lines show a clear overview of the project structure and relationships between phases, tasks,
bookings and milestones in the project. You can expand and collapse each node in the project tree to show or
hide all phases, tasks, bookings, and milestones nested under that node.
The project schedule information (calculated task, phase and project Start dates and Finish dates, and Planned
hours) is updated automatically when you make a relevant change in the project center. When the calculation is
in progress, information in the Start, Finish and Planned hours columns cannot be edited and loading spinners
are visible in the column headers. See Project Schedule Calculation in the Project Center.
3
Booking grid — The Project Center view shows a booking grid alongside the project outline. Depending on
the selected granularity, the booking grid shows a week-by week or month-by-month schedule. Each column
corresponds to a week or month and the column header shows the first day of the week or month. See Date
Navigation in the Project Center.The number of columns in the grid depends on the size of your browser window.
It is calculated automatically when you first load the screen or when you refresh it.
■
You can use the booking grid to enter the number of hours you want to book a resource for a given task (or
at the project level) in a given week or month. You can copy multiple cell values using the copy and paste or fill
handle functionality.
■
You can use the date navigation panel in the toolbar to change the period shown in the booking grid.
■
You can use the measure selector in the toolbar to switch between viewing hours, time costs or time charges
in the booking grid. See Viewing Hours, Time Costs, or Time Charges in the Project Center.
Horizontal bars in the booking grid give a visual representation of the duration of the project, each phase and
task based on the Start and Finish dates. Each bar is located at the top of the row and is color-coded: green
color for the project, dark gray color for each phase, light gray color for each task.
Availability indicators show the availability of the resource for each week as you make changes, and warning
indicators show out of schedule bookings and potential overutilization of resources.
User Guide

Working with the Project Center View 87
Important: Review the following guidelines:
■
The booking grid is available only if project center options are set to show resource booking
information – See the help topic Project Center Options.
■
By default, the calculated task, phase and project Start dates and Finish dates, Planned hours and
% Complete are calculated based on assignments and not on bookings. To base the calculation on
bookings instead of assignments for a project, see Basing Project Schedule Calculation on Bookings
for a Project.
■
The project center does not currently support booking approvals — You cannot submit bookings for
approval, approve or reject bookings using the project center.
User Guide

Lazy Loading 88
Note: The following list view functionality is not available in the project center:
■
Filtering and sorting options — The project center screen is designed to show the full project
outline and all resource bookings in the project sequence.
■
Rows per page — You can collapse and expand nodes in the project trees to show or hide
phase, task, booking and milestone rows nested under the node. This functionality would not
be supported with a limited number of rows per page.
■
Column lock — The project center uses a fixed column lock to separate the project outline and
the booking grid in the same view.
■
Bulk actions — Not currently supported.
Lazy Loading
The project center screen uses lazy loading, or loading “on demand” to load only the data you see on the
screen as you interact with the tool.
The project outline and the booking grid are loaded progressively. OpenAir loads only enough data to
fit the available canvas space when you go to the project center. It then loads data as you scroll, as you
expand or collapse nodes in your project tree, or as you change the period visible in the booking grid.
This ensures a smooth experience when viewing or editing large project structures with a high number of
bookings and achieves a good compromise between loading time and key project center functionality.
You can use the vertical scroll bar to go through all rows in the project center view even if the data is not
loaded. This lets you scroll through the data of larger projects faster.
You can start your project where you left off with remembered vertical scrolling position, which is
maintained when reloading the page or reopening a browser tab. This lets you go faster to any rows in
the project center view, when working on large and complex projects.
Note: The project center initially loads only the number of rows and columns that fit in your
browser window. If you increase or decrease the size of the browser window, reload the page for
optimum user experience.
Project Center Toolbar
The following table describes the main components of the project center toolbar.
1 Actuals — Toggle the Actuals switch ON to view hours or time cost spent on the project thus far, or time
charges already generated for billing. Toggle the switch OFF to view planned time, planned time cost, or time
charge projections across the project lifespan. The Actuals switch works together with measure selector. For
information about the values shown in the booking grid depending on both settings, see Viewing Hours, Time
Costs, or Time Charges in the Project Center.
This functionality is available only if project center options are set to show resource booking information – See
the help topic Project Center Options.
2 Measure selector — Select what values are shown in the booking grid. Depending on your account
configuration and role permissions, you can view hours, primary, secondary and tertiary loaded costs, and time
charges. See Viewing Hours, Time Costs, or Time Charges in the Project Center.
User Guide

Project Center Toolbar 89
This functionality is available only if project center options are set to show resource booking information – See
the help topic Project Center Options.
3 Navigation Panel — Control the period shown in the booking grid, use the navigation panel in the project center
toolbar. See Date Navigation in the Project Center.
This functionality is available only if project center options are set to show resource booking information – See
the help topic Project Center Options.
4 Booking Grid Granularity — Switch between weekly and monthly granularity in the booking grid and view a
week-by week or month-by-month schedule, use the date navigation panel in the project center toolbar. See Date
Navigation in the Project Center.
This functionality is available only if project center options are set to show resource booking information – See
the help topic Project Center Options.
5 Column Options— Select the columns you want to include in the booking grid and specify the column order, use
the column options in the project center toolbar. See Project Center Column Options.
6 List configuration — Save and use list view configurations in the project center view in the same way as in list
views. The list view configuration saves the selected columns and column order in the project outline part of the
page (on the left).See Saving and Using Custom List View Configurations.
7 Save and Discard — Hours you add or update in the booking grid are not saved automatically. You need to save
or discard any changes you make in the booking grid using the buttons in the toolbar.
This functionality is available only if project center options are set to show resource booking information – See
the help topic Project Center Options.
8 Download — Download your list view data in the project center toolbar. See Download Your List View Data.
9 List options — Control the information displayed in the booking grid, use the list options in the project center
toolbar. See Project Center Display Options.
Viewing Hours, Time Costs, or Time Charges in the Project
Center
Note: This functionality is available only if project center options are set to show resource
booking information – See the help topic Project Center Options.
Depending on your account configuration and role permissions, you can view hours, time costs based
on the primary, secondary and tertiary loaded cost rates for each resource, and time charges. Select the
information you want to view from the measure selector in the toolbar.
User Guide

Project Center Toolbar 90
The time cost information is calculated based on current and historical loaded cost rates for each
resource, including any overrides at the project or task level. If your company uses different loaded cost
levels, you can view time cost information based on primary, secondary or tertiary loaded cost rates.
The following table describes the values that are shown depending on the measure selected and on the
Actuals switch.
Measure selected Actuals OFF Actuals ON
Hours Hours booked
■
For past weeks or months: [Read-only] Hours worked
sourced from logged time entries against each task or
against the project in open, submitted, approved and
archived timesheets.
■
For the current and future weeks or months: Hours
booked.
See Hours Worked in Past Weeks or Months (Actuals).
Loaded costs
(primary, secondary,
or tertiary)
[Read-only] Hours booked
× Resource loaded cost
(primary, secondary, or
tertiary)
[Read-only]
■
For past weeks or months: Hours worked × Resource
loaded cost (primary, secondary, or tertiary). Hours worked
are sourced from logged time entries against each task
or against the project in open, submitted, approved and
archived timesheets.
■
For the current and future weeks or months: Hours booked
× Resource loaded cost (primary, secondary, or tertiary).
Charges [Read-only] Time charge
projections (based on time
billing rules)
[Read-only]
■
For past weeks or months: Time charges
■
For the current and future weeks or months: Time charge
projections (based on time billing rules)
Note: Monetary values are shown in the currency set for the project. Actions for booking rows
in the Actions column are not available when viewing loaded costs or charges. Only users who can
view loaded cost information can view cost information in the project center.
Hours Worked in Past Weeks or Months (Actuals)
You can view hours worked in past weeks or months, and assess project performance against your plan
without leaving the project center view.
You can use this functionality to compare hours logged so far against tasks, phases, or the entire project,
with hours booked and adjust your plan accordingly between now and project completion.
User Guide

Project Center Toolbar 91
To view hours worked or hours booked in the columns for past weeks or months, toggle the Actuals
button in the toolbar.
■
If the Actuals switch is ON, the project center shows:
□
Hours worked instead of hours booked in the booking grid columns for past weeks or months:
▬
Hours worked values are sourced from logged time entries against each task or against the
project in open, submitted, approved and archived timesheets.
▬
Hours worked values cannot be modified.
▬
The column header background color and the values for past weeks or months are dimmed.
▬
If a resource is not booked to a task in the project but has logged time entries against this
task, the project center shows a row for the resource with hours worked. The row has a red
background color and an unbooked resource icon next to the resource name.
▬
Hours booked in the booking grid columns for the current and future weeks or months.
▬
Calculated values for each task, for each phase, and for the entire project under the Hours –
ETC and Hours – EAC in the project outline (left side of the project center view).
■
If the Actuals switch is OFF, the booking grid shows hours booked for past, current, and future weeks
or months.
Date Navigation in the Project Center
Note: This functionality is available only if project center options are set to show resource
booking information – See the help topic Project Center Options.
The Project Center view shows a booking grid alongside the project outline. Each column corresponds to
a week or a month, and the column header shows the first day of the week or month, depending on the
chosen granularity.
■
Click the week icon or month icon to switch between weekly and monthly granularity in the
booking grid. Depending on the selected granularity, the booking grid shows a week-by week or
month-by-month schedule.
Review the following guidelines:
User Guide

Project Center Toolbar 92
□
When adding or changing hours in a booking grid cell, OpenAir creates a separate booking record
for this booking grid cell. In a week-by-week schedule, bookings are created for each week. In a
month-by-month schedule, bookings are created for each month.
□
Switching between weekly and monthly granularity without adding or changing hours does not
change the bookings.
▬
Hours added in a month-by-month schedule are shown as distributed proportionally across all
the full weeks and part weeks in that month when you switch to weekly granularity.
▬
Hours added in a week-by-week schedule are summarized when you switch to monthly
granularity. Hours for overlapping weeks (weeks overlapping across two consecutive months)
are shown as distributed proportionally across both months.
□
When changing hours for a booking spanning several booking grid cells (several weeks or months),
OpenAir creates separate bookings for the cell you modified, the range of cells from the original
booking immediately to the left of the cell you modified, and the range of cells from the original
booking immediately to the right of the cell you modified.
□
You should use the same granularity when adding and modifying booking hours for the same
project. Adding hours in one granularity and modifying these hours in the other granularity may
lead to unintended decimals and cell value overrides in you project schedules.
■
The number of visible columns in the grid depends on the size of your browser window. It is calculated
automatically when you first load the screen or when you refresh it.
■
You can use the horizontal scroll bar to move through the project timeline. The default scroll range
covers the period between the earliest booking start date and the latest booking end date across the
project.
■
You can use the date navigation panel in the toolbar to change the visible columns in the booking grid.
□
Click the previous icon or next icon to move the visible period backward or forward by the
number of visible columns. You can also do this when you reach either end of the scroll range to
extend the scroll range and reach dates previously outside the scroll range.
□
Click the date in the center of the date navigation panel to select the starting date of the visible
period. The column containing the date you select then becomes the first visible column on the left.
Selecting a date outside the scroll range shifts the scroll range but does not extend it.
Project Center Column Options
You can add columns containing task and booking information in the project outline.
Click the Columns icon in the list view panel or press on your keyboard to display the List view
columns fly out panel. Select the columns you want to include and specify the column order. Click Apply
to validate your changes and return to your list view. Any column preferences applied to a list view
continue to apply the next time you navigate to the same list view until you change them or switch to a
different list view configuration. See also Selecting List View Columns and Saving and Using Custom List
View Configurations.
Some columns contain information both for the nodes in the project structure (project, phases, tasks and
milestones) and for the bookings:
■
The Start and Finish columns in the project outline show the start and finish dates for the booking
row. For grouped booking rows, the Start column shows the earliest booking start date in the group
and the Finish column shows the latest booking finish date in the group.
User Guide

Project Center Toolbar 93
■
The Hours — Booked column shows the total hours booked for each row. For grouped booking
rows, the Hours - Booked column shows the total hours booked across all bookings in the group. The
column also shows the total hours booked for each task, phase, and for the entire project. The value is
updated automatically when you save changes in the booking grid.
Note: The Show Booked Hours on Lists feature must be enabled for your account to show
the total hours booked at the project level.
There may be rounding discrepancies between the value shown in the Hours - Booked column
and the sum of values shown in the booking grid.
■
The Hours – ETC — The Estimate to Complete (ETC) column shows hours for each task, for each
phase, and for the entire project. It is the total number of hours booked to the task, to all tasks in the
phase, or to all tasks in the project and to the project, from the current week or month to the end of
the project inclusive.
■
The Hours – EAC — The Estimate at Completion (EAC) column shows hours for each task, for each
phase, and for the entire project. It is the sum of the ETC and the total number of hours worked to
the task, to all tasks in the phase, or to all tasks in the project and to the project, for all past weeks or
months since the project start.
Note: The Hours – ETC and Hours – EAC values are calculated only when the Actuals switch
is ON. See Hours Worked in Past Weeks or Months (Actuals).
■
The Notes column in the project outline shows the notes for phases, tasks, milestones, booking. You
can view or edit notes for phases, tasks, milestones, bookings and view notes for the project in the
same column.
Note: Review the following guidelines:
□
Notes are read-only for projects. If the notes field in a grouped booking row are empty,
there are already notes for this row or the field is empty.
□
Changing the notes cell for a grouped booking row, overwrites the notes for every booking
in the row.
□
If the notes cell for a grouped booking row is empty then either there are different notes for
different bookings in the row, or the notes field is empty for all booking in the row.
■
The Non-billable task column is editable for task and milestones.
Project Center Display Options
Note: All display option except QuickViews are available only if project center options are set to
show resource booking information – See the help topic Project Center Options.
You can use the list options to control the information displayed in the booking grid. The following display
options are available:
■
Group booking rows — Show bookings for the same resource, on the same task, and with the same
booking type and job code on a single row or on separate rows. See Group Booking Rows.
■
Freeze Task Column — Keep the Task column always visible when you scroll horizontally in the project
outline. See Freeze Task Column.
User Guide

Project Center Toolbar 94
■
QuickViews — Pause or reinstate them in the context of the project center view. See QuickViews.
■
Show availability — Show or hide resource availability indicators — When shown, resource availability
indicators are visible for the entire booking row when you select a cell. See Resource Availability
Indicators.
■
Warning Indicators — Show or hide warning indicators for off-schedule bookings (bookings before or
after the task date range) and potentially overbooked resources (booked hours making up 100% or
more of working hours for the resource in a given week). See Booking Warning Indicators.
■
Booking grid totals — Show or hide total hours booked against each task, each phase, or the entire
project. See Booking Grid Totals.
Group Booking Rows
Bookings are nested under a task or at the project level. You can choose how bookings are displayed on
the project center view. To change this display option, click the More icon in the toolbar, then toggle
the Group Booking Rows switch under List options.
■
If the Group Booking Rows switch is ON, bookings for the same resource, on the same task (or at the
project level), and with the same booking type and job code, are grouped on a single row.
■
If the Group Booking Rows switch is OFF, each booking appears on a different row even if all booking
information is the same.
User Guide

Project Center Toolbar 95
Note: When you add or edit a booking covering multiple weeks using the project center, a
different booking is created for each week the resource is booked. If you create a booking outside
of the project center covering multiple weeks, this booking always shows on a single line. If you
modify the hours for this booking in the project center, there will be a different row for each week
the resource is booked when the grouped display option is OFF.
Freeze Task Column
You can keep the Task column visible while you scroll horizontally in the project outline. This can be
helpful as you the name of a phase, task, milestone and resource are visible while updating.
The Freeze Task column list option is enabled by default. To change this display option, click the More
icon in the toolbar, then toggle the Freeze Task column switch OFF.
QuickViews
QuickView for the record appears when you point to the name of the project, phase, task, milestone, or
resource listed in the project center view. If QuickViews are enabled for your account and in your user
settings, you can pause or reinstate them in the context of the project center view.
To change this display option, click the More icon in the toolbar, then toggle the Quick views switch
OFF and QuickViews are paused and do not appear.
Resource Availability Indicators
Resource availability indicators show the availability of the booked resource for each week as you make
changes. This can be helpful to avoid overutilization.
Note: Resource availability indicators show only when the booking grid shows Hours. See
Viewing Hours, Time Costs, or Time Charges in the Project Center.
To change this display option, click the More icon in the toolbar, then toggle the Show Availability
switch under Resource availability.
If the Show Availability switch is ON:
When you click a cell in the booking grid, all cells in the booking row show a visual indication of the
resource’s availability that week. The availability indicator shows the number of hours available for
booking and a horizontal progress bar representing the proportion of the resource’s working hours that
are already booked that week. It is updated automatically as you make changes.
User Guide

Project Center Toolbar 96
When you edit a cell value, the cell shows the availability indicator until you save your changes. This also
serves as a visual reminder of the cells you updated since you last saved changes.
■
The number of hours available is calculated as the employee’s working hours less the hours the
employee is booked for in that week.
Hours Available = Working Hours – Booked Hours, where:
□
Working Hours are based on the employee work schedule with any schedule exceptions and
approved time off work deducted.
□
Booked Hours is the sum of hours across all relevant bookings for that resource and that week.
Bookings included in the calculation depend on your account configuration.
Note: Account administrators can configure which bookings are excluded from the
available hours and booked hours calculation based on the Booking type and Approval
status. All booking types and all approval statuses except “Rejected” are included by default.
For more information, see Administrator Guide.
Example:
If the resource works 40 hours in the week according to the work schedule, has 16.06 hours booked to
other tasks this week, the resource has 23.94 available hours. If you book the resource for 6 hours to
this task this week (1), the resource now has 17.94 available hours (2).
■
The progress bar is color-coded. The color code depends on your account configuration.
Note: By default, the following color code is used:
□
Gray color — No booked hours in that week.
□
Green color — Booked hours make up less than 75% of working hours in that week.
□
Orange color — Booked hours make up between 75% (included) and 100% (excluded) of
working hours in that week.
□
Red color — Booked hours make up 100% or more of working hours in that week. The
available hours also appears
Account administrators can customize the color code to suit the business requirements of
your company by defining utilization ranges and selecting a color for each utilization range. For
more information, see Administrator Guide.
Booking Warning Indicators
Booking warning indicators show potential overutilization of resources in each week and out of schedule
bookings.
User Guide

Project Center Toolbar 97
Note: Booking warning indicators show only when the booking grid shows Hours. See Viewing
Hours, Time Costs, or Time Charges in the Project Center.
■
Overbooked resources — Booked hours greater than or equal to a certain percentage of working
hours. The resource availability indicator always shows in the cell if this percentage or more of the
resource time is booked for the resource that week. The percentage of working hours (or utilization
threshold) depends on your account configuration.
Note: Account administrators can set the utilization threshold for your OpenAir account. For
more information, see Administrator Guide.
■
Off-schedule bookings — The cell is highlighted with a red color outline and the hours show in red
color if the booking is before the scheduled start time or after the scheduled end date for the task or
project.
You can control each type of warning indicators using the list options. To change these display options,
click the More icon in the toolbar, then toggle the Overbooked resources or Off-schedule bookings
switch under Warning indicators.
Booking Grid Totals
Booking grid totals show the total number of hours booked against each task, each phase and the entire
project in the booking grid to get an overview of the planned effort.
■
Project level totals — The booking grid is showing the total number of hours booked against the
project and against all tasks across the entire project for each week or month.
■
Phase/task-level totals — The booking grid is showing the following:
□
The total number of hours booked against each task for each week or month.
□
For each phase, the total number of hours booked against all tasks across the phase for each week
or month.
Note: The totals shown in the booking grid are updated immediately after you add or change
booking hours in the booking grid. Click Save in the toolbar to update the totals shown under the
Hours Planned and Hours Booked columns in the project outline (left side of the project center
view).
Managing Project Plans in the Project Center
You can create and modify your project plans directly in the project center.
1
Add new phases, tasks and milestones to your project plan without having to open a form. Click the Add New icon
in the Actions column next to a phase or a next to the project root to insert a new entry. The new entry will be
nested immediately under the phase or the project root.
2
Use inline-editing to enter or update the phase, task or milestone information. See Inline-Editing in List Views.
User Guide

Managing Project Plans in the Project Center 98
You can distinguish set start and end dates from calculated dates. The fixed date icon indicates a set start and
end date for a task or milestone. You can modify set start and end dates using inline editing in the project center,
if your role permissions allow it, but you cannot modify calculated dates. However, you can change calculated
dates to set dates and conversely.
To change a calculated start or end date to a set date, double-click the start or end date cell, clear the Calculated
date box, then select the date. Conversely, to change a set start or end date to a calculated date, double-click the
start or end date cell, then check the Calculated date box.
Click a different row or press Enter to save the changes. A message appears confirming the record was saved.
Note: Form permissions and form rules are respected. Form scripts associated with the project phase,
task or milestone form will be triggered when updating a record directly from the project center outline
view.
Access control at the project level is also supported. For example, if the project can only be edited by
the project owner or authorized users, the project center view is read-only for all other users unless the
Allow employees with appropriate permissions to add project based items when they do not have
permission to modify the project optional feature is enabled for your account and the user can edit
project tasks. A label above the column headers indicates whether the project center is editable or read-
only, depending on the access control settings for the project you are viewing and your permissions.
3
To change the sequence of your project, point to the row corresponding to the phase, task or milestone you want
to move, then drag it to the required position. The mouse pointer changes to a closed hand cursor when you
hold the mouse down.
When you drag the selected entry:
User Guide

Managing Project Plans in the Project Center 99
■
(a) Point in between the rows. Notice a green line and an arrow appear in between the rows. Notice also the
direction of the arrow.
□
If you point closer to the row above, the arrow starts in the row above . Release the mouse to insert
the selected entry after the row above.
□
If you point closer to the row below , the arrow starts in the row below . Release the mouse to insert
the selected entry before the row below.
Note: Inserting the selected entry after/before another entry is relevant when the nesting level
of the two entries is different. For example, when inserting a task between a task nested under a
phase and a milestone at the same level as the phase above, the inserted task will either be nested
under the phase if inserted after the task above, or at the same level as the phase and the milestone if
inserted before the milestone below.
■
(b) Point to a phase row and release the mouse to insert the selected entry into that phase. Notice the
background color of the entire row turns green as you point to a phase row.
■
(c) Point to a task or milestone row. Notice the background color of the entire row turns gray as you point
to a task or milestone row, indicating this is not a valid operation. If you release the mouse, the operation is
cancelled and the sequence of your project is not changed.
4
Click the Edit icon in the Actions column to open the phase, task, or milestone property form.
Click the More icon in the Actions column and select Delete to delete an entry. Any entries nested under the
deleted entry will move up one level. For example, if you delete one of the main phases nested under the project
root, all the sub-phases, tasks and milestones that were nested under that deleted phase will now be nested
under the project root. A message appears confirming the record was deleted successfully.
5
The project center lets you view and set dependencies between predecessor and successor phases or tasks.
■
You can add the Predecessors column to the project outline section of the view.
■
You can set predecessor tasks or phases for any task and phase in your project sequence. The functionality is
similar to setting predecessors from the task entity form or the project outline, Gantt and task detail view. You
set the relationship on the successor task or phase and select multiple tasks or phases that control the start
or finish date of this task or phase (predecessors).
Click the More icon in the Actions column and select Edit predecessors or click the cell in the Predecessors
column to edit the predecessor settings for a task. The Predecessor settings popup window appears and shows
any predecessors already set and a blank line, you can use to add a task or phase dependency.
1.
Select the name of the Predecessor task or phase. This is a task or phase that controls the start or finish
date of the task or phase you a re currently editing.
2.
Select the Type of the relationship. The following options are available.
■
Finish-to-Start — The finish date of the predecessor task or phase controls the start date of the
successor task.
■
Start-to-Start — The start date of the predecessor task or phase controls the start date of the
successor task.
■
Finish-to-Finish — The finish date of the predecessor task or phase controls the finish date of the
successor task.
■
Start-to-Finish — The start date of the predecessor task or phase controls the finish date of the
successor task.
3.
Enter the number of Lag days. This is the number of days you want to allow between the start or finish
date of the successor task and the start or finish date of the predecessor. For example, If you define a
Start-to Finish with 60 Lag days, the finish date of the successor task or phase should be 60 days after the
start date of the predecessor task or phase.
4.
After you set the Predecessor, Type, and Lag days, a new blank line appears.
5.
To remove a dependency, click the delete icon
6.
Click Save to save your changes to the predecessor settings, or Cancel to discard your changes.
The popup window closes and a confirmation message appears if you made any changes.
User Guide

Managing Project Plans in the Project Center 100
User Guide
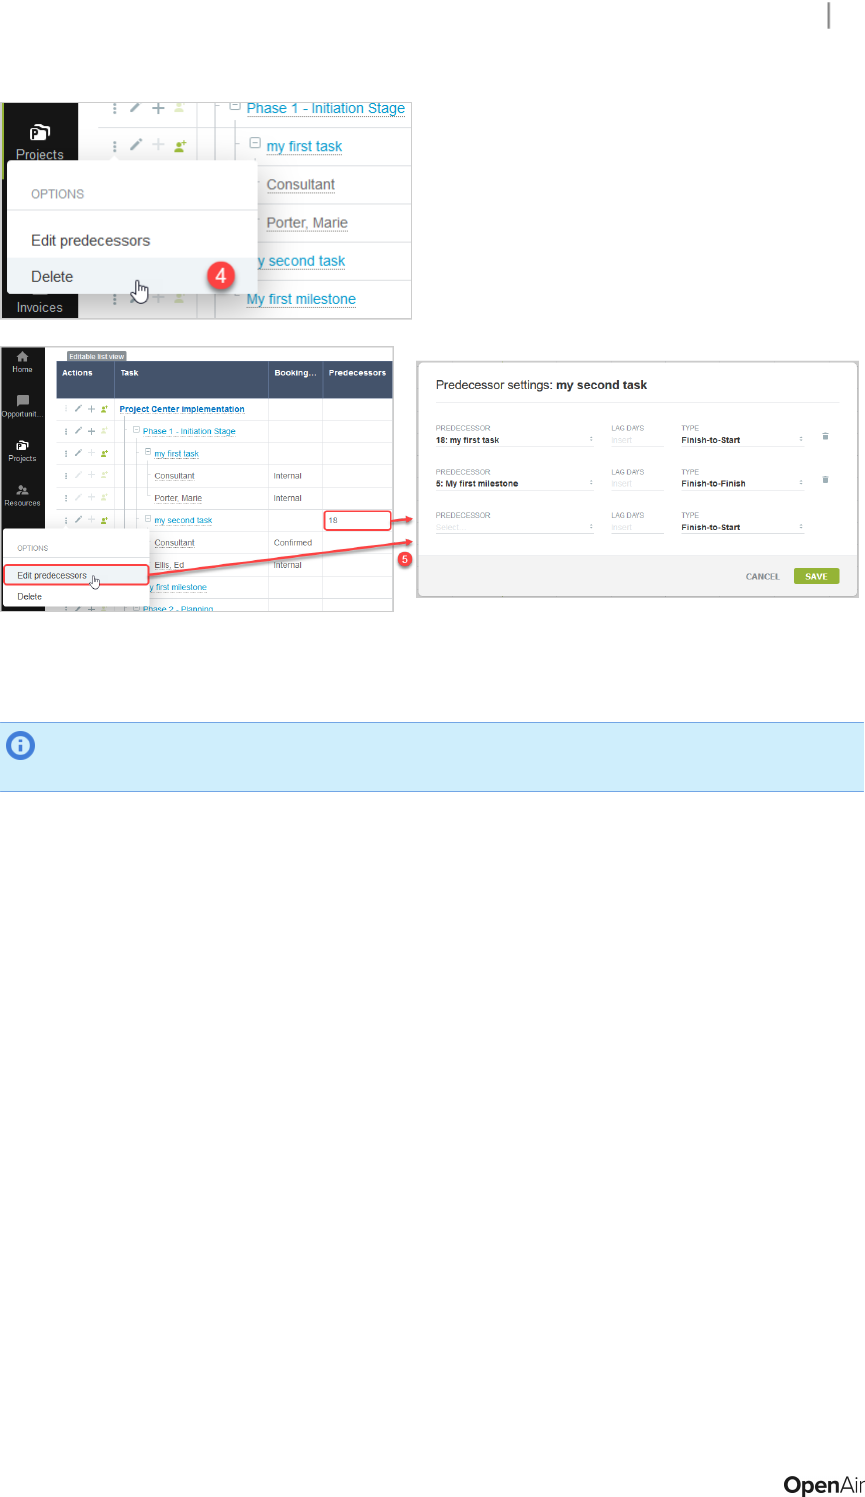
Managing Project Plans in the Project Center 101
Managing Resource Bookings in the Project Center
Note: This functionality is available only if project center options are set to show resource
booking information – See the help topic Project Center Options.
You can view, create and manage resource bookings from the project center.
■
For information about using the toolbar and managing columns, see Project Center Toolbar.
■
For information about other display options, see Project Center Display Options.
■
For information about adding bookings, see Adding Resource Bookings to Your Project Plan.
■
For information about modifying bookings, see Modifying Resource Bookings in the Project Center.
■
For information about adding multiple bookings and distributing hours across adjacent cells on the
same booking row, see Creating a Booking and Distributing Hours Over a Multiple Week Period.
■
For information about copying or cutting values from the booking grid to the clipboard and pasting
values from the clipboard to the booking grid, see Copying, Cutting and Pasting Booking Row Cells.
■
For information about copying values into adjacent cells, see Copying Booking Row Cells Using the Fill
Handle.
■
For information about copying bookings along with other project information when creating a new
project from an existing project, see Copying Bookings with Projects.
■
For information about deleting booing rows, see Deleting a Booking Row in the Project Center.
General Guidelines
Review the following guidelines:
■
Form permissions and form rules are applied. Form scripts associated with the booking form will be
triggered when updating a booking record directly from the project center.
User Guide

Managing Resource Bookings in the Project Center 102
■
The project center does not currently support the ability to open the properties form for a booking
record directly from the project center view.
Tip: If the Quickviews for Projects, Tasks and Employees optional features are enabled for
your account, point to the name of the project, task or employee, press Shift and click All
bookings to view a list view of all bookings for this project, task or employee in a new browser
tab.
■
A label above the project center column headers indicates whether the project center is editable
or read-only, depending on the access control settings for the project you are viewing and your
permissions. Bookings cannot be added, deleted or updated if the project center view is read-only.
Note: If the project can only be edited by the project owner or authorized users, the project
center view is read-only for all other users unless the Allow employees with appropriate
permissions to add project based items when they do not have permission to modify the
project optional feature is enabled for your account and the user can edit project tasks.
■
Inline-editing for bookings in the project outline works the same way as for phases, tasks, and
milestones.
■
You can use inline-editing to edit the information shown in the project outline columns for a grouped
booking row.
□
If you change any information in the grouped booking row, the information will be changed for all
bookings in the group.
If any of the grouped bookings have some unique information other than Project, Task, Customer,
Employee, Job code, or Booking type, and if the relevant column is included in the project outline,
the corresponding cell shows empty.
□
Form scripts associated with the booking form are triggered for each booking record in the group.
This may have a performance impact on the project center, depending on the number of bookings
in the group and on how resource demanding the scripts are.
□
If one of the bookings in the group is not editable, the grouped booking row is not editable.
■
You can change the selected resource to another named or generic resource for all bookings in a
grouped booking row using the Change Resource icon . The booked resource will be changed for
all bookings in the group.
■
Modifying a cell in the booking grid is equivalent to deleting the resource booking for that resource
and for that week, and creating a new resource booking to replace it. Instead of updating the existing
booking, OpenAir marks the existing booking as deleted and creates a new booking with the new
hours. Tale this into consideration if you use the entrance function type parameter in form scripts to
differentiate between newly created bookings and updated bookings. For more information about
entrance function type parameters and OpenAir user scripting, see User Scripting.
Adding Resource Bookings to Your Project Plan
Note: This functionality is available only if project center options are set to show resource
booking information – See the help topic Project Center Options.
You can only add resources when viewing Hours in the booking grid and when the Actuals switch
is toggled OFF. See Viewing Hours, Time Costs, or Time Charges in the Project Center.
You can add resource bookings to your tasks and project without having to open a form.
To add resource bookings to your project plan:
User Guide

Managing Resource Bookings in the Project Center 103
1.
In the project center view, click the Add booking icon in the Actions column next to a task or
next to the project root to add a new resource booking. The new booking row will be nested
immediately under the task or the project root.
2.
Type a few characters in the search box to refine the list of resources, if required, and select a
resource from the list of options.
Note: You can change the selected resource to another named or generic resource for all
bookings in the row at any time. To do so, click the Change Resource icon and select a
new resource.
3.
Use inline-editing to enter information for all required fields and any additional information for
your booking in the relevant project outline columns.
4.
Double click the cell on the booking row corresponding to the week you want to book the resource
for, and type the number of hours you want to book the resource for in that week. Repeat for each
week you want to book the resource for the task.
Tip: Use Tab and Shift + Tab, or the right and left arrow keys to move to the next cell to
the right or to the left of the cell you are currently editing. If the next cell is outside the
horizontal scroll range, moving to that cell extends the scroll range by the number of visible
columns.
You can use the Add multiple bookings action to fill multiple cells on the booking row covering a
continuous period. See Creating a Booking and Distributing Hours Over a Multiple Week Period.
You can copy or cut values from the booking grid to the clipboard and paste values from the
clipboard to the booking grid. See Copying, Cutting and Pasting Booking Row Cells.
You can copy a value into adjacent cells on the same booking row by dragging the fill handle to the
left or right. See Copying Booking Row Cells Using the Fill Handle.
5.
Click Save. A message appears confirming the bookings were created successfully. Booking cells
with errors preventing the save operation are outlined with a black border. Point to the outlined
booking cell to show a tooltip describing the error.
You can also click Discard to cancel all changes made in the booking grid after you last saved it.
General Guidelines
The following guidelines apply when adding bookings in the project center view:
■
A separate booking record is created for each booking grid cell containing hours. This enables you to
distribute hours flexibly over multiple weeks and to include gaps if required.
User Guide

Managing Resource Bookings in the Project Center 104
■
If you want to create a booking over a specified period with hours distributed evenly across all weeks
in the booking period, you can:
□
Create a single booking using the Create button. The booking will show as a single row in the
project center even when the Grouped display option is off. If you edit any hours in the booking
grid, separate booking records will be created for each week in the period.
□
Create multiple contiguous bookings in the Project Center using the Add multiple bookings
action. See Creating a Booking and Distributing Hours Over a Multiple Week Period.
■
If you add a new booking row, you must enter some hours for that booking before you can save it.
■
You can add multiple booking rows before you add hours in the booking grid. However, you must add
hours to all the booking rows before you can save your bookings. Note the Save button in the toolbar
is disabled and shows in gray color if there are no hours in a booking row.
■
Use inline-editing to enter additional information for your booking in the relevant project outline
columns.
■
You can create project templates complete with bookings then copy all bookings from your templates
across to the new projects you create from these templates. Remember to choose the dates
judiciously for your project and booking templates so they do not impact utilization or other reporting
metrics. See Copying Bookings with Projects
Searching for Resources in the Project Center
You can use the resource search functionality to search for resources matching your profile, job code
and availability criteria, and review other projects these resources are booked to directly from the project
center to find the best staffing fit for your projects.
You can use the resource search to add a new resource on a project or task level and to replace a
resource on a booking row.
In the project center view, locate the row for the task you want to add a resource to (or the root row for
the project if you want to add a resource at the project level), or locate the booking row for which you
want to replace the resource. Click the search icon to open the resource search panel.
1 Title
The resource search title includes:
■
The name of the project, task or booking.
■
The project, task, or booking timespan, as defined by:
□
The start and end dates for the project or task you are adding a resource to.
□
The start date of the first booking and end date of the last booking in the row, if you are replacing the
resource on a booking row. In this case, the subtitle also shows the number of requested hours.
■
The number of requested hours (only when replacing a resource).
2 Filter conditions
Resource search results include all generic and named resources. You can add filter conditions to refine your
search and show the resources matching your criteria. See Resource Search Criteria.
3 Name and summary information
The left pane lists the generic and named resources you have access to that match your search criteria in
alphabetical order and their job codes.
When replacing a resource it shows the total number of hours available for each resource across the search
timespan and the availability match. The first row shows the resource who is currently booked and the number of
hours this resource is booked for across the booking timespan. The first row stays visible when you scroll down
the list of resources matching your search.
User Guide

Managing Resource Bookings in the Project Center 105
4 Resource availability grid
The grid shows the available hours for each resource in the search results. It has the same granularity (weekly or
monthly) as the booking grid on the main project center page. It shows up to 100 weeks or months from the start
of the project, task, or booking start and date.
5 Other bookings
You can view other projects each resource is booked to during the search timespan. The list of other projects the
resource is booked to shows on gray color background. For each project, the other bookings list shows the name
and project owner and the number of hours the resource is booked across the search timespan and for each
week or month in the grid.
The other bookings list shows only the projects you have access to.
6 Actions
From the Actions column, you can
■
Click the check mark to add a booking row for this resource, or change the booked resource to this resource.
A check mark with a green color background shows the booking row you have added or the resource you
selected to replace the currently booked resource. Click the check mark again to remove the booking row or
undo the resource replacement.
■
Click the more options icon then Show bookings to show other projects the resource is booked to during
the search timespan.
Adding booking rows using the resource search
You can add booking rows on a project or task using the advanced resource search.
To add booking rows for resources using the advanced resource search:
1.
In the project center view, locate a resource next to a project or task row.
2.
Click the search icon .
The advanced resource search screen appears.
3.
Start typing a few characters of the filter names in the search bar or click the add icon to add a
new filter condition and show the available matching attributes.
User Guide

Managing Resource Bookings in the Project Center 106
Enter a resource profile or skill name, Name or Job code. A list of matching available field names
appears and is updated as you type, with exact and closest match at the top of the list. Select the
relevant field.
4.
The resource results in the name and information pane shows active generic and named resources
sorted in alphabetical order. When replacing an existing resource it also shows the total number of
hours available for this resource across the period.
5.
Select one resource or multiple resources to add to your project plan.
Each resource adds booking rows to your project plan.
6.
Click the add booking row icon .
7.
Click the close icon to return to the project center view.
8.
Check the availability and modify the hours in the booking grid.
9.
Click Save to save the changes or discard to cancel the changes.
Replacing a resource on a booking row using the resource
search
You can replace booking rows on a resource using the advanced resource search.
To replace a resource on a booking row using the advanced resource search:
1.
In the project center view, locate the resource next to a booking row.
2.
Click the search icon .
The advanced resource search screen appears. The first row in the list of matching resources
shows the resource who is currently booked and the number of hours this resource is booked for
across the booking timespan. The first row stays visible when you scroll down the list.
3.
Start typing a few characters of the filter names in the resource search bar or click the add icon
to add a new filter condition and show the available matching attributes. Enter a resource profile or
skill name, Name or Job code. A list of matching available field names appears and is updated as
you type, with exact and closest match at the top of the list. Select the relevant field.
4.
The resource results in the name and information pane shows active generic and named resources
sorted in alphabetical order and the total number of hours available for this resource across the
period.
5.
Select the resource to replace.
Note: Multiple resource selection is not available when you are replacing a resource.
6.
Click change resource icon .
7.
Click the close icon to return to the project center view.
8.
Click Save to save the changes.
Resource Search Criteria
You can define filter conditions to find the resources that match your criteria. To add a filter condition:
1.
Click the add icon to add a new filter condition and show the available matching attributes.
2.
Enter a resource profile, skill name, or field name (Name or Job code). A list of matching available
field names appears and is updated as you type, with exact and closest match at the top of the list.
Select the relevant field.
User Guide

Managing Resource Bookings in the Project Center 107
3.
Select a comparison operator.
4.
Select one or more values, or a range from predefined dropdown options, or enter a custom
value, depending on the field type and comparison operator.
Each filter condition shows the operand and comparison operator in a simple sentence structure. If
multiple values are selected for the second operand, the filter conditions shows a number indicating the
number of values selected instead of the value. Click a filter condition to modify it, or click the clear icon to
remove a filter condition.
Note: By default, all users with the View project center role permission can use the resource
search. Account administrators can restrict access to the resource search functionality for certain
role using the Hide advanced resource search in project center role permission.
Modifying Resource Bookings in the Project Center
Note: This functionality is available only if project center options are set to show resource
booking information – See the help topic Project Center Options.
You can modify resource bookings and resourced booked when viewing Hours in the booking grid
and when the Actuals switch is toggled OFF.. See Viewing Hours, Time Costs, or Time Charges in
the Project Center.
You can modify resource bookings using inline-editing in the booking grid and change the resource
booked for all the bookings on a booking row.
Important: Modifying a cell in the booking grid is equivalent to deleting the resource booking
for that resource and for that week, and creating a new resource booking to replace it. Instead
of updating the existing booking, OpenAir marks the existing booking as deleted and creates a
new booking with the new hours. Tale this into consideration if you use the entrance function type
parameter in form scripts to differentiate between newly created bookings and updated bookings.
For more information about entrance function type parameters and OpenAir user scripting, see
User Scripting.
Review also the general guidelines for adding resource bookings — see General Guidelines.
To modify resource bookings in the project center:
1.
In the project center view, locate the booking row with bookings you want to change.
2.
To change the resource for all the bookings on a booking row, click the Change Resource icon
, then select a named resource or a generic resource from the dropdown list. You can use the
search bar to refine the dropdown list as you type.
User Guide

Managing Resource Bookings in the Project Center 108
You can distinguish between a named resource or a generic resource with different icons. A solid
resource icon indicates a named resource, an outline resource icon indicates a generic
resource.
3.
Double click the booking row cell you want to modify, and type the number of hours you want to
book the resource for in that week. Repeat for each cell you want to modify.
Tip: Use Tab and Shift + Tab, or the right and left arrow keys to move to the next cell to
the right or to the left of the cell you are currently editing.
You can use the Add multiple bookings action to fill multiple cells on the booking row covering a
continuous period. See Creating a Booking and Distributing Hours Over a Multiple Week Period.
You can copy or cut values from the booking grid to the clipboard and paste values from the
clipboard to the booking grid. See Copying, Cutting and Pasting Booking Row Cells.
You can copy a range of cells to adjacent cells horizontally or vertically. See Copying Booking Row
Cells Using the Fill Handle.
4.
Click Save. A message appears confirming the bookings were created successfully. Booking cells
with errors preventing the save operation are outlined with a black border. Point to the outlined
booking cell to show a tooltip describing the error.
You can also click Discard to cancel all changes made in the booking grid after you last saved it.
Note: Modifying resource bookings is possible only when the booking grid measure shows
Hours and the Actuals switch is OFF. See, Hours Worked in Past Weeks or Months (Actuals) and
Viewing Hours, Time Costs, or Time Charges in the Project Center.
Creating a Booking and Distributing Hours Over a Multiple
Week Period
Note: This functionality is available only if project center options are set to show resource
booking information – See the help topic Project Center Options.
Adding multiple bookings is possible only when viewing Hours in the booking grid and when the
Actuals switch is toggled OFF. See Viewing Hours, Time Costs, or Time Charges in the Project
Center.
To create a booking over a specified period with hours distributed evenly across all weeks in the booking
period, you can do one of the following:
■
Create a single booking using the Create button. The booking will show as a single row in the project
center even when the Grouped display option is off. If you edit any hours in the booking grid,
separate booking records will be created for each week in the period.
User Guide

Managing Resource Bookings in the Project Center 109
■
Create multiple contiguous bookings in the Project Center using the Add multiple bookings action.
You can use the following steps to fill multiple cells on the booking row covering a continuous period.
This is equivalent to creating a booking using the Create button above the main navigation menu,
except, in the project center it will create multiple contiguous bookings — one for each complete or
part week — with the total number of hours distributed evenly over all weeks in the specified date
range.
To create a booking and distribute hours over a multiple week period:
1.
Add a resource booking row. See Adding Resource Bookings to Your Project Plan.
2.
Click the More icon in the Actions column, then click Add multiple bookings. The Add multiple
bookings dialog appears.
3.
Select a start date for the booking period. The start date defaults to the first day of the first week
shown in the booking grid.
4.
Select an end date for the booking period. The period between the start date and end date must
not be more than 52 weeks.
5.
Enter the total hours to be booked over the entire period.
6.
Click Add bookings. The booking grid shows the total number of hours distributed evenly over all
weeks in the specified date range. The number of hours for each week is calculated in function of
the number of days available in that week (if the end date falls part through the week, for example).
This operation overrides any existing hours for weeks falling in the specified date range.
Note: Adding multiple bookings is possible only when the booking grid measure shows Hours
and the Actuals switch is OFF. See, Hours Worked in Past Weeks or Months (Actuals) and Viewing
Hours, Time Costs, or Time Charges in the Project Center.
Copying, Cutting and Pasting Booking Row Cells
Note: This functionality is available only if project center options are set to show resource
booking information – See the help topic Project Center Options.
Copy or cut values from the project center booking grid (booked hours) to the clipboard and paste values
from the clipboard to the booking grid.
User Guide

Managing Resource Bookings in the Project Center 110
■
To copy cells to the clipboard, drag to select a range of adjacent cells and press Ctrl+C (Windows) or
Cmd+C (macOS).
■
To cut cells (copy to the clipboard and delete values when values are pasted), drag to select a range of
adjacent cells and press Ctrl+X (Windows) or Cmd+X (macOS).
■
To delete multiple cell values at the same time, drag to select a range of adjacent cells and press
Delete.
■
To paste the clipboard content into the booking grid, select the first cell of the destination range and
press Ctrl+V (Windows) or Cmd+V (macOS).
■
To clear the clipboard content after you copy or cut cells, press Esc. The cut values are not deleted
until you paste them.
Note: You can also use keyboard keys to select a range of adjacent cells. To do so, select a cell,
then use Shift + Arrow keys to extend the selection range both horizontally and vertically.
You can include cells outside the horizontal scroll range in your selection. Dragging or pressing
Shift + Arrow keys beyond the last column in the scroll range extends the scroll range.
The selected area is highlighted with a light blue color background and outlined with a thin blue solid
line. When you cut or copy the selected area, the outline changes to a dotted line. When you paste the
clipboard content, the destination range is highlighted with a light blue color background and outlined
with a thin blue solid line.
Review the following guidelines:
■
You can copy, cut and paste values across multiple adjacent rows and columns.
■
You can only select adjacent booking rows for the same task, or select adjacent booking rows at the
project level. It is not possible to copy, cut or paste booking rows across multiple tasks at the same
time.
■
When pasting into the booking grid:
□
You can paste up to 100 columns at the same time, even if the clipboard data contains more
columns than the number of columns displayed on the project center page.
□
You can only paste into adjacent booking rows for the same task, or paste into adjacent booking
rows at the project level. If the clipboard data contains more rows than the number of available
booking rows, only the first rows of clipboard data are pasted into available booking rows,
additional rows of data in the clipboard are ignored.
User Guide

Managing Resource Bookings in the Project Center 111
□
The selected cell or range indicates the top left corner of the destination range. If you select a
range of cells smaller than the clipboard content, the clipboard content is copied into a destination
range of up to 100 columns across and up to the number of available booking rows down. If you
select a range of cells larger than the clipboard content and the clipboard content contains more
than one value, the destination range is the same size as the clipboard content up to 100 columns
across.
□
If the clipboard content contains only one value, the value is pasted into all cells in the selected
destination range.
□
All existing values in the destination range are overwritten. If the source cell was empty, the
destination cell is cleared.
□
You can paste numerical values copied from any application, including tab-separated numerical
values copied from a text file.
□
The source values must be in the correct numerical format, either an integer or a decimal number
with a dot for decimal separator — 26.75, for example. Pasting a cell value formatted as text or as
a number with a comma for decimal separator or thousands separator, for example, clears the
destination range. This is independent on the number format in your personal settings.
■
Changes in the booking grid are not saved automatically. To save the changes, click Save. To discard
the changes, click Discard.
Copying Booking Row Cells Using the Fill Handle
Note: This functionality is available only if project center options are set to show resource
booking information – See the help topic Project Center Options.
You can copy a single value or multiple values into adjacent cells vertically or horizontally in the project
center booking grid by dragging the fill handle to the left or right.
To copy booking row cell values to adjacent cells:
1.
Drag to select the cell or the range of cells you want to copy (source range).
Note: You can also use keyboard keys to select a range of adjacent cells. To do so, select
a cell, then use Shift + Arrow Keys to extend the selection range both horizontally and
vertically.
You can include cells outside the horizontal scroll range in your selection. Dragging
or pressing Shift + Arrow keys beyond the last column in the scroll range extends the
horizontal scroll range.
2.
Point to the fill handle on the bottom right corner of the selected range.
The cursor becomes a + sign.
3.
Drag the fill handle to the right, to the left, above, or below across the range of cells you want to fill
(destination range).
The destination range is outlined with a blue dotted line.
Note: You can include cells outside the horizontal scroll range in the destination range.
Dragging the fill handle beyond the last column in the scroll range extends the horizontal
scroll range.
4.
Release the mouse.
User Guide

Managing Resource Bookings in the Project Center 112
The destination range is filled automatically with the values of the copied cells. Any existing values
in the destination range are overwritten. If the destination range is larger than the source range,
the source range values are repeated as a pattern to fill the entire destination range.
Note: Changes in the booking grid are not saved automatically. To save the changes, click
Save. To discard the changes, click Discard.
Copying Bookings with Projects
You can create project templates complete with bookings then copy all bookings from your templates
across to the new projects you create from these templates.
The start date of each booking associated with the new project is relative to the project start date and
determined based on the start date of the booking associated with the project template relative to the
project start date in the template. This feature, in combination with the booking-driven project schedule
calculation can save you time staffing your new projects in the project center view.
For more information about booking-driven project schedule calculation, see Basing Project Schedule
Calculation on Bookings for a Project.
Note: Choose the dates judiciously for your project and booking templates so they do not
impact utilization or other reporting metrics.
To copy bookings when creating a new project from another project:
1.
Click the Create button, then Projects: Project, from another project ....
The New Project form appears.
2.
Enter or select all required information.
3.
Select a project from the Duplicate phases and tasks from this project dropdown list.
4.
Check the Duplicate bookings box.
5.
Enter or select any additional information as required.
User Guide

Managing Resource Bookings in the Project Center 113
6.
Click Save.
Deleting a Booking Row in the Project Center
Note: This functionality is available only if project center options are set to show resource
booking information – See the help topic Project Center Options.
You can delete booking rows when viewing Hours in the booking grid and when the Actuals
switch is toggled OFF. See Viewing Hours, Time Costs, or Time Charges in the Project Center.
To delete a booking row, click the More icon in the Actions column and select Delete. A message
appears confirming the booking was deleted successfully.
All business rules are respected — you will not be able to delete a booking if your role does not permit it,
or if the booking was either submitted for approval or approved.
All bookings in a grouped booking row will be deleted except if some of the bookings in the group cannot
be deleted. If some of the bookings cannot be deleted, review each booking in the grouped booking row.
Turn off the Grouped display option and try deleting each booking one by one.
Note: Deleting a booking row is possible only when the booking grid measure shows Hours
and the Actuals switch is OFF. See, Hours Worked in Past Weeks or Months (Actuals) and Viewing
Hours, Time Costs, or Time Charges in the Project Center.
Project Schedule Calculation in the Project Center
The project schedule is recalculated automatically after:
■
You modify the Start date or Finish date for a task.
■
You drag a task into a phase and the task modifies the Start date or Finish date for the phase.
■
You add or modify one or more predecessors to a task or phase.
■
You add or modify Planned hours, if the project schedule calculation is based on assignments
(default).
■
You add or modify hours in the booking grid and click Save, if the project schedule calculation is based
on bookings. For more information about calculating the project schedule based on bookings instead
of assignments, see Basing Project Schedule Calculation on Bookings for a Project.
When you go to the project center or reload the project center page, OpenAir checks if any changes
impacting the project schedule were made outside of the project center and triggers the project schedule
calculation if needed.
All calculated Start dates and Finish dates in the project sequence are updated. Planned hours are also
updated if the project schedule calculation is based on bookings.
User Guide

Project Schedule Calculation in the Project Center 114
Note: You can set individual projects to calculate the following information based on bookings
instead of assignments:
■
Calculated task, phase and project Start dates and Finish dates.
■
Planned hours.
■
% Complete.
For more information , see Basing Project Schedule Calculation on Bookings for a Project.
When the calculation is in progress, information in the Start, Finish and Planned hours columns cannot
be edited and loading spinners are visible in the column headers.
Basing Project Schedule Calculation on Bookings for a
Project
You can set individual projects to use bookings instead of assignments for project schedule calculation.
If the project schedule calculation is based on bookings instead of assignments:
■
All calculated Start dates and Finish dates are updated based on bookings
□
If the task has no predecessor tasks or phases:
▬
The task Start date is the project Start date .
▬
The task Finish date is the latest booking end date out of all bookings to the task.
□
If the task has one or more Finish-to-Start or Start-to-Start predecessor tasks:
▬
The task Start date is calculated based on all dependencies (the latest date to meet all the
dependencies).
▬
The task Finish date is the latest booking end date out of all bookings to the task, or the Start
date + 1 day, whichever is the latest.
□
If the task has one or more Finish-to-Finish or Start-to-Finish predecessor tasks:
▬
The task Finish date is calculated based on all dependencies (the latest date to meet all the
dependencies).
▬
The task Start date is the earliest booking start date out of all bookings to the task, or the
project Start date if it is later than the earliest booking start date.
Note: All task fixed Start dates and fixed End dates remain unchanged.
The earliest Start date for a task is always the project start date. You cannot set an earlier fixed
Start date for a task.
■
Planned hours are calculated based on bookings, instead of being set at the task level or calculated
from task assignments. It is the sum of all hours booked to the task, phase or project. The Planned
hours field on the task entity form is read-only when schedule calculation for the associated project is
based on bookings.
■
% Complete is calculated based on bookings. For tasks, % Complete indicates the amount of work
completed on the task (from approved time entries) compared to Planned hours (sum of all hours
booked to the task).
User Guide

Project Schedule Calculation in the Project Center 115
Important: Review the following guidelines:
■
Only the calculated Start dates, calculated Finish dates, Planned hours, and % Complete are
calculated based on bookings instead of assignments.
■
Using bookings instead of assignments for project schedule calculation may impact other
functionality that are based on assignments. Test extensively on a sandbox account and
consider the impact carefully before you start using this feature on a production account.
Examples of functionality that may have a dependency on assignments:
□
Charge projections based on assigned hours.
□
Earned value management (EVM) metrics.
□
Billing rule rate override at the assignment level.
□
Planned/assigned hours adjustment based on approved hours.
□
Pending bookings from task assignments.
□
Any user scripts or integrations with dependency on assignments.
To base project schedule calculation on bookings for a project:
1.
Create the project_plan_based_on_bookings custom field.
a.
Go to Administration > Global Settings > Custom Fields.
b.
Click the Create button, then click New Custom field.
A form appears.
c.
Select Project from the Add a custom field to dropdown list (under Global).
d.
Select Checkbox from the Type of field to add dropdown list.
e.
Click Continue.
Another form appears.
f.
Enter the Field name — This must be exactly project_plan_based_on_bookings.
g.
Check the Active box.
h.
Enter a Display name — For example, Calculate project schedule based on bookings.
i.
Click Save.
2.
Go to Projects > Projects > [Select a project] > Properties.
3.
Check the Calculate project schedule based on bookings box.
4.
Click Save
User Guide

Working with Dashboards and Calendars 116
Working with Dashboards and Calendars
Home / Dashboard
The content of the home page and dashboard is organized into portlets that can be collapsed, expanded,
resized, and moved. Portlets are screen width responsive.
This example shows three chart portlets. You can interact with the charts, e.g. hiding a series by clicking
on the legend or hovering over a point to display detailed information in a tooltip. You can also download
the chart as an image.
Portlet
The Home and Dashboard screens are organized as a set of portlets. Each portlet type is color coded and
can be moved and resized according to your needs. You will find all of the familiar OpenAir Dashboard
functionality encapsulated within these portlets.
User Guide

Home / Dashboard 117
Portlet features:
■
Portlets have a title that displays in the center when the portlet is collapsed and at the top when the
portlet is expanded.
Note: When collapsed the number of items in the portlet is displayed on the left.
■
Portlets can be moved by dragging the portlet title. To keep a pleasing appearance, portlets
automatically align to a grid.
Note: The Message Board portlet is always shown first and cannot be moved from the top
left position on the Dashboard.
■
Portlets can be collapsed or expanded by clicking on the / Icons or by single clicking on the
portlet title.
■
When expanded, portlets have action buttons displayed in the top right depending on the portlet type.
An action hint is displayed if you hover your mouse over the button.
If the content does not fit within the portlet area, then the content will either automatically resize or
scrollbars will be displayed. Portlets with a icon can be edited to display different information. For
portlets which display information from a report, you can open the report from the portlet by clicking
the icon. You can delete a portlet by clicking the icon.
Important: The maximum number of rows that report portlet can display is limited for
performance reasons. The limit depends on your OpenAir account configuration. We recommend
that you use filters to reduce the report size so all data show on the portlet.
Chart
Colorful and interactive graphs create offer a productive and in-depth way to work with performance
metrics.
User Guide

Home / Dashboard 118
Chart features:
■
Dynamic — You can directly interact with the charts by simply clicking on them. For example, you can
hide a series by clicking on the series in the legend.
■
Tooltip Labels — Point to a chart to display a tooltip with information on each point and series. The
tooltip follows as the user moves the mouse over the graph, and great efforts have been taken to
make it stick to the nearest point as well as making it easy to read a point that is below another point.
■
Export Chart — You can export the chart as an image by clicking on the icon.
■
Chart Preview — You can see a preview of the chart type when editing the Chart Portlet.
■
Chart Types — The following new chart types are available in OpenAir: Donut, Area Spline, Stack Area,
and horizontal / vertical stacked-bar.
User Guide
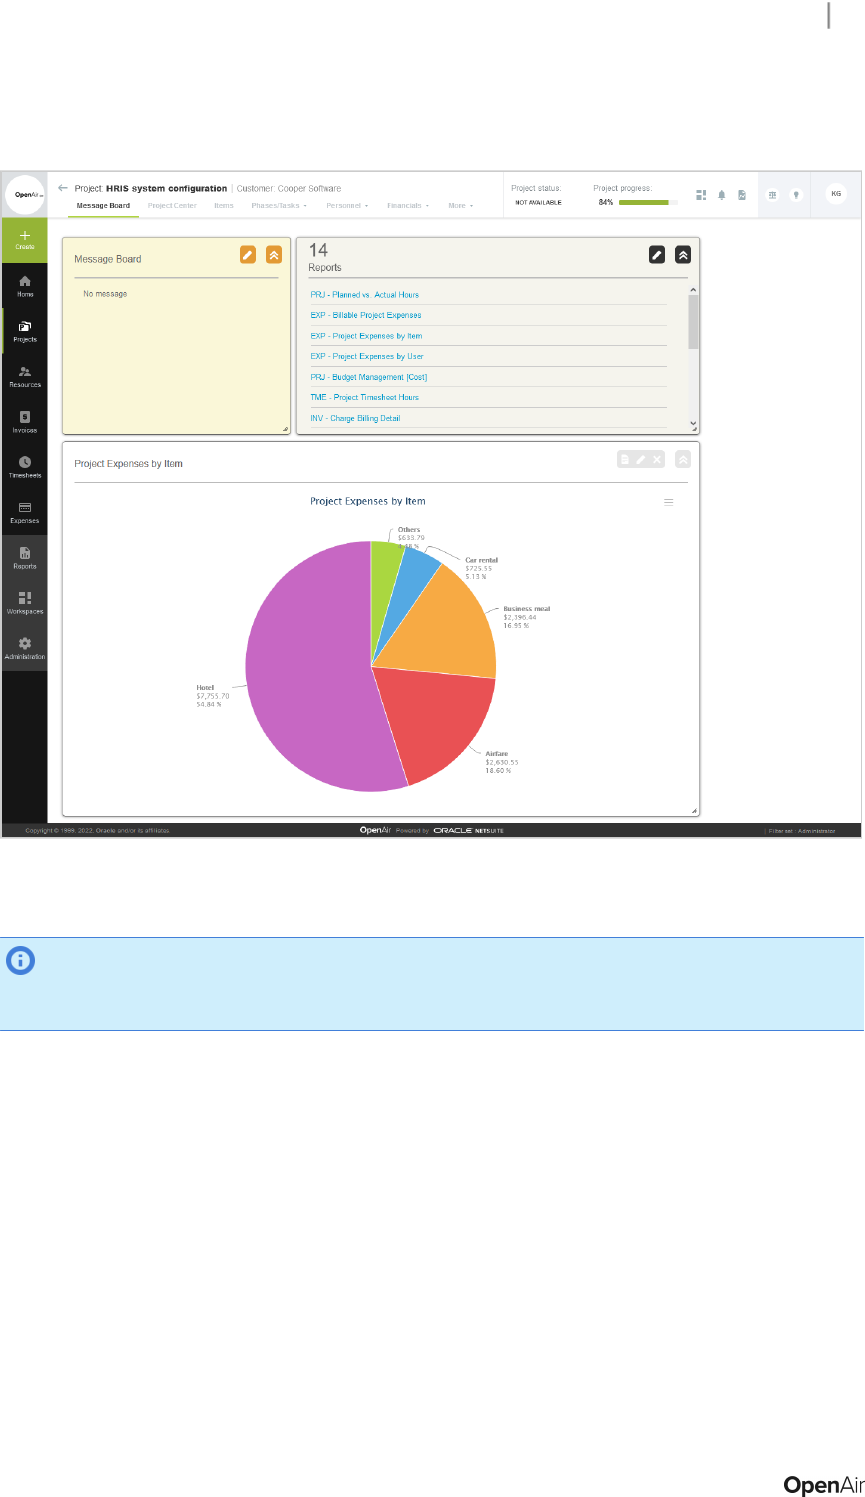
Home / Dashboard 119
Project Dashboard
The Project Dashboard gives a visual analysis of a specific project and is useful for visually comparing
projects.
Note: All items displayed on the Project Dashboard are filtered by the specific project. Only
saved reports with the “Make this report available in project-specific situations” option selected are
shown in the Reports portlet and available to create Charts.
Calendars
In the Calendar, information is presented in a modern, visual way, color-coded by type. A multi-level
filtering system allows users to create various data configurations depending on their needs. You can
always find your calendar by going to Home > Calendars. You can also add a My Calendar tab to other
modules’ in-module navigation (please see Customizing the Calendar below).
User Guide

Calendars 120
Calendar features:
■
Colors — Calendar items are color-coded for ease of identification.
■
Item Count — A count is displayed of items not visible in each calendar cell.
■
Clicking a day in the calendar opens a list of events for that day by type, along with a summary, details,
and notes. Clicking an entry under Summary opens a window with more details about that entry.
Customizing the Calendar
The calendar and the information it displays can be customized by going to Administration > Global
Settings > Display > Interface: Display. The following options all affect the Calendar’s availability in various
modules:
■
Hide the ‘My Calendar’ tab — hides the My Calendar tab across the account. This setting is mutually
exclusive with Show ‘My Calendar’ tab in all modules. If both are selected, the My Calendar tab will
be hidden.
■
Maximum number of rows to display per day in ‘My Calendar’ monthly view — controls how
many rows are displayed for each day in the monthly calendar view. The default (and minimum) is
4 rows, and can be increased up to 10. The option to display all rows regardless of number is also
available.
■
Show ‘My Calendar’ tab in all modules. — shows the My Calendar tab to the in-module navigation in all
modules. This setting is mutually exclusive with Show ‘My Calendar’ tab in all modules. If both are
selected, the My Calendar tab will be hidden.
User Guide

Calendars 121
The following options affect the information which appears on each calendar item in the calendar display
and in the Summary or Detail fields in the list of events.
■
Show booking type for bookings as summary on the calendar — shows booking type information in
the calendar.
■
Show custom fields for bookings as summary on the calendar — shows active booking custom fields in
the calendar and summary.
■
Show custom fields for bookings as detail on the calendar — shows active booking custom fields in the
calendar and detail.
■
Show custom fields for task assignments as summary on the calendar — shows active task custom
fields in the calendar and summary.
■
Show custom fields for task assignments as detail on the calendar — shows active task custom fields in
the calendar and detail.
User Guide

Working with Reports 122
Working with Reports
Reports
Reports take their design from the List Views — Previous UI Version Layout.
Reporting controls can be found in the header.
Report Management and Editor
Note: The functionality described in this help topic is only available if the Report Management
and Editor optional feature is enabled for your account and if you have sufficient privilege to
access the feature. For more information contact your account administrator.
The Report Management and Editor optional feature lets you:
■
Search for saved reports and report templates by name or content. The interface shows a list of
results as you type and lets you preview the configuration of each report. You can perform all available
report actions directly from the search results.
■
Edit saved reports or create new reports from templates using the report editor. The report editor
lists available dimensions and measures, which you can drag into your rows and columns to create
your report. You can also select filters and preview your report layout as you edit the report. You can
preview the report data, run and view the full report directly from the report editor.
User Guide

Report Management and Editor 123
Note: Advanced reports are not currently supported in the Report Management and Editor
interface.
Searching Reports in the Report Management Interface
Note: The functionality described in this help topic is only available if the Report Manager and
Editor optional feature is enabled for your account and if you have sufficient privilege to access the
feature. For more information contact your account administrator.
The report management interface lets you search for saved reports and report templates by name or
content. The interface shows a list of results as you type and lets you preview the configuration of each
report. You can perform all available report actions directly from the search results.
To access the report management interface, go to Reports > Management.
User Guide

Report Management and Editor 124
The report management interface includes the following panels:
1.
Search panel — You can search report templates and saved reports by:
■
Name
■
Measures or attributes (columns) available for inclusion in the report
■
Hierarchies or dimensions (rows) available for inclusion in the report
2.
Results panel — The list of search results is updated as you enter search criteria. The results
include tabular (detail) or crosstabbed (summary) report templates and saved reports you have
access to.
■
Results are organized in tabs. Depending on your access privileges, tabs may include All
(all reports you have access to), All Saved (all saved reports you have access to), My Saved
(saved reports you own), Shared (saved reports others have shared with you), Tabular report
templates, Crosstabbed report templates. The number of reports available in each tab is
indicated under the tab title.
■
Each report template has a rating between 0 and 10, depending on how often the template is
used by OpenAir users. Report templates that are used very often have a rating of 10, reports
that are rarely or never used have a rating of 0. Saved reports have the same ratings as the
report templates they are based on.
■
Each result entry includes the name of the report and icons corresponding to the actions
available for this report.
Action Icon Description
Run the report.
Edit the report in the report editor. See Creating and Editing Reports in the Report
Editor.
Download the report as CSV, HTML or PDF.
Delete the report.
Schedule the report — Configure OpenAir to run and send or publish the report
automatically at regular intervals.
Share the report with other employees in your company.
File the report in a specific folder in OpenAir.
■
Click a report name to preview the report.
3.
Preview panel — Preview any report listed in the search results panel. The preview panel shows
information about the report and a preview of the report layout. When previewing a report
template, the preview layout includes any dimensions and measures entered in the search panel
in the same order.
Click New to create a new report from a template, or Edit to modify a saved report using the
report editor. See Creating and Editing Reports in the Report Editor.
The report information includes the following details:
■
The Report rating appears in the top left corner, next to the Report name.
■
The Category indicates whether it is a saved report, a report template, or a shared report.
■
The Type indicates whether the result is a tabular (detail) or crosstabbed (summary) report.
Advanced reports are not currently supported in the report management interface.
■
Which report Template this saved or shared report is based on (if applicable).
■
The Owner of the report
User Guide

Report Management and Editor 125
■
The date when the report was Created.
■
The date when the report was Last saved.
■
The date when the report was Last viewed.
■
The Duration of the last run for this report.
■
The Total views (total number of views) for this report across all account users.
■
When the report is Scheduled to run automatically (if applicable).
■
The Folder this report is filed in.
■
Who the report is Shared with.
■
Report Notes / description
■
Template specification — The following additional information is shown for report templates.
□
Intro — Brief description of the template report and its layout.
□
Dataset — Which OpenAir tables the information in this report template is sourced from.
□
Grouping — The primary grouping and other potential groupings for this report template.
□
Hierarchy — Which hierarchies are supported (if applicable).
Creating and Editing Reports in the Report Editor
The report editor lets you create, edit, test, and run reports from a single page, without the need to switch
between forms and previews or to refresh the page.
To access the report editor, go to Reports > Management, search for saved report or report template,
then do one of the following:
■
Click the edit icon under the name of the report in the results panel.
■
Click New in the preview panel (to create a new report from a report template).
■
Click Edit in the preview panel (to modify a saved report).
The report editor includes the following elements:
User Guide

Report Management and Editor 126
1.
Report header — The report header shows the report name and the template the report is
based on. The report also lets you enter a new name for the report, select a different report
template to create a new report, and save or discard the changes made.
■
To change the report name, click the report name and enter a new name. The default name
for a new report is "Untitled".
■
To create a new report from a different report template, click the dataset icon and select
the report template.
■
The report header for tabular (detail) reports include a Rollup check box. Check the Rollup
box to add the ability to aggregate and drill down your report data to different levels defined
by non-measurable attributes in your report layout.
■
To save changes made to your report, click Save, to clear the report configuration and revert
to the default template report configuration, click Reset, to discard unsaved changes and go
back to the report management interface.
2.
Report configuration pane — The report configuration pane includes three vertical subtabs.
■
Rows and Columns — The Rows and Columns subtab shows the information currently
included in the report layout. For roll-up tabular reports and crosstabbed reports, it includes
three panes, with lists of rows, columns and measure names in the report. For standard
tabular reports, it includes the Rows pane only. The Rows and Columns subtab includes the
following functionality:
□
Dimensions (non-measurable attributes or aggregation levels) and dates show with a
light blue color background. Measures (aggregated values) show with a green color
background.
□
Drag a row, column or measure to change the order of rows, columns or measures in the
report.
□
Click the remove icon to remove the row, column or measure from the report.
□
Click the visible icon to show or hide a row or a column. The icon shows in dark gray
color when the row or column is visible on the report, and in light gray color when the row
or column is hidden.
User Guide

Report Management and Editor 127
□
Click the total icon to show or hide total columns for all measures. The icon shows in
dark gray color when the total columns are visible on the report, and in light gray color
when the total columns are hidden.
□
Click the filter icon to add or modify a filter based on the row or column. The icon shows
in dark gray color when there is an active filter, and in light gray color when there are no
active filters.
□
Click the add icon to add an entity attribute or dimension to the report.
□
Click the edit icon to modify the list of entity attributes or dimensions included on the
report.
■
Datasets The Datasets subtab shows the information that you can include in the report
layout. For roll-up tabular reports and crosstabbed reports, it includes two panes, with lists
of dimensions (aggregation levels defined by non-measurable attributes) and measures
(aggregated values). For standard tabular reports, it includes the Attributes pane only. The
Datasets subtab includes the following functionality:
□
Enter a few characters into the search bar to filter the list of attributes, dimensions, or
measures as you type.
□
Icons indicate the dimension or measure type:
▬
Dimensions: (Text) or (Hierarchy).
▬
Measures: (Count or Total), (Time - Calculated from the number of days), (Time
- Calculated from the number of hours), or (Custom calculation).
□
Point to an attribute, a dimension, or a measure to view a tooltip description.
□
Click an attribute, a dimension, or a measure to add it to your report. You can also drag it
to the Rows, Columns or Measures panel. The cursor changes to indicate valid or invalid
drop locations.
User Guide

Report Management and Editor 128
■
Settings — The Settings subtab shows a form with other report configuration settings.
Note: You can use the Rows and Columns and Datasets subtabs side by side in the
configuration pane to add attributes, dimensions and measures to your report. However,
the Settings subtab cannot be shown alongside another subtab.
3.
Report View or Preview pane — Preview your report layout without data as you change the
configuration. Click Preview to test your report with sample data limited to one record, click Run
to run the full report.
4.
Filters pane — The filters pane lets you review and modify existing filters, or add new filters to
include just the information you want to report on.
■
Click + Filters to add a new filter, or click a filter to modify it. A window appears to let you
define the filter or select the values you want to include or exclude.
The filters pane can be minimized. Click the arrow pointing right to minimize the filters pane, or
click Filters to view the filters pane.
User Guide
Configuring OpenAir to Run and Deliver a Report Automatically 129
Configuring OpenAir to Run and Deliver a Report
Automatically
You can use the Schedule feature in the OpenAir Reports application to run and deliver your reports
automatically at regular intervals.
To configure OpenAir to run and deliver a report automatically:
1.
Go to Reports > Saved reports > My reports, or to Reports > Management.
2.
Locate the report you want to run automatically.
3.
Click the schedule icon in the Action column or under the report name. The Schedule report
form appears.
4.
In the General section of the Schedule Report form:
a.
Check the Run the report at the following time box.
b.
Select a Day and time (Eastern Time | UTC-5) to set the frequency of publication. The
publication schedule can be set to run everyday, or on a specific day of the week or month.
c.
Check the CSV box to include the report as a CSV file.
d.
Chek the PDF box to include the report as a PDF file.
5.
In the Email options section of the Schedule form:
a.
Check all applicable boxes under Email the generated files to. The report are sent to your
email address by default but you can also check the All the employees who share the
report box, or check the Additional contacts box and click Create to select the contacts
you want to include.
b.
Enter the sender email address to use under The email is from.
Note: Depending on the configuration of your OpenAir account, sending system-
generated email from a custom address may not be permitted. When this is the case,
a note under the text box advises you so, and email is sent from [email protected].
c.
Enter a Subject line. The default value is Scheduled Report: [Report Name].
d.
(Optional) Enter additional text for the body of the message under Optional email text.
Note: Metavalues such as %%date%% are not supported in scheduled report email
subject line and message body.
6.
Check the Email me additional information if the report returns no data if you would like to
receive an email notification if the report returns no data.
7.
Click Save.
User Guide

Personal Settings 130
Personal Settings
Click Personal settings in the User Center to configure your personal settings and optional features.
Personal Settings override any corresponding settings set by your company.
Note: The options which you see in your Personal Settings depend on your user role and your
company’s settings. Some options may not be available to you.
General
Allow support log in
When enabled, OpenAir Customer Support personnel can sign in to your account. This setting is usually
used for troubleshooting and support.
Optional Features
Show the list name in page footer
Displays the list name in the bottom right corner of the screen when in a list view.
Show currently active module name in the browser
title bar
Displays the name of the active module in the browser bar or tab. When this option is cleared, only
“OpenAir” appears in the browser bar or tab.
User Guide

Show company name in the browser title bar 131
Show company name in the browser title bar
Displays the company name in the browser bar or tab. When this option is cleared, only “OpenAir”
appears in the browser bar or tab. The company name which appears is the same as the Company ID
used on the OpenAir sign-in page.
Disable shortcut
Check to hide the navigation shortcuts functionality. See Shortcuts.
User Guide

Time Settings 132
Note: This preference is available only if the Navigation Shortcuts feature is enabled for your
company's OpenAir account.
Time Settings
Time zone
Controls which time zone is used in OpenAir.
Use 24–hour clock for time entry and display
When selected, OpenAir uses 24–hour time (for example, 1:00 p.m. will appear as 13:00) for displaying
time in OpenAir. When cleared, OpenAir will display time using the 12–hour clock with “AM/PM” notation.
Regional Settings
Language
Controls the language used in OpenAir.
User Guide

Date format 133
Date format
Controls how dates are displayed in OpenAir.
Number format
Controls how numbers and decimals are displayed throughout OpenAir, including whether a decimal is
represented by a period (.) or comma (,), and which delimiter OpenAir uses for digit grouping in numbers
larger than 999.
List separator for CSV output files
Controls which list separator (for example, a comma (,) or a semi-colon (;)) is used to separate values in
CSV output files.
Print Settings
Page size for generating PDF pages
Controls whether OpenAir PDF files are generated in Letter or A4 size.
Dashboard Options
Display zero items on dashboard
Displays the entire array of reminder and status options available in the dashboard tab, even if there are
no active items requiring attention. This option is disabled by default because the full set of items may be
long if you have access to all service modules.
Timesheet Options
Sort timesheets alphabetically by customer and
project
This setting re-sorts time entries by customer and project after saving. As time entries are input into the
timesheet and submitted, the customer:project entries are sorted alphabetically within each day instead
of the order they are entered.
Enable start and end time entry on timesheets
When checked, you can enter a start time and end time for each time entry. It can be used to log start
and end time for a portion of the day when you worked on a particular project or task. You can also add a
start time column and end time column to the time entry list view.
User Guide

Display all weeks for timesheets containing multiple weeks 134
To enter a start time and end time, click the Notes icon and enter a start time and end time for each
time entry on the timesheet grid in the additional information popup window for the time entry. Click OK
or Close & Save to save the changes and return to the timesheet grid.
Display all weeks for timesheets containing
multiple weeks
When this feature is enabled, you can work with all the weeks of a multi-week timesheet in the same grid
view.
Enable Approvals on Mobile apps for Timesheets
Displays the To Approve line for Timesheets on the OpenAir for Mobile app dashboards.
Expenses Options
Default to expense worksheet when viewing an
expense report
Automatically displays the expense worksheet when you create an expense report instead of displaying
the receipts form.
User Guide

Enable Approvals on Mobile apps for Expenses 135
Enable Approvals on Mobile apps for Expenses
Displays the To Approve line for Expenses on the OpenAir for Mobile app dashboards.
Invoices Options
Disable confirmation when using the ‘Generate
New Revenue container’ section on invoices.
When this option is cleared, OpenAir opens an “Automatically Generate New Revenue container”
confirmation dialog when “Generate Revenue Container” or “Submit and Generate Revenue Container”
are clicked in an invoice. Select this option to disable this confirmation dialog. This option can also be
selected within the dialog itself.
User Guide

Projects Options 136
Projects Options
Preferred landing page for projects
Controls which page opens when a project is opened, for example, the Task List or Properties.
Scripting Studio Options
Enable script deployment editor content assist auto
activation
When selected, when you type the text “NSOA” into the Scripting Studio editor, and then type a period (.),
the Auto List window appears with all available options which can follow “NSOA.” in a script.
The user has the following options:
■
Click on the required item with the mouse and double-click to select it.
■
Use the up and down arrow keys to select the required item and then hit ‘Enter’ to select it.
■
Type the first character of the required item (e.g. ‘m’) to highlight it and then hit ‘Enter’ to select it. If
more than one item starts with the same letter then the first item will be highlighted and the list of
options filtered.
■
Hit ‘Esc’ to close the Auto List window and type as normal. Clicking outside of the editor window will
also close the Auto List window.
Tip: Press <Ctrl> + <Space> to show the Auto List window at any point in the editor.
After selecting an item from the Auto List window, the value will be copied into the editor and typing
continues after the inserted value.
User Guide

Script deployment editor content assist auto activation delay (milliseconds) 137
Script deployment editor content assist auto
activation delay (milliseconds)
Controls the amount of time it takes for the Content Assist Auto Activation to appear after “NSOA.” has
been typed in the Scripting Studio editor. The default value is 500 milliseconds, and the field accepts
any positive number. This setting has no effect if “Enable script deployment editor content assist auto
activation” is not selected.
Important: Entering a value below 200 milliseconds may cause performance issues.
Display the number of logs at ‘View logs’ link
Displays the number of included logs next the View Log link in Script Deployments list views.
Editor Theme
Customize the script editor with a variety of selectable color schemes.
User Guide

Font Size 138
Font Size
Customize the size of the text font in the script editor. This setting only affects the text within the Script
Editor. All other OpenAir text uses the “Text size” User Center setting.
Indent Unit
Select whether an indent unit is a space or a tab in the script editor.
Tab Size
Set how many spaces a tab equals in the script editor.
User Guide

Display Options 139
Display Options
The following “Number of entries to display...” settings control how many entries appear in drop-downs
throughout OpenAir.
For example, if creating a charge, you may only want to see those customers and projects which you
use most frequently when selecting from the drop-down list in the "New charge" dialog. If you limit the
number of customer:project combinations which are displayed in these drop-downs, the drop-downs will
display only those customers and projects which you have used most recently, up to the limit specified in
these settings.
Tip: For the best performance, do not use the “All” option for the “Number of entries” settings.
■
Number of entries to display in customer:project drop-downs
■
Number of entries to display in customer/prospect:deal drop-downs
■
Number of entries to display in customer drop-downs
■
Number of entries to display in expense item drop-downs
■
Number of entries to display in product drop-downs
■
Number of entries to display in employee drop-downs
■
Number of entries to display in vendor drop-downs
■
Number of entries to display in approver drop-downs
■
Number of entries to display in workspace drop-downs
Shorten customer:project drop-downs
Controls how text appears within “customer:project” drop-downs. It contains three settings:
■
Do not shorten — The drop-down displays both customer and project
User Guide

Sort the customer:project drop-downs by project 140
■
Remove customer name, leave project name indented — The drop-down displays a colon (:) and
project name, but does not include the customer name
■
Remove customer name and indentation of project name — Only displays the project name, and
renames the “customer:project” drop-down to “project”.
Sort the customer:project drop-downs by project
Sorts customer:project drop-downs alphabetically by project instead of by customer. The display order in
the drop-down will still be “customer:project”.
Sort the task drop-downs by name and omit the ID
number prefix
Displays tasks in task drop-downs in alphabetical order and removes the tasks’ number prefixes.
User Guide

Maximum number of rows to display per day in ‘My Calendar’ monthly view 141
Maximum number of rows to display per day in ‘My
Calendar’ monthly view
Controls how many rows are displayed for each day in the monthly “My Calendar” view.
Show ‘My Calendar’ tab in all modules.
Displays the “My Calendar” tab in all modules. When disabled, the “My Calendar” tab only appears in
“Home”.
Note: If you have been assigned the “View calendars for other users” role permission, you
will always see the “Calendars” instead of the “My Calendar” link in “Home”. When “Show ‘My
Calendar’ tab in all modules.” is enabled in this situation, you will see “Calendars” in “Home” and
“My Calendar” in all other modules.
Show Account tab in ‘My Account’ module only.
This setting is no longer supported, and has no effect on OpenAir.
Remember the size of popup windows
This setting is no longer supported, and has no effect on OpenAir.
Disable automatic resizing of popup windows
This setting is no longer supported, and has no effect on OpenAir.
Add the save or run button to the top right of
forms
This setting is no longer supported, and has no effect on OpenAir.
Add “Save & create another” button to the top right
of forms
This setting is no longer supported, and has no effect on OpenAir.
User Guide
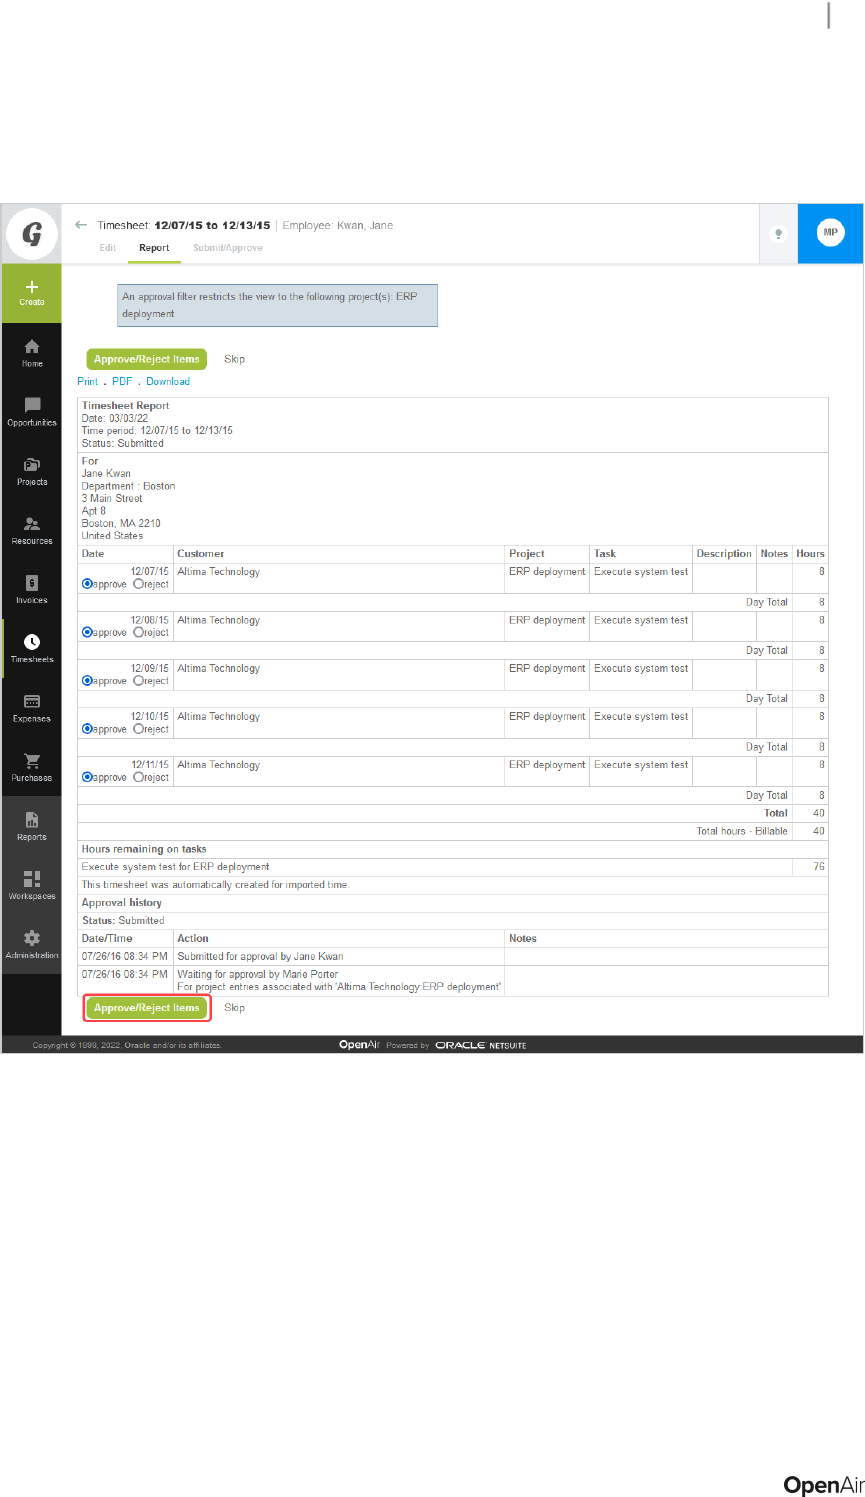
Add approval buttons to the bottom of reports 142
Add approval buttons to the bottom of reports
Adds an Approve/Reject Items to the bottom of Timesheet reports, as well as at the top of the report.
Anchor column titles at top of page when scrolling
vertically
Column titles in list views and reports will remain in view when scrolling down the page.
Preserve row highlighting when checking boxes to
select a row in list views
This setting has no effect on redesigned list views.
User Guide

Enable anchoring of left columns when scrolling horizontally 143
For list views using the previous UI layout, when you check a box to select a row in the list view, the row
is highlighted in yellow to indicate the selected rows. Several rows can be highlighted at once to show all
selections made before saving the list.
Enable anchoring of left columns when scrolling
horizontally
This setting has no effect on redesigned list views.
Row titles in list views and reports will remain in view when scrolling across the page.
Hovering over menu links reveals menu options
This setting has no effect on redesigned list views.
Drop-down menus open automatically when pointing to a menu. When this setting is disabled, click the
menu link to open the drop-down.
Open popups as panels instead of windows.
Opens OpenAir popups as in-form panels, instead of new windows. In-form popups have all of the
advantages of conventional popup windows, but appear as part of the form. This allows you to block
popup windows in your browser and still use all OpenAir functionality.
User Guide

Use in-line multiple selection interface 144
Tip: We recommend you check this box. Using popup panels is an OpenAir best practice.
Use in-line multiple selection interface
Uses an in-line picker selection interface in various modules.
User Guide

Disable QuickView 145
Disable QuickView
Disables QuickViews, preventing them from appearing when pointing to fields which open them.
QuickView popup activation delay
Sets the time it takes for a QuickView window to open when pointing to a field which opens a QuickView.
The options available in the drop-down are time in seconds. This setting has no effect if “Disable
QuickView” is selected.
Data Density
Control the data density displayed in list views with selected
mode
This setting has no effect on redesigned list views.
Controls the appearance of data in list views. In “Compact” mode, the margins are trimmed and headings
wrap to make more data visible. “Comfortable” mode provides more spacing.
User Guide

Data Density 146
Control the data density displayed in timesheet grid with
selected mode
Controls the appearance of data in timesheet grids. In “Compact” mode, the margins are trimmed and
headings wrapped to make more data visible. “Comfortable” mode provides more spacing.
User Guide

Starting Application 147
Starting Application
Controls which module is opened by default when signing in to OpenAir.
Email Settings
Bcc me on all emails
Includes you as a Bcc recipient (i.e. other recipients do not see you on the recipient list) on all emails you
send from OpenAir, including from actions which trigger emails. For example, if you approve a timesheet,
and the person who submitted the timesheet receives an automatic email notification of the approval, you
will also receive a copy of the notification.
Authorized Applications
This Personal Settings section lists all the integration applications you have authorized to access OpenAir
on your behalf.
OpenAir supports OAuth 2.0, a robust authorization framework. This authorization framework enables
integration applications to access OpenAir on your behalf without needing to store or ask for your sign-in
details. Applications using this framework can only access OpenAir on your behalf if you give them explicit
permission to do so.
All the authorized applications listed in this section use the OAuth 2.0 framework to obtain access to
OpenAir. This section lets you revoke the permission given to any of your authorized application at any
time.
For more information about authorizing and revoking applications, see Authorizing Applications to Access
OpenAir on Your Behalf.
Authorizing Applications to Access OpenAir on Your Behalf
Integration applications let you connect OpenAir with other applications and they extend what you can
do with OpenAir. Integration applications may use the OAuth 2.0 authorization protocol to gain access to
your OpenAir account.
The first time an application using the OAuth 2.0 protocol attempts to access OpenAir on your behalf, you
will need to give this application your explicit permission.
To authorize an application, you will typically use the following steps:
1.
The application opens a browser and directs you to the same trusted sign-in page you normally
use to sign in to OpenAir — the OpenAir sign-in page or your company Single Sign-on form
appears.
2.
Enter your sign-in details and click Log in.
An authorization screen will appear indicating that the application <application name> would like
to access your OpenAir data.
User Guide

Authorized Applications 148
3.
Read the content of the authorization screen attentively. It should describe what the application
does and how it will help you. It should also say what the application can do, for example:
■
The application will be able to access all data you have access to.
■
The application will be able to perform all actions permitted by your role and user privileges.
Important: For Administrators — Business rules configured for your OpenAir account
are applied when an integration application interacts with your OpenAir data through
the REST API. However, they are not applied when an integration application interacts
with your OpenAir data through the SOAP API or XML API — application developers must
enforce business rules within their integration application if required. Business rules
include OpenAir account configuration settings and access control mechanisms, as well as
any user scripts deployed on your OpenAir account.
4.
Click ALLOW to authorize the application or click CANCEL if you do not want the application to
access OpenAir on your behalf.
Note: The steps may vary depending on the method you use to sign in to OpenAir:
■
If you normally enter your company ID, user ID and password in OpenAir or if you enter your
company ID and user ID in OpenAir and then your password on your company Single Sign-on
page, the above steps apply.
■
If you normally need to enter all sign-in details then select OpenAir from your company Single
Sign-on solution to access OpenAir without needing to enter any sign-in details on the OpenAir
sign-in page (Identity Provider initiated Single Sign-on), you must sign in and select to open
OpenAir before the application attempts to access OpenAir on your behalf. The authorization
screen appears automatically. Follow steps 3 and 4 above. You do not need to re-enter your
sign-in details.
Integration applications are registered and managed by your account administrator. They need to be
enabled on your account before they can attempt to connect to OpenAir and request your permission.
User Guide

Authorized Applications 149
Note: Integration applications are registered and managed by your account administrator. They
need to be enabled on your OpenAir account before they can attempt to connect to OpenAir and
request your permission.
Account administrators can disable an application at any time.
■
If you have authorized an application and this application is disabled by an administrator, the
application will no longer be able to interact with OpenAir.
■
If an administrator enables this application again, you will need to give this application your
explicit permission again before you can continue to work with it in connection with OpenAir.
After you authorize an application, it will be able to interact with OpenAir on your behalf until you revoke
the authorization.
To view the application you have authorized, go to User Center > Personal Settings > Authorized
Applications. All your authorized applications are listed in a grid. Details include the name of the
application and the date and time when it was last updated.
Note: All times are given as Eastern Standard Time (EST).
To revoke an application, click REVOKE in the top right corner of the corresponding box, then click
REVOKE in the confirmation message. The application no longer shows in the authorized applications
User Guide

Authorized Applications 150
list. If a revoked application attempts to access OpenAir on your behalf, you will be prompted to give this
application your explicit permission again.
User Guide

References 151
References
This section describes the icons used in the user interface.
■
Global Icons
■
List View Icons
■
Record Icons
Global Icons
Icon Description
Create new content. See Create Button.
Access screen tips. See Contextual Tips.
Resource Comparison button
User avatar (initials or profile picture). Open the User Center menu. See User Center.
Home Application
Opportunities Application
Projects Application
Resources Application
User Guide

Global Icons 152
Icon Description
Invoices Application
Timesheets Application
Expenses Application
Purchases Application
Reports Application
Workspaces Application
Administration Application
List View Icons
Icon Description
Open Column options flyout panel
Sort order disabled — Click to open Order by flyout panel
Sort order enabled — Click to open Order by flyout panel
Filters disabled — Click to open Advanced filters flyout panel
Filters enabled — Click to open Advanced filters flyout panel
Open Download data options screen
Open More list view options flyout panel
User Guide

List View Icons 153
Icon Description
Remove
Sort ascending
Sort descending
First sort level (ascending in this case) — Click to clear sort order
Second sort level (ascending in this case) — Click to clear sort order
Third sort level (ascending in this case) — Click to clear sort order
Add criterion row
Remove criterion row
Lock column
Column locked — Click to unlock column
Column tips and Cell tips — Click to view the contextual tips relevant to the column or for the record.
Resize column
Row selected — Click to deselect row
Rows selected — Click to clear row selection
Go to the first page
Show the previous 12–week period (date navigation)
Go to the previous page (page navigation), Show the previous week (date navigation)
Go to the next page (page navigation), Show the next week (date navigation)
Show the next 12–week period ( date navigation)
Go to the last page
Mark as a favorite
Marked as a favorite — Click to remove from favorites
Open the record form to edit the record
Display a non-editable view of the record
Duplicate the record
Delete the record
Add a new record
Add a new booking
Expand node
User Guide

List View Icons 154
Icon Description
Collapse node
View the document
Replace the document
Place the report in a folder or remove it from its current folder.
Publish the report to the OpenAir OData service. See the help topic Publishing Reports to the OpenAir OData
Service.
Run the report.
Run or publish the report automatically according to a specific schedule.
Share the report with other employees.
Record Icons
Icon Description
Go to the list view for this type of records
Display Project Status News Feed
Display the reports associated with this record
Display the Workspace associated with this record
User Guide
