
An intermediate
guide to email
Helping you to stay in touch
Publication date: February
2022

Contents
1. Doing more with email 3
2. Using this guide 5
3. Key terminology 7
4. Using email in Gmail 11
Checking your email inbox 12
Setting up email notifications 12
How to set up a Gmail notification on your web browser 12
How to set up email notifications on the Gmail app 14
How to reply to an email 15
How to send an email with an attachment 16
How to file your emails in Gmail 19
Create a Gmail label in your web browser 19
Create a label in your Gmail app 20
Assign a email to a folder 21
5. Using email in Outlook 24
Checking your email inbox 25
Setting up email notifications 26
How to set up an Outlook notification on your web browser 26
How to set up email notifications on the Outlook app 27
How to reply to an email 28
How to send an email with an attachment 30
How to file your emails in Outlook 32
Create an Outlook folder in your web browser 32
Create a folder in your Outlook app 32
Move an email to a folder 33
6. Downloading images and files in Gmail or Outlook 35
Saving an image from an email on a laptop or computer 36
Saving an image from an email on your Android 36
Saving an image from an email on your iPhone 38
Saving an image from WhatsApp on your Android, iPhone or iPad 38
Downloading a file on a laptop or computer 39
Downloading a file on your Android 40
Downloading a file on your iPhone 41
7. How to spot a spam email 43
8. How do I mark emails as spam or junk? 46
2
|
An intermediate guide to email

1. Doing more
with email
3
|
An intermediate guide to email

1. Doing more with email
Hello,
Welcome to Age UK’s intermediate guide to email.
In our beginner’s guide, we showed you how to set up an email
account. In this guide, we’ll remind you how to check your email
and show you how to do a few tasks, such as setting up notifications,
replying to messages, uploading attachments, organising your inbox
and recognising spam emails.
This might sound daunting and a lot of work. But we’ll take you through each task step
by step, so you can familiarise yourself with what you need to do and practice.
Learning at your own pace
You can go through the steps by yourself, with the support of an Age UK Digital Champion,
or with the help of friends, family and carers. It’s best to work through the guide at your
own pace, repeating any sections you want to focus on. Take the time to reflect on what
you’ve learned, as this will help to build your skills and confidence.
If you’ve got any questions as you work your way through the guide, you may be able
to get support from your local Age UK or local Age Cymru. You can find your local Age UK
at www.ageuk.org.uk/services/in-your-area/
Once you’re feeling comfortable with the content in this guide, you can move onto
our advanced guide. There, you’ll learn more about using email to set up online accounts
and email security.
I hope you enjoy working through the guide.
Dereck, 75
4
|
An intermediate guide to email

2. Using this guide
5
|
An intermediate guide to email

This is an intermediate guide for people who want to learn more
about using email. To use this guide, you’ll need to have already
set up a Gmail or Outlook email account. If not, please go to
‘A beginner’s guide to email’ to learn how to do this.
In this guide, we’ll explain how to view and reply to emails, set up email notifications,
upload documents and photos to emails, and create folders for your emails in your
Inbox. We’ll provide separate instructions for both Gmail and Outlook.
Before reading this intermediate guide, you should feel comfortable:
• using a computer, laptop, tablet or smartphone
• connecting to the internet
• logging on to your Gmail or Outlook email account.
2. Using this guide
6
|
An intermediate guide to email

3. Key terminology
7
|
An intermediate guide to email

To help you get to grips with using your email account, we’ve put
together this useful list of common words and phrases that you might
come across. These include terms that were in the beginner’s guide
and some new words and phrases. These are in alphabetical order
so you can refer to them easily as you work through the guide:
Application, or ‘app’: A type of program
that you can download for your computer,
laptop, tablet or smartphone. There are lots
of apps available, from games and puzzles
to banking.
Attachment: Any file, photograph, video
or document you add to your email is
known as an attachment. An email with
an attachment is indicated by the symbol
of a paperclip.
Cloud storage service: This is a way
of storing and saving your files remotely
on the internet, rather than on your device.
It means if you damage or lose your device,
your files will still be available. Examples
of cloud storage services are Dropbox,
Google Cloud Storage and iCloud.
Device: A general term for a smartphone,
tablet, laptop or computer.
Download: To transfer files or data stored
on the internet onto your smartphone,
tablet, laptop or computer. For example,
you might download a picture that a friend
has sent you over email, a document
to read from a trusted website
or an app from the online app store.
Email: It’s a way of sending and receiving
messages over the internet. It’s free and
quick to use and has replaced letter writing
as the most common way to keep in touch.
Email address: When you set up
an email account, you’ll choose an
email address. This is how people send
you email and is similar to a postal address
in that it’s unique to you. An example is
(the ‘@’ sign is pronounced ‘at’).
Email app: Most email service providers
have their own apps. These are a good
way to access your emails quickly
without logging into them through
your web browser.
Email service provider: To send an email
you need to have an account and email
address with an email service provider like
Gmail or Outlook. These are online services
that let you send, save and organise your
emails and keep your account secure.
File: Similar to a physical file, a digital file
is a portable document that you store on
your device. It could be a photograph,
a scanned document or any other type
of document with data stored on it.
Inbox: The virtual folder in your email
account where any emails you receive
are stored. Any new and unopened
messages will sit in your inbox.
JPEG: A type of image file. When
you upload or download images to your
device they will usually save as a JPEG
or a PNG file.
3. Key terminology
8
|
An intermediate guide to email

Junk: Like the unsolicited mail you
get through your letterbox, junk emails
are messages from businesses advertising
products and services. You can easily
unsubscribe from these emails at any time.
Label: This is a Gmail term and is basically
just another word for an email folder. You
can label your emails so that you can easily
find them at a later date. Example label
names might be ‘Holidays’ or ‘Bills’.
Password: Your password is chosen
by you and keeps your email account
secure. The National Cyber Security Centre
recommends you use three random
words as your password, for example,
‘cupwalldog’ or ‘raincowbox’.
PDF: This is short for Portable
Document File – a useful way
of saving documents you wish
to send as attachments in an email.
PNG: A type of image file. When you
upload or download images to your device
they will usually save as a PNG or JPEG file.
Program: A catch-all term for
something that runs on your device.
Examples include apps on your phone
and tablet and anti-virus programs. You
might also see them described
as ‘software’.
Scan: When you convert a paper document
into a digital document. Portable devices
like tablets and smartphones usually have
in-built scanning programs. Many printers
also have in-built scanning software.
Search bar: A box in a search engine
where you can enter a topic to search
for information on the internet.
Smartphone: A mobile phone which
connects to the internet. You can use
it to do everything from sending emails
to making video calls.
Spam: These are emails from people
and organisations that you did not request.
Usually, your email service provider will
automatically filter these into your Junk
folder. If in doubt, avoid opening any emails
from unknown senders. Spam and junk
emails are often used interchangeably.
Subject line: A short summary or title
of what your email is about, for example
‘Holiday update’. You can enter this into
the subject box at the top of the email.
Subscribe: To sign up to receive emails
from people, businesses or organisations.
By sharing your email address and opting
in to their mailing list, you are subscribing
to their marketing emails.
Tablet: A small portable computer with
a touch screen. You tap the screen with
your finger or a special pen, often referred
to as a ‘stylus’, to use the device rather
than using a keyboard and ‘mouse’.
Two-factor authentication: An additional
form of online security that helps to prove
who you are. You might be asked for this
when you try to log in to an online account.
Usually, once you enter your password,
you’ll need to enter a code sent to your
email account or your phone by text
message to confirm your identity.
3. Key terminology
9
|
An intermediate guide to email

3. Key terminology
Unsubscribe: If you no longer wish
to receive emails from a particular business
or organisation you can opt out of their
mailing list. Usually, you can do this
by clicking the ‘Unsubscribe’ link at the
bottom of their last email.
Username: When you set up your email
account, you might be asked to enter
a ‘username’. You can choose your
username, assuming what you want isn’t
already being used by someone else.
You might want your username
to be your name or a nickname.
Web/internet browser: A program that
runs on your device. It allows you to access
webpages on the internet. Common web
browsers include Microsoft Internet Explorer
or Edge, Google Chrome, Mozilla Firefox
and Apple Safari.
Webmail: A way of accessing your email
through your web browser.
Wireless network, or ‘WiFi’:
How your phone, tablet, laptop or computer
connects to the internet without using
wires or cables. You can access public
WiFi networks, for example when out
and about, or arrange a contract with
an internet provider so you can use
WiFi at home.
10
|
An intermediate guide to email

4. Using email in Gmail
11
|
An intermediate guide to email

4. Using email in Gmail
Checking your inbox
Once you’ve set up an email account, you’ll want to check your inbox from time to time
to see if you have any new emails.
You’ll receive new emails from people you’ve shared your email address with. This could
be friends, family, or any business or organisation you have a relationship with, like your
bank or a charity you support.
The following instructions work on laptops, computers, tablets or smartphones:
1. To check your inbox, go to your web browser or the Gmail app. If using your web
browser, type in the web address www.gmail.com
2. If you’re using your own device, or you’re on the app, you may already be logged
in from the last time you used your email. If not, enter your username and password
and sign in.
3. Your Inbox will then open and any new messages you’ve received will be displayed
in bold type.
4. To read a new message, click on the text and the email will open up for you to read.
Setting up email notifications
How frequently you check your inbox is entirely up to you. It will depend on how many
emails you receive and need to respond to. You may wish to look at them once a day
or every few days. Or, if you’d like to be updated every time you receive a new email,
you can set up a notification on your device.
A notification is an alert that pops up on your screen to let you know when you’ve received
a new email. It works similarly to when you receive a text message on your phone.
You can choose to turn the sound on or off for notifications.
How to set up Gmail notifications on your web browser
You can receive email notifications on your laptop or computer when you’re signed
into your Gmail account and have it open on your web browser.
1. Log in to your email account on your web browser (for example, Microsoft Edge,
Google Chrome or Firefox).
12
|
An intermediate guide to email
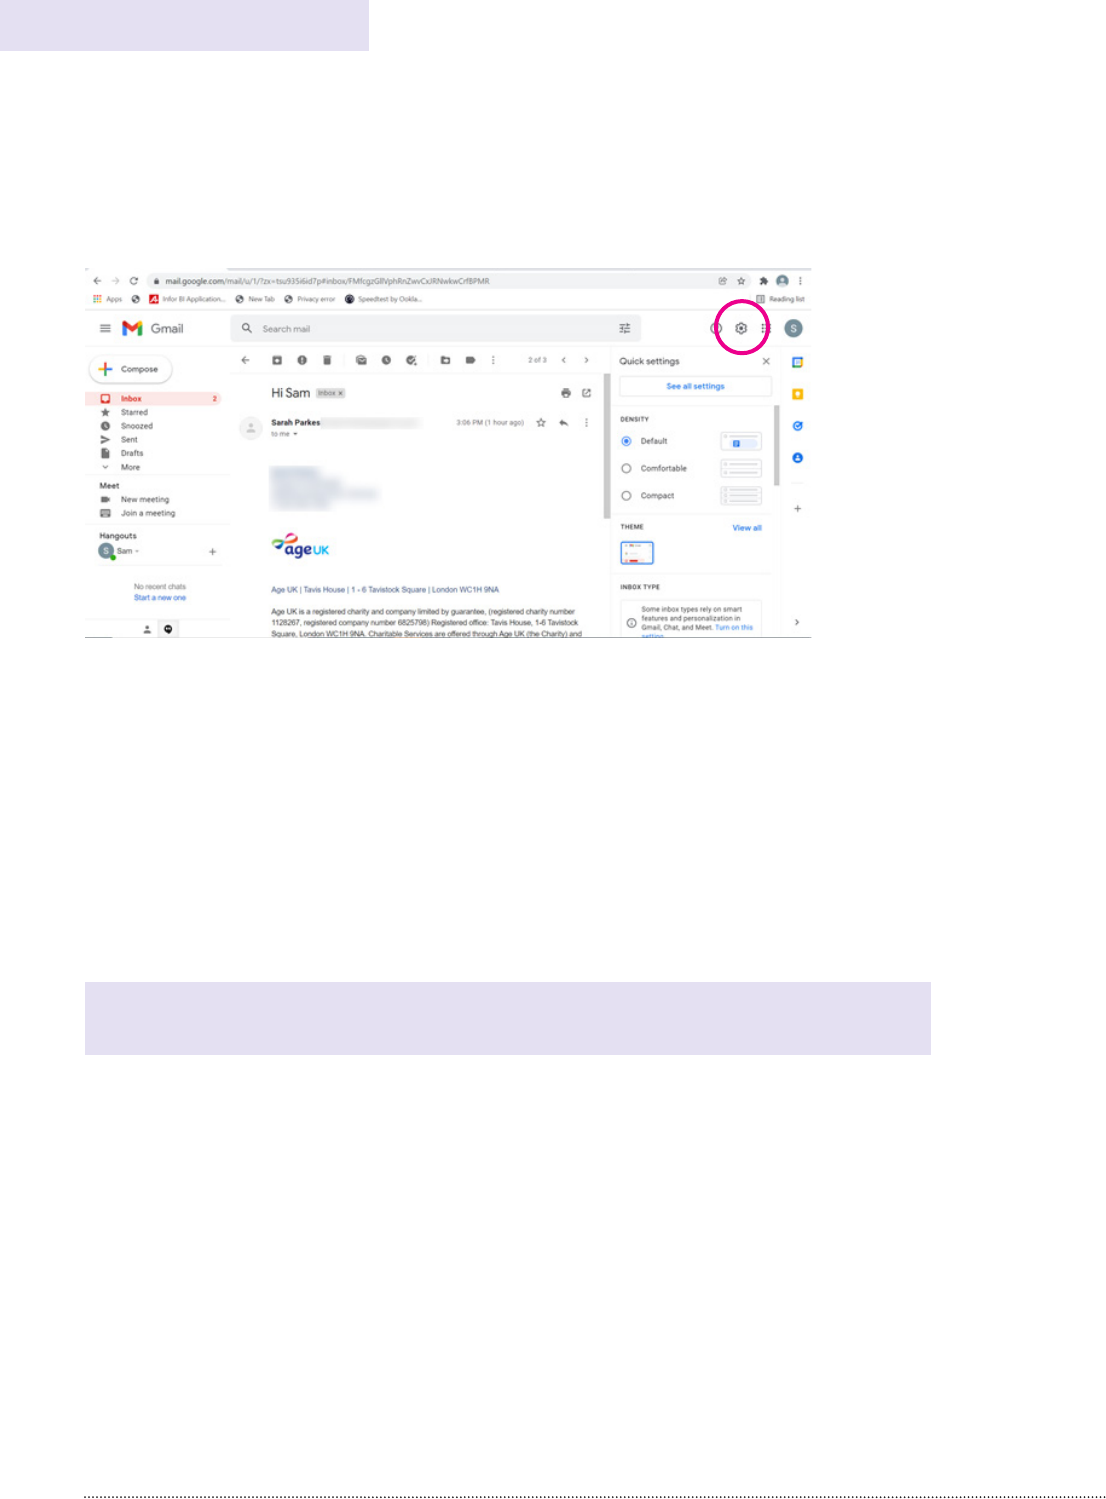
2. Click on the cog symbol in the top right-hand side of your screen, to the right
of the question mark. This will open a drop-down menu of ‘Settings’. Click on the
‘See all settings’ box.
3. You’ll then be presented with a long list of different email settings. Scroll down
through the list until you see ‘Desktop notifications’ in bold type. Select ‘New email
notifications on’.
4. At this point you can choose whether or not to turn the sound on for notifications.
This will alert you each time you have a new email, in a similar way to how your phone
beeps when you receive a new text message.
Next to ‘Mail notification sounds’, select a sound from the list. Or, if you’d rather not
hear email notification sounds, select ‘None’ from the list.
Note: if you opt to turn sound notifications on for email you will only hear them if your
device has the sound turned on and is not in silent mode.
5. Scroll down to the bottom of the page and click ‘Save Changes’.
You’ll now receive notifications when you receive new emails. But remember, these
alerts will only come through when your device is switched on and you are logged
into your Gmail account through your web browser.
How to set up Gmail notifications on your phone or tablet
You can receive email notifications on your phone or tablet when you’ve downloaded
and signed into your Gmail app.
1. You may be automatically logged in to your Gmail app but, if not, sign in using your
username and password.
4. Using email in Gmail
13
|
An intermediate guide to email

2. This will automatically open your Gmail inbox. To access your settings, click
on the three lines in the top left of your screen. This will reveal a drop-down menu.
Tap ‘Settings’, which is near the bottom of the menu.
3. In Settings, select your email address and then scroll down until you see ‘Notifications’.
Tap on this and then, if you’re on an iPhone or iPad, select ‘All new emails’ (you should
see it selected with a blue tick). On an Android, tap on ‘Show notifications’. The white
circle will turn blue when selected.
On iPhone: On Android:
4. Using email in Gmail
14
|
An intermediate guide to email

4. For sound alerts, use the back arrow in the top left of your screen to go back to the
previous page. Select ‘Notification sounds’ and then choose your preferred alert from
the list. See below:
5. On some Android devices your phone may automatically take you to your phone’s
‘Settings’ where you can choose the sound for email notifications.
6. To return to your inbox, use the back arrows in the top left of your screen to go back
to your messages.
How to reply to an email
We briefly mentioned how to reply to an email in our beginner’s guide to email,
but to recap, here are the steps to follow:
1. Log in or open your email account on your device.
2. Select the email you wish to respond to. This might be an email you opened some
time ago or an email you’ve just received.
3. Click on the email to open it and then select the ‘Reply’ button at the bottom
of the email. This is on the left hand-side of the email.
4. This will open a text box for you to type your response in. Once you’ve written your
message, select ‘Send’ if using your email in your web browser. Or, if using the Gmail
app, press the blue arrow in the top right-hand corner.
4. Using email in Gmail
15
|
An intermediate guide to email

How to send an email with an attachment
One of the great things about email is that, as well as sending messages, you can attach
files to them. For example, if you want to share photographs with friends and family you
can attach them to your email. Or, if you need to send a scan of a document to someone,
you can upload that and send it by email too.
Sending an attachment with an email is fairly straightforward. The only thing you need
to be mindful of is the file size of the attachment you are sending. See the box on page
19 for more details.
Sending attachments in Gmail:
1. Create a new email message by selecting ‘Compose’ (in the top left of your web
browser or the bottom right of your Gmail app).
Or, if you would like to send an attachment in a reply to an existing message, select
the message and then click the ‘Reply’ button. A new email box will open up.
2. Type your message as normal and then click on the paperclip symbol to attach a file
(such as a photograph, text document or PDF). This will be in the bottom of your text
box if you are accessing Gmail through your web browser. Or, if you are using the Gmail
app it will be in the top right of your screen.
On web browser:
4. Using email in Gmail
16
|
An intermediate guide to email

On iPhone: On Android:
3. When you click on the paperclip, a box will pop up which allows you to choose the file
you’d like to upload from your device. Find and select the file you’d like to upload.
4. If using a laptop or computer, select ‘Choose’ and the image or file will be uploaded
and attached to your email.
If using a phone or tablet, you just click on the image or file you want to upload
and it will automatically be uploaded as an attachment.
Note: how your attachment displays in your email will vary depending on the device
you’re using and the type of file you’ve uploaded. You can tell if your email has an
attachment if the file name or the file itself appears in the body of the email.
4. Using email in Gmail
17
|
An intermediate guide to email

On iPhone: On Android:
On web browser:
5. You can add more than one attachment to an email. Simply repeat the process
by clicking on the paperclip again and choosing another file to attach.
6. Once your attachments have been uploaded and you’re happy with your email,
click ‘Send’. (Remember, on the Gmail app, the ‘Send’ button is the blue arrow).
4. Using email in Gmail
18
|
An intermediate guide to email

How to file your emails in Gmail
Once you start receiving emails, it can be handy to create a filing system for them,
so that you can find them easily rather than scrolling endlessly through your inbox.
In Gmail, you can do this by creating labels, which are basically just folders you assign
your emails to.
Create a Gmail label in your web browser
1. Open your Gmail account.
2. At the top right, click on the cog symbol, which is your Settings. Depending on whether
you’re using a Windows device or Mac, the display may look different.
3. In the top navigation, select ‘Labels’.
TOP TIP
Attachment file sizes
The more files you attach to an email, the bigger it will be. You don’t want to attach
too many files to an email as it might not be able to send – or the person you’re
sending it to might not be able to open it.
Email service providers have set limits on how big attachments can be. With Gmail,
your attachments can’t total more than 25MB, and with Outlook, they can’t total
more than 20MB. This means that if you want to send a number of photos or files it
might be better to spread them across a few emails rather than just one.
Another alternative is to store your files using a cloud storage service like OneDrive,
Dropbox, iCloud or Google Drive and send a link to it in your email message. Or you
can use a file sharing website like WeTransfer: www.wetransfer.com
4. Using email in Gmail
19
|
An intermediate guide to email

4. Scroll down the page and click on ‘Create new label’.
5. A pop-up box will appear titled ‘New label’. Enter the name of your label in the box
under ‘Please enter a new label name’. An example name might be ‘Holiday planning’.
6. Click the blue ‘Create’ button. The label will then appear in the left-hand column
underneath your Inbox and other folders.
Create a label in the Gmail app on an iPhone or iPad
1. Open your Gmail app.
2. Click on the three lines in the top left of your screen, this will display
a drop-down menu.
3. Scroll down to the labels section and select ‘Create new’.
4. Using email in Gmail
20
|
An intermediate guide to email

4. Add a new label name and select Done when finished.
5. A new label will now appear in your app’s drop-down menu.
Note: you can’t create labels on an Android app. You’ll need to log in to your Gmail
on a web browser to create labels.
Assign an email to a folder
Once you’ve set up your labels, you can start assigning your emails to them.
Unlike Outlook, in Gmail you can assign an email to more than one label (folder).
For example, say you had a label for ‘Family’ and another for ‘Holiday photographs’,
you can assign one email to both of those labels. This means they are tagged twice,
which should make them easier to find if you ever need to look for them.
To assign a label to an email in your web browser:
1. In your Gmail Inbox, click the box next to the email you want to apply a label to.
When you do this, the box next to the email will appear ticked and the email will
be highlighted blue.
2. Select the label symbol in the toolbar, which runs along the top of your Inbox.
It looks like this:
A drop-down menu of your labels will appear.
4. Using email in Gmail
21
|
An intermediate guide to email
3. Tick the boxes next to the labels you want to add and click ‘Apply’ at the bottom.
Note: this won’t remove your emails from your Inbox but the labels will now be assigned.
4. If you’d prefer to move your message out of your Inbox and into a specific label,
select the folder symbol with the arrow inside it from the toolbar. Again, a drop-down
menu will appear. This will say ‘Move to:’ at the top.
5. You can then move the email into the label and out of your Inbox.
To assign a label to an email in your Gmail app on an iPhone:
1. Go to your Inbox in the Gmail app and select the message you want to add a label to.
You can do this by tapping the email.
2. Once it’s open, tap on the three dots in the top right-hand side of your screen.
A menu will then pop up.
4. Using email in Gmail
22
|
An intermediate guide to email

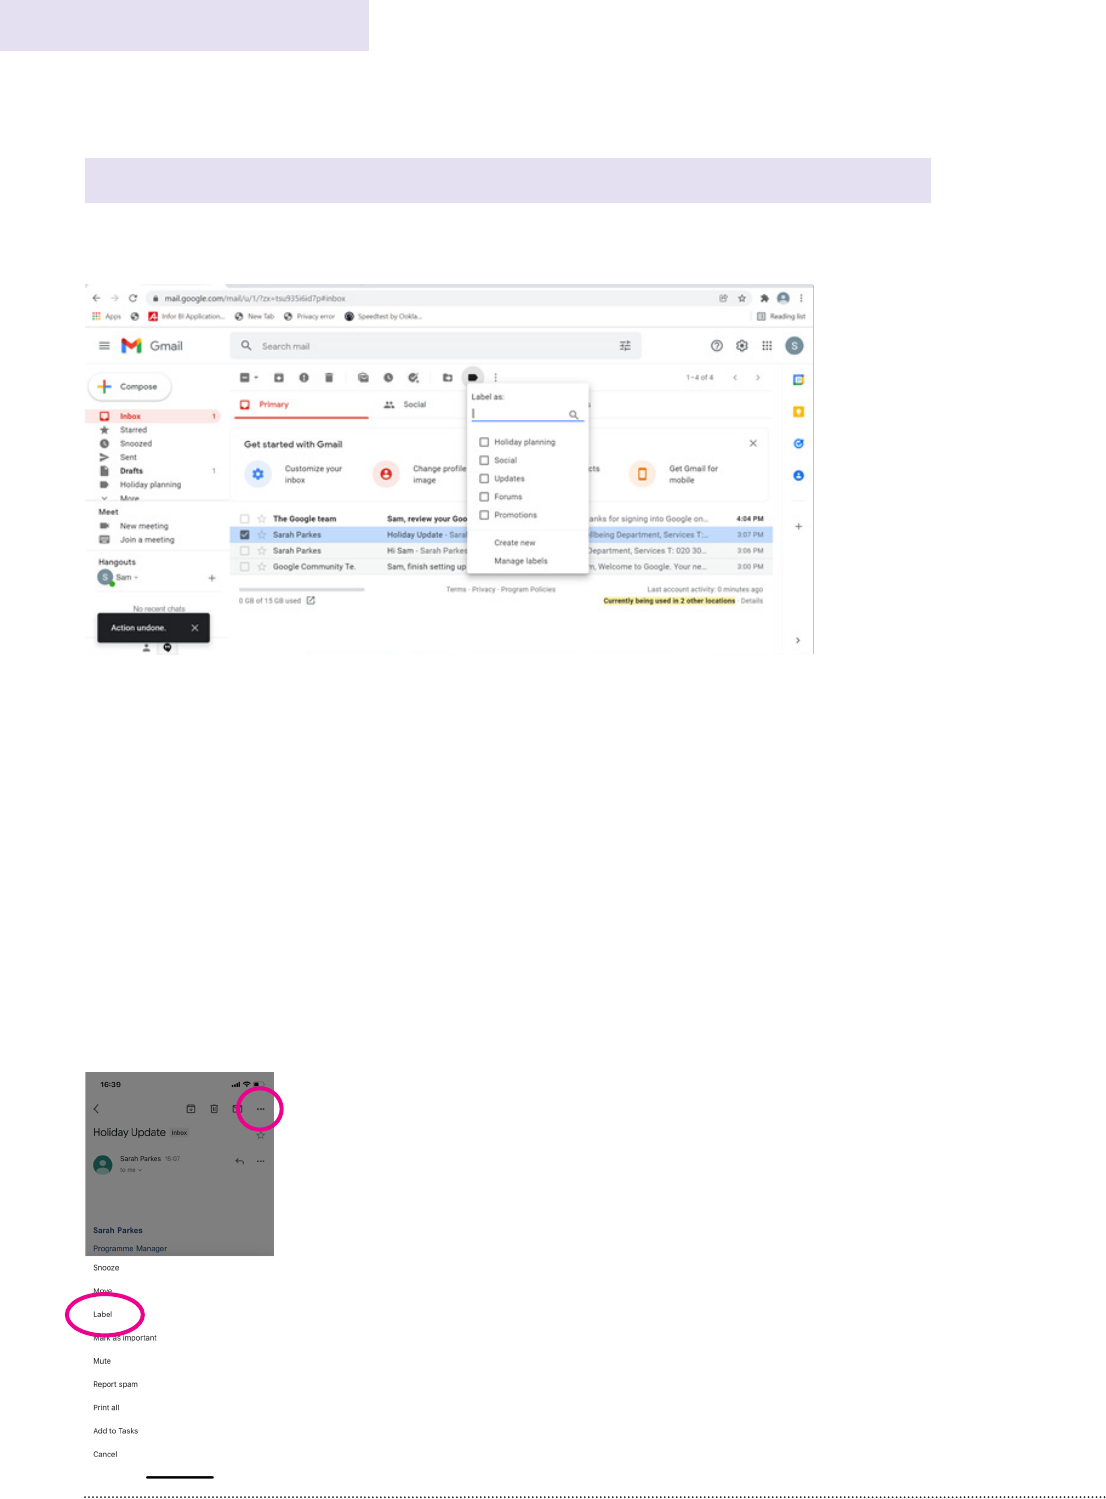
3. Select ‘Label’ and then assign your email to the relevant labels by selecting the tick
boxes and then clicking the tick button in the top right of the screen. Your email
message has now been assigned to a label.
Note: you can’t assign emails to labels on an Android app. You’ll need to log in to your
Gmail on a web browser to do this.
This gives you the basics of filing your emails in Gmail. There’s lots more you can
do in terms of filing and labelling that we won’t go into in this guide. If you feel confident
carrying out the tasks in this guide and would like to know more about what you can
do in Gmail, you can look at the Google website to get support.
4. Using email in Gmail
23
|
An intermediate guide to email

5. Using email
in Outlook
24
|
An intermediate guide to email

5. Using email in Outlook
Checking your inbox
Once you’ve set up an email account, you’ll want to check your inbox from time to time
to see if you have any new emails.
You’ll receive new emails from people you’ve shared your email address with.
This could be friends, family or any business or organisation you have a relationship with,
like your bank or a charity you support.
The following instructions work on laptops, computers, tablets or smartphones:
1. To check your inbox, go to your web browser or the Outlook app. If using your web
browser, type in the web address www.outlook.com
2. If you’re using your own device or you’re on the app, you may already be logged
in from the last time you used your email. If not, enter your username and password
to sign in.
3. Your Inbox will then open and any new messages you’ve received will be displayed
in bold type in your web browser. On an iPhone or an iPad, a new message will have
a blue dot next to it in the Outlook app. On an Android device, a new email will have
bold type like on a web browser.
On iPhone: On Android:
25
|
An intermediate guide to email

On web browser:
4. To read your message, click on the text. The email will then open up for you to read.
Setting up email notifications
How frequently you check your inbox is entirely up to you. It will depend on how many
emails you receive and need to respond to. You may wish to look at them once a day
or every few days. Or, if you’d like to be updated every time you receive a new email,
you can set up a notification on your device.
A notification is an alert that will pop up on your screen to let you know every time you
receive a new email. It works similarly to when you receive a text message on your phone.
You can choose to turn the sound on or off for notifications.
How to set up Outlook notifications on your web browser
You can receive email notifications on your laptop or computer’s desktop, even when
your web browser is closed.
1. Log in to your Outlook account on your web browser (for example, Microsoft Edge,
Google Chrome, Firefox).
2. Go to ‘Settings’ in the top right-hand corner of your screen. This is indicated by the
cog symbol.
3. A drop-down menu will appear. Scroll to the bottom and click ‘View all Outlook
settings’.
5. Using email in Outlook
26
|
An intermediate guide to email

4. A pop-up box will appear with all the Settings options on it. Click on ‘General’ at the top
of the menu and then ‘Notifications’.
5. You can choose your notification options from here. This includes getting a notification
each time you receive a new message and selecting a sound to accompany the
notification.
6. You can also select ‘Desktop notifications’ which alerts you when you receive a new
email, even if Outlook is closed on your web browser. New notifications will appear in
the corner of your screen.
7. Once you’ve selected all the notifications you’d like to activate, you can then close the
pop-up box by clicking the ‘X’ symbol in the top right-hand corner. This will return you
to your inbox.
How to set up Outlook notifications on your phone or tablet
You can receive email notifications on your phone or tablet when you’ve downloaded and
signed into the Outlook app.
1. You may be automatically logged in to your Outlook app but, if not, sign in using your
username and password.
2. This will automatically open your Outlook Inbox. To access your Settings on an iPhone
or tablet, tap on the circle icon with the initial letter of your first name in the top
left-hand of your screen. This is to the left of the word ‘Inbox’. On an Android,
you need to tap on the circle icon to the left of the word ‘Inbox’. This is white with
the blue Outlook logo in the middle.
5. Using email in Outlook
27
|
An intermediate guide to email
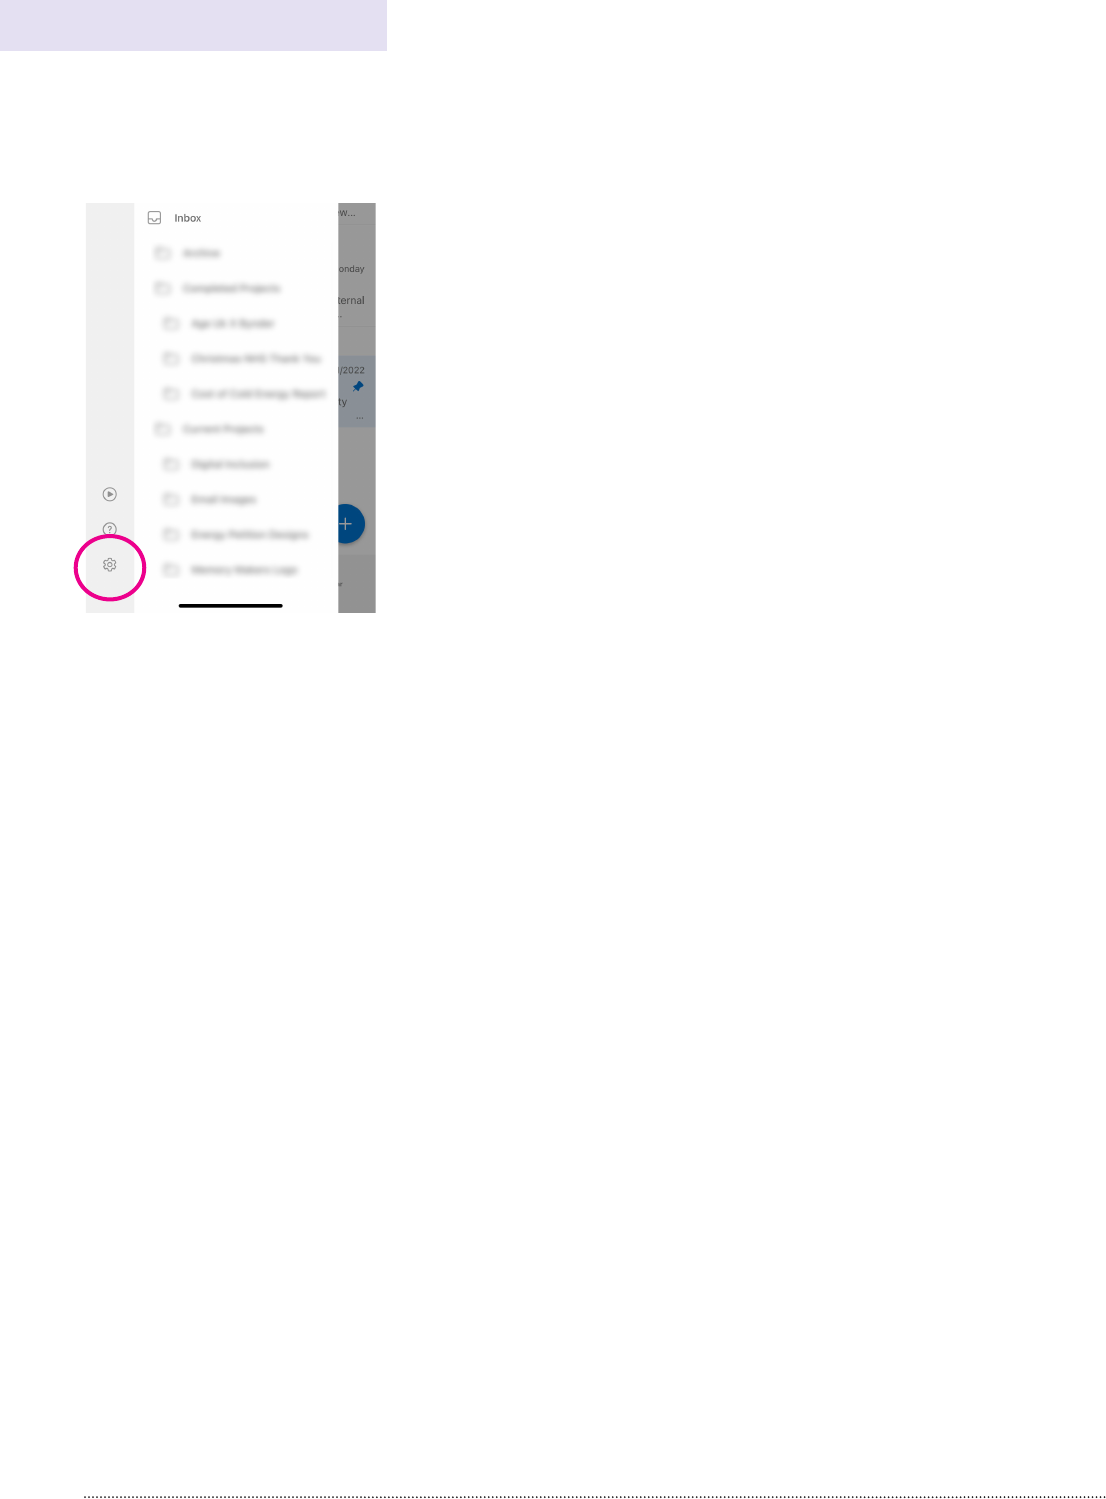
3. This will open a drop-down menu on the left of your screen. Go to the bottom
of the menu and click on the cog symbol.
4. Under the ‘Email’ section you’ll see ‘Notifications’. Select this and choose
the notifications you’d like to receive on your phone or tablet each time you receive
a new message.
On an iPhone or iPad, Outlook gives you the option to have notifications for all
your new emails (Focused and Other Inboxes) or just your important messages
(Focused). On an Android, you can only set up notifications for Focused emails.
You can also choose whether or not to activate a sound alert each time you receive
a new message.
5. Once you are happy with your settings, use the arrow buttons at the top to navigate
back to your inbox.
How to reply to an email
We briefly mentioned how to reply to an email in our beginner’s guide to email,
but to recap, here are the steps to follow:
1. Log in or open your email account on your device.
2. Select the email you wish to respond to. This might be an email you’ve already opened
or an email you’ve just received.
5. Using email in Outlook
28
|
An intermediate guide to email

3. Click on the email to open it and then select ‘Reply’ at the bottom of the email.
On web browsers, there’s also a ‘Reply’ button at the top of the screen.
On iPhone: On Android:
On web browser:
4. This will open a text box for you to type your response in. Once you’ve written your
message, select ‘Send’ if using your email in your web browser. Or, if using the Outlook
app, press the blue arrow in the bottom right-hand corner.
5. Using email in Outlook
29
|
An intermediate guide to email

How to send an email with an attachment
One of the great things about email is that as well as sending messages, you can attach
files to them. For example, if you wanted to share photographs with friends and family
you can attach them to your email. Or, if you need to send a scanned document with
an email you can upload that too.
Sending an attachment with an email is fairly straightforward. The only thing you need to
be mindful of is the file size of the attachment you are sending. See the box on page 31
for more details.
Sending attachments in Outlook:
1. Create a new email message by selecting ‘New message’ in the top left of your web
browser. This is a blue button. Or if you’re using the Outlook app on an iPhone or iPad,
tap the blue circle with a ‘+’ symbol in the bottom right of your screen. On an Android
there is a blue circle with a white square and a pen symbol.
On iPhone: On Android:
On web browser:
5. Using email in Outlook
30
|
An intermediate guide to email

Alternatively, if you would like to send an attachment in a reply to an existing message
you’ve received, select the message and then click the ‘Reply’ button. A new email box
will open up.
2. Type your message as normal and then click on the paperclip symbol to attach
a file (such as a photograph, text document or PDF).
On your web browser, there are two paperclip symbols – one above the email message
you’ve typed and one below it. It’s fine to click on either of these options as they both
do the same thing.
In your Outlook app, the paperclip symbol is beneath the message you’ve just typed.
3. When you click on the paperclip symbol a box will pop up which allows you to choose
the file you’d like to upload. This can be a file you already have stored on your device,
a file stored in a cloud storage service, or one that you’d like to upload to your device
right now. Find and select the file you’d like to upload and then select ‘Open’.
If using a phone or tablet, just tap the image or file you want to upload. On an iPhone
or iPad, there is one more step: selecting ‘Add’ in the top right-hand side of your screen.
4. You can add more than one attachment to an email. Simply repeat the process
by clicking again on the paperclip and choosing another file to attach.
5. Once your attachments have been uploaded and you’re happy with your email,
click ‘Send’. (Remember, on the Outlook app, the Send button is the blue arrow).
TOP TIP
Attachment file sizes
The more files you attach to an email, the bigger it will be. You don’t want to attach
too many files to an email as it might not be able to send – or the person you’re
sending it to might not be able to open it.
Email service providers have set limits on how big attachments can be. With Gmail,
your attachments can’t total more than 25MB, and with Outlook, they can’t total
more than 20MB. This means that if you want to send a number of photos or files it
might be better to spread them across a few emails rather than just one.
Another alternative is to store your files using a cloud storage service like OneDrive,
Dropbox, iCloud or Google Drive and send a link to it in your email message. Or you
can use a file sharing website like WeTransfer: www.wetransfer.com
5. Using email in Outlook
31
|
An intermediate guide to email

How to file your emails in Outlook
Once you start receiving emails it can be handy to create a filing system for them,
so that you can find them easily rather than scrolling endlessly through your Inbox.
In Outlook, you can do this by creating folders.
Create an Outlook folder in your web browser
1. Go to your Inbox and scroll down the menu bar on the left-hand side of your screen
until you see ‘New folder’ in blue type.
2. Click on ‘New folder’ and a text box will appear for you to write your new folder name,
such as ‘Banking’.
3. Hit the return key and the new folder will be created in your folder menu.
Create a folder in the Outlook app on an iPhone or iPad
1. Open the app and, in your Inbox, tap and hold the message you’d like to add to a
folder.
2. Icons will appear at the bottom of the screen. Click on the folder with the arrow in it.
This is the ‘Move’ folder. A list of existing folders will appear: ‘Inbox’, ‘Sent’, ‘Archive’,
‘Deleted’.
3. To create a new folder, tap the ‘+’ icon in the upper right-hand corner of the app.
4. A pop-up will appear prompting you to type in the name of your new folder.
Write the name and tap ‘Create’. You have now made a new folder.
5. Using email in Outlook
32
|
An intermediate guide to email

Note: You can’t create a folder in Outlook using the Android app; you’ll need to use the
web browser. You can move emails to an existing folder in the Outlook app. We explain
how to do this below.
Moving an email to a folder
Once you’ve set up your folders, you can start assigning your emails to them.
To move an email to a folder in your web browser:
1. Go to your Inbox and select the email you’d like to move.
2. Click on the ‘Move to’ icon in the toolbar above your message. A drop-down menu
will appear.
3. Click on ‘Move to a different folder’. Choose the folder you’d like to move your
message to and the email will automatically be removed from your Inbox and filed
in that folder.
5. Using email in Outlook
33
|
An intermediate guide to email

To move an email to a folder in the Outlook app:
1. Open the app and tap the message you’d like to move.
2. Once the message is open, click on the three dots in the top right of the app.
A drop-down menu will appear. Select ‘Move to Folder’.
3. A list of your folders will then appear. Choose the one you’d like to move the message
to by tapping it. Your message will then automatically be removed from your Inbox
and filed in that folder.
This gives you the basics of filing your emails in Outlook. There’s lots more you can
do in terms of folders and organising that we won’t go into in this guide. If you feel
confident carrying out the tasks in this guide and would like to know more about
what you can do in Outlook, see the Outlook Training website.
5. Using email in Outlook
34
|
An intermediate guide to email

6. Downloading
images and files
in Gmail or Outlook
35
|
An intermediate guide to email

Saving an image from an email on a laptop or computer:
1. Click on the image you want to save. The photo will open.
2. You may have the ‘Save as’ icon which looks like a floppy disk. If you do, click on this. Or you may have
three horizontal dots in the top right side of the image. If you do, click on that. This will bring up a menu.
You need to click on ‘Save as’ which is the second option down.
3. A box will then appear. In ‘File name’, create a name for the photo. You may find that, if the person
who sent you the image hasn’t named it themselves, the file name is a number.
4. Then choose where to save the image. A good place to save it is in the ‘Pictures’ folder on your device.
Most laptops and computers will come with this folder already set up.
Saving an image from an email on your Android:
1. Click on the three dots next to the image you want to save.
6. Downloading images and files in Gmail or Outlook
36
|
An intermediate guide to email

2. A box will pop up. You’ll see that the image will automatically download
into your ‘Downloads’ folder on your device.
3. Click on the ‘Gallery’ icon on your home screen. This is where all your photos
are automatically saved. You’ll find the ‘Downloads’ folder in there. Your photo
will be saved in there.
6. Downloading images and files in Gmail or Outlook
37
|
An intermediate guide to email

Saving an image from an email on your iPhone:
1. Click on the image you want to save.
2. A menu will pop up. Click ‘Save Image’.
3. You’ll find the photo in your ‘Photos’ app.
Saving an image from WhatsApp on your Android, iPhone or iPad
1. By default, WhatsApp saves all the photos people send to your phone.
2. Go to the ‘Gallery’ or ‘Photos’ icon and tap it.
3. Then look for the ‘WhatsApp images’ folder. You’ll find the photo there.
6. Downloading images and files in Gmail or Outlook
38
|
An intermediate guide to email

Downloading files
When you buy train tickets, book holidays or pay for insurance, the companies will send
you information attached to emails that you may choose to print out. These are called
‘files’ and are typically sent as PDFs. You’ll need to download them.
Downloading a file on a laptop or computer:
1. Open the email and double click on the file you want to download. The document
will open.
2. You’ll see a toolbar near the top of the screen. The second icon from the right will read
‘Download’. Click on this.
3. This will automatically download your file. You file when then be stored on your laptop
or computer, and can be accessed in your ‘Downloads’ folder.
6. Downloading images and files in Gmail or Outlook
39
|
An intermediate guide to email

Downloading a file on your Android:
1. Tap on the three dots next to the file you want to download.
2. A box will pop up. Click on ‘Device’ and you’ll see that the file will automatically
download into your ‘Downloads’ folder on your device.
6. Downloading images and files in Gmail or Outlook
40
|
An intermediate guide to email

3. Click on the ‘My Files’ icon on your home screen. This is where all your files are
automatically downloaded to. You’ll find the ‘Downloads’ folder in there. Your file will
be saved in there.
Downloading a file on your iPhone
1. Tap on the file you want to download.
2. The file will open. To download it, click on ‘Share file via’.
6. Downloading images and files in Gmail or Outlook
41
|
An intermediate guide to email
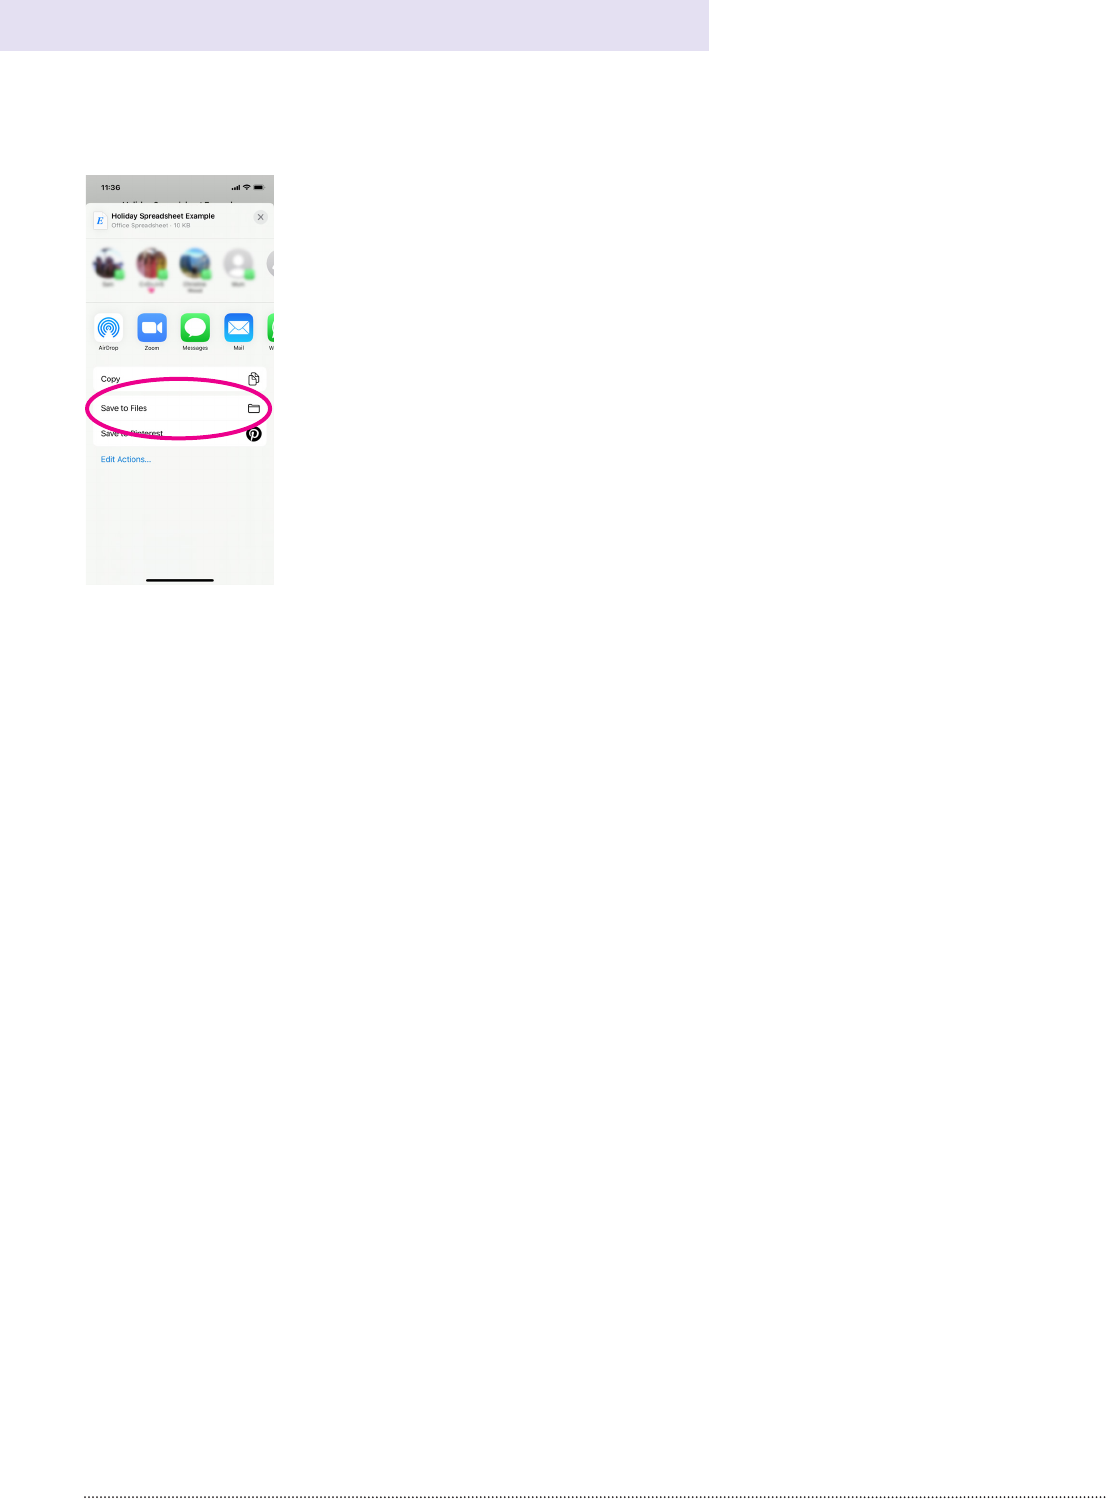
3. Click ‘Save to Files’.
6. Downloading images and files in Gmail or Outlook
42
|
An intermediate guide to email

7. How to spot
a spam email
43
|
An intermediate guide to email

7. How to spot a spam email
One of the most common ways fraudsters try to con people online
is by sending scam emails, also known as spam emails. These are
emails that look legitimate, from companies or organisations you
might have an existing relationship with, but are in fact fake.
Useful tips on spotting scam emails are to:
Check who it’s ‘from’. Always check the email address of the sender to see if it looks
legitimate. Fraudsters will often change the name to make it look like the email is from
a company or organisation you are familiar with. This is known as a ‘phishing’ scam.
Here is an example of an email that claims to be from PayPal but if you check the email
address, it’s from someone completely different:
Look at the subject line. Another way fraudsters will try to con you is by enticing
you with attractive subject lines, such as ‘Claim your discount’ or ‘You’ve won a prize!’
and then ask you to click on a link to claim it. Unless you’ve legitimately entered
a competition with a reputable company, no one will ever email you out of the blue
to say you’ve won something.
Check spelling and grammar. Often scam emails are poorly written and littered with
spelling mistakes. The email might look a bit messy too, with a dodgy looking company
logo and weird fonts. If in doubt, press delete.
Avoid requests for personal information. No legitimate company or organisation
will ask you to respond to an email by sharing personal information, like your passport,
national insurance number or bank details. Any email that does is most likely a scam
and the information will be used to hack your account.
44
|
An intermediate guide to email

Beware any email links. Scam emails will often encourage you to click on a link to claim
a prize or to stop an online transaction from being authorised. If you doubt who the
sender is, do not click on it, as it could infect your device with malware or a virus.
Ignore any threats. Often scam emails will be written with a sense of urgency. They’ll use
phrases like ‘Act now to protect your account’ or ‘You have 24 hours to respond or this deal
will expire’. Don’t panic and click on any links. Instead, if you have a legitimate account
with the company or organisation that has emailed you, log in separately to their website,
using a different browser window, to see if the message is legitimate.
7. How to spot a spam email
45
|
An intermediate guide to email

8. How do I mark emails
as spam or junk?
46
|
An intermediate guide to email

Next Steps
Once you feel comfortable checking and replying to messages, sending attachments
and organising your email Inbox, read our advanced guide to learn how to:
• sign up to email newsletters
• set up online accounts for shopping and banking
• authorise your email address
• understand website security
• unsubscribe from mailing lists.
8. How do I mark emails as spam or junk?
You can mark suspicious emails as spam or junk through your email
provider. This will delete them from your inbox and can stop you from
receiving emails from that sender again.
Useful tips on spotting scam emails are to:
Marking spam in webmail
1. Select the email in your inbox by clicking on the tick box to the left of the sender.
2. Then click on the symbol in the bar above which lets you report the email to the
provider. This will vary depending on your email provider but it may be a no entry
sign, a shield or an exclamation mark, with wording such as ‘Report spam’ or ‘Junk’.
3. Your email account will also have a spam or junk folder. Some emails may go straight
into that folder, so you don’t need to worry about marking those as spam.
Marking spam in your Gmail or Outlook app
1. If you open an email in the Gmail or Outlook app on your tablet or smartphone
that you think is spam, don’t panic.
2. In the top of your screen there should be a three dots symbol: … Click on this
and a drop down menu should appear with a list of options.
3. Click on the wording that says something like ‘Report junk’ or ‘Report spam’.
This will automatically delete the email and alert your email provider that this
is from a spam sender.
4. Your email account will also have a spam or junk folder. Some emails may go straight
into that folder, so you don’t need to worry about marking those as spam.
47
|
An intermediate guide to email

We provide advice and information for people in later life through our
Age UK Adviceline, publications and online.
Age UK Advice: 0800 678 1602
Lines are open seven days a week from 8am to 7pm.
You can find more information at www.ageuk.org.uk
We hope you’ve enjoyed working your way through this guide
and connecting with others through email.
Notes
My Age UK Digital Champion
Telephone number:
Age UK is a charitable company limited by guarantee and registered in England and Wales (registered charity number 1128267 and registered company number
6825798). Registered address: 7th Floor, One America Square, London EC3N 2LB. Age UK and its subsidiary companies and charities form the Age UK Group, dedicated
to helping more people love later life. ID204747 01/22.
