
!
Teleprompter
User Guide for Version 3.0
Pavonine Software
Revised Tuesday, March 26, 2019

Table of Contents
Table of Contents 2....................................................................................
Welcome to Teleprompter! 3......................................................................
Interface Overview 4..................................................................................
Text Entry 6................................................................................................
Inserting Images 7.................................................................................
Importing Files 8.........................................................................................
Exporting Files 9........................................................................................
Prompting 10..............................................................................................
Segments and Automatic Speed 12...........................................................
Using the Timer 13.....................................................................................
Overview 14...............................................................................................
Recording 16..............................................................................................
Adjusting Resolution, Flip Settings, and Opacity 17..................................
Arrow, Times, and Overlays 19..................................................................
Using Multiple Screens 20.........................................................................
Broadcast the Script over the Network 21..................................................
Temporarily Hide Text on Screens 22.........................................................
Multiple Windows 23..................................................................................
Remote Control and Editing 24..................................................................
Remote Control from iPhone 25.................................................................
Preferences 28...........................................................................................
Customizing Keyboard Shortcuts 31.....................................................
Customizing Mouse Behavior 32...........................................................
Configuring Wheels and other Control Devices 33................................
Troubleshooting 34.....................................................................................
Contact Information 35...............................................................................
2

Welcome to Teleprompter!
Congratulations on your purchase of Teleprompter! This user guide hopes to answer
any common questions you have regarding Teleprompter, as well as educate your
usage of the software so you may take full advantage of its capabilities.
If at any time you need help with Teleprompter, visit pavonine.co/teleprompter/support
for additional support.
Using this Manual
This manual often uses formatting to denote what phrases refer to.
For example,
Italicized phrases refer to elements of the user interface or key phrases.
Underlined phrases refer to other sections of the manual or user interface. Click on
these to jump to them.
Common Phrases
Throughout this documentation, certain phrases will used repeatedly. It’s important to
understand what they mean so you may fully understand the documentation.
Script, Document
The script or document represents one Teleprompter file, consisting of a text, speed,
timing information, and overlay settings.!
3

Interface Overview
When you open up a new Teleprompter document, you’re greeted with the following
interface:
1. Opens the Overview side pane. In the overview, you can edit the zoomed-out text in
any location, and view the all the segment times for the script. For more on the
Overview pane, see Overview.
2. Opens the Segments side pane. Use the segments to make bookmarks in the script
that you can later jump back too, and enter planned times for each segment. For
more on the Segments pane, see Segments.
3. The Reset button stops movement of the script, and moves it back to its beginning.
Only available in when the script is not playing.
4. The Reverse control starts the script moving backwards, while the Play control starts
moving the script forward. When the script is either playing or reversing, the
4
1.
2.
3.
4.
5.
6.
7.
8.
9.
10.

respective control changes to a Pause control. Click the pause control to stop script
movement, or the other control to switch direction.
5. The Speed Slider controls the speed of the script. You can scroll or drag on this
slider to adjust the speed. This slider is disabled when using automatic speed mode.
For more about automatic speed mode, see Automatic Prompting.
6. Open the Recording panel, which records video and/or audio when prompting. For
more on recording see Recording.
7. Opens the Timer panel. The timer allows you to see the elapsed and remaining time
when prompting. For more about the timer, see Timer.
8. The Script, Overlay, and Screens buttons open their respective side panels. For
more information, see Script, Overlays, Screens.
9. The Formatting Bar. Use this bar to adjust the font, text size, color, line spacing, etc.
This bar can be hidden in the Preferences.
10. The text entry area. Click here and type when the script isn’t moving to edit the text.
For more information, see Text Entry.!
5

Text Entry
Teleprompter includes a full rich text editor, just like TextEdit.
You may edit the text when the script is not moving. While the script is not moving, click
in the text entry area to begin editing.
To edit the text while the script is moving, use the Overview sidebar.
Teleprompter supports many text formatting features. Access them through the Fonts
and Colors buttons in the script sidebar, or under the system-standard Format menu, or
by using the Formatting Bar above the text entry area.
Background Color
Change the background color of the script by clicking the colored square in the
Background Color section of the Script sidebar. Then select a color in the menu that
appears.
Copy & Paste
You may also paste text into the teleprompter using Edit > Paste and Match Style or
⌘V. The text will automatically change to the formatting of the text in the script. (You
can change this in Preferences.) Remember that black text against a black background
6

will not show up. To paste with the text’s original formatting, use Edit > Paste or
Command+Option+Shift+V.
Inserting Images
You may insert images into the text by dragging or pasting them into the text. Images
are kept inline with the text at their original size.!
7

Importing Files
Teleprompter can open TXT (plain text), RTF (rich text),
and Microsoft Word (doc or docx) documents. To import
a document. choose File > Import.
In the the resulting window, find the file you wish to
open in Teleprompter.
In the options panel, you may change the font, font
size, font color, background color, and/or alignment of
the file when imported.
Check the box next to Change Font, for example, to
change the font size once the document is imported.
Or, keep the box unchecked to preserve the original font size.
Once you’re ready to import the document, click Open, and the file will open as a new
Teleprompter document. You’ll need to save the document as a Teleprompter file again,
since it now includes additional Teleprompter functionality.!
8

Exporting Files
To export the current script from a Teleprompter document to a standard, RTF, TXT, or
Word Document file, click File > Export.
In the resulting window, choose a name and location for your exported file. Then,
choose a file format. Plain text files will discard any formatting applied to the text. If
exporting as .rtf, .doc, or .docx, you may choose to change the font, font size, font color,
background color, and/or alignment of the exported file.
Click Save to save the new file.!
9

Prompting
Once your the text of your script is ready, it’s time to start prompting!
Click the Play button, and the script will begin advancing from its current position. #
Adjust the speed of script motion using the Speed slider. You may also scroll over the
Speed slider, or the text itself to adjust the speed.
•
You can adjust the maximum speed in the Script sidebar, under Maximum Speed.
•
You can change how scrolling adjusts the speed, or adjust how wheels or other
devices change the speed in Preferences.
When the script is playing, the Play button turns into a Pause button. Click this Pause
button to stop the script.
Use the the Reverse button to scroll the script backwards. Like the Play button, the
reverse button changes to a Pause button when the script is reversing.
When the script hits the end while playing, or hits the beginning while reversing, it
automatically stops.
Click the Reset button to stop the script and move it back to the beginning.
You may also Play/Pause the script with the Spacebar. The spacebar only
works for playing when not editing the text. Otherwise, it inserts a space. To
start the script with the spacebar, either scroll the text so the cursor is no
longer visible or click the gray area beside the text to stop editing.
10


Segments and Automatic
Speed
Open the Segments sidebar by clicking the Segments button in the
top toolbar, or by choosing View > Show Segments in the menu bar.!
12
Check this box to use the
durations of the segments to
automatically change the
scrolling speed.
When this box is checked,
the Speed slider is disabled.
Automatic pauses are also
executed when this box is
checked.
Add a new segment at the
blinking text cursor.
The starting timecode of the
first segment. Reflected in
the timer and time overlays.
Check this box and set a time
for a scheduled pause before
the segment. Check the
Automatic Speed box to
execute these pauses
automatically.
This marker shows the
location of segment number
2, “Ground Plan” in the text.
Drag this marker to move the
segment’s starting location.
Click this button to scroll the
script immediately to segment
number 2. An equivalent
shortcut is Command+2 on
the keyboard.
Enter a name for the
segment for quick reference.
The planned duration of this
segment. Check the
Automatic Speed box to
adjust the speed
automatically so the script
scrolls through the text of the
segment in the specified
duration.
The total duration of all the
segments.
Click to scale the durations of all
the segments by the given
percentage. After scaling, the total
duration of the script will be New
Duration.
This red line shows the
current scroll position relative
to the segments.

Using the Timer
#
To open the timer panel, click Timer in the toolbar, or choose
View > Show Timer from the menu bar. The below sidebar is
shown above the text.!
13
Shows the time elapsed since
the script started Playing.
Resets to zero when the script
is Reset.
Reset to zero anytime the
script is not playing by clicking
the RESET button.
Shows how long it will
take the script to
reach the end at the
current speed. Adjust
the Speed slider to
watch this number
change.
The sum of the
Elapsed and
Remaining values.
How long the script
will have taken to get
from top to bottom at
the current speed.
How far ahead or
behind the schedule set
by the Segments is the
script? Always reads
zero when Automatic
Speed is enabled.

Overview
Click the Overview button on the far left left side of the toolbar to open the overview
panel.
!
14
The duration of
the “Entrances”
segment.
The time at which
“Entrances” segment ends
and the “Ground Plan”
segment begins.
•
Drag this time to adjust it.
•
Drag the arrow above to
change the duration of the
segment above segment.
•
Drag the arrow below to
change the duration of the
below segment.
This line follows the mouse
cursor and shows the
equivalent time to the position
in the text.
Right click to show a
contextual menu.
The red outline shows the
current position of the script.
Move the overview to the
script’s current position.
Zoom the overview in and out.
You may also use pinch-to
zoom on trackpads.
Drag this line to move the
segment boundary in the text.
This text supports full editing,
even while the script is
playing.
Scroll the script to this point
when not playing.
Scroll the script to this point
when not playing.

The zoomed out Overview is also useful for
comparing the relative lengths of Segments.
In this screenshot, we can see that “Ground
Plan” will move more quickly than
“Entrances,” since it has less time allocated
relative to its text length.!
15

Recording
To op en t he Recording pane, click the recording button in the toolbar, or choose View >
Show Recording in the menu bar.
Recording settings are per-script and per-device. This means it’s
possible to have multiple recording sessions active at once in
multiple scripts, or on multiple devices.!
16
Click to start and stop recording. The
default shortcut is Shift+Command+M,
but can be changed in the Preferences.
When checked, recording begins
automatically when the script starts
playing, if recording is not already
started.
When checked, recording stops
automatically when the script is reset, if
recording is not already stopped.
Choose a file name for the
recording, and a location to
save the file.
Teleprompter automatically
adds or increments a
number at the end of the file
name on subsequent
recordings.
Choose a video device and/
or video device to record
from. If only an audio device
is selected, an audio file is
saved instead of a video file.
Shows the current audio
volume.
Use this slider to adjust the
recorded audio volume.

Adjusting Resolution, Flip
Settings, and Opacity
Adjusting Script Dimensions
Adjust the dimensions of the script from the Script sidebar. Open the Script sidebar from
the window’s top toolbar by clicking the Script button, or from the menu bar by clicking
View > Show Script Pane.
Adjust the resolution settings in the Resolution section, highlighted in red below.
The script is rescaled and letterboxed to fit on different sized screens and windows.
17
The width of the text area, in pixels.
The height of the text area, in pixels.
The margin between the top of the text
area and visible text, in pixels.
The left text margin, in pixels.
The right text margin, in pixels.
The bottom text margin, in pixels.

The text margins can be visually adjusted from the Overlay pane. With the Overlay pane
open, simply drag the aqua rectangle to resize the text margins.
Adjusting Flip Settings
To adjust the flip settings for the editor window, use the area of
the Script sidebar highlighted in the image on the right. !
18

Arrow, Times, and Overlays
To start adding elements that show over the text, open the Overlay pane from the
toolbar, or from the View menu.
19
The aqua boxes represent the outline
of each element. Click and drag to
move them around, or pinch to resize
them. The placement of the text can
be adjusted by dragging its edges.
Enable or disable the
arrow, chose a style,
color, and opacity for it.
Show the times
Elapsed, Remaining, or
the Total time, just like
in the Timer. Check the
box to include a
descriptive title below
the time.
The scheduled time can
be different colors
depending on whether
the script is ahead or
behind of the schedule
set by the Segments.
Shows the current time.
Uses the system time
preferences defined in
System Preferences >
Language and Region >
Advanced > Medium.
Shows an image of your
choosing over the text.
Checking Exclude
Editors only shows the
image on other screens,
or in Clone Windows.

Using Multiple Screens
Open the the Screens sidebar by clicking the Screens button in the toolbar, or by
selecting View > Show Screens Pane.
The Screens sidebar shows a list of all available screens.
Screen configuration is preserved when re-opening documents on the same Mac.
Use the File > Switch to Recent menu to replace the currently open document with
another document, using the same screens as the current document. This is useful to
doing a “quick change” of scripts.!
20
Check the box to show
the script on the
screen. Uncheck the
box to stop showing
the script on the
screen.
Select the arrows to flip
the script only on the
specified screen.
Click the preview
button to show what’s
currently on the screen
in a small window.

Broadcast the Script over the
Network
Open the the Screens sidebar by clicking the Screens button in the toolbar, or by
selecting View > Show Screens Pane.
Below the list of locally attached screens, the Screens sidebar shows screens available
on the local network. Ensure that Teleprompter is running on the other Mac or iOS
device you wish to broadcast to, and that the other device is connected to the same
WiFi network.
The File > Switch to Recent menu will also change the script on remote screens in
addition to local screens.
21
Check the box to show
the script on the
remote screen.
Uncheck the box to
stop showing the script
on the screen.
Select the arrows to flip
the script only on the
specified screen.
Enable Screen Mirroring
under the iOS Control
Center to AirPlay from the
iOS Device.
iOS devices can only show
one document at a time.

Temporarily Hide Text on
Screens
Open the the Screens sidebar by clicking the Screens button in the toolbar, or by
selecting View > Show Screens Pane.
At the top of the sidebar is the text blocking menu. This menu allows you to temporarily
hide text on all screens and preview windows.!
22
Click to toggle whether the
text is hidden.
Click to hide and show the
below configuration menu.
Drag or paste an image
here to show over the text
when it is hidden.
This color will be shown
over the text when hidden,
behind the above image, if it
exists.

Multiple Windows
You can create another window in which to view you script by choosing File > New >
Window. From the menu bar.
If you want to create a lighter-weight window that supports taking over a screen, use
File > New > Clone Window, or, click the New Clone Window button in the Screens
sidebar.
The clone window has many controls in its toolbar.
You might want to hide the clone window’s toolbar by going to the menu bar and clicking
View > Show Toolbar. This command toggles on and off the toolbar.
The File > Switch to Recent menu will change the script in secondary windows in
addition to the main window when used.!
23
Changes flip for just this
window. Also available in
the View menu.
Toggle the Overlay or Arrow
for all windows.
Make this window transparent, in case
you want to view something behind it.
Make the window fullscreen, and prevent changing spaces, or
computer sleep (which normal fullscreen does not). Exit this mode
by pressing the ESC key. This is equivalent to the fullscreen mode
induced by “checking” a screen in the Screens menu.

Remote Control and Editing
Teleprompter is capable of controlling and editing scripts on other devices. Ensure that
both devices are running Teleprompter and connected to the same WiFi network.
Ensure that the script you wish to edit is open on the other device.
Choose File > Open from Network… to view the available documents.
Select the document you wish to control or edit, and click Open.
The document will open in a new window. Use this document just as you would on the
remote device. Feel free to edit the text, play/pause, change the speed, etc.
These changes will take place simultaneously on the original document, and all copies
of the script open over the network. Changes to the script are saved on the device
where it was originally opened. If the host device disconnects, the script closes.!
24

Remote Control from iPhone
Before using the remote control feature of Teleprompter, some conditions need to be
met.
•
Teleprompter must be open on the Mac or iOS Device you wish to control. Enable
Networking must be checked in preferences.
•
The document you wish to control must be open.
•
The Teleprompter Controller app, available on the App Store, must be running on
the controlling iPhone.
•
Both devices must be connected to the same supported WiFi network. Teleprompter
remote control may not work on some networks. If you are on an unsupported
network, or no WiFi network is available, Teleprompter supports Bluetooth remote
control. See Using Remote Control via Bluetooth.
Using Remote Control
on an iOS Device
After verifying that the above
conditions are met, launch the
Teleprompter Controller app on
your iPhone (or iPad).
When you launch Teleprompter
Controller, you are presented with a
list of available scripts found on the
network. The headings above each
group of scripts indicate on which
Mac or iOS device the scripts
reside.
Tap the script you wish to control to
start controlling it.!
25
Select a script to start controlling.
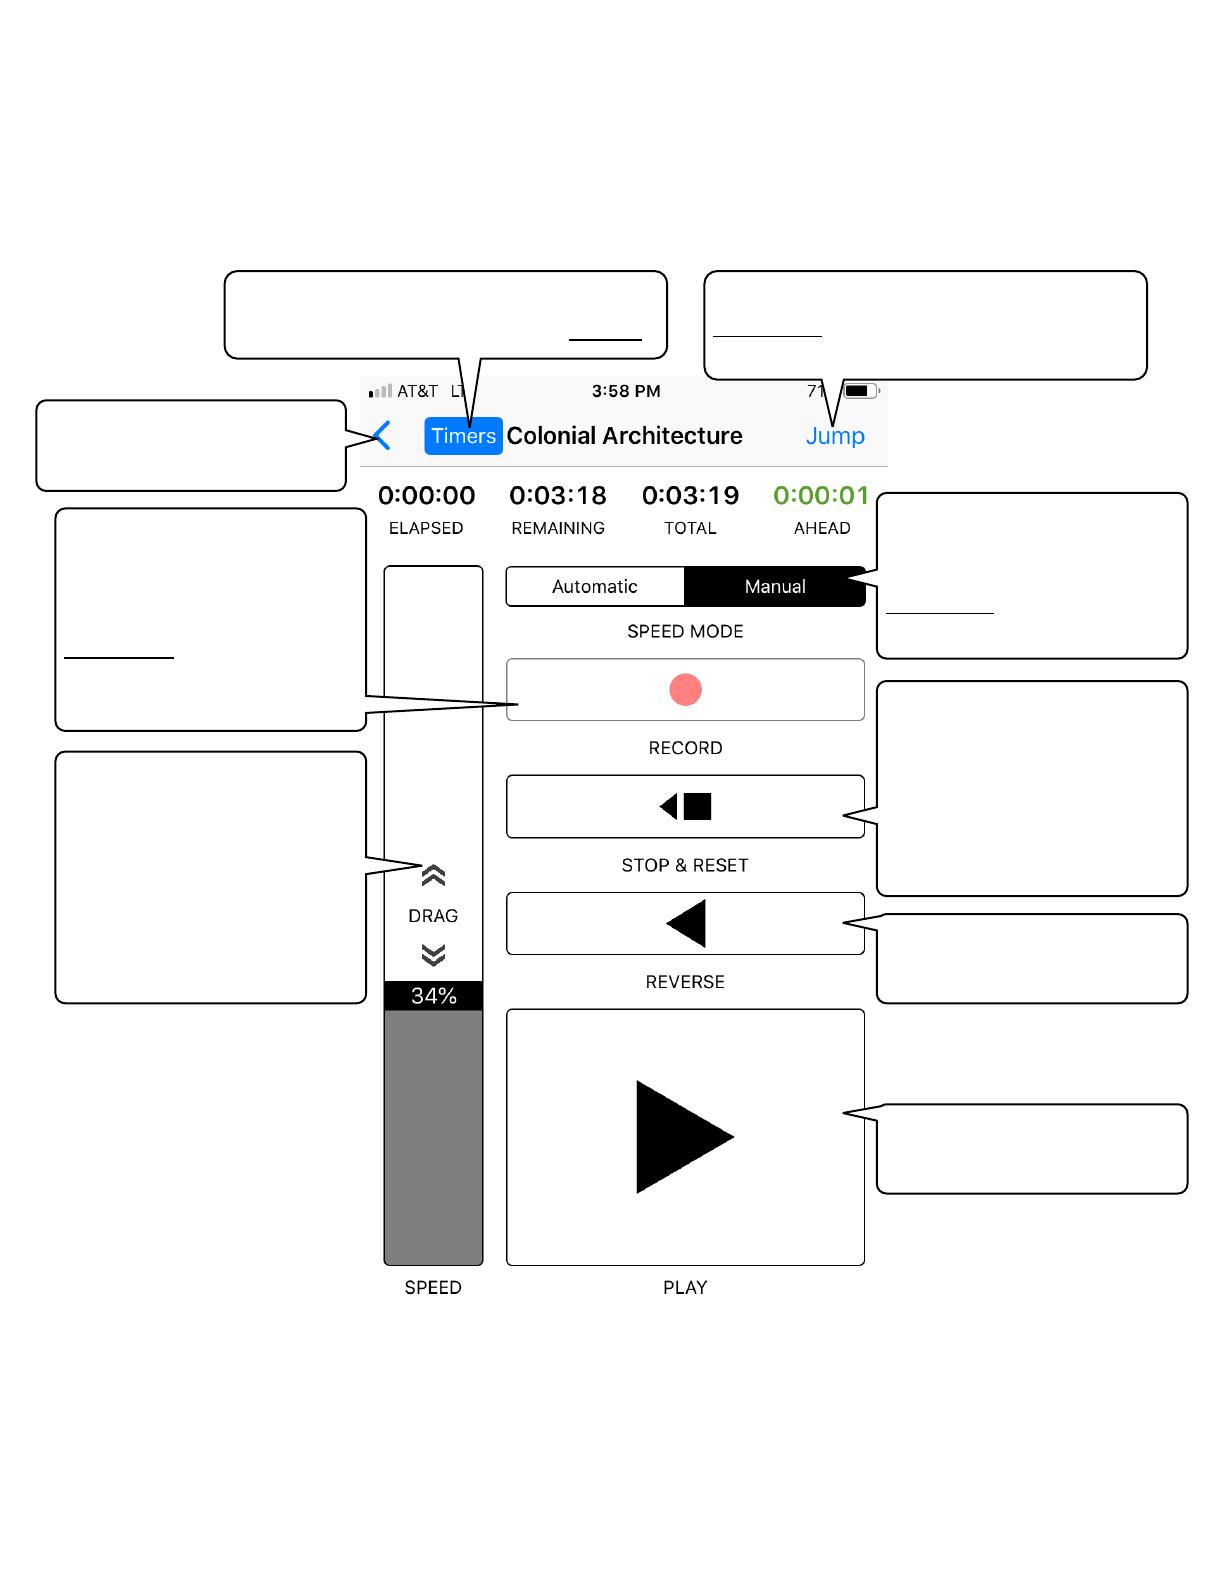
Once you’ve selected script you wish to control, the controller interface appears.
!
26
Go back to the script
selection menu.
Drag to adjust the speed of
prompting. Disabled in
Automatic speed mode.
Dragging to adjust the
speed is supported
anywhere on this screen
for convenience.
Tap to stop prompting and
return the script to its
beginning. A confirmation
dialog makes sure you
want to reset.
Also resets the timers.
Tap t o pl ay.
Tap again to pause.
Tap to reverse.
Tap again to pause.
Choose whether to set the
speed from the slider, or to
use the durations from
Segments to set the speed
automatically.
Tap to show or hide the Timers. For
more on what these mean, see Timers.
Show a menu to Jump to one of the
Segments. In the resulting menu, tap
the segment to jump to it.
Tap to start or stop
recording on the device
which is hosting the script.
You must first open the
Recording pane on the
host device to use this
button.

Using Remote Control with Bluetooth
While Teleprompter and Teleprompter Controller are capable of communicating with
Bluetooth, there are some special considerations to keep in mind.
Requirements for using Bluetooth:
•
Both devices must have Bluetooth activated.
Notes about using Bluetooth with Teleprompter:
•
Remote control over Bluetooth has noticeably more latency than using WiFi. Control
inputs will take longer to register remotely, and there may be a delay in finding
available scripts on the network.
•
Bluetooth devices may sometimes not see each other. If this occurs, go the Bluetooth
menus on each device and pair them to each other.
27

Preferences
To adjust Teleprompter’s preferences, select Teleprompter > Preferences from the menu
bar.
The preferences menu is broken up into seven categories. Use the buttons in the
toolbar to switch panes
General (Miscellaneous) Preferences!
28
When this box is checked, pressing Command
+ V when entering text pastes the text with the
same formatting as the rest of the text. This is
intended to prevent you from pasting black text
on a black background.
Command+Option+Shift+V, which normally
pastes text without the original formatting, is
remapped to paste the text with the original
formatting.
When dragging times in
the Overview, how much
should they be
quantized (rounded).
Should “ESC to Exit
Fullscreen” be shown when
clone windows become
fullscreen, or screens are
Resets all preferences,
including network and device
settings.

Network Settings!
29
Checking or unchecking this box immediately enables
or disables sending or receiving broadcasts to other
devices, as well as remote control.
If you are concerned about security, and don’t need
any of Teleprompter network functionality, uncheck
this box.
When multiple devices communicate using a network key, the text and
control information is encrypted using industry-standard encryption.
You must set the same network key in the preferences of each device,
otherwise they will not be able to communicate.

New Document Template
This window shows an example Teleprompter document. The settings for this
document, including the font, background color, resolution, maximum speed, arrow, time
overlays, and overlay settings, are used when creating a new document.
The example text is included as a demonstration, and is not included in new documents.!
30
These text settings are
used at the insertion point
for new documents.
When dragging this slider,
the preview script scrolls to
demonstrate the maximum
speed.

Customizing Keyboard Shortcuts
Open Teleprompter > Preferences > Keyboard to customize Teleprompter’s
keybindings.
Many non-keyboard devices (pedal controllers, remote triggers) are actually detected by
the system as keyboards. If a device isn’t showing up in Buttons & Wheels, try clicking a
keybinding button and pressing its buttons.!
31
Click this button to add a
new key binding. You
may configure any
number of key bindings
for a given action.
Only the first hotkey will
show in the menu bar.
Click the button with the
keyboard shortcut to
change it. Then, press the
new keyboard shortcut, or
press escape to cancel.
Sometimes, you do not
want a keyboard shortcut
to activate while editing the
text.
For example, we want →
to move the cursor right
while text editing, not
change the speed.
Uncheck Use while Editing
Text hotkeys while text
editing.
Use this button to delete a
hotkey.
Choose how much the speed increases
or decreases for hotkeys that change the
speed.
Holding down the hotkey changes the
speed continually proportionally to this
amount.

Customizing Mouse Behavior
To change how the mouse works with Teleprompter, open Teleprompter > Preferences >
Mouse.#
This panel only governs the left, middle, and right mouse buttons, as well as scrolling.
For changing the functionality of other mouse buttons, see Buttons & Wheels.!
32
This column governs
how the mouse
functions in the text
area of windows
where the text can be
edited.
This column governs
how the mouse
functions in the text
area of copy windows,
or over a fullscreen
script.
For the increase and
decrease speed actions,
how much should the
speed change?

Configuring Wheels and other Control Devices
Button and wheels control the frontmost script. Most types of controllers should be
supported. If you’re having trouble getting a controller working, contact support at
33
This circle lights up and is
scrolled to when its button
is pressed.
This circle lights
up and is scrolled
to when the
wheel, dial, or axis
is moved. The
black dot shows
its current
position.
Checking this box allows button
presses to control the frontmost
script even when Teleprompter is
not the active application.
Click the Calibrate
button to reset the
“neutral” position of
the control to its
current position.
Checking this box allows the
wheel to control the frontmost
script even when Teleprompter is
not the active application.
Checking this
box reverses
the operation
of the control.
This slider controls
how much the script
is affected based on
control movement.
This slider defines a threshold
for moving the control before
the action takes effect. Useful
for control devices that have
some inaccuracy when at rest.
Use the control as a scroll
wheel to change the
speed. Useful for dials.
Use the control’s offset from
neutral to continually increase
or decrease the speed. Useful
for spring-loaded wheels.
Scroll the script up and down
based on the control’s offset
from neutral. Useful for spring-
loaded wheels. Only available
when the script is paused.

Troubleshooting
I’ve pasted or imported text into Teleprompter, but I can’t see it.
You may have black text onto a black background, or white text onto a white
background. Try selecting the text and changing its color.
I’ve pasted or imported text into Teleprompter, but it has weird
margins.
The text may have contained margins. Use Format > Text > Show Ruler to show the
ruler and adjust or remove pasted text margins.
“Different Network Key” message when trying to connect over the
network.
The other device may have a different network key set. Go to Teleprompter >
Preferences > Network > Change Network Key, and ensure all devices have the same
network key set. Devices with different network keys cannot communicate.
“No Documents” message when trying to connect over the network.
You must first open the documents on the device you’re connecting to.
Teleprompter isn’t scrolling.
Ensure that the script is not actually playing with a speed of zero. Ensure that no wheels
or joysticks are connected that are giving erroneous input.!
34

