
NG Harrier
User’s Guide
NG Harrier
2
The contents of this work are proprietary and confidential and neither the whole nor
any part thereof may be used, copied or reproduced in any form or disclosed to a
third party without the prior permission of Tempo Europe Limited.
Due to the Tempo policy of continuing product improvement, the specification of this
product is subject to change without notice. Whilst every effort has been made to
ensure accuracy of this document at the time of printing Tempo Europe Limited will
not be liable for any errors.
If you find any errors in this publication or would like to make suggestions for
improvement, please direct your comments to The Customer Services Department at
the address below quoting the following part number.
User’s Guide Issue 1
8000-03-0120
Tempo Europe Limited
Unit 3, Maesglas Industrial Estate
Newport
NP20 2NN
United Kingdom
Telephone +44 (0) 1633 223552
www.tempo.textron.com
NG Harrier
3
CONTENTS
CONTENTS ...................................................................................................................3
Introduction ....................................................................................................................6
Safety Notices................................................................................................................7
The NG Harrier Test System .........................................................................................8
The Test Screens.......................................................................................................9
Screen 1 – Circuit Connection................................................................................9
Screen 2 – Services Testing ..................................................................................9
Screen 3 – Circuit Quality.....................................................................................10
Button Functions ......................................................................................................10
Auto Test Button ...................................................................................................10
New Button ...........................................................................................................10
Review Test Button...............................................................................................11
Print Button ...........................................................................................................11
Trace On Button ...................................................................................................11
WinAnalyse Button ...............................................................................................11
Help Button ...........................................................................................................11
Exit Button.............................................................................................................11
The Hand Held Tester..................................................................................................12
Key Functions .......................................................................................................12
About the Hand Held Tester ....................................................................................13
To Make a Voice Call – Using the Telephone key...............................................13
Hot Keys ...............................................................................................................14
Connection Field...................................................................................................14
Power Management.................................................................................................14
Internal Battery Supply .........................................................................................15
Accu & Battery Icon ..............................................................................................15
Accu Charging ......................................................................................................15
Backlight - LCD.....................................................................................................15
Menu Structure.............................................................................................................16
Menu Navigation ......................................................................................................16
Line Access..............................................................................................................17
Line Access - Automatic.......................................................................................17
Line Access - S-Access........................................................................................17
Line Access - U-Access........................................................................................17
Line Access - POTS.............................................................................................17
Line Access - S-Bus Wiring..................................................................................17
Access mode [ISDN]....................................................................................................18
Access mode............................................................................................................18
TE automatic.........................................................................................................18
TE P-P...................................................................................................................18
TE P-MP ...............................................................................................................18
No Protocol (Permanent Circuits).........................................................................18
Telephony on permanent circuits .........................................................................19
BERT on permanent circuits.................................................................................19
NE P-P (Option)....................................................................................................19
NE P-MP (Option).................................................................................................19
Monitor (Option)....................................................................................................19
Status Display..............................................................................................................20
Connection to an S-Access or U-Access.............................................................20
Connection to a POTS interface...........................................................................20
NG Harrier
4
Connection to S-Bus Wiring Adaptor ...................................................................20
Menu ............................................................................................................................21
Menu - Single test....................................................................................................21
Menu – Automatic Tests ..........................................................................................22
Menu – Line Voltage................................................................................................23
Line Voltage – S-Access......................................................................................23
Line Voltage - U-Access.......................................................................................23
Line Voltage – U Access - Power.........................................................................23
Menu: Configuration.................................................................................................24
Menu–Configuration-Trace/remote ......................................................................24
Menu–Configuration-ISDN ...................................................................................24
Protocol.................................................................................................................24
Alerting Mode........................................................................................................24
Clock Mode ...........................................................................................................24
BRI Termination....................................................................................................24
Call parameter ......................................................................................................25
Services ................................................................................................................25
Call acceptance....................................................................................................25
Voice Coding.........................................................................................................25
DTMF / keypad .....................................................................................................25
Menu–Configuration-BERT ..................................................................................25
BERT time.............................................................................................................25
Error level..............................................................................................................26
HRX value.............................................................................................................26
Bit pattern..............................................................................................................26
Menu–Configuration-Device.................................................................................26
Menu language .....................................................................................................26
LCD contrast.........................................................................................................26
Printer....................................................................................................................26
Baud Rate.............................................................................................................26
Handset.................................................................................................................26
Alarm bell ..............................................................................................................27
Power supply ........................................................................................................27
Battery type...........................................................................................................27
Accu servicing.......................................................................................................27
Software option.....................................................................................................27
Menu–Configuration-Numbers.............................................................................27
Menu–Configuration-Reset...................................................................................28
Menu – Dual Tests ...................................................................................................28
Menu – L 1 Status [S-Access]..................................................................................28
Menu – Single test – Supp.serv.test........................................................................29
TP test...................................................................................................................29
HOLD test.............................................................................................................29
Calling Line ID tests (CLIP / CLIR / COLP / CLOR)............................................30
CLIP ......................................................................................................................30
CLIR ......................................................................................................................30
COLP....................................................................................................................30
COLR....................................................................................................................30
DDI test.................................................................................................................30
MSN test...............................................................................................................30
CF test (CFU / CFB / CFNR)................................................................................30
CW test.................................................................................................................30
CCBS or CCBS-T test on a P-P Access.............................................................31
CCNR or CCNR-T test on a P-P Access ............................................................31
NG Harrier
5
MCID test..............................................................................................................31
3pty test.................................................................................................................31
ECT test................................................................................................................31
CUG test...............................................................................................................31
CD test..................................................................................................................31
AOC test...............................................................................................................31
SUB test................................................................................................................31
UUS test................................................................................................................31
Menu – Single test – Service test............................................................................32
Interpreting the test results:..................................................................................32
Test Result Description ........................................................................................32
Menu – Single test – Bit Error Test..........................................................................33
BERT Start............................................................................................................34
BERT wait.............................................................................................................35
B-channel LOOP...................................................................................................35
Menu – Single test – X.31 Test................................................................................35
Menu – Single test – CF Interrogation.....................................................................36
Menu – Single test – CF Activation..........................................................................36
Menu – Single test – ISDN Call ...............................................................................37
Menu – Single test – Time measuring.....................................................................38
Connection setup time..........................................................................................38
B-channel delay ....................................................................................................38
Interchannel delay ................................................................................................38
Access mode [POTS]...................................................................................................39
HF Detection.........................................................................................................39
POTS Terminal (TE).............................................................................................39
POTS MONITOR..................................................................................................39
Menu – Line Voltage [POTS]...................................................................................39
Line Voltage POTS Access..................................................................................39
Menu – Configuration [POTS]..................................................................................40
POTS-Dial Mode...................................................................................................40
POTS-DTMF parameter .......................................................................................40
Setting the level of the DTMF signal ....................................................................40
Setting the duration of the DTMF signal...............................................................40
Setting the interval between two DTMF characters.............................................40
Restore the Defaults.............................................................................................41
POTS – FLASH time.............................................................................................41
OPTION - [S-Bus Wiring].............................................................................................42
Access mode............................................................................................................42
Menu.........................................................................................................................42
Test Sequence:.....................................................................................................43
OPTION – [Passive Monitor] .......................................................................................45
OPTION – [Network (NT) Simulation] .........................................................................46
Terminating calls...................................................................................................46
Originating calls ....................................................................................................46
OPTION – [WinAnalyse]..............................................................................................47
Appendix ......................................................................................................................48
A. NG Harrier Configuration Defaults ......................................................................48
B. Acronyms.............................................................................................................49
C. Cause – Messages – DSS1 Protocol..................................................................50
E. NG Harrier Error Messages.................................................................................52
F. X.31 Test – Error messages................................................................................52

NG Harrier
6
Introduction
The NG Harrier Test System is designed to facilitate testing of circuits associated
with the delivery of ISDN and provides test capability appropriate to the test point
accessed on a typical ISDN provision.
Testing on the distribution side is generally related to confirming that the signal
launched from the Exchange Distribution frame reaches the customer side interface.
Testing can be limited to confirming that the signal is present by simply making a
Speech call using the Hot Key function of the hand held tester.
At the Customer Side of the Network the testing requirements can be more complex
and may require that test results are recorded for customer reference or for historical
records. In this situation it may be more appropriate to conduct the tests using a
laptop computer.
The NG Harrier test system provides for both situations in allowing for quick
verification of the ISDN circuit using the handheld unit and comprehensive testing
of the circuit using the NG Harrier PC software.
Comprehensive POTS circuit test capability also allows Analogue Telephone circuits
and services to be tested.
The standard NG Harrier test system comprises the following elements:
PC Software including User’s Guide
Hand Held Tester including shoulder strap
Serial Cable (RJ45 to 9 Pin D type) to connect the hand held tester to the PC
Test cables to facilitate testing at the S- Access and U-Access or POTS Access
Power Adaptor and Battery charger
Carry bag
Quick Reference Guide
The following optional items are available and may be purchased in addition to the
standard test system.
S-Bus Wiring test adaptor Passive Monitor
Network Simulation D Channel Protocol Analysis Software
Roadside
Cabinet
Pole-top
2 Wire U-Access
4 Wire S
-
Access
Exchange
Distribution frame
NTE
S
-
Bus
POTS
Access
Distribution Side – Use the two wire test cable
Customer Side
-
Use 4 wire
test cable
NG Harrier
7
Safety Notices
Tempo will not accept liability for damage or injury resulting from misuse, abuse or
resulting from use of the NG Harrier test system without regard to normal safety
practice.
Information on the correct use of the NG Harrier test system is provided by this
document, the Quick Reference Guide and Targeted Help system forming an integral
part of the PC software.
Do not dismantle the NG Harrier hand held unit beyond removing the battery cover.
The NG Harrier may only be used with the accessories supplied.
The use of other accessories may lead to erroneous measurements and may even
cause damage to the NG Harrier and the connected installation.
The NG Harrier is only to be used in accordance with the instructions in this
documentation. Any other usage may result in bodily injury and damage of the NG
Harrier.
To prevent electrical shocks or damage to the NG Harrier do not connect it to lines
with voltages in excess of 100 Volts
Never attempt a measurement with the case open
The NG Harrier is not watertight. Protect the NG Harrier from exposure to water
Before replacing the batteries switch the NG Harrier off, disconnect all the test leads
and refer to the section “Internal Battery Supply”.
Make certain that the polarity is correct when installing the batteries
Do not use low cost Zinc Carbon batteries as they may leak and let you down when
it’s cold.

NG Harrier
8
The NG Harrier Test System
The NG Harrier test system would normally be used as shown in the following
diagram:
In this configuration all the information required
to install commission and maintain ISDN
services is provided by the PC software.
Information relating to the service or parameter
under test is also provided to assist the user in
understanding how it relates to the ISDN.
The “hover over” targeted help system assists
the user in determining why a test has failed.
All the electronics required to conduct the tests
are resident in the hand held unit. The inherent
power of the PC is used to control the hand held
tester and present information to the user in a manner not economically possible in a
hand held instrument.
It is assumed that the PC software has been loaded on the PC by following the
instructions on the CD containing the NG Harrier software. The software is simply
loaded by placing the CD in the drive and following the on screen instructions.
If the PC is not configured to “auto run” the CD it will be necessary to run the “setup”
program on the CD. In both cases the resulting “Programs” will be as shown below;
After loading the software, run “NG-Launcher” to complete the installation and create
the shortcut on the desktop for the NG-Harrier programme and NG-Harrier Test
Results folder.
Double click on the NG-Harrier desktop icon to
launch the software.
It is not necessary to connect the handheld tester in
order to review the functionality of the PC software.
Clicking on the Help button in the top right hand of the screen will display “Getting
Started” information to assist the user in exploring the way that the software
operates.

NG Harrier
9
The Test Screens
The tests required to effectively characterise an ISDN installation are presented on
three screens. All the information related to each page is available by moving the
mouse pointer over the subject text.
Screen 1 – Circuit Connection
The purpose of this screen is to
present information required to
confirm that the circuit is operational
and the directory numbers are
correct.
Network connection information is
presented and a test call from one
channel to the other in both directions
is made to confirm that the channel
numbers are valid.
Successful completion of this test
screen is confirmed by the voice announcement “Your ISDN connection test has
passed”. Failures on this screen are indicated in Red and the voice announcement is
not played. Voltage indications that are outside normal limits are also shown in Red
to indicate a potential problem. Reference to planning limits and use of calibrated
voltage measurement instruments is advised in order to confirm a fault condition.
It is advisable to obtain a pass on this screen before proceeding otherwise
subsequent testing may not be valid.
Screen 2 – Services Testing
The purpose of this screen is to
present information about the services
available on the circuit being tested.
Available services are determined by
a number of factors including switch
type (System X or Y), type of
interface, national deployment, ISDN
version and customer subscription.
The above factors are used to
determine which services can be
tested and a default set of tests are
selected.
By using the “Clear” and “Set” buttons together with the “tick boxes” any combination
of the available services can be tested.
Failures on this screen may be due to the fact that the service is “not available” or
that the service is “not subscribed”. Hovering the mouse over a Red box will display
the reason for failure. As failures on this test screen may only indicate that the
service is not available, a failure of this type may not affect any subsequent testing.
NG Harrier
10
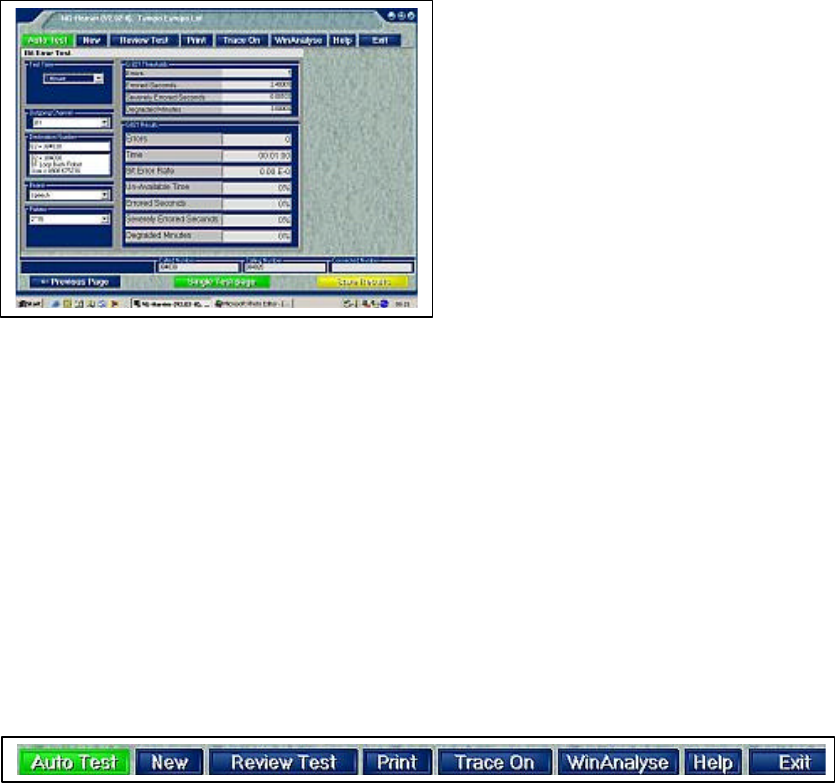
Screen 3 – Circuit Quality
The purpose of this screen is to
present information about the
transmission characteristics of the
circuit under test.
The default test is conducted for one
minute and the results are displayed.
A failure on this screen may require a
repeat of the test or additional testing
to determine the cause of failure.
The default test sends a stream of
“bits” down one channel (B1) via the exchange to the other channel (B2). The “bits”
are returned by the tester along B2 via the exchange back along B1. The received
“bit pattern” is compare with the transmitted “bit pattern” and the difference (if any) is
reported as errors.
This screen provides for the results of all three test screens to be saved to the NG-
Harrier Test Results folder with a file name “year, month, day, time, B1 channel
number” and the extension NGH.
Button Functions
The test screens include a common set of buttons along the top and bottom of the
screen that become “active” or “change appearance” depending on the current tester
activity or button selection. The function of buttons on the bottom of each screen is
obvious while the function of buttons along the top of the screen require additional
explanation.
Auto Test Button
Selecting the Auto Test button opens the Auto Test screen that allows selection and
management of “test scripts”. Selecting the “Run Full Auto Test” button results in the
three test screens being run automatically, one after the other, without user
intervention. Only the services specified in the selected test script are tested.
This feature proves useful when customer specific or network specific test need to be
defined and tested.
New Button
Selecting the New button begins a new test sequence. The software checks that the
PC can communicate with the hand held tester via the serial cable. Then it runs a
series of tests to determine if the tester is connected to a Line Access and displays
information about the Line Access. Finally it checks if “Call Forwarding” is enabled.
Call Forwarding must be disabled before proceeding because test calls originated by
the tester would be redirected and the results of the test call would be invalid.
NG Harrier
11
Always press the “New” button after changing any connection to ensure that
the Tester is aware of the changes.
Review Test Button
Selecting the Review Test button opens the Test Results folder and allows test
result files to be loaded for review. Test results files saved independently by the hand
held tester are also displayed and may be copied to the PC test results folder. These
files can also be reviewed on the PC.
Print Button
Selecting the Print button opens a Print Option screen allowing test results to be
printed in Text or Form formats.
Trace On Button
Selecting the Trace On button opens a Save As screen that allows a file containing
the D Channel protocol to be saved. The saved file can be opened with the protocol
decode software WinAnalyse to assist in determining why a test has failed.
Saving information to the file starts when the file is created and stops when Trace
Off is selected. The button text changes from Trace On to Trace Off and flashes to
indicate that the function is active.
WinAnalyse Button
Selecting the WinAnalyse button will launch the ISDN protocol decode software from
within the NG Harrier application.
WinAnalyse is an option and must be separately purchased. If the WinAnalyse
software is not loaded on the PC the WinAnalyse button is “greyed out” and remains
inoperative.
Help Button
Selecting the Help button displays information intended to introduce the user to the
PC software. Targeted Help about each test and how it relates to the ISDN is
provided on each test screen. A printed Quick Reference Guide is provided with the
tester and provides the minimum information required to begin using the NG Harrier
Test System.
Exit Button
Selecting the Exit button closes the NG Harrier PC test programme.

NG Harrier
12
The Hand Held Tester
Key Functions
Select menu item, continue or enter.
Layer 1 measurement – displays signal and voltage levels
Navigate the menu – scroll in direction of arrow when the display
shows a down arrow otherwise opens the Menu.
Initiates a “Telephone” call – first press allows input of called number and
second press dials the number.
Switches the tester ON or OFF. A momentary press will switch ON the
LCD backlight – to conserve battery power the backlight will switch OFF
automatically after 5 seconds. Hold the key down to switch the tester
OFF.
Earpiece
LED indicators
Soft-Keys
Menu scroll keys
Shoulder Strap
fastener
Select or Enter key
Line Check key
Telephone Call key
ON/OFF Power key
Microphone
I/O connection Port
Line Connection
External Power
Supply Connection
Headset connection

NG Harrier
13
About the Hand Held Tester
At all times it is possible to use the NG Harrier in Hand Held Tester mode for testing
at ISDN Line Access points. Limitations of the hand held tester display compared to
that of a PC requires additional effort from the user and a wider knowledge of how to
test the ISDN.
Testing POTS Line Access points is more readily conducted in Hand Held mode
because the telephone system is largely based on communication via the earpiece.
Making a “telephone call” at any of the Line Access test points using the hand held
tester is a simple and effective way of checking that the circuit is operational.
To assist the user the telephone call function is simplified to four button presses in
addition to entering the called number.
To Make a Voice Call – Using the Telephone key
Connect to the circuit under test using the appropriate connecting cable.
Press the “power on” button to switch ON the NG Harrier and display the
Line Access menu.
If sufficient power is available at the test point the tester will
power up automatically and display the Line Access menu.
Press the soft-key below the “tick” to select Automatic Line
Access. When connected to a working circuit the tester will
automatically establish if it is connected to an S-Access. U-
Access or POTS circuit and display the appropriate menu
otherwise choose the Line Access type.
Press the Telephone key once to display the
Numbers menu and enter the Destination number.
Press the Call key a second time to dial the number.
Use the “soft-keys” to manage the call.
A single key press to initiate Tester functions is described in
the Hot Keys section of this guide and listed on the back of
the Tester for easy reference.
The function of the 3 keys located below the display is determined by what is
displayed directly above the key consequently they are known as “Soft-keys”.
Soft-key Function
Back one level
Scroll the menu
Select menu option on second line of LCD marked with “>”
Function defined by the “TEXT”
Line Access:
>Automatic
S-Access
U-Access
POTS
S-Bus Wiring
----------------------
Numbers
Dest. Number 1
255600
DEL
TEXT

NG Harrier
14
Hot Keys
Once the Tester has recognised the type of Line Access and reached the Status
Display condition the digit keys have a dual function. Unless the Tester expects a
number entry, pressing a digit key has the following Hot Key function.
Hot Key Function
Number 2 Key
Start Service Test
Number 3 Key
Start Supplementary Service Test
Number 4 Key
Starts Automatic Test
Number 6 Key
Dual Tests Menu
Number 7 Key
Numbers Menu – Speed dialling memory
Number 8 Key
Trace ON/OFF
Number 9 Key
Start Bit Error Rate Test (BERT)
Connection Field
9V –
External Power supply connection. The internal
battery supply is disconnected when the external
power supply is connected.
Line
Line Access test cable connection. S –Access on Pins 3, 4, 5 & 6. U-Access and
POTS on pins 7&8.
Headset
Provision is made to connect an external headset
I/O Port
Serial port connection to a PC and connection to the S-Bus Wiring adaptor.
Power Management
In battery operation, if the NG Harrier is idle for 15 minutes, it will automatically
switch to the power-down mode.
From power down mode, the system can only be reactivated by pressing the Power-
Key. In the power-down mode, a battery will last about 3.8 years. Therefore, this
mode serves as an effective protection against discharging the batteries.
Naturally, when the loop back function is active on the NG Harrier or it is in Trace
mode, the NG Harrier will not switch to power-down mode.
As an alternative, it is possible to operate the NG Harrier using the included power
supply. When the power supply is connected, the battery is automatically
disconnected.
The NG Harrier can also be powered from the BRI line. In this case, it does not need
batteries, accumulators, or the plug-in power supply.
Whenever the NG Harrier is powered from the plug-in power supply or the BRI line,
the power-down mode is not active.
I/O Port Line
9V
-
Lin

NG Harrier
15
Internal Battery Supply
The hand held tester is normally powered by three AA NiMH rechargeable cells
(accumulators) located in a compartment at the back of the handset.
Remove all connections to the tester and switch the tester off before
attempting to remove the battery compartment cover.
Take care to insert batteries in accordance with the polarity markings.
If necessary, the rechargeable accumulators can be replaced by normal high quality
batteries. Provision is made in the Configuration – Device - Battery Type menu to
configure the Tester to operate permanently from either rechargeable Accumulators
(accu) or non rechargeable battery types.
Accu & Battery Icon
The battery icon will display the status of the battery (full - empty). This icon is only
displayed while the Tester is in battery supply mode or during charge mode.
Note: The voltage values for the three steps of the icon are different for rechargeable
“accu” or non rechargeable battery mode.
Accu Charging
In the event that the non-rechargeable batteries are subjected to a charging cycle the
Tester will not be damaged. Care should be taken to avoid this happening by
ensuring that the Tester is used in accordance with the instructions.
When the power adaptor is connected to the Tester it assumes
that the power is required by the Tester, therefore charging
does not start unless the Tester is switched OFF.
Accu charging can also be started from the Configuration –
Device – Accu servicing menu.
Accu charging starts after switching the Tester OFF and is only available if
• Accu is selected in the Configuration - Device – Battery Type menu and
• the accu voltage is greater than 0,9 V (no accu) and
• the accu voltage is lower than 3,9 V and
• the 230 V AC/DC converter is connected.
Accu charging will be terminated by
• user (press ABORT Soft-key) or
• minus delta V or
• timer overflow (t > 7 hours) or
• maximum voltage (> 4,8 V) or
• maximum capacity (> 2500 mAh).
Backlight - LCD
Momentary press of the ON/OFF key will turn on the LCD backlight.
To conserve battery power the backlight will switch OFF automatically after 5
seconds. The backlight will remain ON if the tester is powered by the external power
supply. The LCD contrast adjustment is accessed via the Menu, Configuration,
Device, LCD contrast.
Charge accu
V: 3.65
ABORT
Charge accu
V: 3.85
aborted
CONT.

NG Harrier
16
Menu Structure
The following diagram illustrates the top level of the menu structure. On power up the
tester displays the Line Access options. If Automatic is selected the tester will
automatically determine the Access mode and display the access Status and three
soft key options. The available Menu options that are now displayed are related to
the type of Access being tested. Menu options that are not appropriate to the Access
being tested are not displayed.
Line Access can also be User selected. In this case the Access Mode must also be
selected from the available menu options.
Menu Navigation
Navigation of the menu is accomplished by using a combination of main keypad and
soft-keys depending on the test situation. The following conventions are used to
describe operation of the tester using representations of menu display.
Line Access
Automatic
User selected
Line Access
Single Tests
Automatic Tests
Line Voltage
Configuration
Dual Tests
L1 Status
Line Voltage
Configuration
Start Monitor
Line Voltage
Configuration
POTS IS
DN Monitor S
-
Access and U
-
Access
Access Status Display
User selected
Access mode
(back one level) MENU RESTART
Available
M
ENU
options depend
on the selected Line Access
Line Access:
>Automatic
S-Access
U-Access
POTS
S-Bus Wiring
----------------------
3 L
ines LCD
UP/DOWN keypad scroll
keys are active
Soft
-
key to be used
in this instance
Soft
-
key function
Operating mode
> Indicates this item
will be selected by
pressing the “tick” key
Menu list available
by scrolling
Operating mode
End of menu list
Soft
-
keys operational
but not used in this
instance are shown
black

NG Harrier
17
Line Access
All testing begins with the Line Access being determined by the user or by the
Tester. It follows that the user can determine the Line Access prior to connection but
the Tester must be connected to a working Line Access in order to determine
correctly the type of Line Access.
There are five Line Access menu options. Pressing the “down arrow” Soft-key will
display the available options and pressing the “tick” Soft-key will select the option.
When connected to a working ISDN access point, if sufficient power is available, the
Tester will switch itself ON.
Line Access - Automatic
When connected to a working access point the Tester will
automatically determine the Line Access and provide access
to the main Menu via the Status Display.
If the Tester is unable to automatically determine the Line
Access, because of some unusual circuit conditions, the user
needs to select the Line Access and Access mode.
Line Access - S-Access
User selected by scrolling S-Access to the second line of the
display and selecting the function to display the Access Mode menu.
Selecting TE automatic in the Access mode menu returns the status display
provides access to the main Menu.
Line Access - U-Access
User selected by scrolling U-Access to the second line of the display and selecting
the function to display the Access Mode menu.
Selecting TE automatic in the Access mode menu returns the status display
provides access to the main Menu.
Line Access - POTS
User selected by scrolling POTS to the second line of the display and selecting the
function to display the Access mode menu.
Selecting POTS terminal in the Access mode menu returns the status display
provides access to the main Menu.
Line Access - S-Bus Wiring
User selected by scrolling S-Bus Wiring to the second line of
the display and selecting the function to access S-Bus Wiring
main Menu directly because Access mode is not appropriate
in this case. The Soft-key START begins the S-Bus Wiring
test. This function requires an optional cable and adaptor.
Refer to the Options section of this guide for detailed
information.
Note: Line Access selections are stored in EE-PROM therefore the last selected
mode will be active until a new selection is made.
Line Access:
>Automatic
S-Access
U-Access
POTS
S-Bus Wiring
----------------------
Harrier
S-Bus Wiring
MENU START

NG Harrier
18
Access mode [ISDN]
The NG Harrier Test System is primarily designed to test at the S-Access, 4 wire
ISDN presentation because it is the endpoint of the system and the most common
customer point of connection. To facilitate commissioning and maintenance of the
ISDN service additional capability is built into the hand held tester.
Some of the additional test capability such as testing at the POTS Line Access is
more readily carried out by the hand held component while the addition of a PC is
required for D Channel protocol analysis. Test capability only required by some users
to complete specific tasks is available as cost options. Appropriate messages are
displayed when optional test capability is selected but not available with the
configuration being used.
The Access mode menu available depends on the Line Access selection as shown:
S-Access U-Access POTS
Access mode
TE automatic
The Access mode (PP or P-MP) will be determined automatically to provide access
to the main Menu via the Status Display.
TE P-P
The Tester is set to operate in Terminal Equipment (TE) simulation mode at a Point
to Point (P-P) connection to provide access to the main Menu via the Status Display
TE P-MP
The Tester is set to operate in Terminal Equipment (TE) simulation mode at a Point
to Multi Point (P-MP) connection to provide access to the main Menu via the Status
Display
No Protocol (Permanent Circuits)
The Tester is set to operate over an ISDN leased line that does not involve signalling
over the D Channel hence No Protocol. Selecting the option provides access to the
main Menu via the Status Display.
Access mode:
> HF detection
POTS terminal
------------------------
Access mode:
>TE automatic
TE P-P
TE P-MP
No Protocol
----------------------
Access mode:
>TE automatic
TE P-P
TE P-MP
No Protocol
NE P-P
NE P-MP
Monitor
----------------------
Note:
Access mode
selections are
stored in EE
-
PROM
therefore the last selected mode will be active until a
new selection is made.

NG Harrier
19
Besides dial-up connections to any subscriber, ISDN also supports the use of
permanent circuits switched to a specific remote location.
These permanent circuits are available after setting up Layer 1, in other words after
synchronizing both terminals.
As a quick test of a permanent circuit, you can simply call the opposite end using a
selected B-channel. However, for a more revealing test of a permanent circuit, you
should perform a bit error rate test. Both ends of the permanent circuit must use the
same channel.
Telephony on permanent circuits
The telephony (voice) call can be started with the Telephone key or via
selection of the ISDN call option in the Single test menu.
After the B-channel for the permanent circuit is selected, the telephone
connection will be setup automatically. In addition to the Telephony function, the
Tester also shows the B-channel used (second line in display) and the duration of the
permanent circuit (third line).
BERT on permanent circuits
A number of variations are possible in testing permanent circuits with the bit error
rate test. In the simplest case, a B-channel loop will be set up at the remote end.
After selecting BERT start, selection of the B channel the Tester will send the test
pattern, receive it back and evaluate it accordingly. The display and operation during
and after the bit error rate test are similar to that of a BERT with dial-up connections.
The only difference is that it is not necessary to select a call number or service.
It is also possible to run a BERT on the D Channel in end to
end mode (refer to the Section single test-BERT) by making
the appropriate selection in the Channel select menu.
The Tester display changes to reflect that the D channel is
being used for the test.
NE P-P (Option)
If the option is available, the Tester can be set to operate in Network Emulation (NE)
mode to facilitate the testing of Terminal Equipment (TE) operating in Pont to Point
(P-P) mode. If the option is not fitted, the display will show “Option not enabled!”
Refer to Options Section in this guide
NE P-MP (Option)
If the option is available, the Tester can be set to operate in Network Emulation (NE)
mode to facilitate the testing of Terminal Equipment (TE) operating in Pont to Multi
Point (P-MP) mode. If the option is not fitted, the display will show “Option not
enabled!”. Refer to Options Section in this guide
Monitor (Option)
If the option is available, the Tester can be set to operate in passive Monitor mode
where it monitors the activity on the D channel that can be viewed on connected PC
running WinAnalyse software. SETUP messages are displayed on the LCD and it is
possible to monitor the signal on the incoming B channel. If the option is not fitted,
the display will show “Option not enabled” Refer to Options section in this guide.
Channel select
> B-channel (64k)
D-channel
------------------------

NG Harrier
20
Status Display
The Status Display is the state reached following automatic or user selection of Line
Access and/or Access mode to provide access to the main Menu.
Connection to an S-Access or U-Access
While Layer 1 is being setup, the L1 LED above the display will blink. If an error
occurs, the message No Network will be displayed.
When connected to a U-Access it can take up to 2.5 minutes to activate Layer 1.
As soon as Layer 1 is successfully setup, LED L1 will light continuously.
When Layer 2 is successfully setup, LED L2 will also light continuously.
If no error occurs, the Tester will display the access mode and a qualitative
assessment of the signal Level
The Tester (using the protocol set in the Configuration menu) will attempt to setup
Layer 3 (LED L3 lights). At the same time, the B-channel test is started and the
results are shown on the Status Display to provide access to the main Menu as
shown below.
In the example both B-channels are available.
B12 = both channels are available
B1- = only B-channel 1 is available
B-2 = only B-channel 2 is available
B-- = no B-channel available
If only one B-channel is available, this can have an impact on the service check and
the testing of the supplementary services.
The Level is in order (level can only be evaluated on a BRI
access):
OK the level is in order
Hi = the level is too low
Lo = the level is too high
No = no level
The Tester in TE mode, Point to Multi-Point employing the DSS1 protocol
Soft-key options allow back one menu level, access to the main Menu or a restart.
Connection to a POTS interface
In this case the POTS Terminal (TE) Status Display is
reached via the intermediate step of HF detection unless
“POTS” Line Access and “Terminal” Access Mode is user
selected.
Connection to S-Bus Wiring Adaptor
The Status Display is simply reached by selecting
S-Bus Wiring in the Line Access menu
Harrier BRI
B12 Level: OK
TEs P-MP DSS1
MENU RESTART
Harrier
S-Bus Wiring
MENU START
Harrier POTS
Voltage; 48.0V
MENU TALK
Harrier
U
-
2B1Q
U: 90V
TEs P-P DSS1
MENU RESTART

NG Harrier
21
Menu
The Status Display provides access to the main Menu that offers selections based
on the Access mode.
S-Access U-Access POTS
TE P- P TE P- P Terminal and TE
TE P- MP TE P- MP Monitor
No Protocol No Protocol HF detection
OPTIONAL Access mode if available
S-Access S-Access S Bus Wiring
NE P- P Monitor
NE P- MP
Menu - Single test
The Single test menu provides for the user to initiate calls
that exercise the selected Access mode. Menu options that
are not appropriate to the selected Access mode are not
displayed.
Harrier U
-
2B1Q
>Single Test
Automatic Test
Line Voltage
Configuration
Dual tests
----------------------
Harrier BRI
>Single Test
Automatic Test
Line Voltage
Configuration
Dual tests
L1 Status
----------------------
Harrier POTS
>Line Voltage
Configuration
------------------------
Harrier BRI
>Start Monitor
Line Voltage
Configuration
----------------------
Harrier BRI
>Single Test
Automatic Test
Line Voltage
Configuration
Dual tests
----------------------
Harrier
>Start L-test
Line Voltage
Configuration
----------------------
Single test
s
Supp.serv.test
Service test
Bit error test
X.31 test
CF interrogation
CF activation
ISDN Call
Time measuring
------------
-----------

NG Harrier
22
Menu – Automatic Tests
The Automatic test menu allows the user to initiate a test sequence automatically
depending on the selected Access mode. The test results can be viewed in the
display or saved by the PC component of NG Harrier and then be viewed and
printed.
The Tester automatically performs the following sequence of tests:
On a BRI or U-interface access
• Level Measuring
• Service Tests
• BERT in an extended call to oneself
• Tests the supplementary services
• X.31 Test
• CF Interrogation
On an ISDN permanent circuit
• Level Measuring
• BERT in end-to-end mode (e.g. with a loop-box on the remote end)
The test results and the time will be saved in the Tester .Additionally, settings such
as your own plus a remote call number will also be saved. The test results are stored
in non-volatile memory and are not lost when the Tester is switched off. Each line in
the Auto test menu refers to one of the test series saved as a record.
Therefore, the first step will open a dialog in which you must select one of the empty
data records. The following display shows that record 6 was used to save results for
a test interface with the own number 225600.
The final step is to select the desired service from the Select service menu.
During the test the first three lines in the display will reflect the test currently being
run. If the test is cancelled (using the ABORT soft-key) a menu will open with the
option of aborting the entire series of tests or skipping individual test segments.
If the automatic test is interrupted, the test results gathered up to this point will not be
saved. Any “old” data stored under this data record number from a prior test will be
retained.
Auto test
> 1 empty
2 empty
3 empty
4 empty
5 empty
6 225600
7 empty
8 empty
9 empty
10 empty
------------------------
Auto test No. 1
>Start
Display Results
Test Data to PC
Print Data
Delete
-----------------------
Numbers
Own Number:
223552
DEL
Numbers
Dest. number
01633223552
DEL

NG Harrier
23
Menu – Line Voltage
Line Voltage – S-Access
The Tester measures the level of the received useful signal
and the phantom power feed. The measurement is
updated continuously. A qualitative assessment of the
voltage values is given. REV indicates inverted phantom
feed and NONE indicates no phantom feed.
ABORT returns to the Menu screen.
R>ON applies the S-Bus termination resistors and the display changes to R>OFF.
NEW Layer 1 is set up again to update the Level measurement
Line Voltage - U-Access
The Tester offers the option to
measure the Voltage or power at
the U- Access. Selecting the
Voltage displays the measured line
voltage that is updated
continuously.
ABORT returns to the Menu screen.
NEW refreshes the voltage measurement
Line Voltage – U Access - Power
With this function you can use the tester to apply an incremental load to the U
interface.
The Tester measures the voltage and calculates the
current and power. When switching the load levels, the
power limitations of the components within the Tester and
the maximum permissible power (1300mW) of the U-
interface must be taken into consideration. Therefore, the Tester will only permit the
load to be switched another increment when the specified power will not be
exceeded.
Note:
Soft-keys “- -“and“++” are used to vary the power.
The values of “R” range between 2.72k Ohm and 64.4k Ohm.
Level: 0.97V Hi
Voltage:
38.9V OK NORM
ABORT R>ON NEW
Voltage U
U: 89.9V
ABORT NEW
Line voltage
>Voltage U
Power U
Power U
R: 9.2k U: 85V
P: 761mW I: 9.1mA
ABORT
--
++

NG Harrier
24
Menu: Configuration
The Configuration menu provides for Tester or function variables to be set. The
variable currently set is indicated by star “*” symbol left of the text.
Menu–Configuration-Trace/remote
Open the menu allowing options related to the Tester
passing D-Channel data to the connected PC.
The default setting is “Auto PC sync”
When Trace mode is active the “Trace” LED will be ON
continuously. If the Tester is unable to send data to the PC
without errors the “Trace” LED will flash at about 5 times
per second.
Menu–Configuration-ISDN
Opens the “ISDN Config” sub-menu allowing the following ISDN options to be set.
Protocol
Normally the Tester will use the default DSS1 Layer 3 D-channel protocol. However,
the Tester can be set to operate using CorNet-N, CorNet-T, QSIG or VN4 protocols.
The selected protocol will be shown in the Status display. The selection is saved to
EE-PROM and will remain in force until another selection is made.
Alerting Mode
You can specify whether, for an incoming call on a BRI point-to-point access, the
Tester should only display the access number without extension or the complete
number with extension.
If you select Manual, the extension can be displayed (An incoming call will be
signalled. The Tester will send the Layer 3 message “Alert” when it accepts the call.
The digits of the extension that have been sent by this point will be displayed.).
With the Manual setting, an incoming call must be answered within 20 seconds or it
will be lost.
Furthermore, you should note that the remote subscriber will not hear a ringing tone.
If you select Automatic, the Tester will only display the access number without
extension or, depending on the configuration of the access in the exchange, it may
not display the number called at all. The default setting is “Automatically”
Clock Mode
You can select the L1 clock mode according to the application. With the Tester
operating in NE mode the Clock mode is set to “master” and for operating in TE
mode it is set to “slave”.
BRI Termination
You can set the “S-Bus termination” resistors to be “on” or “off”. With the Tester
operating in NE mode the BRI termination is “on” and for operating in TE mode the
setting is “off”.
Configuration
>Trace/remote
ISDN
BERT
Device
Numbers
Reset
----------------------

NG Harrier
25
Call parameter
Allows the user to specify the Type of Number (TON) and the Numbering Plan (NP)
for the CallinG party Number (CGN) and CalleD party (CDN) Number that is used in
the outgoing (SETUP, INFO) message. CGN and CDN; Values are different for NE-
Mode (NET) and TE mode (USER) as shown.
Text: Mode: Information element: Parameter:
Net CGN TON: NT simulation; Calling party number; Type of number
Net CGN NP: NT simulation; Calling party number; Numbering plan
Net CDN TON: NT simulation; Called party number; Type of number
Net CDN NP: NT simulation; Called party number; Numbering plan
User CGN TON: TE simulation; Calling party number; Type of number
User CGN NP: TE simulation; Calling party number; Numbering plan
User CDN TON: TE simulation; Called party number; Type of number
User CDN NP: TE simulation; Called party number; Numbering plan
Services
Allows a user specified ISDN service to be defined by entering the BC, HLC and
LLC. Once defined, the User Specified Service (1 -3) appears at the end of the
Services list and is available for selection.
The value entry screen allows input of the BC, HLC and LLC
in Hexadecimal format.
In each case press the enter key to store the
values.
Call acceptance
In TE mode on a P-MP access, the Tester can either respond to all incoming calls or
just those calls whose destination address matches the MSN of the access under
test.
The function is only available, when your own call number has been saved in the
speed-dialling memory under “own number” and the incoming call has a destination
MSN. The default is to answer “all MSN/DDI”
Voice Coding
Allows selection between A-law and µ–law voice coding. The default is A-law.
DTMF / keypad
Opens a menu that allows selection of signalling during an ISDN call between
“keypad” information elements and “DTMF” tones. The default is “DTMF”.
Menu–Configuration-BERT
Opens the “BERT Config” sub-menu allowing the following options to be set.
BERT time
The default setting for the duration of the Bit Error Test is1 minute. The measurement
time may be set to a maximum of up to 99:59 (99 hours and 59 minutes) or an
unlimited time (by entering 00:00).
User1 BC (HEX)
ABORT DEL A-F
NG Harrier
26
If you select an unlimited measurement time, the test will not stop automatically, it
must be stopped by the user.
Error level
The default threshold (error level) is 10
-06
. That means that, in the event that the bit
error rate is less than 10
-06
(one in 10
6
= 1,000,000 sent bits), the bit error test will be
evaluated as OK. If the bit error rate is greater than the error level value, the Tester
will display NO.
This parameter can be set to any value from 01 (=10
-01
) to 99 (= 10
-99
).
HRX value
Allows the Hypothetical Reference Connection (HRX) value to be set in %.
Bit pattern
There are two predefined bit patterns available. Additionally, it is also possible to
enter a 16 bit pattern of your choice in binary.
The default pattern is 2
15
-1. If a "user defined" bit pattern is selected, an entry mask
will be displayed.
A 16 bit long pattern can be entered here in binary. In the BERT, the Tester will then
either send this bit pattern cyclically or compare it with the received bit pattern.
Menu–Configuration-Device
Opens the “Device Config” sub-menu allowing the following options to be set.
Menu language
Allows the menu language to be selected. The default language is “English”
LCD contrast
Allows the LCD contrast to be set using the up/down arrow keys. The default is a mid
setting.
Printer
Allows printer options to be set. The default is Epson LQ.
If you wish to use a printer that is not compatible with either the HP-Printer or the
EPSON LQ, select the ESC sequence. An entry mask will open in which you can
enter an ESC sequence character-by-character, which will permit the optimum
adaptation to your printer. Up to 9 different ESC sequences can be entered and
saved in the EEPROM in the Tester so that these will still be available after the
Tester has been switched off and then back on.
Baud Rate
There is a selection of baud rates available for use when connecting the Tester to a
PC. The default setting is 57600 baud.
Handset
The Tester makes a distinction between the integrated handset and an external
headset. Note: If “extern” is selected you can change to internal hand set using
the Soft key “intern” during the connection. The default is “internal”.
NG Harrier
27
Alarm bell
The Tester will sound an alarm in a variety of situations, for example, when a bit error
occurs during a BERT. The Setting is not lost when the tester is switched off and
back on again. The default setting is “off”.
Power supply
The tester can be powered from the line “Normal” or “Restricted” supply. Modern NT1
units now include additional electronics that consume line power restricting the
amount available at the test interface. The default setting is “no line power”.
Note: If “no line power” is selected and the tester is connected to a BRI line, it will
try to take power from the line if no batteries are inserted.
Battery type
The tester can be operated using rechargeable accumulators or “normal” batteries. If
Battery is selected the recharging circuit is disabled. The default setting is “Accu”
which means rechargeable batteries.
Accu servicing
Allows the user to initiate a charge and discharge cycle. About 30 minutes after
discharging the Tester automatically starts charging.
Software option
The user is able to enter the software key to enable additional Tester functionality
purchased at a later date than the Tester. The software key is unique to the tester
and is associated with the Tester serial number that can be revealed by keying the
sequence “*1”.
Menu–Configuration-Numbers
Provides access to the “Numbers” sub-menu allowing up to ten numbers with a
maximum of 24 places to be entered in the speed dial memory.
The first number must be the own call number of the access under test (this is
especially important for the automatic Service test). In the Remote No.1-8 memory
locations, you can save which ever remote call numbers you wish.
In the memory location X.31 test number, the Tester expects the entry of the X.25
access number for the X.31 test.
When entering a call number with an extension (operation of the Tester on a PBX
access) observe the following: The extension is separated from the access number
by a #. For outgoing calls, the Tester uses the entire call number (without #) as the
number called (CDPN) and, for the calling number (DSS1-CGPN) only the number
after the #, in other words the extension.
A "#" at the beginning of a call number is treated as a valid character.
If the “# “is at the end of a number, when the number is later dialled it will be done
without calling party number (CGPN). This is important for some PBXs.

NG Harrier
28
Menu–Configuration-Reset
The Tester resets all the settings or entries made in the Configuration menu back to
their default values.
The speed –dialling memory and the results of all the automatic tests will be
deleted.
The default Configuration settings for all parameters are given in the Appendix.
Menu – Dual Tests
The Tester can simultaneously start two tests or “connections” fully independent of
each other. As an example, a BERT can be run at the same time that you make a
phone call. The individual tests or “connections” use resources. All of the tests that
have been started will be administered under “Dual Tests”. Using Dual Tests you can
start new tests, switch between tests running in parallel or terminate all of the tests
that are currently running.
When a call attempt is in progress the soft-key label “DT” can be selected to enter
the Dual Tests menu and administer a second call.
The Dual tests menu provides information about the tests currently active as shown
in the following example where a self call BERT is set up. A self call BERT originates
a call on B1 to B2. The call is looped back by B2 and returned to B1. It can be said
that two calls are active – one on B1 the other on B2.
Second line of Display First line of display
Meaning
Cancel all Tests -/02 B-- There are 2 active tests
Start new one Tests -/02 B-- There are 2 active tests
BERT outgoing Tests 1/02 B01 Test 1 of 2 is using B1
Auto LOOP Tests 2/02 B02 Test 2 of 2 is using B2
Menu – L 1 Status [S-Access]
The Tester displays the current status of Layer 1. The signal received from the
remote end (Rx) and the signal sent by the Tester (Tx).

NG Harrier
29
Menu – Single test – Supp.serv.test
The Tester allows the user to select test parameters that structure a test capable of
checking a range of Supplementary Services.
The test begins with entering the Own Number, selecting a Service, the outgoing B
channel and finally the Supplementary Service to be tested.
The result of a successful test is displayed at the end of the
test otherwise an error message indicating the failure mode
will be displayed. Refer to the Appendix for explanation of
the Clear Cause Codes.
A brief explanation of the test and possible results is given
below.
TP test
The Tester checks the TP (Terminal Portability) supplementary service by making a
self call.
Result: + = TP is possible on this Access
- = TP is not possible on this Access
HOLD test
The Tester checks the HOLD supplementary service by making a self call.
Result: + = HOLD is possible on this Access
- = HOLD is not possible on this Access
Numbers
Own Number:
01633223552
DEL
Select Service
Speech
UDI 64 kBit
3.1 kHz audio
7 kHz Audio
UDI TA
Tel. ISDN
Fax G3
Fax G4
Mixed Mode
Teletex
Videotext
Telex
OSI
Tele. 7 kHz
Videotel 1
Videotel 2
------------------------
B channel select
Active B ch.: 1
Ch.available !
DEL
Supp. Serv. Test
TP test
HOLD test
CLIP test
DDI test
MSN test
CF test
CW test
CCBS test
CCNR test
CCBS-T test
CCNR-T test
MCID test
3pty test
ECT test
CUG test
CD test
AOC test
SUB test
UUS test
---------------------
NG Harrier
30
Calling Line ID tests (CLIP / CLIR / COLP / CLOR)
For this test, the Tester will make up to three self calls one after the other. In this test,
the Tester checks whether the 4 supplementary services CLIP, CLIR, COLP and
COLR are supported on the access under test.
The test will be performed automatically for all four supplementary services.
CLIP
Will the calling subscriber’s number be displayed at the called subscriber?
- = no += yes
CLIR
Will the display of calling subscriber’s number at the called subscriber be
suppressed or is it possible to temporarily suppress the display?
- = no += yes * = no statement, since CLIP is not setup
COLP
Will the call number of the subscriber who answered be displayed on the
caller’s phone?
- = no += yes
COLR
Will the display of the call number of the subscriber who answered be
suppressed on the caller’s phone or is it possible to temporarily suppress the
display?
- = no += yes * = no statement, since COLP is not setup
The supplementary services CLIP and CLIR as well as COLP and COLR will
be tested in pairs. If CLIR or COLR is setup permanently, it is not possible to
make a clear assessment.
DDI test
Can a caller directly dial in to an extension on the PBX access under test?
- = no += yes
MSN test
Can a caller dial the number assigned to a specific terminal on an S-Bus
- = no += yes
CF test (CFU / CFB / CFNR)
This test checks whether the 3 supplementary services CFU, CFB and CFNR are
supported on the access under test. The test is automatically performed for all three
supplementary services. The CF test attempts to setup a call diversion to the call
number that is in the speed-dialling memory location for “destination no. 1”. The CF
test cannot be performed, if this location does not contain a valid call number to
which it is possible to divert a call.
Use the down arrow soft-key to scroll through the test results
CW test
Can the access under test support call waiting.
- = no += yes
NG Harrier
31
CCBS or CCBS-T test on a P-P Access
Will the access under test automatically recall a remote subscriber, if the number
called was busy?
- = no += yes
CCNR or CCNR-T test on a P-P Access
Will the access under test automatically recall a remote subscriber if the call was not
answered?
- = no += yes
MCID test
Does the access tested allow identification of malicious callers (call tracing)?
- = no += yes
3pty test
Does the access under test support a three-party conference call?
For this test, you need the assistance of a remote subscriber, whose call number
must be entered.
- = no += yes
ECT test
Is an explicit call transfer supported by the access under test?
For this test, you need the assistance of a remote subscriber, whose call number
must be entered.
- = no += yes
CUG test
Is closed user group supported by the access under test?
- = no += yes
CD test
Is call deflection supported by the access under test?
AOC test
The Tester checks whether the charges can be sent to the access under test. The
test uses a call to oneself to check both AOC-D (AOC during a call) and AOC-E
(AOC at the end of a call). Does the access support AOC?
- = no += yes
SUB test
A call is made to oneself and answered to check the transfer of the sub-address in
both directions. Are sub-addresses supported on the access under test?
- = no += yes
UUS test
Does the access under test support the transfer of user data?
- = no += yes

NG Harrier
32
Menu – Single test – Service test
The Tester allows the user to test for the availability of the following ISDN Bearer
services and Teleservices.
1. Speech 5. UDI TA 9. Mixed Mode 13. OSI
2. UDI 64 kBit 6. Tel. ISDN 10. Teletex 14. Tele. 7 kHz
3. 3.1 kHz audio 7. Fax G3 11. Videotext 15. Videotel 1
4. 7 kHz Audio 8 Fax G4 12. Telex 16. Videotel 2
The test runs automatically once the Own number and the outgoing B channel is
selected.
The Service test is performed using a self call
The B channel select menu allows the selection of B1, B2 or
“any” by deleting (DEL) the selection
displayed and entering 1, 2 or * (star).
In each case the display shows if the
selected Channel is available
For each service, the Tester will place a call to itself (to the access under test).
However, the call will not be answered so no charges will be incurred. At the end of
the test use the scroll keys to review the results.
Interpreting the test results:
The Tester reports on the result of making an outgoing call (the first +, - or *) and the
result of an incoming call (the second +, - or *).
+ Service supported
- Service not supported
* Result not definite
The reason that it is not possible to make a definite statement is given in the adjacent
error code.
Test Result Description
+ + The self call functions OK or the remote end can take the call for this service
+ - Call was sent successfully, however, it was rejected on the remote end due to
missing authorization
- An outgoing call with this service is not possible
+ * Call was sent successfully, the call back or call to the remote end failed (e.g.,
remote end busy or no B-channel available for the call back).
* Wrong number, no B-channel available or other error.
If the outgoing call is not successful, it is not possible to make a statement about an
incoming call. Therefore, you will never see “- +” or “- *” on the display.
Numbers
Own Number:
01633223552
DEL
B channel select
Active B ch.: 1
Ch.available !
DEL
NG Harrier
33
Menu – Single test – Bit Error Test
The bit error rate test (BERT = Bit Error Rate Test) serves to check the transmission
quality of the access circuit.
As a rule, the network operator will guarantee an average error rate of 1 x 10
-7
, in
other words in long-term operation1 bit error in 10 million transmitted bits.
A higher bit error rate will be especially noticeable in transmitting data. The
application program detects the errors in the data blocks transmitted and requests
that the remote partner send them again, which reduces the effective throughput of
the ISDN connection.
In the bit error test, the tester establishes an ISDN connection to a remote tester or
places a call to itself, sends a standardized (pseudo-) random number string and
compares the received data with that which was sent. The individual bit errors are
summed and evaluated in accordance with the ITU Guidelines G.821.
The duration of the BERT can be set in the Configuration - BERT menu (default
setting is 1 minute).As a rule, the quality of the network operator’s access circuits is
quite good. Therefore, no bit errors should occur in a 1-minute test. However, if an
error occurs, the test should be repeated with a measurement time of 15 minutes to
achieve higher statistical precision. If more than 10 bit errors occur during this 15-
minute test (call to oneself), the access circuit is too heavily distorted.
The BERT can be performed in three different ways:
1. BERT in an extended call to oneself
A remote number is not needed, since the ISDN connection is setup to oneself. In
this case, the tester requires two B-channels for the test.
2. BERT with a loop-box
A loop-box (a device capable of looping back the bit pattern or another NG Harrier at
the remote end) is required. The test uses one B-channel.
3. BERT end-to-end
This test requires a waiting remote tester such as an NG Harrier in the BERT wait
mode. A bit pattern is sent to the remote tester. Independent of the received bit
pattern, the remote tester uses the same algorithm to generate the bit pattern that it
sends back. Therefore, both directions are tested independently.
Note: For this test both devices must have the same bit pattern selected.

NG Harrier
34
BERT Start
After selecting BERT Start, enter number of the channel that will loop-back the bit
pattern. It may be your Own number (to perform a BERT in an extended call to
oneself) the number of the loop-box or a remote NG Harrier (to perform an end to
end BERT)
After the tester has set up the connection and synchronised
the send and receive directions it will display the outgoing B
channel, the remaining test time in hours:minutes:seconds,
the number of bit errors that have occurred (line 2) and the Synchronicity of the bit
pattern (line 3 – synchronous or asynchronous).
Pressing the “ERROR” Soft-key injects an artificially generated bit error which can
demonstrate that the test is effective when running end to ends tests. The Soft-key
“DT” opens the Dual Test menu. If an end to end BERT is in progress where only
one channel is being used, therefore the second call can be set up on the other
channel via the Dual Test menu.
When a bit error is detected, it will be signalled by a brief alarm (if the Configuration-
Alarm bell is set to On). In the event that the synchronisation is lost, a constant
alarm will sound. The measurement time for the BERT is set in the Configuration
menu.
After the test is done, the Tester will display the cause on the second line and the
location that initiated the disconnect will be shown on the third line. If the test ran
normally, the Tester will display “Active clearing”. Press the “CONT.” Soft-key to
review the results.
First line: B-channel used
Second line: Transferred data in k Bits
Third line: Number of the bit errors that have occurred
The evaluation of the results depends on the error threshold that you set in
Configuration – BERT – Error level - Threshold
OK = bit error rate is less than the error threshold (set by the user) and NO = bit error
rate is above the error threshold.
For a detailed explanation of the (G.821) results refer to the PC component of NG
Harrier.
Bit error test
>BERT Start
BERT wait
B-channel LOOP
----------------------
B channel select
Active B ch.: 1
Ch.available !
DEL
Select Service
Speech
UDI 64 kBit
Numbers
Own Number:
01633223552
DEL
NG Harrier
35
BERT wait
The BERT wait menu option is set for the remote Tester when conducting an end to
end test. The local Tester uses the BERT start option.
The Tester first waits for a call and then sets up the connection.
During the connection, the received bit pattern will be evaluated and an additional
independent bit pattern will be sent.
B-channel LOOP
When the B-channel loop function is active, the Tester will automatically take an
incoming call for any service and switch a loop back in the B-channel that is specified
by the exchange. The Tester acts as a Loop-box.
The received bit pattern will be sent back to the caller/sender.
A second B-channel loop connection can be started via the Dual test menu
Menu – Single test – X.31 Test
The x.31 test consists of two steps.
First Step
The tester checks whether it is possible to access the X.25 service via the D-
channel on the access under test. The Tester sequentially checks all the TEI
from 0 to 63.
All the TEI, with which the X.31service is possible on Layer 2, will be shown
on the display.
Second Step
For each TEI with which X.31 is possible on Layer 2, a CALL_REQ packet will
be sent and then the Tester will wait for an answer. Beforehand, the Tester
will request the entry of the X.25 access number, which will be saved in
speed-dialling memory under Configuration – Numbers – X.31 number.
With the entry of the X.25 access number, you can - if you wish - select a
logical channel (LCN) other than the default. For this purpose, append a “#”
plus the desired LCN to the access number (default: LCN = 1).
The test can take up to 4 minutes during which the Tester will display a rotating bar.
In the second line, beginning at the left, will be displayed the tested TEI and its result:
+ = X.31 is available for this TEI
- = X.31 is not available for this TEI
When the test sequence is completed the Tester displays whether the X.31 service is
available for Layer 3 for the TEI found in Fist Step.
Test results:
TEI 02 = the first valid TEI value is 02.
+ + = both test steps were successful
+ - = one test step successful, second step not. In this case, the Tester will
display the relevant X.31 cause for the failure and an associated diagnostic
code if there is one.

NG Harrier
36
If the X.31 service is not available, the Tester will show the message
"X.31 (D) n. impl.”
Additional error information is given in Appendix F. X.31 – Error messages!
Menu – Single test – CF Interrogation
The ARGUS will check whether a Call Forwarding (diversion) is setup in the
exchange for the access under test. After the test, the Tester will show the type of
diversion (CFU, CFNR or CFB) and the call diversion’s service. The display is limited
to a maximum of 10 call diversions for all of the MSN.
Any call diversion setup in the exchange can be cleared with the Tester.
The test can take a few seconds, during which a bar will rotate on the display.
Menu – Single test – CF Activation
The Tester allows the user to set Call Forwarding at the test interface by selecting
service, call forwarding type, originating number and destination number.
The tester reports the result of the activation attempt and
provides Cause: number information if the attempt is
unsuccessful.
Select Service
>All
Spch
UDI
A3K1H
A7KHz
T3K1H
TTX
FaxG4
ViSyB
ViTel
FaxG3
Tel7k
------------------------
Select
CF type:
*CFU
CFB
CFNR
------------------------
Numbers
Own Number:
01633223552
DEL
Numbers
Dest. Number 1
255600
Dest number 2
Dest number 3
Dest number 4
Dest number 5
Dest number 6
Dest number 7
Dest number 8
DEL

NG Harrier
37
Menu – Single test – ISDN Call
The Tester offers menu options for the user to set up a call selecting the dialling
method, Service type, and outgoing channel.
In the case of a telephone connection, you can either use the integrated handset or
attach an optional external handset.
When an ISDN connection is setup, pressing the number keys (0-9) or the * or # will
generate and send the corresponding DTMF tones or keypad information elements
depending on the setting in Configuration – ISDN – DTMF / keypad.
The extension is separated from the access number by a #. For an outgoing call, the
Tester uses the entire call number (without #) as the number called (CDPN or DAD)
and, for the calling number, only the extension (DSS1-CGPN or 1TR6-OAD). A "#" at
the beginning of a call number is treated as a valid character. A ‘#’ at the end of the
own call number instructs the Tester to not send the caller’s number for outgoing
calls (CGPN or OAD).
Simplified overlap signalling using the telephone key:
Regardless of the currently open menu, you can quickly and easily place a
call:
Press the telephone key once to enter the Enblock Connect function (in the
Single tests menu).enter the destination number and press the telephone
key a second time to set up the connection.
Connection
*Overlap sending
Enblock
------------------------
Select Service
>Speech
UDI 64 kBit
3.1 kHz audio
7 kHz Audio
UDI TA
Tel. ISDN
Fax G3
Fax G4
Mixed Mode
Teletex
Videotext
Telex
OSI
Tele. 7 kHz
Videotel 1
Videotel 2
------------------------
B channel select
Active B ch.: 1
Ch.available !
DEL
Outg. call Spee.
223552 B1
to:
CLEAR DEL
If
Enblock
is
selected instead
of Overlap
sending the
Tester request
input of the
Destination
number before
offering the
Select Service
menu.

NG Harrier
38
Menu – Single test – Time measuring
The Tester can measure three different times on a BRI or U interface access:
connection setup time, the propagation delay of the data and the difference between
the propagation delays for the data on two B-channels.
Connection setup time
The Tester places an outgoing call and measures the time between sending the
SETUP and receiving the ALERT or CONNECT message.
B-channel delay
The Tester places a call to itself (self call) or to a remote loop-box and measures the
propagation delay for the data in the selected B-channel. The propagation delay is
given in multiples of the time required for sending one byte at 64k Bit/s. (The time for
sending 1 byte at 64k Bit/s = approx. 125µs.)
Interchannel delay
The Tester establishes two separate connections to a remote loop-box. The loop-box
sends the respective B channel data back on the same channel. The Tester
measures the propagation delay for the data on each of the B-channels and
determines the difference between the two propagation delays (inter-channel delay).
The difference in the propagation delay (inter-channel delay) is given in multiples of
the time required for sending one byte at 64k Bit/s.
(The time for sending 1 byte at 64kBit/s = approx. 125 µs.)
When it is connected to a loop-box, if the Tester does not receive the data back
within 13 seconds, it will display the message “No LOOP”.
Time measuring
>Conn.setup time
B-channel delay
Interchan.delay
------------------------
Numbers
Dest. Number 1
255600
Dest number 2
Dest number 3
Dest number 4
Dest number 5
Dest number 6
Dest number 7
Dest number 8
Select Service
>Speech
UDI 64 kBit
3.1 kHz audio
7 kHz Audio
UDI TA
Tel. ISDN
Fax G3
Fax G4
Mixed Mode
Teletex
Videotext
Telex
OSI
Tele. 7 kHz
Videotel 1
Videotel 2
------------------------
B channel select
Active B ch.: 1
Ch.available!
DEL
If the
tester
cannot perform the
measurement, for example,
because the call number entered
was wrong or no B channel was
free, the corresponding cause will
be displayed.

NG Harrier
39
Access mode [POTS]
HF Detection
The Tester is set to operate in high impedance mode to measure the voltage on the
POTS line and detect the presence of signal frequencies above 20kHz.
The presence of signals above 20kHz on a 2 wire circuit
indicates that the line may be carrying digital services (ADSL)
in place of, or in addition to, POTS. The user can exercise
caution, confirm the correct circuit connection and avoid
accidental disruption of the traffic on the line.
Select TE to for the Tester to behave as a
Telephone terminal and press Talk to
obtain dial tone.
POTS Terminal (TE)
Selecting POTS terminal in the Access mode menu bypasses the HF detect function
and the Tester is set to operate as an analogue telephone and provide access to the
main Menu via the Status Display
POTS MONITOR
Selecting MONITOR in the HF detection menu allows the Tester to monitor the
activity of another Telephone Terminal connected to the same line. DTMF digits
dialled by the other telephone terminal are displayed on the Tester LCD.
Caller display information directed at the other connected
terminal will also be shown on the display.
Pressing the DEL. Soft-key will clear
information in the display.
Menu – Line Voltage [POTS]
Line Voltage POTS Access
The Tester displays Polarity based on
• Red plug = a
• Black plug = b.
The “On Hook” line open voltage and “Off Hook” line busy
voltages are displayed.
ABORT returns to the Menu screen.
NEW refreshes the voltage measurement
Polarity: a+ b
-
Line open: 45.3V
Line busy: 12.1V
ABORT NEW
Access mode
>HF detection
POTS terminal
-----------------------
Harrier HF detect
Voltage: 48.5V
No HF signal
TE MONITOR
Harrier POTS
Voltage: 48.5V
MENU TALK
Harrier HF detect
Voltage: 48.5V
No HF signal
TE MONI
TOR
POTSmon.V:48V
ABORT DEL.

NG Harrier
40
Menu – Configuration [POTS]
Allows parameters related to POTS testing to be selected.
POTS-Dial Mode
Allows selection of DTMF or pulse mode dialling. The
Default is DTMF
POTS-DTMF parameter
The Tester can set the parameters Level, Duration and
Interval of the DTMF signals that are generated during
POTS operation.
Setting the level of the DTMF signal
The default value is -3dB. The level can be set to a value between -21dB and +12 dB
adjustable in steps of 3dB by pressing the up or down “arrow” keys.
Setting the duration of the DTMF signal
The default setting is 80ms. The duration of the signal can be set to a value between
40ms and 1s. The duration can be raised or lowered using the arrow keys as follows:
In the range 40 200ms in 10ms increments
In the range 200...300ms in 20ms increments
In the range 300...1000ms in 100ms increments
When the upper limit is reached (1000ms), the soft-key up arrow will automatically
change to a down arrow and vice versa when the lower limit (40ms) is reached.
Setting the interval between two DTMF characters
The default value is 80ms. The interval between two DTMF characters can take a
value between 40ms and 1s. The interval can be raised or lowered by using the
arrow keys as follows:
In the range 40 200ms in 10ms increments
In the range 200...300ms in 20ms increments
In the range 300...1000ms in 100ms increments
When the upper limit is reached (1000ms), the soft-key up arrow will automatically
change to a down arrow and vice versa when the lower limit (40ms) is reached.
POTS Config.
>DTMF paramet
FLASH time
-----------------------
Configuration
>POTS
Device
Numbers
-----------------------
DTMF Paramete
>Level
Time
Interval
Defaults
-----------------------
DTMF level
- 3dB
ABORT
DEL
NG Harrier
41
Restore the Defaults
Selecting the Defaults option restores the settings to the following values.
• Level=-3dB
• Time= 80ms
• Interval = 80ms
POTS – FLASH time
With this selection, you can set the duration of a flash in analogue operation. The
FLASH time can be set to a value between 40ms and 1s. It can be raised or lowered
using the arrow keys as follows:
In the range 40 200ms in 10ms increments
In the range 200...300ms in 20ms increments
In the range 300...1000ms in 100ms increments

NG Harrier
42
OPTION - [S-Bus Wiring]
Access mode
This option is supplied complete with an additional test cable and Line Test adaptor.
It is used to check the terminating resistors and wiring of a four-wire bus.
The tester also detects errors in the cabling e.g. any broken wires, short-circuits and
crossed wires.
Example test results
Menu
The S-Bus wiring menu provides for the user to initiate the wiring test and readily
access the Line Voltage test and Configuration menu
Example displays
The Configuration menu options
operate as for the other Line Access
options fully describe in the relevant
section of this guide.
Harrier
S-Bus Wiring
MENU START
S
-
Bus Wiring
S Bus OK
Not Terminated
ABORT NEW
S
-
Bus Wiring
Short Circuit
4, 5
ABORT NEW
S
-
Bus Wiring
S Bus OK
Termination 100
ABORT NEW
Harrier
>Start L-test
Line Voltage
Configuration
----------------------
Harrier
S-Bus Wiring
MENU START
S
-
Bus Wiring
S Bus OK
Termination 100
ABORT NEW
Configuration
>Device
Numbers
Reset
----------------------
Device Config.
>Menu language
LCD contrast
Printer
Baud rate
Handset
Alarm bell
Power supply
Battery type
Accu servicing
Softwareoption
------------------------
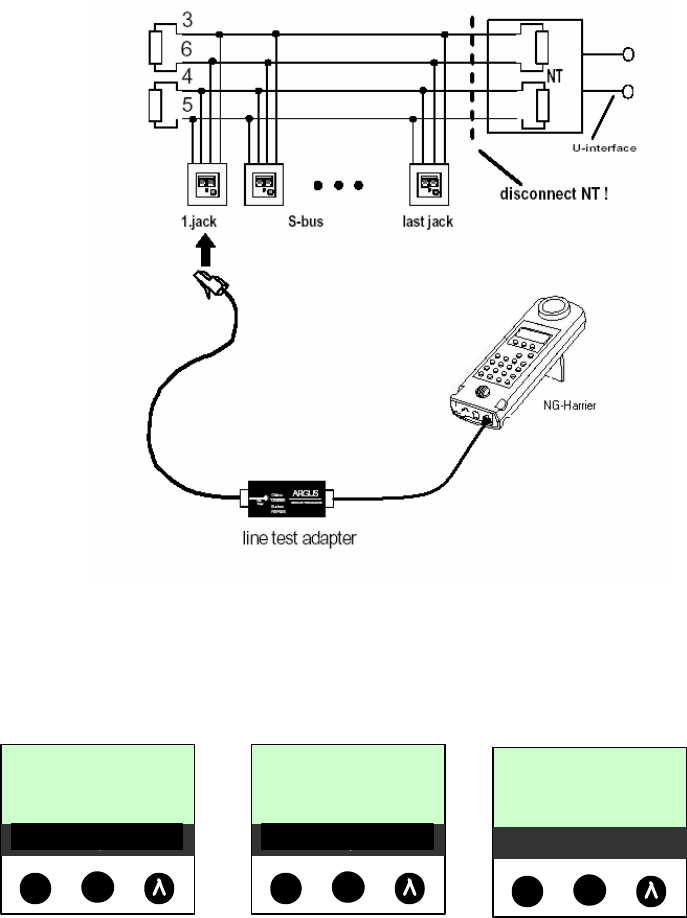
NG Harrier
43
Test Sequence:
To perform a thorough test of the lines, the test must be done in 2 steps.
Unplug the NT and all terminal equipment from the bus, before performing
wiring test!
WARNING
Should the Tester detect a user error (Line test on a fed bus), it will emit a continuous
acoustic signal. In this case, to prevent the destruction of the Tester, the line test
must not be started.
First step:
Use the test adapter to connect the Tester to the Bus to be tested. In this step, the
Tester will determine whether or not there is a short circuit or a terminating resistor
and whether there is a fault between the terminating resistor – if there is one – and
the test adapter.
Possible test results:
• The Tester has detected a short circuit: Clear the fault and repeat the test
• The Tester reports that the resistance is wrong. Repeat the test from another
socket, if necessary remove the terminating resistor(s)
• The Tester reports that the line is OK: Continue test with step 2
S
-
Bus Wiring
S Bus OK
Not Terminated
ABORT NEW
S
-
Bus Wiring
Short Circuit
4, 5
ABORT NEW
S
-
Bus Wiring
S Bus OK
Termination 100
ABORT NEW

NG Harrier
44
Second Step
Connect the test adapter to the jack, which was tested as OK in the first step.
Connect the Tester via its I/O Port connector to the next jack on the bus.
Possible test results:
• The Tester reports broken connections or crossed wires: Clear the fault and
repeat the test beginning with the first step.
• The Tester reports that the line is OK: Connect the Tester (L-Test jack) to
each of the sockets on the bus one after the other.
Comments about the test results:
The bus can be considered to be free of defects, when all of the sockets have been
reported by the Tester as OK.
• Short-circuits are reported as a resistance value less than 10ohms.
• Crossed wires and broken connections between the test adapter and the
terminating resistor cannot be found.
• The displayed test results are either for just the bus lines between the Tester
and the test adapter in the case of cross-wires and broken connections or for
the entire bus in the event of short-circuits and terminations.

NG Harrier
45
OPTION – [Passive Monitor]
In Monitor mode, the Tester passively monitors the connected BRI access and
sends the recorded D-channel signals via the serial interface to the connected PC on
which WinAnalyse must be running. Neither the S-Bus nor Layer 1 is influenced.
After selecting the Monitor function, the Tester will initially be in the trace mode (the
Tester will not yet be monitoring): the second line shows the evaluation (OK, hi, lo or
no) of the level
Selecting MENU provides access to Line voltage and
Configuration operating as for ISDN line access.
Pressing LISTEN allows audio
monitoring of the selected B channel.
When the monitor function is active, the
Tester counts the number of incoming
signals and presents this number in the
second line of the display. The amount of time that has
passed since the monitor was started is displayed in third line.
The Trace LED is on. The captured D-channel signals will be
sent via the serial interface to the connected PC, which must be running WinAnalyse.
Parallel call display in Monitor operating mode
When Monitor mode is active, the Tester will search all of the D-channels signals
sent for a SETUP. As soon as a SETUP is found, the CALL Soft-key will appear in
the display.
The direction (Net >User)of the SETUP message, the Service
(Speech) the B channel and the originating and destination
numbers are displayed.
The Sub-address, User-User info, DSP
messages (if present) Type of Number
(TON) and Numbering Plan (NP) will be
displayed in this order
Pressing the down arrow Soft-key will toggle the display.
Harrier BRI
Level: hi
Monitor
MENU START
Monitoring
Signals:
Time: 00:00:00
ABORT LISTEN
B channel select
Active B ch.: 1
Ch.available !
DEL
Monitoring
Signals:
Time: 00:00:00
ABORT QUIET
Monitoring:
Signals: 65
Time: 0:17:21
ABORT LIST. CALL
N
à
U Spee.
TON: unknown
NP unknown
SIGNAL
N
à
U Spee.
225600 B02
to: 225600
SIGNAL
N
à
U Spee.
TON: unknown
NP unknown
SIGNAL

NG Harrier
46
OPTION – [Network (NT) Simulation]
In this mode the Tester simulates an exchange and is able to originate and terminate
calls to and from ISDN terminals. Use the special cable supplied with this option to
connect the Tester to the ISDN terminal and select NE P-MP in the Access mode
menu or select NE P-P when connecting an ISDN switch (PBX).
Terminating calls
Terminating call in NT mode requires no action other that to select the required (NE
P-P or NE PMP) Access mode. The incoming call display screen shows the Service
B channel and call numbers.
Originating calls
Originating calls in NT mode follows the same process as for operating the Tester in
TE mode except that there are consequential restrictions on the range of tests that
can be performed.
Selection of a Single test (ISDN Call) is followed by selecting the Dialling method,
Service and outgoing B channel to place the outgoing call
With the addition of Monitor options and WinAnalyse, the D Channel protocol can be
decoded and viewed to further assist the fault analysis of defective ISDN circuits.
In. call UDI64
223552 B01
to:
REJECT ACCEPT
Harrier BRI
>Single test
Automatic test
Line Voltage
Configuration
Dual tests
----------------------
Harrie
r BRI
B12 Level : no
NEm P-MP DSS1
MENU RESTART
Harrier BRI
B12 Level : no
NEm P-MP DSS1
MENU RESTART
Single test
>Service test
Bit error test
ISDN Call
Time measuring
----------------------
NG Harrier
47
OPTION – [WinAnalyse]
This option is required to decode the D Channel protocol and is used in conjunction
with the passive Monitor option. It is stand alone software product operating on a
“Windows” PC Any NG Harrier Tester with the Monitor option can use the software.
Detailed operating instructions are supplied with the software.
NG Harrier
48
Appendix
A. NG Harrier Configuration Defaults
PARAMETER Default value Restore default
with RESET
Saved in
EE-PROM
Trace/remote Auto PC sync. Yes Yes
ISDN-Protocol DSS1 Yes Yes
ISDN-Alerting mode Automatic. Yes Yes
ISDN-Clock mode TE: slave
NT: master
No No
ISDN-BRI termination NT: in
TE: out
No No
ISDN-Call parameter all unknown Yes Yes
ISDN-Services
ISDN-Call acceptance all MSN Yes Yes
ISDN-Voice coding A-Law Yes Yes
BERT-Time 1 min Yes Yes
BERT-Error level 10E-05 Yes Yes
BERT-HRX value 15% Yes Yes
BERT-Bit pattern (2^15)-1 Yes Yes
BERT-Bit pattern user defined 0000000000000000
Yes Yes
POTS-Dial mode DTMF Yes Yes
POTS- DTMF parameter Level -3 dB Yes Yes
POTS- DTMF parameter Time 80msec Yes Yes
POTS- DTMF parameter Interval 80msec Yes Yes
POTS- Flash time 80msec Yes Yes
DEVICE- Menu language English Yes Yes
DEVICE-LCD Contrast Medium Yes Yes
DEVICE- Printer Epson LQ Yes Yes
DEVICE- Printer Esc sequence empty Yes Yes
DEVICE- Baud rate 57600 Yes Yes
DEVICE- Headset Internal Yes Yes
DEVICE Alarm bell Off Yes Yes
DEVICE- Power supply no line power Yes Yes
DEVICE- Battery type Accu Yes Yes
DEVICE- Software option no option No Yes
Numbers
Own number
dest. number 1
dest. number 2
Dest. Number 3 to 8
X.31 number
empty
17070
0800675230
empty
empty
Yes
Yes
Yes
Yes
Yes
Yes
Yes
Yes
Yes
Yes
Automatic test 1..10 empty Yes Yes
NG Harrier
49
B. Acronyms
3PTY Three party service. Three party conference
Al Action Indicator
AOC Advice of Charge
AOC-D Advice of Charge Charging information during the call and at the end of the
call
AOC-E Advice of Charge Charging information at the end of the call
AWS Call Forwarding
BC Bearer Capability
BER Basic Encoding Rules / Bit Error Rate
BERT Bit Error Rate Test
CALL PROC CALL PROCeeding message
CCBS Completion of Calls to Busy Subscriber
CCNR Call Complete No Response Automatic Call back if the called party did not
answer
CD Call Deflection
CDPN CalleD Party Number
CF Call Forwarding
CFB Call Forwarding Busy Forward calls when busy
CFNR Call Forwarding No Reply Forward calls when no answer
CFU Call Forwarding Unconditional Forward all calls
CGPN CallinG Party Number
CLIP Calling Line Identification Presentation Display caller’s number
CLIR Calling Line Identification Restriction Suppress display of the caller’s
number
COLP Connected Line Identification Presentation Display the number of the party
called
COLR Connected Line Identification Restriction Suppress the display of the
number of the party with whom one is connected
CONN CONNect Message
CONN ACK CONNect ACKnowledge Message
CR Call Reference
CT Call Transfer
CUG Closed User Group
CW Call Waiting
DDI Direct Dialling In Direct dialling in to an extension on a PBX
DISC DISConnect Message
DM Supplementary services
DTMF Dual Tone Multi Frequency
ECT Explicit Call Transfer Call transfer or directed call forwarding
E-DSS1 European Digital Subscriber Signalling System Number 1
GBG Closed user group (CUG)
HLC High Layer Compatibility
HOLD Call Hold
ISDN Integrated Services Digital Network
INFO INFOrmation Message
LAPD Link Access Procedure for D-channels
LCN Logical channel number Channel number in X.25
LLC Low Layer Compatibility
MCID Malicious Call Identification
MSN Multiple Subscriber Number
NSF Network Specific Facilities
NT Network Termination
PD Protocol Discriminator
REL RELease Message
REL ACK RELease ACKnowledge Message
REL COMPL RELease COMPLete Message
SCI Sending Complete Indication
SUB Sub-addressing / Sub-addressing is possible
NG Harrier
50
SUSP SUSPend Message
TE TErminal, Terminal Equipment
TEI Terminal Endpoint Identifier
TP Terminal Portability - Moving the terminal on the bus
UUS User-to-User Signalling Transfer of user data
C. Cause – Messages – DSS1 Protocol
Dec. Cause Description
01 Unallocated (unassigned) number No access under this call number
02 No route to specified transit network
Transit network not reachable
03 No route to destination Wrong route or routing error
06 Channel unacceptable B-channel for the sending system not
acceptable
07 Call awarded and being delivered in
an established channel
Call awarded and connected in an already
existing channel (e.g., X.25 SVC)
16 Normal call clearing Normal disconnect
17 User busy The number called is busy
18 No user responding No terminal equipment answered (Timer NT303
/ NT310 time-out)
19 No answer from user (user alerted) Call time too long
21 Call rejected Call rejected (active)
22 Number changed Call number has been changed
26 Non-selected user clearing Incoming call not awarded to this terminal
27 Destination out of order Destination / access out of order
28 Invalid number format (address
incomplete)
Wrong call number format or call number
incomplete
29 Facility rejected The facility is not offered
30 Response to STATUS ENQUIRY Response to status enquiry
31 Normal, unspecified Unspecified for “normal class” (Dummy)
34 No circuit / channel available No circuit / B-channel available
38 Network out of order Network not operational
41 Temporary failure Network is temporarily not operational
42 Switching equipment congestion Switching equipment is overloaded
43 Access information discarded Access information could not be transferred
44 Requested circuit / channel not
available
Requested circuit / B-channel is not available
47 Resources unavailable, unspecified
Unspecified for “resource unavailable class”
(Dummy)
49 Quality of service unavailable The requested quality of service is not available
50 Requested facility not subscribed Requested service attribute is not subscribed
57 Bearer capability not authorized The requested bearer capability is not enabled
58 Bearer capability not presently
available
The requested bearer capability is not currently
available
63 Service or option not available “Service unspecified or option not available
class” (Dummy)
65 Bearer capability not implemented Bearer capability is not supported
66 Channel type not implemented Channel type is not supported
69 Requested facility not implemented Requested facility is not supported
70 Only restricted digital information
bearer capability is available
Only limited bearer capability is available
79 Service or option not implemented,
service unspecified or option not
implemented class” (Dummy)
Unspecified
81 Invalid call reference value Invalid call reference value
82 Identified Channel does not exist Requested channel is invalid
83 A suspended call exists, but this
call identity does not
The call identity entered is the wrong one for
the parked call
84 Call identity in use The call identity is already in use
85 No call suspended No call has been parked
NG Harrier
51
86 Call having the requested call
identity has been cleared
The parked call has been cleared
88 Incompatible destination Incompatible destination
91 Invalid transit network selection Invalid format for the transit network identifier
95 Invalid message, unspecified Unspecified for “Invalid message class”
(Dummy)
96 Mandatory information element is
missing
Mandatory information element is missing
97 Message type non-existent or not
implemented
This type of message is in this phase not
permitted, not defined or not supported
98 Message not compatible with call
state or message type non-existent
or not implemented
The content of the message is in this phase not
permitted, not defined or not supported
99 Information element non-existent or
not implemented
The content of the information element is in this
phase not permitted, not defined or not
supported
100 Invalid information element
contents
Invalid content in information element
101 Message not compatible with call
state
Message not valid in this phase
102 Recovery on timer expired Error handling routine started due to time-out
111 Protocol error, unspecified Unspecified for “protocol error class” (Dummy)
127 Inter-working, unspecified Unspecified for “inter-working class” (Dummy)

NG Harrier
52
E. NG Harrier Error Messages
Error
Number
Cause Description
0 Network The network is not in a state defined for DSS1 or 1TR6. It may
be that this state is normal for a PBX.
1 to 127 Network DSS1 or 1TR6 causes
150 NG Harrier An error occurred during the supplementary service test.
Frequent cause: no response from network
152 NG Harrier The CF-Test was started with the wrong own number.
153 NG Harrier no HOLD is available, but HOLD is required to test the
supplementary service (ECT,3pty)
154 NG Harrier CLIR or COLR could not be tested, since CLIP or COLP is not
available
161 NG Harrier The party called did not answer within the prescribed time
(approx.10 sec)
162 NG Harrier A call was setup to a remote subscriber, instead of being
setup – as was expected – to your own number.
163 NG Harrier The Auto-Test could not setup a connection and therefore the
AOC/D supplementary service could not be tested.
199 NG Harrier A call number was entered.
201 NG Harrier Network did not confirm acceptance of the call (CONN sent, no
CONN_ACK received from network)
204 NG Harrier Layer 2 connection was cleared-down- No response to SETUP
(call setup)- Layer 2 connection could not be setup
205 NG Harrier Re establish the Layer 2Connection
210 NG Harrier No response to the clear-down ( REL sent, no
REL_CMP/REL_ACK received from network)
220 NG Harrier Remote end signalled that it is in State 0.
245 NG Harrier Keypad sent via ESC, but no response was received from
network
250 NG Harrier FACility was sent, but no response was received from network
F. X.31 Test – Error messages
0 to 255 Network See ISO 8208: 1987(E)Table 5- Coding of the clearing cause field
in clear indication packets, page 35
257 NG Harrier no response from network (for a CALL-REQUEST or
CLEARREQUEST)
258 NG Harrier Unexpected or wrong answer from network (no CALL-
CONNECTED or CLEAR INDICATION as response to a
CALLREQUEST)
259 NG Harrier The network has indicated in a DIAGNOSTIC message that the
logical channel is invalid. Cause: No (=1) or a wrong LCN was set.
512 NG Harrier It was not possible to determine an internal or external cause.
Cause: Layer 2 could not be setup or remote end does not support
X.31
65535 NG Harrier X.31 Layer 3 test was not performed. The error can only occur in a
test log.
X.31 Diagnostic (only for a cause less than 256)
0 to 255
Network
See ISO 8208: 1987(E)Figure 14A page 121Figure 14B page 123ff
And/or CCITT Recommendation X.25, Annex E
End
